Code Monkey home page Code Monkey logo

image-sequencer's Introduction

Image Sequencer

Code of Conduct npm version Build Status Maintainability Codecov Gitpod Ready-to-Code

Begin running (and contributing to) this codebase immediately with GitPod (this also opens the latest main branch code):

Open in Gitpod

Why

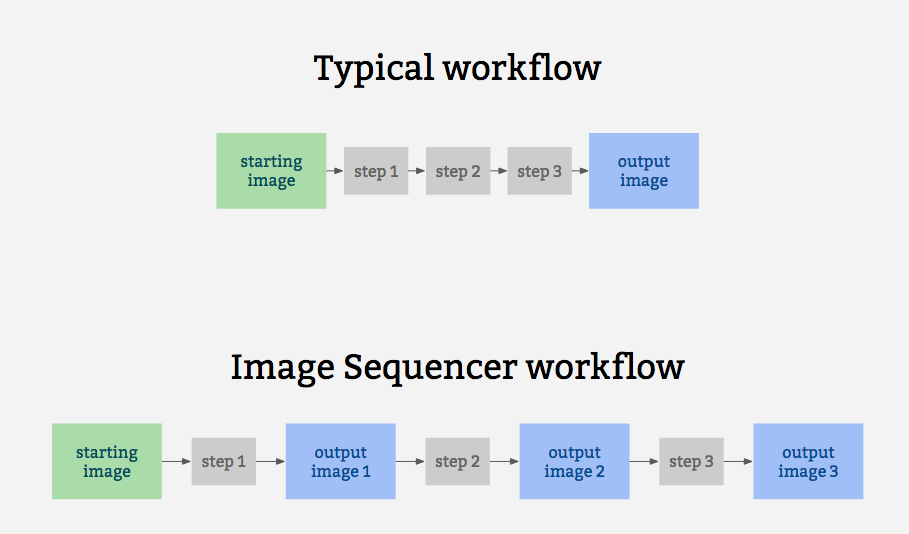
Image Sequencer is different from other image processing systems because it's non-destructive: instead of modifying the original image, it creates a new image at each step in a sequence. This is because it:

  • produces a legible trail of operations, to "show your work" for evidential, educational, or reproducibility reasons
  • makes the creation of new tools or "modules" simpler -- each must accept an input image, and produce an output image
  • allows many images to run through the same sequence of steps
  • works identically in the browser, on Node.js, and on the command line

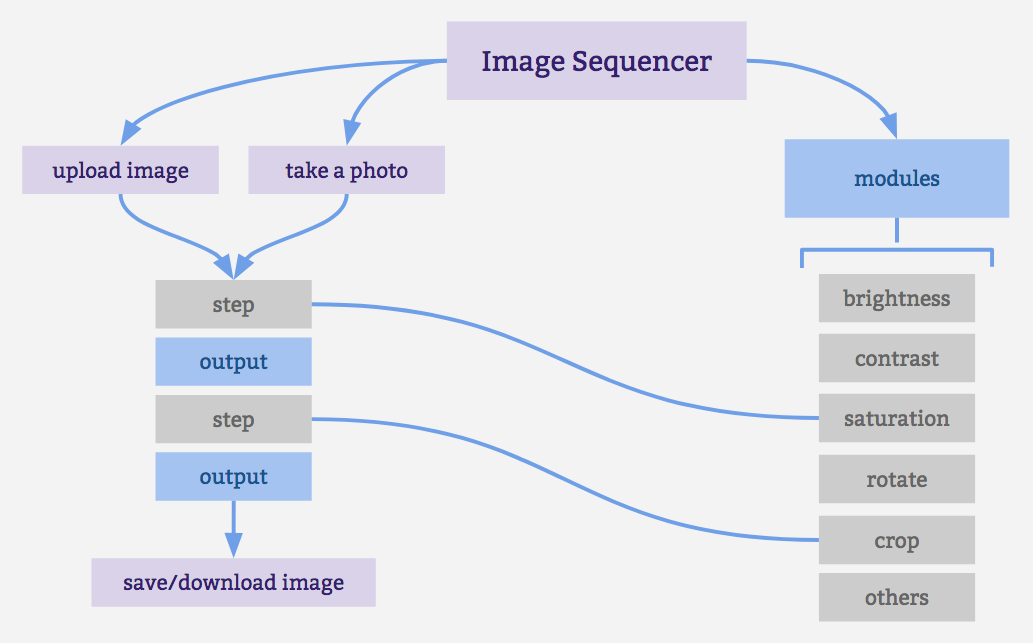
The following diagrams attempt to explain how the applications various components interconnect:

general diagram

workflow diagram

It also for prototypes other related ideas:

  • filter-like image processing -- apply a transform to an image from a given source, like a proxy. I.e. every image tile of a satellite imagery web map
  • test-based image processing -- the ability to create a sequence of steps that do the same task as other image processing tools, provable with example before/after images to compare with
  • logging each step -- to produce an evidentiary record of modifications to an original image
  • cascading changes -- change an earlier step's settings, and see those changes affect later steps
  • "small modules" -- based extensibility: see Contributing

Examples

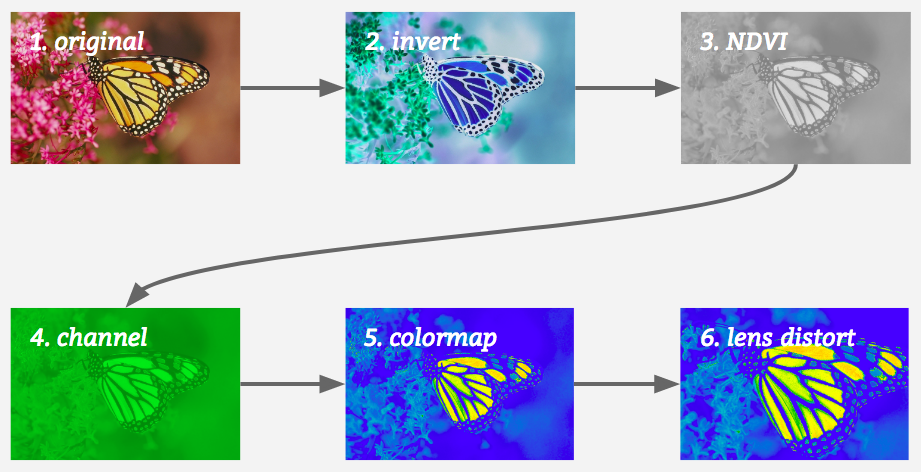
A diagram of this running 5 steps on a single sample image may help explain how it works:

example workflow

Jump to:

Installation

This library conveniently works in the browser, in Node, and on the command line (CLI).

Unix based platforms

You can set up a local environment to test the UI with sudo npm run setup followed by npm start.

Windows

Our npm scripts do not support windows shells, please run the following snippet in PowerShell.

npm i ; npm i -g grunt grunt-cli ; grunt build; grunt serve

In case of a port conflict please run the following

npm i -g http-server ; http-server -p 3000

Online one-click setup for contributing

Contribute to ImageSequencer using a fully featured online development environment that will automatically: clone the repo, install the dependencies and start the webserver.

Open in Gitpod

Browser

Just include image-sequencer.min.js in the Head section of your web page. See the demo here!

Node (via NPM)

(You must have NPM for this) Add image-sequencer to your list of dependencies and run npm install

CLI

Globally install Image Sequencer:

$ npm install image-sequencer -g

(You should have Node.JS and NPM for this.)

To run the debug script

$ npm run debug invert

Quick Usage

Initializing the Sequencer

The Image Sequencer Library exports a function ImageSequencer which initializes a sequencer.

var sequencer = ImageSequencer();

Image Sequencer can be used to run modules on an HTML Image Element using the replaceImage method, which accepts two parameters - selector and steps. selector is a CSS selector. If it matches multiple images, all images will be modified. steps may be the name of a module or array of names of modules.

Note: Browser CORS Restrictions apply. Some browsers may not allow local images from other folders, and throw a Security Error instead.

sequencer.replaceImage(selector,steps,optional_options);

optional_options allows passing additional arguments to the module itself.

For example:

sequencer.replaceImage('#photo','invert');
sequencer.replaceImage('#photo',['invert','ndvi-red']);

Data URL usage

Since Image Sequencer uses data-urls, you can initiate a new sequence by providing an image in the data URL format, which will import into the demo and run:

Try this example link with a very small Data URL

To produce a data URL from an HTML image, see this nice blog post with example code.

CLI Usage

Image Sequencer also provides a CLI for applying operations to local files. The CLI takes the following arguments:

-i  | --image [PATH/URL] | Input image URL. (required)
-s  | --step [step-name] | Name of the step to be added. (required)
-b  | --basic            | Basic mode only outputs the final image
-o  | --output [PATH]    | Directory where output will be stored. (optional)
-c  | --config {object} | Options for the step. (optional)
--save-sequence [string] | Name space separated with Stringified sequence to save
--install-module [string] | Module name space seaprated npm package name

The basic format for using the CLI is as follows:

$ ./index.js -i [PATH] -s step-name

NOTE: On Windows you'll have to use node index.js instead of ./index.js.

The CLI also can take multiple steps at once, like so:

$ ./index.js -i [PATH] -s "step-name-1 step-name-2 ..."

But for this, double quotes must wrap the space-separated steps.

Options for the steps can be passed in one line as JSON in the details option like

$ ./index.js -i [PATH] -s "brightness" -c '{"brightness":50}'

Or the values can be given through the terminal prompt like

screen shot 2018-02-14 at 5 18 50 pm

save-sequence option can be used to save a sequence and the associated options for later usage. You should provide a string which contains a name of the sequence space separated from the sequence of steps which constitute it.

sequencer --save-sequence "invert-colormap invert(),colormap()"

install-module option can be used to install new modules from npm. You can register this module in your sequencer with a custom namespace separated with the npm package name. Below is an example of the image-sequencer-invert module.

sequencer --install-module "invert image-sequencer-invert"

The CLI is also chainable with other commands using &&

sequencer -i <Image Path> -s <steps> && mv <Output Image Path> <New path>

Classic Usage

Initializing the Sequencer

The Image Sequencer Library exports a function ImageSequencer which initializes a sequencer.

var sequencer = ImageSequencer();

Loading an Image into the Sequencer

The loadImage method is used to load an image into the sequencer. It accepts an image src, either a URL or a data-url. The method also accepts an optional callback.

sequencer.loadImage(image_src, optional_callback);

On Node.js the image_src may be a DataURI or a local path or a URL.

On browsers, it may be a DatURI, a local image or a URL (Unless this violates CORS Restrictions). To sum up, these are accepted:

  • Images in the same domain (or directory - for a local implementation)
  • CORS-Proof images in another domain.
  • DataURLs

return value: none (A callback should be used to ensure the image gets loaded) The callback is called within the scope of a sequencer. For example: (addSteps is defined later)

sequencer.loadImage('SRC', function(){
  this.addSteps('module-name');
});

The this refers to all the images added in the parent loadImages function only. In this case, only 'SRC'.

Adding steps to the image

The addSteps method is used to add steps to the image. One or more steps can be added at a time. Each step is called a module.

sequencer.addSteps(modules, optional_options);

If only one module is to be added, modules is simply the name of the module. If multiple images are to be added, modules is an array, which holds the names of modules to be added, in that particular order.

optional_options is just an optional parameter, in object form, which you might want to provide to the modules.

A variety of syntaxes are supported by Image Sequencer to add multiple steps and configurations quickly for module chaining. The project supports the string syntax, designed to be compact and URL friendly, and JSON, for handling more complex sequences. This can be achieved by passing strings to sequencer.addStep():

sequencer.addSteps('invert,channel');
sequencer.addSteps(['invert','channel']);

For passing default configurations ({} is optional):

sequencer.addSteps('brightness{}');

For passing custom configurations:

sequencer.addSteps('brightness{brightness:80}');

For passing multiple custom configurations:

sequencer.addSteps('crop{x:120|y:90}')

For passing multiple custom configurable modules:

sequencer.addSteps('crop{x:130|y:80},brightness{brightness:80}')

return value: sequencer (To allow method chaining)

Running the Sequencer

Once all steps are added, This method is used to generate the output of all these modules.

sequencer.run();

Sequencer can be run with a custom config object

// The config object enables custom progress bars in a node environment and
// ability to run the sequencer from a particular index(of the steps array)

sequencer.run(config);

The config object can have the following keys

config: {
  progressObj: , //A custom object to handle progress bar
  index: //Index to run the sequencer from (defaults to 0)
}

Additionally, an optional callback function can be passed to this method.

sequencer.run(function callback(out){
  // this gets called back.
  // "out" is the DataURL of the final image.
});
sequencer.run(config,function callback(out){
  // the callback is supported by all types of invocations
});

return value: sequencer (To allow method chaining)

Removing a step from the sequencer

The removeSteps method is used to remove unwanted steps from the sequencer. It accepts the index of the step as an input or an array of the unwanted indices, if there are more than one.

For example, if the modules ['ndvi-red','crop','invert'] were added in this order, and I wanted to remove 'crop' and 'invert', I can either do this:

sequencer.removeSteps(2);
sequencer.removeSteps(3);

or:

sequencer.removeSteps([2,3]);

return value: sequencer (To allow method chaining)

Inserting a step in between the sequencer

The insertSteps method can be used to insert one or more steps at a given index in the sequencer. It accepts the index where the module is to be inserted, the name of the module, and an optional options parameter. index is the index of the inserted step. Only one step can be inserted at a time. optional_options plays the same role it played in addSteps.

Indexes can be negative. Negative sign with an index means that counting will be done in reverse order. If the index is out of bounds, the counting will wrap in the original direction of counting. So, an index of -1 means the module is inserted at the end.

sequencer.insertSteps(index,module_name,optional_options);

return value: sequencer (To allow method chaining)

Importing an independent module

The loadNewModule method can be used to import a new module inside the sequencer. Modules can be downloaded via npm, yarn or CDN and are imported with a custom name. If you wish to load a new module at runtime, it will need to avoid using require() -- unless it is compiled with a system like browserify or webpack.

const module = require('sequencer-moduleName')
sequencer.loadNewModule('moduleName',module);

Method Chaining

Methods can be chained on the Image Sequencer:

  • loadImage()/loadImages() can only terminate a chain.
  • run() can not be in the middle of the chain.
  • If the chain starts with loadImage() or loadImages(), the following methods are applied only to the newly loaded images.

Valid Chains:

sequencer.loadImage(function(){
  this.addSteps('invert').run(function(out){
    //do something with ouptut.
  });
})
sequencer.addSteps(['ndvi-red','invert']).run();
et cetra.

Invalid Chains:

sequencer.addSteps('invert').run().addSteps('ndvi-red');

Fetching current steps

The getSteps method can be used to get the array of current steps in this instance of sequencer.For example

sequencer.getSteps()

returns an array of steps associated with the current sequencer.

Saving Sequences

IMAGE SEQUENCER supports saving a sequence of modules and their associated settings in a simple string syntax. These sequences can be saved in the local storage of the browser and inside a JSON file in node.js. sequences can be saved in node context using the CLI option

--save-sequence "name stringified-sequence"

In Node and the browser the following function can be used

sequencer.saveSequence(name,sequenceString)

The function sequencer.loadModules() reloads the modules and the saved sequences into sequencer.modules and sequencer.sequences

String syntax

Image sequencer supports stringifying a sequence which is appended to the url and hence can then be shared. An example below shows the string syntax for channel and invert module

channel{channel:green},invert{}

The use of () in place of {} for backward compatibility with older links is now deprecated. (There is no longer support for the following syntax, and should be avoided)

channel(channel:green),invert()

Following are the core API functions that can be used to stringify and jsonify steps.

sequencer.toString() //returns the stringified sequence of current steps
sequencer.toJSON(str) // returns the JSON for the current sequence
sequencer.stringToJSON(str) // returns the JSON for given stringified sequence
sequencer.importString(str) //Imports the sequence of steps into sequencer
sequencer.importJSON(obj) //Imports the given sequence of JSON steps into sequencer

Image Sequencer can also generate a string for usage in the CLI for the current sequence of steps:

sequencer.toCliString()

Importing steps using JSON array

Image sequencer provides the following core API function to import the given sequence of JSON steps into sequencer.

sequencer.importJSON(obj)

It can be implemented the following way for example:

sequencer.importJSON([
    { name: 'blur', options: {} }
  ]);

where name is the name of step to be added, options object can be the one used to provide various params to the sequencer which can customise the default ones.

To see this in action, please refer to line # 51 of the following:

test/core/modules/import-export.js

Creating a User Interface

Image Sequencer provides the following events which can be used to generate a UI:

  • onSetup : this event is triggered when a new module is set up. This can be used, for instance, to generate a DIV element to store the generated image for that step.
  • onDraw : This event is triggered when Image Sequencer starts drawing the output for a module. This can be used, for instance, to overlay a loading GIF over the DIV generated above.
  • onComplete : This event is triggered when Image Sequencer has drawn the output for a module. This can be used, for instance, to update the DIV with the new image and remove the loading GIF generated above.
  • onRemove : This event is triggered when a module is removed. This can be used, for instance, to remove the DIV generated above.
  • notify : This event is triggered whenever we need to shoot a notification to the user-interface.For example when the step is not available, we can shoot a notification, by sending appropriate message.For HTML UI it adds a DOM node to the browser, for CLI and node , it logs the notification output to the respective console.

How to define these functions:

sequencer.setUI({
  onSetup: function(step) {},
  onDraw: function(step) {},
  onComplete: function(step) {},
  onRemove: function(step) {},
  notify: function(msg,id) {}
});

These methods can be defined and re-defined at any time, but it is advisable to set them before any module is added and not change it thereafter. This is because the setUI method will only affect the modules added after setUI is called.

The onComplete event is passed on the output of the module.

Image Sequencer provides a namespace step for the purpose of UI Creation in the scope of these definable function. This namespace has the following predefined properties:

  • step.name : (String) Name of the step
  • step.ID : (Number) An ID given to every step of the sequencer, unique throughout.
  • step.imageName : (String) Name of the image the step is applied to.
  • step.output : (DataURL String) Output of the step.
  • step.inBrowser : (Boolean) Whether the client is a browser or not

In addition to these, one might define their own properties, which shall be accessible across all the event scopes of that step.

For example :

sequencer.setUI({
  onSetup: function(step){
    // Create new property "step.image"
    step.image = document.createElement('img');
    document.body.append(step.image);
  },
  onComplete: function(step){
    // Access predefined "step.output" and user-defined "step.image"
    step.image.src = step.output;
  },
  onRemove: function(step){
    // Access user-defined "step.image"
    step.image.remove();
  }
});

Using multiple images on same sequencer:

Image Sequencer object supports one imageURL at a time.

Adding a seccond image to same sequencer will result to adding same set of steps added to prior image and flushing out the previous one.

s1 = new ImageSequencer(...);
s1.loadImage(url1);
s1.addSteps('blur');
s1.run();
s1.addImage(url2);
s1.run();

However if we want to use more than one image, we can either initialize a sequencer for each image like:

sequencer1 = new ImageSequencer(...);
sequencer1.loadImage(...);
sequencer1.addSteps(steps);
sequencer1.run();

sequencer2 = new ImageSequencer(...);
sequencer2.loadImage(...);
sequencer2.addSteps(steps);
sequencer2.run();

Note: Details of all modules can be sought using sequencer.modulesInfo(). This method returns an object which defines the name and inputs of the modules. If a module name (hyphenated) is passed in the method, then only the details of that module are returned.

The notify function takes two parameters msg and id, former being the message to be displayed on console (in case of CLI and node ) and a HTML component(in browser). The id is optional and is useful for HTML interface to give appropriate IDs.

Using WebAssembly for heavy pixel processing

Any module which uses the changePixel function gets WebAssembly acceleration (wasm). Both node and browser code use WebAssembly and the only code which falls back to non-wasm code is the browserified unit tests.

The main advantage we get using wasm is blazing fast speed attained in processing pixels for many modules that is very clear from checking module benchmarks.

The only limitation is that browser and node code for wasm had to be written separately, and switched between. This is because in browser we use fetch to retrieve the compiled wasm program while in node we use the fs module, each of which cannot be used in the other's environment.

wasm mode is enabled by default. If you need to force this mode to be on or off, you can use the useWasm option when initializing ImageSequencer:

let sequencer = ImageSequencer({useWasm:true}) // for wasm mode or simply

let sequencer = ImageSequencer() // also for wasm mode i.e. default mode

let sequencer = ImageSequencer({useWasm:false}) //for non-wasm mode 

Experimental GIF processing support

ImageSequencer currently can process GIFs but only for most of the modules. Every frame of the GIF is manipulated sequentially (parallel processing would be preferable in the future). The final frames are then converted back to a GIF but in the process, the time duration of each frame is lost and defaults to 0.1s.

Modules that do not work:

  1. ColorBar (Will get fixed upon fixing overlay as this is a meta module which uses overlay)
  2. FisheyeGL
  3. Overlay
  4. Blend
  5. Histogram
  6. WebGL Distort

image-sequencer's People

Contributors

aashna27 avatar adisapphire avatar ankit-singla avatar anthony-zhou avatar ataata107 avatar bhavayanand9 avatar ccpandhare avatar daemon1024 avatar dependabot-preview[bot] avatar dependabot[bot] avatar divy123 avatar harshithpabbati avatar harshkhandeparkar avatar igorwilbert avatar jywarren avatar keshav234156 avatar lohitha02 avatar margaretan9 avatar mridul97 avatar rcya1 avatar rishabhshuklax avatar rooday avatar root00198 avatar sashadev-sky avatar tech4gt avatar tsparksh avatar vibhorgupta-gh avatar vivek-30 avatar vladimirmikulic avatar waridrox avatar

Stargazers

 avatar  avatar  avatar  avatar  avatar  avatar  avatar  avatar  avatar  avatar  avatar  avatar  avatar  avatar  avatar  avatar  avatar  avatar  avatar  avatar  avatar  avatar  avatar  avatar  avatar  avatar  avatar  avatar  avatar  avatar  avatar  avatar  avatar  avatar  avatar  avatar  avatar  avatar  avatar  avatar  avatar  avatar  avatar  avatar  avatar  avatar  avatar  avatar  avatar  avatar  avatar  avatar  avatar  avatar  avatar  avatar  avatar  avatar  avatar  avatar  avatar  avatar  avatar  avatar  avatar  avatar  avatar  avatar  avatar  avatar  avatar  avatar  avatar  avatar  avatar  avatar  avatar  avatar  avatar  avatar  avatar  avatar  avatar  avatar  avatar  avatar  avatar  avatar  avatar  avatar  avatar  avatar  avatar  avatar  avatar  avatar  avatar  avatar  avatar  avatar

Watchers

 avatar  avatar  avatar  avatar  avatar  avatar  avatar  avatar  avatar  avatar  avatar  avatar  avatar  avatar  avatar  avatar  avatar  avatar  avatar  avatar

image-sequencer's Issues

Reorganize Modules Folder Structure

I was implementing FishEyeGL and noticed that we need a different folder structure for that.
FishEyeGL has shaders. So there have to be multiple files.
So instead of this:

.
โ””โ”€ src
    โ””โ”€ modules
        โ”œโ”€ Crop.js
        โ”œโ”€ NdviRed.js
        โ””โ”€ FishEyeGL.js

Should we move into this:

.
โ””โ”€ src
    โ””โ”€ modules
        โ”œโ”€ Crop
        โ”‚   โ””โ”€ Module.js
        โ”œโ”€ NdviRed
        โ”‚   โ””โ”€ Module.js
        โ””โ”€ FishEyeGL
            โ”œโ”€ Module.js (Connects Image Sequencer to the external module - fisheyegl.js)
            โ”œโ”€ fisheyegl.js
            โ””โ”€ shaders
                โ”œโ”€ fragment.glfs
                โ”œโ”€ method.glfs
                โ””โ”€ vertex.glfs

Benfits of this folder structure :

  • Multiple files per module can be stored.
  • Easier to port external modules - We can have the external module file and our own Module.js which will act as an API between the external module file and hence convert the external module into an ImageSequencer "Module"
  • Easier to maintain long code for complex modules like "segmented-colormap" (I know, this isn't that complex, but modularization will make the code more readable.)

segmented-colormap module

we can use PixelManipulation, and copy this directly from Infragram.org (https://infragram.org/sandbox/):

https://github.com/publiclab/infragram-js/blob/master/public/infragram.js#L88-L114

that method returns a new function which maps an incoming value (0-255) to an outgoing value, and can be run on each pixel.

Colormap functions are based on a nested array:

https://github.com/publiclab/infragram-js/blob/master/public/infragram.js#L212-L214

var c = segmented_colormap([[0, [0, 0, 255], [38, 195, 195]], [0.5, [0, 150, 0], [255, 255, 0]], [0.75, [255, 255, 0], [255, 50, 50]]]);
c(0) // => [0, 0, 255]

then we can make lots of different segmented_colormaps! Gradient colormaps too, but later; this is simpler for now.

screenshot 2017-07-08 at 2 05 29 pm

Also the Fastie colormap:

colormap_fastie = segmented_colormap([[0, [255, 255, 255], [0, 0, 0]], [0.167, [0, 0, 0], [255, 255, 255]], [0.33, [255, 255, 255], [0, 0, 0]], [0.5, [0, 0, 0], [140, 140, 255]], [0.55, [140, 140, 255], [0, 255, 0]], [0.63, [0, 255, 0], [255, 255, 0]], [0.75, [255, 255, 0], [255, 0, 0]], [0.95, [255, 0, 0], [255, 0, 255]]]);
ย ```

Add Step via HTML ui in demo errors in PixelManipulation

As described in #6, in comments, after merging #6, I still got:

Uncaught TypeError: Cannot read property 'src' of undefined
    at PixelManipulation (image-sequencer.js:184462)

on this line: https://github.com/publiclab/image-sequencer/blob/master/src/modules/PixelManipulation.js#L17

when adding a new step via the HTML ui. But then when I drop a new image into the image-select UI, all steps run correctly.

This may have to do with sequencer.run()

Planning interface architecture

Just to kick this off, i had some thoughts:

Each module should have a default interface, which perhaps just doesn't do anything. But we should be able to add an interface, and connect up:

  • onAdd or onSetup - runs when the module is added - can be used to create/append HTML
  • onTrigger or onDraw - runs when the module is run
  • beforeDraw vs. afterDraw? These could display for example a spinning icon when a process starts, and hide the spinner on completion. Alternately, we could also use onComplete.
  • we should make some methods available to any HTML features we construct inside onSetup -- maybe pass in some methods like onSetup(stuff)

NodeJS Binary Output

We should allow users on NodeJS to save output to actual binary files!
Agree?
Some gitignored directory like ./output/ could be used for the same

Tweaks to getImages & docs

Just reading through this again and trying to think as a newcomer --

Should we add loadImage() as well as loadImages()? I guess I feel the initial default assumption should be that the library works on a single image, and multiple images is a additional mode. That's sort of conceptually simpler too, as a starting point. The README could then say use loadImage(...) then have a section called For multiple images, use loadImages(). I feel this could be clearer, what do you think?

Clarification About GH-Pages

I am not sure what we could put up on the gh-pages branch. As of now, ImageSequencer doesn't have a browser UI, although it does work on browser. So what should I update on the gh-pages branch? It won't be a very good demo, for sure...

Incorporate test images into tests

Closed #1 as it is a bit out of date now, but I still would like tests which incorporate a "before" and "after" image, as attempted in this code:

https://github.com/jywarren/image-sequencer/blob/3d43eceff9a51ed2f85c3ce42277017c7890e435/test/image-sequencer.js#L31-L59

At simplest, we could perform an operation, then reverse it -- like, for example, inverting and inverting again -- and then confirm that the image is the same after the test, perhaps using:

Or even as an initial step, do an operation on an image and expect() that it's not the same -- just confirm that /something/ happened. Then move on to more complex tests of actual test images.

If this is in another PR, please link it here, thanks!

Browser Based Tests Using tape-run

And confirm that the library runs the same in both nodejs and phantomjs -- this will be cool! You could do it in a separate file called browserSpec or something.

Custom UI for modules

We discussed on #62 that modules should provide their own basic UI. This can be done by creating a wrapper UI module which requires in the actual module and also contains the UI elements.

What do we mean by a basic UI? A basic UI could just mean <input type="text" /> elements for all input fields or a slider as in FIsheyeGl. It's not very clear as to what should be done - or what the purpose is.

What are our expectations from the module in terms of UI? What UI Elements should it return? Ideally, Image Sequencer is supposed to have multiple steps, and not one entire page for just one step (Which has been the case for the demos I have recently made).

This is why I thought that the module can return the elements that it wants, but again the positioning and styling will highly depend on the implementation (one-step, multi-step, multi-image, et cetra.) , so it is really hard to expect the module to return a fit-all UI which can simply be injected into the front end code.

I think still a little clarity is needed on this front.

chainable methods

if each method loadImages(), addStep() etc returns the sequencer itself, we can chain, like:

sequencer.loadImages(image_name, image_src)
         .addStep(...)
         .run();

That's also a really succinct way to demonstrate the entire usage cycle of the library, and would be great to include in the README!

Issues With ImageManipulation.js

There is some problem with the savePixels part of the ImageManipulation.js with all images.
Some pixels don't get saved and also the saturation of the image, somehow, decreases.

Before:
Timetable Before

After:
Timetable After

In fact, the "After" image is corrupted, those at the bottom are empty pixels and not white pixels.
The module used with ImageManipulation.js was DoNothingPix.js. This module just includes ImageManipulation.js without changing any pixels. This module was made specifically for this purpose.

I believe the number of empty pixels isn't proportional to image size. This is because larger images have smaller area of "empty" pixels. For example:
Before:
Sundar Before

After:
Sundar After

One might be tempted to think that the "After" image of Sundar Pichai is perfectly fine, but upon close inspection, it comes out that there is a thin strip of empty pixels at the bottom, and also, the image is slightly desaturated.

Maybe this is a flaw with save-pixels module (the desaturation part).
We are surely missing something due to which we are gettng the blank strip of pixels.

Unnecessarily slow algorithm

When a step is added to the sequencer, It gets pushed into steps[], and then the code runs through ALL the steps, running the modules again and again.
I think we should change that. This is making the program unnecessarily slow.

Shouldn't we change this? What do you think, @jywarren ?

CORS Image error on GitHub hosted demos

There are Cross Origin Resource Sharing Canvas errors on Safari, IE, Opera, Mobile based-browsers.

This is because they not implemented CORS enabled images yet. MDN Source
The entire code of Image Sequencer depends on CORS Enabled images.

CORS enabled images are supported only on Desktop based Chrome and Firefox
Other desktop based browsers and support by any mobile-based browser is questionable as of now.

Can we do something about this? Because not doing so would render "Image Sequencer" useless for a huge chunk of Desktop users and all Moblie users?

Implement QR-Decode Module

I found quite a few npm packages for the same:

Since jsQR is a pure JS port of the best QR Code decoding library ZXing, and it does not use Canvas or WebGL, I think We should use that. Nad I shall go ahead with it's implementation.

Should Node-Canvas be used?

I know, we've had this discussion about node-canvas earlier, but since quite a lot of algorithms are based on canvas, Do you think we should include node-canvas in image sequencer anyway?

Planning Issue for the Image Sequencer GSoC Project

This is my plan for the summer. Please suggest any suggestions which you may deem fit @jywarren @ebarry. There is still a lot to be written here, will keep adding more points with time. This is by no means, exhaustive.
Link to my proposal

Phase 1 : Core functionality and JSON Input Support

In this phase I will build upon the core fuctions of Image Sequencer (addSteps, removeSteps, insertSteps, loadImage)

  • Create function addSteps which accepts data in many formats (JSON and otherwise) as described in the development wiki (PR #24)
  • Create the system to be used for handling images : Instead of choosing Sharp or Jimp or lwip, I stuck to plain old DataURIs in custom Image objects. As the mentioned modules have huge functionalities which are not relevant to Image Sequencer. (PR #24)
  • Create the framework for using multiple images : Finally enables Image Sequencer to handle multiple images at once. (PR #24)
  • Similarly, create removeSteps, insertSteps, loadImages and modify run (PR #24)
  • Update Usage Instructions in Readme.md

Phase 2 : Unit Tests, Modularization, Unified Input Parsing

  • Unit Tests for the methods addSteps, removeSteps, insertSteps, run (PR #28)
  • Image Based Unit Tests : Double Inversion Test, NDVI Test (PR #30)
  • Unified Input Parser : A Single Module to parse inputs in different formats - reduces source size and helps manage code. (PR #28)
  • Modularization of large functions which were earlier a part of src/ImageSequencer.js (PR #28)

Phase 3 : Module Logs, custom I/O, headless testing, Chaining, replaceImage

  • Headless Browser Testing using the tape-run module. (PR #55)
  • Method Chaining (PR #44, #53)
  • Added Invert Module (PR #30)
  • replaceImage Created, and along with it, its gh-pages demo. (PR #35)
  • Create a module log. This will store logs from various modules. Useful for debugging. (PR #37)
  • Allow modules to interact with the user, accept and output data apart from images. (example: data of a QR Code)

Phase 4 : User Interface, Support external Images

  • Create Module Interface (PR #67 ISS #85)
  • Create the User Interface for node based and browser based implementations of Image Sequencer. (Across various PRs)
  • local image support on Browser (PR #81)
  • URL image support on Browser (PR #81)
  • URL image support on Node.JS (PR #81)

Phase 5 : Additional New Features

  • Added method .exportBinary() to export images as binary (NodeJS) (PR #90)
  • Image testing using pixel-by-pixel comparison with a tolerance level (PR #89)
  • Describing module requirements using an info.json file for every module. (PR #92)
  • Implemented Complete demo (PR #92)
  • Added Basic Command Line Interface (CLI) (PR #95)
  • Publish demos to GH-Pages (PR #96)

Phase 6 : Module Implementation & NPM

This phase involves implementing the various modules as mentioned in the Readme.md and my project proposal.

  • Publish to NPM
  • FisheyeGl (PR #61)
  • Crop (PR #56)
  • Invert
  • Segmented Colormap (PR #57)
  • QR Code Module (PR #72)

Filetype extraction

Some modules might require the filetype.
I hadn't noticed that options.format is undefined, so:

options.format = options.format || "jpg";

always results in options.format to be equal to jpg.
Also, we can't only rely on extension of the file. For example, a jpg file renamed as png would work perfectly fine otherwise, but when we set the src for img, we do:

img.src = 'data:image/' + options.format + ';base64,' + buffer.read().toString();

so this might result in a faulty image.
Should we import the module file-type?

Rewrite using callbacks

I was working on #1. I was able to get a basic version running on node.
I was wondering if we could use callbacks/promises in the code?

Colorbar acts awry

When a Colorbar module is applied, It Makes the entire page (HTML) slow. Also after adding a colorbar module, results of adding other modules is undesirable.

Should we implement a better alternative?

What Should Module Logs Include?

We decided to have logging. SO, what data should be logged? Where does the logged data go?
Does it remain accessible only for that session or should it get stored in a LOG file (for Node.js)?

I think the following should be logged:

  • Module Name & Options
  • Image details (dimensions,format)
  • Success/Failure in generating image

Please let me know what all I am missing.
Thanks :-)

Rework UI Handling

@jywarren you were once suggesting changes in the UI module. I thought upon them, and find them really interesting. Also, the current system has forward compatibility issues (Adding new features to it is really complicated. The code quality isn't very good). I have been working on the new model, with a much cleaner syntax and code and working on it all day. Will create a PR when ready.

Some takeaway features are:

  • User defined variables : Users can define a variable for any step. This can be used to store the reference of an HTML Element, for further use in the other events (Like you suggested earlier) .
        sequencer.setUI(
            onSetup: function(step){
                step.image = document.createElement('img'); // create a user defined variable step.image
                step.image.setAttribute( 'id', 'IS-'+step.ID ); // access the default variable step.ID
                ... // append to DOM and other stuff
            },
            onComplete: function(step){
                step.src = step.output;
            },
            onRemove: function(step){
                step.remove();
            },
        );
  • Unified variables : Earlier there were too many unnecessary variables and objects in the picture : options, identity, etc. Now all come under the same banner steps. This brings in clarity and helps maintain code, and is good for new contributors!
  • Easier to understand and more User Friendly.

I am sorry, the "Bootstrapping Phase" doesn't seem to end very soon, major functionality changes happening every day... :(

Issue with non-JPEG images also affecting alpha channel

The Issue

Now PixelManipulation works perfectly fine for JPEG images. Issues come up when we use PNG/GIF images. I am currently using a petty fix so that this works for all images. This is what I do in PixelManipulation.js :

options.format = "jpeg";

I am hardcoding the format to "jpeg" whenever a module using PixelManipulation is used.
So this is working for all images. But as a result, we can't work with images having an alpha channel.

This is what is happening: (Have spent about 2 days on this)

  • savePixels() generates a readable stream -- r
  • base64-stream generates a writable stream -- w
  • r.pipe(w) pipes r to w
  • the event listener 'finished' is attached to the pipe which is responsible for converting the image data to a DataURI.

In JPEG images this process works perfectly fine. But for PNG/GIF, the 'finished' event never gets triggered (I've tested this.)

Surprisingly, the same code worked for a 16x16 pixel PNG image.

Possible Explanation(s)

I am aware that save-pixels uses different parsers for PNG, JPEG, GIF. This may be causing some issue. But also, The code works fine when the writable stream is as follows

var w = require('fs').createWriteStream('output.png')

instead of:

var w = base64.encode();

So this may be an issue with the base64-stream.

Overview

  • Works fine for JPEG
  • Issue saving PNG or GIF images
  • Temporary fix applied : convert all images to JPEG
  • Implication : We can't work with alpha channel images

Another Fix (not a good idea, didn't do this)

Create a temporary binary PNG/GIF file using fs, convert it into a DataURI using urify and then destroy the temporary binary. Didn't do this because this won't work for Browsers.

Errors on /index.html, /examples/ndvi/index.html

/index.html and /examples/ndvi/index.html give out errors on running (Safari, Chrome, Firefox on Mac)

Am I doing something wrong since I believe nobody else is getting these errors?

On Safari [Mac]

/index.html

The following pops up every time a module is called

[Error] IndexSizeError (DOM Exception 1): The index is not in the allowed range.
getImageData (image-sequencer.js:184439)
draw (image-sequencer.js:184439)
output (image-sequencer.js:184203)
(anonymous function) (image-sequencer.js:184551)
emit (image-sequencer.js:26578)
(anonymous function) (image-sequencer.js:12768)
run (image-sequencer.js:163900)
drainQueue (image-sequencer.js:163870)

The following error comes up only when "Add Step is clicked"

[Error] TypeError: undefined is not an object (evaluating 'options.el.html')
draw (image-sequencer.js:184409)
run (image-sequencer.js:184221)
(anonymous function) (index.html:78)
dispatch (image-sequencer.js:60435)
handle (image-sequencer.js:60247)

/examples/ndvi/index.html

The following pops up every time "Add step is clicked"

[Error] TypeError: undefined is not an object (evaluating 'options.el.html')
draw (image-sequencer.js:184409)
run (image-sequencer.js:184221)
(anonymous function) (index.html:76)
dispatch (image-sequencer.js:60435)
handle (image-sequencer.js:60247)

On Chrome [Mac]

Both files

On clicking "Add Step"

Uncaught TypeError: Cannot read property 'html' of undefined
at Object.draw (image-sequencer.js:184409)
at Object.run (image-sequencer.js:184221)
at HTMLButtonElement. (index.html:76)
at HTMLButtonElement.dispatch (image-sequencer.js:60435)
at HTMLButtonElement.elemData.handle (image-sequencer.js:60247)

On Firefox [Mac]

Both files

On clicking "Add Step"

ReferenceError: event is not defined image-sequencer.js:184383:11
onImage/reader.onload /dist/image-sequencer.js:184383:11

Difference in Infragram & ImageSequencer ndvi-red results

Original

original

Image Sequencer Output

Full Image

Image Sequencer

Infragram Output

Full Image

Infragram

Is the algorithm we are using for ndvi-red correct?

    function changePixel(r, g, b, a) {
      var ndvi = 255 * (b - r) / (1.00 * b + r);
      return [ndvi, ndvi, ndvi, a];
    }

image degredation over repeated steps (invert)

Aha, very interesting! If you repeat clicking too long, the image degrades; we can address this in a follow-up issue but it's really cool to see, actually! Must be decimal/integer issues.

index 2

Kind of fascinating actually I wonder if it's conversing values from decimal to integer and back over and over. We could actually test for this, to be honest, by running the invert 20 times.

As to a solution, I think there are non drifting decimal math implementations we could use from other libraries.

Namespaced persistent data for each module

Still traveling so i'll get to your other issues when i can, but I wanted to suggest that persisted data from each module could be stored in a namespaced hash, such as:

metadata = {
'ndvi-red': { ... },
'exif': { ... }
}

That object would be accessible to each module, and the UI functions as well. Haven't thought through how to pass it but perhaps it's just a property of each image object that the sequencer stores? Any thoughts?

Demos rework + starter module rethink

Now that we have a UI system, I'd like to take the "starter module" idea from the previous demo, and start by plugging it into the new sequencer code.

This is the first step in getting a demo that runs on the new code. But do you think we should package up the selector more than including it in the demo code? I had originally seen it as a kind of "special module" but if it really doesn't fit into the architecture, we can just provide it in something like demo/initial-image.js

Which versions of node are to be supported and tested?

In .travis.yml :

language: node_js
node_js:
  - '4'
  - '5'
env:
  - CXX=g++-4.8

Are these the only Node versions we should be testing builds on? what about v6, v7, v8?
I run v7.4.0 on my computer.

โžœ  image-sequencer git:(documentation) node -v
v7.4.0

Split README.md into README.md and CONTRIBUTING.md

Now that Image Sequencer has been published to npm, I think the README.md should only consist of Usage instructions and all the development notes should be in CONTRIBUTING.md.
Am I right in thinking so?
Also because README.md has become very long over the time.

Should README.md have a small navigation or "jump to..." section?

UniqueID : Random or Sequential?

@jywarren I have been working on the removeStep().
We need a unique ID for every step for this to be done. I am aware that we already have one. It is defined in /src/UserInterface.js. This is a problem. Because /src/UserInterface.js is imported only for browser implementations.
Hence it is a unique ID only for the Browser UI, right?

We'll need a unique ID for every step. Either now, or in the future.

For the purpose of testing my code, I have implemented a sequential Unique ID system : 0,1,2,... which is implemented in /src/ImageSequencer.js

My question is : should we use a sequential one, or the one which is already implemented in /src/UserInterface.js ?

Break out longer functions into sub source files and require in

If it's possible, can you check if you can break out any of your longer functions into sub files? If you need shared scope, maybe you'll have to pass them in via the function parameters, so they'll be less inter-referential.

But this will make your code into smaller, more independent and easier (one thing per function) parts. So I think it's worth it in some cases!

More Testing

Should we include grunt build as a build job?
anything else we should include? Once the PhantomJS tests are ready, we should include them too.

expose direct commandline interface via commander

This would be really great to show in the README, too -- to demonstrate that it's possible to use this in an everyday commandline setting:

https://www.npmjs.com/package/commander

I think it'd have to accept some kind of command string, maybe JSON like:

imagesequencer --help
imagesequencer -s "crop:cropOptions,..." image.png

This may need more thought but it'd be a cool idea to have a section in the docs that's like From the commandline

add fisheyegl module

Hi, @ccpandhare - whats the latest?

I wanted to add this as a feature request down the line -- it's a good one to try to develop a test for:

https://github.com/jywarren/fisheyegl

could be a great module. I want to suggest a test that takes a checkerboard image and corrects fisheye, then diff-compares it with a correct checkerboard.

A Semantic Issue

How addSteps, removeSteps, etc. work currently :
If no image is specified in the addSteps or removeSteps arguments, then the operation is performed on all images.

Recently we allowed chaining of methods which enables us to do this:

    sequencer.loadImage('image.jpg').addSteps('ndvi-red').run()

As you can see, no image is specified with addSteps. This means that ndvi-red will be added to ALL images present in the sequencer.

What should be done:

  • If chained, apply the steps only to the image which is being chained by storing which steps are being chained and the image associated in the object returned by these methods?

or

  • Force the user to specify the image.

Pixel Manipulation and GIFs

Thanks to #73, GIFs are fully supported by PixelManipulation!

But It doesn't really work as expected. I inverted the following GIF using IS :

ani-pm-hammer

This is the result:

gif

It doesn't apply to all frames, I guess. Also, now the GIF doesn't play infinitely. It just plays once.
(Try opening the image in a browser tab and then Cmd+Shift+R or Ctrl+Shift+R)

Create Histogram Module

Also, don't you think that the steps after histogram should use the output from the step BEFORE histogram?
It doesn't quite make sense to apply a module on the "histogram" output.
So what we can do is, the histogram module shows the histogram of the image but passes on ITS INPUT as its output to OTHER modules.

Similarly for the QR Code module?

Recommend Projects

  • React photo React

    A declarative, efficient, and flexible JavaScript library for building user interfaces.

  • Vue.js photo Vue.js

    ๐Ÿ–– Vue.js is a progressive, incrementally-adoptable JavaScript framework for building UI on the web.

  • Typescript photo Typescript

    TypeScript is a superset of JavaScript that compiles to clean JavaScript output.

  • TensorFlow photo TensorFlow

    An Open Source Machine Learning Framework for Everyone

  • Django photo Django

    The Web framework for perfectionists with deadlines.

  • D3 photo D3

    Bring data to life with SVG, Canvas and HTML. ๐Ÿ“Š๐Ÿ“ˆ๐ŸŽ‰

Recommend Topics

  • javascript

    JavaScript (JS) is a lightweight interpreted programming language with first-class functions.

  • web

    Some thing interesting about web. New door for the world.

  • server

    A server is a program made to process requests and deliver data to clients.

  • Machine learning

    Machine learning is a way of modeling and interpreting data that allows a piece of software to respond intelligently.

  • Game

    Some thing interesting about game, make everyone happy.

Recommend Org

  • Facebook photo Facebook

    We are working to build community through open source technology. NB: members must have two-factor auth.

  • Microsoft photo Microsoft

    Open source projects and samples from Microsoft.

  • Google photo Google

    Google โค๏ธ Open Source for everyone.

  • D3 photo D3

    Data-Driven Documents codes.