Code Monkey home page Code Monkey logo

pynet's Introduction

Replacing Mobile Camera ISP with a Single Deep Learning Model


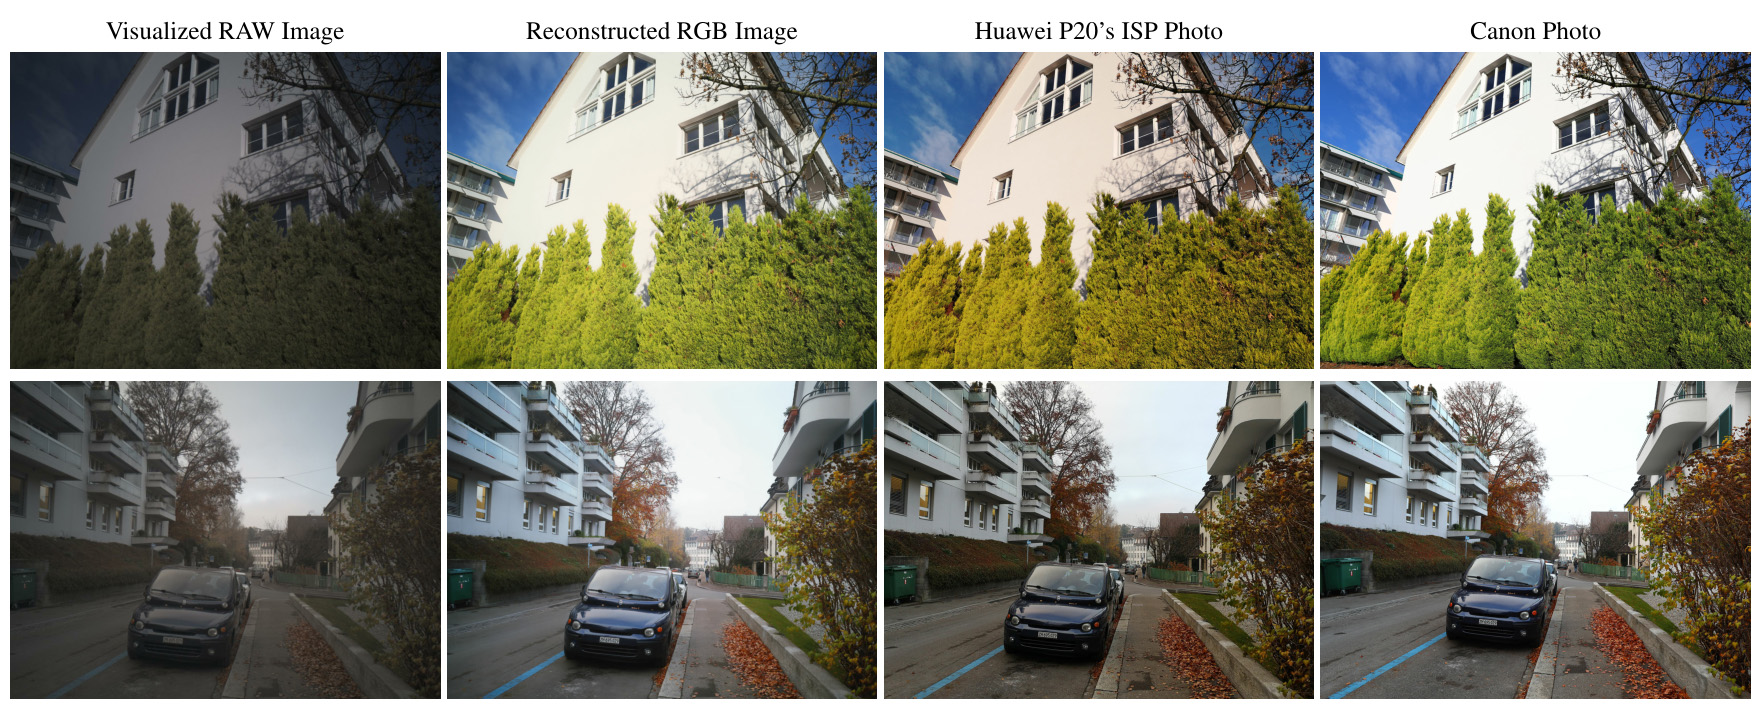
This repository provides the implementation of the RAW-to-RGB mapping approach and PyNET CNN presented in this paper. The model is trained to convert RAW Bayer data obtained directly from mobile camera sensor into photos captured with a professional Canon 5D DSLR camera, thus replacing the entire hand-crafted ISP camera pipeline. The provided pre-trained PyNET model can be used to generate full-resolution 12MP photos from RAW (DNG) image files captured using the Sony Exmor IMX380 camera sensor. More visual results of this approach for the Huawei P20 and BlackBerry KeyOne smartphones can be found here.


2. Prerequisites


3. First steps

  • Download the pre-trained VGG-19 model Mirror and put it into vgg_pretrained/ folder.

  • Download the pre-trained PyNET model and put it into models/original/ folder.

  • Download Zurich RAW to RGB mapping dataset and extract it into raw_images/ folder.
    This folder should contain three subfolders: train/, test/ and full_resolution/

    Please note that Google Drive has a quota limiting the number of downloads per day. To avoid it, you can login to your Google account and press "Add to My Drive" button instead of a direct download. Please check this issue for more information.


4. PyNET CNN


drawing


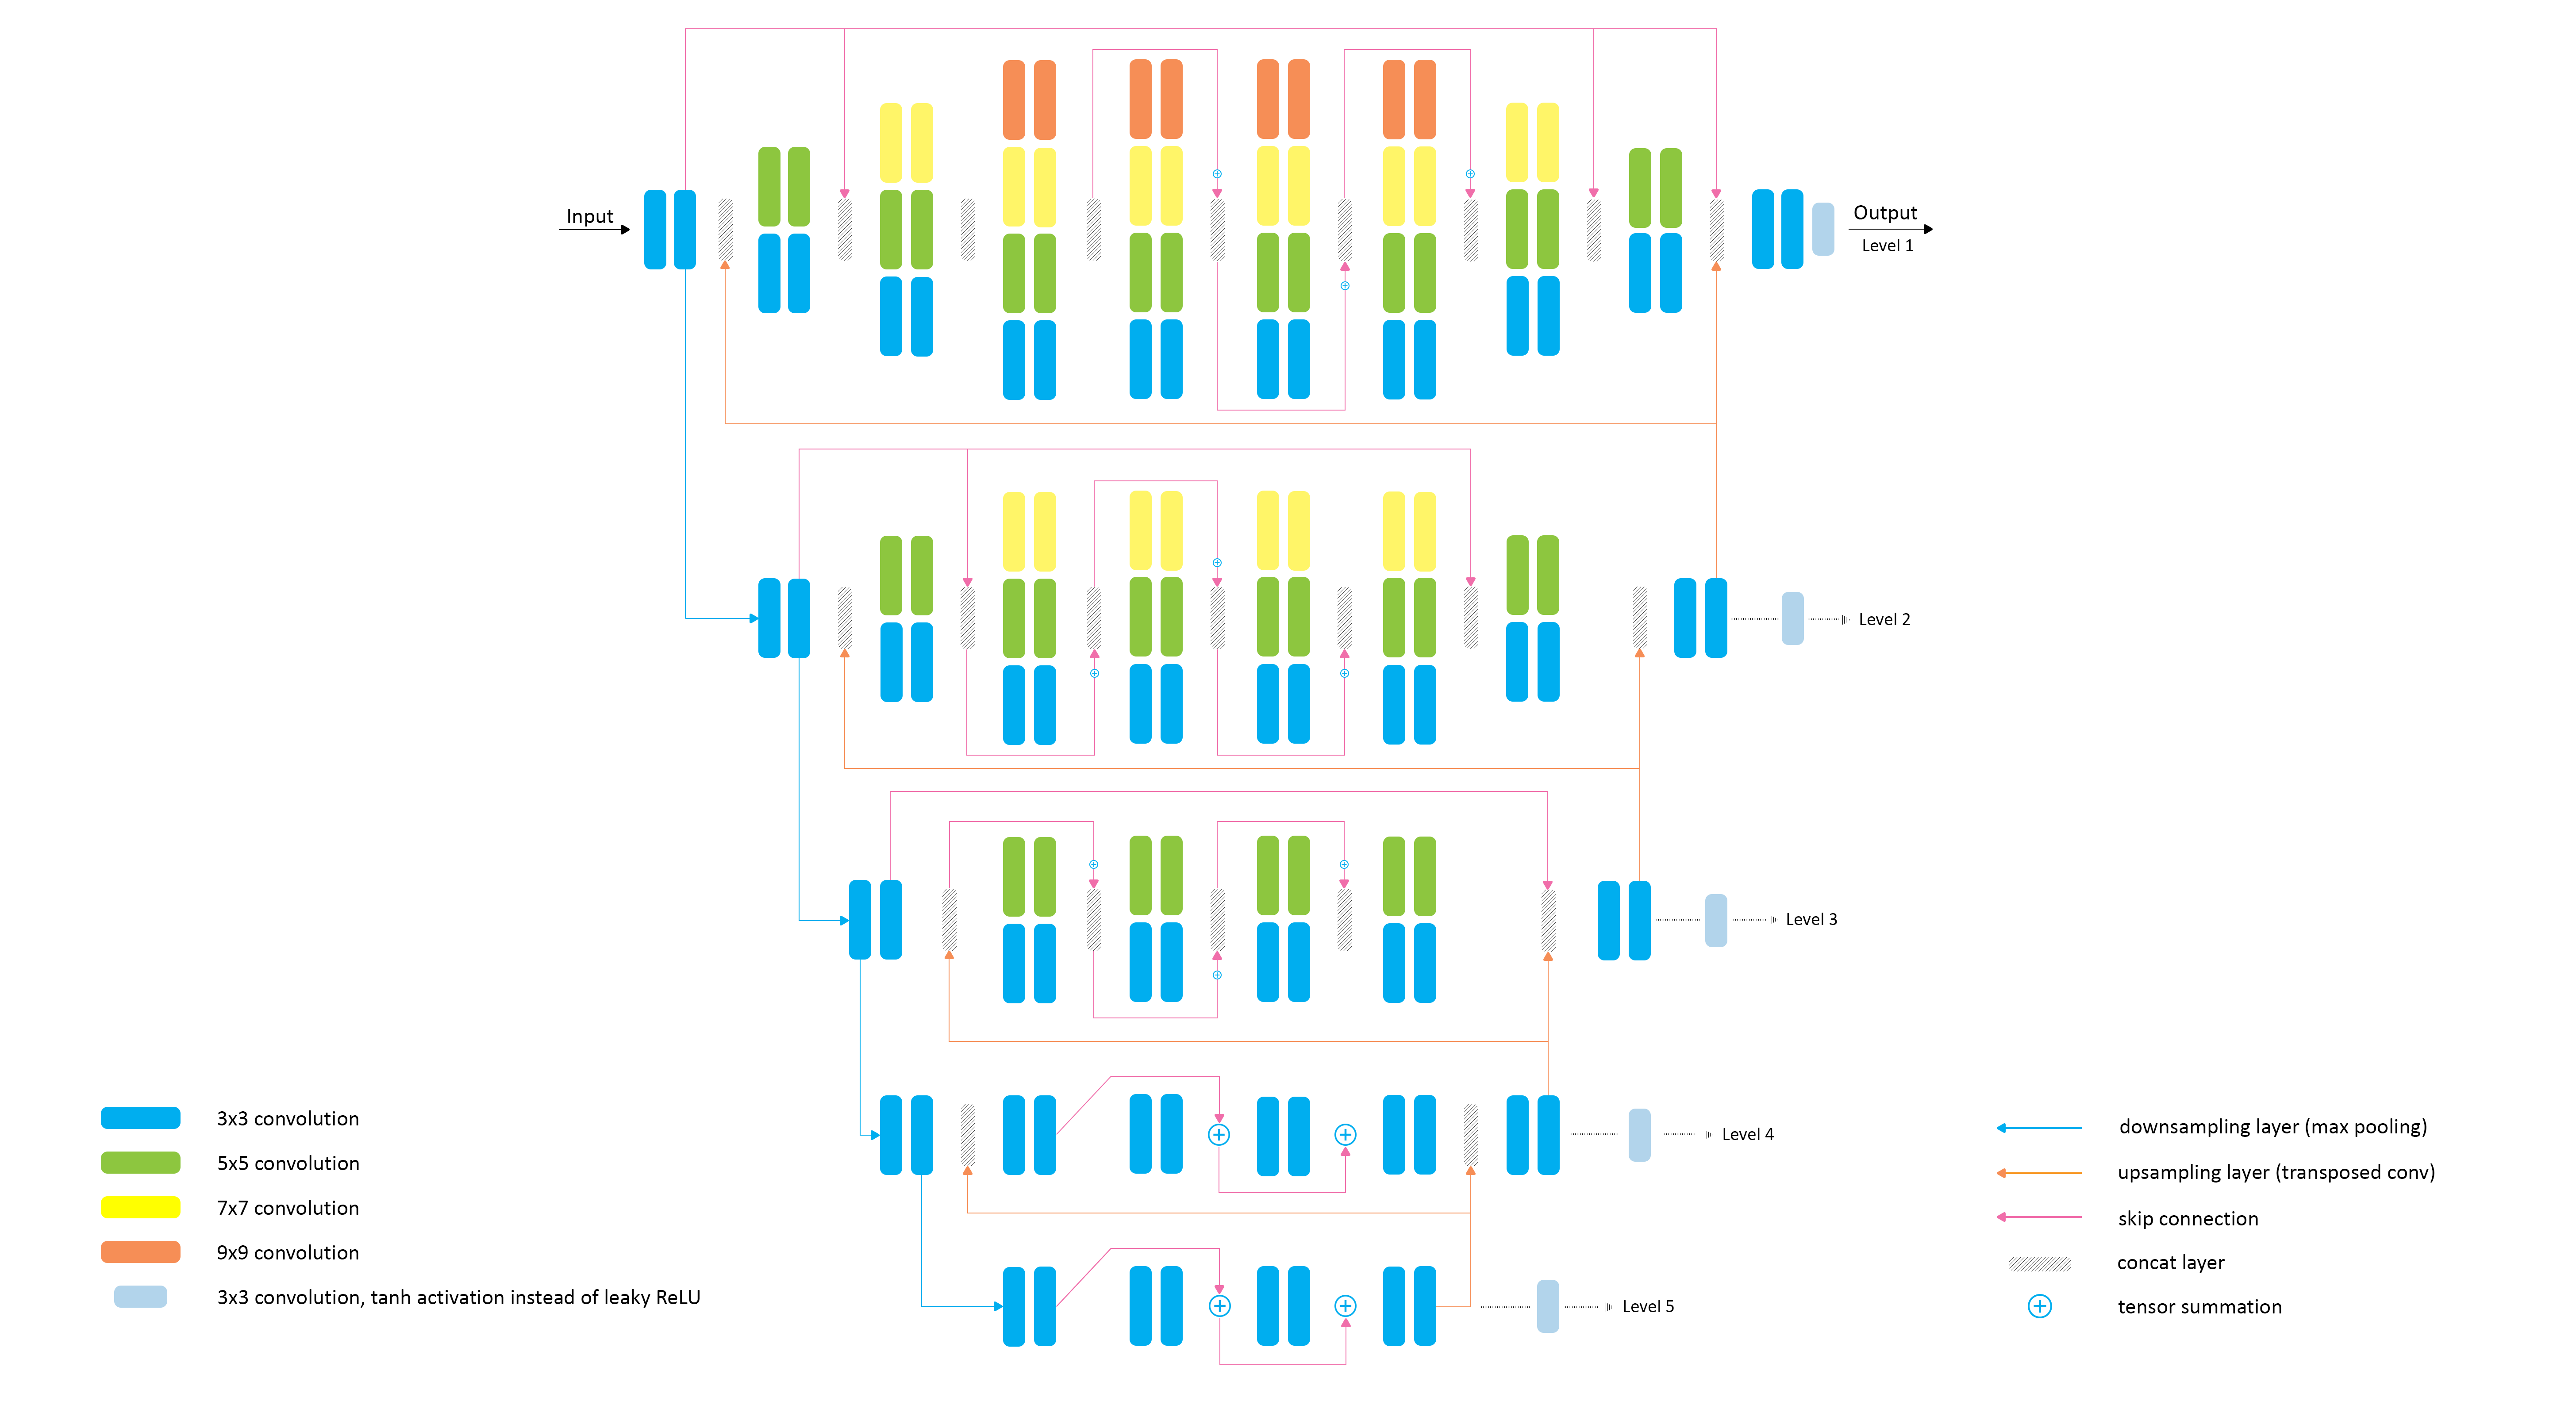
PyNET architecture has an inverted pyramidal shape and is processing the images at five different scales (levels). The model is trained sequentially, starting from the lowest 5th layer, which allows to achieve good reconstruction results at smaller image resolutions. After the bottom layer is pre-trained, the same procedure is applied to the next level till the training is done on the original resolution. Since each higher level is getting upscaled high-quality features from the lower part of the model, it mainly learns to reconstruct the missing low-level details and refines the results. In this work, we are additionally using one transposed convolutional layer (Level 0) on top of the model that upsamples the image to its target size.


5. Training the model

The model is trained level by level, starting from the lowest (5th) one:

python train_model.py level=<level>

Obligatory parameters:

level: 5, 4, 3, 2, 1, 0

Optional parameters and their default values:

batch_size: 50   -   batch size [small values can lead to unstable training]
train_size: 30000   -   the number of training patches randomly loaded each 1000 iterations
eval_step: 1000   -   each eval_step iterations the accuracy is computed and the model is saved
learning_rate: 5e-5   -   learning rate
restore_iter: None   -   iteration to restore (when not specified, the last saved model for PyNET's level+1 is loaded)
num_train_iters: 5K, 5K, 20K, 20K, 35K, 100K (for levels 5 - 0)   -   the number of training iterations
vgg_dir: vgg_pretrained/imagenet-vgg-verydeep-19.mat   -   path to the pre-trained VGG-19 network
dataset_dir: raw_images/   -   path to the folder with Zurich RAW to RGB dataset


Below we provide the commands used for training the model on the Nvidia Tesla V100 GPU with 16GB of RAM. When using GPUs with smaller amount of memory, the batch size and the number of training iterations should be adjusted accordingly:

python train_model.py level=5 batch_size=50 num_train_iters=5000
python train_model.py level=4 batch_size=50 num_train_iters=5000
python train_model.py level=3 batch_size=48 num_train_iters=20000
python train_model.py level=2 batch_size=18 num_train_iters=20000
python train_model.py level=1 batch_size=12 num_train_iters=35000
python train_model.py level=0 batch_size=10 num_train_iters=100000

6. Test the provided pre-trained models on full-resolution RAW image files

python test_model.py level=0 orig=true

Optional parameters:

use_gpu: true,false   -   run the model on GPU or CPU
dataset_dir: raw_images/   -   path to the folder with Zurich RAW to RGB dataset


7. Test the obtained model on full-resolution RAW image files

python test_model.py level=<level>

Obligatory parameters:

level: 5, 4, 3, 2, 1, 0

Optional parameters:

restore_iter: None   -   iteration to restore (when not specified, the last saved model for level=<level> is loaded)
use_gpu: true,false   -   run the model on GPU or CPU
dataset_dir: raw_images/   -   path to the folder with Zurich RAW to RGB dataset


8. Folder structure

models/   -   logs and models that are saved during the training process
models/original/   -   the folder with the provided pre-trained PyNET model
raw_images/   -   the folder with Zurich RAW to RGB dataset
results/   -   visual results for small image patches that are saved while training
results/full-resolution/   -   visual results for full-resolution RAW image data saved during the testing
vgg-pretrained/   -   the folder with the pre-trained VGG-19 network

load_dataset.py   -   python script that loads training data
model.py   -   PyNET implementation (TensorFlow)
train_model.py   -   implementation of the training procedure
test_model.py   -   applying the pre-trained model to full-resolution test images
utils.py   -   auxiliary functions
vgg.py   -   loading the pre-trained vgg-19 network


9. Bonus files

These files can be useful for further experiments with the model / dataset:

dng_to_png.py   -   convert raw DNG camera files to PyNET's input format
evaluate_accuracy.py   -   compute PSNR and MS-SSIM scores on Zurich RAW-to-RGB dataset for your own model


10. License

Copyright (C) 2020 Andrey Ignatov. All rights reserved.

Licensed under the CC BY-NC-SA 4.0 (Attribution-NonCommercial-ShareAlike 4.0 International).

The code is released for academic research use only.


11. Citation

@article{ignatov2020replacing,
  title={Replacing Mobile Camera ISP with a Single Deep Learning Model},
  author={Ignatov, Andrey and Van Gool, Luc and Timofte, Radu},
  journal={arXiv preprint arXiv:2002.05509},
  year={2020}
}

12. Any further questions?

Please contact Andrey Ignatov ([email protected]) for more information

pynet's People

Contributors

aiff22 avatar

Stargazers

 avatar  avatar  avatar  avatar  avatar  avatar  avatar  avatar  avatar  avatar  avatar  avatar  avatar  avatar  avatar  avatar  avatar  avatar  avatar  avatar  avatar  avatar  avatar  avatar  avatar  avatar  avatar  avatar  avatar  avatar  avatar  avatar  avatar  avatar  avatar  avatar  avatar  avatar  avatar  avatar  avatar  avatar  avatar  avatar  avatar  avatar  avatar  avatar  avatar  avatar  avatar  avatar  avatar  avatar  avatar  avatar  avatar  avatar  avatar  avatar  avatar  avatar  avatar  avatar  avatar  avatar  avatar  avatar  avatar  avatar  avatar  avatar  avatar  avatar  avatar  avatar  avatar  avatar  avatar  avatar  avatar  avatar  avatar  avatar  avatar  avatar  avatar  avatar  avatar  avatar  avatar  avatar  avatar  avatar  avatar  avatar  avatar  avatar  avatar  avatar

Watchers

 avatar  avatar  avatar  avatar  avatar  avatar  avatar  avatar  avatar  avatar  avatar

pynet's Issues

How could I test on common 3 channel RGB images?

I tried on a 448*448*3 PNG image but this error occurred :

Traceback (most recent call last):
  File "test_model.py", line 67, in <module>
    I = np.reshape(I, [1, I.shape[0], I.shape[1], 4])
  File "<__array_function__ internals>", line 6, in reshape
  File "C:\Users\127051\AppData\Local\Programs\Python\Python37\lib\site-packages\numpy\core\fromnumeric.py", line 301, in reshape
    return _wrapfunc(a, 'reshape', newshape, order=order)
  File "C:\Users\127051\AppData\Local\Programs\Python\Python37\lib\site-packages\numpy\core\fromnumeric.py", line 61, in _wrapfunc
    return bound(*args, **kwds)
ValueError: cannot reshape array of size 602112 into shape (1,224,224,4)

EBB Dataset

Hi, Where can I find the EBB complete dataset?

The competition site, to which I'm directed to get the test dataset at-leats to is not updated since 2020. So it does not provide the complete dataset.

This is for a university project. Would be appreciated very much if this could be addressed ASAP.

cannot train with mutil gpus

hello, does this can be trainned on mutil gpus?
when i train these code with two gpus, while just exe on one gpu.
not familiar with tf, could you please give some guidence how to trainning on mutil gpus with your code? thanks.

about the data bits depth and normalization

As far as I am concerned, the huawei P20's raw image is 10bits dng files. but the data downloaded form the link http://people.ee.ethz.ch/~ihnatova/pynet.html#dataset are mixed with 8bits and 10bits png files. And the normalization code for training and testting in load_dataset.py at 21th line is shown below where the divisor is 4*255:

RAW_norm = RAW_combined.astype(np.float32) / (4 * 255)

Since there are part of data are 8bits depth, the divisor is too big for them.

And I tryed to used the pretrained model to test my own data captuered by huawei P20, the result is slightly overlighted.

So Is that a bug? or something far from my understand?

I try to fix this by replace the code in load_dataset.py at 21th line and re-train the model:

RAW_norm = RAW_combined.astype(np.float32) / (4 * 255)

by

if raw.dtype == np.uint16:
    # 10bits

   RAW_norm = RAW_combined.astype(np.float32) / (1023)

elif raw.dtype == np.uint8:

    # 8bits

    RAW_norm = RAW_combined.astype(np.float32) / (255)
Is that correct?

Hi there, Something is wrong with the Loss...

Hello, Why is the calculation of loss not consistent with the paper, and the weight of each part of loss is not the same? The tensorflow version.
Look forward to your reply. Thanks.

Cannot download dataset from Google Drive

Google Drive returns:

Sorry, you can't view or download this file at this time.

Too many users have viewed or downloaded this file recently. Please try accessing the file again later. If the file that you are trying to access is particularly large or is shared with many people, it may take up to 24 hours to be able to view or download the file. If you still can't access a file after 24 hours, contact your domain administrator.

value range of loss_mse, loss_ssim, loss_content in training

Hi:
Thanks a lot for sharing your source code.
In your paper, the loss for level 1 is loss_1 = L_vgg + 0.75L_ssim + 0.05L_mse, and each loss is normalized to 1. While in your code, I think the condition of LEVEL ==0 is same as loss_1 in your paper. The loss is loss_generator = loss_mse*20 + loss_content + (1 - loss_ssim)*20.
Q1, why are they different? How to normalize L_ms to 1?
Q2, why is these weights for loss_mse and (1 - loss_ssim) the same. I think loss_mse is a big value(>50), while 1-ssim is smaller than 0.1.
Q3, could you tell me the value range of these 3 losses? Maybe this can help me to understand the weights for loss. In my case, the loss_mse is around 100, ssim is around 0.98, and loss_content is around 7.
Thanks in advance.

PyNET image quality

Hi andrey

Thank you for share PyNET source code and pretrained models !

I sent you an email(to [email protected]), but unfortunately, for now you have not reply me.

I have cloned PyNET code and downloaded data set and pretrained models.
https://github.com/aiff22/PyNET

I downloaded a dng pictrure(get form LEICA M9) form : https://www.kenrockwell.com/leica/m9/sample-photos-3.htm.
I test the pictrure on your pretrained PyNET model, unfortunately I got a very bad image quality.

I provide my dng pictrue(L1004235.dng), input png picture(get by dng_to_png.py(L1004235-input.png)) and output png(L1004235_level_0_iteration_None.png) as attachments in the mail I sent to you.

Hope you can help me to fix this issue.

Last level training

I encountered an issue when training at the last level. When I execute the command

python train_model.py level=0 batch_size=10 num_train_iters=100000

I got the following error:
Loading training data...
Killed

Any ideas?

Recommend Projects

  • React photo React

    A declarative, efficient, and flexible JavaScript library for building user interfaces.

  • Vue.js photo Vue.js

    🖖 Vue.js is a progressive, incrementally-adoptable JavaScript framework for building UI on the web.

  • Typescript photo Typescript

    TypeScript is a superset of JavaScript that compiles to clean JavaScript output.

  • TensorFlow photo TensorFlow

    An Open Source Machine Learning Framework for Everyone

  • Django photo Django

    The Web framework for perfectionists with deadlines.

  • D3 photo D3

    Bring data to life with SVG, Canvas and HTML. 📊📈🎉

Recommend Topics

  • javascript

    JavaScript (JS) is a lightweight interpreted programming language with first-class functions.

  • web

    Some thing interesting about web. New door for the world.

  • server

    A server is a program made to process requests and deliver data to clients.

  • Machine learning

    Machine learning is a way of modeling and interpreting data that allows a piece of software to respond intelligently.

  • Game

    Some thing interesting about game, make everyone happy.

Recommend Org

  • Facebook photo Facebook

    We are working to build community through open source technology. NB: members must have two-factor auth.

  • Microsoft photo Microsoft

    Open source projects and samples from Microsoft.

  • Google photo Google

    Google ❤️ Open Source for everyone.

  • D3 photo D3

    Data-Driven Documents codes.