Code Monkey home page Code Monkey logo

yolov5's Introduction

yolov5汉化版

近期更新

  • v7.0 版本: 新增实例分割,现在可以训练、测试、检测、导出实例分割模型,目前视觉领域的三大任务目标检测、分类、分割都可以用yolov5工程了
  • 支持飞桨PaddlePaddle的导出和推理了
  • v6.2 版本: 新增yolov5分类模型, 适配苹果M1/M2芯片,引入ClearML和Deci.ai。
  • v6.1 版本: 现在支持11种格式的模型导出和推理,更新了预训练权重,指标上相较v6.0好了一点。
    现在支持导出和推理的模型有:PyTorch(.pt), TorchScript(.torchscript), ONNX(.onnx), OpenVINO, TensorRT(.engine), CoreML(.mlmodel), TensorFlow SavedModel, Tensorflow GraphDef(.pb), TensorFlow Lite(.tflite), TensorFlow Edge TPU(.tflite), Tensorflow.js
  • v6.0 版本: 新增yolov5 nano模型,其他模型结构也有修改,模型转换/导出友好,精度基本不变,速度略有提升。

目录


简介

本仓库Fork自Ultralytics公司出品的yolov5,原仓库地址为:ultralytics/yolov5 ,版权请参见原仓库License

1. 模型效果

点击展开

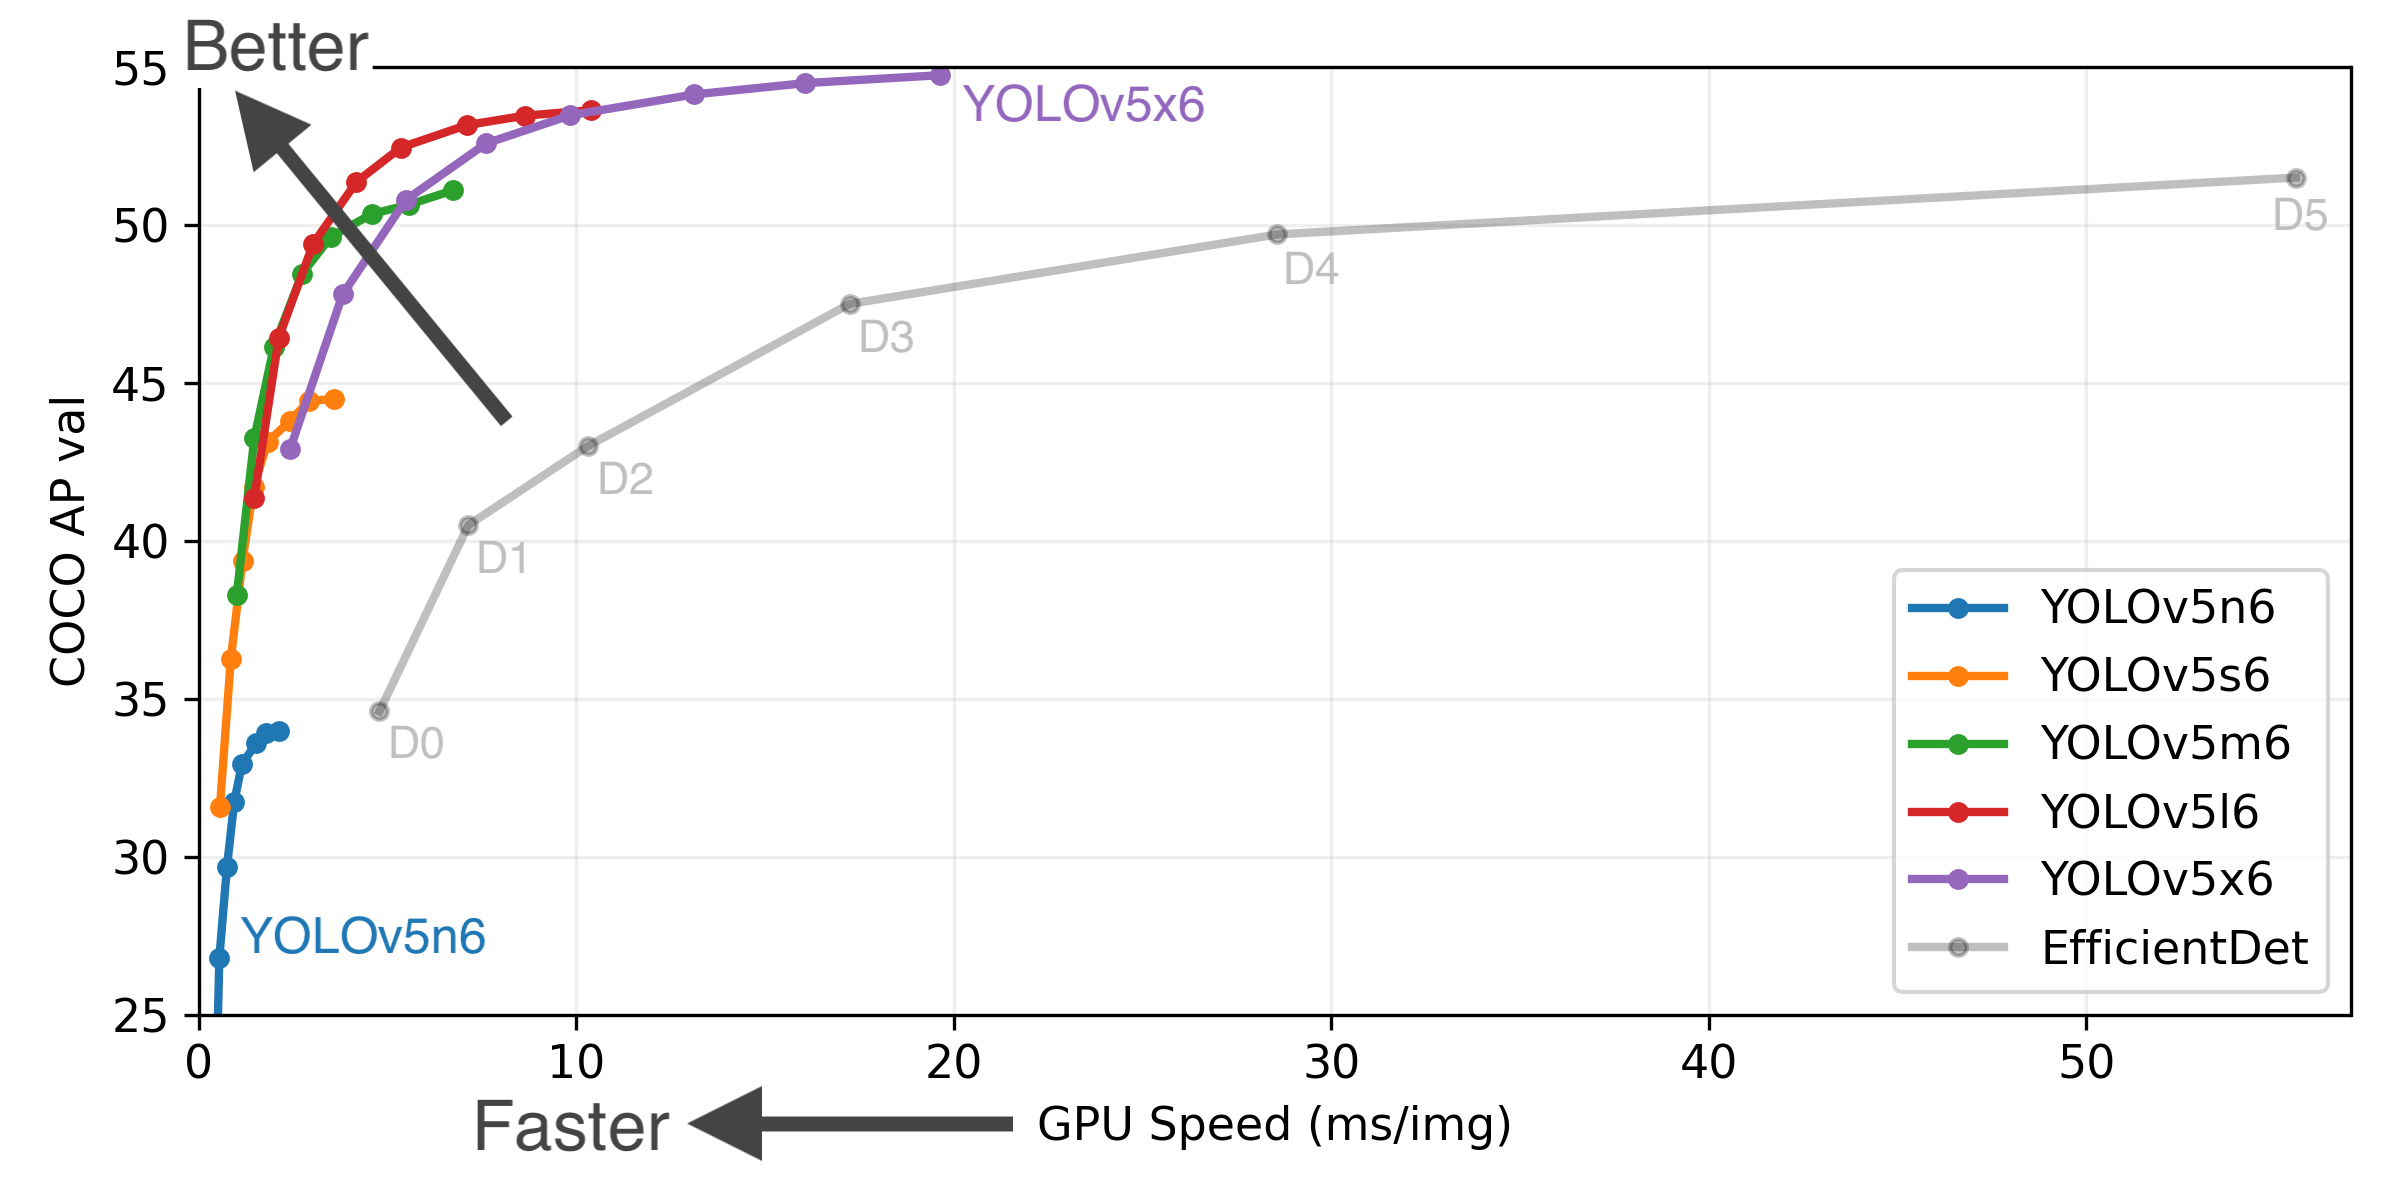
yolov5按从小到大分为五个模型yolov5n、yolov5s、yolov5m、yolov5l、yolov5x,这五个模型的表现见下图:

在这五个模型基础上增加P6层,模型结构更深,四个模型效果分别为:

2. yolov5版本:

注意:yolov5更新很快,永远建议使用最新版本代码,我不能及时更新的话请去官方repo下更新。


依赖

Python版本需要 ≥ 3.6.0,使用GPU的话要有CUDA环境。其他依赖都写在了requirements.txt 里面。一键安装依赖的话,打开命令行,cd到yolov5的文件夹里,输入:

$ pip install -r requirements.txt

有安装多个版本python的,记得在命令行里把开头的pip替换为pip3python也换为你的版本,如python3或者python3.8,下同。

pip安装慢的,请配置镜像源,下面是清华的镜像源。

$ pip install pip -U
$ pip config set global.index-url https://pypi.tuna.tsinghua.edu.cn/simple

想配其他镜像源直接把网址替换即可,以下是国内常用的镜像源:

豆瓣 https://pypi.doubanio.com/simple/
网易 https://mirrors.163.com/pypi/simple/
阿里云 https://mirrors.aliyun.com/pypi/simple/
腾讯云 https://mirrors.cloud.tencent.com/pypi/simple
清华大学 https://pypi.tuna.tsinghua.edu.cn/simple/
注意事项
  1. Windows版在检测(detect.py)时可能有问题,请尽量在Linux或者MacOS使用本工程。如果你是CUDA11,且检测不出框,则降级到CUDA10.2,然后重装Pytorch1.8.1+cu102试试。
  2. 不想自己配环境的可以用colab或者docker,下面是几个免费环境:

训练

1. 简单复现训练

直接执行下面命令。根据你的显卡情况,使用最大的 --batch-size ,(下列命令中的batch size是16G显存的显卡推荐值)。其中,--cfg为指定模型结构,--weights为指定初始化模型权重。

$ python train.py --data coco.yaml --cfg yolov5s.yaml --weights '' --batch-size 64
                                         yolov5m.yaml                           40
                                         yolov5l.yaml                       	24
                                         yolov5x.yaml                       	16

2. 自定义训练

使用自己的训练集进行自定义训练,详情点击展开:

① 准备标签

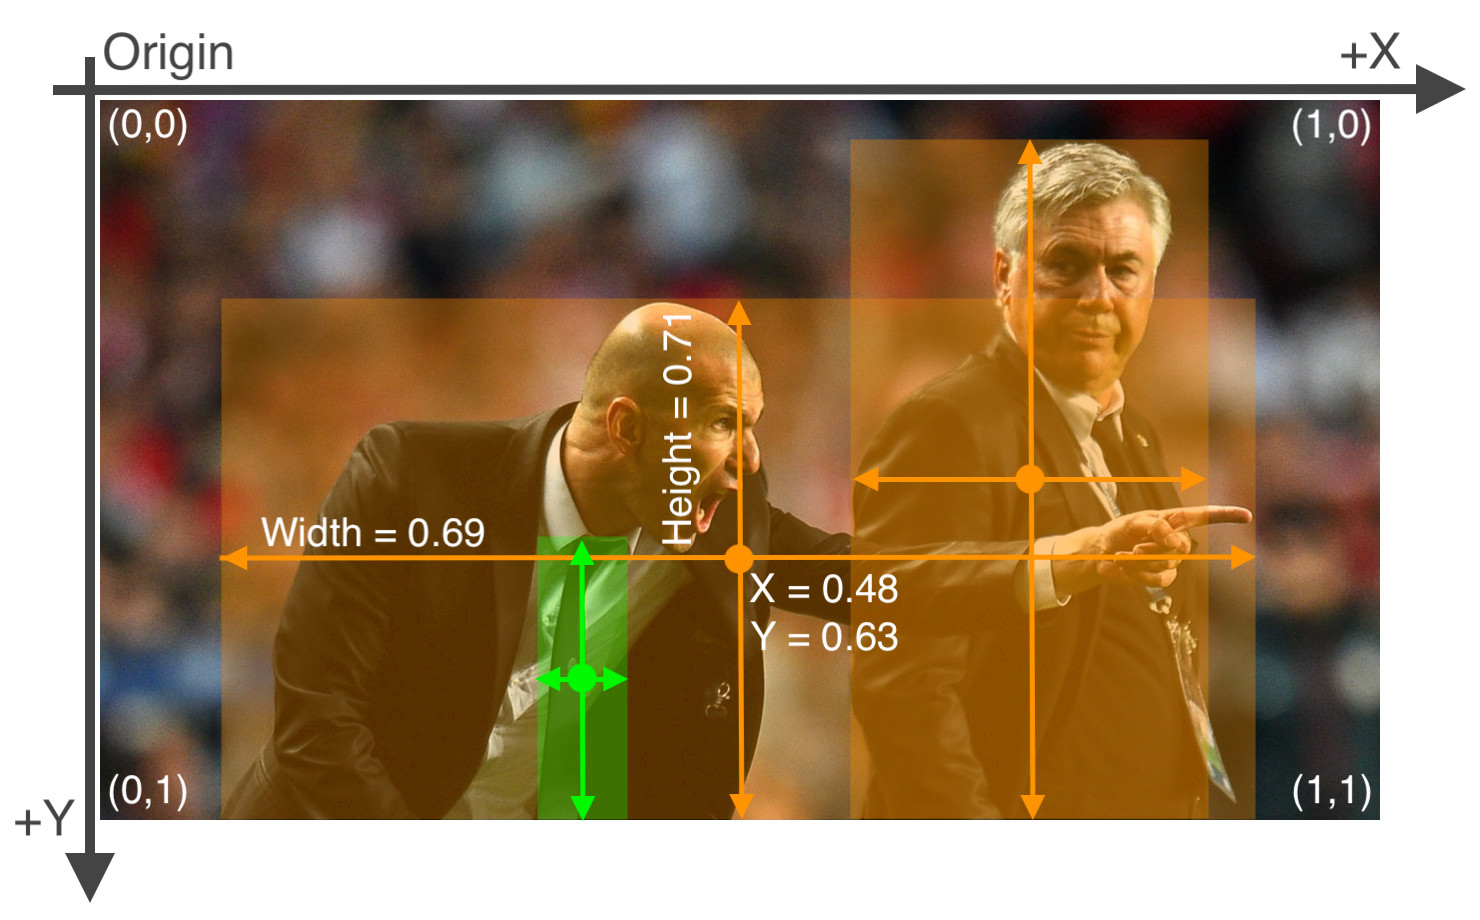
yolo格式的标签为txt格式的文件,文件名跟对应的图片名一样,除了后缀改为了.txt。 具体格式如下:

  • 每个目标一行,整个图片没有目标的话不需要有txt文件,或者空文件。
  • 每行的格式为class_num x_center y_center width height
  • 其中class_num取值为0total_class - 1,框的四个值x_center y_center width height是相对于图片分辨率大小正则化的0-1之间的数,左上角为(0,0),右下角为(1,1)
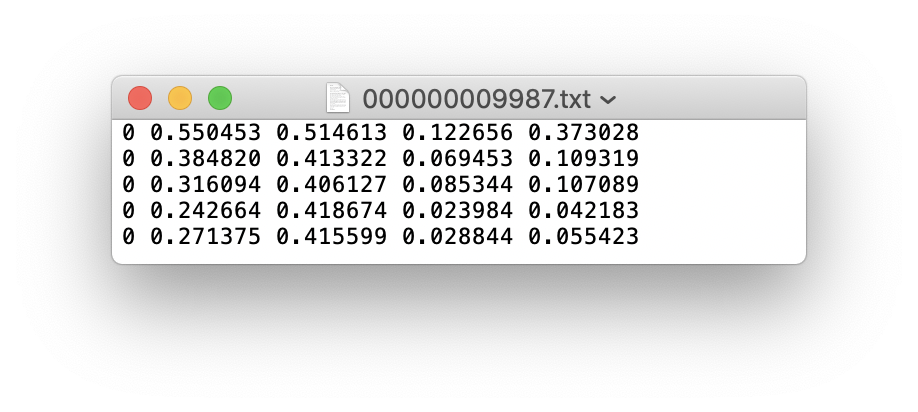
最终的标签文件应该是这样的:
② 数据存放规范

数据读取有三种形式,但是还是推荐下面这个存储方式。因为yolov5只需要给图片路径即可,代码会根据图片找标签,具体形式的把图片路径/images/*.jpg替换为/labels/*.txt,所以要新建两个文件夹,一个名为images存放图片,一个名为labels存放标签txt文件,如分训练集、验证集和测试集的话,还要再新建各自的文件夹,如图:

③ 准备yaml文件

自定义训练需要修改.yaml文件,一个是模型文件(可选),一个是数据文件。

  • 模型文件(可选):可以根据你选择训练的模型,根据需要修改./models里的yolov5s.yaml / yolov5m.yaml / yolov5l.yaml / yolov5x.yaml文件,
    注意 :当需要随机初始化或者修改模型结构时才会使用本文件,如未修改模型结构,推荐使用预训练权重初始化,
    python3 train.py --weights yolov5s.pt,
    而不是python3 train.py --weights '' --cfg yolov5s.yaml
  • 数据文件:根据./data文件夹里的coco数据文件,制作自己的数据文件,在数据文件中定义训练集、验证集、测试集路径;定义总类别数;定义类别名称
    # train and val data as 1) directory: path/images/, 2) file: path/images.txt, or 3) list: [path1/images/, path2/images/]
    train: ../coco128/images/train2017/
    val: ../coco128/images/val2017/
    test:../coco128/images/test2017/
    
    # number of classes
    nc: 80
    
    # class names
    names: ['person', 'bicycle', 'car', 'motorcycle', 'airplane', 'bus', 'train', 'truck', 'boat', 'traffic light',
            'fire hydrant', 'stop sign', 'parking meter', 'bench', 'bird', 'cat', 'dog', 'horse', 'sheep', 'cow',
            'elephant', 'bear', 'zebra', 'giraffe', 'backpack', 'umbrella', 'handbag', 'tie', 'suitcase', 'frisbee',
            'skis', 'snowboard', 'sports ball', 'kite', 'baseball bat', 'baseball glove', 'skateboard', 'surfboard',
            'tennis racket', 'bottle', 'wine glass', 'cup', 'fork', 'knife', 'spoon', 'bowl', 'banana', 'apple',
            'sandwich', 'orange', 'broccoli', 'carrot', 'hot dog', 'pizza', 'donut', 'cake', 'chair', 'couch',
            'potted plant', 'bed', 'dining table', 'toilet', 'tv', 'laptop', 'mouse', 'remote', 'keyboard', 
            'cell phone', 'microwave', 'oven', 'toaster', 'sink', 'refrigerator', 'book', 'clock', 'vase', 'scissors', 
            'teddy bear', 'hair drier', 'toothbrush']
④ 进行训练

训练直接运行train.py即可,后面根据需要加上指令参数,--weights指定权重,--data指定数据文件,--batch-size指定batch大小,--epochs指定epoch。一个简单的训练语句:

# 使用yolov5s模型训练coco128数据集5个epochs,batch size设为16
$ python train.py --batch 16 --epochs 5 --data ./data/coco128.yaml --weights ./weights/yolov5s.pt

3. 训练指令说明

各个训练指令的详细说明,新手的话只需要关注这几个加⭐的指令,点击展开:

有参指令(后面要加相应参数)
  • --weights (⭐)指定模型权重,如果不加此参数会默认使用COCO预训的yolov5s.pt作为初始化权重,--weights ''则会随机初始化权重
  • --cfg 指定模型文件,当使用--weights ''时,需用此命令指定模型文件。
  • --data (⭐)指定数据文件
  • --hyp指定超参数文件
  • --epochs (⭐)指定epoch数,默认300
  • --batch-size --batch (⭐)指定batch大小,默认16,传-1的话就是autobatch
  • --img-size --img --imgsz(⭐)指定训练图片大小,默认640
  • --cache 缓存到ram或者disk以加速训练
  • --device (⭐)指定训练设备,如--device 0,1,2,3
  • --local_rank 分布式训练参数,不要自己修改!
  • --workers 指定dataloader的workers数量,默认8
  • --project 训练结果存放目录,默认./runs/train/
  • --name 训练结果存放名,默认exp
  • --label-smoothing 标签平滑处理,默认0.0
  • --bbox_interval 设置W&B的标签图片显示间隔?没用过
  • --save_period 设置多少个epoch保存一次模型
  • --artifact_alias W&B用哪个版本的数据集
  • --freeze 冻结模型层数,默认0不冻结,冻结主干网就传10,冻结所有就传24
  • --patience 多少个epoch没有提升就终止训练,默认100
无参指令
  • --rect矩形训练
  • --resume 继续训练,默认从最后一次训练继续
  • --nosave 训练中途不存储模型,只存最后一个checkpoint
  • --noval 训练中途不在验证集上测试,训练完毕再测试
  • --noautoanchor 关闭自动锚点检测
  • --evolve 超参数演变
  • --bucket使用谷歌gsutil bucket
  • --image-weights 训练中对图片加权重
  • --multi-scale 训练图片大小+/-50%变换
  • --single-cls 单类训练
  • --adam 使用torch.optim.Adam()优化器
  • --sync-bn 使用SyncBatchNorm,只在分布式训练可用
  • --entity W&B的参数,不懂
  • --exist-ok 如训练结果存放路径重名,不覆盖已存在的文件夹
  • --quad 使用四合一dataloader,详见原作者说明
  • --linear-lr 线性学习率
  • --upload_dataset 上传数据集至W&B

检测

推理支持多种模式,图片、视频、文件夹、rtsp视频流和流媒体都支持。

1. 简单检测命令

直接执行detect.py,指定一下要推理的目录即可,如果没有指定权重,会自动下载默认COCO预训练权重模型。手动下载:v6.0权重阿里云盘下载地址 (将后缀改为zip解压即可)。 推理结果默认会保存到 ./runs/detect中。

# 快速推理,--source 指定检测源,以下任意一种类型都支持:
$ python detect.py --source 0  # 本机默认摄像头
                            image.jpg  # 图片 
                            video.mp4  # 视频
                            path/  # 文件夹下所有媒体
                            path/*.jpg # 使用glob模块匹配文件
                            screen # 检测本机屏幕
                            rtsp://170.93.143.139/rtplive/470011e600ef003a004ee33696235daa  # rtsp视频流
                            http://112.50.243.8/PLTV/88888888/224/3221225900/1.m3u8  # http视频流

2. 自定义检测

使用权重./weights/yolov5s.pt去推理./data/images文件夹下的所有媒体,并且推理置信度阈值设为0.5:

$ python detect.py --source ./data/images/ --weights ./weights/yolov5s.pt --conf 0.5

3. 检测指令说明

自己根据需要加各种指令,新手只需关注带⭐的指令即可。

有参
  • --source (⭐)指定检测来源,详见上面的介绍
  • --weights (⭐)指定权重,不指定的话会使用yolov5s.pt预训练权重
  • --img-size --imgsz --img (⭐)指定推理图片分辨率,默认640,三个指令一样
  • --conf-thres (⭐)指定置信度阈值,默认0.4,也可使用--conf
  • --iou-thres 指定NMS(非极大值抑制)的IOU阈值,默认0.5
  • --max-det 每张图最多检测多少目标
  • --device 指定设备,如--device 0 --device 0,1,2,3 --device cpu
  • --classes 只检测特定的类,如--classes 0 2 4 6 8
  • --project 指定结果存放路径,默认./runs/detect/
  • --name 指定结果存放名,默认exp
  • --line-thickness 画图时线条宽度
无参
  • --view-img 图片形式显示结果
  • --save-txt 输出标签结果(yolo格式)
  • --save-conf 在输出标签结果txt中同样写入每个目标的置信度
  • --save-crop 从图片\视频上把检测到的目标抠出来保存
  • --nosave 不保存图片/视频
  • --agnostic-nms 使用agnostic NMS(前背景)
  • --augment 增强识别,速度会慢不少。详情
  • --visualize 特征可视化
  • --update 更新所有模型
  • --exist-ok 若重名不覆盖
  • --hide-labels 隐藏标签
  • --hide-conf 隐藏置信度
  • --half 半精度检测(FP16)
  • --dnn 在onnx推理中使用OpenCV DNN

测试

1. 测试命令

首先明确,推理是直接检测图片,而测试是需要图片有相应的真实标签的,相当于检测图片后再把推理标签和真实标签做mAP计算。
例如使用./weights/yolov5x.pt权重检测./data/coco.yaml里定义的测试集,图片分辨率设为672。

$ python val.py --weights ./weights/yolov5x.pt --data ./data/coco.yaml --img 672

2. 各指令说明

有参
  • --weights (⭐)测试所用权重,默认yolov5sCOCO预训练权重模型
  • --data (⭐)测试所用的.yaml文件,默认使用./data/coco128.yaml
  • --batch-size 测试用的batch大小,默认32,这个大小对结果无影响
  • --img-size --imgsz --img 测试集分辨率大小,默认640,测试建议使用训练分辨率
  • --conf-thres目标置信度阈值,默认0.001
  • --iou-thresNMS的IOU阈值,默认0.65
  • --task 指定任务模式,train, val, test, speed或者study
  • --device 指定设备,如--device 0 --device 0,1,2,3 --device cpu
  • --project 指定结果存放路径,默认./runs/test/
  • --name 指定结果存放名,默认exp
无参
  • --single-cls 所有类别视为一类
  • --augment 增强识别
  • --verbose 输出各个类别的mAP
  • --save-txt 输出标签结果(yolo格式)
  • --save-hybrid 输出标签+预测混合结果到txt
  • --save-conf 保存置信度至输出文件中
  • --save-json 保存结果为json
  • --exist-ok 若重名不覆盖
  • --half 半精度检测(FP16)

TODO

  • 翻译官方Tutorial的各个教程
  • 建一个交流群

联系方式

如有疑问可在本repo的Issues里提,我看到会及时回复。

如有代码bug请去yolov5官方Issues下提。

个人联系方式:[email protected]


LICENSE

遵循yolov5官方LICENSE
本README所有内容禁止除fork外的任何形式的转载

yolov5's People

Contributors

alexstoken avatar anon-artist avatar ayushexel avatar borda avatar cristifati avatar d57montes avatar democat3457 avatar dependabot[bot] avatar developer0hye avatar glenn-jocher avatar imyhxy avatar jebastin-nadar avatar kalenmike avatar laughing-q avatar lorenzomammana avatar lornatang avatar nanocode012 avatar paulguerrie avatar pre-commit-ci[bot] avatar skalskip avatar taoxiesz avatar thepycoder avatar tkianai avatar unglvkitde avatar wudashuo avatar xylieong avatar yxnong avatar zengyf-cver avatar zhiqwang avatar zldrobit avatar

Stargazers

 avatar  avatar  avatar  avatar  avatar  avatar  avatar  avatar  avatar  avatar  avatar  avatar  avatar  avatar  avatar  avatar  avatar  avatar  avatar  avatar  avatar  avatar  avatar  avatar  avatar  avatar  avatar  avatar  avatar  avatar  avatar  avatar  avatar  avatar  avatar  avatar  avatar  avatar  avatar  avatar  avatar  avatar  avatar  avatar  avatar  avatar  avatar  avatar  avatar  avatar  avatar  avatar  avatar  avatar  avatar  avatar  avatar  avatar  avatar  avatar  avatar  avatar  avatar  avatar  avatar  avatar  avatar  avatar  avatar  avatar  avatar  avatar  avatar  avatar  avatar  avatar  avatar  avatar  avatar  avatar  avatar  avatar  avatar  avatar  avatar  avatar  avatar  avatar  avatar  avatar  avatar  avatar  avatar  avatar  avatar  avatar  avatar  avatar  avatar  avatar

Watchers

 avatar  avatar  avatar  avatar  avatar  avatar  avatar

yolov5's Issues

About the enhancement traick mosaic_9?

Search before asking

Question

YOLO v5的mosaic-9启用问题:需要设置哪些参数,如何启用Mosaic-9?
I would like to know that how to set the config for mosiac-9 and how to activate it ?
thanks a lot !

Additional

No response

训练时间

Search before asking

Question

使用yolov5s,3090显卡,batch=64,epoch=300,单卡和8卡大家训练时间分别多少?我8卡怎么要25小时,这个正常吗?

Additional

No response

多摄像头的场景

❔Question

想问下yolov单机最多能支持多少路实时rtsp摄像头的处理,需要什么硬件支撑。

Additional context

val.py 跟 train.py 的 P R map 等结果不一样

❔Question

我修改了一下网络,train.py训练出来的P R map这些结果挺正常的,但是我用训练出来的权重跑 val.py 的时候P R map就全部都是0,这是怎么回事?

Additional context

語意分割能否存成json?

你好
yolo 6.2 and 7.0版本皆有支援語意分割功能
不曉得能否再predict.py,除了save-txt功能外,多加一個save-json
方便我們直接在labelme軟體編輯
謝謝

报错batch-size 64 not multiple of GPU count 9 & 在设置GPU后, 训练代码会占用所有的GPU

当我训练时,会报以下错误:
Traceback (most recent call last): File "/home/code/yolov5-master/train.py", line 522, in <module> device = select_device(opt.device, batch_size=opt.batch_size) File "/home/code/yolov5-master/utils/torch_utils.py", line 78, in select_device assert batch_size % n == 0, f'batch-size {batch_size} not multiple of GPU count {n}' AssertionError: batch-size 64 not multiple of GPU count 9

为此我注释掉 untils/torch_utils.py文件中的以下两行:
if n > 1 and batch_size: # check that batch_size is compatible with device_count assert batch_size % n == 0, f'batch-size {batch_size} not multiple of GPU count {n}'

当我再运行时,将device设置为1,但最终会占用所有的gpu(linux系统**有9个gpu,会被全部占用)

我的安装包如下所示:
_libgcc_mutex 0.1 main https://mirrors.tuna.tsinghua.edu.cn/anaconda/pkgs/main
ca-certificates 2021.1.19 h06a4308_1 https://mirrors.tuna.tsinghua.edu.cn/anaconda/pkgs/main
certifi 2020.12.5 py38h06a4308_0 https://mirrors.tuna.tsinghua.edu.cn/anaconda/pkgs/main
cudatoolkit 10.1.243 h6bb024c_0
ld_impl_linux-64 2.33.1 h53a641e_7 https://mirrors.tuna.tsinghua.edu.cn/anaconda/pkgs/main
libffi 3.3 he6710b0_2 https://mirrors.tuna.tsinghua.edu.cn/anaconda/pkgs/main
libgcc-ng 9.1.0 hdf63c60_0 https://mirrors.tuna.tsinghua.edu.cn/anaconda/pkgs/main
libstdcxx-ng 9.1.0 hdf63c60_0 https://mirrors.tuna.tsinghua.edu.cn/anaconda/pkgs/main
ncurses 6.2 he6710b0_1 https://mirrors.tuna.tsinghua.edu.cn/anaconda/pkgs/main
numpy 1.20.2
openssl 1.1.1k h27cfd23_0 https://mirrors.tuna.tsinghua.edu.cn/anaconda/pkgs/main
Pillow 8.2.0
pip 21.0.1 py38h06a4308_0 https://mirrors.tuna.tsinghua.edu.cn/anaconda/pkgs/main
python 3.8.8 hdb3f193_4 https://mirrors.tuna.tsinghua.edu.cn/anaconda/pkgs/main
readline 8.1 h27cfd23_0 https://mirrors.tuna.tsinghua.edu.cn/anaconda/pkgs/main
setuptools 52.0.0 py38h06a4308_0 https://mirrors.tuna.tsinghua.edu.cn/anaconda/pkgs/main
sqlite 3.35.4 hdfb4753_0 https://mirrors.tuna.tsinghua.edu.cn/anaconda/pkgs/main
tk 8.6.10 hbc83047_0 https://mirrors.tuna.tsinghua.edu.cn/anaconda/pkgs/main
torch 1.7.1+cu101
torchvision 0.8.2
typing-extensions 3.7.4.3
wheel 0.36.2 pyhd3eb1b0_0 https://mirrors.tuna.tsinghua.edu.cn/anaconda/pkgs/main
xz 5.2.5 h7b6447c_0 https://mirrors.tuna.tsinghua.edu.cn/anaconda/pkgs/main
zlib 1.2.11 h7b6447c_3 https://mirrors.tuna.tsinghua.edu.cn/anaconda/pkgs/main

absl-py 0.12.0
cachetools 4.2.1
certifi 2020.12.5
chardet 4.0.0
cycler 0.10.0
Cython 0.29.22
google-auth 1.28.1
google-auth-oauthlib 0.4.4
greenlet 1.0.0
grpcio 1.37.0
idna 2.10
kiwisolver 1.3.1
Markdown 3.3.4
matplotlib 3.3.4
mkl-fft 1.3.0
mkl-random 1.1.1
mkl-service 2.3.0
numpy 1.20.2
oauthlib 3.1.0
olefile 0.46
opencv-python 4.5.1.48
pandas 1.2.3
Pillow 8.2.0
pip 21.0.1
protobuf 3.15.8
pyasn1 0.4.8
pyasn1-modules 0.2.8
pycairo 1.19.1
pycocotools 2.0.2
pyparsing 2.4.7
python-dateutil 2.8.1
pytz 2021.1
PyYAML 5.4.1
reportlab 3.5.66
requests 2.25.1
requests-oauthlib 1.3.0
rsa 4.7.2
scipy 1.6.2
seaborn 0.11.1
setuptools 52.0.0.post20210125
six 1.15.0
SQLAlchemy 1.4.5
tensorboard 2.4.1
tensorboard-plugin-wit 1.8.0
thop 0.0.31.post2005241907
torch 1.7.1+cu101
torchvision 0.8.2
tornado 6.1
tqdm 4.60.0
typing-extensions 3.7.4.3
urllib3 1.26.4
Werkzeug 1.0.1
wheel 0.36.2

训练出的模型效果不佳

❔Question

我下载的caltech数据集12万张,只检测行人一个类的,然后跑了50个epoch后得到的模型检测时效果不好,想问下我该如何进一步优化呢,是在这个模型的基础上继续加大epoch训练吗还是怎么做呢?求大佬指点一波

Additional context

融合BN层

❔Question请问融合BN层的功能怎么使用呢?在哪里添加?

Additional context

分类种类太多该怎么调优?

❔Question

运行的时,有500多种分类,批次大小32,然后就报GPU内存不足。后面就把种类调到85,批次大小调成16就没报错了,请问这个怎么调参呢?

Additional context

  • CentOS 7.6.1810
  • 显存 16G
  • Python 3.8.3
  • PyTorch 1.7.1
  • CUDA 10.1

使用detect.py 和 hub 推理。

E:\anaconda3\envs\pytorch\python.exe C:/yolov5-master/detect.py
detect: weights=C:/Users/10980/PycharmProjects/best.pt, source=runs/detect/exp25/zidane.jpg, imgsz=[640, 640], conf_thres=0.25, iou_thres=0.45, max_det=1000, device=0, view_img=True, save_txt=False, save_conf=False, save_crop=False, nosave=False, classes=None, agnostic_nms=False, augment=False, visualize=False, update=False, project=runs/detect, name=exp, exist_ok=False, line_thickness=3, hide_labels=False, hide_conf=False, half=False
YOLOv5 2021-9-21 torch 1.9.1 CUDA:0 (NVIDIA GeForce RTX 2080 Ti, 11264.0MB)

Fusing layers...
Model Summary: 224 layers, 7056607 parameters, 0 gradients, 16.3 GFLOPs
image 1/1 C:\yolov5-master\runs\detect\exp25\zidane.jpg: 384x640 2 person_heads, 2 person_vboxs, Done. (0.016s)
Speed: 0.0ms pre-process, 15.6ms inference, 0.0ms NMS per image at shape (1, 3, 640, 640)
Results saved to runs\detect\exp26
#############################################

E:\anaconda3\envs\pytorch\python.exe C:/Users/10980/PycharmProjects/msstestcapture.py
Using cache found in C:\Users\10980/.cache\torch\hub\ultralytics_yolov5_master
YOLOv5 2021-9-24 torch 1.9.1 CUDA:0 (NVIDIA GeForce RTX 2080 Ti, 11264.0MB)

Fusing layers...
Model Summary: 224 layers, 7266973 parameters, 0 gradients
Adding AutoShape...
image 1/1: 720x1280 2 persons, 2 ties
Speed: 15.6ms pre-process, 15.6ms inference, 0.0ms NMS per image at shape (1, 3, 384, 640)

Process finished with exit code 0

Run detect.py 为什么速度更快?同一张图片。看时间是跳过了pre-process.
Speed: 0.0ms pre-process, 15.6ms inference, 0.0ms NMS per image at shape (1, 3, 640, 640)
但是为什么hub 不是这样呢? 或者怎么提升这个速度呢?
谢谢!

# Model
# model = torch.hub.load('ultralytics/yolov5', 'yolov5s')  # or yolov5m, yolov5l, yolov5x, custom

# Images
img = 'C:/yolov5-master/GettyImages-688402807_header-1024x575.jpg'  # or file, Path, PIL, OpenCV, numpy, list

# Inference
results = model(img)
# results.save()
# Results
results.print()  # or .show(), .save(), .crop(), .pandas(), etc.

E:\anaconda3\envs\pytorch\python.exe C:/Users/10980/PycharmProjects/msstestcapture.py
Using cache found in C:\Users\10980/.cache\torch\hub\ultralytics_yolov5_master
YOLOv5 2021-9-24 torch 1.9.1 CUDA:0 (NVIDIA GeForce RTX 2080 Ti, 11264.0MB)

Fusing layers...
Model Summary: 224 layers, 7266973 parameters, 0 gradients
Adding AutoShape...
image 1/1: 720x1280 2 persons, 2 ties
Speed: 15.6ms pre-process, 15.6ms inference, 0.0ms NMS per image at shape (1, 3, 384, 640)

模型改进

❔Question

想请问一下,修改模型是在哪里修改呢?

Additional context

Recommend Projects

  • React photo React

    A declarative, efficient, and flexible JavaScript library for building user interfaces.

  • Vue.js photo Vue.js

    🖖 Vue.js is a progressive, incrementally-adoptable JavaScript framework for building UI on the web.

  • Typescript photo Typescript

    TypeScript is a superset of JavaScript that compiles to clean JavaScript output.

  • TensorFlow photo TensorFlow

    An Open Source Machine Learning Framework for Everyone

  • Django photo Django

    The Web framework for perfectionists with deadlines.

  • D3 photo D3

    Bring data to life with SVG, Canvas and HTML. 📊📈🎉

Recommend Topics

  • javascript

    JavaScript (JS) is a lightweight interpreted programming language with first-class functions.

  • web

    Some thing interesting about web. New door for the world.

  • server

    A server is a program made to process requests and deliver data to clients.

  • Machine learning

    Machine learning is a way of modeling and interpreting data that allows a piece of software to respond intelligently.

  • Game

    Some thing interesting about game, make everyone happy.

Recommend Org

  • Facebook photo Facebook

    We are working to build community through open source technology. NB: members must have two-factor auth.

  • Microsoft photo Microsoft

    Open source projects and samples from Microsoft.

  • Google photo Google

    Google ❤️ Open Source for everyone.

  • D3 photo D3

    Data-Driven Documents codes.