Code Monkey home page Code Monkey logo

colorful-colorization's Introduction

Colorful Image Colorization PyTorch

This is a from-scratch PyTorch implementation of "Colorful Image Colorization" [1] by Zhang et al. created for the Deep Learning in Data Science course at KTH Stockholm.

The following sections describe in detail:

  • how to install the dependencies necessary to get started with this project
  • how to colorize grayscale images using pretrained network weights
  • how to train the network on a new dataset
  • how to run colorization programatically

Prerequisites

We recommend you use Anaconda to create a virtual enviroment in which to install the modules needed to run this program, i.e you should run:

conda env create --file environment.yml

There are some extra dependencies needed to run some of the scripts but you should install those manually when it becomes necessary as you may not need them.

In addition, you will need some files provided by R. Zhang, these include the points of the ab gamut bins used to discretize the image labels and pretrained Caffe models. Run resources/get_resources.sh to download these automatically. If you skip this step you will not be able to run the network at all, even if you provide your own weight initialization or want to train from scratch.

You might also notice another shell script, data/get_cval.sh, that downloads several additional resources. However, this is mainly a remnant of the developement process and you can safely ignore it.

In order to use the pretrained weights for prediction, you will have to convert them from Caffe to PyTorch. We provide the convenience script scripts/convert_weights for exactly this purpose. In order to use it you will have to install the caffe Python module (if you want to convert one of the Caffe models provided by R. Zhang)

For example, in order to convert the Caffe model trained with class rebalancing downloaded by resources/get_resources.sh, you can call the script like this:

./scripts/convert_weights vgg PYTORCH_WEIGHTS.tar \
	--weights resources/colorization_release_v2.caffemodel \
	--proto resources/colorization_deploy_v2.prototxt

Which will save the converted PyTorch weights to PYTORCH_WEIGHTS.tar.

Colorize Images with Pretrained Weights

The easiest way to colorize several grayscale images of arbitrary size is to place them in the same directory and colorize them in batch mode using scripts/convert_images. For example, if you have placed the images in directory dir1 and subsequently run:

./scripts/convert_images predict_color \
    --input-dir dir1 \
    --output-dir dir2 \
    --model-checkpoint PYTORCH_WEIGHTS.tar \
    --gpu \
    --verbose

The script will colorize all images in dir1 on the GPU and place the results in dir2 (with the same filenames). You can choose an annealed mean temperature parameter other then the default 0.38 with --annealed-mean-T. .

Train the Network

Prepare a Dataset

If you intend to train the network on your own dataset, you might want to use the convenience scripts scripts/prepare_dataset to convert it into a form suitable for training. For example, if all your images are stored in a directory tree similar to this one:

dir1/
├── subdir1
│   ├── img1.JPEG
│   ├── img2.JPEG
│   └── ...
├── subdir2
│   ├── img1.JPEG
│   ├── img2.JPEG
│   └── ...
└── ...

you may want to run:

./scripts/prepare_dataset dir1 \
    --flatten \
    --purge \
    --clean \
    --file-ext JPEG \
    --val-split 0.2 \
    --test-split 0.1 \
    --resize-height 256 \
    --resize-width 256 \
    --verbose

The script will first recursively look for images files with the extension .JPEG in dir1 and remove all other files and those images that cannot be read or converted to RGB. It will then resize all remaining images to 256x256 and randomly place them in the newly created subdirectories train, val and test using a 70/20/10 split.

Note that this will take a while for large datasets since every single image has to be read into memory. If your images already have the desired size (this does not necessarily have to be 256x256, the network is fully convolutional and can train on images of arbitrary size) and you are sure that none of them are corrupted, you don't have to use the --resize-height/--resize-width and --clean arguments which will speed up the process considerably.

Run the Training

To train the network on your dataset you can use the script scripts/run_training. The script accepts command line arguments that control e.g. the duration of the training and where/how often logfiles and model checkpoints are written. More specific settings like dataloader configuration, network type and optimizer settings need to be specified via a configuration file which is essentially a nested directory of Python objects converted to JSON. Most likely you will want to use config/default.json and provide specific settings or override some defaults in a separate JSON file. See config/vgg.json for an example.

Once you have decided on a configuration file you can run the script as follows:

./scripts/run_training \
    --config YOUR_CONFIG.json \
    --default-config config/default.json \
    --data-dir dir1 \
    --checkpoint-dir YOUR_CHECKPOINT_DIR \
    --log-file YOUR_LOG_FILE.txt \
    --iterations ITERATIONS \
    --iterations-till-checkpoint ITERATIONS_TILL_CHECKPOINT \
    --init-model-checkpoint INIT_MODEL-CHECKPOINT.tar

This will recursively merge the configurations in YOUR_CONFIG.json and config/default.json and then train on the the images in dir1 for ITERATIONS iterations (batches). Every ITERATIONS_TILL_CHECKPOINT iterations, an intermediate model checkpoint will be written to YOUR_CHECKPOINT_DIR. Specifying --init-model-checkpoint is optional but useful if you want to finetune the network from some pretrained set of weights.

You can also continue training from an arbitrary training checkpoint using the --continue-training flag which will load network weights and optimizer state from INIT_MODEL_CHECKPOINT.tar (which has to be a checkpoint created by a previous run of scripts/run_training) and pick the training up from the last training iteration (thus ITERATIONS still specifies the total number of training iterations).

Colorize Images Programmatically

Colorizing images programmatically using our implementation is very simple. You first need to instantiate the network itself:

from colorization import ColorizationNetwork

network = ColorizationNetwork(annealed_mean_T=0.38, device='gpu')

The parameters should be self explanatory (and are in this case optional), use device='cpu' if you plan to run the network on the CPU.

You will then need to wrap the network in an instance of ColorizationModel which implements (among other things) checkpoint saving/loading:

from colorization import ColorizationModel

model = ColorizationModel(network)
model.load_checkpoint('YOUR_CHECKPOINT_DIR/checkpoint_final.tar')

In order to colorize a grayscale image you should then:

  • load it into a numpy array
  • resize a copy of it to 224x224 (this is not strictly necessary but produces better results)
  • convert it to a torch tensor
  • pass it through the model
  • reassemble the result

All of this is already implemented in a convenience function:

from colorization predict_color
from skimage.io import imread

img = imread('YOUR_IMAGE.jpg')
img_colorized = predict_color(model, img)

References

[1] Colorful Image Colorization, Zhang, Richard and Isola, Phillip and Efros, Alexei A, in ECCV 2016 (website)

colorful-colorization's People

Contributors

time0o avatar

Stargazers

 avatar  avatar  avatar  avatar  avatar  avatar  avatar  avatar  avatar  avatar  avatar  avatar  avatar  avatar  avatar  avatar  avatar  avatar  avatar  avatar  avatar  avatar  avatar  avatar  avatar  avatar  avatar  avatar  avatar  avatar  avatar  avatar  avatar  avatar  avatar  avatar  avatar  avatar  avatar  avatar  avatar  avatar  avatar  avatar  avatar  avatar  avatar  avatar  avatar  avatar  avatar

Watchers

 avatar  avatar

colorful-colorization's Issues

Separate network and model

Details open to discussion, model should contain network, take an optimizer as parameter and implement training, logging, evaluation and saving/restoring.

the loss is too large

I train the model from scratch and use the default parameters,but the loss remains too large(1e4) after 40000 iters.

training issues

Hi,
I want to can continue training on a pretrained model provided in the resources, is that possible?
I used the run_training script with all of the flags and gave my 'PYTORCH_WEIGHTS.tar' which was converted using convert_weights script.
I am getting the following error:

line 298, in load_checkpoint
 self.optimizer.load_state_dict(state['optimizer'])
AttributeError: 'NoneType' object has no attribute 'load_state_dict'

I also tried to train from scratch but I get this error:

line 198, in train
    self.optimizer.zero_grad()
AttributeError: 'NoneType' object has no attribute 'zero_grad'

Can you help me with these issues please?
Thank you so much.

Input ab channels of ground-truth image for recovering the ground-truth.

Thank you for sharing your code.
I have a question:
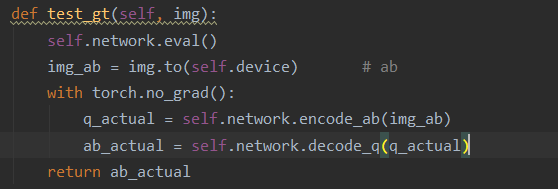
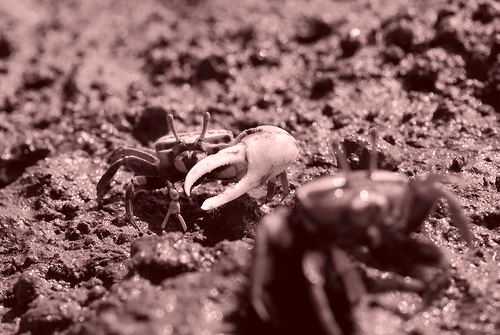
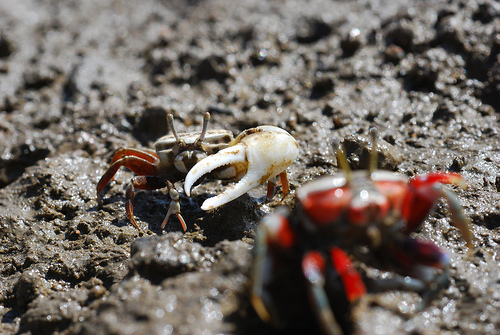
I observed that if I input the ab channels of the ground-truth image, and operate SoftEncodeAB and AnnealedMeanDecodeQ successively, then I get ab_actual and concat with the input L. But the result is totally different from the ground-truth image and not colorful. It seems wrong but I don't know why.

The code, the recovered image, and the ground-truth image are shown here.
Hope to hear from you, thanks!
image
recover_gt
gt

Start training

We could now try starting a couple training runs, I expect this might not work as well as we would like in the beginning.

These are the minimal steps I think are necessary to make this work:

  1. Choose a training set. I think a couple hundred or thousand imagenet images depicting the same class should do. I.e. you should:

    • choose a class and download the from the offiical imagenet page (I think you need to create an account there)
    • reserve some images for training
    • modify the configuration file so that training will not run on tiny-imagenet (use ImageFileOrDirectory and just dump all images into a directory)
    • before starting training, run evaluation on a couple images and check if the results look okay to confirm there are no problems
  2. Start training and record how long each iteration takes approximately, then adjust the total number of iterations so that training will take a couple of hours. Don't forget to adjust the checkpoint spacing so that maybe a dozen will be saved overall.

  3. Train with the following configurations (maybe just one a first):

    • with rebalancing, without model initialization (just start training)
    • with rebalancing, with model initialization (use --init-proto resources/...v2.prototxt and --init-model resources/init_v2.caffemodel),
    • without rebalancing (remove class_rebal_lambda from config), again with and without model initialization
  4. IMPORTANT : Figure out how to use the authors caffe code to train their model on the same dataset with exactly the same settings (don't use their PyTorch code and really check that the optimization parameters are the same). Save the resulting models somewhere and record the training set loss curves.

Implement run_benchmark.py

Up to discussion what we want to benchmark, benchmark.py already contains some benchmarking functions. The script should probably also work on the basis of a config file.

How can I replace the network with another network?

Thanks very much for sharing the pytorch code for this work! I have a question here: how can I replace the network to another network, like vgg 16? Please guide me which ".py" file I should modify to use my network, also other things I need to pay attention to.

Hope to hear form you, thanks!

Hi

Hi, thank You for your work.
Could You help me convert this models colorization_release_v2.caffemodel to NCNN model?
Thank You for advance

Facing the issue of pickled data when using the prepare_dataset script. Can anyone help me out

Traceback (most recent call last):
File "./scripts/prepare_dataset", line 13, in
from colorization.util.argparse import nice_help_formatter
File "/home/amq/work/acclivis/project_2/pytorch-colorful-colorization/scripts/../colorization/init.py", line 2, in
from .modules.colorization_network import ColorizationNetwork
File "/home/amq/work/acclivis/project_2/pytorch-colorful-colorization/scripts/../colorization/modules/colorization_network.py", line 5, in
from ..cielab import ABGamut, CIELAB, DEFAULT_CIELAB
File "/home/amq/work/acclivis/project_2/pytorch-colorful-colorization/scripts/../colorization/cielab.py", line 214, in
DEFAULT_CIELAB = CIELAB()
File "/home/amq/work/acclivis/project_2/pytorch-colorful-colorization/scripts/../colorization/cielab.py", line 39, in init
self.gamut = gamut if gamut is not None else ABGamut()
File "/home/amq/work/acclivis/project_2/pytorch-colorful-colorization/scripts/../colorization/cielab.py", line 18, in init
self.points = np.load(self.RESOURCE_POINTS).astype(self.DTYPE)
File "/home/amq/.local/lib/python3.6/site-packages/numpy/lib/npyio.py", line 457, in load
raise ValueError("Cannot load file containing pickled data "
ValueError: Cannot load file containing pickled data when allow_pickle=False

How can I calculate q-prior on my dataset?

Thanks very much for sharing the code for this work!

I have a question here:

I'd like to calculate q-prior on my dataset instead of image-net.
So, I obtained empirical distribution using plot_empirical_distribution first.
But I'm not sure how to quantize this ab_acc_log value to get my q-prior.npy file.
Could you briefly explain how to do this?

Hope to hear from you, thanks!

about rebalance loss

Hi, thank you for your code. I have a question about the class RebalanceLoss in rebalance_loss.py.
My command line is
--config
D:\GAN_work\colorful-colorization-master\config\vgg.json
--default-config
D:\GAN_work\colorful-colorization-master\config\default.json
--data-dir
D:\GAN_work\colorful-colorization-master\all_image\train
--checkpoint-dir
D:\GAN_work\colorful-colorization-master\checkpoint
--log-file
D:\GAN_work\colorful-colorization-master\log\test_log.txt
--iterations
10
--iterations-till-checkpoint
5

and the variable class_rebal_lambda is 0.5, the forward function of RebalanceLoss will work, however, the backward function of
it is not used when the project is running.
I think it means that the the gradient is not reweight by color.
Could you give me some suggestions?

Recommend Projects

  • React photo React

    A declarative, efficient, and flexible JavaScript library for building user interfaces.

  • Vue.js photo Vue.js

    🖖 Vue.js is a progressive, incrementally-adoptable JavaScript framework for building UI on the web.

  • Typescript photo Typescript

    TypeScript is a superset of JavaScript that compiles to clean JavaScript output.

  • TensorFlow photo TensorFlow

    An Open Source Machine Learning Framework for Everyone

  • Django photo Django

    The Web framework for perfectionists with deadlines.

  • D3 photo D3

    Bring data to life with SVG, Canvas and HTML. 📊📈🎉

Recommend Topics

  • javascript

    JavaScript (JS) is a lightweight interpreted programming language with first-class functions.

  • web

    Some thing interesting about web. New door for the world.

  • server

    A server is a program made to process requests and deliver data to clients.

  • Machine learning

    Machine learning is a way of modeling and interpreting data that allows a piece of software to respond intelligently.

  • Game

    Some thing interesting about game, make everyone happy.

Recommend Org

  • Facebook photo Facebook

    We are working to build community through open source technology. NB: members must have two-factor auth.

  • Microsoft photo Microsoft

    Open source projects and samples from Microsoft.

  • Google photo Google

    Google ❤️ Open Source for everyone.

  • D3 photo D3

    Data-Driven Documents codes.