This application demonstrates the creation and transfer of container shipments between actors leveraging Hyperledger Fabric in the supply chain. In this demo app we will set up the minimum number of nodes required to develop chaincode. It has a single peer and a single organization. This code is based on code written by the Hyperledger Fabric community. Source code can be found here: (https://github.com/hyperledger/fabric-samples).
- Install the required libraries from the
package.jsonfile
yarn
- Set
GOPATHvariable
export GOPATH=$GOPATH:~/go:~/go/src
- Install Go dependencies
go get github.com/cespare/xxhash
go get github.com/pkg/errors
go get github.com/iotaledger/iota.go/address
go get github.com/iotaledger/iota.go/api
go get github.com/iotaledger/iota.go/bundle
go get github.com/iotaledger/iota.go/consts
go get github.com/iotaledger/iota.go/mam/v1
go get github.com/iotaledger/iota.go/pow
go get github.com/iotaledger/iota.go/trinary
- Start the Hyperledger Fabric network
./startFabric.sh
- Register the Admin and User components of our network
node registerAdmin.js
node registerUser.js
- Start the client application
yarn dev
- Load the client by opening localhost:3000 in any browser window of your choice, and you should see the user interface for our simple application at this URL.
You can test the chaincode by invoking any of its functions from the inside the Docker container or from the outside of it.
To invoke the chaincode function from the outside, run the following command and provide parameters to the function as an array of strings:
docker exec cli peer chaincode invoke -C mychannel -n fabric-demo-app -c '{"Args":["changeContainerHolder", "1", "Thomas"]}'
To invoke the chaincode inside the Docker container, do the following:
- Run
docker exec -it cli bash
- Call a chaincode function
peer chaincode invoke -C mychannel -n fabric-demo-app -c '{"Args":["changeContainerHolder", "1", "Thomas"]}'
The logs for chaincodes are in their respective Docker containers. To inspect logs for a chaincode called fabric-demo-app at version 1.0 on peer0 of org and see the output of any fmt.Print*s, run the following command:
docker logs -f dev-peer0.org1.example.com-fabric-demo-app-1.0
- Stop chaincode Docker container
- Remove chaincode Docker container
- Remove chaincode Docker container image
- Run
./startFabric.shto create and deploy new chaincode
- Stop existing HL Fabric Instance
cd basic-network
./stop.sh
./teardown.sh
- Remove any pre-existing containers and images, as it may conflict with commands in this project
docker image rm -f XXXXXXXXXXXX
docker rm -f $(docker ps -aq)
- Remove key store contents
cd ~ && rm -rf .hfc-key-store/
In case of permission error while running ./startFabric.sh execute the following:
chmod a+x startFabric.sh
You can download the source code files for Hyperledger Fabric chaincode IOTA connector from this public GitHub repository.
We will start with a simple chaincode file suitable for a supply chain project and will add a few IOTA connectors one by one with a short usage description.
The plain Hyperledger Fabric chaincode written in Go has a namespace, which can be defined is the docker-compose.yml file under volumes:

In our case, the chaincode folder is mapped to the github.com namespace. All external packages, including IOTA connector, need to be imported using the same namespace.
We start by adding the IOTA connector code into the chaincode folder.

In addition, you will need to add 3 other complementary packages.
You can do this either by adding an instruction to the shell script that installs and starts the Hyperledger instance or by manually downloading and copying the projects into the chaincode folder.
To add instructions to the shell script, add the following three lines before the “chaincode install” command
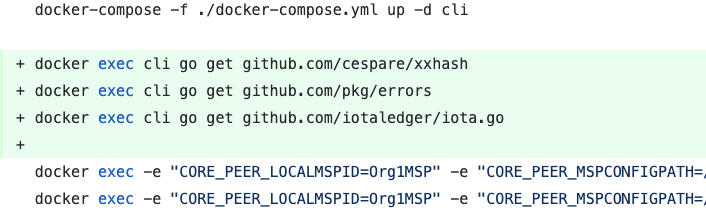
This will ensure that required packages are downloaded and placed into the chaincode folder, mapped as github.com
Depending on your version of Go, the last command that downloads the iota.go library might fail. In this case, you can download it manually and place it into the chaincode folder.

Next, add import of the IOTA connector library to the list of imports of your chaincode.go file. Please note, gibhub.com namespace in from of the iota package name. If your organization uses a different namespace, please adjust accordingly.

Hyperledger chaincode contains a function called initLedger(), where you can define an initial structure of the ledger and store data as key/value pairs. For complex types, you would typically use structures to describe object fields.
In our example, the initial ledger structure consists of a number of container definitions, where each container includes the Holder field among many others

Once the structure is defined, it is stored on a ledger one by one

This is one possible way to store data on a ledger. We do not claim to develop a best possible option.
We will add the IOTA connector here, to ensure that the digital twin is stored on the Tangle in MAM message streams. We will create an individual message stream for each container, where all changes to the container data, location, holder etc. will be tracked.
First, define the structure of the IOTA MAM stream. It should contain randomly generated Seed, MamState object, Root address to fetch data from, stream mode and sideKey (encryption key).

Then, define mode and encryption key for every asset, that will get a digital twin on the Tangle.
You can use one of the following modes: “public”, “private”, “restricted”.
SideKey (encryption key) is only required for the “restricted” mode. Otherwise, it can remain an empty string.
We provide two helper functions for the sideKey. Both functions are accessible from the iota namespace:
iota.GenerateRandomSeedString(length)will generate a random string of the given length. It can be used as seed or encryption key.iota.PadSideKey()will automatically adjust the length of the short key to 81 characters. If you do not want to define your own values formodeandsideKey, you can use default valuesiota.MamModeandiota.MamSideKey, which you can inspect and modify underchaincode/iota/config.go
After that, you can call a function iota.PublishAndReturnState(), which will publish the message payload as a new MAM channel. This function returns the mamState, root and seed values.
MamState and seed are needed for further appends to the same channel. Root value is used to read data from the channel.
These values need to be stored on the ledger and communicated to each peer of the organization.
If you do not want to append new messages to the same channel in the future, you can call iota.Publish() function instead, which won’t return the MamState.
iota.PublishAndReturnState() requires the following parameters:
- Message payload (string)
- Existing MAM stream flag (bool)
- Existing seed value (string)
- Existing MamState value (string)
- Mode (string)
- sideKey (string)
If you create a new MAM stream, set values for
existing MAM stream,seedandmamStateto false, “”, “”
Once the message was published, it is time to persist values on the ledger. Create a new object of type IotaPayload and put it on the ledger, similarly as you created records for container assets.
Please note that we recommend to add a prefix like “IOTA_” in front of the asset ID.
APIstub.PutState(“IOTA_” + strconv.Itoa(i+1), iotaPayloadAsBytes)

If your smart contract contains a function to add new records to the ledger, please update this function by adding the IOTA connector code to it.
Please note that the ID of the new asset is used for the new IOTA object
APIstub.PutState(“IOTA_” + args[0], iotaPayloadAsBytes)

Similarly, if your smart contract contains a function to modify existing records, please update this function by adding the IOTA connector code to it as well.
Please note that in this case, we are appending the modified asset data to the existing MAM stream of this asset. Therefore we retrieve the iotaPayload for specific assets from the ledger, and communicate this information to the iota.PublishAndReturnState() function, along with the existing MAM stream flag set to true.
Also note, at this point, the mode and encryption key of the existing MAM stream can not be changed. Please use existing values stored on the ledger.
Once the new message was added to the existing stream, the new MamState should replace the previous state on the ledger. All other values should remain the same as before.

If your smart contract contains a function to query a specific record from the ledger, you might want to also fetch and return the state stored on the Tangle. To perform the query from the Tangle, you can use the following function available from the IOTA connector code:
iota.Fetch(root, mode, sideKey)
Please note that the ID of the asset is used to retrieve the corresponding IOTA object from the ledger.
iotaPayloadAsBytes, _ := APIstub.GetState(“IOTA_” + args[0])
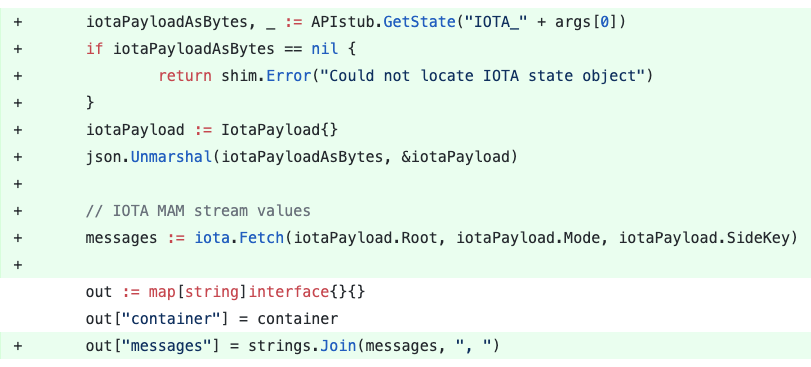
Fetched messages are returned as an array of strings. If you want to join them together into one string and add to the output object, you will also need to import the “strings” Go package.
In addition, if you want to output the MamState values, to be able to perform other actions on the UI, like confirm and compare data from the ledger with data stored on the Tangle, you can add the MamState object to the output

Supply chain projects might benefit from the built-in payment solution, where payments for certain services and goods can be sent between supply chain participants.
One possible use case could be when retailers or end consumers send payments to the producers, logistics and fulfillment providers for the ordered assets.
Since none of the Hyperledger projects support cryptocurrency or any other type of payments, IOTA connector can be used to perform fee-less payments between participants at the moment where a smart contract confirms successful transaction.
To send payment using the IOTA wallet, you will need to store wallet seed and keyIndex on the ledger. Seed is used to initiate a transaction, and keyIndex is specific for IOTA implementation and represents the index of the current wallet address, which holds the tokens.
After every outgoing payment transaction, the remaining tokens are transferred to the next address in order to prevent double-spending. The index of the new address (called remainderAddress) should be stored on the ledger and used for the next outgoing payment. Incoming payments do not trigger address or index change.
In the example, we will maintain only one wallet for outgoing payments. This wallet will be assigned to the retailer, who is the end consumer of the asset in this supply chain project.
The payment will be sent to the previous asset holder each time the holder is changed, which indicates asset movement towards the end consumer. In other words, once a producer prepares a container for shipment and transfer it over to a freight forwarder, the retailer will pay to the producer in IOTA tokens. Then, once a freight forwarder delivers the container to the next destination, the retailer will transfer IOTA tokens to pay for this service.
All possible participants in this sample of a supply chain project are defined upon initialisation of the ledger. For simplicity, we assume that there is only one participant with the role of “Producer”, “Shipper” and so on.

We will start with the definition of the structure for the wallet object

This structure contains seed and keyIndex as described above. In addition, it also contains the actual address where tokens are currently stored. You can perform balance check to ensure sufficient balance of the wallet. Enter your wallet address on this page to check the current balance.
Next, we will extend the existing Participant structure by adding the IotaWallet part into it

And then we will generate a new empty wallet and add wallet information to every participant record.
To generate a new wallet, you can use a function from the IOTA connector:
walletAddress, walletSeed := iota.CreateWallet()
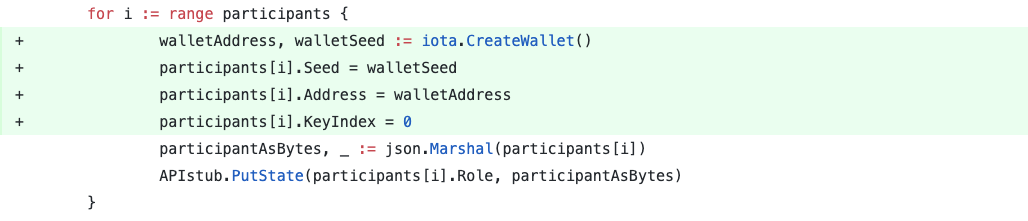
Since we generate a new wallet for every record, we set the keyIndex value to 0. If you are about to use existing wallets, please adjust keyIndex values accordingly.
The generated wallets are empty and currently can only receive IOTA tokens.
In order to send tokens, you need to maintain at least one wallet funded with IOTA tokens.
Wallet data of this wallet should be stored on the ledger.
You can provide wallet data upon ledger initialisation, or you can modify values in the configuration file under chaincode/iota/config.go
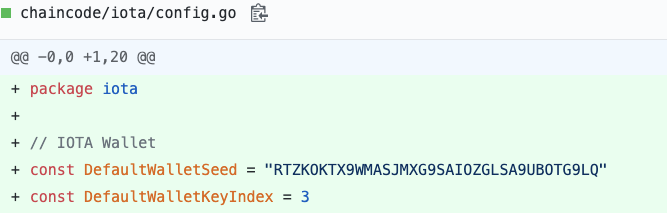
To store a wallet on the ledger, please update the initLedger() function by adding the following code. You can replace values for iota.DefaultWalletSeed and iota.DefaultWalletKeyIndex with respective values of your wallet.

Once the wallets are configured, we can add functionality to perform payments. This consists of 3 simple steps:
- Identify function in your smart contract which should trigger payment.
- Identify the payment recipient. Retrieve
wallet addressof the recipient. - Identify the payment sender. Retrieve wallet
seedandkeyIndexof the sender. Perform token transfer, then updatekeyIndexto the new value and store it on the ledger.
In our example, we will perform payments once the asset holder was changed. So, the function that triggers payments called changeContainerHolder(). Payment recipient is the previous container holder. So, we need to preserve the holder value before changing, to be able to retrieve the corresponding wallet data from the ledger.
On the screenshot below you see the required updates to the function. Container data is retrieved based on the provided ID. Before the holder is reassigned, we store the original holder value. Later we query the ledger in order to get the wallet address of the original container holder.

For step 3 we will request the IOTA wallet data of the retailer. Then we will trigger the following function and submit seed and keyIndex values of the sender and address value of the recipient.
iota.TransferTokens(seed, keyIndex, address)
Once this is done, we just need to update keyIndex to the new value and store it on the ledger.

Token transfer usually requires a few seconds in order to be confirmed. Please do not attempt to trigger multiple transfers from the same wallet within a very short timeframe (less than 10 seconds), as it will result into “Invalid balance” error, and wallet keyIndex should be reset to previous value manually. As always, you can check the status of the token transfer on this page by entering the wallet address.
- The source code of the IOTA Connector can be downloaded from this open-source GitHub repository.
- API Reference can be found here.
- The supplementary iota.go library, that need to be located within the same chaincode folder, can be downloaded from this open-source GitHub repository.
![dependabot[bot] avatar](https://avatars.githubusercontent.com/in/29110?v=4 "dependabot[bot]")


