Code Monkey home page Code Monkey logo

surreal's Introduction

Learning from Synthetic Humans (SURREAL)

Gül Varol, Javier Romero, Xavier Martin, Naureen Mahmood, Michael J. Black, Ivan Laptev and Cordelia Schmid, Learning from Synthetic Humans, CVPR 2017.

[Project page] [arXiv]

Contents

1. Download SURREAL dataset

In order to download SURREAL dataset, you need to accept the license terms. The links to license terms and download procedure are available here:

https://www.di.ens.fr/willow/research/surreal/data/

Once you receive the credentials to download the dataset, you will have a personal username and password. Use these either to download the dataset excluding optical flow data from here: (SURREAL_v1.tar.gz, 86GB) or download individual files with the download/download_surreal.sh script as follows:

./download_surreal.sh /path/to/dataset yourusername yourpassword

You can check Storage info for how much disk space they require and can do partial download.

Find under datageneration/misc/3Dto2D scripts that explain the projective relations between joints2D and joints3D variables. And here, some issues about the joints are explained.

The structure of the folders is as follows:

SURREAL/data/
------------- cmu/  # using MoCap from CMU dataset
-------------------- train/
-------------------- val/ # small subset of test 
-------------------- test/
----------------------------  run0/ #50% overlap
----------------------------  run1/ #30% overlap
----------------------------  run2/ #70% overlap
------------------------------------  <sequenceName>/ #e.g. 01_01
--------------------------------------------------  <sequenceName>_c%04d.mp4        # RGB - 240x320 resolution video
--------------------------------------------------  <sequenceName>_c%04d_depth.mat  # Depth
#     depth_1,   depth_2, ...  depth_T [240x320 single] - in meters
--------------------------------------------------  <sequenceName>_c%04d_segm.mat   # Segmentation
#     segm_1,     segm_2, ...   segm_T [240x320 uint8]  - 0 for background and 1..24 for SMPL body parts
--------------------------------------------------  <sequenceName>_c%04d_gtflow.mat # Ground truth optical flow
#     gtflow_1, gtflow_2, ... gtflow_T [240x320x2 single]
--------------------------------------------------  <sequenceName>_c%04d_info.mat   # Remaining annotation
#     bg           [1xT cell]      - names of background image files
#     camDist      [1 single]      - camera distance
#     camLoc       [3x1 single]    - camera location
#     clipNo       [1 double]      - clip number of the full sequence (corresponds to the c%04d part of the file)
#     cloth        [1xT cell]      - names of texture image files
#     gender       [Tx1 uint8]     - gender (0: 'female', 1: 'male')
#     joints2D     [2x24xT single] - 2D coordinates of 24 SMPL body joints on the image pixels
#     joints3D     [3x24xT single] - 3D coordinates of 24 SMPL body joints in real world meters
#     light        [9x100 single]  - spherical harmonics lighting coefficients
#     pose         [72xT single]   - SMPL parameters (axis-angle)
#     sequence     [char]          - <sequenceName>_c%04d
#     shape        [10xT single]   - body shape parameters
#     source       [char]          - 'cmu'
#     stride       [1 uint8]       - percent overlap between clips, 30 or 50 or 70
#     zrot         [Tx1 single]    - rotation in Z (euler angle)

# *** T is the number of frames, mostly 100.

Note: There are some monster shapes in the dataset which were not cleaned before training. Some subjects spotted by visual inspection are 18, 19, 143_21.

2. Create your own synthetic data

Note June 2021: Check the surreact repository for code that works with more recent versions of libraries (e.g., Blender 2.92).

2.1. Preparation

2.1.1. SMPL data

a) You need to download SMPL for MAYA from http://smpl.is.tue.mpg.de in order to run the synthetic data generation code. Once you agree on SMPL license terms and have access to downloads, you will have the following two files:

basicModel_f_lbs_10_207_0_v1.0.2.fbx
basicModel_m_lbs_10_207_0_v1.0.2.fbx

Place these two files under datageneration/smpl_data folder.

b) With the same credentials as with the SURREAL dataset, you can download the remaining necessary SMPL data and place it in datageneration/smpl_data.

./download_smpl_data.sh /path/to/smpl_data yourusername yourpassword
smpl_data/
------------- textures/ # folder containing clothing images (also available at lsh.paris.inria.fr/SURREAL/smpl_data/textures.tar.gz)
------------- (fe)male_beta_stds.npy
------------- smpl_data.npz # 2.5GB
 # trans*           [T x 3]     - (T: number of frames in MoCap sequence)
 # pose*            [T x 72]    - SMPL pose parameters (T: number of frames in MoCap sequence)
 # maleshapes       [1700 x 10] - SMPL shape parameters for 1700 male scans
 # femaleshapes     [2103 x 10] - SMPL shape parameters for 2103 female scans 
 # regression_verts [232]
 # joint_regressor  [24 x 232]

Note: SMPL pose parameters are MoSh'ed from CMU MoCap data. Note that these are not the most recent MoSh results. For any questions regarding MoSh, please contact [email protected] instead. Here, we only provide the pose parameters for MoCap sequences, not their shape parameters (they are not used in this work, we randomly sample body shapes).

2.1.2. Background images

We only provide names of the background images we used. They are downloaded from LSUN dataset using this code. You can download images from this dataset or use any other images.

2.1.3. Blender

You need to download Blender and install scipy package to run the first part of the code. The provided code was tested with Blender2.78, which is shipped with its own python executable as well as distutils package. Therefore, it is sufficient to do the following:

# Install pip
/blenderpath/2.78/python/bin/python3.5m get-pip.py
# Install scipy
/blenderpath/2.78/python/bin/python3.5m pip install scipy

get-pip.py is downloaded from pip. Replace the blenderpath with your own and set BLENDER_PATH.

Known problem: Blender2.78a has problems with pip. You can try with new versions of Blender. Otherwise, you can install the dependencies such as scipy to a new python3.5 environment and add this environment's site-packages to PYTHONPATH before running Blender.

2.1.4. FFMPEG

If you want to save the rendered images as videos, you will need ffmpeg library. Build it and set the FFMPEG_PATH to the directory that contains lib/ and bin/ folders. Additionally, if you want to use H.264 codec as it is done in the current version of the code, you need to have the x264 libraries compiled. In that case, set X264_PATH to your build. If you use another codec, you don't need X264_PATH variable and you can remove -c:v h264 from main_part1.py.

This is how the ffmpeg was built:

# x264
./configure  --prefix=/home/gvarol/tools/ffmpeg/x264_build --enable-static --enable-shared --disable-asm
make 
make install

# ffmpeg
./configure --prefix=/home/gvarol/tools/ffmpeg/ffmpeg_build_sequoia_h264 --enable-avresample --enable-pic --disable-doc --disable-static --enable-shared --enable-gpl --enable-nonfree --enable-postproc --enable-libxcb --disable-yasm --enable-libx264 --extra-ldflags="-I/home/gvarol/tools/ffmpeg/x264_build/include -L/home/gvarol/tools/ffmpeg/x264_build/lib" --extra-cflags="-I/home/gvarol/tools/ffmpeg/x264_build/include"
make
make install

2.1.5. OpenEXR

The file type for some of the temporary outputs from Blender will be EXR images. In order to read these images, the code uses OpenEXR bindings for Python. These bindings are available for python 2, the second part of the code (main_part2.py) needs this library.

Note: OpenEXR now exists for python 3, therefore you can run pip install openexr and merge main_part1.py and main_part2.py to get rid of the python 2 requirements.

2.2. Running the code

Copy the config.copy into config and edit the bg_path, tmp_path, output_path and openexr_py2_path with your own paths.

  • bg_path contains background images and two files train_img.txt and test_img.txt. The ones used for SURREAL dataset can be found in datageneration/misc/LSUN. Note that the folder structure is flattened for each room type.

  • tmp_path stores temporary outputs and is deleted afterwards. You can use this for debugging.

  • output_path is the directory where we store all the final outputs of the rendering.

  • openexr_py2_path is the path to libraries for OpenEXR bindings for Python.

run.sh script is ran for each clip. You need to set FFMPEG_PATH, X264_PATH (optional), PYTHON2_PATH, and BLENDER_PATH variables. -t 1 option can be removed to run on multi cores, it runs faster.

# When you are ready, type:
./run.sh

3. Training models

Here, we provide code to train models on the synthetic data to predict body segmentation or depth. You can also find the models pre-trained on synthetic data.

3.1. Preparation

3.1.1. Requirements

Tested on Linux with cuda v8 and cudNN v5.1. Let me know if there are other major dependencies that I forgot to include.

3.1.2. Setup paths

Place the data under ~/datasets/SURREAL or change the opt.dataRoot in opts.lua. The outputs will be written to ~/cnn_saves/<datasetname>/<experiment>, you can change the opt.logRoot to change the cnn_saves location.

3.2. Running the code

3.2.1. Train

There are sample scripts under training/exp/train directory that are self-explanatory. Those are used for the 'Synth' experiments in the paper. Check opts.lua script to see what options are available.

3.2.2. Visualize

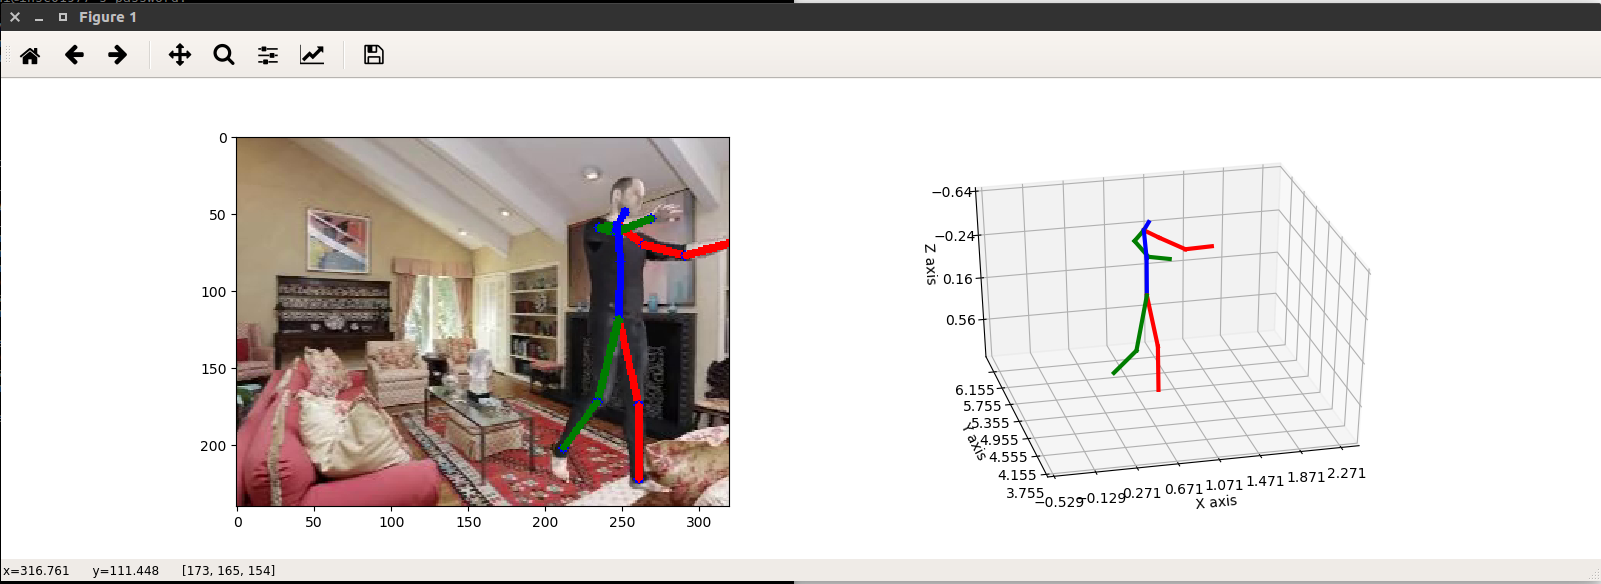
A few display functionalities are implemented to debug and visualize results. Example usage:

./training/exp/vis.sh 1 30 cmu eval val

3.2.3. Evaluate

To obtain the final results, you can run ./training/exp/eval.sh 1 30 cmu test, by setting the experiment number, model number, dataset and evaluation set. You can save the outputs to a text file by removing -saveScores option.

3.2.4. Use pre-trained models

We provide 4 pre-trained models for segmentation and depth, either trained using lossless renderings (png) or using the compressed videos (mp4).

./download_models.sh /path/to/models yourusername yourpassword
# model_segm_png.t7
# model_segm_mp4.t7
# model_depth_png.t7
# model_depth_mp4.t7

Use the demo script to apply these models on sample images.

qlua demo/demo.lua

You can also use demo/demo.m Matlab script to produce the visualizations in the paper.

4. Storage info

You might want to do a partial download depending on your needs.

Dataset *_info.mat *.mp4 *_segm.mat *_depth.mat *_gtflow.mat Total
SURREAL (cmu) 3.8G 3.3G 6.0G 82.5G 179G 275G

Citation

If you use this code, please cite the following:

@INPROCEEDINGS{varol17_surreal,  
  title     = {Learning from Synthetic Humans},  
  author    = {Varol, G{\"u}l and Romero, Javier and Martin, Xavier and Mahmood, Naureen and Black, Michael J. and Laptev, Ivan and Schmid, Cordelia},  
  booktitle = {CVPR},  
  year      = {2017}  
}

License

Please check the license terms before downloading and/or using the code, the models and the data. http://www.di.ens.fr/willow/research/surreal/data/license.html

Acknowledgements

The data generation code is built by Javier Romero, Gul Varol and Xavier Martin.

The training code is written by Gul Varol and is largely built on the ImageNet training example https://github.com/soumith/imagenet-multiGPU.torch by Soumith Chintala, and Stacked Hourglass Networks by Alejandro Newell.

surreal's People

Contributors

gulvarol avatar zldrobit avatar

Stargazers

 avatar  avatar  avatar  avatar  avatar  avatar  avatar  avatar  avatar  avatar  avatar  avatar  avatar  avatar  avatar  avatar  avatar  avatar  avatar  avatar  avatar  avatar  avatar  avatar  avatar  avatar  avatar  avatar  avatar  avatar  avatar  avatar  avatar  avatar  avatar  avatar  avatar  avatar  avatar  avatar  avatar  avatar  avatar  avatar  avatar  avatar  avatar  avatar  avatar  avatar  avatar  avatar  avatar  avatar  avatar  avatar  avatar  avatar  avatar  avatar  avatar  avatar  avatar  avatar  avatar  avatar  avatar  avatar  avatar  avatar  avatar  avatar  avatar  avatar  avatar  avatar  avatar  avatar  avatar  avatar  avatar  avatar  avatar  avatar  avatar  avatar  avatar  avatar  avatar  avatar  avatar  avatar  avatar  avatar  avatar  avatar  avatar  avatar  avatar  avatar

Watchers

 avatar  avatar  avatar  avatar  avatar  avatar  avatar  avatar  avatar  avatar  avatar  avatar  avatar  avatar  avatar  avatar  avatar  avatar  avatar  avatar  avatar  avatar  avatar  avatar  avatar  avatar  avatar  avatar  avatar  avatar  avatar

surreal's Issues

How generate own synthetic data

I am trying to generate my own synthetic data, using different background images, different camera focal length and mean distance. I followed the instructions on the README, however I don’t fully understand how to generate a large set of video clips. By running run.sh only one clip is generated. How can I generate many clips as in your dataset? Thanks

Reproducing the numbers on the synthetic test set

Hi, I am trying to reproduce the segmentation results on the synthetic test set as said in page 5 of the paper (69.13% IoU, 80.61% accuracy). However, I couldn't match those numbers using either the pre-trained model nor a model trained from scratch, and they are 2~3% lower for both metrics. The only thing I changed from the out-of-the-shelf code is the dataRoot parameters. Could you shed some light on reproducing those numbers?

[Question] Regarding depth in main_part1.py

Hello Gul Varol,

First of all, I really appreciate your great work. I can see great potential of SURREAL in various fields of applications. As an example, I am attempting to use your code to create construction context synthetic images and ground truth (mainly for 3D pose estimation of construction workers).

I am not computer science guy so am a bit struggling at implementing your code. I followed all the steps you mentioned and believe all the dependencies are now installed correctly. Thanks for your kind explanation.

One problem is that I get an error message regarding depth in main_part1.py:
Traceback (most recent call last):
File "/home/daeho/PycharmProjects/SURREAL-P2.7/datageneration/main_part1.py", line 827, in
main()
File "/home/daeho/PycharmProjects/SURREAL-P2.7/datageneration/main_part1.py", line 555, in main
res_paths = create_composite_nodes(scene.node_tree, params, img=bg_img, idx=idx)
File "/home/daeho/PycharmProjects/SURREAL-P2.7/datageneration/main_part1.py", line 156, in create_composite_nodes
tree.links.new(layers.outputs['Z'], depth_out.inputs[0]) # save depth
KeyError: 'bpy_prop_collection[key]: key "Z" not found'

Would you please help me to address this issue? I think the depth information is important in estimating the ground truth of 3D joint locations. So, I don't want to skip the depth information (though I can run the code when I mute this line).

Any advice or comments will be greatly appreciated.

FYI #1) I am using Blender 2.79b (since I can't address the pip issue with 2.78 or 2.78a).
FYI #2) I am trying with my own background images (just two construction images at this time), I changed the train and test text files for that.
FYI #3) When I run the code while muting the problematic line, I can see the synthetic image created with my background image. But, it won't allow me to run main_part2.py as it does not save the depth information.

Thanks,
Daeho

Civil & Environmental Engineering, University of Michigan

Questions about Human Textures

Hi, Thanks a lot for your work.

I feel confused about your human texture set. In the original paper, you say that there exist two set of human textures. How can we get the source information of the human textures, which indicates which set they come from.

Strange values after converting 3D joint positions from world to camera coordinates

Hi, thanks for the great dataset! I used some of the code you provided (e.g. for retrieving the camera extrinsic matrix) to convert 3D joint positions from world to camera coordinates. However, the values of joint positions in camera coordinates seem a bit strange to me. Here is the code:

def get_extrinsic_matrix(T):
	# Return the extrinsic camera matrix for SURREAL images
	# Script based on:
	# https://blender.stackexchange.com/questions/38009/3x4-camera-matrix-from-blender-camera
	# Take the first 3 columns of the matrix_world in Blender and transpose.
	# This is hard-coded since all images in SURREAL use the same.
	R_world2bcam = np.array([[0, 0, 1], [0, -1, 0], [-1, 0, 0]]).transpose()
	# *cam_ob.matrix_world = Matrix(((0., 0., 1, params['camera_distance']),
	#                               (0., -1, 0., -1.0),
	#                               (-1., 0., 0., 0.),
	#                               (0.0, 0.0, 0.0, 1.0)))

	# Convert camera location to translation vector used 
	# in coordinate changes
	T_world2bcam = -1 * np.dot(R_world2bcam, T)

	# Following is needed to convert Blender camera to 
	# computer vision camera
	R_bcam2cv = np.array([[1, 0, 0], [0, -1, 0], [0, 0, -1]])

	# Build the coordinate transform matrix from world to 
	# computer vision camera
	R_world2cv = np.dot(R_bcam2cv, R_world2bcam)
	T_world2cv = np.dot(R_bcam2cv, T_world2bcam)

	# Put into 3x4 matrix
	RT = np.concatenate([R_world2cv, T_world2cv], axis=1)
	return RT, R_world2cv, T_world2cv

def world_to_camera(RT,p_w):
        # Get a set of n points in world coordinates (p_w) and
	# convert them to camera coordinates (p_c)
        # Args:
        # p_w (numpy array): points in world coordinates, shape (n, 3, 1)
        # RT  (numpy array) : 4x4 camera extrinsic matrix, shape (4,4)
	n_points = p_w.shape[0]
	ones = np.ones([n_points, 1, 1])
	p_w = np.concatenate((p_w, ones), axis=1)
	
	p_c = np.dot(RT, p_w[0])
	for p in p_w[1:]:
		p_c = np.concatenate((p_c, np.dot(RT, p)))
		
	return p_c.reshape(n_points,3,1)

# Read annotation file
mat = scipy.io.loadmat("./01_06_c0001_info.mat")

# Get camera position in world coordinates
camera_pos = mat['camLoc']

# Get camera extrinsic matrix
extrinsic, _, _ = get_extrinsic_matrix(camera_pos)

# Frame number
frame_id = 10

# Get joints positions in world coordinates
joints3d = mat['joints3D'][:, :, frame_id].T # shape (24, 3)
joints3d = joints3d.reshape([
					joints3d.shape[0],
					joints3d.shape[1],
					1]
			) # shape (24, 3, 1)

# Convert 3D joint positions from world to camera coords
joints3d_cam = world_to_camera(extrinsic, joints3d)

# Reshape to restore previous shape, and permute
joints3d_cam = joints3d_cam.reshape(joints3d_cam.shape[0], 
						joints3d_cam.shape[1]) # shape (24, 3)
joints3d_cam = np.moveaxis(joints3d_cam, 0, 1) # shape (3, 24)

# Swap Y and Z axes
joints3d_cam[[0,1,2]] = joints3d_cam[[0,2,1]]

When plotting the joints in 3D I get strange depth values (see Y axis in the figure below). For example, in the image below the subject appears very close to the camera, however it's position on the Y axis (computed with the above code) is about 6 meters, which seems quite unrealistic to me:
Screenshot from 2019-04-08 11-12-46

Do you have any idea why this is happening? Thanks

Non-overlapping data

Is the pose parameters for the sequences with no overlapping frames available?

I tried to work around this by making my own algorithm to detect overlaps and then cut and splice the clips into non-overlapping sequences. Running that on run1 of the test and training data I found 2666 non-overlapping sequences (703 in test, 1963 train), does that seem about right?

Could you please provide the code of MoSh or the way to obtain that algorithm?

Thanks for your dataset! It does help a lot. I am trying to synthetic more data with your approach. But I could not get the MoSh algorithm to convert Human3.6M rawangle data to SMPL parameters. Could you please provide the code of MoSh or the way to obtain that algorithm? Or any way else? Looking for your reply!

Ground truth optical flow

Hi,
thank you for sharing such a great dataset. I think this dataset is very useful for Computer Vision community. 😀

First large-scale person dataset to generate depth, body parts, optical flow, 2D/3D pose, surface normals ground truth for RGB video input.
http://www.di.ens.fr/willow/research/surreal/data/

I can only find raw video, depth, segmentation, and meta-info in the downloaded dataset.
Would you also release ground truth optical flow, please?

Material segments vertices loaded from pickle file may contains gaps

Thanks for making this available! I'm an amateur at both ML and Blender, but your project is fascinating, so I'm digging into it from top to bottom. I've begun generating synthetic data according to your scripts and instructions, and I noticed this:

image

This is the raw synthetic data, with Material 1 (head) vertices selected. The back is worse:

image

Update: From what I can tell, there are gaps in the faces between spine2 and head, and between hips and left/rightUpperLeg. This seems to be because the first sorted key in the list of parts doesn't actually have a segment created from the material, but whatever is left over among unassigned vertices is applied to the first material group. So although it seems that the head is being properly assigned, it actually is given anything that is left over.

I'm not sure this actually makes a difference once training is done on the synthetic data, as it seems that you join together various discrete segments into larger segments. So perhaps the gaps disappear. However, when using your pre-trained models to segment images, I do recall occasionally seeing odd parts near the hips and upper body that were mis-segmented as the head, so I think this might be a real bug. I am running Blender 2.79, so if you're not seeing the same thing, perhaps that's the culprit.

Thanks again for sharing this!

## My hack added to main_part_1.py - create_segmentation(). It seems like there ought to be a way to configure Blender to just assign these automatically. 

vsegm['rightUpLeg'].extend([4353, 4418])
vsegm['leftUpLeg'].extend([869, 932])
vsegm['spine2'].extend([709, 712, 734, 1236, 1535, 1840, 1847, 1899, 2903, 2938, 2940, 2949, 4195, 4200, 4222, 4719, 5006, 5301, 5308, 5360, 6362, 6397, 6399, 6408])

image

Scipy in Blender 2.78

Hi Gül,
thank you for sharing your great work.
I'm generating my own data using your scripts. Therefore I've installed Blender 2.78a as you recommend in the readme. Unfortunately, the python version coming with Blender 2.78a uses an outdated version of OpenSSL which made it impossible to install scipy using pip for me.
I've just used Blender 2.79b. That works great for me and it should work for everyone since the python APIs of these versions are compatible.
I just wanted to document that somewhere for people running into the same problems. Maybe you can change the readme.

Best
Fabian

How to transfrom SMPL vertex coordinate to rgb image coordinate

I extract images and SMPL parameters from the dataset. Then I use the demo provided by SMPL (http://smpl.is.tue.mpg.de/) to transform the vertexes and then visualize, then I get:
image

The shape and pose in the rgb image and the visualized vertexes seems agree, but need some rotation and translation. How to do this?

Besides, the coordinate range in the image is: 0-319 for x and 0-239 for y. The range for vertex is about -1 to 1. How to transform vertex cord to image cord?

Use smplx instead of smpl

Thanks for your great work.
I understand that you are using smpl model (embedded) and I wonder if I can use smplx instead of smpl in the synthetic data creation part? and how?

Thanks

smpl texture

The texture files present in Surreal Data-set are 512x512 packed texture images.
How to convert these texture files into a newer format of texture format currently being used in smpl texturing, which are 1080x1080.

grey_female_0019
surreal texture map

sample_texture_2
uvtexture map found in new repositories like octopus https://github.com/thmoa/octopus

2D pose inverted

Hi, thanks for posting this interesting and useful dataset. I am testing the data generation and when i plot the joints on the frames of the video they seem to be rotated 180 degrees. How can i fix it ?

Thanks for your response.

OpenEXR seems unnecessary when running in Blender v2.79

Source: https://blender.stackexchange.com/questions/69230/python-render-script-different-outcome-when-run-in-background/81240#81240

I am running a newer version of Blender (2.79, built from source on OSX), and I didn't run into the problems you mention in the code or discussed in the SO question above — it works fine in background mode and UI mode both with a standard build of the latest blender source.

As a small note, using 2.79 required a small change to switch from 'Z' output layer to 'Depth' here: https://github.com/gulvarol/surreal/blob/master/datageneration/main_part1.py#L148. Otherwise I've noticed no difference. I haven't seen any memory leaks, but I also haven't done a full run of data generation.

How to get 3D coordinates from depth maps

Hi, thank you so much for this dataset!
But I have a question. I want to transform depth maps to 3D point clouds, i.e. calculate the 3D coordinates according to depth maps.
I try to inverse the process in https://github.com/gulvarol/surreal/tree/master/datageneration/misc/3Dto2D
but the result seems wrong, especially for the x coordinates. The image below shows some of my results, joint3D is calculated from depth maps and real3D is the ground truth.
image

How can I get the right 3D coordinates from depth maps?
Thanks a lot!

Cannot access dataset website

Hi,

I'm interesting in your great work and want to try something with the dataset, but the link in README.md seems broken.
Screenshot from 2020-06-17 14-47-51

Would you fix this problem? Or it's just something I miss so I can't access the website?

Number of body parts

In the segmentation model, there are 14 body parts + 1 background. In the dataset, there are 24 body parts + 1 background. How do they relate? I couldn't find a mapping.

The pretrained model finetuned on Human 3.6M dataset

Thanks for your great work
you have provided 4 pretrained models (2 for segmentation and 2 for depth estimation), I am wondering if you can provide the model that is fine-tuned on Human3.6M training dataset?
Regards,
Amr

"Monster shapes", anomalies in dataset.

In the README you mention the anomalies you have detected in the dataset 18, 19, 143_21.
I was wondering if you have a more exhaustive list? Or a list of those that are certainly correctly detected. It would be very useful to me!

Also, is the framerate the same for all clips? E.g. 106_XX seems very fast compared to 01_XX.

surreal `idx_info.pickle` mismatch the smpl_data file `smpl_data.npz`

In the file idx_info.pickle, there are some info starts with h36m, however, the smpl_data.npz provided doesn't contain the pose of h36m, so if we directly use the code to generate images, it will raise some errors. To avoid this, I removed h36m items in idx_info.pickle, but I wonder if the pose data of h36m is available? Thanks.

Is MoSH code available?

Hi,

I am trying to create my own dataset using skeleton recordings from Kinect cameras. I wished to know if the MoSH code to map joint positions to SMPL model is available publicly? I contacted the original authors but they did not respond. Any help would be appreciated.

Flow x-channel

@gulvarol
HI,

Thanks a lot for your works:) I found in an issue that after data generation, x channel of the optical flow should be multiplied by -1. I am a little bit confused about that. Does it mean that the direction of x-channel in "RenderLayer.Vector" which could be activated by "use_vector_pass" is the reverse direction of the motion in reality?

Thanks a lot for your response.

Best regards,
Haozhou

Reproducing the depth estimation results on the synthetic test set

Hi, I am reproducing the depth estimation results on the synthetic test set. But the results I got are quite different from the results reported in the paper. As the paper suggested 'To interpret the error in real world coordinates, we multiply it by the quantization constant (45mm).' I can only get 4.39 * 45mm = 197.8mm (RMSE). That number is far bigger than the number reported in the paper. It would be very appreciated if you could run your released model on the depth estimation baseline too.

Originally posted by @Dominoer in #9 (comment)

What does "ung_" mean?

Many of the clips have the prefix "ung_" in their sequence name. I wonder what this means and if these sequences should be treated different.

How to get the SMPL shape parameters?

Hi @gulvarol ,

Thanks for releasing the code.

I would like to create my own synthetic data with different shapes. I find that in #2-create-your-own-synthetic-data there are:

maleshapes [1700 x 10] - SMPL shape parameters for 1700 male scans
femaleshapes [2103 x 10] - SMPL shape parameters for 2103 female scans

Those parameters are not provided in smpl_data.npz. I'm wondering where can I get those parameters?

Thanks!

Segmentation Creation or Visualization is Broken

01_01_c0001_segm

Hi,

This image represents the segmentation I got from generating the synthetic data. I've followed sctrictly the procedure explained for data creation except , I needed to use blender 2.9 in order to install pip (ssl certificate issue otherwise).

There is an empty part in the visualized upper body in this image. Similar results are obtained when downloading directly the data instead of creating them.

Any help that can explained this observation ?

Thanks in advance

about joints2D and joints3D

Hi!
I have a question about the joints parameter reading from _info.mat file
Because I read a joints3d from mat file, But it's location is weird.
For example, the first coordinate is [-0.3, -0.9, 1.1].
joints2D is okay.
What do I do?

Incorrect global rotation

Hello, thank you for your excellent work!
I use surreal dataset to train the model,When reading smpl parameter data,I have done the preprocessing according to your methodpose[0:3] = rotateBody(RzBody, pose[0:3]),However, during the training process, I found that the global rotation of the model was still biased (not too large)
But in the test program of dataset,Model rendering is correct (but left and right seem to be opposite),
Different from the following program, I used orthogonal projection in my training program. Is there any error here?
proj_smpl_vertices = project_vertices(smpl_vertices, intrinsic, extrinsic)

Thank you!

Data generator doesn't work on GPU mode??

Hi gulvarol,

Thank you for providing such a good tool, when I run main_part1.py, it seems too slow to render one frame on CPU mode, so I modify your code by adding:

bpy.context.user_preferences.addons['cycles'].preferences.compute_device_type = "CUDA"
bpy.context.user_preferences.addons['cycles'].preferences.devices[0].use = True
scene.cycles.device = 'GPU'

Now it works on GPU mode, but those images rendered on GPU mode lose body texture.
image

Any ideas? Thank you very much:)

Sicong

Human pose is outside of rendered frame

Hi,

I have generated some data, 100 frames are produced for each run. But some of the images, especially later frames, present only background image : the human model is rendered outside of the image window.

Is this expected, or should I set some parameters to fix this issue ?

Regards

cost too much memory

i try to render data by myself,and i set clipsize to 500,but it cost too much memory!
is there has some function to release memory after render a image?

bpy.ops.render.render(animation=False,write_still=True,use_viewport=False,)

Joint annotation of "Head Top"

The two most common real human dataset LSP and MPII, they both have "head top" in their joint annotations. Can you also add this to your output?

Using Surreal for Human Action Recognition

Hi @gulvarol

Thank you for a great dataset.

Actually I want to use Surreal dataset for human action recognition task. In this regard, I have following two questions.

  1. From where do I obtain the information about specific action type in the videos? Do you store that information in any of the mat files?

  2. Also if I want to generate videos for custom actions according to my own requirement then how can I achieve that?

Thank you

h36m seg/depth gt

Hey there,

I might have missed this, but I was wondering if the repo contains ground truth segmentation/depth of H36M dataset or anything related to training on Synth+H36M / H36M only?

Thanks!

Output path is wrongly set in main_part2.py

Dear author,
It's nice of you to create such a tool for data generation. When I run the code, I happened to find some bugs. In main_part2.py, the output path is wrongly setup ("output_path = join(output_path, 'run%d' % runpass, name.replace(" ", ""))"). It should use the name from idx_info rather than body_data.

Multiperson?

Is there plans to have multiple people encoded into the output?

Question about the fine tuning with some real images.

Hi,

Thanks a lot for your work. I have learned much from this project.

And I have a question about the fine tunning. You have mentioned it in your paper , that with fine tuning with some real training data, you have improved the network a lot. So i'd like to know how did you implement the fine tuning? Did you add one more conv layer after the trained network and then training the whole network more iterations with some real data?

Could you please explain more about it, thanks!

3D Joint positions from SMPL Model (ref: [19])

Hi,

I am trying to acquire mesh vertices and 3D joint positions by providing pose and shape parameters (provided as ground truth in SURREAL) to the SMPL model given in ref. [19]. However, the 24 3D joint positions which I get from SMPL model, are different from what is provided as the ground truth 3D joint positions in SURREAL.

Could you please guide me so that I could acquire same 3D joint positions from SMPL model as provided by SURREAL in the ground truth ?

-- Thanks

Correspondence between texture map and SMPL model

Hi Gul,
Thanks for sharing the great project! I am curious about how the texture UV mapping works on the rendering. If I understood correctly about the graphics pipline, you will need a uv coordinate associated with each of the 6890 SMPL vertices. Where is the uv data from? It seems that the uv data is created here https://github.com/gulvarol/surreal/blob/master/datageneration/main_part1.py#L172 ? Are they provided in the SMPL .fbx model? Looking forward to your reply. Thanks!

Questions about depth image.

I am trying to generate point clouds from depth image, and during the process i find a big question about the depth value of your depth image.
How do you generate the depth value of your depth image ? I compare the depth value of the depth pixel and the corresponding joints in the camera coordinates , and there are always an error about 0.15 meters.
Here is a point cloud i generated in the camera coordinate system.
cam_coordinates_visualize
Notice that there is about an error of about 0.15 meters in the depth value.
I wonder how do you generate the depth value of the image, and i would be of great help

Recommend Projects

  • React photo React

    A declarative, efficient, and flexible JavaScript library for building user interfaces.

  • Vue.js photo Vue.js

    🖖 Vue.js is a progressive, incrementally-adoptable JavaScript framework for building UI on the web.

  • Typescript photo Typescript

    TypeScript is a superset of JavaScript that compiles to clean JavaScript output.

  • TensorFlow photo TensorFlow

    An Open Source Machine Learning Framework for Everyone

  • Django photo Django

    The Web framework for perfectionists with deadlines.

  • D3 photo D3

    Bring data to life with SVG, Canvas and HTML. 📊📈🎉

Recommend Topics

  • javascript

    JavaScript (JS) is a lightweight interpreted programming language with first-class functions.

  • web

    Some thing interesting about web. New door for the world.

  • server

    A server is a program made to process requests and deliver data to clients.

  • Machine learning

    Machine learning is a way of modeling and interpreting data that allows a piece of software to respond intelligently.

  • Game

    Some thing interesting about game, make everyone happy.

Recommend Org

  • Facebook photo Facebook

    We are working to build community through open source technology. NB: members must have two-factor auth.

  • Microsoft photo Microsoft

    Open source projects and samples from Microsoft.

  • Google photo Google

    Google ❤️ Open Source for everyone.

  • D3 photo D3

    Data-Driven Documents codes.