zhuping / blog Goto Github PK
View Code? Open in Web Editor NEW个人博客,记录工作中遇到的问题及平时学习的一些总结感悟
个人博客,记录工作中遇到的问题及平时学习的一些总结感悟


Flux作为一种设计模式,以单向数据流的方式补充了 React 视图组件。主要分成三个部分:
基于 https://github.com/facebook/flux/tree/2.0.1/examples/flux-todomvc
// https://github.com/facebook/flux/blob/2.0.1/examples/flux-todomvc/js/stores/TodoStore.js#L122
AppDispatcher.register(function(payload) {
  ...
})
// https://github.com/facebook/flux/blob/2.0.1/examples/flux-todomvc/js/components/TodoApp.react.js#L35
getInitialState: function() {
return getTodoState();
},
componentDidMount: function() {
TodoStore.addChangeListener(this._onChange);
},// https://github.com/facebook/flux/blob/2.0.1/examples/flux-todomvc/js/dispatcher/AppDispatcher.js#L24
this.dispatch({
source: 'VIEW_ACTION',
action: action
});// https://github.com/facebook/flux/blob/2.0.1/examples/flux-todomvc/js/stores/TodoStore.js#L126
switch(action.actionType) {
...
}// https://github.com/facebook/flux/blob/2.0.1/examples/flux-todomvc/js/stores/TodoStore.js#L173
TodoStore.emitChange();// https://github.com/facebook/flux/blob/2.0.1/examples/flux-todomvc/js/components/TodoApp.react.js#L66
_onChange: function() {
this.setState(getTodoState());
}通过上文 Vue 源码学习(一) - 目录结构与构建,我们了解了整个项目的目录结构,这次我们就从构造函数开始,看 vue 到 export default Vue 都经历了什么。
声明:为了更好的理解 vue 源码,我们将以完整版 umd 模块的 vue 为入口
根据 entry 配置,找到入口文件,
// src/platforms/web/entry-runtime-with-compiler.js

import config from 'core/config'
import { warn, cached } from 'core/util/index'
import { mark, measure } from 'core/util/pref'

import Vue from './runtime/index'
...
根据文件的引用关系找到 Vue 的构造函数所在
// src/platforms/web/runtime/index.js

import Vue from 'core/index'
...
// src/core/index.js
import Vue from './instance/index'
...// src/core/instance/index.js
function Vue (options) {
if (process.env.NODE_ENV !== 'production' &&
!(this instanceof Vue)
) {
warn('Vue is a constructor and should be called with the `new` keyword')
}
this._init(options)
}
initMixin(Vue)
stateMixin(Vue)
eventsMixin(Vue)
lifecycleMixin(Vue)
renderMixin(Vue)
export default Vue最终我们在 src/core/instance/index.js 中找到了 Vue 的构造函数,内容部分也很简单,传入一个 options 参数,如果是非生产环境且没用使用 new Vue 的方式调用函数,给出警告,然后执行 _init 方法。
接着经过如下
5个方法的包装处理,最终对外抛出 Vue。
我们后面的分析,也是根据这几个方法的顺序来分析,他们内部到底做了哪些处理。
在此之前,我们再来看下
// src/core/index.js

import Vue from './instance/index'
import { initGlobalAPI } from './global-api/index'

initGlobalAPI(Vue)
...通过上一篇文章的目录可知,global-api 是负责给 Vue 构造函数挂载全局的方法(静态方法)或属性的代码。它对我们后续的代码分析很重要,所以在分析 _init 前,我们不妨先看看 global-api 具体挂载了哪些方法和属性呢?
// src/core/global-api/index.js

import config from '../config'
import { initUse } from './use'
import { initMixin } from './mixin'
import { initExtend } from './extend'
import { initAssetRegisters } from './assets'
import { set, del } from '../observer/index'
import { ASSET_TYPES } from 'shared/constants'
import builtInComponents from '../components/index'
import { observe } from 'core/observer/index'

export function initGlobalAPI (Vue: GlobalAPI) {
  // config
  const configDef = {}
  configDef.get = () => config
  if (process.env.NODE_ENV !== 'production') {
    configDef.set = () => {
      warn(
        'Do not replace the Vue.config object, set individual fields instead.'
      )
    }
  }
  Object.defineProperty(Vue, 'config', configDef)

  // exposed util methods.
  // NOTE: these are not considered part of the public API - avoid relying on
  // them unless you are aware of the risk.
  Vue.util = {
    warn,
    extend,
    mergeOptions,
    defineReactive
  }

  Vue.set = set
  Vue.delete = del
  Vue.nextTick = nextTick

  // 2.6 explicit observable API
  Vue.observable = <T>(obj: T): T => {
    observe(obj)
    return obj
  }

  Vue.options = Object.create(null)
  ASSET_TYPES.forEach(type => {
    Vue.options[type + 's'] = Object.create(null)
  })

  // this is used to identify the "base" constructor to extend all plain-object
  // components with in Weex's multi-instance scenarios.
  Vue.options._base = Vue

  extend(Vue.options.components, builtInComponents)

  initUse(Vue)
  initMixin(Vue)
  initExtend(Vue)
  initAssetRegisters(Vue)
}
我们来逐行看下代码,首先是在构造函数 Vue 上增加了一个 config 的静态只读属性,读取 config 返回的是 core/config.js 中导出的对象,如果试图修改该值时,在非生产环境下会给一个警告。
接着是扩展了 util 属性,增加了 warn,extend,mergeOptions 和 defineReactive 四个方法。
Vue.util = {
  warn,
  extend,
  mergeOptions,
  defineReactive
}
然后是在 Vue 上增加了 set,delete 以及 nextTick 三个方法,同时在 2.6 以上版本,新增了 observable 方法,原本必须在一个 Vue 实例中配置的响应对象,现在可以在 Vue 实例外部通过 Vue.observable(data) 来创建了。
Vue.set = set
Vue.delete = del
Vue.nextTick = nextTick

// 2.6 explicit observable API
Vue.observable = <T>(obj: T): T => {
  observe(obj)
  return obj
}
下面是对 options 属性的创建,后面的 options 合并章节中起着关键的作用。
Vue.options = Object.create(null)
ASSET_TYPES.forEach(type => {
  Vue.options[type + 's'] = Object.create(null)
})

// this is used to identify the "base" constructor to extend all plain-object
// components with in Weex's multi-instance scenarios.
Vue.options._base = Vue
首先是创建一个空对象,然后遍历 src/shared/constants.js 中 ASSET_TYPES 数组,分创建一个空对象,
// src/shared/constants.js

export const ASSET_TYPES = [
  'component',
  'directive',
  'filter'
]
经过处理后的 options 最终变成:
Vue.options = {
  components: Object.create(null),
  directives: Object.create(null),
  filters: Object.create(null),
  _base: Vue
}
紧接着的这句代码:
extend(Vue.options.components, builtInComponents)把 builtInComponents 返回的值与 Vue.options.components 进行合并操作,
// src/core/components/index.js

import KeepAlive from './keep-alive'

export default {
  KeepAlive
}
最终 Vue.options 变为:
Vue.options = {
  components: {
    KeepAlive
  },
  directives: Object.create(null),
  filters: Object.create(null),
  _base: Vue
}
在文件最后,还有4个 init* 方法,我们再来逐个看下每个方法都是干嘛的。
// src/core/global-api/use.js

export function initUse(Vue: GlobalAPI) {
  Vue.use = function(plugin: Function | Object) {
    ...
  }
}
该方法的作用是在 Vue 构造函数上添加 use 方法,该方法是用来安装 Vue 插件的。
// src/core/global-api/mixin.js

export function initMixin (Vue: GlobalAPI) {
  Vue.mixin = function (mixin: Object) {
    this.options = mergeOptions(this.options, mixin)
    return this
  }
}
该方法是在 Vue 上添加 mixin 方法,该方法是全局注册一个混入,并且会影响注册之后所有创建的每个 Vue 实例。
// src/core/global-api/extend.js

export function initExtend(Vue: GlobalAPI) {
  Vue.cid = 0;
  let cid = 1;

  ...

  Vue.extend = function(extendOptions: Object): Function {

  }
}
该方法是在 Vue 上添加了 Vue.cid 静态属性和 extend 静态方法。该方法继承自 Vue 构造器,创建一个子类。
// src/core/global-api/assets.js

export function initAssetRegisters(Vue: GlobalAPI) {
  ASSET_TYPES.forEach(type => {
    Vue[type] = function() {
      // ...
    }
  })
}
ASSET_TYPES 我们已不陌生,就是上面提到的 component,directive 和 filter。该方法在 Vue 上增加了三个静态方法,他们分别用来全局注册组件,指令和过滤器。
我们再回溯到前面的文件,分别扩展了 directives 和 components:
// src/platforms/web/runtime/index.js

import platformDirectives from './directives/index'
import platformComponents from './components/index'

extend(Vue.options.directives, platformDirectives)
extend(Vue.options.components, platformComponents)
// src/platforms/web/runtime/directives/index.js
export default {
model,
show
}// src/platforms/web/runtime/components/index.js
export default {
Transition,
TransitionGroup
}至此整个构造函数都讲解完了,主要是通过 global-api/index.js 这个文件,对 Vue 的构造函数增加了许多静态属性和方法,方便后续的使用。此时 Vue 上挂载的属性和方法如下:
Vue.config

Vue.util = {
  warn,
  extend,
  mergeOptions,
  defineReactive
}

Vue.set
Vue.delete
Vue.nextTick
Vue.observable

Vue.options = {
  components: {
    KeepAlive,
    Transition,
    TransitionGroup
  },
  directives: {
    model,
    show
  },
  filters: Object.create(null),
  _base: Vue
}

Vue.use
Vue.mixin
Vue.extend
Vue.cid
Vue.components
Vue.directives
Vue.filters自从家里有了小宝宝后,开始多关注起家里人的健康状况,在辛苦赚钱的同时,希望能够有一份全面的保障,所以就开始慢慢接触保险相关的内容。但因为前期没做足功课,导致先前购买的保险产品并不适用当前情况,所以又发生了退保行为。后来在不断摸索过程中,对保险也有了更多的认识,遂想通过此文记录下这个过程。
说到买保险,大家可能都会有过这样的场景:商城里一个穿着西装革履的人,手里拿着传单热情的向你走来,各种不厌其烦的给你介绍他们的产品多么多么好之类的,大家第一反应可能就是绕着走,但如果你最近刚好要买保险,你可能就停下脚步听他介绍了。
那么买保险到底有什么用呢?就拿车险来说,有车一族都会给自己的爱车买一份保险,保额50万不够,直接上100万或者更高,不为别的,就怕哪一天开车的时候头脑一热,直接怼到豪车上去了。这时保险就派上用场了,如果你是全责方,不仅能报销自己修车的钱,同时也能报销对方的修车费用,解决了你卖房赔钱的尴尬境地。
天有不测风云,人有旦夕祸福,车险亦如此,那何况人险呢。所以,保险的存在,就是为了帮你解决烦恼的,它能帮你风险转移,解决后顾之忧,让你更好的享受生活。
可能有人会问,作为上班族,公司已经帮我们交了五险,那为什么还要买保险呢?公司交的五险,主要包含了养老保险、医疗保险、失业保险、工伤保险和生育保险。我们就医保展开说明一下,医保作为补偿疾病所带来的医疗费用的一种保险,并不能完全解决我们的后顾之忧,它还是有很多限制的:
对于医保报销公式,可理解为如下:
报销金额=(治疗总费用-起付线-自费部分-自付部分)×报销比例
单纯的理论比较抽象,举个具体的例子可能更容易理解:
假设小开住院一共花了40万元医疗费用(金额比较大,一般花不了这么多):
- 起付线是1300元
- 封顶线是25万
- 医保不给报销的自费药品及项目花7万元
- 医保部分报销的自负费用有1.5万元
- 医保整体报销比例是80%
那么,小开的实际医保报销金额=(40万-1300元-7万-1.5万)*80%=250960元。因为超过了封顶线,最后能报销25万,剩余15万自己出。
所以医保只能解决我们部分的后顾之忧,这时额外的保险成了我们自费部分的补充。
随着人们生活水平的提高,对保险的需求也日益增加。各保险公司纷纷推出了种类繁多的险种,这里我主要想介绍下4大险种:重疾险、医疗险、意外险、寿险。
重疾险和医疗险都属于健康险,保的就是健康,从小病小灾到重疾癌症,它都能覆盖。医疗险是报销型,看病花了多少就报多少,而重疾险属于给付型,也就是只要患了重疾,重疾险会一次性把钱给你。
先说重疾险,可能会有人问,医保和医疗险基本能报销我们所有看病的费用了,要重疾险何用呢?试想一下,如果哪天真的得了重疾,那这班肯定是上不成了,没有了收入来源,加上期间的生活费、护理费,康复费等都是一笔不小的费用,医保和医疗险并不能解决这部分的开支。所以就有了重疾险,重疾险作为一种工作收入损失险,只要患了重疾,就会一次性把钱给你。
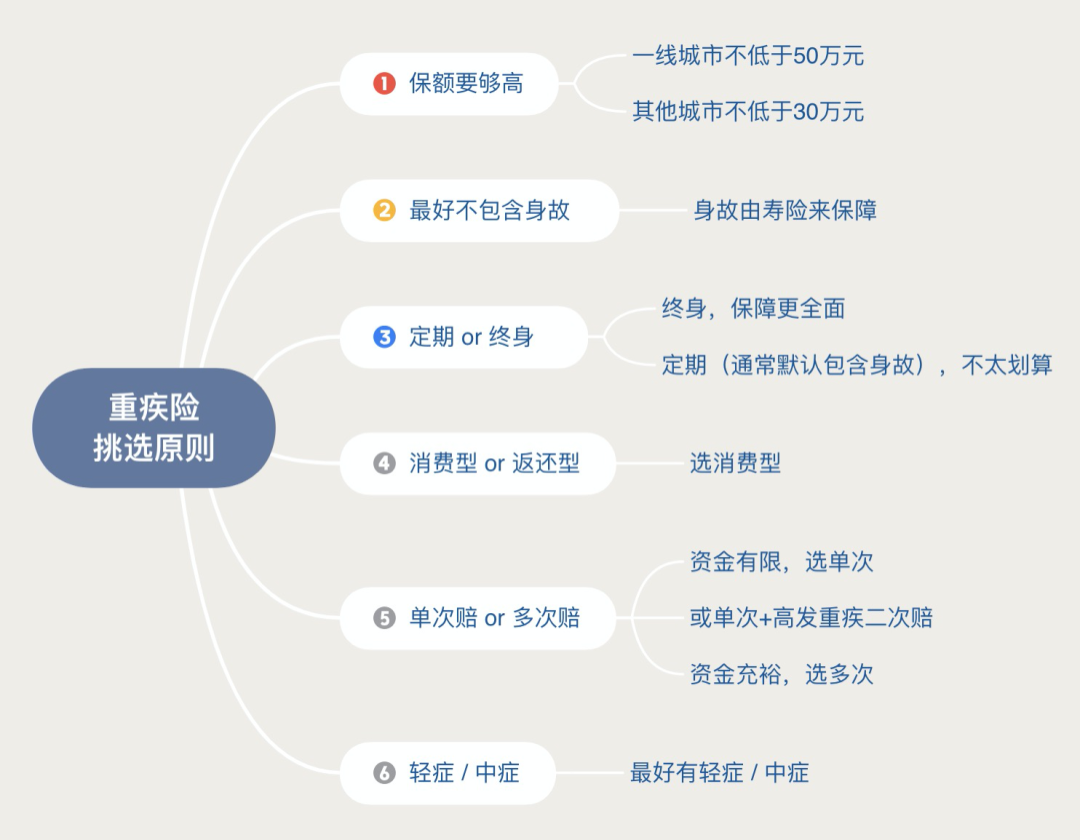
购买重疾,核心要抓住两点:保额和保障时间
重疾险买的就是保额,优先考虑保额,保额不足很可能在关键时刻起不到作用。对于一线城市保额最好不低于50万元,其他城市最好不低于30万元。在保证保额足够的基础上,再去延长保障时间。关于重疾险的挑选原则,家庭经济支柱优先,大人配置好之后,再给孩子进行配置,另外截取了网上的一张图片:
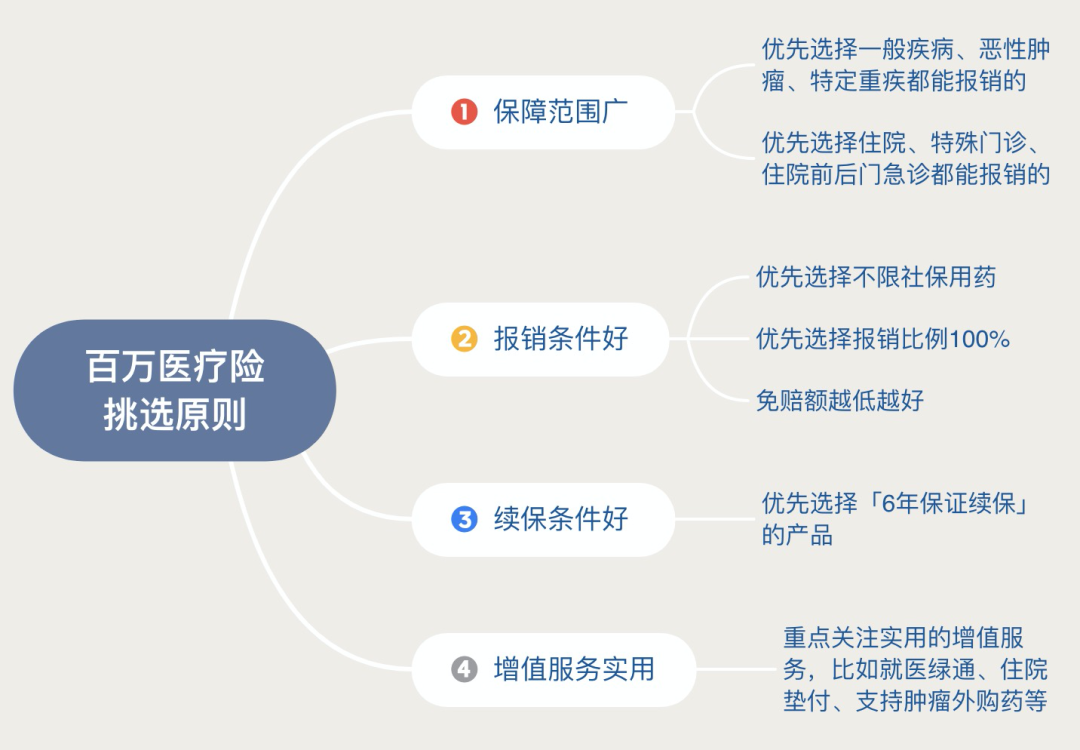
前面提到医保只解决了部分报销问题,剩余部分我们可以通过医疗险得到进一步的保障。医疗险根据报销内容不同,可以分成5类:门诊报销金、百万医疗险、普通住院医疗险、中段医疗险和高端医疗险,对于普通人来说,百万医疗险是最为实用的一款产品。无论是由于生病还是意外事故,需要住院治疗时,百万医疗险都能派上大用场,通常只需几百块的保费,保额可以高达几百万,非常适合一家大小一起配置。
对于医疗险的挑选原则如下:
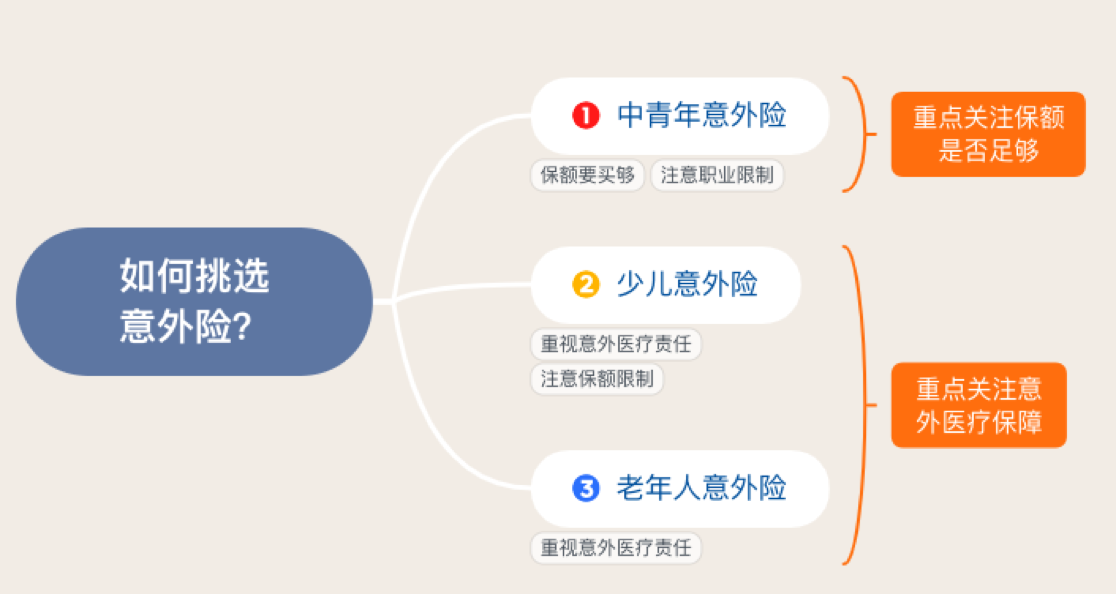
意外险,顾名思义保的就是意外。在生活中,明天和意外不知道哪个会先来,所以意外险是我们每个人都要保障的。但对意外的定义,还是需要满足一定条件的:
意外险有三大保障责任,「意外身故」责任、「意外伤残」责任、「意外医疗」责任,前两者属于给付型,也就是一次性赔一笔钱,后者属于报销型,也就是花多少报多少。
意外险买一年保一年,价格便宜,保障杠杆非常高,一般花200左右就能得到50万的保障。需要注意的是,不是所有的意外险都包含有「意外医疗」责任,另外普通意外险不保国外,出国旅游前买一份旅游意外险很有必要。
有人说寿险保证了你站着是一颗摇钱树,倒下是一堆人民币,所以寿险解决的是不幸身故以后,家人可以一次性获得一笔大额的赔偿,这笔赔偿可以用于老人养老,孩子教育,偿还房贷、车贷等贷款。
按照保障期限,寿险可以分为定期寿险和终身寿险。定期寿险只保障一段时间,可以是一年,也可以是几十年,保障期内没有出险,不会退你一分钱;终身寿险指的是保终身,人固有一死,所以这个险种是一定会赔给你的,因此价格也比较高。
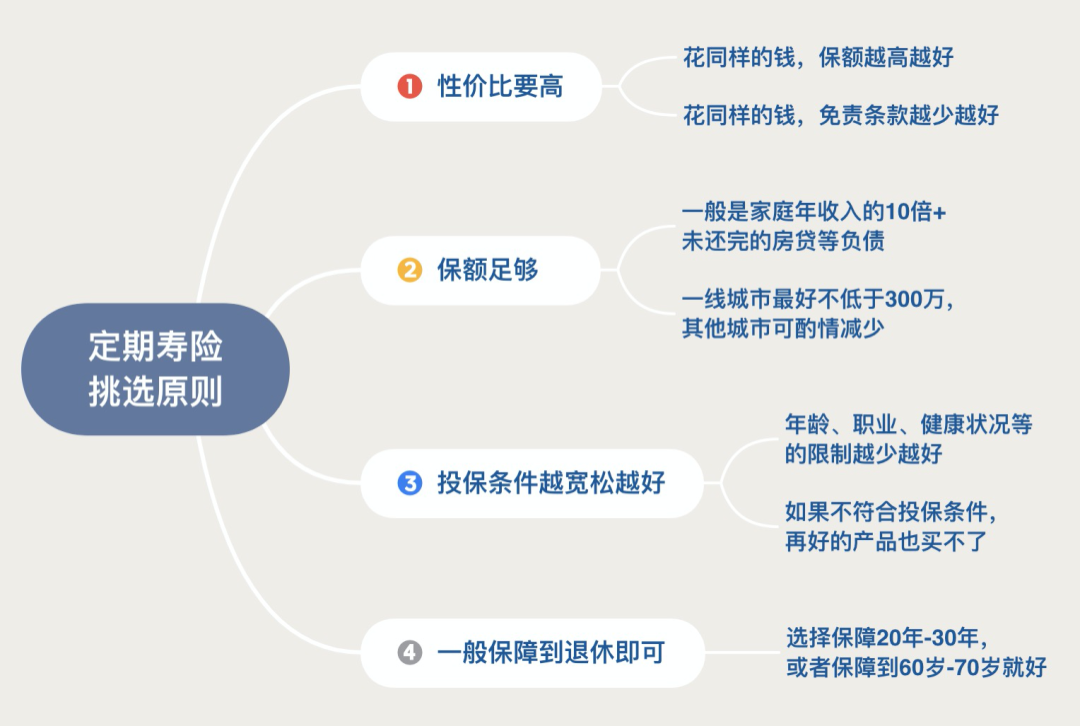
一般推荐都是买定期寿险,一个是因为便宜,差不多保额的定期寿险差不多只有终身寿险的五分之一;另一方面等我们这一辈老了的时候,孩子都已经长大了,身上的担子就轻了很多,家中的主要劳动力也不是自己了,就没什么必要买寿险了。
关于定期寿险挑选原则如下:
前段时间在油管上看到一个 BUILD YOUR OWN WEBPACK 的演讲,作者以简单易懂的方式,现场一步步实现了一个 100 行代码左右的webpack,顿时让我对研究 webpack 多了一丢丢的兴趣。webpack 功能虽然很强大,但那复杂的配置,也是让一波猿望而却步。今天我们就来看下,这 100 行代码是如何实现一个简易的 webpack 的。
在正式分析前,我们先来看几个 babel 的包:
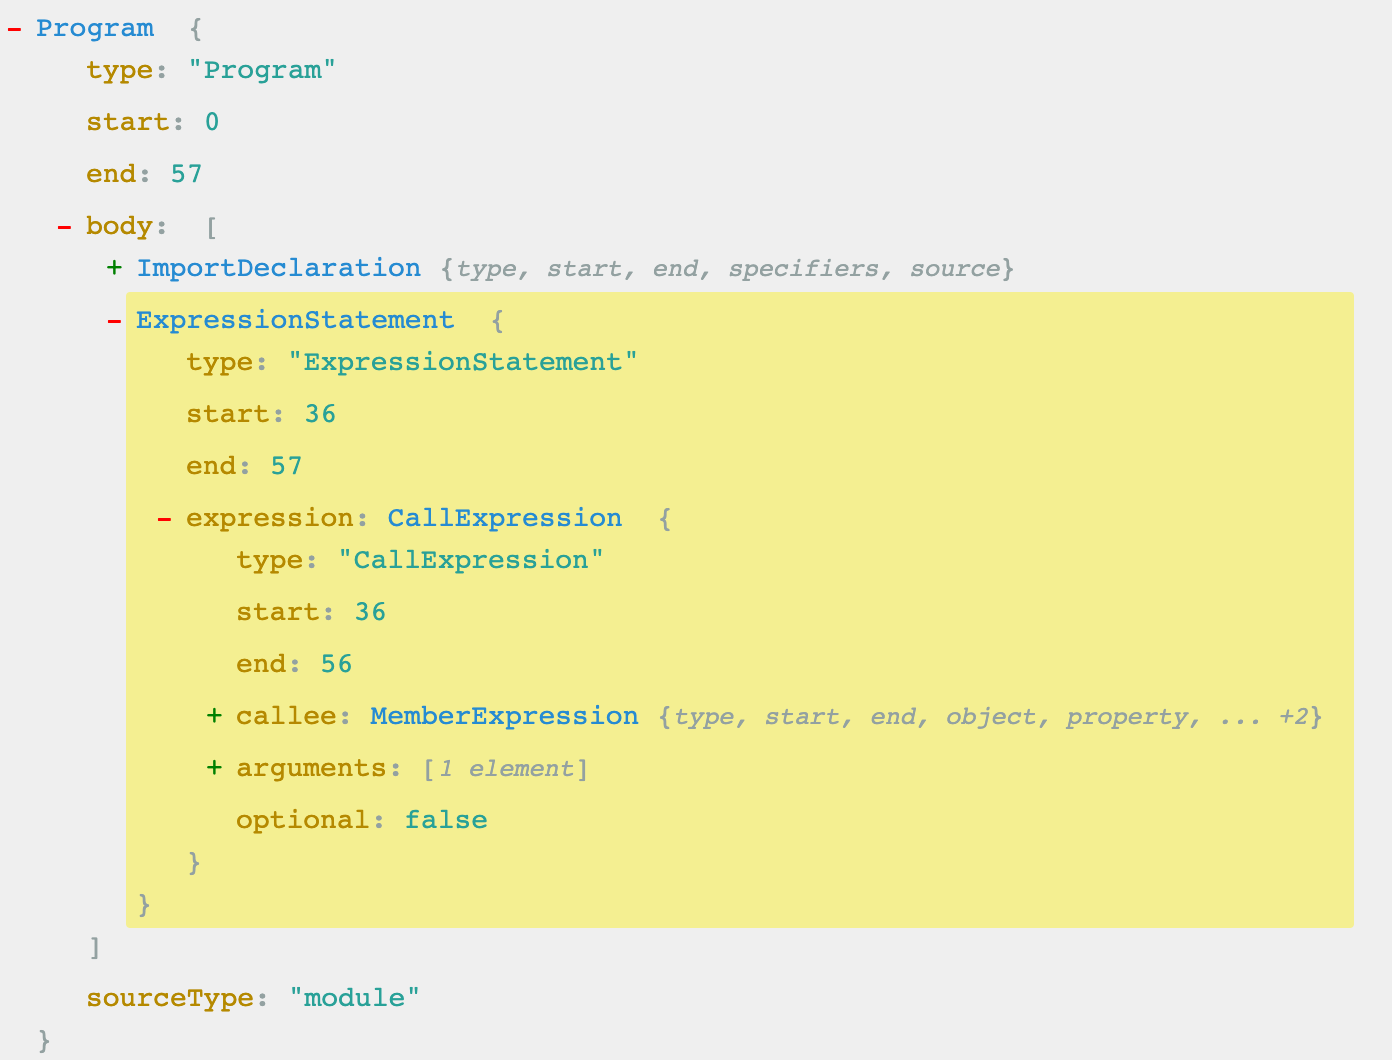
@babel/parser 的作用是把一段代码转换成 AST,比如下面这段代码:
import message from '/message.js';

console.log(message);
经过转换变成:
你可以通过 astexplorer 自己试下。
@babel/traverse 的作用是可以增删改查 parse 生成的语法树。
@babel/core 的作用就是代码的转换。
好了,了解过这三个包的大致用法后,我们来看下下面这个函数,
let ID = 0;
function createAsset(filename) {
  const content = fs.readFileSync(filename, 'utf-8');

  const ast = babylon.parse(content, {
    sourceType: 'module'
  });

  let dependencies = [];

  traverse(ast, {
    ImportDeclaration: ({ node }) => {
      dependencies.push(node.source.value);
    }
  });

  const id = ID++;

  const { code } = babel.transformFromAstSync(ast, null, {
    presets: ['@babel/preset-env']
  });

  return {
    id,
    filename,
    dependencies,
    code
  };
}
createAsset 方法很简单,根据传入的文件路径,获取到文件内容,然后通过 @babel/parser 包生成对应的 AST;接着使用 traverse 方法来获取该文件 import 了哪些文件,并且把这些依赖存储在 dependencies 数组中;然后用 transformFromAstSync 方法把 AST 转换成 es5 的代码。最终返回一个对象,包括文件 ID,文件路径,依赖及内容代码。(下文中提到的对象数据,都是指返回的这个对象)
那么对于那些被依赖的文件,如何来遍历查询他们的依赖关系呢?
function createGraph(entry) {
  const mainAsset = createAsset(entry);

  const queue = [mainAsset];

  for (const asset of queue) {
    const dirname = path.dirname(asset.filename);

    asset.mapping = {};

    asset.dependencies.forEach(relativePath => {
      const absolutePath = path.join(dirname, relativePath);

      const child = createAsset(absolutePath);

      asset.mapping[relativePath] = child.id;

      queue.push(child);

    });
  }

  return queue;
}
首页根据入口文件拿到它所对应的对象数据,既然要做广度遍历,那先放入一个数组当中,然后逐层开始遍历。首先获取 entry 文件所在目录,然后依赖文件路径,获取依赖文件的绝对路径,再次调用 createAsset 方法返回依赖文件所包含的对象数据,同时标记文件 ID,然后 push 到数组中,等待下次的循环遍历。最后的 queue 队列,则包含了所有文件的依赖关系。
那么当我们拿到完整的依赖关系后,怎么让代码能在浏览器中跑起来呢,我们知道经过 babel 转换后的代码是 CommonJS 规范的,如果不转换格式,是不能在浏览器端执行的。
function bundle(graph) {
  let modules = '';

  graph.forEach(mod => {
    modules += `${mod.id}:[
      function(module, exports, require) {
        ${mod.code}
      },
      ${JSON.stringify(mod.mapping)},
    ],`;
  });

  const results = `
    (function(modules) {
      function require(id) {
        const [fn, mapping] = modules[id];
        function localRequire(relativePath) {
          return require(mapping[relativePath]);
        }
        const module = { exports: {} };

        fn(module, module.exports, localRequire);
        return module.exports;
      }
      require(0);
    })({${modules}})
  `;
  return results;
}
要想跑起来,我们得先提供 module、exports 和 require 三个变量。如果结合经过 babel 转换后的代码来看,可能会更好的理解上面这段代码:
// name.js
export const nickname = 'jax';
转换后变成:
"use strict";

Object.defineProperty(exports, "__esModule", {
  value: true
});
exports.nickname = void 0;
var nickname = 'jax';
exports.nickname = nickname;
// message.js
import { nickname } from './name.js';
export default `hello ${nickname}!`;转换后变成:
"use strict";

Object.defineProperty(exports, "__esModule", {
  value: true
});
exports.default = void 0;

var _name = require("./name.js");

var _default = "hello ".concat(_name.nickname, "!");

exports.default = _default;在分析模块之间依赖关系的时候,我们的实现有什么问题吗?如果存在一个模块被多个模块引用,或者存在两个模块互相引用又会出现上面问题呢?
答案在 minipack 的 PR 中可以找到。
自从换了工作后,每天都有忙不完的业务代码要写,已经很久没有学/写点东西了。刚好最近在组内做了一次小分享,那就把这次分享的内容整理成文吧。可能很多人会和我一样,平时对 css 的关注度没有像其他技术一样那么多,很多都停留在【能用就行】的阶段,对 css 背后的一些明文规范也不是很清楚。那么今天我们就拿 vertical-align 来说下吧,大家都知道它可以用来指定元素的垂直对齐方式,但是你平时真的有用对吗?
我们先来看几个例子,都很简单而且平时会经常碰到。
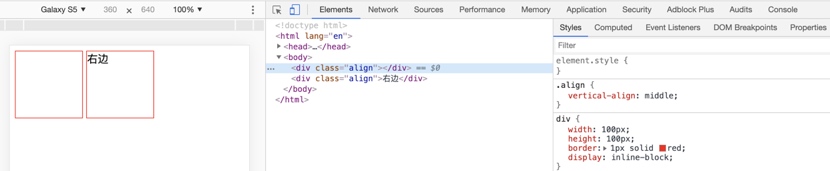
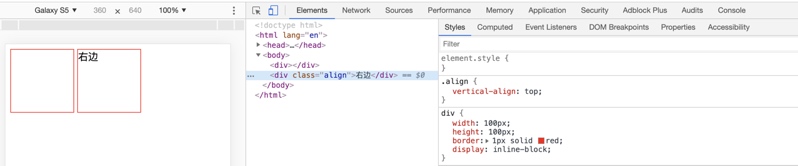
Demo1:两个并排的 div 元素,设置为 inline-block ,可以看到能水平对齐展示
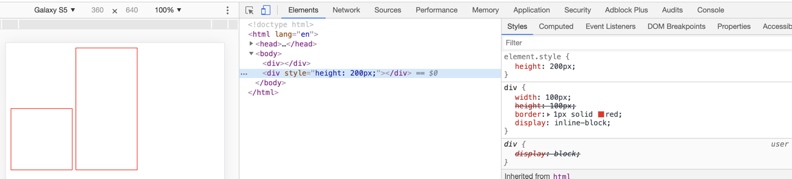
Demo2:同样是两个设置为 inline-block 的 div,但这次右边的 div 内增加两个汉字,导致右边的 div 跑到了下边。
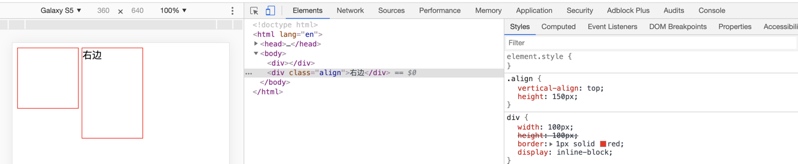
Demo3:在 Demo2 的基础上,我们对第二个 div 添加了一个 class,class 的内容是 vertical-align:top,神奇的让右边的 div 再次和左边的 div 水平对齐了。
Demo4:在 Demo2 的基础上,我们在左边的 div 内也加入两个汉字,也可以达到和 Demo3 一样的效果。
例子真的都很简单,没有引入任何复杂的其他样式来干扰我们的测试,但通过添加汉字和一句 vertical-align 实现了两个 div 从对齐到不对齐,再到对齐,是不是很神奇 :)
既然今天讨论的是 vertical-align,那 vertical-align 到底是什么呢?来自 MDN 上的介绍:
用来指定行内元素(inline)或表格单元格(table-cell)元素的垂直对齐方式
我们再来看下 w3c 上的规范文档
从文档上可以看到,value 值有 baseline、sub、super、...,初始值为 baseline,仅作用于 inline-level 和 table-cell 的元素,也就是说对于 block 元素是不起作用的,无继承,如果后面跟的是百分比值,那么取决于元素本身的 line-height 值。
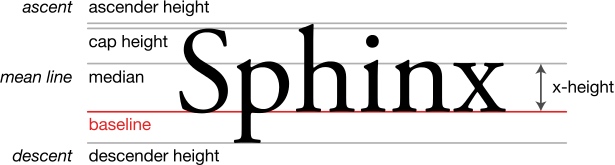
初始值为 baseline 基线,那可能会疑惑什么是基线呢?可以通过下面这张图了解:
它是英文字母小写的 x 下边缘线就是基线,而且字母 x 的高度也称为 x-height。
| 属性值 | 描述 |
|---|---|
| top | Align the top of the aligned subtree with the top of the line box.(使元素及其后代元素的顶部与整行的顶部对齐) |
| bottom | Align the bottom of the aligned subtree with the bottom of the line box.(使元素及其后代元素的顶部与整行的顶部对齐) |
| baseline | Align the baseline of the box with the baseline of the parent box. If the box does not have a baseline, align the bottom margin edge with the parent's baseline. (将元素的基线与父元素的基线对齐。 如果该元素没有基线,则将下边距边缘与父元素的基线对齐) |
| middle | Align the vertical midpoint of the box with the baseline of the parent box plus half the x-height of the parent. (将元素的中点与父元素的基线加上父元素 x-height 的一半对齐) |
| sub | Lower the baseline of the box to the proper position for subscripts of the parent's box. (This value has no effect on the font size of the element's text.) (使元素的基线与父元素的下标基线对齐,对元素文本的 font size 无影响) |
| super | Raise the baseline of the box to the proper position for superscripts of the parent's box. (This value has no effect on the font size of the element's text.) (使元素的基线与父元素的上标基线对齐,对元素文本的 font size 无影响) |
| text-top | Align the top of the box with the top of the parent's content area. (使元素的顶部与父元素的字体顶部对齐) |
| text-bottom | Align the bottom of the box with the bottom of the parent's content area. (使元素的底部与父元素的字体底部对齐) |
<percentage> |
Raise (positive value) or lower (negative value) the box by this distance (a percentage of the 'line-height' value). The value '0%' means the same as ‘baseline’. (表示升高(正值)或者降低(负值)元素的距离(相对于 line-height 的值),0% 与 baseline 等同) |
<length> |
Raise (positive value) or lower (negative value) the box by this distance. The value '0cm' means the same as ‘baseline'. (表示升高(正值)或者降低(负值)元素的距离,0 cm 和 baseline 等同) |
上面列举了 value 值的一个解释说明,只要记个大概就好,后面真正使用的时候,直接套这里的规范来就行,但值得关注的是,里面缺少了 top 和 bottom 两个值,而且上面的对齐方式都是参考父元素。
| 属性值 | 描述 |
|---|---|
| top | Align the top of the aligned subtree with the top of the line box.(使元素及其后代元素的顶部与整行的顶部对齐) |
| bottom | Align the bottom of the aligned subtree with the bottom of the line box.(使元素及其后代元素的底部与整行的底部对齐) |
之所以要把 top 和 bottom 单独拎出来讲,是因为它俩的对齐方式与其他值不一样,它俩是使元素相对于线框(line box)对齐,至于线框,可以理解为内联级元素在一行中一个挨一个地排列,一旦当前行放不下了,就在它下方创建一个新行,所有这些行就是所谓的线框(line box),用来包住这一行的所有内容。不同大小的内容意味着不等高的线框,下图红色的线就是线框边界,可以看出它的高度取决于最顶部内容和最底部内容的差。
另外,我们在 w3c 的文档上还能看到两句总结性的结论:
第一句说 line-table 元素的基线取决于表格第一行的基线,这个不是我们本期讨论的重点。我们再来看下第二句,inline-block 元素的基线是常规流中其最后一个线框的基线,如果它没有常规流中的线框,或者是其 overflow 属性的值不是 visible ,基线则是它下边距的边界。
有了上面的理论知识,我们再回头看下最前面的几个问题,试着用上面的知识去解释下现象。

inline-block 元素的基线是最后一个 line box 的基线,当前 div 都为空,也就是没有线框,所以当前元素的基线是下边距边界,默认都是以 baseline 方式对齐,所以两个 div 基线对齐,就是呈现水平对齐了。为了验证上面的解释,我们把第二个 div 的高度设置为
200px,可以看到仍旧是底部对齐,说明解释是对的。

第一个 div 没有内容,所以基线是下边距边界,第二个 div 包含了内容文本,所以它的基线是最后一行的 line box 基线,两个 div 都是以默认 baseline 对齐方式,所以呈现第一个 div 的下边距边界与第二个 div 的内容基线对齐。同样为了验证上面的解释,我们在第二个 div 内写入两行文本,可以看到左边的 div 与第二个文本底部对齐了;或者是对左边的 div 添加一个下边距,可以看到下边距与右边的文本底部对齐了,所以两个 case 都再次证明上面的解释是正确的。
第一个 div 还是没有内容,所以基线仍旧是底部下边界。第二个 div 这次加了 vertical-align:top,所以它会使元素及其子元素的顶部,与线框 line box 的顶部对齐,这里的线框指的是两个 div 所在的线框,那顶部边界也就是第一个 div 的顶部,所以呈现两个 div 顶部对齐。同样,为了验证我们把第二个 div 的高度设置为 150px,结果发现还是顶部对齐排列,所以上面的分析也是正确的。

这个就比较简单了,两个 div 都有内容,所以它们的基线都是最后一个线框 line box 的基线,默认都是 baseline 方式对齐,所以两个 div 的基线对齐,因此两个 div 也对齐。为了验证是与最后一个线框对齐,我们在左边的 div 内再加入一行文字,可以看到这次左边的最后一行与右边的最后一行对齐了,所以确实是基于最后一个线框对齐。
通过上面案例的分析,大家是不是对 vertical-align 有了一些了解呢?那不妨来思考一下下面这个案例为什么能对齐:
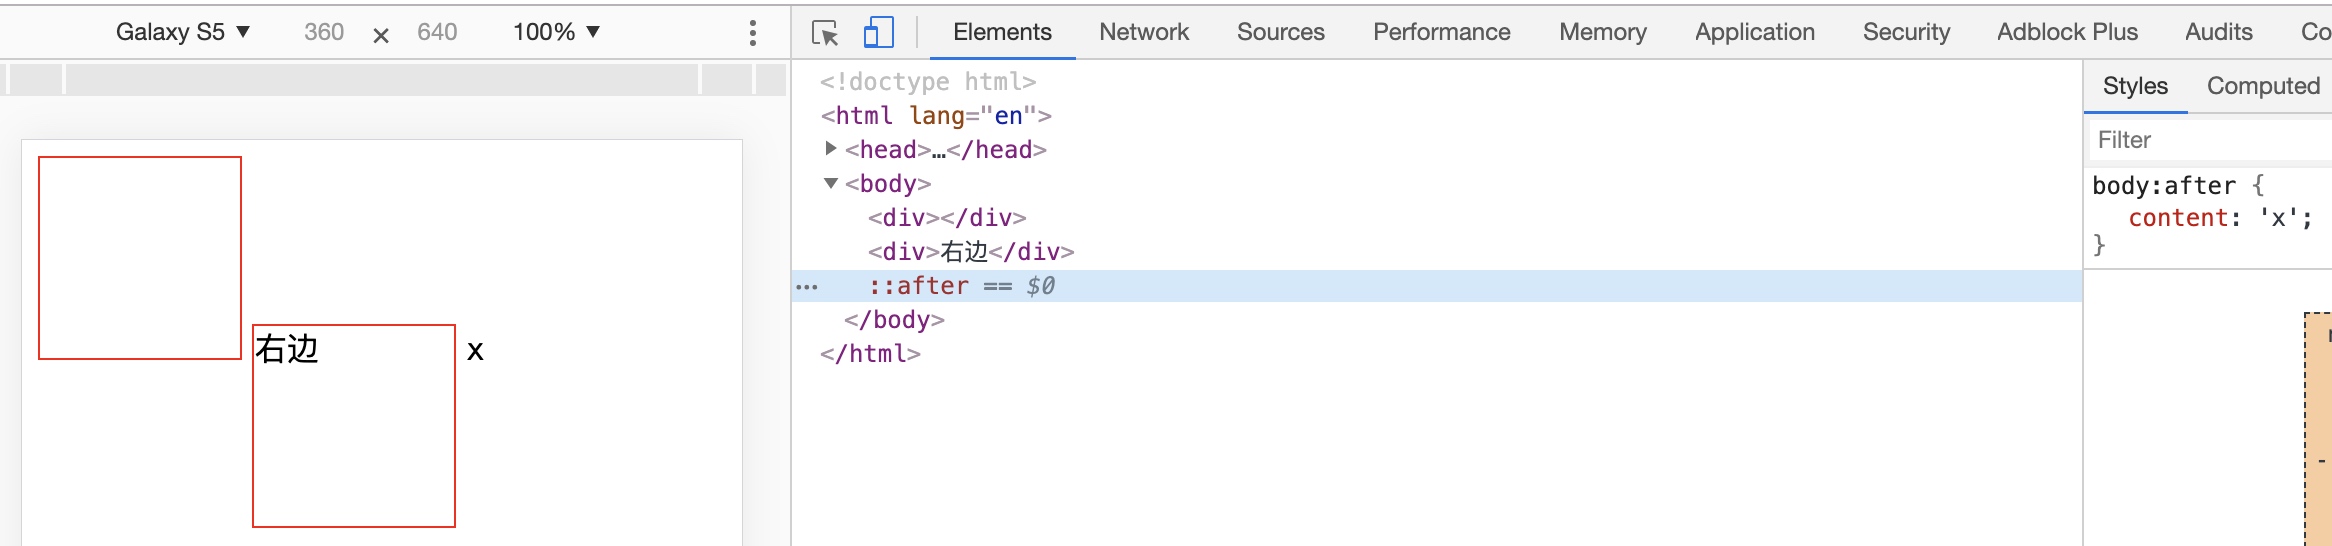
还是由两个 inline-block 的 div 组成,左边的无内容,右边的包含一行文本,且两个 div 都被设置了 vertical-align:middle 属性,那为什么这样也可以对齐呢?
我们试着方向推导下,如果都去掉 vertical-align:middle 属性,由问题二分析可知会如下呈现
然后我们再来回顾下,vertical-align:middle 是将元素的中点与父元素的基线加上父元素 x-height 的一半对齐,所以知道父元素基线在哪成了关键。这里的父元素是 body,那怎么获取父元素的基线呢?这里有个技巧,因为基线是字母 x 的下边缘线,所以给 body 添加一个 after 伪类,content 内容为 x,这样就能知道父元素的基线在哪里了
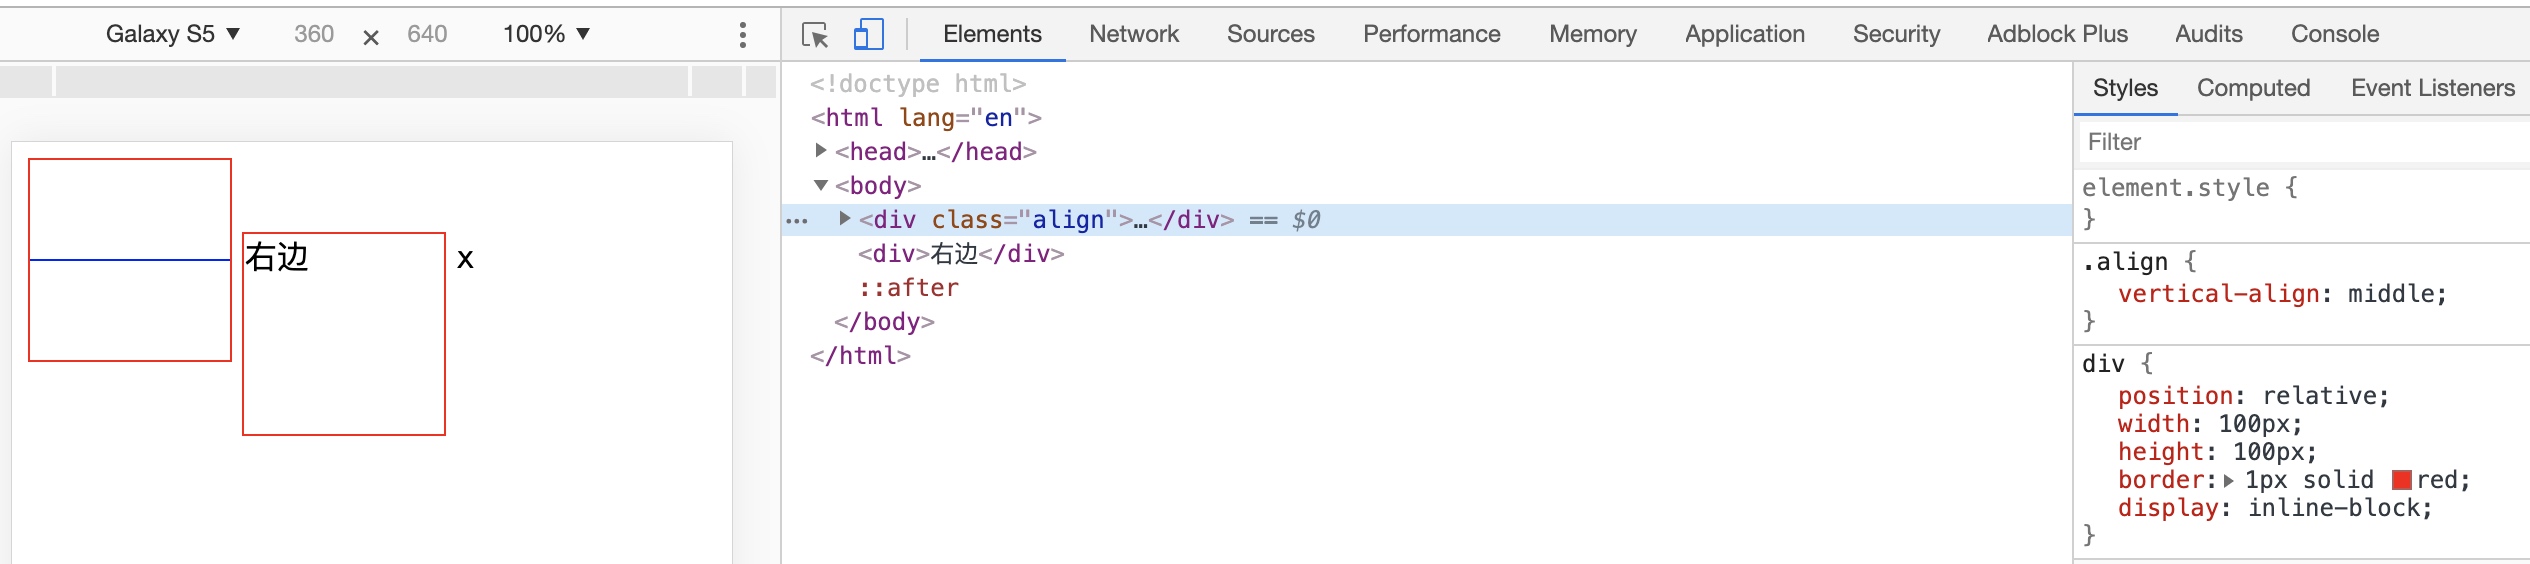
那么我们试着给左边的 div 加一个 vertical-align:middle,同时为方便理解,把左边 div 的中间显示出来,
可以看到左边的 div 的中点与父元素基线加上父元素 x-height 的一半对齐了,然后再对右边的 div 同样添加 vertical-align:middle,这样右边的 div 的中点也同父元素基线加上父元素 x-height 的一半对齐,所以最终两个 div 对齐。
本文是基于[email protected]来讲解的
从14年开始接触 Koa,翻过源码,写过文章,后面也陆续用 Koa 做过一些项目,但一直都没系统性的学习总结过。今天想通过这篇文章,给大家介绍下 Koa 中中间件从加载到执行的整个过程剖析。如有不准确的地方还忘指出。
我们先来看下 Koa 的整个发展历程,每个里程碑都发生了哪些变化
纵观整个发展历程,我们似乎发现个规律,Koa 每两年发布一个大版本。那么,我们是不是可以期待下2019年迎来 v3 呢?
在正式分析 Koa 源码之前,我们还需要一些其他知识的储备。这里我们就来简单回顾下 Generator 函数、Co & Promise 的使用。如果想深入学习的,可以网上找找相关的资料来学习。如果你已熟练掌握它们的用法,可以直接跳过下面内容,继续阅读后面内容。
Generator 函数
generator 是 ES6 中处理异步编程的解决方案,我们通过一个简单的例子,来回顾下它的用法。
function* gen1() {
  console.log('gen1 start');
  yield 1;
  var value = yield 2;
  console.log(value);
  yield* gen2();
  yield 4;
  console.log('gen1 end');
}

function* gen2() {
  console.log('gen2 start');
  yield 3;
  console.log('gen2 end');
}

var g = gen1();
g.next(); 			// gen1 start {value: 1, done: false}
g.next(); 			// {value: 2, done: false}
g.next('delegating to gen2');   // delegating to gen2 gen2 start  {value: 3, done: false}
g.next(); 			// gen2 end {value: 4, done: false}
g.next(); 			// gen1 end {value: undefined, done: true}
看完例子,我们需要注意几个点:
Co & Promise 的使用
通过上面的例子我们可以看到,通过不断的调用 next 方法,可以执行完整个 generator function。那有没有什么解决方案,可以自动的调用这些 next 方法呢?答案就是 co。另外,Promise 作为 ES6 中提供的解决异步编程的方案,可以有效的规避 callback hell 的产生。这里同样通过一个小例子,来回顾下 co 的实现原理以及 Promise 的用法。
var co = require('co');

co(function* () {
  var a = Promise.resolve(1);
  var b = Promise.resolve(2);
  var c = Promise.resolve(3);
  var res = yield [a, b, c];
  console.log(res);
  // => [1, 2, 3]
}).catch(onerror);

function onerror(err) {
  console.log(err.stack);
}
这个例子 res 直接输出了 [1, 2, 3]。那我们来看下,co 内部到底做了什么操作,直接上代码
function co(gen) {
  // xxx
  return new Promise(function(resolve, reject) {
    if (typeof gen === 'function') gen = gen.apply(ctx, args);
    if (!gen || typeof gen.next !== 'function') return resolve(gen);

    onFulfilled();

    function onFulfilled(res) {
      var ret;
      try {
        ret = gen.next(res);
      } catch (e) {
        return reject(e);
      }
      next(ret);
    }

    function onRejected(err) {
      var ret;
      try {
        ret = gen.throw(err);
      } catch (e) {
        return reject(e);
      }
      next(ret);
    }

    function next(ret) {
      if (ret.done) return resolve(ret.value);
      var value = toPromise.call(ctx, ret.value);
      if (value && isPromise(value)) return value.then(onFulfilled, onRejected);
      return onRejected(new TypeError('You may only yield a function, promise, generator, array, or object, '
        + 'but the following object was passed: "' + String(ret.value) + '"'));
    }
  }

  // xxx
}

function toPromise(obj) {
  if (!obj) return obj;
  if (isPromise(obj)) return obj;
  if (isGeneratorFunction(obj) || isGenerator(obj)) return co.call(this, obj);
  if ('function' == typeof obj) return thunkToPromise.call(this, obj);
  if (Array.isArray(obj)) return arrayToPromise.call(this, obj);
  if (isObject(obj)) return objectToPromise.call(this, obj);
  return obj;
}

function arrayToPromise(obj) {
  return Promise.all(obj.map(toPromise, this));
}
可以看到 co 最终返回的是一个 Promise 对象,所以才有了例子中的 catch 方法,这个先不管。我们来看下 Promise 内部的具体实现
首先判断这个 gen 是不是一个 function,如果是就直接调用;再通过判断是否有 next 方法,来判断是不是一个 generator 实例,如果不是就直接 resolve 返回;在函数 onFulfilled 内部第一次调用 gen.next 方法,ret 的值 {value: 数组,done: false},再把 ret 传给内部的 next 方法;因为我们知道 ret.value 的值是一个数组,所以我们直接来看 arrayToPromise 这个方法。
大家先回忆下 Promise 的用法,Promise.resolve() 可以创建一个 Promise 实例,Promise.all() 用于将多个 Promise 实例,包装成一个新的 Promise 实例。只有数组中的每个实例状态都变成 fulfilled 的时候,Promise.all 的状态才会是 fulfilled,此时数组中每个实例的返回值组成一个数组,传递给 all 的回调函数。
因为我们例子中用的都是 Promise.resolve(),所以我们 Promise.all 的状态肯定是 fulfilled。回头看 next 方法中的
if (value && isPromise(value))
	return value.then(onFulfilled, onRejected);
此时的 value 值是 Promise.all 包装成的新实例,且状态是 fulfilled,调用 then 的第一个回调函数 onFulfilled,参数是有各个子实例返回值组成的数组,也就是 [1, 2, 3]。所以到第二次调用 gen.next 方法的时候,res 的值是数组 [1, 2, 3]。通过前面 generator 中的回顾,我们知道,传给 gen.next 的参数会赋值给外部 yield 左侧的变量,所以上述例子中,res 最终输出 [1, 2, 3]。而此时我们内部的 onFulfilled 中,ret 的值为 {value: undefined, done: true},在 next 方法中直接 resolve 返回,结束运行。
有了上面的这些基础打底,终于可以来讲讲正题了。老规矩,我们先来看下 Koa 中如何添加中间件。
var koa = require('koa');
var app = koa();

app.use(function* (next) {
  console.log('gen1 start');
  yield next;
  console.log('gen1 end');
});

app.use(function* (next) {
  console.log('gen2 start');
  yield next;
  console.log('gen2 end');
});

app.listen(3000);
在这里,我们添加了两个中间件,先不着急知道代码的输出结果,当你第一次看到这段代码的时候,会不会有疑问?
那么我们就带着这些问题,来看下 Koa 内部是怎么实现的,为方便理解,删去了部分代码
function Application() {
  // xxx
  this.middleware = [];
  // xxx
}

app.use = function(fn){
  // xxx
  this.middleware.push(fn);
  return this;
}

app.listen = function(){
  debug('listen');
  var server = http.createServer(this.callback());
  return server.listen.apply(server, arguments);
};

app.callback = function(){
  // xxx
  var fn = this.experimental
    ? compose_es7(this.middleware)
    : co.wrap(compose(this.middleware));

  if (!this.listeners('error').length) this.on('error', this.onerror);

  return function handleRequest(req, res){
    // xxx
    fn.call(ctx).then(function handleResponse() {
      respond.call(ctx);
    }).catch(ctx.onerror);
  }
};
由代码可知,我们通过 use 方法添加的中间件,都被塞到了一个事先定义好的 middleware 数组中。通过 app.listen 入口方法,创建了一个 http server 服务。在 callback 回调中,我们着重来看下这行代码
co.wrap(compose(this.middleware))这是嵌套了两层方法,第一层由中间件组件的 middleware 数组被传入了 compose 方法中;第二层是由第一层返回的结果传给了 co.wrap 方法。那我们先来看第一层的 compose 方法
function compose(middleware){
  return function *(next){
    if (!next) next = noop();

    var i = middleware.length;

    while (i--) {
      next = middleware[i].call(this, next);
    }

    return yield *next;
  }
}

function *noop(){}
返回一个 generator 函数 ,在函数内部,i 是数组长度,middleware[i] 表示数组最末尾一个中间件,执行middleware[i].call(this, next) 生成一个 generator 实例并赋值给 next。大家注意下这里的参数 next,第一次 next 为 noop 这个空的 generator function。做完一次 i-- 后,next 成了上一个 generator 函数的实例对象,以此类推。换句话说,这个 while 循环从最后一个中间件开始处理,一直往前,把后一个 generator 函数的实例作为前一个 generator 函数的参数传入,那么执行完整个循环,我们的 next 的值就是数组第一个 generator 的实例。
看到这,我们是不是可以解答上面第一个疑问了呢,参数 next 其实就是下一个中间件的 generator 实例。
compose 的存在,让整个中间件都串联了起来,但它并没有让中间件跑起来。要让整个过程跑起来,关键还是要看 co。我们继续来看下面的代码
co.wrap = function (fn) {
  createPromise.__generatorFunction__ = fn;
  return createPromise;
  function createPromise() {
    return co.call(this, fn.apply(this, arguments));
  }
};
这里的 fn 就是我们上面 compose 返回的 generator 函数。在 wrap 内部调用 co,继续我们 co 内部的分析,在函数 onFulfilled 内部第一次调用 gen.next 方法,执行到 compose 内部的 yield *next,next 是我们的第一个中间件,根据 delegating yield 的知识,它会代理到第一个中间件的内部去,在我们中间件的 yield next 处暂停,此处 next 是下一个中间件的 generator 实例。ret 的值是 {value: generator实例, done: false},再把 ret 传给内部的 next 方法。
if (isGeneratorFunction(obj) || isGenerator(obj))
	return co.call(this, obj);
如果 value 值是 generator 函数或者是 generator 实例,则继续调用 co。在函数 onFulfilled 内部第二次调用 gen.next 方法到第二个中间的 yield next 处暂停。以此类推,直到最后遇到那个空的 generator 函数 noop 为止,执行 if (ret.done) return resolve(ret.value),promise 状态置为 fulfilled。
var value = toPromise.call(ctx, ret.value);
if (value && isPromise(value))
	return value.then(onFulfilled, onRejected);
因为每次调用 co 都是返回一个 promise 实例,且 ret.done 为 true 的时候,状态被置为 fulfilled,所以执行回调中的 onFulfilled 函数。这样又从最后一个中间件往回执行,像个回形标一样,整个流程串了起来。
看完这部分,我们再来解答下剩下的两个疑问,yield next 用于执行下一个中间件的内容;中间件之间的执行顺序也是按照 use 的顺序来执行的。
是不是觉得整个过程很绕呢,但又不得不佩服作者设计的巧妙。我们可以从下图更直观的理解整个执行过程
图片来自参考3
到此为止,中间件的整个执行过程都已经讲解完了。不过大家在看 compose 源码的时候,有没有一个疑惑呢,为什么在 compose 内部是 yield *next,而在我们的中间件里都是 yield next 呢?按理说这里的 next 都是 generator 实例啊,有什么区别?
Koa 的维护者们也曾讨论过这个问题,具体看查看最后两个参考链接。性能上来说,yield *next 稍微优于 yield next,毕竟前者是原生的,后者是需要经过 co 包装处理过的,但写成后者也没什么大影响,Koa 作者 TJ 本人也是很反对两者之间切换来写的,推荐使用后者。再者,yield * 后面只能跟 generator 函数或者是可迭代的对象,而中间件中的 yield 我们可以跟 function,promise,generator,array 或者 object,因为 co 最终都会帮我们处理成 promise,所以建议大家在用 Koa 做开发的时候,都能写成 yield next。
通过上篇文章 Vue 源码学习(二)- 构造函数,我们知道了 Vue 的构造被多个函数包装处理,所以我们今天来分析下第一个包装函数 initMixin,它到底做了哪些处理呢?
我们可以看到,在 initMixin 方法中,在 Vue 的原型链上增加了 _init 方法,这个方法是不是很眼熟,在分析构造函数的时候,它就调用了这个方法,原来是在这里定义的。
// src/core/instance/init.js

let uid = 0

export function initMixin (Vue: Class<Component>) {
  Vue.prototype._init = function (options?: Object) {
    const vm: Component = this
    // a uid
    vm._uid = uid++

    let startTag, endTag
    /* istanbul ignore if */
    if (process.env.NODE_ENV !== 'production' && config.performance && mark) {
      startTag = `vue-perf-start:${vm._uid}`
      endTag = `vue-perf-end:${vm._uid}`
      mark(startTag)
    }

    // a flag to avoid this being observed
    vm._isVue = true
    // merge options
    if (options && options._isComponent) {
      // optimize internal component instantiation
      // since dynamic options merging is pretty slow, and none of the
      // internal component options needs special treatment.
      initInternalComponent(vm, options)
    } else {
      vm.$options = mergeOptions(
        resolveConstructorOptions(vm.constructor),
        options || {},
        vm
      )
    }
    /* istanbul ignore else */
    if (process.env.NODE_ENV !== 'production') {
      initProxy(vm)
    } else {
      vm._renderProxy = vm
    }
    // expose real self
    vm._self = vm
    initLifecycle(vm)
    initEvents(vm)
    initRender(vm)
    callHook(vm, 'beforeCreate')
    initInjections(vm) // resolve injections before data/props
    initState(vm)
    initProvide(vm) // resolve provide after data/props
    callHook(vm, 'created')

    /* istanbul ignore if */
    if (process.env.NODE_ENV !== 'production' && config.performance && mark) {
      vm._name = formatComponentName(vm, false)
      mark(endTag)
      measure(`vue ${vm._name} init`, startTag, endTag)
    }

    if (vm.$options.el) {
      vm.$mount(vm.$options.el)
    }
  }
}
首先声明了常量 vm,指向当前 Vue 实例,然后添加了一个唯一标示 _uid,其值为 uid。uid 初始值为 0,所以每次实例化一个 Vue 实例之后,uid 的值都会自增 ++。
下面我们可以看到两段关于性能标记的代码,他们主要是对中间包裹的代码做性能追踪分析用的:
let startTag, endTag
/* istanbul ignore if */
if (process.env.NODE_ENV !== 'production' && config.performance && mark) {
  startTag = `vue-perf-start:${vm._uid}`
  endTag = `vue-perf-end:${vm._uid}`
  mark(startTag)
}

// 中间代码...

/* istanbul ignore if */
if (process.env.NODE_ENV !== 'production' && config.performance && mark) {
  vm._name = formatComponentName(vm, false)
  mark(endTag)
  measure(`vue ${vm._name} init`, startTag, endTag)
}
我们这边不做详细介绍,主要还是来看下中间部分的内容:
// a flag to avoid this being observed
vm._isVue = true
// merge options
if (options && options._isComponent) {
  // optimize internal component instantiation
  // since dynamic options merging is pretty slow, and none of the
  // internal component options needs special treatment.
  initInternalComponent(vm, options)
} else {
  vm.$options = mergeOptions(
    resolveConstructorOptions(vm.constructor),
    options || {},
    vm
  )
}
/* istanbul ignore else */
if (process.env.NODE_ENV !== 'production') {
  initProxy(vm)
} else {
  vm._renderProxy = vm
}
// expose real self
vm._self = vm
initLifecycle(vm)
initEvents(vm)
initRender(vm)
callHook(vm, 'beforeCreate')
initInjections(vm) // resolve injections before data/props
initState(vm)
initProvide(vm) // resolve provide after data/props
callHook(vm, 'created')
我们来逐行分析下,首先是在 Vue 实例上添加 _isVue 属性,并设置其值为 true。看注释知道是为了避免被响应系统观察,也就是说,如果一个对象拥有 _isVue 属性并且值为 true,那么就代表该对象是 Vue 实例,这样就可以避免被观察。
接下来是一个 options && options._isComponent 判断,它是用来初始化内部组件用到的,这块内容等讲到组件部分再来分析,所以先看 else 部分。
vm.$options = mergeOptions(
  resolveConstructorOptions(vm.constructor),
  options || {},
  vm
)
在 Vue 实例上添加了 $options 属性,在官方文档中,我们也能看到它是用于当前 Vue 实例的初始化选项,它是通过 mergeOptions 函数创建而来。该函数有三个参数,第一个是通过函数 resolveConstructorOptions 返回得到,第二个是调用 Vue 构造函数时透传进来的对象,第三个参数是当前的 Vue 实例。
在讲 mergeOptions 前,我们先来看下 resolveConstructorOptions 函数,看名字应该是用来解析构造函数的 options,传的参数也是实例的构造函数。看下具体实现:
export function resolveConstructorOptions (Ctor: Class<Component>) {
  let options = Ctor.options
  if (Ctor.super) {
    const superOptions = resolveConstructorOptions(Ctor.super)
    const cachedSuperOptions = Ctor.superOptions
    if (superOptions !== cachedSuperOptions) {
      // super option changed,
      // need to resolve new options.
      Ctor.superOptions = superOptions
      // check if there are any late-modified/attached options (#4976)
      const modifiedOptions = resolveModifiedOptions(Ctor)
      // update base extend options
      if (modifiedOptions) {
        extend(Ctor.extendOptions, modifiedOptions)
      }
      options = Ctor.options = mergeOptions(superOptions, Ctor.extendOptions)
      if (options.name) {
        options.components[options.name] = Ctor
      }
    }
  }
  return options
}
通过上面调用时传递的参数 vm.constructor 知道,这里的 Ctor 是当前实例的构造函数,也就是 Vue 本身。那么这里一定是 Vue 吗?通过下面 if 判断中的 super 知道,Ctor 也有可能是个子类,因为只有之类才有 super 属性。也就是说 Ctor 有可能是通过 Vue.extend 创造的一个子类。
有了上面的理解,下面的 if 判断也比较好理解了。如果当前是 Vue 的实例,那么直接返回 Vue.options 的值。根据前面文章构造函数篇章知道,Vue.options 的值是通过全局 global-api 来初始化的,内容如下:
Vue.options = {
  components: {
    KeepAlive,
    Transition,
    TransitionGroup
  },
  directives: {
    model,
    show
  },
  filters: Object.create(null),
  _base: Vue
}
那么如果当前是子类的实例呢?
const superOptions = resolveConstructorOptions(Ctor.super)
const cachedSuperOptions = Ctor.superOptions
通过递归调用 resolveConstructorOptions 来获取父类的 options。
而 Ctor.superOptions 的值我们前面的文章 Vue.extend 中提到
Sub.superOptions = Super.options也就是说它是通过 Vue.extend 继承而来的父类的静态属性 options 值。
if (superOptions !== cachedSuperOptions) {
  // super option changed,
  // need to resolve new options.
  Ctor.superOptions = superOptions
  // check if there are any late-modified/attached options (#4976)
  const modifiedOptions = resolveModifiedOptions(Ctor)
  // update base extend options
  if (modifiedOptions) {
    extend(Ctor.extendOptions, modifiedOptions)
  }
  options = Ctor.options = mergeOptions(superOptions, Ctor.extendOptions)
  if (options.name) {
    options.components[options.name] = Ctor
  }
}
当 superOptions 和 cachedSuperOptions 不相等时,更新 Ctor.superOptions。这种情况比如如下例子:
var Profile = Vue.extend({
  template: '<p>{{firstName}} {{lastName}} aka {{alias}}</p>',
});
Vue.mixin({ data: function () {
return {
  firstName: 'Walter',
  lastName: 'White',
  alias: 'Heisenberg'
}
}});
new Profile().$mount('#mount-point');
因为在执行 Vue.mixin 时,修改了 Vue.options 的值:
Vue.mixin = function (mixin: Object) {
  this.options = mergeOptions(this.options, mixin)
}
如果没有这个 if 判断,页面将只显示 aka,因为 Vue.options 上的值还是旧的。
接下来通过 resolveModifiedOptions 方法来检测“自身”的 options 是否发生变化,如果有变化,返回修改的值。Ctor.extendOptions 作为传递给 Vue.extend 的参数,和 superOptions 合并并赋值给 options,最终返回 options。
上面说了这么多,似乎都是和 options 有关。而且后面的内容,都会使用到这个 options。既然 options 这么重要,我们下一篇来说说 options 的合并策略 mergeOptions 函数是怎么实现的。
比较只会在同层进行,不会跨层比较。

这里会有三个对象,一个是新虚拟节点对象,一个是旧虚拟节点对象,另外一个就是真实的 dom 节点对象。
比较逻辑如下:

updateChildren(parentElm, oldCh, newCh) {
  let oldStartIdx = 0,
      newStartIdx = 0
  let oldEndIdx = oldCh.length - 1
  let oldStartVnode = oldCh[0]
  let oldEndVnode = oldCh[oldEndIdx]
  let newEndIdx = newCh.length - 1
  let newStartVnode = newCh[0]
  let newEndVnode = newCh[newEndIdx]
  let oldKeyToIdx
  let idxInOld
  let elmToMove
  let before
  while (oldStartIdx <= oldEndIdx && newStartIdx <= newEndIdx) {
    if (oldStartVnode == null) { //对于vnode.key的比较,会把oldVnode = null
      oldStartVnode = oldCh[++oldStartIdx]
    } else if (oldEndVnode == null) {
      oldEndVnode = oldCh[--oldEndIdx]
    } else if (newStartVnode == null) {
      newStartVnode = newCh[++newStartIdx]
    } else if (newEndVnode == null) {
      newEndVnode = newCh[--newEndIdx]
    } else if (sameVnode(oldStartVnode, newStartVnode)) {
      patchVnode(oldStartVnode, newStartVnode)
      oldStartVnode = oldCh[++oldStartIdx]
      newStartVnode = newCh[++newStartIdx]
    } else if (sameVnode(oldEndVnode, newEndVnode)) {
      patchVnode(oldEndVnode, newEndVnode)
      oldEndVnode = oldCh[--oldEndIdx]
      newEndVnode = newCh[--newEndIdx]
    } else if (sameVnode(oldStartVnode, newEndVnode)) {
      patchVnode(oldStartVnode, newEndVnode)
      api.insertBefore(parentElm, oldStartVnode.el, api.nextSibling(oldEndVnode.el))
      oldStartVnode = oldCh[++oldStartIdx]
      newEndVnode = newCh[--newEndIdx]
    } else if (sameVnode(oldEndVnode, newStartVnode)) {
      patchVnode(oldEndVnode, newStartVnode)
      api.insertBefore(parentElm, oldEndVnode.el, oldStartVnode.el)
      oldEndVnode = oldCh[--oldEndIdx]
      newStartVnode = newCh[++newStartIdx]
    } else {
      // 使用key时的比较
      if (oldKeyToIdx === undefined) {
        oldKeyToIdx = createKeyToOldIdx(oldCh, oldStartIdx, oldEndIdx) // 有key生成index表
      }
      idxInOld = oldKeyToIdx[newStartVnode.key]
      if (!idxInOld) {
        api.insertBefore(parentElm, createEle(newStartVnode).el, oldStartVnode.el)
        newStartVnode = newCh[++newStartIdx]
      } else {
        elmToMove = oldCh[idxInOld]
        if (elmToMove.sel !== newStartVnode.sel) {
          api.insertBefore(parentElm, createEle(newStartVnode).el, oldStartVnode.el)
        } else {
          patchVnode(elmToMove, newStartVnode)
          oldCh[idxInOld] = null
          api.insertBefore(parentElm, elmToMove.el, oldStartVnode.el)
        }
        newStartVnode = newCh[++newStartIdx]
      }
    }
  }
  if (oldStartIdx > oldEndIdx) {
    before = newCh[newEndIdx + 1] == null ? null : newCh[newEndIdx + 1].el
    addVnodes(parentElm, before, newCh, newStartIdx, newEndIdx)
  } else if (newStartIdx > newEndIdx) {
    removeVnodes(parentElm, oldCh, oldStartIdx, oldEndIdx)
  }
}
过程可以概括为:oldCh和newCh各有两个头尾的变量StartIdx和EndIdx,它们的2个变量相互比较,一共有4种比较方式。如果4种比较都没匹配,如果设置了key,就会用key进行比较,在比较的过程中,变量会往中间靠,一旦StartIdx>EndIdx表明oldCh和newCh至少有一个已经遍历完了,就会结束比较。
置换比较过程

原文地址:http://www.acuriousanimal.com/2017/08/12/understanding-the-nodejs-cluster-module.html
NodeJS 是单进程应用,这意味着默认情况下它不会利用多核系统。如果你有一个8核的 CPU,并且通过 $ node app.js 来运行一个 Node 程序,那么它只会在一个进程中运行,其余的 CPU 将会浪费掉。
幸运的是NodeJS 提供了一个 cluster 模块,它提供了一系列的函数和属性,来帮助我们创建能充分使用 CPU 的程序。不足为奇,cluster 模块中能最大化使用 CPU 正是通过衍生(fork)子进程的方式来达到的,类似于老 fork() 系统调用 Unix 系统。
cluster 模块包含了一系列的函数和属性,来帮助我们衍生子进程并充分利用多核系统。
通过 cluster 模块,父进程衍生出来的子进程可通过 IPC 通道来与父进程进行通信。记住进程之间是不共享内存的,是相互独立的内存空间
下面是引用了 NodeJS 官方文档来解释 cluster 模块
Node.js在单个线程中运行单个实例。 为了利用多核系统,用户有时需要启动一个进程集群来处理负载任务。
cluster 模块允许简单容易的创建共享服务器端口的子进程。
工作进程由
child_process.fork()方法创建,因此它们可以使用IPC和父进程通信,从而使各进程交替处理连接服务。child_process.fork()方法是child_process.spawn()的一个特殊情况,专门用于衍生新的 Node.js 进程。 跟child_process.spawn()一样返回一个ChildProcess对象。 返回的ChildProcess会有一个额外的内置的通信通道,它允许消息在父进程和子进程之间来回传递。 详见subprocess.send()。衍生的 Node.js 子进程与两者之间建立的 IPC 通信信道的异常是独立于父进程的。 每个进程都有自己的内存,使用自己的 V8 实例。 由于需要额外的资源分配,因此不推荐衍生大量的 Node.js 进程。
所以大部分的工作其实是由 child_process 模块来完成的,它可以产生新的进程并且帮助他们进行通信,比如创建管道(pipes)。推荐阅读文章你所不知道的Node.js子进程。
让我们来看一个简单的例子:
const cluster = require('cluster');
const http = require('http');
const numCPUs = require('os').cpus().length;

if (cluster.isMaster) {
  masterProcess();
} else {
  childProcess();
}

function masterProcess() {
  console.log(`Master ${process.pid} is running`);

  for (let i = 0; i < numCPUs; i++) {
    console.log(`Forking process number ${i}...`);
    cluster.fork();
  }

  process.exit();
}

function childProcess() {
  console.log(`Worker ${process.pid} started and finished`);

  process.exit();
}
保存代码为 app.js 并执行 $ node app.js。打印结果类似如下:
$ node app.js

Master 8463 is running
Forking process number 0...
Forking process number 1...
Forking process number 2...
Forking process number 3...
Worker 8464 started and finished
Worker 8465 started and finished
Worker 8467 started and finished
Worker 8466 started and finished当我们执行 app.js 的时候,操作系统会创建一个进程来运行我们的代码。我们引入 cluster 模块,并通过 isMaster 属性来判断是不是主进程。因为是第一个进程,所以 isMaster 值为 true,接着执行 masterProcess 函数。在 masterProcess 函数中根据 CPU 个数,从当前进程中循环 fork 出相同的子进程数。
通过 fork 方法创建的进程,就像是命令行中执行 $node app.js 一样,也就是说现在有多个进程在跑 app.js 的代码。
当每个子进程被创建和执行的时候,做的是跟第一次父进程一样的事,引入 cluster 模块执行 if 判断,不同的是现在 isMaster 为 false,所以他们执行 childProcess 函数。
注:NodeJS 还提供了 Child Processes 模块,可以简化与其他进程的创建和通信。例如,我们执行一条
ls -l的终端指令,让另外一个进程的标准输出通过管道(pipe)连接,作为它的标准输入。译者注:例如
ls -l /etc/ | wc -l
子进程一旦被创建,主进程和子进程之间的 IPC 通道也会被创建,我们可以通过 send() 方法来进行通信,send() 方法接受一个 object 对象作为参数。因为他们是不同的进程(不是线程),所以不能通过内存共享的方式来进行通信。
在主进程中,我们可以使用进程引用(即 someChild.send({...}))向子进程发送消息,并且在子进程内,我们可以简单地使用当前进程引用向主进程发送消息 process.send()。
修改 childProcess 函数如下:
function childProcess() {
  console.log(`Worker ${process.pid} started`);

  process.on('message', function(message) {
    console.log(`Worker ${process.pid} recevies message '${JSON.stringify(message)}'`);
  });

  console.log(`Worker ${process.pid} sends message to master...`);
  process.send({ msg: `Message from worker ${process.pid}` });

  console.log(`Worker ${process.pid} finished`);
}
我们通过 process.on('message', handler) 来监听 message 事件,然后通过 process.send({...}) 来发送消息。这里的消息是一个 Object 对象。
let workers = [];

function masterProcess() {
  console.log(`Master ${process.pid} is running`);

  // Fork workers
  for (let i = 0; i < numCPUs; i++) {
    console.log(`Forking process number ${i}...`);

    const worker = cluster.fork();
    workers.push(worker);

    // Listen for messages from worker
    worker.on('message', function(message) {
      console.log(`Master ${process.pid} recevies message '${JSON.stringify(message)}' from worker ${worker.process.pid}`);
    });
  }

  // Send message to the workers
  workers.forEach(function(worker) {
    console.log(`Master ${process.pid} sends message to worker ${worker.process.pid}...`);
    worker.send({ msg: `Message from master ${process.pid}` });
  }, this);
}
在 masterProcess 函数中,我们通过循环创建了 CPU 数等量的子进程,其中 cluster.fork() 返回的是一个子进程对象,我们把它存储在 workers 数组中,同时监听由子进程发来的信息。另外我们也通过 worker.send({...}) 从主进程往对应子进程发送消息。
打印结果如下:
$ node app.js

Master 4045 is running
Forking process number 0...
Forking process number 1...
Master 4045 sends message to worker 4046...
Master 4045 sends message to worker 4047...
Worker 4047 started
Worker 4047 sends message to master...
Worker 4047 finished
Master 4045 recevies message '{"msg":"Message from worker 4047"}' from worker 4047
Worker 4047 recevies message '{"msg":"Message from master 4045"}'
Worker 4046 started
Worker 4046 sends message to master...
Worker 4046 finished
Master 4045 recevies message '{"msg":"Message from worker 4046"}' from worker 4046
Worker 4046 recevies message '{"msg":"Message from master 4045"}'cluster 模块为 NodeJS 提供了充分利用 CPU 所需的功能,不仅弥补了 child process 模块的不足,如提供了大量工具来处理进程:启动,停止和管道输入/输出等,而且帮助我们能轻松创建子进程,通过创建 IPC 通道来进行父子进程间的通信。尽管在这篇文章中没能体现所有功能,但它对应用带来性能上的提升是不争的事实。下篇文章我将介绍 HTTP 服务中 cluster 模块的作用。
Vue 已然成为目前最流行的主流框架之一,现在出去找工作,如果说不会使用 Vue,似乎有些说不过去。我平时工作中也会使用到 Vue,但就使用率来说,只能算是用到了些常用的api,对于一些高阶用法或者是技术细节,了解甚少,遇到问题还是需要反复的去查询文档或者寻求他人帮助。所以想要彻底的搞懂 Vue,还是要从它的源码入手。
在此之前,我也看过很多网上别人写的关于源码分析的文章,不过如果不是按照自己的思路去一行一行的分析过,很容易遗忘掉。接下来我会出一些根据自己的理解,阅读 Vue 源码的系列文章,本人水平有限,欢迎指出。
声明:Vue 版本为:v2.6.10
我们先来看下 Vue 的目录结构,了解下大致的文件分布:
├── scripts ------------------------------- 构建相关的文件,一般情况下我们不需要动
│   ├── git-hooks ------------------------- 存放git钩子的目录
│   ├── alias.js -------------------------- 别名配置
│   ├── config.js ------------------------- 生成rollup配置的文件
│   ├── build.js -------------------------- 对 config.js 中所有的rollup配置进行构建
│   ├── ci.sh ----------------------------- 持续集成运行的脚本
│   ├── release.sh ------------------------ 用于自动发布新版本的脚本
├── dist ---------------------------------- 构建后文件的输出目录
├── examples ------------------------------ 存放一些使用Vue开发的应用案例
├── flow ---------------------------------- 类型声明,使用开源项目 [Flow](https://flowtype.org/)
├── packages ------------------------------ 存放独立发布的包的目录
├── test ---------------------------------- 包含所有测试文件
├── src ----------------------------------- 这个是我们最应该关注的目录,包含了源码
│   ├── compiler -------------------------- 编译器代码的存放目录,将 template 编译为 render 函数
│   ├── core ------------------------------ 存放通用的,与平台无关的代码
│   │   ├── observer ---------------------- 响应系统,包含数据观测的核心代码
│   │   ├── vdom -------------------------- 包含虚拟DOM创建(creation)和打补丁(patching)的代码
│   │   ├── instance ---------------------- 包含Vue构造函数设计相关的代码
│   │   ├── global-api -------------------- 包含给Vue构造函数挂载全局方法(静态方法)或属性的代码
│   │   ├── components -------------------- 包含抽象出来的通用组件
│   ├── server ---------------------------- 包含服务端渲染(server-side rendering)的相关代码
│   ├── platforms ------------------------- 包含平台特有的相关代码,不同平台的不同构建的入口文件也在这里
│   │   ├── web --------------------------- web平台
│   │   │   ├── entry-runtime.js ---------- 运行时构建的入口,不包含模板(template)到render函数的编译器,所以不支持 `template` 选项,我们使用vue默认导出的就是这个运行时的版本。大家使用的时候要注意
│   │   │   ├── entry-runtime-with-compiler.js -- 独立构建版本的入口,它在 entry-runtime 的基础上添加了模板(template)到render函数的编译器
│   │   │   ├── entry-compiler.js --------- vue-template-compiler 包的入口文件
│   │   │   ├── entry-server-renderer.js -- vue-server-renderer 包的入口文件
│   │   │   ├── entry-server-basic-renderer.js -- 输出 packages/vue-server-renderer/basic.js 文件
│   │   ├── weex -------------------------- 混合应用
│   ├── sfc ------------------------------- 包含单文件组件(.vue文件)的解析逻辑,用于vue-template-compiler包
│   ├── shared ---------------------------- 包含整个代码库通用的代码
├── package.json -------------------------- 不解释
├── yarn.lock ----------------------------- yarn 锁定文件
├── .editorconfig ------------------------- 针对编辑器的编码风格配置文件
├── .flowconfig --------------------------- flow 的配置文件
├── .babelrc ------------------------------ babel 配置文件
├── .eslintrc ----------------------------- eslint 配置文件
├── .eslintignore ------------------------- eslint 忽略配置
├── .gitignore ---------------------------- git 忽略配置
了解每个模块的具体功能,对后面源码的阅读也有帮助。
根据 package 中可执行脚本命令可以看出,vue 有三种构建方式,不同的方式采取不同的打包方式,对应的分别是 UMD,CommonJS 以及 ES Module
"dev": "rollup -w -c scripts/config.js --environment TARGET:web-full-dev",
"dev:cjs": "rollup -w -c scripts/config.js --environment TARGET:web-runtime-cjs-dev",
"dev:esm": "rollup -w -c scripts/config.js --environment TARGET:web-runtime-esm",
打开 scripts/config.js 文件,我们可以看到 cjs 模块分别输出了 运行时版 以及 完整版 两个版本,es 模块也做了同样的事情,我们观察运动时版与完整版本的区别:
运行时的入口文件名字为: entry-runtime.js
完整版的入口文件名字为:entry-runtime-with-compiler.js
通过名字,我们就可以猜到,完整版比运行时版本多了一个传说中的 compiler,而 compiler 在我们介绍目录结构的时候说过,它的作用是:编译器代码的存放目录,将 template 编译为 render 函数。除了 cjs 和 es 版本的输出,对于 umd 模块格式的输出,同样也分为 运行时版 与 完整版,并且还分为 生产环境 与 开发环境。
之所以要区分 运行时版 和 完整版,主要是省去了将字符串编译为 render 函数的这个过程,我们可以把这个过程在代码构建的时候去完成,这样真正运行的代码就省去了这一步骤,提升了性能,同时可以将 compiler 单独抽离为一个包,还减小了库的体积。
在上一篇构造函数部分,我们知道了在 global-api 添加全局 API 的时候,在 Vue 上增加了 Vue.extend 方法,因为考虑到后面讲解 initMixin 部分有涉及到这部分的内容,所以今天先来讲讲这个 Vue.extend 好了。
通过 Vue 的 extend 文档 我们知道,它是使用基础 Vue 构造器,可以用来创建一个“子类”。比如:
<div id="mount-point"></div>//创建构造器
var Profile = Vue.extend({
template: '<p>{{firstName}} {{lastName}} aka {{alias}}</p>',
data: function() {
return {
firstName: 'Walter',
lastName: 'White',
alias: 'Heisenberg'
}
}
})
new Profile().$mount('#mount-point')结果如下:
<p>Walter White aka Heisenberg</p>我们直接来看下代码:
export function initExtend (Vue: GlobalAPI) {
  /**
   * Each instance constructor, including Vue, has a unique
   * cid. This enables us to create wrapped "child
   * constructors" for prototypal inheritance and cache them.
   */
  Vue.cid = 0
  let cid = 1

  /**
   * Class inheritance
   */
  Vue.extend = function (extendOptions: Object): Function {
    extendOptions = extendOptions || {}
    const Super = this
    const SuperId = Super.cid
    const cachedCtors = extendOptions._Ctor || (extendOptions._Ctor = {})
    if (cachedCtors[SuperId]) {
      return cachedCtors[SuperId]
    }

    const name = extendOptions.name || Super.options.name
    if (process.env.NODE_ENV !== 'production' && name) {
      validateComponentName(name)
    }

    const Sub = function VueComponent (options) {
      this._init(options)
    }
    Sub.prototype = Object.create(Super.prototype)
    Sub.prototype.constructor = Sub
    Sub.cid = cid++
    Sub.options = mergeOptions(
      Super.options,
      extendOptions
    )
    Sub['super'] = Super

    // For props and computed properties, we define the proxy getters on
    // the Vue instances at extension time, on the extended prototype. This
    // avoids Object.defineProperty calls for each instance created.
    if (Sub.options.props) {
      initProps(Sub)
    }
    if (Sub.options.computed) {
      initComputed(Sub)
    }

    // allow further extension/mixin/plugin usage
    Sub.extend = Super.extend
    Sub.mixin = Super.mixin
    Sub.use = Super.use

    // create asset registers, so extended classes
    // can have their private assets too.
    ASSET_TYPES.forEach(function (type) {
      Sub[type] = Super[type]
    })
    // enable recursive self-lookup
    if (name) {
      Sub.options.components[name] = Sub
    }

    // keep a reference to the super options at extension time.
    // later at instantiation we can check if Super's options have
    // been updated.
    Sub.superOptions = Super.options
    Sub.extendOptions = extendOptions
    Sub.sealedOptions = extend({}, Sub.options)

    // cache constructor
    cachedCtors[SuperId] = Sub
    return Sub
  }
}下面我们来逐行分析下代码,extendOptions 为通过 Vue.extend 透传进去的 options 对象,Super 指向当前构造函数 Vue。初始给 Vue 添加一个 cid,它的值为0,之后每次通过 Vue.extend 创建的子类的 cid 值依次递增。extendOptions._Ctor 是用来缓存子类构造函数,如果已存在就直接返回。
在讲全局 API 的时候,我们有讲到过 Vue.component 这个方法,它是用来注册子组件的
// src/core/global-api/assets.js

export function initAssetRegisters(Vue: GlobalAPI) {
  ASSET_TYPES.forEach(type => {
    Vue[type] = function(
      id: string,
      definition: Function | Object
    ): Function | Object | void {
      ...
      if (type === 'component' && isPlainObject(definition)) {
        definition.name = definition.name || id
        definition = this.options._base.extend(definition)
      }
    }
  })
}
如果当 type = 'component' 且 definition 是一个对象时,比如:
Vue.component('my-component-name', { })就会执行 this.options._base.extend(definition),相当于是 Vue.extend(definition),这里的 name 就是 my-components-name。所以在 Vue.extend 中下面这段代码是用来校验组件名称是否规范用的。
const name = extendOptions.name || Super.options.name
if (process.env.NODE_ENV !== 'production' && name) {
  validateComponentName(name)
}
再下面就是继承部分了,创建 Sub 构造函数,同时把父类的原型赋值到 Sub.prototype 上。除了原型链的继承,还把父类的静态属性和方法也一并继承了下来:
const Sub = function VueComponent (options) {
  this._init(options)
}
Sub.prototype = Object.create(Super.prototype)
Sub.prototype.constructor = Sub
Sub.cid = cid++
Sub.options = mergeOptions(
  Super.options,
  extendOptions
)
Sub['super'] = Super

// For props and computed properties, we define the proxy getters on
// the Vue instances at extension time, on the extended prototype. This
// avoids Object.defineProperty calls for each instance created.
if (Sub.options.props) {
  initProps(Sub)
}
if (Sub.options.computed) {
  initComputed(Sub)
}

// allow further extension/mixin/plugin usage
Sub.extend = Super.extend
Sub.mixin = Super.mixin
Sub.use = Super.use

// create asset registers, so extended classes
// can have their private assets too.
ASSET_TYPES.forEach(function (type) {
  Sub[type] = Super[type]
})
// enable recursive self-lookup
if (name) {
  Sub.options.components[name] = Sub
}

// keep a reference to the super options at extension time.
// later at instantiation we can check if Super's options have
// been updated.
Sub.superOptions = Super.options
Sub.extendOptions = extendOptions
Sub.sealedOptions = extend({}, Sub.options)

// cache constructor
cachedCtors[SuperId] = Sub
return Sub
最终返回子类。
我们可以看下,现在子类 Sub 上已经包含了哪些属性和方法:
Sub.cid
Sub.options // 包含了父类的 options 和子类本身的 options
Sub.extend
Sub.mixin
Sub.use
Sub.component
Sub.directive
Sub.filter

// 新增
Sub.super = Super
Sub.superOptions = Super.options
Sub.extendOptions = extendOptions
Sub.sealedOptions = extend({}, Sub.options)对比了上一篇中父类上列举的属性和方法,除了新增部分,Sub 上没有的属性包括:
Vue.config
Vue.util

Vue.set
Vue.delete
Vue.nextTick
Vue.observable原文地址:http://www.acuriousanimal.com/2017/08/18/using-cluster-module-with-http-servers.html
cluster 模块能够使我们在多核系统中提高应用性能。无论是基于何种服务,我们都希望尽可能利用每台机器上的所有 CPU。它允许我们在一组工作进程之间对传入的请求进行负载均衡,并因此提高我们应用程序的吞吐量。
在之前的文章中,我介绍了集群模块,并展示了它的一些基本用法,以创建工作进程并将其与主进程通讯。 在这篇文章中,我们将看到如何在创建HTTP服务器时使用集群模块,无论是使用纯HTTP模块还是使用ExpressJS。
让我们来看看如何创建一个基础HTTP服务来享受集群模块带来的利益。
const cluster = require('cluster');
const http = require('http');
const numCPUs = require('os').cpus().length;

if (cluster.isMaster) {
  masterProcess();
} else {
  childProcess();
}

function masterProcess() {
  console.log(`Master ${process.pid} is running`);

  for (let i = 0; i < numCPUs; i++) {
    console.log(`Forking process number ${i}...`);
    cluster.fork();
  }
}

function childProcess() {
  console.log(`Worker ${process.pid} started...`);

  http.createServer((req, res) => {
    res.writeHead(200);
    res.end('Hello World');
  }).listen(3000);
}
在 masterProcess 函数中,我们为每个 CPU 派生一个工作进程。另一方面,childProcess 只是在端口 3000 上创建一个 HTTP 服务,然后返回一个带有 200 状态码的 Hello World 文本字符串。
执行结果如下:
$ node app.js

Master 1859 is running
Forking process number 0...
Forking process number 1...
Forking process number 2...
Forking process number 3...
Worker 1860 started...
Worker 1862 started...
Worker 1863 started...
Worker 1861 started...
基本上我们的初始进程(主)会为每个 CPU 运行一个处理 HTTP 服务请求的新进程。正如你所看到,这可以提高你的服务器性能,因为本由一个进程处理100万条请求的任务,现在改由4个进程来处理了。
上面的例子看上去简单,但却暗藏玄机。我们知道在任意系统中,一个进程可以使用一个端口与其他系统通信,这也意味着,给定的端口只能被改进程使用。那么问题来了,为什么新建的工作进程能使用相同的端口呢?
简单来说,是主进程监听了给定的端口,并负载均衡所有子进程之间的请求。按官方文档来说:
工作进程由child_process.fork()方法创建,因此它们可以使用IPC和父进程通信,从而使各进程交替处理连接服务。
cluster模块支持两种连接分发模式(将新连接安排给某一工作进程处理)。
第一种方法(也是除Windows外所有平台的默认方法),是循环法。由主进程负责监听端口,接收新连接后再将连接循环分发给工作进程。在分发中使用了一些内置技巧防止工作进程任务过载。
第二种方法是,主进程创建监听socket后发送给感兴趣的工作进程,由工作进程负责直接接收连接。
只要有存活的工作进程,服务器就可以继续处理连接。如果没有存活的工作进程,现有连接会丢失,新的连接也会被拒绝。
集群模块允许主进程接收请求并在所有工作进程之间进行负载平衡。 这是一种提高性能的方法,但并不是唯一的方法。
在文章 cluster 模块,iptables以及Nginx之间的负载均衡性能比较 中,你可以在集群模块,iptables和nginx反向代理之间找到性能比较。
如今的性能在任何Web应用程序中都是强制性的,我们需要支持高吞吐量和快速服务数据。
集群模块是一个可行的解决方案,它允许我们有一个主进程,并为每个核心创建一个工作进程,以便它们运行一个HTTP服务器。 群集模块提供了两个很棒的功能:
process.send() 发送消息来简化主进程和工作进程之间的通信现如今 Vue 作为主流的前端框架之一,其健全的配套工具,活跃的开源社区,让广发码农热衷追捧。Vue CLI 作为其官方的开发构建工具,目前已更新迭代到 4.x 版本,其内部集成了日常开发用到的打包压缩等功能,简化了常规自己动手配置 webpack 的烦恼。另外提供的插件功能更是满足了使用者定制化的需求场景,那么本文就来讲下如何去开发一个插件。
假设我们团队现在需要去开发一套 UI 组件库,由于团队内每个人的编码习惯不一样,可能会出现单一组件命名、目录结构等不统一的问题,对于团队统一对外呈现的组件库来说,这当然不是一件好事。那有什么办法可以去约束团队成员统一风格呢?这里我们就可以开发一个组件插件来解决这些烦恼,那么我们来看下如何来开发这个组件插件呢?
为了让一个 CLI 插件能够被其他开发者使用,官方介绍了必须遵循 vue-cli-plugin- 的命名约定,所以这里我们命名为 vue-cli-plugin-next-component。
mkdir vue-cli-plugin-next-component && cd $_对于官方自己的插件,都是以 @vue/cli-plugin- 命名以示区别。
确定好插件名称后,我们就要为它填充目录结构了。首先我们得先确认,这个插件具体要实现哪些功能:
通过对话的形式,接收开发者输入的组件信息,包括组件名称,类型,作者等信息
获取组件信息,用来渲染内置的 template 组件模板,这样保证所有创建的组件都是统一的结构目录
至此,大致的结构目录如下:
.
├── README.md
├── generator
│ ├── template
│ └── index.js # generator
├── prompts.js # prompt 文件 (可选)
├── index.js # service 插件
└── package.json
Service 插件作为其主要导出文件,导出的函数接受两个参数,包含 api 和 options,api 允许 service 插件针对不同的环境扩展/修改内部的 webpack 配置,并向 vue-cli-service 注入额外的命令。options 包含了 vue.config.js 内指定选项的对象或者是在 package.json 内的 vue 字段。
module.exports = (api, options) => {
 api.chainWebpack(webpackConfig => {
 // 通过 webpack-chain 修改 webpack 配置
 })

 api.configureWebpack(webpackConfig => {
 // 修改 webpack 配置
 // 或返回通过 webpack-merge 合并的配置对象
 })

 api.registerCommand('test', args => {
 // 注册 `vue-cli-service test`
 })
}
Prompt 作为对话文件,在插件被初始化的时候会被调用,底层使用了 inquire 模块,最终返回一个用于 inquire 的问题的数组,被解析的答案会作为选项被传递给插件的 generator,这里我们可以增加一些组件相关的问题,同时也可以对输入的内容做校验。
module.exports = [
  {
    name: 'componentName',
    type: 'input',
    message: '请输入要创建的组件名称(kebab-case):',
    validate: function(str) {
    return /^[a-z][a-z|-]*[a-z]$/.test(str);
    }
  },
  {
    name: 'componentCnName',
    type: 'input',
    message: '请输入要创建的组件中文名称(中文):',
    validate: function(str) {
      return /[^\x00-\xff]$/.test(str);
    }
  },
  ...
]
Generator 最终导出一个函数,这个函数接收三个参数,一个是 GeneratorAPI 实例,对于第三方插件来说,options 来自 prompt 对话内容,如果用户使用某个预设创建项目,整个预设将作为第三个参数传递。在调用 render 方法时,该 generator 将使用 ejs 来渲染 template 模板,所以我们在写模板时,需要把动态配置的地方,用 ejs 的模板语法去标注。
module.exports = (api, options, rootOptions) => {
 api.render('./template', {
 ...options
 });
}
模板示例:
<template>
 <div>I am a <%=camelName %> component. Rewrite me from here.</div>
</template>

<script>
export default {
 name: 'nx-<%=componentName %>'
};
</script>完成插件的开发后,先来本地验证下。先建个目录执行 npm init 后,通过 install 安装写好的插件,

安装好后,通过 vue invoke 指令初始化插件
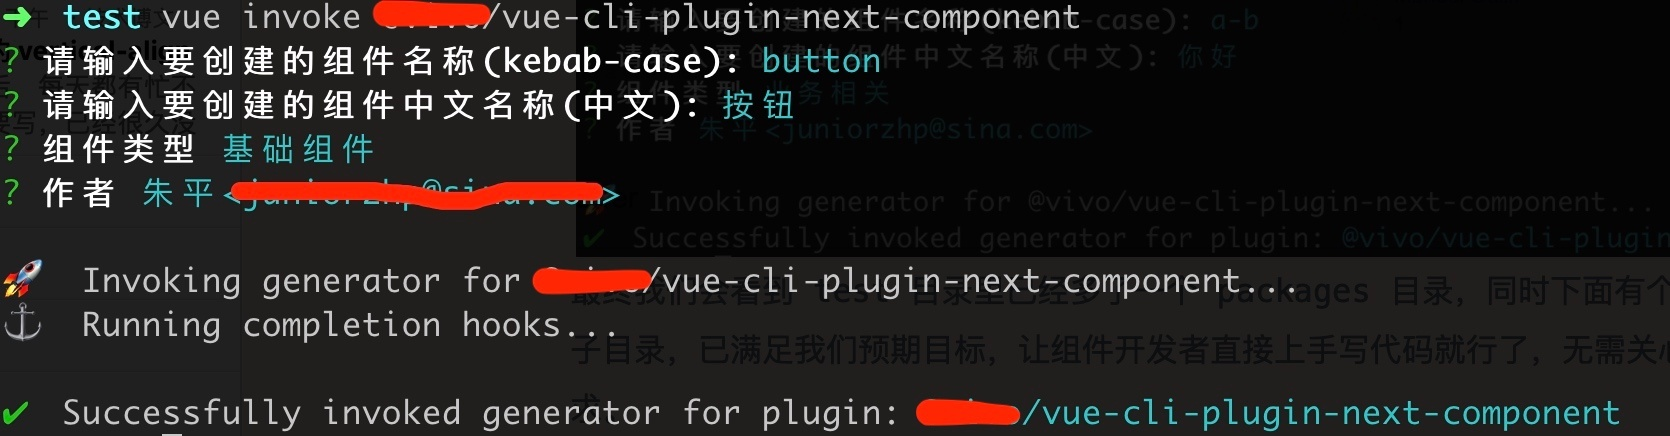
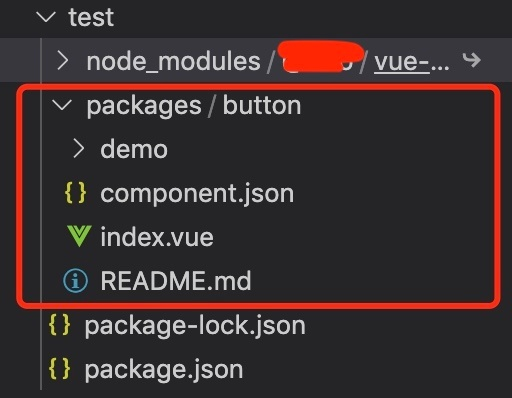
最终我们会看到 test 目录里已经多了一个 packages 目录,同时下面有个叫 button的组件子目录,这样就满足我们预期目标啦,让参与组件开发的同学更加专注的去写代码就行了,不用再关心目录、命名等规范要求了。
对于一些项目开发,如果需要经常引入其他工程的一些功能模块或者是业务组件,但又不想每次都是复制粘贴,就可以写个插件来帮你完成,解放双手,一劳永逸。另外,插件也弥补了脚手架在定制化方面的不足,让附加功能变得单一便捷可插拔,使得 Vue CLI 工具能够更加专注在 Vue 项目脚手架上,将 Vue 生态中的工具基础更加标准通用化。
附上完整插件代码,点击查看
redux 主要包含 5 个方法,分别是:
今天主要讲解下 applyMiddleware 和 compose 这两个方法。在 redux 中引入了中间件的概念,没错如果你使用过 Express 或者 Koa 的话,一定不会对中间件陌生。我们知道,在 Koa 中,串联各个中间件的正是 compose 方法,所以在 redux 中也同样使用了这个命名,作用也是串联所有中间件。
在正式讲解前,我们先来看下 reduce 的用法。根据 MDN 上的解释,
reduce() 方法是对累加器和数组中的每个元素(从左到右)应用一个函数,将其减少为单个值。
arr.reduce(callback[, initialValue])callback
执行数组中每个值的函数,包含四个参数:
initialValue
用作第一个调用 callback的第一个参数的值。 如果没有提供初始值,则将使用数组中的第一个元素。 在没有初始值的空数组上调用 reduce 将报错。
函数累计处理的结果
有了上面 reduce 的基础,我们再来看下 compose 的代码。compose 的代码很简单,10行代码左右,但你看到 reduce 部分的时候,估计会一脸懵逼,短短的一行代码看上去却很绕。
/**
 * Composes single-argument functions from right to left. The rightmost
 * function can take multiple arguments as it provides the signature for
 * the resulting composite function.
 *
 * @param {...Function} funcs The functions to compose.
 * @returns {Function} A function obtained by composing the argument functions
 * from right to left. For example, compose(f, g, h) is identical to doing
 * (...args) => f(g(h(...args))).
 */

export default function compose(...funcs) {
  if (funcs.length === 0) {
    return arg => arg
  }

  if (funcs.length === 1) {
    return funcs[0]
  }

  return funcs.reduce((a, b) => (...args) => a(b(...args)))
}
看注释,它的作用应该是
执行 compose(f, g, h)
得到 (...args) => f(g(h(...args)))
我们来推导下,它是怎么得出这个结果的。假设 funcs 等于 [f1, f2, f3],其中 f1,f2,f3 是三个中间件,(a, b) => (..args) => a(b(...args)) 等于 f,那么 funcs.reduce((a, b) => (...args) => a(b(...args))) 可以简化为 [f1, f2, f3].reduce(f)。
第 1 次执行 f:
a = f1
b = f2
返回 (...args) => f1(f2(..args))
第 2 次执行 f:
a = (...args) => f1(f2(...args))
b = f3
返回 (...args) => a(f3(...args)) = f1(f2(f3(...args)))
通过上面的推导,证实了先前得出的结论
compise(f, g, h) = (...args) => f(g(h(...args)))
通过上面的分析,我们知道 compose 是对中间件的串联,那么 applyMiddleware 就是对中间件的应用了。最终返回 createStore 中的方法以及经过中间件包装处理过的 dispatch 方法。
export default function applyMiddleware(...middlewares) {
  return createStore => (...args) => {
    const store = createStore(...args)
    let dispatch = () => {
      throw new Error(
        `Dispatching while constructing your middleware is not allowed. ` +
          `Other middleware would not be applied to this dispatch.`
      )
    }
    let chain = []

    const middlewareAPI = {
      getState: store.getState,
      dispatch: (...args) => dispatch(...args)
    }
    chain = middlewares.map(middleware => middleware(middlewareAPI))
    dispatch = compose(...chain)(store.dispatch)

    return {
      ...store,
      dispatch
    }
  }
}
我们通过一个具体的中间件 redux-thunk,来查看它内部到底是怎么来执行加载的中间件的。
function createThunkMiddleware(extraArgument) {
  return ({ dispatch, getState }) => next => action => {
    if (typeof action === 'function') {
      return action(dispatch, getState, extraArgument);
    }

    return next(action);
  };
}

const thunk = createThunkMiddleware();
thunk.withExtraArgument = createThunkMiddleware;

export default thunk;
中间件中包含了三个箭头函数,在 applyMiddleware 中的 map 操作后,返回了第二层箭头函数,所以 chain 中存储的是各个中间件的第二层函数。
根据 compose 的分析,
dispatch = compose(...chain)(store.dispatch)
等于
dispatch = f1(f2(f3(store.dispatch)))
我们先执行第三个中间件,并把返回结果作为第二个中间件的入参继续执行,以此类推,下一个中间件的入参是上一个中间件的返回。如果说这里第三个中间件是上面的 redux-thunk,那么函数中的 next 就是 store.dispatch,返回第三个箭头函数 action。这里返回的第三个箭头函数,就是第二个中间件的 next 形参。以此类推,第二个返回的 action 就是第一个中间件的 next 形参。但是这里都还没真正开始执行中间件。
当我们外部调用 store.dispatch(action) 方法的时候,才要真正开始执行各个中间件。首先执行中间件 f1,当执行到 next 的时候,开始执行第二个中间件 f2,以此类推直到最后一个中间件,调用原生 store.dispatch 方法。
之所以要写这么绕,也是为了符合 redux 单一数据源的原则,applyMiddleware 的写法保证了 action 的流向,而且每一步的数据变化都是可以追踪的。
对比了 4.0.0-beta.1 之前版本的 applyMiddleware 的区别,发现内部 dispatch 从之前的 store.dispatch 改成了现在的直接抛出一个错误。根据这个 issues 的讨论,在中间件顶层调用了 store.dispatch,结果导致无法执行后面的中间件。这个调用应该是在处理 map 操作的时候执行的,此时的 applyMiddleware 还没执行完,store.dispatch 调用的还是原生 createStroe 中的方法才导致的这个问题。
另外如果在中间件中即 action 层使用 dispatch 会怎样呢?我们知道我们可以通过 next 进入到下个中间件,那如果调用 store.dispatch 的话又会从外层重新来一遍,假如这个中间件内部只是粗暴的调用 store.dispatch(action) 的话,就会形成死循环。如下图所示
Dispatching in a middleware before applyMiddleware completes
A declarative, efficient, and flexible JavaScript library for building user interfaces.
🖖 Vue.js is a progressive, incrementally-adoptable JavaScript framework for building UI on the web.
TypeScript is a superset of JavaScript that compiles to clean JavaScript output.
An Open Source Machine Learning Framework for Everyone
The Web framework for perfectionists with deadlines.
A PHP framework for web artisans
Bring data to life with SVG, Canvas and HTML. 📊📈🎉
JavaScript (JS) is a lightweight interpreted programming language with first-class functions.
Some thing interesting about web. New door for the world.
A server is a program made to process requests and deliver data to clients.
Machine learning is a way of modeling and interpreting data that allows a piece of software to respond intelligently.
Some thing interesting about visualization, use data art
Some thing interesting about game, make everyone happy.
We are working to build community through open source technology. NB: members must have two-factor auth.
Open source projects and samples from Microsoft.
Google ❤️ Open Source for everyone.
Alibaba Open Source for everyone
Data-Driven Documents codes.
China tencent open source team.