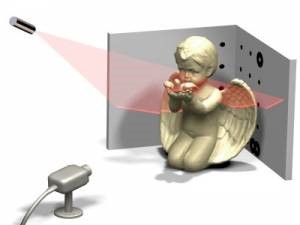
结合计算机视觉、光学工程、自动控制原理等相关知识,利用工业相机、线激光光源、步进电机等硬件,构建半自动/自动的激光3D扫描系统,完成对目标表面形貌的3D扫描,实现3D重构。
-
器材准备:工业相机、激光器、标定板、旋转平台、STM32、扫描物体
-
环境搭建:固定相机、激光器、旋转平台的相对位置呈30°、60°、90°直角三角形,且始终保持不变
-
软件支持:MATLAB Image Acquisition Tool及对应的adaptor、MATLAB Camera Calibration Toolbox、MindVision软件
-
拍摄无激光照射下标定板图像
工业相机通过USB接口连接到装有驱动的电脑中,通过MindVision软件控制工业相机,设置相机参数(调整合适焦距,保持正常亮度、曝光度),拍摄无激光照射下的标定板图像。需要拍摄正常、左偏、右偏、上偏、下偏、远、近共7张图片,并保存在本地。
驱动软件下载地址:http://www.mindvision.com.cn/rjxz/list_12.aspx?lcid=138
-
拍摄有激光照射下标定板图像
使用MindVision软件拍摄使用有激光照射下棋盘格(标定板)图片,要求相机、激光器位置不变,标定板的七个位置也与无激光标定时的相同,激光面竖直打在标定板上。改变曝光时间的大小,确保激光照射下白色格子的激光线不能太粗,使得图像中的激光线尽可能最细又能够辨认,便于之后确定一条单一直线。
-
使用 MATLAB 的Camera Calibration Toolbox进行相机标定。
下载MATLAB的Camera Calibration Toolbox
下载地址:http://www.vision.caltech.edu/bouguetj/calib_doc/index.html#links
进入到存放无激光标定板图像的文件夹目录下(no laser images文件夹),在MATLAB命令行输入calib,选择Standard模式,依次点击Image names,Read images,Extract grid corners,Calibration,Show Extrinsic,Save,Show calib results。
标定结果保存在Calib_Results.mat和Calib_Results.m中。
-
图像去畸变(image.bmp → image_rect.bmp)
将标定结果文件
Calib_Results.mat复制到存放有激光标定板图像的文件夹目录下(laser images文件夹),进入该文件夹目录下,在MATLAB命令行输入calib,选择Standard模式,点击Load加载Calib_Results.mat,点击Image names输入图像头文字,点击Read images读取所有图像,点击Undistort image去畸变并导出去畸变完成后的图像。 -
把去畸变的图片进行mask操作(image_rect.bmp → image_mask.bmp)
mask步骤可有可无,根据实际情况做选择。
若有激光照射时的标定板图像标定板外有较明显的激光噪点,需进行mask操作,保证激光线只存在于标定板上,否则也可以不做mask。
% 实现输入mask的坐标范围(0, y_min, 0, y_max),能够生成mask矩阵。
% mask矩阵大小与图像大小相同(1280 * 1024)
% mask矩阵在确定的mask区域内的值全为1,区域外的值全为0。
% img_num 需要处理的图像的数量
% output_file_name 保存的图像的文件名
make_mask_new(y_min,y_max,img_num,output_file_name)
-
二值化操作
% threshold 阈值大小
% input_num 处理数据的组数
% input_file_path 输入mat文件路径
% output_file_path 输出的mat文件路径
image_thresh(threshold, input_num, input_file_path, output_file_path)
-
灰度归一化取平均(u取小数)得到(u, v)点
% input_num 处理数据的组数
% input_file_path 输入的mat文件路径
% output_file_path 输出的mat文件路径
image_thresh_average(input_num, input_file_path, output_file_path)
-
计算世界坐标系下的坐标点
% input_num: 处理数据的组数
% calib_file_path: Calib_Results.mat文件的路径
% u_v_results_file_path: 存储u,v点的坐标mat路径
% output_file_path: 输出的mat文件路径
calc_world_coordinate(input_num, calib_file_path, u_v_results_file_path, output_file_path)
-
计算相机坐标系下的坐标点
% input_num: 处理数据的数量
% calib_file_path: Calib_Results.mat文件的路径
% w_c_results_file_path: 相机坐标系下的坐标点
% output_file_path: 输出文件的名称
calc_camera_coordinate(input_num, calib_file_path, w_c_results_file_path, output_file_path)
-
获取所有的相机坐标系下的坐标点
% input_num: 拍摄的图片数量
% result_file_path: 保存相机坐标系下的 x' y' z'的mat文件
[X, Y, Z]  = get_all_camera_coordinate(input_num, results_file_path)
-
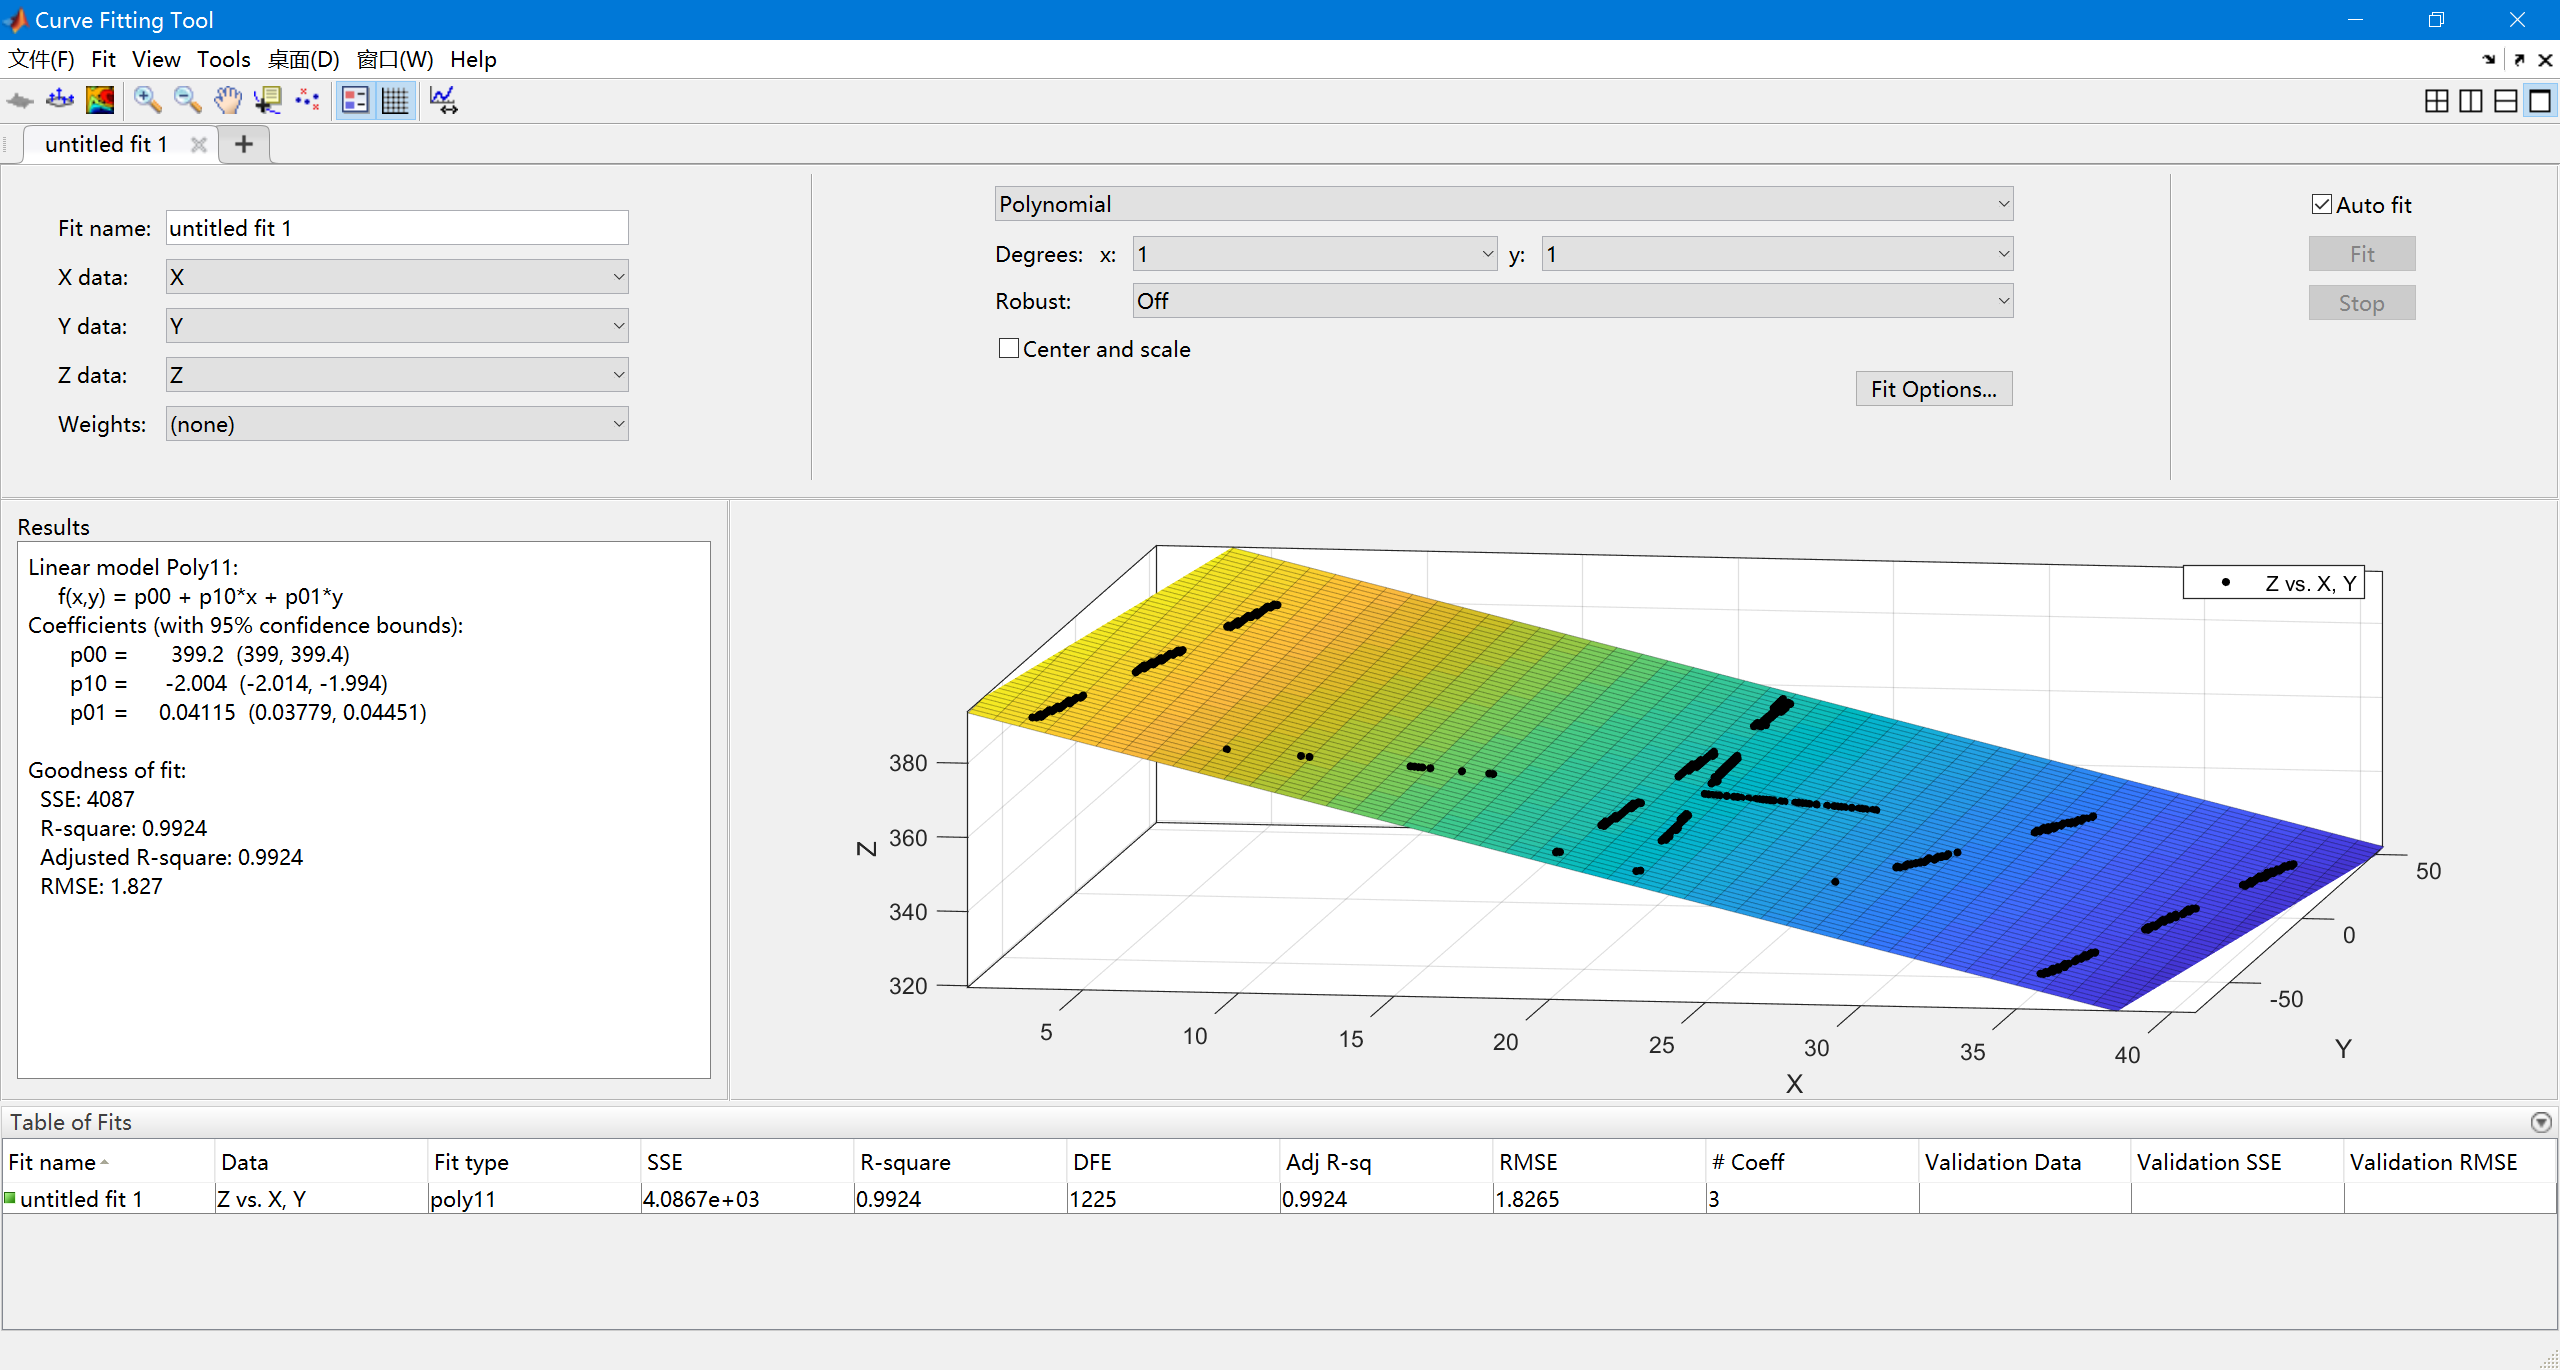
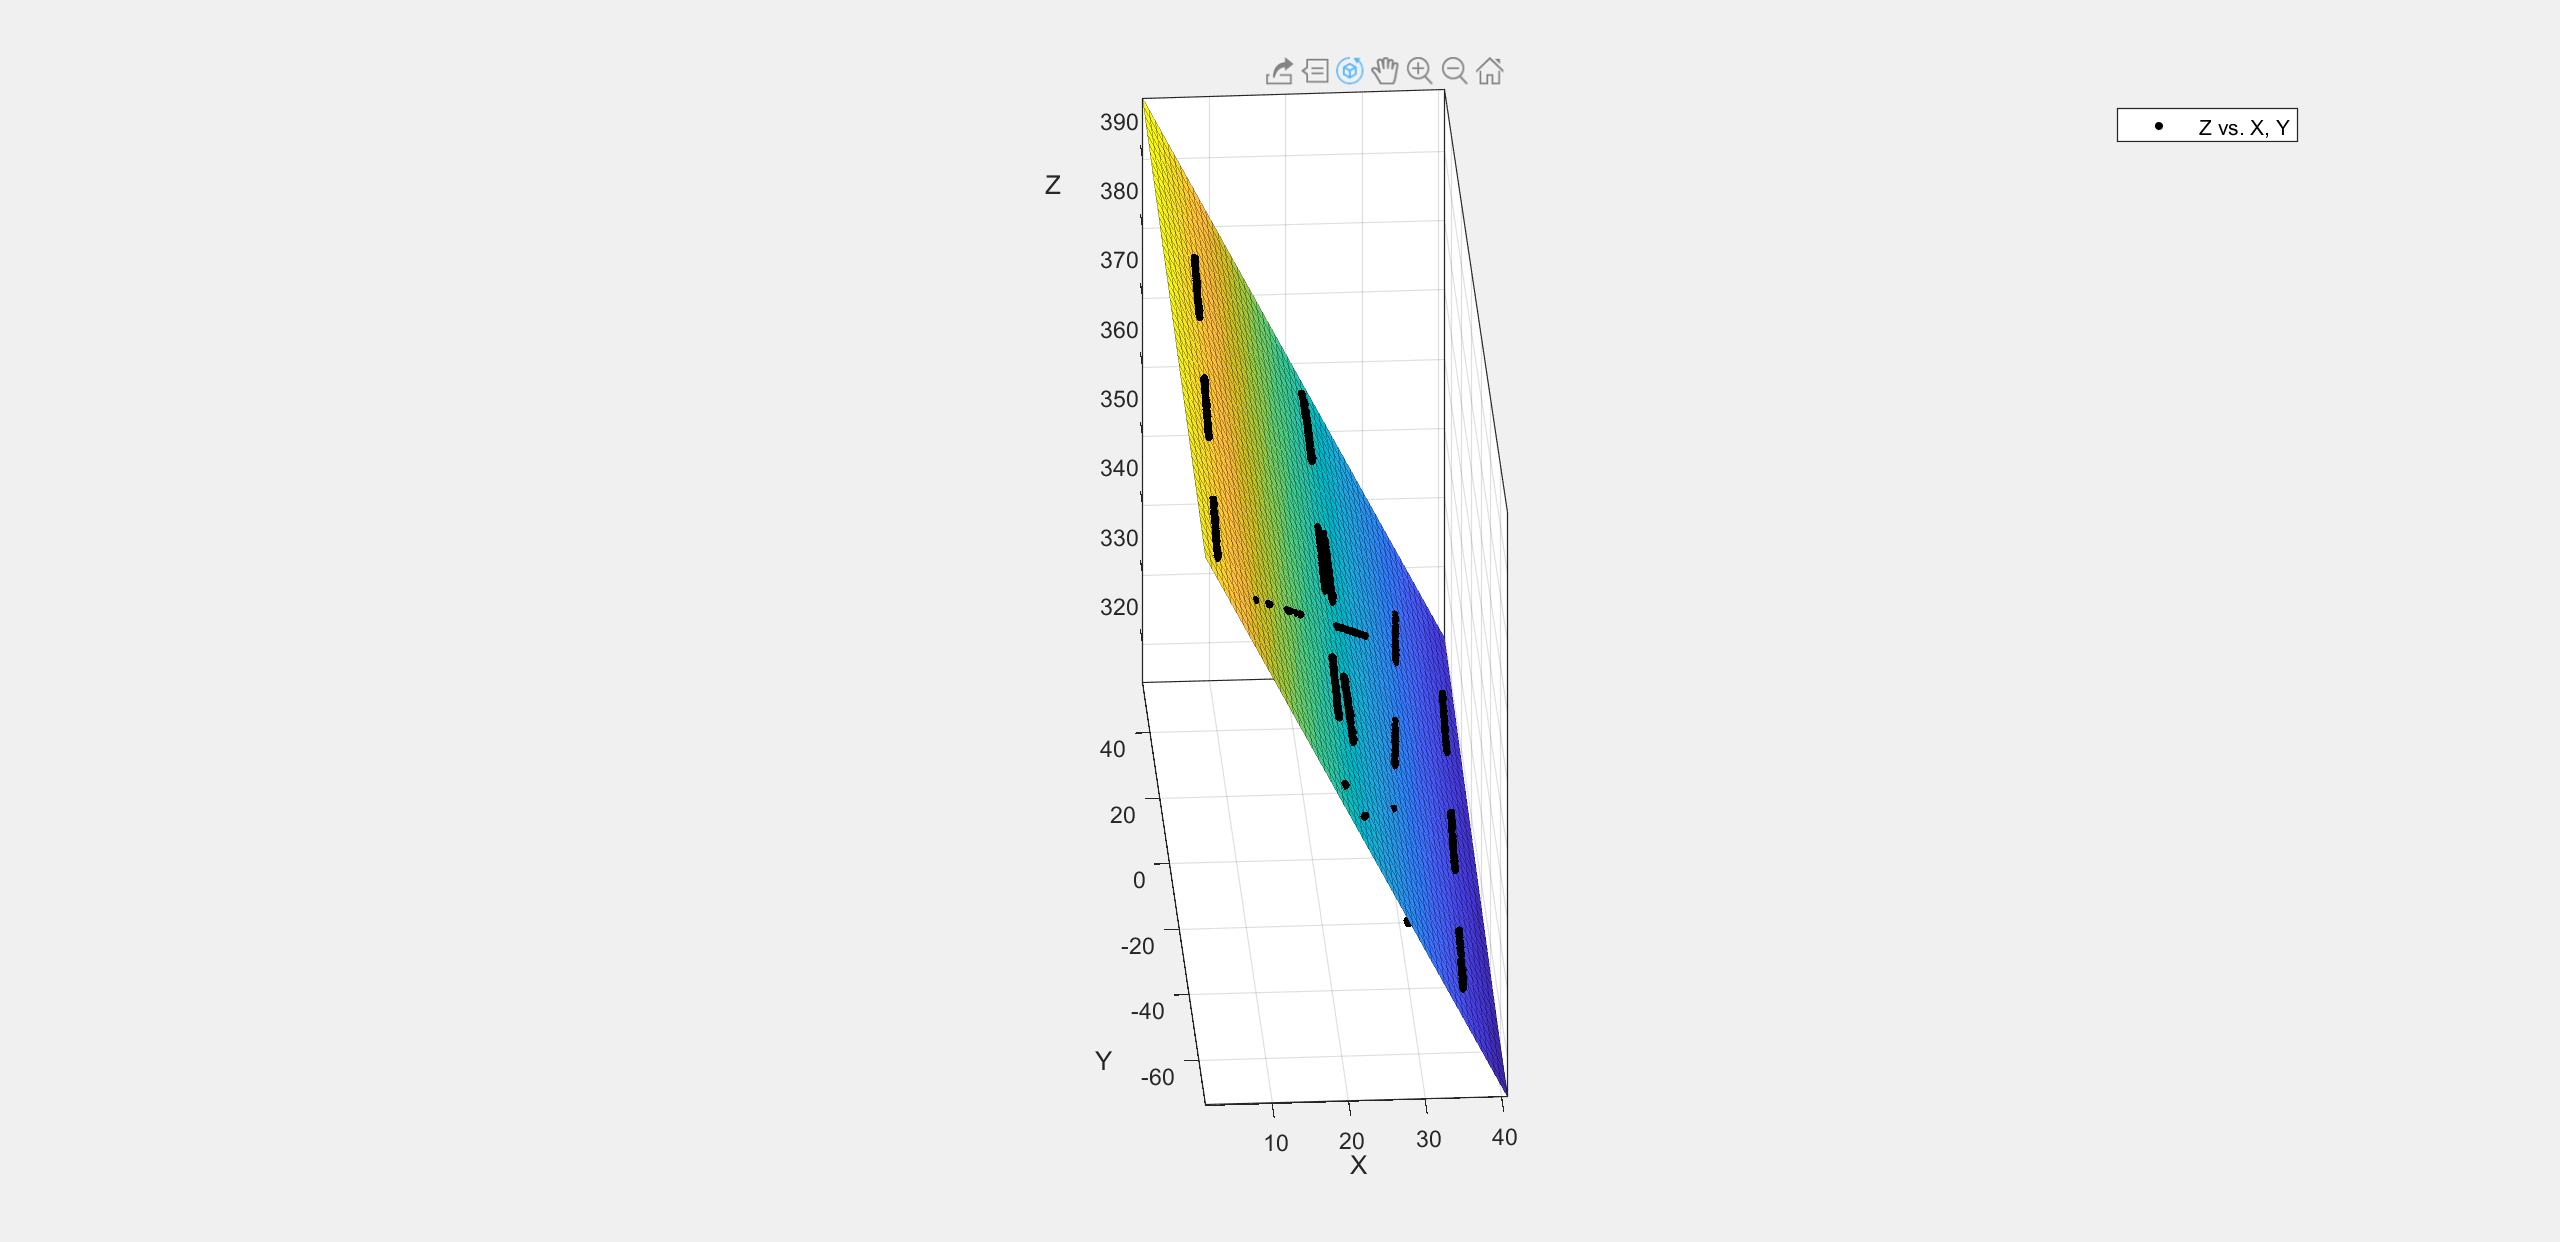
使用Curve Fitting 工具箱进行激光平面拟合,并Generate Code保存为
createFit.m,并保存为.fig文件(需要做axis equal处理)
-
拍摄无激光照射下的标定板图像
需要拍摄正位置1张、不同角度左偏3张、不同角度右偏3张共7张图片(位置如下图所示),保持正常亮度、曝光度,并保存在本地。
-
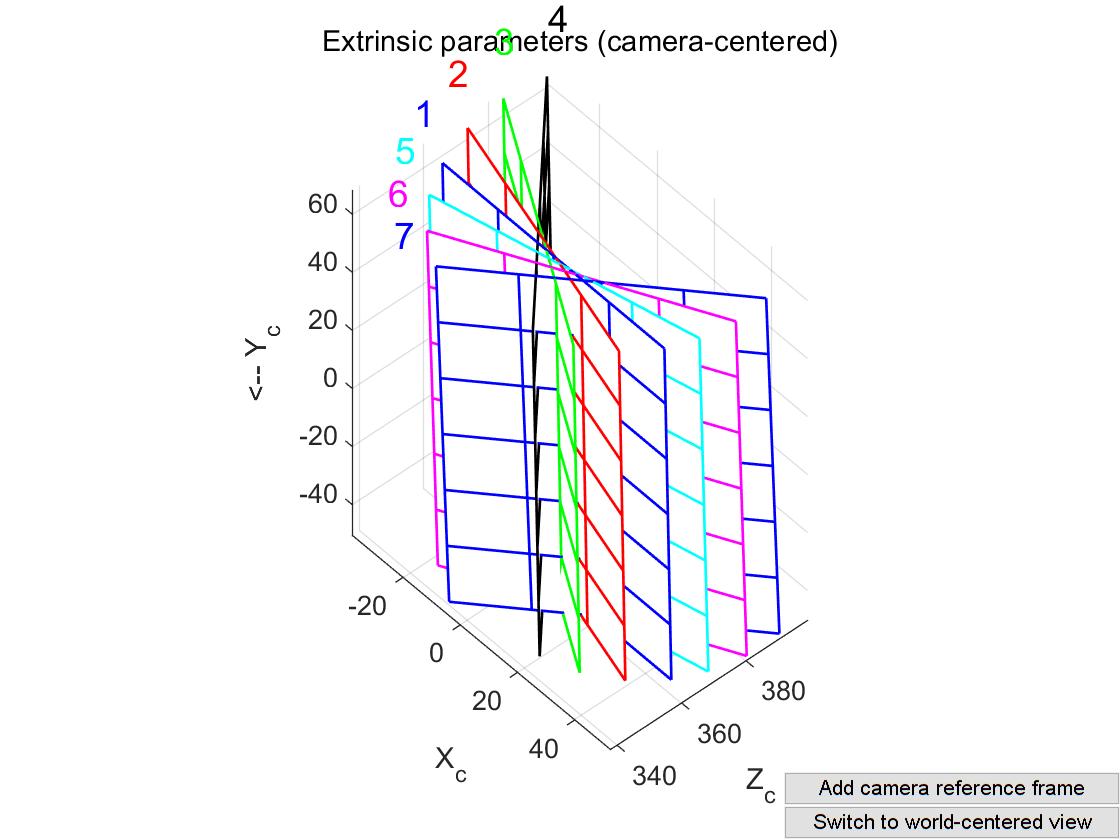
使用 MATLAB 的Camera Calibration Toolbox获取外参三维图像。
进入到上一步存放无激光标定板图像的文件夹目录下(no laser images文件夹),在MATLAB命令行输入calib,选择Standard模式,依次点击Image names,Read images,Extract grid corners,Show Extrinsic。将show出来的图像以fig格式保存。
-
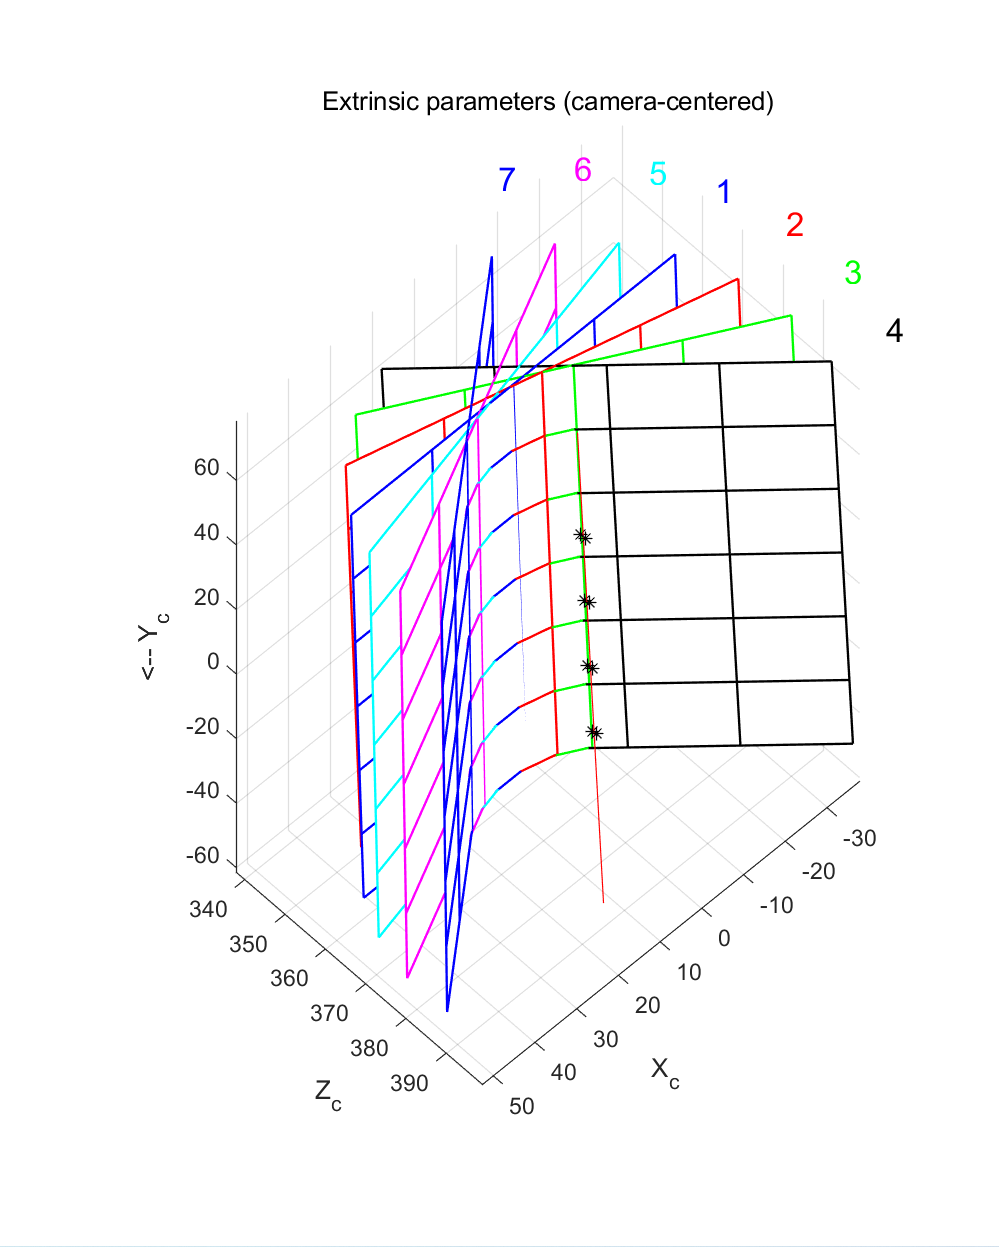
获取标定板格点三维坐标
打开上一步保存的fig图像,进入到camera-centered、remove camera reference frame模式,点击窗口中的数据游标按钮,然后在每块标定板的同一高度左右两边各取一个格点,鼠标点击格点即可获取坐标值,取多个高度,记录所有取的点的坐标值。如下图所示,圆圈圈出来的就是所取的格点。
-
获取同一高度下的所有坐标
% points_nums: 输入文件中每组的坐标数量
% same_height_nums 同一高度的坐标点的数量
% c_c_results_file_path: camera_coordinate_results.mat 文件路径
% output_file_path: 保存.mat文件的名称
get_c_c_in_same_height(points_nums, same_height_nums, c_c_results_file_path, output_file_path)
-
使用同一高度的点云数据拟合圆心
calc_circle_center(height_num, c_c_same_height_data_file_path, output_file_path)
-
根据圆心拟合轴线
% points是若干圆心的三维坐标形成矩阵
% 得到轴线直线方程式的六个参数
fitLine3d(points)
-
整理公用数据。
./examples/public_data存放的是公用数据的文件夹,包括c_c_results.mat-- 确定激光平面所用到的点云数据Calib_Results.mat-- 相机标定的结果
-
拍摄图像并自动化保存(image.bmp)
调用下方函数,进入debug模式,在循环下的第一行打断点,配合转台舵机,每转一次就运行一次代码
% img_num 拍摄图像的数量

auto_read_img(img_num)
-
图像去畸变(image.bmp → image_rect.bmp)
下载MATLAB的Camera Calibration Toolbox
下载地址:http://www.vision.caltech.edu/bouguetj/calib_doc/index.html#links
在图像保存文件夹下,命令行输入calib,选择Standard模式,点击Load加载
Calib_Results.mat,点击Image names输入图像头文字,点击Read images读取所有图像,点击Undistort image去畸变并导出去畸变完成后的图像。 -
图像mask处理(image_rect.bmp → image_mask.bmp)
% img_num 需要处理的图像的数量
% img_name 保存的图像的文件名
% y_max mask的最大的y值,即mask是x:[1 1280], y:[1,y_max]范围为1,其余为0的1280*1024矩阵

rect2mask_bmp(img_num,img_name,y_max)
-
二值化操作
% threshold 阈值大小
% input_num 需要处理的图片数量
% input_file_name 处理的图片的文件名
% output_file_name 输出的图片文件名

image_thresh(threshold, input_num, input_file_name, output_file_name)
-
灰度归一化取平均(u取小数)得到(u, v)点
% input_num 需要处理的图片数量
% input_filename 处理的图片的文件名
% output_filename 输出的mat文件名

image_thresh_average(input_num, input_filename, output_filename)
-
计算真实相机坐标系下的坐标点
% image_num 需要处理的图片数量
% output_file_name 输出结果文件名(文件格式: .mat)

calc_true_camera_coordinates(image_num, output_file_name)
-
把相机坐标系下的点移到轴线坐标系下
% t 平移矩阵
% input_file_name 相机坐标系下的点mat文件
% input_num 需要处理的图片数量
% output_file_name 输出结果文件名(文件格式: .mat)

cc_points_offset(t, input_file_name, input_num, output_file_name)
-
把轴线坐标系下的点进行旋转
% input_num 需要处理的图片数量
% input_file_name
% r 轴线的方向向量
% output_file_name 输出结果文件名(文件格式: .mat)

cc_rotate(input_num, input_file_name, r, output_file_name)
-
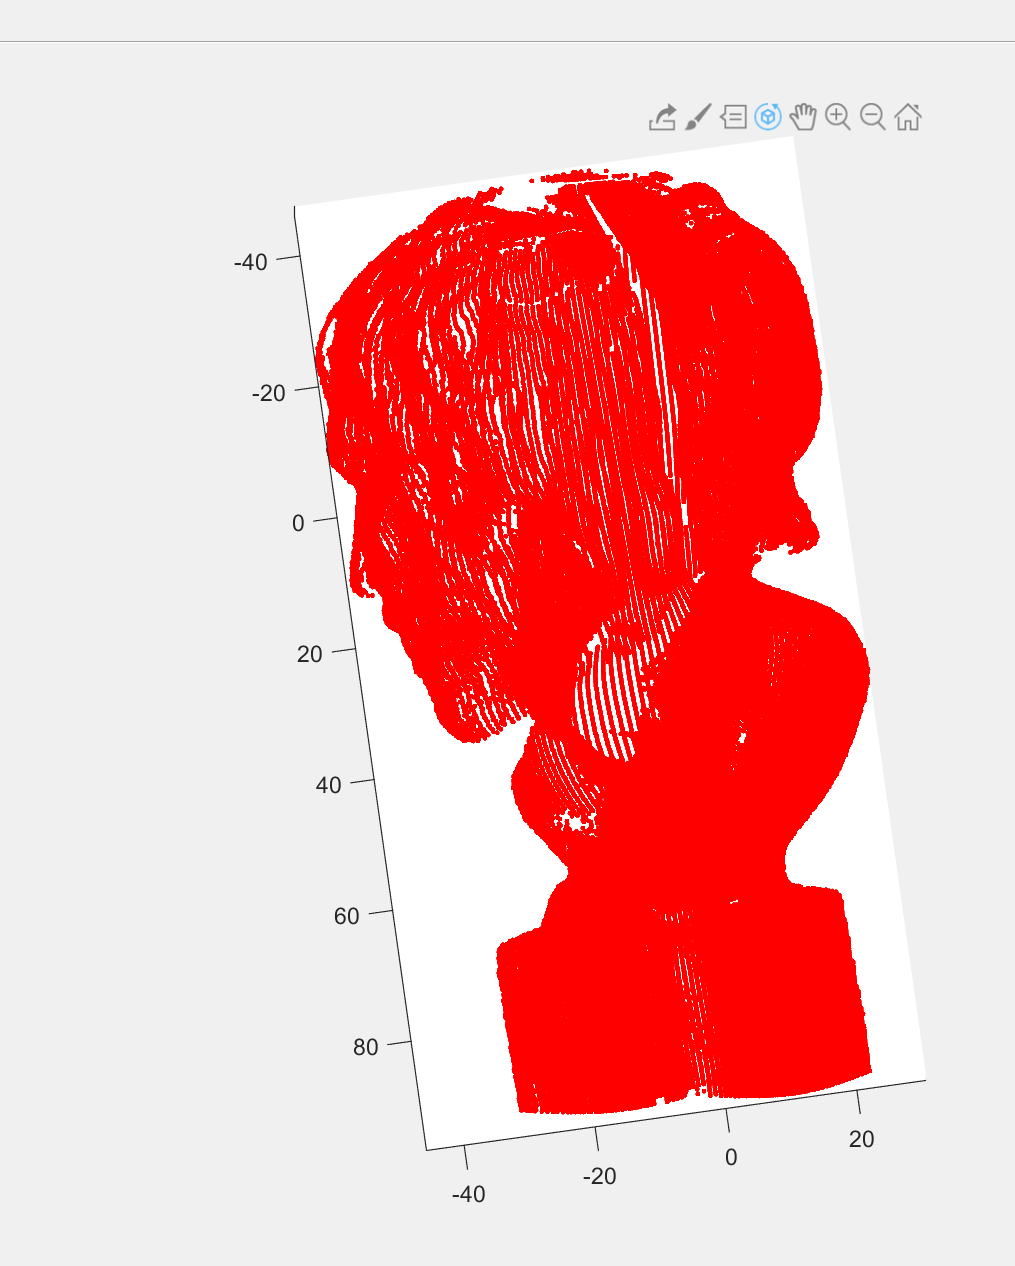
点云的结果
>> [X, Y, Z]  = get_all_camera_coordinate(image_num, results_file_path)
>> plot3(X, Y, Z, 'r.'); hold on; axis equal;
-
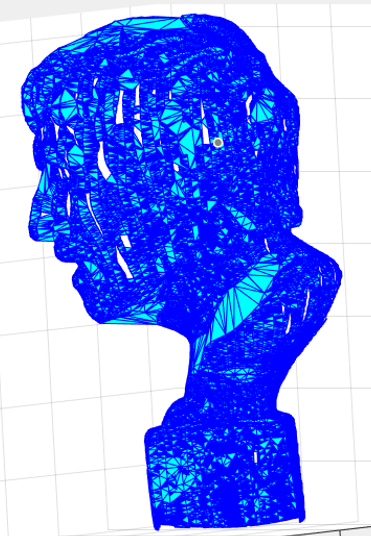
点云经过网格化后的结果
-
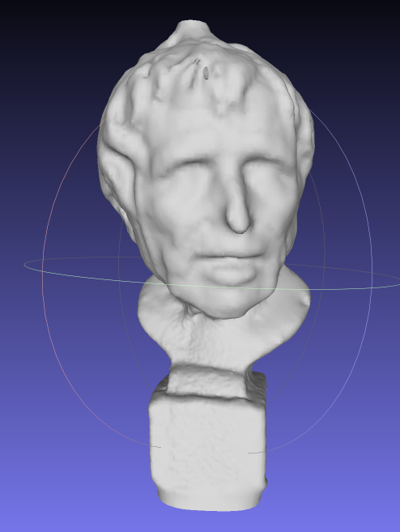
泊松重构后的结果