📖 可以从 Github Issues 或者 [推荐]博客站点 浏览文章
xiaoxiaojx / blog Goto Github PK
View Code? Open in Web Editor NEWProject for records problems solved in my work and study.
Home Page: https://xiaoxiaojx.github.io/
License: MIT License
Project for records problems solved in my work and study.
Home Page: https://xiaoxiaojx.github.io/
License: MIT License
📖 可以从 Github Issues 或者 [推荐]博客站点 浏览文章


看 Node.js 中这段代码较为疑惑, 如下 StorageSize 函数通过 JavaScript 字符串的长度(str->Length)估算出转换为 UTF-8 编码会占用的最大字节数为 3 * str->Length(), 说明长度为 1 的 JavaScript 字符串转换为 UTF-8 编码最多需要 3 个字节来存储, 那么这个结论是如何得出来的?
Maybe<size_t> StringBytes::StorageSize(Isolate* isolate,
                                       Local<Value> val,
                                       enum encoding encoding) {
  HandleScope scope(isolate);
  size_t data_size = 0;

  Local<String> str;
  if (!val->ToString(isolate->GetCurrentContext()).ToLocal(&str))
    return Nothing<size_t>();

  switch (encoding) {
    // 省略 ...

    case UTF8:
      data_size = 3 * str->Length();
      break

    default:
      CHECK(0 && "unknown encoding");
      break;
  }

  return Just(data_size);
}
MDN String length: The length read-only property of a string contains the length of the string in UTF-16 code units.
通过查阅 MDN 发现 JavaScript 字符串是 UTF-16 编码, 那么 UTF-16 的编码规则是怎样的了?

通过查阅 UTF-16 维基百科 发现 UTF-16 共2种情况的编码, 码点范围 0-65535 的字符在 UTF-16 是 2 个字节, 65536 以上为 4 个字节
最后我们再查阅 统一码 百度百科 发现 UTF-8 共4种情况的编码

于是我们可以从码点范围 0-127, 128-2047, 2048-65535 中任意取一个数来验证 JavaScript 字符串的长度与转换为 UTF-8 编码的字节数的关系
// 码点范围 0~127, "1".codePointAt(): 49
"1".length
// length: 1, Buffer.byteLength("1", "utf16le"): 2, Buffer.byteLength("1", "utf8"): 1

// 码点范围 128~2047, "®".codePointAt(): 174
"®".length
// length: 1, Buffer.byteLength("®", "utf16le"): 2, Buffer.byteLength("®", "utf8"): 2

// 码点范围 2048~65535, "多".codePointAt(): 22810
"多".length
// length: 1, Buffer.byteLength("多", "utf16le"): 2, Buffer.byteLength("多", "utf8"): 3

// 码点范围 65536~2097151, "𐀀".codePointAt(): 65536
"𐀀".length
// length: 2, Buffer.byteLength("𐀀", "utf16le"): 4, Buffer.byteLength("𐀀", "utf8"): 4
上面的验证结果来看, 当 JavaScript 字符串的长度为 1 时 UTF-8 编码的字节数可能为1个或者2个或者3个, ✅ 从而验证了 JavaScript 字符串转换为 UTF-8 编码最多需要 3 * str->Length() 个字节来存储。

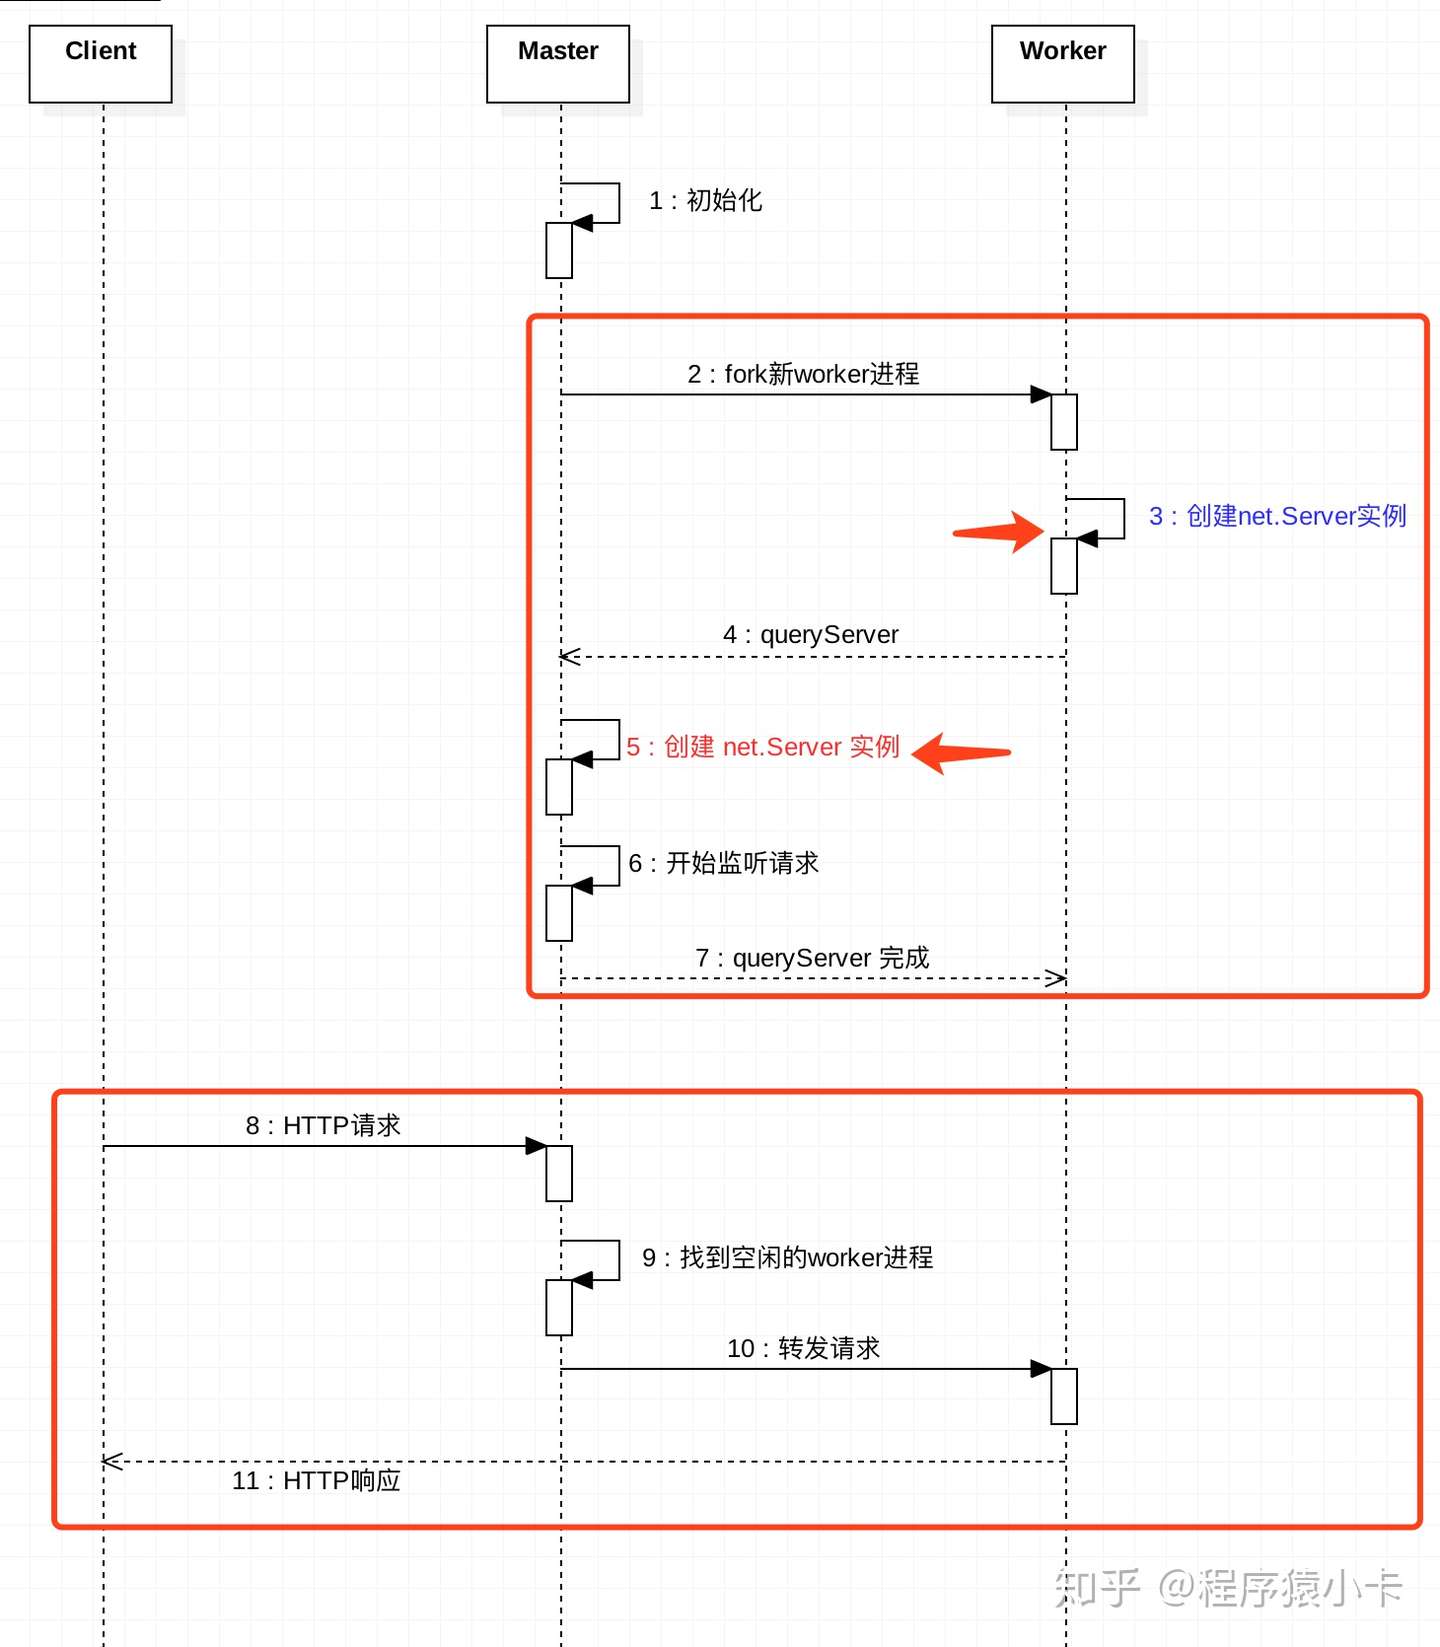
有同学吐槽整个 CI/CD 下来时间太长了, 其中 e2e 测试节点就花了 10 分钟 🐢
现在我们采用的是 puppeteer 进行的一个自动化 e2e 测试, 该节点是在正式发布前, 预发发布后。
作为一个所有项目都必须要通过的一个节点, 它主要的功能是读取项目中的所有路由页面进行一个白屏测试与检查是否有 console.error 、网络错误等。
收到反馈后首先是进行排查, 发现该 spa 项目共 96 个
一开始也没有着急去改, 而是问第一版开发 e2e 的大佬, 为何没有开启多个 browser 实例去并行完成这些路由页面的任务, 得到的反馈是当时项目还比较小, 就没有做这方面的优化了。
看样子多个实例不是因为有坑才没做, 当时可能只是不想 Overdesign。解决这个问题比较简单把收到的若干个任务进行分组, 然后去开启多个 browser 实例去并行完成这些任务即可。

如上图, 最后分为 5 个实例去并发完成, 将该节点耗时减少到了 3分25 秒。
这里说明的一点分的组不是越多越好, 比如 96 个任务每组最大 20个分为 5 组, 总时长并不会减少 5 倍。因为 browser 实例越多占用的系统资源也会越多。这有点像小学求最优解的题, 随着分组数量(x 轴)的增长, 总耗时(y 轴)会类似于一个抛物线。
其实 puppeteer 已经应用在我们很多的前端领域, 如上面所说的 e2e 测试, 其他诸如爬虫、页面定时巡检、页面性能监控都是使用的 puppeteer。
本次就很快解决了这个问题, 出于好奇也粗略的去学习了一下 puppeteer 的实现原理。
const puppeteer = require('puppeteer');

(async () => {
  const browser = await puppeteer.launch();
  const page = await browser.newPage();
  await page.goto('https://example.com');
  await page.screenshot({ path: 'example.png' });

  await browser.close();
})();// src/node/BrowserRunner.ts
start(options: LaunchOptions): void {
//...
this.proc = childProcess.spawn(
this._executablePath,
this._processArguments,
{
// On non-windows platforms, `detached: true` makes child process a
// leader of a new process group, making it possible to kill child
// process tree with `.kill(-pid)` command. @see
// https://nodejs.org/api/child_process.html#child_process_options_detached
detached: process.platform !== 'win32',
env,
stdio,
}
);
// ...
this._listeners = [
helper.addEventListener(process, 'exit', this.kill.bind(this)),
];
if (handleSIGINT)
this._listeners.push(
helper.addEventListener(process, 'SIGINT', () => {
this.kill();
process.exit(130);
})
);
if (handleSIGTERM)
this._listeners.push(
helper.addEventListener(process, 'SIGTERM', this.close.bind(this))
);
if (handleSIGHUP)
this._listeners.push(
helper.addEventListener(process, 'SIGHUP', this.close.bind(this))
);
}// src/node/BrowserRunner.ts
function waitForWSEndpoint(
browserProcess: childProcess.ChildProcess,
timeout: number,
preferredRevision: string
): Promise<string> {
return new Promise((resolve, reject) => {
const rl = readline.createInterface({ input: browserProcess.stderr });
let stderr = '';
const listeners = [
helper.addEventListener(rl, 'line', onLine),
helper.addEventListener(rl, 'close', () => onClose()),
helper.addEventListener(browserProcess, 'exit', () => onClose()),
helper.addEventListener(browserProcess, 'error', (error) =>
onClose(error)
),
];
const timeoutId = timeout ? setTimeout(onTimeout, timeout) : 0;
/**
* @param {!Error=} error
*/
function onClose(error?: Error): void {
cleanup();
reject(
new Error(
[
'Failed to launch the browser process!' +
(error ? ' ' + error.message : ''),
stderr,
'',
'TROUBLESHOOTING: https://github.com/puppeteer/puppeteer/blob/main/docs/troubleshooting.md',
'',
].join('\n')
)
);
}
function onTimeout(): void {
cleanup();
reject(
new TimeoutError(
`Timed out after ${timeout} ms while trying to connect to the browser! Only Chrome at revision r${preferredRevision} is guaranteed to work.`
)
);
}
function onLine(line: string): void {
stderr += line + '\n';
const match = line.match(/^DevTools listening on (ws:\/\/.*)$/);
if (!match) return;
cleanup();
resolve(match[1]);
}
function cleanup(): void {
if (timeoutId) clearTimeout(timeoutId);
helper.removeEventListeners(listeners);
}
});上面 waitForWSEndpoint 函数获取到新打开的 chromium 进程的 WebSocket 监听的 url 后, 这里就通过 ws 这个 npm 包生成了一个 NodeWebSocket。
到这里我们知道了提供若干个 api 的 puppeteer 原来是一个 WebSocket 客户端, 另一端是 chromium 进程进行真实的操作。
// src/node/NodeWebSocketTransport.ts

import NodeWebSocket from 'ws';

export class NodeWebSocketTransport implements ConnectionTransport {
  static create(url: string): Promise<NodeWebSocketTransport> {
    // eslint-disable-next-line @typescript-eslint/no-var-requires
    const pkg = require('../../../../package.json');
    return new Promise((resolve, reject) => {
      const ws = new NodeWebSocket(url, [], {
        followRedirects: true,
        perMessageDeflate: false,
        maxPayload: 256 * 1024 * 1024, // 256Mb
        headers: {
          'User-Agent': `Puppeteer ${pkg.version}`,
        },
      });

      ws.addEventListener('open', () =>
        resolve(new NodeWebSocketTransport(ws))
      );
      ws.addEventListener('error', reject);
    });
}以浏览器新打开一个页面 newPage 函数的实现为例, 可知是通过 NodeWebSocket 发送了一个 'Target.createTarget' 事件, 可传参数见下面的 DevTools Protocol
//src/common/Browser.ts

newPage(): Promise<Page> {
    return this._browser._createPageInContext(this._id);
}

async _createPageInContext(contextId?: string): Promise<Page> {
    const { targetId } = await this._connection.send('Target.createTarget', {
      url: 'about:blank',
      browserContextId: contextId || undefined,
    });
    const target = this._targets.get(targetId);
    assert(
      await target._initializedPromise,
      'Failed to create target for page'
    );
    const page = await target.page();
    return page;
  }
这里用来操控 chromium 的协议都可以在这里查阅 Chrome DevTools Protocol

发现问题后最好先追本溯源, 以免走前人踩过的坑。其次有多余的时间也不妨探究一下其实现原理, 技术其实都是相通的, 看的多了总是能举一反三 ~
最近开始看到 http 模块的实现, 首先值得说的是 http 请求报文与响应报文的解析部分的实现, 或许大家都有一定的映像, node 12 的一个变更为报文解析由 http_parser 换成了 llhttp, 其中 llhttp 快了大约 156% !
| input size | bandwidth | reqs/sec | time | |
|---|---|---|---|---|
| llhttp | 8192.00 mb | 1777.24 mb/s | 3583799.39 req/sec | 4.61 s |
| http_parser | 8192.00 mb | 694.66 mb/s | 1406180.33 req/sec | 11.79 s |
涉及的知识点
下面是访问百度 开发者工具 -> Network -> Copy-> Copy response 复制出来的一个响应报文
HTTP/1.1 200 OK
Cache-Control: private
Connection: keep-alive
Content-Encoding: gzip
Content-Type: text/html;charset=utf-8
Date: Tue, 29 Jun 2021 12:41:24 GMT
Expires: Tue, 29 Jun 2021 12:41:19 GMT
Server: BWS/1.1
Set-Cookie: H_PS_PSSID=33801_33969_33848_34133_34073_33607_34135_26350; path=/; domain=.baidu.com
Strict-Transport-Security: max-age=172800
Traceid: 1624970484055677338616295512869175318410
Transfer-Encoding: chunked
和一个请求报文
GET / HTTP/1.1
Host: www.baidu.com
Connection: keep-alive
Cache-Control: max-age=0
User-Agent: Mozilla/5.0 (Macintosh; Intel Mac OS X 10_13_3) AppleWebKit/537.36 (KHTML, like Gecko) Chrome/91.0.4472.114 Safari/537.36
Accept: text/html,application/xhtml+xml,application/xml;q=0.9,image/avif,image/webp,image/apng,*/*;q=0.8,application/signed-
一个请求发出去, 响应的内容其实是一个字节流的形式返回的数据, 你可以等所有数据接受完毕再去进行解析, 不过这个效率就会明显变低。
当 TCP 连接中有可读的流数据时, llhttp 就会逐个去解析收到的数据, 如果刚开始收到的内容只有一个
H
这就涉及到编译原理中的 有限状态机, 当然你也需要对 http 协议有足够的了解, 详细的协议可以查阅 HTTP/1.1 rfc2616

状态机是一种行为模型。它由有限数量的状态组成,因此也称为有限状态机 (FSM)。基于当前状态和给定输入,机器执行状态转换并产生输出。有像 Mealy 和 Moore 机器这样的基本类型和更复杂的类型,比如 Harel 和 UML 状态图。
如图生活中的开关按钮就是最简单的状态机, 当此时是关闭状态时, 点击按钮灯就会进入开启状态, 再点击一下先判断此时是什么状态, 如开启状态就会进入关闭状态。
代码表示即像 switch 语句, 其中有大量的 case, 状态 a 转到状态 b 即像逻辑由 case a 处理到改变到 case b 去处理。下面为实际解析的代码片段
// deps/llhttp/src/llhttp.c

static llparse_state_t llhttp__internal__run(
    llhttp__internal_t* state,
    const unsigned char* p,
    const unsigned char* endp) {
  int match;
  switch ((llparse_state_t) (intptr_t) state->_current) {
    case s_n_llhttp__internal__n_closed:
    s_n_llhttp__internal__n_closed: {
      if (p == endp) {
        return s_n_llhttp__internal__n_closed;
      }
      switch (*p) {
        case 10: {
          p++;
          goto s_n_llhttp__internal__n_closed;
        }
        case 13: {
          p++;
          goto s_n_llhttp__internal__n_closed;
        }
        default: {
          p++;
          goto s_n_llhttp__internal__n_error_4;
        }
      }
      /* UNREACHABLE */;
      abort();
    }
    case s_n_llhttp__internal__n_invoke_llhttp__after_message_complete:
    s_n_llhttp__internal__n_invoke_llhttp__after_message_complete: {
      switch (llhttp__after_message_complete(state, p, endp)) {
        case 1:
          goto s_n_llhttp__internal__n_invoke_update_finish_2;
        default:
          goto s_n_llhttp__internal__n_invoke_update_finish_1;
      }
      /* UNREACHABLE */;
      abort();
    }

    ....
其实上面的 deps/llhttp/src/llhttp.c 的代码是由 llhttp 包下的脚本命令生成的, 并非是手写的, 我想到的一个原因是 http 报文过于复杂导致需要关注的状态过多, deps/llhttp/src/llhttp.c 的代码已经达到了 14927 行 !
比较常见的场景就是配置化表单, 比如通过一个 json 去遍历渲染一系列表单, 因为直接手写会复制粘贴大量重复的代码。
这里 llhttp 没有用 json 去描述, 还是因为状态过于复杂, json 抽象程度不高, 其最终用的 llparse 去描述出的一套 DSL。
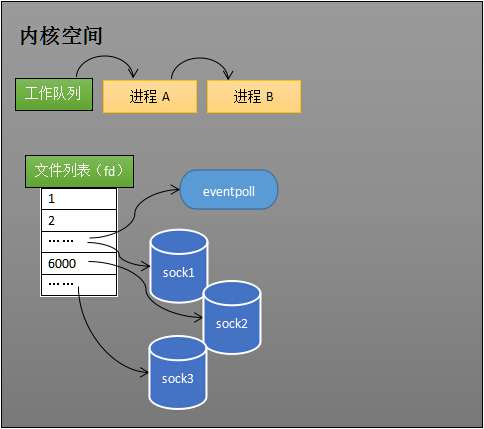
全部的状态, 参考下图
聪明的你已经想到了, 图不就用数据结构中的 Graph 就行了 ~ 其中 llparse 在 Graph 的基础上又做了一些扩展, 让我们一起去探个究竟
下面就是完整的描叙的过程
// src/llhttp/http.ts

public build(): IHTTPResult {
    const p = this.llparse;

    p.property('i64', 'content_length');
    p.property('i8', 'type');
    p.property('i8', 'method');
    p.property('i8', 'http_major');
    p.property('i8', 'http_minor');
    p.property('i8', 'header_state');
    p.property('i8', 'lenient_flags');
    p.property('i8', 'upgrade');
    p.property('i8', 'finish');
    p.property('i16', 'flags');
    p.property('i16', 'status_code');

    // Verify defaults
    assert.strictEqual(FINISH.SAFE, 0);
    assert.strictEqual(TYPE.BOTH, 0);

    // Shared settings (to be used in C wrapper)
    p.property('ptr', 'settings');

    this.buildLine();
    this.buildHeaders();

    return {
      entry: this.node('start'),
    };
}
// src/llhttp/http.ts

private buildLine(): void {
    const p = this.llparse;
    const span = this.span;
    const n = (name: string): Match => this.node<Match>(name);

    const url = this.url.build();

    const switchType = this.load('type', {
      [TYPE.REQUEST]: n('start_req'),
      [TYPE.RESPONSE]: n('start_res'),
    }, n('start_req_or_res'));

    n('start')
      .match([ '\r', '\n' ], n('start'))
      .otherwise(this.update('finish', FINISH.UNSAFE,
        this.invokePausable('on_message_begin',
          ERROR.CB_MESSAGE_BEGIN, switchType)));

    n('start_req_or_res')
      .peek('H', n('req_or_res_method'))
      .otherwise(this.update('type', TYPE.REQUEST, 'start_req'));

    n('req_or_res_method')
      .select(H_METHOD_MAP, this.store('method',
        this.update('type', TYPE.REQUEST, 'req_first_space_before_url')))
      .match('HTTP/', this.update('type', TYPE.RESPONSE, 'res_http_major'))
      .otherwise(p.error(ERROR.INVALID_CONSTANT, 'Invalid word encountered'));

    // Response

    n('start_res')
      .match('HTTP/', n('res_http_major'))
      .otherwise(p.error(ERROR.INVALID_CONSTANT, 'Expected HTTP/'));

    n('res_http_major')
      .select(MAJOR, this.store('http_major', 'res_http_dot'))
      .otherwise(p.error(ERROR.INVALID_VERSION, 'Invalid major version'));

    n('res_http_dot')
      .match('.', n('res_http_minor'))
      .otherwise(p.error(ERROR.INVALID_VERSION, 'Expected dot'));

    n('res_http_minor')
      .select(MINOR, this.store('http_minor', 'res_http_end'))
      .otherwise(p.error(ERROR.INVALID_VERSION, 'Invalid minor version'));

    ...
  }
首先从 switchType 开始详细讲一下是如何描叙的, 其主要调用了 this.load 方法
src/llhttp/http.ts

private load(field: string, map: { [key: number]: Node },
               next?: string | Node): Node {
    const p = this.llparse;

    const res = p.invoke(p.code.load(field), map);
    if (next !== undefined) {
      res.otherwise(this.node(next));
    }
    return res;
}
这段描述, 后面会被 llparse 生成如下的实际会运行的代码, 看到目标代码就会明朗一点
// deps/llhttp/src/llhttp.c

case s_n_llhttp__internal__n_invoke_load_type:
    s_n_llhttp__internal__n_invoke_load_type: {
      switch (llhttp__internal__c_load_type(state, p, endp)) {
        case 1:
          goto s_n_llhttp__internal__n_start_req;
        case 2:
          goto s_n_llhttp__internal__n_start_res;
        default:
          goto s_n_llhttp__internal__n_start_req_or_res;
      }
      /* UNREACHABLE */;
      abort();
}
从 start 的起始点开始图文并茂的再解释一下
n('start')
      .match([ '\r', '\n' ], n('start'))
      .otherwise(this.update('finish', FINISH.UNSAFE,
        this.invokePausable('on_message_begin',
          ERROR.CB_MESSAGE_BEGIN, switchType)));

可以发现 match 方法其实是可以向 图 Graph 中一次性加入若干个边 Edge
// llparse-builder/src/node/match.ts

public match(value: MatchValue, next: Node): this {
    if (Array.isArray(value)) {
      for (const subvalue of value) {
        this.match(subvalue, next);
      }
      return this;
    }

    const buffer = toBuffer(value as MatchSingleValue);
    const edge = new Edge(next, false, buffer, undefined);
    this.addEdge(edge);
    return this;
}
otherwise 也是表示加入一个 Edge, 其对应的是 default 语句
// llparse-builder/src/node/base.ts

public otherwise(node: Node): this {
    if (this.otherwiseEdge !== undefined) {
      throw new Error('Node already has `otherwise` or `skipTo`');
    }

    this.otherwiseEdge = new Edge(node, true, undefined, undefined);
    return this;
}
通过上面费劲的描述的图与里面各个边与节点关系后, 其会通过这份数据生成实际会运行的什么代码了?
// deps/llhttp/src/llhttp.c

case s_n_llhttp__internal__n_start:
    s_n_llhttp__internal__n_start: {
      if (p == endp) {
        return s_n_llhttp__internal__n_start;
      }
      switch (*p) {
        case 10: {
          p++;
          goto s_n_llhttp__internal__n_start;
        }
        case 13: {
          p++;
          goto s_n_llhttp__internal__n_start;
        }
        default: {
          goto s_n_llhttp__internal__n_invoke_update_finish;
        }
}
类似于 match, 通过 Edge 构造函数的第二个参数为 true 表示不会消耗字节, 即只是偷窥一下, 字符串下标的位置不需要移动。
// llparse-builder/src/node/match.ts

public peek(value: MatchValue, next: Node): this {
    if (Array.isArray(value)) {
      for (const subvalue of value) {
        this.peek(subvalue, next);
      }
      return this;
    }

    const buffer = toBuffer(value as MatchSingleValue);
    assert.strictEqual(buffer.length, 1,
      '`.peek()` accepts only single character keys');

    const edge = new Edge(next, true, buffer, undefined);
    this.addEdge(edge);
    return this;
}
通过上面 p.invoke 的讲解也提到, invoke 也是增加了一个 Edge, 不同的是会调用一个内置的辅助函数, 如
// llparse-builder/src/node/invoke.ts

export class Invoke extends Node {
  /**
   * @param code  External callback or intrinsic code. Can be created with
   *              `builder.code.*()` methods.
   * @param map   Map from callback return codes to target nodes
   */
  constructor(public readonly code: Code, map: IInvokeMap) {
    super('invoke_' + code.name);

    Object.keys(map).forEach((mapKey) => {
      const numKey: number = parseInt(mapKey, 10);
      const targetNode = map[numKey]!;

      assert.strictEqual(numKey, numKey | 0,
        'Invoke\'s map keys must be integers');

      this.addEdge(new Edge(targetNode, true, numKey, undefined));
    });
  }
}
类似于 match, select, 但传入的节点必须是 Invoke 类型。即能够增加 Object.keys(map).length 个 Edge 且需要调用具体行为动作。
对于参数 map 产生的 Object.keys(map).length 种情况, 将最后符合条件的 value 通过 Invoke 调用的内置辅助函数进行保存
// llparse-builder/src/node/match.ts

public select(keyOrMap: MatchSingleValue | IMatchSelect,
                valueOrNext?: number | Node, next?: Node): this {
    // .select({ key: value, ... }, next)
    if (typeof keyOrMap === 'object') {
      assert(valueOrNext instanceof Node,
        'Invalid `next` argument of `.select()`');
      assert.strictEqual(next, undefined,
        'Invalid argument count of `.select()`');

      const map: IMatchSelect = keyOrMap as IMatchSelect;
      next = valueOrNext as Node | undefined;

      Object.keys(map).forEach((mapKey) => {
        const numKey: number = mapKey as any;

        this.select(numKey, map[numKey]!, next);
      });
      return this;
    }

    // .select(key, value, next)
    assert.strictEqual(typeof valueOrNext, 'number',
      'Invalid `value` argument of `.select()`');
    assert.notStrictEqual(next, undefined,
      'Invalid `next` argument of `.select()`');

    const key = toBuffer(keyOrMap as MatchSingleValue);
    const value = valueOrNext as number;

    const edge = new Edge(next!, false, key, value);
    this.addEdge(edge);
    return this;
  }
llhttp 最后在 node 中的调用方式可以类似于下面的例子
#include "llhttp.h"

llhttp_t parser;
llhttp_settings_t settings;

/* Initialize user callbacks and settings */
llhttp_settings_init(&settings);

/* Set user callback */
settings.on_message_complete = handle_on_message_complete;

/* Initialize the parser in HTTP_BOTH mode, meaning that it will select between
 * HTTP_REQUEST and HTTP_RESPONSE parsing automatically while reading the first
 * input.
 */
llhttp_init(&parser, HTTP_BOTH, &settings);

/* Parse request! */
const char* request = "GET / HTTP/1.1\r\n\r\n";
int request_len = strlen(request);

enum llhttp_errno err = llhttp_execute(&parser, request, request_len);
if (err == HPE_OK) {
  /* Successfully parsed! */
} else {
  fprintf(stderr, "Parse error: %s %s\n", llhttp_errno_name(err),
          parser.reason);
}
本节主要讲了 llhttp 如何对一个请求报文或者响应报文流数据的解析过程, 当 Header 解析完成, 报文的 Body 就可以交给用户自行去处理了, 如通过 Content-Type 发现传的内容为文件, 即导入到一个文件可写流中保存文件即可, 亦或是一个 Json 数据, 即可等内容流结束去 JSON.parse 即可。
stream 流是许多 nodejs 核心模块的基类, 在讲解它们之前还是要认真说一下 nodejs stream 的实现。其实在 【libuv 源码学习笔记】网络与流 中 BSD 套接字 中就开始提到 c 中的流, nodejs 的 c++ 代码的实现更多的是作为一个胶水层, 实际调用的 js 层面的 stream 实例的方法。
流是用于在 Node.js 中处理流数据的抽象接口。 stream 模块提供了用于实现流接口的 API。
Node.js 提供了许多流对象。 例如,对 HTTP 服务器的请求和 process.stdout 都是流的实例。
流可以是可读的、可写的、或两者兼而有之。 所有的流都是 EventEmitter 的实例。
双工流同时实现了可读流和可写流,例如 TCP socket 连接。
双工流相当于同时继承了可读流和可写流
// lib/internal/streams/duplex.js

function Duplex(options) {
  if (!(this instanceof Duplex))
    return new Duplex(options);

  Readable.call(this, options);
  Writable.call(this, options);
  this.allowHalfOpen = true;

  if (options) {
    if (options.readable === false)
      this.readable = false;

    if (options.writable === false)
      this.writable = false;

    if (options.allowHalfOpen === false) {
      this.allowHalfOpen = false;
    }
  }
}
const { Duplex } = require('stream');

const myDuplex = new Duplex({
  read(size) {
    // ...
  },
  write(chunk, encoding, callback) {
    // ...
  }
});
这里 js 里面 socket 对象实际操作的是【libuv 源码学习笔记】网络与流 中提到当有一个 TCP 连接时,返回的 acceptFd,我们可以从中读取客户端发送来的数据或者是写入数据响应给客户端。
// lib/net.js

function Socket(options) {
  if (!(this instanceof Socket)) return new Socket(options);

  // ...
}

Socket.prototype._read = function(n) {
  debug('_read');

  if (this.connecting || !this._handle) {
    debug('_read wait for connection');
    this.once('connect', () => this._read(n));
  } else if (!this._handle.reading) {
    tryReadStart(this);
  }
};

Socket.prototype._write = function(data, encoding, cb) {
  this._writeGeneric(false, data, encoding, cb);
};
Transform 继承于 Duplex,所以也算是 Duplex 的实现,下面我们接着讲 Transform 的实现
转换流是一种双工流,它会对输入做些计算然后输出。 例如 zlib 流和 crypto 流会压缩、加密或解密数据。
和名字一样,转换流强调的是一对一的转换关系,其实可以类似于 js 数组的 map 函数,一系列输入经过某个规则转换成一系列经过处理的输出
// lib/internal/streams/transform.js

function Transform(options) {
  if (!(this instanceof Transform))
    return new Transform(options);

  Duplex.call(this, options);

  this._readableState.sync = false;

  this[kCallback] = null;

  if (options) {
    if (typeof options.transform === 'function')
      this._transform = options.transform;

    if (typeof options.flush === 'function')
      this._flush = options.flush;
  }

  this.on('prefinish', prefinish);
}
其设计的核心应用场景是对流动中的数据进行加工处理,如
readable.pipe(transform1).pipe(transform2).pipe(transform3).pipe(writeable)
从上面应用场景需求出发,实现一个转换流主要是对可读流或者其他转换流产生的数据进行处理后,然后发送给下一个可写流或者转换流
从上一节【node 源码学习笔记】stream 可读流的 pipe 方法可知,可读流生产出数据后会调用传入流的 write 方法,而转换流这里实现的 write 方法,主要是调用把上一个流生产的数据传给 _transform 方法,然后把返回值 val 传给 this.push 。
其实你可能已经发现了,上面的 this.push 就是可读流 read 接口调用产生数据的核心,所以转换流这里的 _read 方法相当于是闲置不会被调用的。
// lib/internal/streams/transform.js

Transform.prototype._write = function(chunk, encoding, callback) {
  const rState = this._readableState;
  const wState = this._writableState;
  const length = rState.length;

  let called = false;
  const result = this._transform(chunk, encoding, (err, val) => {
    called = true;
    if (err) {
      callback(err);
      return;
    }

    if (val != null) {
      this.push(val);
    }

    if (
      wState.ended || // Backwards compat.
      length === rState.length || // Backwards compat.
      rState.length < rState.highWaterMark ||
      rState.length === 0
    ) {
      callback();
    } else {
      this[kCallback] = callback;
    }
  });
  if (result !== undefined && result != null) {
    try {
      const then = result.then;
      if (typeof then === 'function') {
        then.call(
          result,
          (val) => {
            if (called)
              return;

            if (val != null) {
              this.push(val);
            }

            if (
              wState.ended ||
              length === rState.length ||
              rState.length < rState.highWaterMark ||
              rState.length === 0) {
              process.nextTick(callback);
            } else {
              this[kCallback] = callback;
            }
          },
          (err) => {
            process.nextTick(callback, err);
          });
      }
    } catch (err) {
      process.nextTick(callback, err);
    }
  }
};
在上面的 Transform 构造函数中看到,还有一个 flush 的可选参数。flush 方法期盼的的作用是将缓冲区中的数据强制写出,这是什么意思了?让我们看一下当可写流的数据是要写入设备的例子
应用程序每次 IO 都要和设备进行通信,效率很低,因此缓冲区为了提高效率,当写入设备时,先写入缓冲区,等到缓冲区有足够多的数据时,就整体写入设备
所以 flush 方法的调用一般是流结束的前夕,此时就不需要考虑写入效率的问题,只需干完最后的工作然后收工就完事了。
所以转换流实现了【node 源码学习笔记】stream 可写流提到的 _final 接口,主要是调用了 flush 方法,如果你实现的转换流为了效率等原因有缓存机制,即可以在 flush 方法中返回缓存中的所有数据。
// lib/internal/streams/transform.js

function final(cb) {
  let called = false;
  if (typeof this._flush === 'function' && !this.destroyed) {
    const result = this._flush((er, data) => {
      called = true;
      if (er) {
        if (cb) {
          cb(er);
        } else {
          this.destroy(er);
        }
        return;
      }

      if (data != null) {
        this.push(data);
      }
      this.push(null);
      if (cb) {
        cb();
      }
    });
    if (result !== undefined && result !== null) {
      try {
        const then = result.then;
        if (typeof then === 'function') {
          then.call(
            result,
            (data) => {
              if (called)
                return;
              if (data != null)
                this.push(data);
              this.push(null);
              if (cb)
                process.nextTick(cb);
            },
            (err) => {
              if (cb) {
                process.nextTick(cb, err);
              } else {
                process.nextTick(() => this.destroy(err));
              }
            });
        }
      } catch (err) {
        process.nextTick(() => this.destroy(err));
      }
    }
  } else {
    this.push(null);
    if (cb) {
      cb();
    }
  }
}
const { Transform } = require('stream');

const myTransform = new Transform({
  transform(chunk, encoding, callback) {
    // ...
  }
});
zlib 流的核心就是对传入的数据进行转换返回压缩后的数据
ZlibBase.prototype._transform = function(chunk, encoding, cb) {
  let flushFlag = this._defaultFlushFlag;
  // We use a 'fake' zero-length chunk to carry information about flushes from
  // the public API to the actual stream implementation.
  if (typeof chunk[kFlushFlag] === 'number') {
    flushFlag = chunk[kFlushFlag];
  }

  // For the last chunk, also apply `_finishFlushFlag`.
  if (this.writableEnded && this.writableLength === chunk.byteLength) {
    flushFlag = maxFlush(flushFlag, this._finishFlushFlag);
  }
  processChunk(this, chunk, flushFlag, cb);
};
PassThrough 继承于 Transform,所以也算是 Transform 的实现,下面我们接着讲 PassThrough 的实现
stream.PassThrough 类是一个无关紧要的转换流,只是单纯地把输入的字节原封不动地输出。
function PassThrough(options) {
  if (!(this instanceof PassThrough))
    return new PassThrough(options);

  Transform.call(this, options);
}

PassThrough.prototype._transform = function(chunk, encoding, cb) {
  cb(null, chunk);
};
透传流相当于啥事也没干,那它存在的意义又是啥了?
下面我们通过其在 pipeline 函数的使用场景进行讲解
通过下面 pipeline 的例子我们看到,相比上面 readable.pipe(transform1).pipe(writeable) 管道的调用形式
const { pipeline } = require('stream/promises');
const fs = require('fs');

async function run() {
  await pipeline(
    fs.createReadStream('lowercase.txt'),
    async function* (source) {
      source.setEncoding('utf8');  // 使用字符串而不是 `Buffer`。
      for await (const chunk of source) {
        yield chunk.toUpperCase();
      }
    },
    fs.createWriteStream('uppercase.txt')
  );
  console.log('Pipeline succeeded.');
}

run().catch(console.error);
选择上面的例子还有一个原因,是 pipeline 函数的转换流可以是一个异步迭代器,其实现主要是通过 PassThrough ,一个迭代器转换为可读流的实现可以参考【node 源码学习笔记】stream 可读流
下面的异步迭代器函数其实也很好的说明了转换流的意义,即把输入经过一定规则转换然后输出,让一个函数轻松得转变为转换流也是能降低不少开发成本与理解,让我想起了 React 中的 Hooks 函数的实现,其原因也觉得用 Class 的形式写 HOC 成本和负担可能会大一点
async function* (source) {
      source.setEncoding('utf8');  // 使用字符串而不是 `Buffer`。
      for await (const chunk of source) {
        yield chunk.toUpperCase();
      }
}
其转换的实现主要是下面的 pump 函数
pump 函数的第一参数是异步迭代器,可以是上面例子的函数,第二个参数即是一个 PassThrough 的实例,第三个参数 finish 即表示该转换工作结束的回调
pump 其实就很好的考虑到了积压问题,关于积压问题可参考 【node 源码学习笔记】stream 可读流
// lib/internal/streams/pipeline.js

async function pump(iterable, writable, finish) {
  if (!EE) {
    EE = require('events');
  }
  let error;
  try {
    if (writable.writableNeedDrain === true) {
      await EE.once(writable, 'drain');
    }

    for await (const chunk of iterable) {
      if (!writable.write(chunk)) {
        if (writable.destroyed) return;
        await EE.once(writable, 'drain');
      }
    }
    writable.end();
  } catch (err) {
    error = err;
  } finally {
    finish(error);
  }
}
上面讲解的是一个异步迭代器转换为转换流,在 pipeline 的实现中发现会始终返回了一个双工流,所以返回值 s 也能继续调用 pipe 方法,如下面的例子,如果最后的可写流部分是个 Promise 对象的话也是能兼容
const { pipeline, Readable } = require("stream");

const s = pipeline(
  Readable.from("1"),
  () => Promise.resolve("2"),
  (err) => {
    if (err) {
      console.log("err: ");
    } else {
      console.log("success");
    }
  }
);

s.pipe(process.stdout);
其实现也是通过 PassThrough, pipeline 函数的返回值会是 pt,pt 里面保存的数据即是例子中 Promise.resolve("2") 中的字符串 2
// lib/internal/streams/pipeline.js

const pt = new PassThrough({
  objectMode: true
});

// Handle Promises/A+ spec, `then` could be a getter that throws on
// second use.
const then = ret?.then;
if (typeof then === 'function') {
  then.call(ret,
            (val) => {
              value = val;
              pt.end(val);
            }, (err) => {
              pt.destroy(err);
            },
  );
}
eos 表示的是 end-of-stream 即是流结束的一个实用函数,在 pipeline 函数中会为传入的流参数使用 eos 包裹获取每个流结束的处理函数,eos 即是下面例子中的 finished 函数
const { finished } = require('stream');

const rs = fs.createReadStream('archive.tar');

finished(rs, (err) => {
  if (err) {
    console.error('Stream failed.', err);
  } else {
    console.log('Stream is done reading.');
  }
});

rs.resume(); // 排空流。
eos 主要是封装了可读流,可写流,双工流,req,res 等结束或者关闭被摧毁等情况下的实现
如果流已经关闭或者结束在下一个 nextTick 直接运行回调函数,否则收到下面事件也代表结束
可读流正常结束一般是收到 end 事件,可写流正常结束一般是收到 finish 事件
eos 的返回值为 cleanup 函数,主要用于清除卸载监听
// lib/internal/streams/end-of-stream.js

function eos(stream, options, callback) {
  // ...

  stream.on('end', onend);
  stream.on('finish', onfinish);
  if (options.error !== false) stream.on('error', onerror);
  stream.on('close', onclose);

  if (closed) {
    process.nextTick(onclose);
  } else if (wState?.errorEmitted || rState?.errorEmitted) {
    if (!willEmitClose) {
      process.nextTick(onclose);
    }
  } else if (
    !readable &&
    (!willEmitClose || isReadable(stream)) &&
    (writableFinished || !isWritable(stream))
  ) {
    process.nextTick(onclose);
  } else if (
    !writable &&
    (!willEmitClose || isWritable(stream)) &&
    (readableFinished || !isReadable(stream))
  ) {
    process.nextTick(onclose);
  } else if ((rState && stream.req && stream.aborted)) {
    process.nextTick(onclose);
  }

  const cleanup = () => {
    callback = nop;
    stream.removeListener('aborted', onclose);
    stream.removeListener('complete', onfinish);
    stream.removeListener('abort', onclose);
    stream.removeListener('request', onrequest);
    if (stream.req) stream.req.removeListener('finish', onfinish);
    stream.removeListener('end', onlegacyfinish);
    stream.removeListener('close', onlegacyfinish);
    stream.removeListener('finish', onfinish);
    stream.removeListener('end', onend);
    stream.removeListener('error', onerror);
    stream.removeListener('close', onclose);
  };

  if (options.signal && !closed) {
    const abort = () => {
      // Keep it because cleanup removes it.
      const endCallback = callback;
      cleanup();
      endCallback.call(stream, new AbortError());
    };
    if (options.signal.aborted) {
      process.nextTick(abort);
    } else {
      const originalCallback = callback;
      callback = once((...args) => {
        options.signal.removeEventListener('abort', abort);
        originalCallback.apply(stream, args);
      });
      options.signal.addEventListener('abort', abort);
    }
  }

  return cleanup;
}
可以看见如果双工流收到 finish 事件以及 end 事件后才算结束或者出现了错误
// lib/internal/streams/end-of-stream.js

const onfinish = () => {
  writableFinished = true;
  // Stream should not be destroyed here. If it is that
  // means that user space is doing something differently and
  // we cannot trust willEmitClose.
  if (stream.destroyed) willEmitClose = false;

  if (willEmitClose && (!stream.readable || readable)) return;
  if (!readable || readableFinished) callback.call(stream);
};

let readableFinished = isReadableFinished(stream, false);
const onend = () => {
  readableFinished = true;
  // Stream should not be destroyed here. If it is that
  // means that user space is doing something differently and
  // we cannot trust willEmitClose.
  if (stream.destroyed) willEmitClose = false;

  if (willEmitClose && (!stream.writable || writable)) return;
  if (!writable || writableFinished) callback.call(stream);
};
从上面也能发现如果会 emit('close') 的事件的流则会以 close 事件为结束的标记,比如 http server 的 res 就是这样的流,其触发流程是 res.end 方法中发送 finish 事件,finish 事件的回调中做了一些内存回收等操作然后发送 close 事件
本文主要讲了 双工流 Duplex,转换流 Transform,透传流 PassThrough 的代码实现和实际的运用场景,函数式的 pipeline 函数以及实用的 finished 方法用于设置流结束或者发生错误时的回调。

在 2022 前端技术领域会有哪些新的变化? 话题中我曾回答到,越来越多的项目会开始使用 pnpm。
这是我正在推动的一件事,使用 pnpm 替换现在的 yarn 。无论是 csr 、ssr、monorepos 等类型项目都正在进行中,有近 10个项目已经迁移完成。
当时 yarn 的 pnp 特性出来的时候,观望过一阵子,没有大面积火起来,遂放弃 ...
现在是注意到 vite、modernjs 等使用了 pnpm,其设计理念与node_modules的目录结构也能让业务更加快速安全,所以决定开始全面使用 pnpm。
下面记录与分享一下最近使用 pnpm 遇到的问题与解决的过程~

// Copyright 2004-present Facebook. All Rights Reserved.

'use strict';

jest.useFakeTimers();

describe('timerGame', () => {
  beforeEach(() => {
    jest.spyOn(global, 'setTimeout');
  });
  it('waits 1 second before ending the game', () => {
    const timerGame = require('../timerGame');
    timerGame();

    expect(setTimeout).toBeCalledTimes(1);
    expect(setTimeout).toBeCalledWith(expect.any(Function), 1000);
  });

  it('calls the callback after 1 second via runAllTimers', () => {
    const timerGame = require('../timerGame');
    const callback = jest.fn();

    timerGame(callback);

    // At this point in time, the callback should not have been called yet
    expect(callback).not.toBeCalled();

    // Fast-forward until all timers have been executed
    jest.runAllTimers();

    // Now our callback should have been called!
    expect(callback).toBeCalled();
    expect(callback).toBeCalledTimes(1);
  });
});# pnpm i better-sqlite3
Packages: +11
+++++++++++
Resolving: total 11, reused 11, downloaded 0, done
node_modules/.pnpm/registry.npmjs.org/integer/2.1.0/node_modules/integer: Running install script, done in 2s
node_modules/.pnpm/registry.npmjs.org/better-sqlite3/5.4.3/node_modules/better-sqlite3: Running install script, failed in 393ms
.../5.4.3/node_modules/better-sqlite3 install$ node-gyp rebuild
│ gyp info it worked if it ends with ok
│ gyp info using [email protected]
│ gyp info using [email protected] | linux | x64
│ gyp info find Python using Python version 3.6.8 found at "/usr/bin/python3"
│ gyp info spawn /usr/bin/python3
│ gyp info spawn args [
│ gyp info spawn args '/usr/lib/node_modules/pnpm/lib/node_modules/node-gyp/gyp/gyp_main.py',
│ gyp info spawn args 'binding.gyp',
│ gyp info spawn args '-f',
│ gyp info spawn args 'make',
│ gyp info spawn args '-I',
│ gyp info spawn args '/root/2/node_modules/.pnpm/registry.npmjs.org/better-sqlite3/5.4.3/node_modules/better-sqlite3/build/config.gypi',
│ gyp info spawn args '-I',
│ gyp info spawn args '/usr/lib/node_modules/pnpm/lib/node_modules/node-gyp/addon.gypi',
│ gyp info spawn args '-I',
│ gyp info spawn args '/root/.cache/node-gyp/12.13.0/include/node/common.gypi',
│ gyp info spawn args '-Dlibrary=shared_library',
│ gyp info spawn args '-Dvisibility=default',
│ gyp info spawn args '-Dnode_root_dir=/root/.cache/node-gyp/12.13.0',
│ gyp info spawn args '-Dnode_gyp_dir=/usr/lib/node_modules/pnpm/lib/node_modules/node-gyp',
│ gyp info spawn args '-Dnode_lib_file=/root/.cache/node-gyp/12.13.0/<(target_arch)/node.lib',
│ gyp info spawn args '-Dmodule_root_dir=/root/2/node_modules/.pnpm/registry.npmjs.org/better-sqlite3/5.4.3/node_modules/better-sqlite3',
│ gyp info spawn args '-Dnode_engine=v8',
│ gyp info spawn args '--depth=.',
│ gyp info spawn args '--no-parallel',
│ gyp info spawn args '--generator-output',
│ gyp info spawn args 'build',
│ gyp info spawn args '-Goutput_dir=.'
│ gyp info spawn args ]
│ Traceback (most recent call last):
│ File "/usr/lib/node_modules/pnpm/lib/node_modules/node-gyp/gyp/gyp_main.py", line 50, in <module>
│ sys.exit(gyp.script_main())
│ File "/usr/lib/node_modules/pnpm/lib/node_modules/node-gyp/gyp/pylib/gyp/__init__.py", line 554, in script_main
│ return main(sys.argv[1:])
│ File "/usr/lib/node_modules/pnpm/lib/node_modules/node-gyp/gyp/pylib/gyp/__init__.py", line 547, in main
│ return gyp_main(args)
│ File "/usr/lib/node_modules/pnpm/lib/node_modules/node-gyp/gyp/pylib/gyp/__init__.py", line 532, in gyp_main
│ generator.GenerateOutput(flat_list, targets, data, params)
│ File "/usr/lib/node_modules/pnpm/lib/node_modules/node-gyp/gyp/pylib/gyp/generator/make.py", line 2215, in GenerateOutput
│ part_of_all=qualified_target in needed_targets)
│ File "/usr/lib/node_modules/pnpm/lib/node_modules/node-gyp/gyp/pylib/gyp/generator/make.py", line 794, in Write
│ extra_mac_bundle_resources, part_of_all)
│ File "/usr/lib/node_modules/pnpm/lib/node_modules/node-gyp/gyp/pylib/gyp/generator/make.py", line 978, in WriteActions
│ part_of_all=part_of_all, command=name)
│ File "/usr/lib/node_modules/pnpm/lib/node_modules/node-gyp/gyp/pylib/gyp/generator/make.py", line 1724, in WriteDoCmd
│ force = True)
│ File "/usr/lib/node_modules/pnpm/lib/node_modules/node-gyp/gyp/pylib/gyp/generator/make.py", line 1779, in WriteMakeRule
│ cmddigest = hashlib.sha1(command if command else self.target).hexdigest()
│ TypeError: Unicode-objects must be encoded before hashing
│ gyp ERR! configure error
│ gyp ERR! stack Error: `gyp` failed with exit code: 1
│ gyp ERR! stack at ChildProcess.onCpExit (/usr/lib/node_modules/pnpm/lib/node_modules/node-gyp/lib/configure.js:351:16)
│ gyp ERR! stack at ChildProcess.emit (events.js:210:5)
│ gyp ERR! stack at Process.ChildProcess._handle.onexit (internal/child_process.js:272:12)
│ gyp ERR! System Linux 4.15.0-33-generic
│ gyp ERR! command "/usr/bin/node" "/usr/lib/node_modules/pnpm/lib/node_modules/node-gyp/bin/node-gyp.js" "rebuild"
│ gyp ERR! cwd /root/2/node_modules/.pnpm/registry.npmjs.org/better-sqlite3/5.4.3/node_modules/better-sqlite3
│ gyp ERR! node -v v12.13.0
│ gyp ERR! node-gyp -v v6.0.0
│ gyp ERR! not ok
└─ Failed in 393ms
ERROR Command failed with exit code 1.// .pnpmfile.cjs
function readPackage(pkg, context) {
if (pkg.name && pkg.peerDependencies) {
// https://pnpm.io/zh/how-peers-are-resolved
pkg.peerDependencies = {}
}
return pkg
}
module.exports = {
hooks: {
readPackage,
},
}
{
    "scripts": {
        "preinstall": "npx only-allow pnpm"
    }
}// .pnpmfile.cjs
const argv = process.argv.slice(2)
function readPackage(pkg, context) {
// Override the manifest of [email protected] after downloading it from the registry
if (pkg.name && pkg.peerDependencies) {
// Replace [email protected] with [email protected]
pkg.peerDependencies = {}
}
return pkg
}
function checkCommand() {
const command = argv[0]
const pkgJson = require('./package.json')
const deps = Object.assign({}, pkgJson.dependencies || {}, pkgJson.devDependencies || {})
if (['add', 'i', 'install'].some((name) => command === name) && typeof argv[1] === 'string') {
const { name, version } = getNameAndVersion(argv[1])
if (deps[name]) {
throw new Error(
`【Inspector 依赖检查】: 更新升级依赖请用 "pnpm update ${name}${
version ? '@' + version : ''
}" 命令 !!!`
)
}
}
}
function getNameAndVersion(nameAndVersion) {
let name = ''
let version = ''
let splitName = nameAndVersion.split('@')
if (nameAndVersion.startsWith('@')) {
// @xxxx/pkg@latest or @xxxx/pkg
if (splitName.length === 3) {
// @xxxx/pkg@latest
name = `@` + splitName[1]
version = splitName[splitName.length - 1]
} else {
// @xxxx/pkg
name = `@` + splitName[1]
version = ''
}
} else {
// react@latest or react
if (splitName.length === 2) {
// @xxxx/pkg@latest
name = splitName[0]
version = splitName[1]
} else {
// @xxxx/pkg
name = splitName[0]
version = ''
}
}
return {
name,
version: version || 'latest',
}
}
module.exports = {
hooks: {
readPackage,
afterAllResolved(lockfile) {
checkCommand()
return lockfile
},
},
}作为 【libuv 源码学习笔记】1. 事件循环 的补充篇, 本篇主要讲解涉及的知识点
这是自己写的一个例子, 主要用于从代码实现中理解运行的顺序。
// time.js

process.on("unhandledRejection", (err) => {
  console.log(1);
});

console.log(2);

setTimeout(() => {
  console.log(3);

  Promise.resolve().then((_) => console.log(3.1));

  process.nextTick(() => {
    console.log(3.2);
  });

  Promise.resolve().then((_) => console.log(3.3));

  console.log(3.4);
}, 0);

Promise.reject().finally((_) => console.log(4));

setImmediate(() => {
  console.log(5)
})

process.nextTick(() => {
  console.log(6);
});
代码运行的结果如下:
➜  test node time.js
2
6
4
1
3
3.4
3.2
3.1
3.3
5
在浏览器的 js 事件循环中, setTimeout 通常被我们说成了是宏任务, Promise.resolve 等被认为是微任务, 即在 setTimeout 创建的宏任务中, 会先执行函数主体的代码, 然后在执行微任务的代码, 如果有其他宏任务将会放入下一次事件循环中运行。
其实 node 中也是遵循的浏览器中的标准实现的一套宏任务与微任务, 让我们通过看 setTimeout 的实现来看 node 中的具体实现, 其中也会涉及到 nextTick 的实现。也能解释 console.log(6) 会在 console.log(4) 的前面的原因了。
主要是实例化了一个 Timeout 对象, 然后调用了 insert 方法插入到了某个队列中。
// lib/timers.js
function setTimeout(callback, after, arg1, arg2, arg3) {
  validateCallback(callback);

  let i, args;
  switch (arguments.length) {
    // fast cases
    case 1:
    case 2:
      break;
    case 3:
      args = [arg1];
      break;
    case 4:
      args = [arg1, arg2];
      break;
    default:
      args = [arg1, arg2, arg3];
      for (i = 5; i < arguments.length; i++) {
        // Extend array dynamically, makes .apply run much faster in v6.0.0
        args[i - 2] = arguments[i];
      }
      break;
  }

  const timeout = new Timeout(callback, after, args, false, true);
  insert(timeout, timeout._idleTimeout);

  return timeout;
}
会把相同超时时间, 如 1000ms 的都存在一个 TimersList 中, 然后以超时时间如 1000 为 key 挂载在一个全局的 timerListMap 对象中。
通过上面的步骤就已经完成了回调函数的注册, 在阅读完 【libuv 源码学习笔记】1. 事件循环 我们知道, setTimeout 会在事件循环的阶段一Timer阶段被调用。
那么是具体如何注册到 libuv 的事件循环去的了?
function insert(item, msecs, start = getLibuvNow()) {
  // Truncate so that accuracy of sub-millisecond timers is not assumed.
  msecs = MathTrunc(msecs);
  item._idleStart = start;

  // Use an existing list if there is one, otherwise we need to make a new one.
  let list = timerListMap[msecs];
  if (list === undefined) {
    debug('no %d list was found in insert, creating a new one', msecs);
    const expiry = start + msecs;
    timerListMap[msecs] = list = new TimersList(expiry, msecs);
    timerListQueue.insert(list);

    if (nextExpiry > expiry) {
      scheduleTimer(msecs);
      nextExpiry = expiry;
    }
  }

  L.append(list, item);
}
setupTimers 就是注册到 libuv 事件循环 Timer 阶段的实现。
其中 processTimers 函数会运行 setTimeout 设置的回调, processImmediate 会运行 setImmediate 设置的回调, 所以他俩注册到 libuv 的过程是一致的。
// lib/internal/bootstrap/node.js

const { setupTimers } = internalBinding('timers');
const { getTimerCallbacks } = require('internal/timers');
const { setupTimers } = internalBinding('timers');
const { processImmediate, processTimers } = getTimerCallbacks(runNextTicks);
// Sets two per-Environment callbacks that will be run from libuv:
// - processImmediate will be run in the callback of the per-Environment
//   check handle.
// - processTimers will be run in the callback of the per-Environment timer.
setupTimers(processImmediate, processTimers);
// src/timers.cc
void Initialize(Local<Object> target,
                       Local<Value> unused,
                       Local<Context> context,
                       void* priv) {
  Environment* env = Environment::GetCurrent(context);

  ...
  env->SetMethod(target, "setupTimers", SetupTimers);
  ...
}

void SetupTimers(const FunctionCallbackInfo<Value>& args) {
  CHECK(args[0]->IsFunction());
  CHECK(args[1]->IsFunction());
  auto env = Environment::GetCurrent(args);

  env->set_immediate_callback_function(args[0].As<Function>());
  env->set_timers_callback_function(args[1].As<Function>());
}
可以看到在 RunTimers 函数中, 会拿到 timers_callback_function 进行调用, 并且有一个 do while 循环, 当 ret.IsEmpty() && env->can_call_into_js() 值为 true 时会一直运行完 timers_callback_function 函数。
关于 IsEmpty 何时返回 true, 让我们看看 v8 的文档, 可以简单的理解为返回值大于 0 即为 false, -1 则为 true, 否则会一直调用 timers_callback_function 函数。
IsEmpty(expression)

Returns -1 (TRUE) if a variant has been initialized; 0 (FALSE) otherwise.
// src/env.cc
void Environment::RunTimers(uv_timer_t* handle) {
  ...

  Local<Function> cb = env->timers_callback_function();

  do {
    TryCatchScope try_catch(env);
    try_catch.SetVerbose(true);
    ret = cb->Call(env->context(), process, 1, &arg);
    // https://docs.oracle.com/cd/B40099_02/books/VBLANG/VBLANGVBLangRef136.html
  } while (ret.IsEmpty() && env->can_call_into_js());

  ...
  int64_t expiry_ms =
      ret.ToLocalChecked()->IntegerValue(env->context()).FromJust();

  uv_handle_t* h = reinterpret_cast<uv_handle_t*>(handle);

  if (expiry_ms != 0) {
    int64_t duration_ms =
        llabs(expiry_ms) - (uv_now(env->event_loop()) - env->timer_base());

    env->ScheduleTimer(duration_ms > 0 ? duration_ms : 1);

  ...
}
timers_callback_function 就是上面 setupTimers 函数传入的 processTimers 函数, 我们应该先去看看该函数的实现。
// lib/internal/timers.js
function processTimers(now) {
    debug('process timer lists %d', now);
    nextExpiry = Infinity;

    let list;
    let ranAtLeastOneList = false;
    while (list = timerListQueue.peek()) {
      if (list.expiry > now) {
        nextExpiry = list.expiry;
        return refCount > 0 ? nextExpiry : -nextExpiry;
      }
      if (ranAtLeastOneList)
        runNextTicks();
      else
        ranAtLeastOneList = true;
      listOnTimeout(list, now);
    }
    return 0;
  }
void Environment::ScheduleTimer(int64_t duration_ms) {
  if (started_cleanup_) return;
  uv_timer_start(timer_handle(), RunTimers, duration_ms, 0);
}
processTimers 函数中主要调用了 listOnTimeout 函数, 比如该 list 设置的 1000ms 已经超时被事件循环执行
function listOnTimeout(list, now) {
    const msecs = list.msecs;

    debug('timeout callback %d', msecs);

    let ranAtLeastOneTimer = false;
    let timer;
    while (timer = L.peek(list)) {
      const diff = now - timer._idleStart;

      // Check if this loop iteration is too early for the next timer.
      // This happens if there are more timers scheduled for later in the list.
      if (diff < msecs) {
        list.expiry = MathMax(timer._idleStart + msecs, now + 1);
        list.id = timerListId++;
        timerListQueue.percolateDown(1);
        debug('%d list wait because diff is %d', msecs, diff);
        return;
      }

      if (ranAtLeastOneTimer)
        runNextTicks();
      else
        ranAtLeastOneTimer = true;

      // The actual logic for when a timeout happens.
      L.remove(timer);

      const asyncId = timer[async_id_symbol];

      if (!timer._onTimeout) {
        if (!timer._destroyed) {
          timer._destroyed = true;

          if (timer[kRefed])
            refCount--;

          if (destroyHooksExist())
            emitDestroy(asyncId);
        }
        continue;
      }

      emitBefore(asyncId, timer[trigger_async_id_symbol], timer);

      let start;
      if (timer._repeat)
        start = getLibuvNow();

      try {
        const args = timer._timerArgs;
        if (args === undefined)
          timer._onTimeout();
        else
          ReflectApply(timer._onTimeout, timer, args);
      } finally {
        if (timer._repeat && timer._idleTimeout !== -1) {
          timer._idleTimeout = timer._repeat;
          insert(timer, timer._idleTimeout, start);
        } else if (!timer._idleNext && !timer._idlePrev && !timer._destroyed) {
          timer._destroyed = true;

          if (timer[kRefed])
            refCount--;

          if (destroyHooksExist())
            emitDestroy(asyncId);
        }
      }

      emitAfter(asyncId);
    }

    // If `L.peek(list)` returned nothing, the list was either empty or we have
    // called all of the timer timeouts.
    // As such, we can remove the list from the object map and
    // the PriorityQueue.
    debug('%d list empty', msecs);

    // The current list may have been removed and recreated since the reference
    // to `list` was created. Make sure they're the same instance of the list
    // before destroying.
    if (list === timerListMap[msecs]) {
      delete timerListMap[msecs];
      timerListQueue.shift();
    }
  }
可以从上可知, 运行完一次 setTimeout 的回调用后会开始调用 runNextTicks 函数运行 node 微任务, 实现浏览器的宏任务与微任务的标准。
如果没有 nextTick 或者 promiseRejection 则只运行 runMicrotasks 函数, 否则运行 processTicksAndRejections 函数。
function runNextTicks() {
  if (!hasTickScheduled() && !hasRejectionToWarn())
    runMicrotasks();
  if (!hasTickScheduled() && !hasRejectionToWarn())
    return;

  processTicksAndRejections();
}
function processTicksAndRejections() {
  let tock;
  do {
    while (tock = queue.shift()) {
      const asyncId = tock[async_id_symbol];
      emitBefore(asyncId, tock[trigger_async_id_symbol], tock);

      try {
        const callback = tock.callback;
        if (tock.args === undefined) {
          callback();
        } else {
          const args = tock.args;
          switch (args.length) {
            case 1: callback(args[0]); break;
            case 2: callback(args[0], args[1]); break;
            case 3: callback(args[0], args[1], args[2]); break;
            case 4: callback(args[0], args[1], args[2], args[3]); break;
            default: callback(...args);
          }
        }
      } finally {
        if (destroyHooksExist())
          emitDestroy(asyncId);
      }

      emitAfter(asyncId);
    }
    runMicrotasks();
  } while (!queue.isEmpty() || processPromiseRejections());
  setHasTickScheduled(false);
  setHasRejectionToWarn(false);
}
顺带说一下 nextTick 的实现, 其实就是向 queue 中 push 了一个 tickObject, 在上面的 processTicksAndRejections 函数中又从 queue 中取出来运行了。
function nextTick(callback) {
  validateCallback(callback);

  if (process._exiting)
    return;

  let args;
  switch (arguments.length) {
    case 1: break;
    case 2: args = [arguments[1]]; break;
    case 3: args = [arguments[1], arguments[2]]; break;
    case 4: args = [arguments[1], arguments[2], arguments[3]]; break;
    default:
      args = new Array(arguments.length - 1);
      for (let i = 1; i < arguments.length; i++)
        args[i - 1] = arguments[i];
  }

  if (queue.isEmpty())
    setHasTickScheduled(true);
  const asyncId = newAsyncId();
  const triggerAsyncId = getDefaultTriggerAsyncId();
  const tickObject = {
    [async_id_symbol]: asyncId,
    [trigger_async_id_symbol]: triggerAsyncId,
    callback,
    args
  };
  if (initHooksExist())
    emitInit(asyncId, 'TickObject', triggerAsyncId, tickObject);
  queue.push(tickObject);
}
看到了你也许发现了, node 中的所有异步操作都调用了 emitInit, emitBefore, emitDestroy, emitAfter 等函数, 这也是 async_hooks(异步钩子) 实现的原理。
回到主线, 发现其实类似于浏览器标准的微任务, 依旧是 v8 在管理, 存储在微任务队列中, 可以通过 GetMicrotaskQueue()->PerformCheckpoint api 来执行。
static void Initialize(Local<Object> target,
                       Local<Value> unused,
                       Local<Context> context,
                       void* priv) {
  Environment* env = Environment::GetCurrent(context);
  Isolate* isolate = env->isolate();
  ...
  env->SetMethod(target, "runMicrotasks", RunMicrotasks);
  ...
}

static void RunMicrotasks(const FunctionCallbackInfo<Value>& args) {
  Environment* env = Environment::GetCurrent(args);
  env->context()->GetMicrotaskQueue()->PerformCheckpoint(env->isolate());
}
在一次 node 微任务中
发现在一次微任务的最后 会运行 processPromiseRejections 函数, 把 pendingUnhandledRejections 中所有回调函数拿出来给运行一次, 其中每个 promise 的信息是从 maybeUnhandledPromises map 中取的。
其错误处理方式也会根据 node a.js 的 --unhandled-rejection 参数决定。
function processPromiseRejections() {
  let maybeScheduledTicksOrMicrotasks = asyncHandledRejections.length > 0;

  while (asyncHandledRejections.length > 0) {
    const { promise, warning } = ArrayPrototypeShift(asyncHandledRejections);
    if (!process.emit('rejectionHandled', promise)) {
      process.emitWarning(warning);
    }
  }

  let len = pendingUnhandledRejections.length;
  while (len--) {
    const promise = ArrayPrototypeShift(pendingUnhandledRejections);
    const promiseInfo = maybeUnhandledPromises.get(promise);
    if (promiseInfo === undefined) {
      continue;
    }
    promiseInfo.warned = true;
    const { reason, uid, emit } = promiseInfo;

    switch (unhandledRejectionsMode) {
      case kStrictUnhandledRejections: {
        const err = reason instanceof Error ?
          reason : generateUnhandledRejectionError(reason);
        triggerUncaughtException(err, true /* fromPromise */);
        const handled = emit(reason, promise, promiseInfo);
        if (!handled) emitUnhandledRejectionWarning(uid, reason);
        break;
      }
      case kIgnoreUnhandledRejections: {
        emit(reason, promise, promiseInfo);
        break;
      }
      case kAlwaysWarnUnhandledRejections: {
        emit(reason, promise, promiseInfo);
        emitUnhandledRejectionWarning(uid, reason);
        break;
      }
      case kThrowUnhandledRejections: {
        const handled = emit(reason, promise, promiseInfo);
        if (!handled) {
          const err = reason instanceof Error ?
            reason : generateUnhandledRejectionError(reason);
          triggerUncaughtException(err, true /* fromPromise */);
        }
        break;
      }
      case kWarnWithErrorCodeUnhandledRejections: {
        const handled = emit(reason, promise, promiseInfo);
        if (!handled) {
          emitUnhandledRejectionWarning(uid, reason);
          process.exitCode = 1;
        }
        break;
      }
    }
    maybeScheduledTicksOrMicrotasks = true;
  }
  return maybeScheduledTicksOrMicrotasks ||
         pendingUnhandledRejections.length !== 0;
}
那么 pendingUnhandledRejections 是在何时 push 的数据了?
原来是在 lib/internal/process/promises.js 中先通过 v8 的 SetPromiseRejectCallback api 设置了所有 Promise 的 rejectCallback
// lib/internal/process/promises.js
function listenForRejections() {
  setPromiseRejectCallback(promiseRejectHandler);
}
// src/env.cc
static void Initialize(Local<Object> target,
                       Local<Value> unused,
                       Local<Context> context,
                       void* priv) {
  Environment* env = Environment::GetCurrent(context);
  ...

  env->SetMethod(target,
                 "setPromiseRejectCallback",
                 SetPromiseRejectCallback);
}
即当有 promise 发生 reject 及下面的条件时, 会触发 promiseRejectHandler 函数的执行。
// src/env.cc
function promiseRejectHandler(type, promise, reason) {
  if (unhandledRejectionsMode === undefined) {
    unhandledRejectionsMode = getUnhandledRejectionsMode();
  }
  switch (type) {
    case kPromiseRejectWithNoHandler:
      unhandledRejection(promise, reason);
      break;
    case kPromiseHandlerAddedAfterReject:
      handledRejection(promise);
      break;
    case kPromiseResolveAfterResolved:
      resolveError('resolve', promise, reason);
      break;
    case kPromiseRejectAfterResolved:
      resolveError('reject', promise, reason);
      break;
  }
}
// deps/v8/include/v8.h
enum PromiseRejectEvent {
  kPromiseRejectWithNoHandler = 0,
  kPromiseHandlerAddedAfterReject = 1,
  kPromiseRejectAfterResolved = 2,
  kPromiseResolveAfterResolved = 3,
};
关于 emit 方法, 会通过调用 process.emit 方法发布事件, process 如果有监听 unhandledRejection 事件, 则用户的回调 console.log(1); 被触发!
// lib/internal/process/promises.js
function unhandledRejection(promise, reason) {
  const asyncId = async_hooks.executionAsyncId();
  const triggerAsyncId = async_hooks.triggerAsyncId();
  const resource = promise;

  const emit = (reason, promise, promiseInfo) => {
    try {
      pushAsyncContext(asyncId, triggerAsyncId, resource);
      if (promiseInfo.domain) {
        return promiseInfo.domain.emit('error', reason);
      }
      return process.emit('unhandledRejection', reason, promise);
    } finally {
      popAsyncContext(asyncId);
    }
  };

  maybeUnhandledPromises.set(promise, {
    reason,
    uid: ++lastPromiseId,
    warned: false,
    domain: process.domain,
    emit
  });
  // This causes the promise to be referenced at least for one tick.
  ArrayPrototypePush(pendingUnhandledRejections, promise);
  setHasRejectionToWarn(true);
}
var p = Promise.reject().finally(() => console.log(7));

p.then(() => Promise.reject()).catch(() => {
  console.log(7.1);
});
可以看到, 为了实现第二次不被触发 unhandledRejection 事件, 会从 maybeUnhandledPromises map 中删除该 promise 的信息, 即上面的 processPromiseRejections 函数 while 循环会跳过该情况, 但是会 promiseInfo.warned 为true 时 asyncHandledRejections 里面 push 一条数据, promiseInfo.warned = true 会在 processPromiseRejections 中设置, 即每当 Promise 被拒绝并且错误句柄附加到它(例如,使用 promise.catch())晚于一个 Node.js 事件循环时,就会触发 'rejectionHandled' 事件。该实现也验证了 'rejectionHandled' 事件 文档的定义。
function handledRejection(promise) {
  const promiseInfo = maybeUnhandledPromises.get(promise);
  if (promiseInfo !== undefined) {
    maybeUnhandledPromises.delete(promise);
    if (promiseInfo.warned) {
      const { uid } = promiseInfo;
      // Generate the warning object early to get a good stack trace.
      // eslint-disable-next-line no-restricted-syntax
      const warning = new Error('Promise rejection was handled ' +
                                `asynchronously (rejection id: ${uid})`);
      warning.name = 'PromiseRejectionHandledWarning';
      warning.id = uid;
      ArrayPrototypePush(asyncHandledRejections, { promise, warning });
      setHasRejectionToWarn(true);
      return;
    }
  }
  if (maybeUnhandledPromises.size === 0 && asyncHandledRejections.length === 0)
    setHasRejectionToWarn(false);
}

// 如果晚于 Node.js 事件循环时, asyncHandledRejections 数组就会被 push 数据, 即触发 rejectionHandled 事件。
function processPromiseRejections() {
  let maybeScheduledTicksOrMicrotasks = asyncHandledRejections.length > 0;

  while (asyncHandledRejections.length > 0) {
    const { promise, warning } = ArrayPrototypeShift(asyncHandledRejections);
    if (!process.emit('rejectionHandled', promise)) {
      process.emitWarning(warning);
    }
  }

  ...
  promiseInfo.warned = true;
  ...
}
function resolveError(type, promise, reason) {
  // We have to wrap this in a next tick. Otherwise the error could be caught by
  // the executed promise.

  process.nextTick(() => {
    process.emit('multipleResolves', type, promise, reason);
  });
}
multipleResolves 事件触发的条件如下
最后我们在说一下 setImmediate 的实现, 除了它是事件循环的第六 check 阶段晚于 setTimeout 的事件循环的第一 timer 阶段, 还有什么其他含义了?
主要生成了一个 Immediate 实例, Immediate 的构造函数中会向 immediateQueue 中 append 一条记录。immediateQueue 的消费和 setTimeout 中的 timerListQueue 消费过程是完全一致的。
在事件循环的第六 check 阶段调用 processImmediate 函数, 其注册到 libuv 的流程和上面说的 processTimers是完全一致的。
// lib/timers.js
function setImmediate(callback, arg1, arg2, arg3) {
  validateCallback(callback);

  let i, args;
  switch (arguments.length) {
    // fast cases
    case 1:
      break;
    case 2:
      args = [arg1];
      break;
    case 3:
      args = [arg1, arg2];
      break;
    default:
      args = [arg1, arg2, arg3];
      for (i = 4; i < arguments.length; i++) {
        // Extend array dynamically, makes .apply run much faster in v6.0.0
        args[i - 1] = arguments[i];
      }
      break;
  }

  return new Immediate(callback, args);
}
processImmediate 函数主要存在于 getTimerCallbacks 的函数闭包中, 细心的你可能会发现函数外有缓存了一个 outstandingQueue 字段, 其主要作用是在事件循环的 check 阶段, 如果某个 setImmediate 设置的回调函数如果运行出错, 导致 while 循环退出, 剩余的 immediateQueue 中的数据没有被消耗完。
请注意下面的 try finally 语法没有 catch, 所以 outstandingQueue 能在不捕获错误的情况下也能保存剩余未执行完的 immediateQueue 数据。
function getTimerCallbacks(runNextTicks) {
  const outstandingQueue = new ImmediateList();

  function processImmediate() {
    const queue = outstandingQueue.head !== null ?
      outstandingQueue : immediateQueue;
    let immediate = queue.head;

    if (queue !== outstandingQueue) {
      queue.head = queue.tail = null;
      immediateInfo[kHasOutstanding] = 1;
    }

    let prevImmediate;
    let ranAtLeastOneImmediate = false;
    while (immediate !== null) {
      if (ranAtLeastOneImmediate)
        runNextTicks();
      else
        ranAtLeastOneImmediate = true;
      if (immediate._destroyed) {
        outstandingQueue.head = immediate = prevImmediate._idleNext;
        continue;
      }

      immediate._destroyed = true;

      immediateInfo[kCount]--;
      if (immediate[kRefed])
        immediateInfo[kRefCount]--;
      immediate[kRefed] = null;

      prevImmediate = immediate;

      const asyncId = immediate[async_id_symbol];
      emitBefore(asyncId, immediate[trigger_async_id_symbol], immediate);

      try {
        const argv = immediate._argv;
        if (!argv)
          immediate._onImmediate();
        else
          immediate._onImmediate(...argv);
      } finally {
        immediate._onImmediate = null;

        if (destroyHooksExist())
          emitDestroy(asyncId);

        outstandingQueue.head = immediate = immediate._idleNext;
      }

      emitAfter(asyncId);
    }

    if (queue === outstandingQueue)
      outstandingQueue.head = null;
    immediateInfo[kHasOutstanding] = 0;
  }

  function processTimers(now) {
    ...
  }

  function listOnTimeout(list, now) {
    ...
  }

  return {
    processImmediate,
    processTimers
  };
}
正如上面说的, 类似于 setImmediate, setTimeout 注册的回调, 如果发送了错误, 此时代码将会如何处理该类型的错误了 ?
下面我们就可以说说我们代码中常写的如下方式捕获未处理错误的实现。
process.on('uncaughtException', err => {
	myReportFatalError(err)
})
该错误的接口来自于 v8 的 AddMessageListenerWithErrorLevel api, 在 nodejs 的调用链路如下
// src/api/environment.cc
void SetIsolateErrorHandlers(v8::Isolate* isolate, const IsolateSettings& s) {
  if (s.flags & MESSAGE_LISTENER_WITH_ERROR_LEVEL)
    isolate->AddMessageListenerWithErrorLevel(
            errors::PerIsolateMessageListener,
            Isolate::MessageErrorLevel::kMessageError |
                Isolate::MessageErrorLevel::kMessageWarning);

  ...
}
// src/node_errors.cc
void PerIsolateMessageListener(Local<Message> message, Local<Value> error) {
  Isolate* isolate = message->GetIsolate();
  switch (message->ErrorLevel()) {
    case Isolate::MessageErrorLevel::kMessageWarning: {
      Environment* env = Environment::GetCurrent(isolate);
      if (!env) {
        break;
      }
      Utf8Value filename(isolate, message->GetScriptOrigin().ResourceName());
      // (filename):(line) (message)
      std::stringstream warning;
      warning << *filename;
      warning << ":";
      warning << message->GetLineNumber(env->context()).FromMaybe(-1);
      warning << " ";
      v8::String::Utf8Value msg(isolate, message->Get());
      warning << *msg;
      USE(ProcessEmitWarningGeneric(env, warning.str().c_str(), "V8"));
      break;
    }
    case Isolate::MessageErrorLevel::kMessageError:
      TriggerUncaughtException(isolate, error, message);
      break;
  }
}
// src/node_errors.cc
void TriggerUncaughtException(Isolate* isolate,
                              Local<Value> error,
                              Local<Message> message,
                              bool from_promise) {

...
Local<Object> process_object = env->process_object();
Local<String> fatal_exception_string = env->fatal_exception_string();
Local<Value> fatal_exception_function =
      process_object->Get(env->context(),
                          fatal_exception_string).ToLocalChecked();
 ...
}
// lib/internal/bootstrap/node.js

process._fatalException = onGlobalUncaughtException;

// lib/internal/process/execution.js
function createOnGlobalUncaughtException() {
  return (er, fromPromise) => {
    ...

    const type = fromPromise ? 'unhandledRejection' : 'uncaughtException';
    process.emit('uncaughtExceptionMonitor', er, type);
    if (exceptionHandlerState.captureFn !== null) {
      exceptionHandlerState.captureFn(er);
    } else if (!process.emit('uncaughtException', er, type)) {
      ...
    }
	...
}
一开始运行例子的时候, 发现结果和眼前的代码预期是不一致的, 思考了一番后, 把本地 node 版本切换到最新后重新运行了一次例子, 结果和代码符合预期了~
可以观察到某个页面第一次被点击的时候是骨架屏直出, 第二次及以后变成了极度丝滑无任何白屏时间的页面直出。
如果是 h5 的页面, 那么大概率是 Webview 缓存池实现的效果
如果是原生的页面, 那么大概率只是缓存了 30 个商品的数据
我倾向于是原生的页面, 30 个 Webview 感觉有点多了, 占用内存应该会很高。还是演示的 iPhone12 手机性能好才动态设置了数量为 30 个? 不确定具体实现, 总之直出效果很不错, 学习了 ~
纯粹是没事瞎点点, 偶尔也做一下 h5 性能优化
stream 流是许多 nodejs 核心模块的基类, 在讲解它们之前还是要认真说一下 nodejs stream 的实现。其实在 【libuv 源码学习笔记】网络与流 中 BSD 套接字 中就开始提到 c 中的流, nodejs 的 c++ 代码的实现更多的是作为一个胶水层, 实际调用的 js 层面的 stream 实例的方法。
流是用于在 Node.js 中处理流数据的抽象接口。 stream 模块提供了用于实现流接口的 API。
Node.js 提供了许多流对象。 例如,对 HTTP 服务器的请求和 process.stdout 都是流的实例。
流可以是可读的、可写的、或两者兼而有之。 所有的流都是 EventEmitter 的实例。
涉及的知识点
可写流的例子包括:
所有的 Writable 流都实现了 stream.Writable 类定义的接口。
实现一个可写流的核心是继承 Writable, 并至少实现一个 _write 或者 _writev 方法。
// lib/internal/streams/writable.js

function Writable(options) {
  const isDuplex = (this instanceof Stream.Duplex);

  if (!isDuplex && !FunctionPrototypeSymbolHasInstance(Writable, this))
    return new Writable(options);

  this._writableState = new WritableState(options, this, isDuplex);

  if (options) {
    if (typeof options.write === 'function')
      this._write = options.write;

    if (typeof options.writev === 'function')
      this._writev = options.writev;

    if (typeof options.destroy === 'function')
      this._destroy = options.destroy;

    if (typeof options.final === 'function')
      this._final = options.final;

    if (typeof options.construct === 'function')
      this._construct = options.construct;
    if (options.signal)
      addAbortSignalNoValidate(options.signal, this);
  }

  Stream.call(this, options);

  destroyImpl.construct(this, () => {
    const state = this._writableState;

    if (!state.writing) {
      clearBuffer(this, state);
    }

    finishMaybe(this, state);
  });
}
const { Writable } = require('stream');

const myWritable = new Writable({
  write(chunk, encoding, callback) {
    // ...
  }
});
完整的实现在 lib/internal/fs/streams.js 文件中
总体上和上一篇 【node 源码学习笔记】stream 可读流 类似, 其中的 _destroy, construct 参数就不在这篇重复讲了。
WriteStream 是继承于 Writable, 其中的 options 参数可以传入, 也可以在 WriteStream 中自己实现 options 需要的 _write, _writev, _construct, _final, _destroy 方法
可以看见对于一个文件的可读流的 _write 方法, 当有数据传入时, 会把当前数据就是不断写入 fd, 每写入一次 this.pos += data.length 偏移量加上本次写入的数据的长度, 保证数据都被写入到了正确的位置。
// lib/internal/fs/streams.js

WriteStream.prototype._write = function(data, encoding, cb) {
  this[kIsPerformingIO] = true;
  this[kFs].write(this.fd, data, 0, data.length, this.pos, (er, bytes) => {
    this[kIsPerformingIO] = false;
    if (this.destroyed) {
      // Tell ._destroy() that it's safe to close the fd now.
      cb(er);
      return this.emit(kIoDone, er);
    }

    if (er) {
      return cb(er);
    }

    this.bytesWritten += bytes;
    cb();
  });

  if (this.pos !== undefined)
    this.pos += data.length;
};
与 _write 方法不同的是每次写的是一组数据(如 chunk[], _write 仅为一个 chunk), 其来源为内存中 state.buffered 的数据
// lib/internal/fs/streams.js

WriteStream.prototype._writev = function(data, cb) {
  const len = data.length;
  const chunks = new Array(len);
  let size = 0;

  for (let i = 0; i < len; i++) {
    const chunk = data[i].chunk;

    chunks[i] = chunk;
    size += chunk.length;
  }

  this[kIsPerformingIO] = true;
  this[kFs].writev(this.fd, chunks, this.pos, (er, bytes) => {
    this[kIsPerformingIO] = false;
    if (this.destroyed) {
      // Tell ._destroy() that it's safe to close the fd now.
      cb(er);
      return this.emit(kIoDone, er);
    }

    if (er) {
      return cb(er);
    }

    this.bytesWritten += bytes;
    cb();
  });

  if (this.pos !== undefined)
    this.pos += size;
};
doWrite 方法中可以看见如果同时实现了 _write 与 _writev 方法, 会调用 _writev 方法。
// lib/internal/streams/writable.js

function doWrite(stream, state, writev, len, chunk, encoding, cb) {
  state.writelen = len;
  state.writecb = cb;
  state.writing = true;
  state.sync = true;
  if (state.destroyed)
    state.onwrite(new ERR_STREAM_DESTROYED('write'));
  else if (writev)
    stream._writev(chunk, state.onwrite);
  else
    stream._write(chunk, encoding, state.onwrite);
  state.sync = false;
}
writev 在 c 中的使用如下, writev以顺序iov[0],iov[1]至iov[iovcnt-1]从缓冲区中聚集输出数据。writev返回输出的字节总数,通常,它应等于所有缓冲区长度之和。
char *str0 = "hello ";
char *str1 = "world\n";
struct iovec iov[2];
ssize_t nwritten;

iov[0].iov_base = str0;
iov[0].iov_len = strlen(str0);
iov[1].iov_base = str1;
iov[1].iov_len = strlen(str1);

nwritten = writev(STDOUT_FILENO, iov, 2);
在 writeOrBuffer 方法中可以看见, 满足如下条件数据讲会先写入内存 state.buffered 中
// lib/internal/streams/writable.js

function writeOrBuffer(stream, state, chunk, encoding, callback) {
  const len = state.objectMode ? 1 : chunk.length;

  state.length += len;

  // stream._write resets state.length
  const ret = state.length < state.highWaterMark;
  // We must ensure that previous needDrain will not be reset to false.
  if (!ret)
    state.needDrain = true;

  if (state.writing || state.corked || state.errored || !state.constructed) {
    state.buffered.push({ chunk, encoding, callback });
    if (state.allBuffers && encoding !== 'buffer') {
      state.allBuffers = false;
    }
    if (state.allNoop && callback !== nop) {
      state.allNoop = false;
    }
  } else {
    state.writelen = len;
    state.writecb = callback;
    state.writing = true;
    state.sync = true;
    stream._write(chunk, encoding, state.onwrite);
    state.sync = false;
  }

  // Return false if errored or destroyed in order to break
  // any synchronous while(stream.write(data)) loops.
  return ret && !state.errored && !state.destroyed;
}
实现自己的可写流时一定要注意 writeOrBuffer 的返回值, 因为此时可能出现了积压的问题, 详见上一篇 【node 源码学习笔记】stream 可读流
从下面的 afterWrite 函数发现,在每次 write 后,如果当前流没有结束 & 没有摧毁 & 内存中的数据清空后才会触发 drain 事件,即自从积压问题出现后第一次释放出的可以继续开始流动的信号。其实也好理解,如果一出现积压,内存中的数据刚下降一点就触发 drain 事件的话,短时间内会不断触发积压机制。
// lib/internal/streams/writable.js

function afterWrite(stream, state, count, cb) {
  const needDrain = !state.ending && !stream.destroyed && state.length === 0 &&
    state.needDrain;
  if (needDrain) {
    state.needDrain = false;
    stream.emit('drain');
  }

  while (count-- > 0) {
    state.pendingcb--;
    cb();
  }

  if (state.destroyed) {
    errorBuffer(state);
  }

  finishMaybe(stream, state);
}
fs.WriteStream 没有实现该方法, 在 lib/internal/streams/writable.js 在 write, end 等方法后, 会在 finishMaybe > needFinish > prefinish 中调用 _final 方法。
从 state 的属性可知道只会被调用一次, 并且是 destroyed 之前。
// lib/internal/streams/writable.js

function prefinish(stream, state) {
  if (!state.prefinished && !state.finalCalled) {
    if (typeof stream._final === 'function' && !state.destroyed) {
      state.finalCalled = true;
      callFinal(stream, state);
    } else {
      state.prefinished = true;
      stream.emit('prefinish');
    }
  }
}
从 callFinal 方法中发现, 实现的 _final 会传入一个 callback, 在 _final 方法的最后必须调用一次 callback, 因为该 callback 调用 finish 方法开始走接下来的结束流程。
// lib/internal/streams/writable.js

function callFinal(stream, state) {
  state.sync = true;
  state.pendingcb++;
  const result = stream._final((err) => {
    state.pendingcb--;
    if (err) {
      const onfinishCallbacks = state[kOnFinished].splice(0);
      for (let i = 0; i < onfinishCallbacks.length; i++) {
        onfinishCallbacks[i](err);
      }
      errorOrDestroy(stream, err, state.sync);
    } else if (needFinish(state)) {
      state.prefinished = true;
      stream.emit('prefinish');
      // Backwards compat. Don't check state.sync here.
      // Some streams assume 'finish' will be emitted
      // asynchronously relative to _final callback.
      state.pendingcb++;
      process.nextTick(finish, stream, state);
    }
  });
  if (result !== undefined && result !== null) {
    // ...
  }
  state.sync = false;
}
总体看上去 _final 更像是一个结束前的勾子, 没有像 _destroy 直接关闭 fd 那么"沉重", 其实现该接口的流有 net 模块
这里 js 里面 Socket 对象实际操作的是 【libuv 源码学习笔记】网络与流 中提到到 accept 返回的一个连接的 acceptFd, 如下 _final 方法主要是调用了 shutdown 方法。
// lib/net.js

Socket.prototype._final = function(cb) {
  // If still connecting - defer handling `_final` until 'connect' will happen
  if (this.pending) {
    debug('_final: not yet connected');
    return this.once('connect', () => this._final(cb));
  }

  if (!this._handle)
    return cb();

  debug('_final: not ended, call shutdown()');

  const req = new ShutdownWrap();
  req.oncomplete = afterShutdown;
  req.handle = this._handle;
  req.callback = cb;
  const err = this._handle.shutdown(req);

  if (err === 1 || err === UV_ENOTCONN)  // synchronous finish
    return cb();
  else if (err !== 0)
    return cb(errnoException(err, 'shutdown'));
};
shutdown 追溯下去是的调用是在 libuv 中的流的 i/o 观察者回调函数 uv__stream_io 中, 如下当写入队列未空时调用 uv__drain 方法
// deps/uv/src/unix/stream.c

static void uv__stream_io(uv_loop_t* loop, uv__io_t* w, unsigned int events) {
  uv_stream_t* stream;

  // ...

    /* Write queue drained. */
    if (QUEUE_EMPTY(&stream->write_queue))
      uv__drain(stream);
  }
}
uv__drain 主要是调用了 shutdown(2) - Linux man page 方法, 用于关闭部分全双工连接, 如当前传入 SHUT_WR 即关闭写端, 表示服务端降不会再发送数据。
shutdown() 调用导致全部或部分全双工 与要关闭的 sockfd 关联的套接字上的连接。 如果如何是 SHUT_RD,将不允许进一步接收。如果如何 是 SHUT_WR,将不允许进一步传输。如果怎么样 SHUT_RDWR,进一步的接收和传输将是 不允许。
// deps/uv/src/unix/stream.c

static void uv__drain(uv_stream_t* stream) {
  uv_shutdown_t* req;
  int err;

  assert(QUEUE_EMPTY(&stream->write_queue));
  uv__io_stop(stream->loop, &stream->io_watcher, POLLOUT);
  uv__stream_osx_interrupt_select(stream);

  /* Shutdown? */
  if ((stream->flags & UV_HANDLE_SHUTTING) &&
      !(stream->flags & UV_HANDLE_CLOSING) &&
      !(stream->flags & UV_HANDLE_SHUT)) {
    assert(stream->shutdown_req);

    req = stream->shutdown_req;
    stream->shutdown_req = NULL;
    stream->flags &= ~UV_HANDLE_SHUTTING;
    uv__req_unregister(stream->loop, req);

    err = 0;
    if (shutdown(uv__stream_fd(stream), SHUT_WR))
      err = UV__ERR(errno);

    if (err == 0)
      stream->flags |= UV_HANDLE_SHUT;

    if (req->cb != NULL)
      req->cb(req, err);
  }
}
以及实现 _final 接口的 【node 源码学习笔记】stream 双工流、转换流、eos、pipeline 中提到的 Transform 流,其 _final 方法是主要调用了 flush 方法将缓冲区中的数据强制写出
通常可写流会调用 end 方法表示流写入工作完成, 如 http server 的 res.end() 调用,end 方法可以传入数据进行最后一次的数据写入工作,后开始结束流程。如果你只有一份数据,其实也可仅调用一次 end 方法,即不用单独调用 write 方法
Writable.prototype.end 方法的结束流程主要是调用了如下的 finish 方法
// lib/internal/streams/writable.js

function finish(stream, state) {
  state.pendingcb--;
  // TODO (ronag): Unify with needFinish.
  if (state.errorEmitted || state.closeEmitted)
    return;

  state.finished = true;

  const onfinishCallbacks = state[kOnFinished].splice(0);
  for (let i = 0; i < onfinishCallbacks.length; i++) {
    onfinishCallbacks[i]();
  }

  stream.emit('finish');

  if (state.autoDestroy) {
    // In case of duplex streams we need a way to detect
    // if the readable side is ready for autoDestroy as well.
    const rState = stream._readableState;
    const autoDestroy = !rState || (
      rState.autoDestroy &&
      // We don't expect the readable to ever 'end'
      // if readable is explicitly set to false.
      (rState.endEmitted || rState.readable === false)
    );
    if (autoDestroy) {
      stream.destroy();
    }
  }
}
本文主要讲了可写流基类 Writable 的实现以及 fs.WriteStream 可写流的实现。
事件跟踪相信不少同学都接触过,可以用来对程序的运行链路进行一个记录用于发生故障的一个回溯, 也可以用来记录一些性能数据, 并且通过 Chrome 的 chrome://tracing 方便的进行可视化的预览
链路追踪(TracingAnalysis)为分布式应用的开发者提供了完整的调用链路还原、调用请求量统计、链路拓扑、应用依赖分析等工具。能够帮助开发者快速分析和诊断分布式应用架构下的性能瓶颈,提高微服务时代下的开发诊断效率。

Chrome Trace Viewer 它是一个强大的可视化展示和分析工具,之前 google 有一个专门的 trace-viewer 项目,现在该项目合并到了 catapult 中, catapult 是 Chromium 工程师开发的一系列性能工具的合集,可以用来收集、展示、分析 Chrome、Website 甚至 Android 的性能。 关于 Chrome Trace Viewer 推荐阅读 强大的可视化利器 Chrome Trace Viewer 使用详解
node 中 trace_events 模块提供了一种机制来集中由 V8、Node.js 核心和用户空间代码生成的跟踪信息。可以使用 --trace-event-categories 命令行标志或使用 trace_events 模块启用跟踪。该 --trace-event-categories 标志接受以逗号分隔的类别名称列表。
node --trace-event-categories v8,node,node.async_hooks server.js
支持跟踪的事件包含下面
代码运行后会产生若干 node_trace.[num].log 文件, 类似于下面这种
实际的运行产生的日志保存在了 blog/node_trace.1.log
[ {"name": "出方案", "ph": "B", "pid": "Main", "tid": "工作", "ts": 0},
  {"name": "出方案", "ph": "E", "pid": "Main", "tid": "工作", "ts": 28800000000},
  {"name": "看电影", "ph": "B", "pid": "Main", "tid": "休闲", "ts": 28800000000},
  {"name": "看电影", "ph": "E", "pid": "Main", "tid": "休闲", "ts": 32400000000},
  {"name": "写代码", "ph": "B", "pid": "Main", "tid": "工作", "ts": 32400000000},
  {"name": "写代码", "ph": "E", "pid": "Main", "tid": "工作", "ts": 36000000000},
  {"name": "遛狗", "ph": "B", "pid": "Main", "tid": "休闲", "ts": 36000000000},
  {"name": "遛狗", "ph": "E", "pid": "Main", "tid": "休闲", "ts": 37800000000}
]
每一个 Event 主要由以下几部分组成
{
  "name": "myName", // 事件名,会展示在 timeline 上
  "cat": "category,list", // 事件分类,类似 Tag,但 UI 上不支持选择 Tag
  "ph": "B", // phase,后面着重会讲到
  "ts": 12345, // 事件发生时的时间戳,以微秒表示
  "pid": 123, // 进程名
  "tid": 456, // 线程名
  "args": { // 额外参数,当选中某个 event 后,会在底部的面板展示
    "someArg": 1,
    "anotherArg": {
      "value": "my value"
    }
  }
}
node 作为一个服务端语言, 可能被大、中小型应用所调用, 仔细阅读 trace_events 模块代码实现能学习到不少高效读写方面的知识
保存命令行中获取到的参数, 本次需要跟踪哪些事件类型记录在 PerProcessOptions::trace_event_categories 中
// src/node_options.cc

PerProcessOptionsParser::PerProcessOptionsParser(

  AddOption("--trace-event-categories",
            "comma separated list of trace event categories to record",
            &PerProcessOptions::trace_event_categories,
            kAllowedInEnvironment);
  // ...
}
初始化函数, tracing_agent_ 上保存了 controller, tracing_file_writer_, trace_buffer_ 等, 主要用于 trace 调用的代理或者说是衔接的作用
在软件工程中,依赖注入(dependency injection)的意思为,给予调用方它所需要的事物。“依赖”是指可被方法调用的事物。依赖注入形式下,调用方不再直接指使用“依赖”,取而代之是“注入” 。“注入”是指将“依赖”传递给调用方的过程。在“注入”之后,调用方才会调用该“依赖”。传递依赖给调用方,而不是让让调用方直接获得依赖,这个是该设计的根本需求。在编程语言角度下,“调用方”为对象和类,“依赖”为变量。在提供服务的角度下,“调用方”为客户端,“依赖”为服务。
// src/node_v8_platform-inl.h

inline void Initialize(int thread_pool_size) {
  CHECK(!initialized_);
  initialized_ = true;
  tracing_agent_ = std::make_unique<tracing::Agent>();
  node::tracing::TraceEventHelper::SetAgent(tracing_agent_.get());
  node::tracing::TracingController* controller =
      tracing_agent_->GetTracingController();
  trace_state_observer_ =
      std::make_unique<NodeTraceStateObserver>(controller);
  controller->AddTraceStateObserver(trace_state_observer_.get());
  tracing_file_writer_ = tracing_agent_->DefaultHandle();
  // Only start the tracing agent if we enabled any tracing categories.
  if (!per_process::cli_options->trace_event_categories.empty()) {
    StartTracingAgent();
  }
  // Tracing must be initialized before platform threads are created.
  platform_ = new NodePlatform(thread_pool_size, controller);
  v8::V8::InitializePlatform(platform_);
}
agent 代理的**也是见到不少地方, 实际作用可能有所不同, 如
以 fs 操作的事件跟踪为例, 会在实际 SyncCall 调用前后通过 FS_SYNC_TRACE_BEGIN 与 FS_SYNC_TRACE_END 进行 trace 事件的记录
// src/node_file.cc

void Access(const FunctionCallbackInfo<Value>& args) {
  // ...
  } else {  // access(path, mode,
    FS_SYNC_TRACE_BEGIN(access);
    SyncCall(env, args[3], &req_wrap_sync, "access", uv_fs_access, *path, mode);
    FS_SYNC_TRACE_END(access);
  }
}
FS_SYNC_TRACE_BEGIN 最后会调用 controller->AddTraceEventWithTimestam 新增一个 trace event
// src/tracing/trace_event.h

static V8_INLINE uint64_t AddTraceEventWithTimestampImpl(
   // ...
  return controller->AddTraceEventWithTimestamp(
      phase, category_group_enabled, name, scope, id, bind_id, num_args,
      arg_names, arg_types, arg_values, arg_convertables, flags, timestamp);
}
新增链路: controller->AddTraceEventWithTimestam
AddTraceEventWithTimestamp 为 v8 内实现
到这里发现 controller->AddTraceEventWithTimestamp 其实是调用了 trace_buffer_->AddTraceEvent, 那 trace_buffer_ 又从何而来了 ?
// deps/v8/src/libplatform/tracing/tracing-controller.cc

uint64_t TracingController::AddTraceEventWithTimestamp(
    char phase, const uint8_t* category_enabled_flag, const char* name,
    const char* scope, uint64_t id, uint64_t bind_id, int num_args,
    const char** arg_names, const uint8_t* arg_types,
    const uint64_t* arg_values,
    std::unique_ptr<v8::ConvertableToTraceFormat>* arg_convertables,
    unsigned int flags, int64_t timestamp) {
  int64_t cpu_now_us = CurrentCpuTimestampMicroseconds();

  uint64_t handle = 0;
  if (recording_.load(std::memory_order_acquire)) {
    TraceObject* trace_object = trace_buffer_->AddTraceEvent(&handle);
    if (trace_object) {
      {
        base::MutexGuard lock(mutex_.get());
        trace_object->Initialize(phase, category_enabled_flag, name, scope, id,
                                 bind_id, num_args, arg_names, arg_types,
                                 arg_values, arg_convertables, flags, timestamp,
                                 cpu_now_us);
      }
    }
  }
  return handle;
}
新增链路: controller->AddTraceEventWithTimestam > trace_buffer_
trace_buffer_ 是在 Agent::Start 函数中通过调用 tracing_controller_->Initialize(trace_buffer_) 被注册
// src/tracing/agent.cc

void Agent::Start() {
  if (started_)
    return;

  NodeTraceBuffer* trace_buffer_ = new NodeTraceBuffer(
      NodeTraceBuffer::kBufferChunks, this, &tracing_loop_);
  tracing_controller_->Initialize(trace_buffer_);

  // This thread should be created *after* async handles are created
  // (within NodeTraceWriter and NodeTraceBuffer constructors).
  // Otherwise the thread could shut down prematurely.
  CHECK_EQ(0, uv_thread_create(&thread_, [](void* arg) {
    Agent* agent = static_cast<Agent*>(arg);
    uv_run(&agent->tracing_loop_, UV_RUN_DEFAULT);
  }, this));
  started_ = true;
}
NodeTraceBuffer 通过 uv_async_init 注册了两个异步 i/o 观察者, 分别为 flush_signal_ 刷新时的处理与 exit_signal_ 退出时的处理, 异步 i/o 相关参考【libuv 源码学习笔记】线程池与i/o
NodeTraceBuffer::NodeTraceBuffer(size_t max_chunks,
    Agent* agent, uv_loop_t* tracing_loop)
    : tracing_loop_(tracing_loop),
      buffer1_(max_chunks, 0, agent),
      buffer2_(max_chunks, 1, agent) {
  current_buf_.store(&buffer1_);

  flush_signal_.data = this;
  int err = uv_async_init(tracing_loop_, &flush_signal_,
                          NonBlockingFlushSignalCb);
  CHECK_EQ(err, 0);

  exit_signal_.data = this;
  err = uv_async_init(tracing_loop_, &exit_signal_, ExitSignalCb);
  CHECK_EQ(err, 0);
}
新增链路: controller->AddTraceEventWithTimestam > trace_buffer_->AddTraceEvent
AddTraceEvent 又是调用的内部属性的 current_buf_ 的 AddTraceEvent 方法
TraceObject* NodeTraceBuffer::AddTraceEvent(uint64_t* handle) {
  // If the buffer is full, attempt to perform a flush.
  if (!TryLoadAvailableBuffer()) {
    // Assign a value of zero as the trace event handle.
    // This is equivalent to calling InternalTraceBuffer::MakeHandle(0, 0, 0),
    // and will cause GetEventByHandle to return NULL if passed as an argument.
    *handle = 0;
    return nullptr;
  }
  return current_buf_.load()->AddTraceEvent(handle);
}
新增链路: controller->AddTraceEventWithTimestam > trace_buffer_->AddTraceEvent > current_buf_
current_buf_ 这里指向 InternalTraceBuffer 对象, 结果可能是 buffer1_ 或者是 buffer2_ 这里又涉及到一个高效写入的一个优化点
// src/tracing/node_trace_buffer.h

std::atomic<InternalTraceBuffer*> current_buf_;
InternalTraceBuffer buffer1_;
InternalTraceBuffer buffer2_;
从 TryLoadAvailableBuffer 函数可以看出, 如果当前指向的是 buffer1_ 已经达到最大值, 将会触发之前注册的 flush_signal_ 处理函数, 转而 current_buf_ 指向另一个 buffer2_, 可以说设计得比较巧妙
// src/tracing/node_trace_buffer.cc

bool NodeTraceBuffer::TryLoadAvailableBuffer() {
  InternalTraceBuffer* prev_buf = current_buf_.load();
  if (prev_buf->IsFull()) {
    uv_async_send(&flush_signal_);  // trigger flush on a separate thread
    InternalTraceBuffer* other_buf = prev_buf == &buffer1_ ?
      &buffer2_ : &buffer1_;
    if (!other_buf->IsFull()) {
      current_buf_.store(other_buf);
    } else {
      return false;
    }
  }
  return true;
}
新增链路: controller->AddTraceEventWithTimestam > trace_buffer_->AddTraceEvent > current_buf_.load()->AddTraceEvent
InternalTraceBuffer::AddTraceEvent 又是调用的 chunk->AddTraceEven 函数
// src/tracing/node_trace_buffer.cc

TraceObject* InternalTraceBuffer::AddTraceEvent(uint64_t* handle) {
  Mutex::ScopedLock scoped_lock(mutex_);
  // Create new chunk if last chunk is full or there is no chunk.
  if (total_chunks_ == 0 || chunks_[total_chunks_ - 1]->IsFull()) {
    auto& chunk = chunks_[total_chunks_++];
    if (chunk) {
      chunk->Reset(current_chunk_seq_++);
    } else {
      chunk = std::make_unique<TraceBufferChunk>(current_chunk_seq_++);
    }
  }
  auto& chunk = chunks_[total_chunks_ - 1];
  size_t event_index;
  TraceObject* trace_object = chunk->AddTraceEvent(&event_index);
  *handle = MakeHandle(total_chunks_ - 1, chunk->seq(), event_index);
  return trace_object;
}
新增链路: controller->AddTraceEventWithTimestam > trace_buffer_->AddTraceEvent > current_buf_.load()->AddTraceEvent > chunk->AddTraceEvent
到这里层层的 AddTraceEvent 调用链路算是到头了, 最后其实是在了内存 chunk_ 数组中存放了若干 trace_object 对象
// deps/v8/src/libplatform/tracing/trace-buffer.cc

TraceObject* TraceBufferChunk::AddTraceEvent(size_t* event_index) {
  *event_index = next_free_++;
  return &chunk_[*event_index];
}
刷新链路: InternalTraceBuffer::Flush
当数据达到一定阀值 TryLoadAvailableBuffer 中被调用或者手动触发 Flush 时
关于 flush 的设计在 【node 源码学习笔记】stream 双工流、转换流、透传流等 中有提到, flush 方法期盼的的作用是将缓冲区中的数据强制写出,这是什么意思了?让我们看一下当可写流的数据是要写入设备的例子
应用程序每次 IO 都要和设备进行通信,效率很低,因此缓冲区为了提高效率,当写入设备时,先写入缓冲区,等到缓冲区有足够多的数据时,就整体写入设备
所以 flush 方法的调用一般是流结束的前夕,此时就不需要考虑写入效率的问题,只需干完最后的工作然后收工就完事了。
// src/tracing/node_trace_buffer.cc

void InternalTraceBuffer::Flush(bool blocking) {
  {
    Mutex::ScopedLock scoped_lock(mutex_);
    if (total_chunks_ > 0) {
      flushing_ = true;
      for (size_t i = 0; i < total_chunks_; ++i) {
        auto& chunk = chunks_[i];
        for (size_t j = 0; j < chunk->size(); ++j) {
          TraceObject* trace_event = chunk->GetEventAt(j);
          // Another thread may have added a trace that is yet to be
          // initialized. Skip such traces.
          // https://github.com/nodejs/node/issues/21038.
          if (trace_event->name()) {
            agent_->AppendTraceEvent(trace_event);
          }
        }
      }
      total_chunks_ = 0;
      flushing_ = false;
    }
  }
  agent_->Flush(blocking);
}
刷新链路: InternalTraceBuffer::Flush > agent_->AppendTraceEvent
这里又是调用的 id_writer.second->AppendTraceEvent 函数
// src/tracing/agent.cc

void Agent::AppendTraceEvent(TraceObject* trace_event) {
  for (const auto& id_writer : writers_)
    id_writer.second->AppendTraceEvent(trace_event);
}
刷新链路: InternalTraceBuffer::Flush > agent_->AppendTraceEvent > id_writer.second->AppendTraceEvent
继续调用 json_trace_writer_->AppendTraceEvent 函数
// src/tracing/node_trace_writer.cc

void NodeTraceWriter::AppendTraceEvent(TraceObject* trace_event) {
  Mutex::ScopedLock scoped_lock(stream_mutex_);
  // If this is the first trace event, open a new file for streaming.
  if (total_traces_ == 0) {
    OpenNewFileForStreaming();
    // Constructing a new JSONTraceWriter object appends "{\"traceEvents\":["
    // to stream_.
    // In other words, the constructor initializes the serialization stream
    // to a state where we can start writing trace events to it.
    // Repeatedly constructing and destroying json_trace_writer_ allows
    // us to use V8's JSON writer instead of implementing our own.
    json_trace_writer_.reset(TraceWriter::CreateJSONTraceWriter(stream_));
  }
  ++total_traces_;
  json_trace_writer_->AppendTraceEvent(trace_event);
}
刷新链路: InternalTraceBuffer::Flush > agent_->AppendTraceEvent > id_writer.second->AppendTraceEvent
到这里会把 trace_event 序列化成字符串保存到 stream_ 中
// deps/v8/src/libplatform/tracing/trace-writer.cc

void JSONTraceWriter::AppendTraceEvent(TraceObject* trace_event) {
  if (append_comma_) stream_ << ",";
  append_comma_ = true;
  stream_ << "{\"pid\":" << trace_event->pid()
          << ",\"tid\":" << trace_event->tid()
          << ",\"ts\":" << trace_event->ts()
          << ",\"tts\":" << trace_event->tts() << ",\"ph\":\""
          << trace_event->phase() << "\",\"cat\":\""
          << TracingController::GetCategoryGroupName(
                 trace_event->category_enabled_flag())
          << "\",\"name\":\"" << trace_event->name()
          << "\",\"dur\":" << trace_event->duration()
          << ",\"tdur\":" << trace_event->cpu_duration();
  if (trace_event->flags() &
      (TRACE_EVENT_FLAG_FLOW_IN | TRACE_EVENT_FLAG_FLOW_OUT)) {
    stream_ << ",\"bind_id\":\"0x" << std::hex << trace_event->bind_id() << "\""
            << std::dec;
    if (trace_event->flags() & TRACE_EVENT_FLAG_FLOW_IN) {
      stream_ << ",\"flow_in\":true";
    }
    if (trace_event->flags() & TRACE_EVENT_FLAG_FLOW_OUT) {
      stream_ << ",\"flow_out\":true";
    }
  }
  if (trace_event->flags() & TRACE_EVENT_FLAG_HAS_ID) {
    if (trace_event->scope() != nullptr) {
      stream_ << ",\"scope\":\"" << trace_event->scope() << "\"";
    }
    // So as not to lose bits from a 64-bit integer, output as a hex string.
    stream_ << ",\"id\":\"0x" << std::hex << trace_event->id() << "\""
            << std::dec;
  }
  stream_ << ",\"args\":{";
  const char** arg_names = trace_event->arg_names();
  const uint8_t* arg_types = trace_event->arg_types();
  TraceObject::ArgValue* arg_values = trace_event->arg_values();
  std::unique_ptr<v8::ConvertableToTraceFormat>* arg_convertables =
      trace_event->arg_convertables();
  for (int i = 0; i < trace_event->num_args(); ++i) {
    if (i > 0) stream_ << ",";
    stream_ << "\"" << arg_names[i] << "\":";
    if (arg_types[i] == TRACE_VALUE_TYPE_CONVERTABLE) {
      AppendArgValue(arg_convertables[i].get());
    } else {
      AppendArgValue(arg_types[i], arg_values[i]);
    }
  }
  stream_ << "}}";
  // TODO(fmeawad): Add support for Flow Events.
}
对象序列化到字符串流后, 最后一步才会通过 WriteToFile 去写入到文件 blog/node_trace.1.log 中
写入的时候发现也是有优化, 会有一个 write_req_queue_ 队列去控制逐个写入, 能有效防止任务过多 fd 占用量过大导致线程假死的发生, 血淋淋的案例可以继续阅读 Node 案发现场揭秘 —— 文件句柄泄露导致进程假死, 毕竟增强性功不要影响到主流程
// src/tracing/node_trace_writer.cc

void NodeTraceWriter::WriteToFile(std::string&& str, int highest_request_id) {
  if (fd_ == -1) return;

  uv_buf_t buf = uv_buf_init(nullptr, 0);
  {
    Mutex::ScopedLock lock(request_mutex_);
    write_req_queue_.emplace(WriteRequest {
      std::move(str), highest_request_id
    });
    if (write_req_queue_.size() == 1) {
      buf = uv_buf_init(
          const_cast<char*>(write_req_queue_.front().str.c_str()),
          write_req_queue_.front().str.length());
    }
  }
  // Only one write request for the same file descriptor should be active at
  // a time.
  if (buf.base != nullptr && fd_ != -1) {
    StartWrite(buf);
  }
}
通过 uv_fs_write 去写入到文件中, uv_fs_write 实现类似于 【libuv 源码学习笔记】线程池与i/o 中讲到的 uv_fs_open
当一次写入成功回调函数中继续调用 AfterWrite 去看 write_req_queue_ 队列中是否还有写入任务
程序先会初始化一次线程池, 任务队列为空时线程都进入沉睡状态。当调用 uv_fs_open 方法提交一个 fs_open 任务时, 会通过 pthread_cond_signal 唤醒一个线程开始工作, 工作内容即为 fs_open, 在该线程内同步等待 fs_open 函数结束, 然后去通知主线程。
// src/tracing/node_trace_writer.cc

void NodeTraceWriter::StartWrite(uv_buf_t buf) {
  int err = uv_fs_write(
      tracing_loop_, &write_req_, fd_, &buf, 1, -1,
      [](uv_fs_t* req) {
        NodeTraceWriter* writer =
            ContainerOf(&NodeTraceWriter::write_req_, req);
        writer->AfterWrite();
      });
  CHECK_EQ(err, 0);
}
其中 uv_fs_write 最后一个参数回调函数的语法为 C++ 11 中的 Lambda 表达式
lambda 函数的 C++ 概念起源于 lambda 演算和函数式编程。lambda 是一个未命名的函数,对于无法重用且不值得命名的短代码片段很有用(在实际编程中,而不是理论上)。
实际写入的文件参考 blog/node_trace.1.log
Node.js 的运行流程与原理下图描述的比较形象, 通过 v8 运行 js 代码, 产生的异步任务不断被压进 libuv 的事件循环中运行, 然后可能产生新的任务, 直到事件循环为空或者程序异常才会退出

图片来自于 https://www.cnblogs.com/papertree/p/5225201.html
代码的运行流程图可以参照下图, 到 LoadEnvironment 其实就是 【node 源码学习笔记】lib 模块运行 一节讲到的开始运行 lib 下的 js 文件进行一些初始化操作, 最后开始运行用户的 js 文件。

图片来自于 https://yi-love.github.io/articles/node-start
下面我们开始讲解实际代码的实现 ~
node 作为 c++ 程序, 起始入口为 src/node_main.cc 文件的 main 函数, main 函数的返回值用于说明程序的退出状态。如果返回0,则代表程序正常退出。返回其它数字的含义则由系统决定。通常,返回非零代表程序异常退出
// src/node_main.cc

int main(int argc, char* argv[]) {
#if defined(__POSIX__) && defined(NODE_SHARED_MODE)
  {
    // 定义一个结构体 act
    struct sigaction act;
    // memset: 可以方便的清空一个结构类型的变量或数组, 指针的为NULL, 其他为0
    // memset: https://blog.csdn.net/faihung/article/details/90707367
    memset(&act, 0, sizeof(act));
    // 设置新的信号处理函数
    act.sa_handler = SIG_IGN;
    // tips: 结构体和函数是可以同名的
    // sigaction: 函数的功能是检查或修改与指定信号相关联的处理动作
    sigaction(SIGPIPE, &act, nullptr);
  }
#endif

#if defined(__linux__)
  // 辅助向量(auxiliary vector),一个从内核到用户空间的信息交流机制,它一直保持透明。然而,在GNU C库(glibc)2.16发布版中添加了一个新的库函数”getauxval()”
  // http://www.voidcn.com/article/p-flcjdfbd-bu.html https://man7.org/linux/man-pages/man3/getauxval.3.html
  node::per_process::linux_at_secure = getauxval(AT_SECURE);
#endif
  // nullptr: C++中有个nullptr的关键字可以用作空指针,既然已经有了定义为0的NULL,为何还要nullptr呢?这是因为定义为0的NULL很容易引起混淆,尤其是函数重载调用时
  // nullptr: https://blog.csdn.net/u012707739/article/details/77915483
  // setvbuf: C 库函数 int setvbuf(FILE *stream, char *buffer, int mode, size_t size) 定义流 stream 应如何缓冲。
  // _IONBF: 无缓冲:不使用缓冲。每个 I/O 操作都被即时写入。buffer 和 size 参数被忽略。
  setvbuf(stdout, nullptr, _IONBF, 0);
  setvbuf(stderr, nullptr, _IONBF, 0);
  return node::Start(argc, argv);
}main > node::Start
到这里开始进入核心的运行逻辑, 可以发现主要包含了如下几个步骤
这里也进行了一下链路追踪,用户可以通过 require('perf_hooks').performance 里面获取到运行的性能数据, 本次设置了 UV_METRICS_IDLE_TIME 就会记录下 epoll_wait 的等待时间在 idleTime 字段中
// src/node.cc
int Start(int argc, char** argv) {
InitializationResult result = InitializeOncePerProcess(argc, argv);
if (result.early_return) {
return result.exit_code;
}
{
Isolate::CreateParams params;
const std::vector<size_t>* indexes = nullptr;
const EnvSerializeInfo* env_info = nullptr;
bool force_no_snapshot =
per_process::cli_options->per_isolate->no_node_snapshot;
if (!force_no_snapshot) {
v8::StartupData* blob = NodeMainInstance::GetEmbeddedSnapshotBlob();
if (blob != nullptr) {
params.snapshot_blob = blob;
indexes = NodeMainInstance::GetIsolateDataIndexes();
env_info = NodeMainInstance::GetEnvSerializeInfo();
}
}
uv_loop_configure(uv_default_loop(), UV_METRICS_IDLE_TIME);
NodeMainInstance main_instance(¶ms,
uv_default_loop(),
per_process::v8_platform.Platform(),
result.args,
result.exec_args,
indexes);
result.exit_code = main_instance.Run(env_info);
}
TearDownOncePerProcess();
return result.exit_code;
}main > node::Start > InitializeOncePerProcess
对当前进程做一些初始化的操作
// src/node.cc

InitializationResult InitializeOncePerProcess(int argc, char** argv) {
  // Initialized the enabled list for Debug() calls with system
  // environment variables.
  // tips: 访问命名空间 per_process用::中某个实例的方法用.
  per_process::enabled_debug_list.Parse(nullptr);

  atexit(ResetStdio);
  PlatformInit();

  CHECK_GT(argc, 0);

  // Hack around with the argv pointer. Used for process.title = "blah".
  argv = uv_setup_args(argc, argv);

  InitializationResult result;
  result.args = std::vector<std::string>(argv, argv + argc);
  std::vector<std::string> errors;

  // This needs to run *before* V8::Initialize().
  {
    result.exit_code =
        InitializeNodeWithArgs(&(result.args), &(result.exec_args), &errors);
    for (const std::string& error : errors)
      fprintf(stderr, "%s: %s\n", result.args.at(0).c_str(), error.c_str());
    if (result.exit_code != 0) {
      result.early_return = true;
      return result;
    }
  }

  if (per_process::cli_options->use_largepages == "on" ||
      per_process::cli_options->use_largepages == "silent") {
    int result = node::MapStaticCodeToLargePages();
    if (per_process::cli_options->use_largepages == "on" && result != 0) {
      fprintf(stderr, "%s\n", node::LargePagesError(result));
    }
  }

  if (per_process::cli_options->print_version) {
    printf("%s\n", NODE_VERSION);
    result.exit_code = 0;
    result.early_return = true;
    return result;
  }

  if (per_process::cli_options->print_bash_completion) {
    std::string completion = options_parser::GetBashCompletion();
    printf("%s\n", completion.c_str());
    result.exit_code = 0;
    result.early_return = true;
    return result;
  }

  if (per_process::cli_options->print_v8_help) {
    V8::SetFlagsFromString("--help", static_cast<size_t>(6));
    result.exit_code = 0;
    result.early_return = true;
    return result;
  }

#if HAVE_OPENSSL
  {
    std::string extra_ca_certs;
    if (credentials::SafeGetenv("NODE_EXTRA_CA_CERTS", &extra_ca_certs))
      crypto::UseExtraCaCerts(extra_ca_certs);
  }
#ifdef NODE_FIPS_MODE
  // In the case of FIPS builds we should make sure
  // the random source is properly initialized first.
  OPENSSL_init();
#endif  // NODE_FIPS_MODE
  // V8 on Windows doesn't have a good source of entropy. Seed it from
  // OpenSSL's pool.
  V8::SetEntropySource(crypto::EntropySource);
#endif  // HAVE_OPENSSL

  per_process::v8_platform.Initialize(
      per_process::cli_options->v8_thread_pool_size);
  V8::Initialize();
  performance::performance_v8_start = PERFORMANCE_NOW();
  per_process::v8_initialized = true;
  return result;
}main > node::Start > InitializeOncePerProcess > PlatformInit
对 stdio 进行了一些有效性检查以及对进程的资源使用限制做了设置
HAVE_INSPECTOR 的值由构建 node 时 --without-inspector 参数决定, 如果为 true 则会调用 pthread_sigmask 来设置本线程会阻塞 SIGUSR1 信号
确保标准输入输出 fd 0-2 没被占用, 且把 stat 等数据存在了 stdio 中
sigaction 设置一些信号的处理函数
通过 getrlimit, setrlimit 获取或设定资源使用限制。每种资源都有相关的软硬限制,软限制是内核强加给相应资源的限制值,硬限制是软限制的最大值。非授权调用进程只可以将其软限制指定为0~硬限制范围中的某个值,同时能不可逆转地降低其硬限制。授权进程可以任意改变其软硬限制。RLIM_INFINITY的值表示不对资源限制。
// src/node.cc

inline void PlatformInit() {
#ifdef __POSIX__
#if HAVE_INSPECTOR
  sigset_t sigmask;
  // sigemptyset: 用来将参数set信号集初始化并清空
  sigemptyset(&sigmask);
  // sigaddset: 用来将参数signum 代表的信号加入至参数set 信号集里
  sigaddset(&sigmask, SIGUSR1);
  const int err = pthread_sigmask(SIG_SETMASK, &sigmask, nullptr);
#endif  // HAVE_INSPECTOR

  for (auto& s : stdio) {
    const int fd = &s - stdio;
    // 如果没被占用返回 0
    if (fstat(fd, &s.stat) == 0)
      continue;
    // Anything but EBADF means something is seriously wrong.  We don't
    // have to special-case EINTR, fstat() is not interruptible.
    if (errno != EBADF)
      ABORT();
    if (fd != open("/dev/null", O_RDWR))
      ABORT();
    if (fstat(fd, &s.stat) != 0)
      ABORT();
  }

#if HAVE_INSPECTOR
  CHECK_EQ(err, 0);
#endif  // HAVE_INSPECTOR

  // TODO(addaleax): NODE_SHARED_MODE does not really make sense here.
#ifndef NODE_SHARED_MODE
  // Restore signal dispositions, the parent process may have changed them.
  struct sigaction act;
  memset(&act, 0, sizeof(act));

  for (unsigned nr = 1; nr < kMaxSignal; nr += 1) {
    if (nr == SIGKILL || nr == SIGSTOP)
      continue;
    act.sa_handler = (nr == SIGPIPE || nr == SIGXFSZ) ? SIG_IGN : SIG_DFL;
    CHECK_EQ(0, sigaction(nr, &act, nullptr));
  }
#endif  // !NODE_SHARED_MODE

  for (auto& s : stdio) {
    const int fd = &s - stdio;
    int err;

    do
      s.flags = fcntl(fd, F_GETFL);
    while (s.flags == -1 && errno == EINTR);  // NOLINT
    CHECK_NE(s.flags, -1);

    if (uv_guess_handle(fd) != UV_TTY) continue;
    s.isatty = true;

    do
      err = tcgetattr(fd, &s.termios);
    while (err == -1 && errno == EINTR);  // NOLINT
    CHECK_EQ(err, 0);
  }

  RegisterSignalHandler(SIGINT, SignalExit, true);
  RegisterSignalHandler(SIGTERM, SignalExit, true);

#if NODE_USE_V8_WASM_TRAP_HANDLER
#if defined(_WIN32)
  {
    constexpr ULONG first = TRUE;
    per_process::old_vectored_exception_handler =
        AddVectoredExceptionHandler(first, TrapWebAssemblyOrContinue);
  }
#else
  {
    struct sigaction sa;
    memset(&sa, 0, sizeof(sa));
    sa.sa_sigaction = TrapWebAssemblyOrContinue;
    sa.sa_flags = SA_SIGINFO;
    CHECK_EQ(sigaction(SIGSEGV, &sa, nullptr), 0);
  }
#endif  // defined(_WIN32)
  V8::EnableWebAssemblyTrapHandler(false);
#endif  // NODE_USE_V8_WASM_TRAP_HANDLER

  // Raise the open file descriptor limit.
  struct rlimit lim;
  if (getrlimit(RLIMIT_NOFILE, &lim) == 0 && lim.rlim_cur != lim.rlim_max) {
    // Do a binary search for the limit.
    rlim_t min = lim.rlim_cur;
    rlim_t max = 1 << 20;
    // But if there's a defined upper bound, don't search, just set it.
    if (lim.rlim_max != RLIM_INFINITY) {
      min = lim.rlim_max;
      max = lim.rlim_max;
    }
    do {
      lim.rlim_cur = min + (max - min) / 2;
      if (setrlimit(RLIMIT_NOFILE, &lim)) {
        max = lim.rlim_cur;
      } else {
        min = lim.rlim_cur;
      }
    } while (min + 1 < max);
  }
#endif  // __POSIX__
// ...
}
🤔 关于 s.flags == -1 && errno == EINTR
在 node 以及 libuv 中经常出现 errno == EINTR 重试的代码,其原因是如果在系统调用正在进行时发生信号,许多系统调用将报告 EINTR 错误代码。实际上没有发生错误,只是因为系统无法自动恢复系统调用而以这种方式报告。这种编码模式只是在发生这种情况时重试系统调用,以忽略中断。
main > node::Start > InitializeOncePerProcess > ResetStdio
作为 atexit 的处理函数,主要通过 tcsetattr 设置如果有操作未完成应当立即执行,这里的意义在于,如果你正在向一个串行终端写入数据,那么写入的数据可能需要一段时间才能被刷新。比如 Open
【node 源码学习笔记】stream 双工流、转换流、透传流等 里提到的 _flush 优化
// src/node.cc

void ResetStdio() {
  uv_tty_reset_mode();
#ifdef __POSIX__
  for (auto& s : stdio) {
    const int fd = &s - stdio;

    struct stat tmp;
    if (-1 == fstat(fd, &tmp)) {
      CHECK_EQ(errno, EBADF);  // Program closed file descriptor.
      continue;
    }

    bool is_same_file =
        (s.stat.st_dev == tmp.st_dev && s.stat.st_ino == tmp.st_ino);
    if (!is_same_file) continue;  // Program reopened file descriptor.

    int flags;
    do
      flags = fcntl(fd, F_GETFL);
    while (flags == -1 && errno == EINTR);  // NOLINT
    CHECK_NE(flags, -1);

    // Restore the O_NONBLOCK flag if it changed.
    if (O_NONBLOCK & (flags ^ s.flags)) {
      flags &= ~O_NONBLOCK;
      flags |= s.flags & O_NONBLOCK;

      int err;
      do
        err = fcntl(fd, F_SETFL, flags);
      while (err == -1 && errno == EINTR);  // NOLINT
      CHECK_NE(err, -1);
    }

    if (s.isatty) {
      sigset_t sa;
      int err;
      sigemptyset(&sa);
      sigaddset(&sa, SIGTTOU);

      CHECK_EQ(0, pthread_sigmask(SIG_BLOCK, &sa, nullptr));
      do
        err = tcsetattr(fd, TCSANOW, &s.termios);
      while (err == -1 && errno == EINTR);  // NOLINT
      CHECK_EQ(0, pthread_sigmask(SIG_UNBLOCK, &sa, nullptr));

      // Normally we expect err == 0. But if macOS App Sandbox is enabled,
      // tcsetattr will fail with err == -1 and errno == EPERM.
      CHECK_IMPLIES(err != 0, err == -1 && errno == EPERM);
    }
  }
#endif  // __POSIX__
}main > node::Start > InitializeOncePerProcess > InitializeNodeWithArgs
进行 c++ 模块的注册,环境变量的一些挂载,进程 title 的设置等
// src/node.cc

int InitializeNodeWithArgs(std::vector<std::string>* argv,
                           std::vector<std::string>* exec_argv,
                           std::vector<std::string>* errors) {
  // Make sure InitializeNodeWithArgs() is called only once.
  CHECK(!init_called.exchange(true));

  // Initialize node_start_time to get relative uptime.
  per_process::node_start_time = uv_hrtime();

  // Register built-in modules
  binding::RegisterBuiltinModules();

  // Make inherited handles noninheritable.
  uv_disable_stdio_inheritance();

  // Cache the original command line to be
  // used in diagnostic reports.
  per_process::cli_options->cmdline = *argv;

#if defined(NODE_V8_OPTIONS)
  V8::SetFlagsFromString(NODE_V8_OPTIONS, sizeof(NODE_V8_OPTIONS) - 1);
#endif

  HandleEnvOptions(per_process::cli_options->per_isolate->per_env);

#if !defined(NODE_WITHOUT_NODE_OPTIONS)
  std::string node_options;

  if (credentials::SafeGetenv("NODE_OPTIONS", &node_options)) {
    std::vector<std::string> env_argv =
        ParseNodeOptionsEnvVar(node_options, errors);

    if (!errors->empty()) return 9;

    // [0] is expected to be the program name, fill it in from the real argv.
    env_argv.insert(env_argv.begin(), argv->at(0));

    const int exit_code = ProcessGlobalArgs(&env_argv,
                                            nullptr,
                                            errors,
                                            kAllowedInEnvironment);
    if (exit_code != 0) return exit_code;
  }
#endif

  const int exit_code = ProcessGlobalArgs(argv,
                                          exec_argv,
                                          errors,
                                          kDisallowedInEnvironment);
  if (exit_code != 0) return exit_code;

  // Set the process.title immediately after processing argv if --title is set.
  if (!per_process::cli_options->title.empty())
    uv_set_process_title(per_process::cli_options->title.c_str());

#if defined(NODE_HAVE_I18N_SUPPORT)
  // If the parameter isn't given, use the env variable.
  if (per_process::cli_options->icu_data_dir.empty())
    credentials::SafeGetenv("NODE_ICU_DATA",
                            &per_process::cli_options->icu_data_dir);

#ifdef NODE_ICU_DEFAULT_DATA_DIR
  // If neither the CLI option nor the environment variable was specified,
  // fall back to the configured default
  if (per_process::cli_options->icu_data_dir.empty()) {
    // Check whether the NODE_ICU_DEFAULT_DATA_DIR contains the right data
    // file and can be read.
    static const char full_path[] =
        NODE_ICU_DEFAULT_DATA_DIR "/" U_ICUDATA_NAME ".dat";

    FILE* f = fopen(full_path, "rb");

    if (f != nullptr) {
      fclose(f);
      per_process::cli_options->icu_data_dir = NODE_ICU_DEFAULT_DATA_DIR;
    }
  }
#endif  // NODE_ICU_DEFAULT_DATA_DIR

  if (!i18n::InitializeICUDirectory(per_process::cli_options->icu_data_dir)) {
    errors->push_back("could not initialize ICU "
                      "(check NODE_ICU_DATA or --icu-data-dir parameters)\n");
    return 9;
  }
  per_process::metadata.versions.InitializeIntlVersions();
#endif

  NativeModuleEnv::InitializeCodeCache();

  node_is_initialized = true;
  return 0;
}核心的运行逻辑,开始跑起来了~
// src/node_main_instance.cc

int NodeMainInstance::Run(const EnvSerializeInfo* env_info) {
  Locker locker(isolate_);
  Isolate::Scope isolate_scope(isolate_);
  HandleScope handle_scope(isolate_);

  int exit_code = 0;
  DeleteFnPtr<Environment, FreeEnvironment> env =
      CreateMainEnvironment(&exit_code, env_info);

  CHECK_NOT_NULL(env);
  {
    Context::Scope context_scope(env->context());

    if (exit_code == 0) {
      LoadEnvironment(env.get());

      exit_code = SpinEventLoop(env.get()).FromMaybe(1);
    }

    ResetStdio();

    // TODO(addaleax): Neither NODE_SHARED_MODE nor HAVE_INSPECTOR really
    // make sense here.
#if HAVE_INSPECTOR && defined(__POSIX__) && !defined(NODE_SHARED_MODE)
  struct sigaction act;
  memset(&act, 0, sizeof(act));
  for (unsigned nr = 1; nr < kMaxSignal; nr += 1) {
    if (nr == SIGKILL || nr == SIGSTOP || nr == SIGPROF)
      continue;
    act.sa_handler = (nr == SIGPIPE) ? SIG_IGN : SIG_DFL;
    CHECK_EQ(0, sigaction(nr, &act, nullptr));
  }
#endif

#if defined(LEAK_SANITIZER)
  __lsan_do_leak_check();
#endif
  }

  return exit_code;
}开始写一些博客主要是在看完代码后再温故总结一遍, 也是为了后面回头也能查阅。本系列会从官网的例子出发, 尽可能以链路追踪的方式记录其中源码核心模块的实现。
涉及的知识点
先说一下 JavaScript 中的 ArrayBuffer 的接口及其背景, 如下内容来自于 ECMAScript 6 入门 ArrayBuffer 。
ArrayBuffer对象、TypedArray视图和DataView视图是 JavaScript 操作二进制数据的一个接口。这些对象早就存在,属于独立的规格(2011 年 2 月发布),ES6 将它们纳入了 ECMAScript 规格,并且增加了新的方法。它们都是以数组的语法处理二进制数据,所以统称为二进制数组。
这个接口的原始设计目的,与 WebGL 项目有关。所谓 WebGL,就是指浏览器与显卡之间的通信接口,为了满足 JavaScript 与显卡之间大量的、实时的数据交换,它们之间的数据通信必须是二进制的,而不能是传统的文本格式。文本格式传递一个 32 位整数,两端的 JavaScript 脚本与显卡都要进行格式转化,将非常耗时。这时要是存在一种机制,可以像 C 语言那样,直接操作字节,将 4 个字节的 32 位整数,以二进制形式原封不动地送入显卡,脚本的性能就会大幅提升。
二进制数组就是在这种背景下诞生的。它很像 C 语言的数组,允许开发者以数组下标的形式,直接操作内存,大大增强了 JavaScript 处理二进制数据的能力,使得开发者有可能通过 JavaScript 与操作系统的原生接口进行二进制通信。
看完我们知道, ArrayBuffer 系列接口使得 JavaScript 有了处理二进制数据的能力, 其使用方式主要是分为如下几步
const buf1 = new ArrayBuffer(10);
const x1 = new Uint8Array(buf1);
x1[0]  = 123;
在 Node.js 中也完全可以使用 ArrayBuffer 相关的接口去处理二进制数据, 仔细看完 ArrayBuffer 与 Buffer 的文档可以发现, Buffer 的进一步封装能够更简单的上手与更好的性能, 接着让我们去看看 Buffer 的使用例子
const buf1 = Buffer.alloc(10);
buf1.writeUInt8(123, 0)
buf1.readUint8(0)
通过静态方法 alloc 创建一个 Buffer 实例
Tips: 直接通过 Buffer 构造函数创建实例的方式由于安全性问题已经废弃
Buffer.alloc = function alloc(size, fill, encoding) {
  assertSize(size);
  if (fill !== undefined && fill !== 0 && size > 0) {
    const buf = createUnsafeBuffer(size);
    return _fill(buf, fill, 0, buf.length, encoding);
  }
  return new FastBuffer(size);
};

class FastBuffer extends Uint8Array {
  constructor(bufferOrLength, byteOffset, length) {
    super(bufferOrLength, byteOffset, length);
  }
}
发现 Buffer 其实就是 Uint8Array, 这里再补充一下在 JavaScript 中也可以不通过 ArrayBuffer 对象, 直接使用 Uint8Array 操作内存, 如以下的例子
const x1 = new Uint8Array(10);
x1[0] = 123
那么 Node.js 中 Buffer 仅通过 Uint8Array 类, 如何模拟实现下面所有的视图类型的行为, 以及 Buffer 又做了哪些其他的扩展了 ?
提供了 alloc, allocUnsafe, allocUnsafeSlow 3个方法去创建一个 Buffer 实例, 上面讲了 alloc 方法没有什么特别, 下面讲一下另外两种方法
与 alloc 不同的是, allocUnsafe 并没有直接返回 FastBuffer, 而是始终从 allocPool 中类似 slice 出来的内存区。
Buffer.allocUnsafe = function allocUnsafe(size) {
  assertSize(size);
  return allocate(size);
};

function allocate(size) {
  if (size <= 0) {
    return new FastBuffer();
  }
  if (size < (Buffer.poolSize >>> 1)) {
    if (size > (poolSize - poolOffset))
      createPool();
    const b = new FastBuffer(allocPool, poolOffset, size);
    poolOffset += size;
    alignPool();
    return b;
  }
  return createUnsafeBuffer(size);
}
这块内容其实我也是很早之前在读朴灵大佬的深入浅出 Node.js 就有所映像, 为什么这样做了, 原因主要如下
为了高效地使用申请来的内存,Node采用了slab分配机制。slab是一种动态内存管理机制,最早
诞生于SunOS操作系统(Solaris)中,目前在一些*nix操作系统中有广泛的应用,如FreeBSD和Linux。
简单而言,slab就是一块申请好的固定大小的内存区域。slab具有如下3种状态。
当我们需要一个Buffer对象,可以通过以下方式分配指定大小的Buffer对象:
new Buffer(size);
Node以8 KB为界限来区分Buffer是大对象还是小对象:
Buffer.poolSize = 8 * 1024;
这个8 KB的值也就是每个slab的大小值,在JavaScript层面,以它作为单位单元进行内存的分配。
比起 allocUnsafe 从预先申请好的 allocPool 内存中切割出来的内存区, allocUnsafeSlow 是直接通过 createUnsafeBuffer 先创建的内存区域。从命名可知直接使用 Uint8Array 等都是 Slow 缓慢的。
Buffer.allocUnsafeSlow = function allocUnsafeSlow(size) {
  assertSize(size);
  return createUnsafeBuffer(size);
};
这个 Unsafe 不安全又是怎么回事了, 其实我们发现直接通过 Uint8Array 申请的内存都是填充了 0 数据的认为都是安全的, 那么 Node.js 又做了什么操作使其没有被填充数据了 ?
let zeroFill = getZeroFillToggle();
function createUnsafeBuffer(size) {
  zeroFill[0] = 0;
  try {
    return new FastBuffer(size);
  } finally {
    zeroFill[0] = 1;
  }
}
那么我们只能去探究一下 zeroFill 在创建前后, 类似开关的操作的是如何实现这个功能
zeroFill 的值来自于 getZeroFillToggle 方法返回, 其实现在 src/node_buffer.cc 文件中, 整个看下来也是比较费脑。
简要的分析一下 zeroFill 的设置主要是修改了 zero_fill_field 这个变量的值, zero_fill_field 值主要使用在 Allocate 分配器函数中。
void GetZeroFillToggle(const FunctionCallbackInfo<Value>& args) {
  Environment* env = Environment::GetCurrent(args);
  NodeArrayBufferAllocator* allocator = env->isolate_data()->node_allocator();
  Local<ArrayBuffer> ab;
  // It can be a nullptr when running inside an isolate where we
  // do not own the ArrayBuffer allocator.
  if (allocator == nullptr) {
    // Create a dummy Uint32Array - the JS land can only toggle the C++ land
    // setting when the allocator uses our toggle. With this the toggle in JS
    // land results in no-ops.
    ab = ArrayBuffer::New(env->isolate(), sizeof(uint32_t));
  } else {
    uint32_t* zero_fill_field = allocator->zero_fill_field();
    std::unique_ptr<BackingStore> backing =
        ArrayBuffer::NewBackingStore(zero_fill_field,
                                     sizeof(*zero_fill_field),
                                     [](void*, size_t, void*) {},
                                     nullptr);
    ab = ArrayBuffer::New(env->isolate(), std::move(backing));
  }

  ab->SetPrivate(
      env->context(),
      env->untransferable_object_private_symbol(),
      True(env->isolate())).Check();

  args.GetReturnValue().Set(Uint32Array::New(ab, 0, 1));
}
内存分配器的实现
从代码实现可以看到如果 zero_fill_field 值为
void* NodeArrayBufferAllocator::Allocate(size_t size) {
  void* ret;
  if (zero_fill_field_ || per_process::cli_options->zero_fill_all_buffers)
    ret = UncheckedCalloc(size);
  else
    ret = UncheckedMalloc(size);
  if (LIKELY(ret != nullptr))
    total_mem_usage_.fetch_add(size, std::memory_order_relaxed);
  return ret;
}
接着 Allocate 函数的内容
关于 calloc 与 realloc 函数
至此读到这里, 我们知道了 createUnsafeBuffer 创建未被初始化内存的完整实现, 在需要创建时设置 zero_fill_field 为 0 即假值即可, 同步创建成功再把 zero_fill_field 设置为 1 即真值就好了。
inline T* UncheckedCalloc(size_t n) {
  if (n == 0) n = 1;
  MultiplyWithOverflowCheck(sizeof(T), n);
  return static_cast<T*>(calloc(n, sizeof(T)));
}

template <typename T>
inline T* UncheckedMalloc(size_t n) {
  if (n == 0) n = 1;
  return UncheckedRealloc<T>(nullptr, n);
}

template <typename T>
T* UncheckedRealloc(T* pointer, size_t n) {
  size_t full_size = MultiplyWithOverflowCheck(sizeof(T), n);

  if (full_size == 0) {
    free(pointer);
    return nullptr;
  }

  void* allocated = realloc(pointer, full_size);

  if (UNLIKELY(allocated == nullptr)) {
    // Tell V8 that memory is low and retry.
    LowMemoryNotification();
    allocated = realloc(pointer, full_size);
  }

  return static_cast<T*>(allocated);
}
通过 Uint8Array 如何写入读取 Int8Array 数据? 如通过 writeInt8 写入一个有符号的 -123 数据。
const buf1 = Buffer.alloc(10);
buf1.writeInt8(-123, 0)
其实作为 Uint8Array 对应的 C 语言类型为 unsigned char, 可写入的范围为 0 到 255, 当写入一个有符号的值时如 -123, 其最高位符号位为 1, 其二进制的原码为 11111011, 最终存储在计算机中所有的数值都是用补码。所以其最终存储的补码为 10000101, 10 进制表示为 133。
function writeInt8(value, offset = 0) {
  return writeU_Int8(this, value, offset, -0x80, 0x7f);
}

function writeU_Int8(buf, value, offset, min, max) {
  value = +value;
  // `checkInt()` can not be used here because it checks two entries.
  validateNumber(offset, 'offset');
  if (value > max || value < min) {
    throw new ERR_OUT_OF_RANGE('value', `>= ${min} and <= ${max}`, value);
  }
  if (buf[offset] === undefined)
    boundsError(offset, buf.length - 1);

  buf[offset] = value;
  return offset + 1;
}

function readInt8(offset = 0) {
  validateNumber(offset, 'offset');
  const val = this[offset];
  if (val === undefined)
    boundsError(offset, this.length - 1);

  return val | (val & 2 ** 7) * 0x1fffffe;
}
计算机中的有符号数有三种表示方法,即原码、反码和补码。三种表示方法均有符号位和数值位两部分,符号位都是用0表示“正”,用1表示“负”,而数值位,三种表示方法各不相同。在计算机系统中,数值一律用补码来表示和存储。原因在于,使用补码,可以将符号位和数值域统一处理;同时,加法和减法也可以统一处理。
通过 Uint8Array 如何写入读取 Uint16Array 数据?
从下面的代码也是逐渐的看清了 Uint8Array 的实现, 如果写入 16 位的数组, 即会占用两个字节长度的 Uint8Array, 每个字节存储 8 位即可。
function writeU_Int16BE(buf, value, offset, min, max) {
  value = +value;
  checkInt(value, min, max, buf, offset, 1);

  buf[offset++] = (value >>> 8);
  buf[offset++] = value;
  return offset;
}

function readUInt16BE(offset = 0) {
  validateNumber(offset, 'offset');
  const first = this[offset];
  const last = this[offset + 1];
  if (first === undefined || last === undefined)
    boundsError(offset, this.length - 2);

  return first * 2 ** 8 + last;
}
BE 指的是大端字节序, LE 指的是小端字节序, 使用何种方式都是可以的。小端字节序写用小端字节序读, 端字节序写就用大端字节序读, 读写规则不一致则会造成乱码, 更多可见 理解字节序。
对于 float32Array 的实现, 相当于直接使用了 float32Array
const float32Array = new Float32Array(1);
const uInt8Float32Array = new Uint8Array(float32Array.buffer);

function writeFloatForwards(val, offset = 0) {
  val = +val;
  checkBounds(this, offset, 3);

  float32Array[0] = val;
  this[offset++] = uInt8Float32Array[0];
  this[offset++] = uInt8Float32Array[1];
  this[offset++] = uInt8Float32Array[2];
  this[offset++] = uInt8Float32Array[3];
  return offset;
}

function readFloatForwards(offset = 0) {
  validateNumber(offset, 'offset');
  const first = this[offset];
  const last = this[offset + 3];
  if (first === undefined || last === undefined)
    boundsError(offset, this.length - 4);

  uInt8Float32Array[0] = first;
  uInt8Float32Array[1] = this[++offset];
  uInt8Float32Array[2] = this[++offset];
  uInt8Float32Array[3] = last;
  return float32Array[0];
}
本文主要讲了 Node.js 中 Buffer 的实现, 相比直接使用 Uint8Array 等在性能安全以及使用的便利层度上做了一些优化, 感兴趣的同学可以扩展阅读 gRPC 中 Protocol Buffers 的实现, 其遵循的是 Varints 编码 与 Zigzag 编码实现。

报错信息如下
Uncaught ReferenceError: exports is not defined
    at Module.<anonymous> (browser.js:13:1)
    at Module../node_modules/.pnpm/[email protected]/node_modules/abort-controller/dist/abort-controller.js (abort-controller.ts:62:1)
    at __webpack_require__ (bootstrap:84:1)
    at Object.<anonymous> (polyfill.js:4:1)
    at Object../node_modules/.pnpm/[email protected]/node_modules/abort-controller/polyfill.js (polyfill.js:21:1)
    at __webpack_require__ (bootstrap:84:1)
首先查看 node_modules 中 abort-controller 包的代码, 找到报错的地方, 为下图中红色下划线标出的有 exports 变量这一行代码

仔细查看发现代码并无明显语法错误, 报 exports is not defined 不合常理
正常来说 webpack 打包过后会把该模块的代码放在一个闭包函数中去运行, 通过函数参数中传入 module, exports 等变量, 运行完成后 module, exports 的值即为该模块的导出来的值, 和 Node.js 编译运行一个 js 文件模块的原理是类似的, 如下所示👇

但是这里报错的地方的闭包函数却不长上面那样, 区别是该闭包函数传入的第二个参数值是 __webpack_exports__ 而非 exports ?!

所以代码在浏览器运行时该模块作用域内没有 exports, 就出现了本文开始的错误信息 exports is not defined ❌
// abort-controller/dist/abort-controller.js

exports.AbortController = AbortController;
🤔 那么是什么条件决定了形参何时命名为 __webpack_exports__, 何时为 exports 了? 接着去探寻一下 webpack 这部分实现的代码
通过查看 webpack 的代码我们发现 isHarmony 变量的值为 true 则会命名为 __webpack_exports__, isHarmony 为 true 的条件是isStrictHarmony 为 true 或者当前有 import、export 等 ES Module 语句时, 可想而知 CommonJs 则会命名为 exports
// webpack/lib/dependencies/HarmonyDetectionParserPlugin.js

module.exports = class HarmonyDetectionParserPlugin {
	apply(parser) {
		parser.hooks.program.tap("HarmonyDetectionParserPlugin", ast => {
            const isStrictHarmony = parser.state.module.type === "javascript/esm";
			const isHarmony =
				isStrictHarmony ||
				ast.body.some(
					statement =>
						statement.type === "ImportDeclaration" ||
						statement.type === "ExportDefaultDeclaration" ||
						statement.type === "ExportNamedDeclaration" ||
						statement.type === "ExportAllDeclaration"
				);
			if (isHarmony) {
				// ...
				module.buildInfo.exportsArgument = "__webpack_exports__";

			}
		});
isStrictHarmony 为 true 的条件则是该文件是类型是 "javascript/esm", 通过查看 webpack 默认规则 .mjs 文件类型即为 "javascript/esm"
// webpack/lib/WebpackOptionsDefaulter.js

this.set("module.defaultRules", "make", options => [
	{
		type: "javascript/auto",
		resolve: {}
	},
	{
		test: /\.mjs$/i,
		type: "javascript/esm",
		resolve: {
			mainFields:
				options.target === "web" ||
				options.target === "webworker" ||
				options.target === "electron-renderer"
					? ["browser", "main"]
					: ["main"]
		}
	},
	{
		test: /\.json$/i,
		type: "json"
	},
	{
		test: /\.wasm$/i,
		type: "webassembly/experimental"
	}
]);
这也容易理解, 当发现该文件是 ES Module 模块时, 没有必要传入 exports, 因为 CommonJs 导出模块变量时才会去 exports 上面去赋值导出变量, 所以 ES Module 模块里面 exports 变量不是一个关键字, 用户可以像普通变量一样使用
🤯 不过我们回头看一下, 报错的 abort-controller 包在 node_modules 中的代码不就是 CommonJs 规范的吗, 按理来说此时 isHarmony 为 false, 函数的入参是 exports 才对!
💡 这里要补充的知识是像 create-react-app、next、jest 等 Node 工具都默认不会让 babel 去处理 node_modules 中包的代码, 因为按规范, 每个包发布到 npm 中时都最好是 es5 等兼容性良好的代码, 而非 jsx, ts 等需要二次编译的代码
而报错的该包因为如下有 const 语句的 es6 代码
// abort-controller/dist/abort-controller.js

class AbortController {
// ...
}
/**
 * Associated signals.
 */
const signals = new WeakMap();
既然经过了一次 babel-loader, 那么我们需要知道 abort-controller 代码经过 babel-loader 编译后交给 webpack 处理时的代码长什么样子
接着看看我们的 babel 配置的 preset 使用的是 babel-preset-react-app
// webpack 的配置

{
  loader: require.resolve('babel-loader'),
  options: {
    babelrc: false,
    presets: [require.resolve('babel-preset-react-app')],
    plugins: [
      // ...
    ],
    cacheDirectory: !isProd
}
深入 babel-preset-react-app 的代码, 发现其内置使用了 @babel/plugin-transform-runtime 插件
// babel-preset-react-app/create.js

module.exports = function(api, opts, env) {
      // Polyfills the runtime needed for async/await, generators, and friends
      // https://babeljs.io/docs/en/babel-plugin-transform-runtime
      [
        require('@babel/plugin-transform-runtime').default,
        {
          // ...
        },
};
@babel/plugin-transform-runtime 的作用是当检测到该文件代码中有 es6 等高级语法的代码时, 会通过在文件顶部添加 import 等语句动态添加对应的 polyfill, 达到按需添加 polyfill 的作用
相比直接把如下的 _classCallCheck 等实现的代码直接插入到文件头部, 通过 import 一行代码动态添加能够有效避免每个文件中都有这些重复的 polyfill 具体实现的代码, 所以使用 transform-runtime 也算一个常见的优化手段

😯 到这里我们知道了 abort-controller 这个包在 node_modules 中的代码虽然是 CommonJs, 但是通过 @babel/plugin-transform-runtime 给其添加的 import 语句, 使得 webpack 判断它为 ES Module 模块了
接着我们只能探索 @babel/plugin-transform-runtime 是否能通过 require 来动态添加 polyfill 了, 这样 webpack 也不会误判了...
通过查看插入 import 语句实现的代码,此时我们是因为进入了下图 isModuleForBabel 为 true 的逻辑, 而 builder.import() 显然就是添加一个 import AST 的函数实现。如果能进入 else 的逻辑使用上 builder.require() 逻辑不就解决了我们的问题!
// @babel/helper-module-imports/lib/import-injector.js
如上图, 要是 babel 能根据原始代码来动态赋值 sourceType, 从而影响添加的是 import 语句还是 require 语句即可
谷歌一下就找到了官方的解决方案, [email protected] 版本 sourceType 字段新增了 unambiguous 选项, 即如果原始代码有 import 或者 export 语句则把 sourceType 赋值为 module, 否则赋值为 script webpack/issues/4039

顺带一提下面这个问题造成的原因是一样的
Uncaught TypeError: Cannot assign to read only property 'exports' of object '#<Object>'
    at Module.<anonymous> (App.js:46:1)
    at Module../src/components/App.js (App.js:49:1)
    at __webpack_require__ (bootstrap:774:1)
    at fn (bootstrap:129:1)
    at Module../src/index.js (index.js:2:1)
    at __webpack_require__ (bootstrap:774:1)
    at fn (bootstrap:129:1)
    at Object.1 (index.scss:1:1)
    at __webpack_require__ (bootstrap:774:1)
    at bootstrap:951:1
何时会报上面那个错误, 看一下下面这个例子就知道了, 只是因为不同版本抛错的方式有所不同

// webpack 的配置

{
  loader: require.resolve('babel-loader'),
  options: {
    babelrc: false,
+   sourceType: "unambiguous",
    presets: [require.resolve('babel-preset-react-app')],
    plugins: [
      // ...
    ],
    cacheDirectory: !isProd
}Type: "script" | "module" | "unambiguous", Default: "module"
"script" - Parse the file using the ECMAScript Script grammar. No import/export statements allowed, and files are not in strict mode."module" - Parse the file using the ECMAScript Module grammar. Files are automatically strict, and import/export statements are allowed."unambiguous" - Consider the file a "module" if import/export statements are present, or else consider it a "script".近期时常有其他团队同学询问运行 Next.js 项目遇见的如下报错, 考虑到这块资料较少, 所以本次就简单记录一下。
# 错误信息1

> Build error occurred
{ /xxx/node_modules/pkg/index.scss:1
$color: #4c9ffe;
                      ^

SyntaxError: Invalid or unexpected token
    at Module._compile (internal/modules/cjs/loader.js:723:23)
# 错误信息2
error - ./node_modules/pkg/index.scss:1
Global CSS cannot be imported from within node_modules.错误信息1 的原因是 Node 环境进行时发现 node_modules 中有 js 文件 require 了 *.scss 文件, 因为 Node 默认只能解析 .js, .mjs, .json, .node 后缀文件。
注意 SSR 项目会打包出两份文件, 一份是正常的客户端渲染时在浏览器端运行, 一份是服务端渲染时 Node 端运行。Node 端运行的这份代码通常会把 node_modules 的包设置为 externals, 这样能有效避免 node_modules 中某个包如果不 externals 会存在一个引用在 bundle.js, 一个引用在 node_modules 中。externals 后如 react 就仅 node_modules 中一个实例。
// node_modules/pkg/index.js

require("./index.scss")
如何扩展 Node 可识别的文件类型了, 了解过 ts-node 实现就比较清楚了。 如下代码即可设置 Node 对于 .scss 文件的处理函数。这里我们无需真实转换, 设置一个空函数忽略即可。
require.extensions['.scss'] = () => {}作为对照, 可以看下如下 Node 处理 .json 文件的逻辑
// lib/internal/modules/cjs/loader.js

// Native extension for .json
Module._extensions['.json'] = function(module, filename) {
  const content = fs.readFileSync(filename, 'utf8');

  if (policy?.manifest) {
    const moduleURL = pathToFileURL(filename);
    policy.manifest.assertIntegrity(moduleURL, content);
  }

  try {
    module.exports = JSONParse(stripBOM(content));
  } catch (err) {
    err.message = filename + ': ' + err.message;
    throw err;
  }
};
综上所述, next.config.js 加入如下代码, next dev 就解决 报错1 了。为什么 next export / next build 命令还会有问题了? 原因是 next 进行 SSG 时, 是按照每个页面一个单独的线程并行进行的任务, 如下的赋值语句子线程不能生效。
require.extensions['.scss'] = () => {}
require.extensions['.sass'] = () => {}
require.extensions['.less'] = () => {}
require.extensions['.css'] = () => {}
那么我们可以在每个页面运行加上上面的代码就能解决了。不过我们要加入的是如下的代码, 因为 require 关键字会被 webpack 给编译, webpack 会提供 require 相关的 api, 编译后 require 将不复存在。故 webpack 提供了 non_webpack_require 使得编译后能够保留 require 关键字, 即 non_webpack_require (编译前) => require (编译后)。
__non_webpack_require__.extensions['.scss'] = () => {}
__non_webpack_require__.extensions['.sass'] = () => {}
__non_webpack_require__.extensions['.less'] = () => {}
__non_webpack_require__.extensions['.css'] = () => {}
错误信息2 是打包给客户端渲染时的代码遇见了发现 node_modules 中有 js 文件 require 了 *.css 等文件的校验报错。即不给这样的代码放行。
解决的办法就是遍历 webpackConfig 剔除校验的 error-loader。
if (item.use && item.use.loader === "error-loader") {
   return false;
}
Next.js v12 已经内置了 .scss, .css 文件的支持, 但是不会处理 node_modules 中的 js 文件 require 的 *.css。
解决的办法就是遍历 webpackConfig 篡改 issuer.not 的配置使得能够支持。
if (
  item.issuer &&
  Array.isArray(item.issuer.not) &&
  item.issuer.not.find((i) => i.toString() === "/node_modules/")
) {
  item.issuer.not = item.issuer.not.filter(
    (i) => i.toString() !== "/node_modules/"
  );
}这块解决的代码 2年写到这个包中, 本次也是适配了 Next.js v12, 有需要或者想查阅完整的代码可以点击 xiaoxiaojx/with-ssr-entry
// next.config.js

const withSsrEntry = require('with-ssr-entry')
module.exports = withSsrEntry() // like withCss, withSass
以上介绍的都是如何逃避 Next.js 的检查, 适用于推动不了第三包去修改代码。如果你是这些包的负责人, 则可以像 antd 这样书写正确推荐的代码。即对于 antd 组件来说 date-picker.js 内部不引入 .css 文件, 转而由业务项目 src 下的代码去引入所需的 css。
// my-app/src/**

// 引入 js
import { DatePicker } from 'antd';
// 一次性引入全部的 css 或者按需引入当前组件的 css
// import 'antd/es/date-picker/style/css'
import 'antd/dist/antd.css'

ReactDOM.render(<DatePicker />, mountNode);node 中主要有 c++ 模块,lib 目录下的 js 模块,用户的 js 模块以及用户的 c++ 插件模块。其注册,运行,加载的机制都有所不同,下面让我们逐一讲解它们的实现
lib 模块主要指的是 API 文档 | Node.js 中文网 左侧导航栏中展示的模块,在 node 的源码存放的位置为 lib 目录, 看上去就像普通的 CommonJs 的代码

用户的 js 模块代码一般是运行时通过 fs 去同步读取到 require 文件的内容,然后在沙盒中运行该代码字符串获取到 module.exports 然后保存下来。
这里的 lib 以及 deps 目录 下的 js 模块 其实也可以这样去实现,不过 node 有意做了优化,会在 node 构建时把 lib, deps 下的模块全部打包到一个 node_javascript.cc 文件中最后被生成到一个以二进制文件中,带来的好处是运行时不会有文件 i/o 操作,可以直接从内存中获取代码内容然后通过 v8 去编译后运行拿到 js 运行的结果
构建时生成 node_javascript.cc 文件主要长下面这个样子, 完整的代码见blog/node_javascript.cc
// node_javascript.cc

static const uint8_t internal_bootstrap_environment_raw[] = {
 39,117,115,101, 32,115,116,114,105, 99,116, 39, 59, 10, 10, 47, 47, 32, 84,104,105,115, 32,114,117,110,115, 32,110,101,
 99,101,115,115, 97,114,121, 32,112,114,101,112, 97,114, 97,116,105,111,110,115, 32,116,111, 32,112,114,101,112, 97,114,
101, 32, 97, 32, 99,111,109,112,108,101,116,101, 32, 78,111,100,101, 46,106,115, 32, 99,111,110,116,101,120,116, 10, 47,
 47, 32,116,104, 97,116, 32,100,101,112,101,110,100,115, 32,111,110, 32,114,117,110, 32,116,105,109,101, 32,115,116, 97,
116,101,115, 46, 10, 47, 47, 32, 73,116, 32,105,115, 32, 99,117,114,114,101,110,116,108,121, 32,111,110,108,121, 32,105,
110,116,101,110,100,101,100, 32,102,111,114, 32,112,114,101,112, 97,114,105,110,103, 32, 99,111,110,116,101,120,116,115,
 32,102,111,114, 32,101,109, 98,101,100,100,101,114,115, 46, 10, 10, 47, 42, 32,103,108,111, 98, 97,108, 32,109, 97,114,
107, 66,111,111,116,115,116,114, 97,112, 67,111,109,112,108,101,116,101, 32, 42, 47, 10, 99,111,110,115,116, 32,123, 10,
 32, 32,112,114,101,112, 97,114,101, 77, 97,105,110, 84,104,114,101, 97,100, 69,120,101, 99,117,116,105,111,110, 10,125,
 32, 61, 32,114,101,113,117,105,114,101, 40, 39,105,110,116,101,114,110, 97,108, 47, 98,111,111,116,115,116,114, 97,112,
 47,112,114,101, 95,101,120,101, 99,117,116,105,111,110, 39, 41, 59, 10, 10,112,114,101,112, 97,114,101, 77, 97,105,110,
 84,104,114,101, 97,100, 69,120,101, 99,117,116,105,111,110, 40, 41, 59, 10,109, 97,114,107, 66,111,111,116,115,116,114,
 97,112, 67,111,109,112,108,101,116,101, 40, 41, 59, 10
};

// ...

void NativeModuleLoader::LoadJavaScriptSource() {
  source_.emplace("internal/bootstrap/environment", UnionBytes{internal_bootstrap_environment_raw, 374});
  source_.emplace("internal/bootstrap/loaders", UnionBytes{internal_bootstrap_loaders_raw, 10133});
  source_.emplace("internal/bootstrap/node", UnionBytes{internal_bootstrap_node_raw, 13426});
  source_.emplace("internal/bootstrap/pre_execution", UnionBytes{internal_bootstrap_pre_execution_raw, 14964});
  source_.emplace("internal/bootstrap/switches/does_own_process_state", UnionBytes{internal_bootstrap_switches_does_own_process_state_raw, 3480});
  source_.emplace("internal/bootstrap/switches/does_not_own_process_state", UnionBytes{internal_bootstrap_switches_does_not_own_process_state_raw, 1277});
  source_.emplace("internal/bootstrap/switches/is_main_thread", UnionBytes{internal_bootstrap_switches_is_main_thread_raw, 6397});
  source_.emplace("internal/bootstrap/switches/is_not_main_thread", UnionBytes{internal_bootstrap_switches_is_not_main_thread_raw, 1161});
  source_.emplace("internal/per_context/primordials", UnionBytes{internal_per_context_primordials_raw, 4543});
  source_.emplace("internal/per_context/domexception", UnionBytes{internal_per_context_domexception_raw, 3645});
  source_.emplace("internal/per_context/messageport", UnionBytes{internal_per_context_messageport_raw, 726});
  source_.emplace("async_hooks", UnionBytes{async_hooks_raw, 9202});
  source_.emplace("assert", UnionBytes{assert_raw, 28416});
  source_.emplace("assert/strict", UnionBytes{assert_strict_raw, 58});
  source_.emplace("buffer", UnionBytes{buffer_raw, 35267});
  // ...
}

UnionBytes NativeModuleLoader::GetConfig() {
  return UnionBytes(config_raw, 3196);  // config.gypi
}
上面的 internal_bootstrap_environment_raw 是源码通过 ASCII 编码的, 其对应的为 libinternal/bootstrap/environment 文件的内容,是在下面的 js2c.py 脚本的 ord 函数完成
Python ord() 函数: ord() 函数是 chr() 函数(对于8位的ASCII字符串)或 unichr() 函数(对于Unicode对象)的配对函数,它以一个字符(长度为1的字符串)作为参数,返回对应的 ASCII 数值,或者 Unicode 数值,如果所给的 Unicode 字符超出了你的 Python 定义范围,则会引发一个 TypeError 的异常。
让我们通过 js 的 String.fromCharCode 去解码看看原始的文件内容

AscII 码只定义了128个字符,如果文件内容有任意一个字符大于 127, 则会通过 python 的 bytearray(source, 'utf-16le') 保存,对于 node 来说, 等价于 Buffer.from(source, 'utf16le')。
// node_javascript.cc

static const uint16_t internal_cli_table_raw[] = {
 39,117,115,101, 32,115,116,114,105, 99,116, 39, 59, 10, 10, 99,111,110,115,116, 32,123, 10, 32, 32, 77, 97,116,104, 67,
101,105,108, 44, 10, 32, 32, 77, 97,116,104, 77, 97,120, 44, 10, 32, 32, 79, 98,106,101, 99,116, 80,114,111,116,111,116,
121,112,101, 72, 97,115, 79,119,110, 80,114,111,112,101,114,116,121, 44, 10,125, 32, 61, 32,112,114,105,109,111,114,100,
105, 97,108,115, 59, 10, 10, 99,111,110,115,116, 32,123, 32,103,101,116, 83,116,114,105,110,103, 87,105,100,116,104, 32,
125, 32, 61, 32,114,101,113,117,105,114,101, 40, 39,105,110,116,101,114,110, 97,108, 47,117,116,105,108, 47,105,110,115,
112,101, 99,116, 39, 41, 59, 10, 10, 47, 47, 32, 84,104,101, 32,117,115,101, 32,111,102, 32, 85,110,105, 99,111,100,101,
 32, 99,104, 97,114, 97, 99,116,101,114,115, 32, 98,101,108,111,119, 32,105,115, 32,116,104,101, 32,111,110,108,121, 32,
110,111,110, 45, 99,111,109,109,101,110,116, 32,117,115,101, 32,111,102, 32,110,111,110, 45, 65, 83, 67, 73, 73, 10, 47,
 47, 32, 85,110,105, 99,111,100,101, 32, 99,104, 97,114, 97, 99,116,101,114,115
};
构建时 node_javascript.cc 文件由 js2c.py 脚本生成, 该脚本主要是遍历 lib/**/*.js, 然后获取到文件名,文件内容,最后按下面的模版把获取到的数据通过模版语法的形式填充进去
// tools/js2c.py

TEMPLATE = """
#include "env-inl.h"
#include "node_native_module.h"
#include "node_internals.h"

namespace node {{

namespace native_module {{

{0}

void NativeModuleLoader::LoadJavaScriptSource() {{
  {1}
}}

UnionBytes NativeModuleLoader::GetConfig() {{
  return UnionBytes(config_raw, {2});  // config.gypi
}}

}}  // namespace native_module

}}  // namespace node
"""
BootstrapInternalLoaders 函数加载编译且运行了第一个 js 文件 internal/bootstrap/loaders, 运行的时候参数 loaders_params 带上了 process, getLinkedBinding, getInternalBinding, primordials 等全局变量
// src/node.cc

MaybeLocal<Value> Environment::BootstrapInternalLoaders() {
  EscapableHandleScope scope(isolate_);

  // Create binding loaders
  std::vector<Local<String>> loaders_params = {
      process_string(),
      FIXED_ONE_BYTE_STRING(isolate_, "getLinkedBinding"),
      FIXED_ONE_BYTE_STRING(isolate_, "getInternalBinding"),
      primordials_string()};
  std::vector<Local<Value>> loaders_args = {
      process_object(),
      NewFunctionTemplate(binding::GetLinkedBinding)
          ->GetFunction(context())
          .ToLocalChecked(),
      NewFunctionTemplate(binding::GetInternalBinding)
          ->GetFunction(context())
          .ToLocalChecked(),
      primordials()};

  // Bootstrap internal loaders
  Local<Value> loader_exports;
  if (!ExecuteBootstrapper(
           this, "internal/bootstrap/loaders", &loaders_params, &loaders_args)
           .ToLocal(&loader_exports)) {
    return MaybeLocal<Value>();
  }
  CHECK(loader_exports->IsObject());
  Local<Object> loader_exports_obj = loader_exports.As<Object>();
  Local<Value> internal_binding_loader =
      loader_exports_obj->Get(context(), internal_binding_string())
          .ToLocalChecked();
  CHECK(internal_binding_loader->IsFunction());
  set_internal_binding_loader(internal_binding_loader.As<Function>());
  Local<Value> require =
      loader_exports_obj->Get(context(), require_string()).ToLocalChecked();
  CHECK(require->IsFunction());
  set_native_module_require(require.As<Function>());

  return scope.Escape(loader_exports);
}
关于参数 loaders_params
BootstrapInternalLoaders > ExecuteBootstrapper
// src/node.cc

MaybeLocal<Value> ExecuteBootstrapper(Environment* env,
                                      const char* id,
                                      std::vector<Local<String>>* parameters,
                                      std::vector<Local<Value>>* arguments) {
  EscapableHandleScope scope(env->isolate());
  MaybeLocal<Function> maybe_fn =
      NativeModuleEnv::LookupAndCompile(env->context(), id, parameters, env);

  Local<Function> fn;
  if (!maybe_fn.ToLocal(&fn)) {
    return MaybeLocal<Value>();
  }

  MaybeLocal<Value> result = fn->Call(env->context(),
                                      Undefined(env->isolate()),
                                      arguments->size(),
                                      arguments->data());

  // If there was an error during bootstrap, it must be unrecoverable
  // (e.g. max call stack exceeded). Clear the stack so that the
  // AsyncCallbackScope destructor doesn't fail on the id check.
  // There are only two ways to have a stack size > 1: 1) the user manually
  // called MakeCallback or 2) user awaited during bootstrap, which triggered
  // _tickCallback().
  if (result.IsEmpty()) {
    env->async_hooks()->clear_async_id_stack();
  }

  return scope.EscapeMaybe(result);
}
BootstrapInternalLoaders > ExecuteBootstrapper > LookupAndCompile
// src/node_native_module_env.cc

MaybeLocal<Function> NativeModuleEnv::LookupAndCompile(
    Local<Context> context,
    const char* id,
    std::vector<Local<String>>* parameters,
    Environment* optional_env) {
  NativeModuleLoader::Result result;
  MaybeLocal<Function> maybe =
      NativeModuleLoader::GetInstance()->LookupAndCompile(
          context, id, parameters, &result);
  if (optional_env != nullptr) {
    RecordResult(id, result, optional_env);
  }
  return maybe;
}
BootstrapInternalLoaders > ExecuteBootstrapper > LookupAndCompile > LookupAndCompile
// src/node_native_module.cc

MaybeLocal<Function> NativeModuleLoader::LookupAndCompile(
    Local<Context> context,
    const char* id,
    std::vector<Local<String>>* parameters,
    NativeModuleLoader::Result* result) {
  Isolate* isolate = context->GetIsolate();
  EscapableHandleScope scope(isolate);

  Local<String> source;
  if (!LoadBuiltinModuleSource(isolate, id).ToLocal(&source)) {
    return {};
  }

  std::string filename_s = std::string("node:") + id;
  Local<String> filename =
      OneByteString(isolate, filename_s.c_str(), filename_s.size());
  ScriptOrigin origin(isolate, filename, 0, 0, true);

  ScriptCompiler::CachedData* cached_data = nullptr;
  {
    // Note: The lock here should not extend into the
    // `CompileFunctionInContext()` call below, because this function may
    // recurse if there is a syntax error during bootstrap (because the fatal
    // exception handler is invoked, which may load built-in modules).
    Mutex::ScopedLock lock(code_cache_mutex_);
    auto cache_it = code_cache_.find(id);
    if (cache_it != code_cache_.end()) {
      // Transfer ownership to ScriptCompiler::Source later.
      cached_data = cache_it->second.release();
      code_cache_.erase(cache_it);
    }
  }

  const bool has_cache = cached_data != nullptr;
  ScriptCompiler::CompileOptions options =
      has_cache ? ScriptCompiler::kConsumeCodeCache
                : ScriptCompiler::kEagerCompile;
  ScriptCompiler::Source script_source(source, origin, cached_data);

  MaybeLocal<Function> maybe_fun =
      ScriptCompiler::CompileFunctionInContext(context,
                                               &script_source,
                                               parameters->size(),
                                               parameters->data(),
                                               0,
                                               nullptr,
                                               options);

  // This could fail when there are early errors in the native modules,
  // e.g. the syntax errors
  Local<Function> fun;
  if (!maybe_fun.ToLocal(&fun)) {
    // In the case of early errors, v8 is already capable of
    // decorating the stack for us - note that we use CompileFunctionInContext
    // so there is no need to worry about wrappers.
    return MaybeLocal<Function>();
  }

  // XXX(joyeecheung): this bookkeeping is not exactly accurate because
  // it only starts after the Environment is created, so the per_context.js
  // will never be in any of these two sets, but the two sets are only for
  // testing anyway.

  *result = (has_cache && !script_source.GetCachedData()->rejected)
                ? Result::kWithCache
                : Result::kWithoutCache;
  // Generate new cache for next compilation
  std::unique_ptr<ScriptCompiler::CachedData> new_cached_data(
      ScriptCompiler::CreateCodeCacheForFunction(fun));
  CHECK_NOT_NULL(new_cached_data);

  {
    Mutex::ScopedLock lock(code_cache_mutex_);
    // The old entry should've been erased by now so we can just emplace.
    // If another thread did the same thing in the meantime, that should not
    // be an issue.
    code_cache_.emplace(id, std::move(new_cached_data));
  }

  return scope.Escape(fun);
}
BootstrapInternalLoaders > ExecuteBootstrapper > LookupAndCompile > LookupAndCompile > LoadBuiltinModuleSource
通过文件名 id 获取到文件内容,可以发现
// src/node_native_module.cc

MaybeLocal<String> NativeModuleLoader::LoadBuiltinModuleSource(Isolate* isolate,
                                                               const char* id) {
#ifdef NODE_BUILTIN_MODULES_PATH
  std::string filename = OnDiskFileName(id);

  std::string contents;
  int r = ReadFileSync(&contents, filename.c_str());
  if (r != 0) {
    const std::string buf = SPrintF("Cannot read local builtin. %s: %s \"%s\"",
                                    uv_err_name(r),
                                    uv_strerror(r),
                                    filename);
    Local<String> message = OneByteString(isolate, buf.c_str());
    isolate->ThrowException(v8::Exception::Error(message));
    return MaybeLocal<String>();
  }
  return String::NewFromUtf8(
      isolate, contents.c_str(), v8::NewStringType::kNormal, contents.length());
#else
  const auto source_it = source_.find(id);
  if (UNLIKELY(source_it == source_.end())) {
    fprintf(stderr, "Cannot find native builtin: \"%s\".\n", id);
    ABORT();
  }
  return source_it->second.ToStringChecked(isolate);
#endif  // NODE_BUILTIN_MODULES_PATH
}
BootstrapInternalLoaders > ExecuteBootstrapper > LookupAndCompile > LookupAndCompile > LoadBuiltinModuleSource
看到这里知道源代码通过 ASCII 保存起来主要是能通过 v8::String::NewExternalOneByte 或者 v8::String::NewExternalTwoByte 轻易转换成 v8::String
// src/node_union_bytes.h

v8::Local<v8::String> ToStringChecked(v8::Isolate* isolate) const {
    if (is_one_byte()) {
      NonOwningExternalOneByteResource* source =
          new NonOwningExternalOneByteResource(one_bytes_data(), length_);
      return v8::String::NewExternalOneByte(isolate, source).ToLocalChecked();
    } else {
      NonOwningExternalTwoByteResource* source =
          new NonOwningExternalTwoByteResource(two_bytes_data(), length_);
      return v8::String::NewExternalTwoByte(isolate, source).ToLocalChecked();
    }
  }
在 LookupAndCompile 函数的后半部分就是 v8 编译 js 代码部分了
// src/node_native_module.cc

ScriptCompiler::Source script_source(source, origin, cached_data);

MaybeLocal<Function> maybe_fun =
      ScriptCompiler::CompileFunctionInContext(context,
                                               &script_source,
                                               parameters->size(),
                                               parameters->data(),
                                               0,
                                               nullptr,
                                               options);
关于 v8 的代码实现是一个深水区,还未系统的学习,v8 简单的使用例子可以先看一下 deps/v8/samples/hello-world.cc 文件,一切还是从👋 你好世界开始 ~
上面说了第一个运行的 internal/bootstrap/loaders 文件,代码部分内容如下
nativeModuleRequire 主要调用了 compileForInternalLoader 方法
// lib/internal/bootstrap/loaders.js

const loaderExports = {
  internalBinding,
  NativeModule,
  require: nativeModuleRequire
};

function nativeModuleRequire(id) {
  if (id === loaderId) {
    return loaderExports;
  }

  const mod = NativeModule.map.get(id);
  // Can't load the internal errors module from here, have to use a raw error.
  // eslint-disable-next-line no-restricted-syntax
  if (!mod) throw new TypeError(`Missing internal module '${id}'`);
  return mod.compileForInternalLoader();
}
nativeModuleRequire > compileForInternalLoader
// lib/internal/bootstrap/loaders.js

compileForInternalLoader() {
  if (this.loaded || this.loading) {
    return this.exports;
  }

  const id = this.id;
  this.loading = true;

  try {
    const requireFn = StringPrototypeStartsWith(this.id, 'internal/deps/') ?
      requireWithFallbackInDeps : nativeModuleRequire;

    const fn = compileFunction(id);
    fn(this.exports, requireFn, this, process, internalBinding, primordials);

    this.loaded = true;
  } finally {
    this.loading = false;
  }

  ArrayPrototypePush(moduleLoadList, `NativeModule ${id}`);
  return this.exports;
}
compileForInternalLoader > CompileFunction
compileFunction 调用的是 NativeModuleEnv::CompileFunction 函数
// src/node_native_module_env.cc

env->SetMethod(target, "compileFunction", NativeModuleEnv::CompileFunction);

void NativeModuleEnv::CompileFunction(const FunctionCallbackInfo<Value>& args) {
  Environment* env = Environment::GetCurrent(args);
  CHECK(args[0]->IsString());
  node::Utf8Value id_v(env->isolate(), args[0].As<String>());
  const char* id = *id_v;
  NativeModuleLoader::Result result;
  MaybeLocal<Function> maybe =
      NativeModuleLoader::GetInstance()->CompileAsModule(
          env->context(), id, &result);
  RecordResult(id, result, env);
  Local<Function> fn;
  if (maybe.ToLocal(&fn)) {
    args.GetReturnValue().Set(fn);
  }
}
compileForInternalLoader > CompileFunction > CompileAsModule
调用 NativeModuleLoader::LookupAndCompile 方法编译 js 代码,步骤和上面说的第一个 js 逻辑是一样的,不同的是本次编译的参数是 exports,require,module,process,internalBinding,primordials
参数运行时实际传入的值为 nativeModuleRequire > compileForInternalLoader 函数中 fn(this.exports, requireFn, this, process, internalBinding, primordials) 调用时传入的值
// src/node_native_module.cc
MaybeLocal<Function> NativeModuleLoader::CompileAsModule(
Local<Context> context,
const char* id,
NativeModuleLoader::Result* result) {
Isolate* isolate = context->GetIsolate();
std::vector<Local<String>> parameters = {
FIXED_ONE_BYTE_STRING(isolate, "exports"),
FIXED_ONE_BYTE_STRING(isolate, "require"),
FIXED_ONE_BYTE_STRING(isolate, "module"),
FIXED_ONE_BYTE_STRING(isolate, "process"),
FIXED_ONE_BYTE_STRING(isolate, "internalBinding"),
FIXED_ONE_BYTE_STRING(isolate, "primordials")};
return LookupAndCompile(context, id, ¶meters, result);
}
本文主要讲了 lib 模块的构建,加载,编译,运行的实现。


这两天帮兄弟团队新建一个 Next.js 项目,主要是内部的基础包,组件库等在最新的 next12 & webpack5 & react18 环境下跑通。其中遇见了如上图所示的编译错误, 即 .d.ts 文件没有设置对应的 loader 处理。

回头看一下报错处的代码 import BasicLogic from './BasicLogic', 没有写文件后缀怎么会被解析成 BasicLogic.d.ts, 而不是 BasicLogic.js 了 !?
类似于 Node.js 不写文件后缀会依次尝试 .js、.json、.node, webpack 则是通过 resolve.extensions 字段来配置需要自动补充的文件后缀。
于是先检查 webpack-config.ts 文件, 发现 extensions 字段配置正确 ✅, webpack 尝试的解析顺序将是 .js > .tsx > .ts > .jsx > .json > .wasm, 按数组索引由小到大优先级由大到小降低。
// packages/next/build/webpack-config.ts

const resolveConfig = {
    // Disable .mjs for node_modules bundling
    extensions: isNodeServer
      ? [
          '.js',
          '.mjs',
          ...(useTypeScript ? ['.tsx', '.ts'] : []),
          '.jsx',
          '.json',
          '.wasm',
        ]
      : [
          '.mjs',
          '.js',
          ...(useTypeScript ? ['.tsx', '.ts'] : []),
          '.jsx',
          '.json',
          '.wasm',
        ],
	// ...
  }
接着检查了一下 next 是否配置了 resolve 文件解析相关的插件, 使得错误的篡改了原有的解析顺序, 排查了一圈未发现可疑的插件。此时彷佛陷入了僵局, 一时想不明白问题出在了哪 🤯


对于 require 函数, webpack 支持传入的文件路径可是静态的字符串, 也可以是夹杂着变量的字符串拼接。
当然 webpack 不能准确推算出 dynamicPath 的值来定位到具体的文件, 因为 dynamicPath 是运行时变量, 或者例子中 dynamicPath 赋值语句可以写成 const dynamicPath = windows.dynamicPath, 使得静态分析没有了可能。
接着我们 debug 一下 webpack 对这样写法的处理代码, 通过上图 DEBUG CONSOLE 的信息可知, require(../utils/${dynamicPath}) 其实会转换为类似于 require(../utils/*.*) 语句。
作用就是会去 utils 目录下扫描正则匹配上的模块, 匹配成功的模块全部会打包进入 dist 目录备用。
当实际浏览器运行时就会一股脑把正则匹配上的模块加载进内存, 从而支持动态获取某个 key 值对应的模块, 所以你只需确保 dynamicPath 是 utils 下目录真实存在的模块就好。

回头看 import BasicLogic from './BasicLogic' 这行代码, 完全就是 es6 支持静态分析的 import 语句, 怎么出现了 require 函数传入了变量参数的问题了? 一搜索发现是如上图该文件的 51 行写了 require 函数 😓
既然确保了 .d.ts 是被无辜扫描进去的模块, 且实际运行时也不会用到该模块, 那么我们可以配置一个 ignore-loader 来处理 *.d.ts 的文件就好了。我个人认为要尽量避免使用含有变量参数的动态 require、动态 import 这样的语法, 除非正则匹配上的文件都是运行时需要的, 否则大量冗余模块使得 js 体积无故增大。
Pure 是我写的一个轻量级的 JavaScript runtime, 写的动机是最近先后出现了 Next.js Edge Runtime、cloudflare workerd、Noslate JavaScript worker 等 3 个相似的产品, 所以我想通过写 Pure 与写完后它的性能表现来感受为何大家都会投入进来 🤔
由于本人 C++ 段位仅为初级 👷, 所以记录一下写 Pure 遇见的一些坑与解决的办法
v8 编译问题见: MacBook M1 编译 v8 问题记录
# Fatal error in , line 0
# Embedder-vs-V8 build configuration mismatch. On embedder side pointer compression is DISABLED while on V8 side it's ENABLED.
#
#
#
#FailureMessage Object: 0x16fc2a918
问题解决: 编译参数加上 -DV8_COMPRESS_POINTERS -DV8_ENABLE_SANDBOX
g++ src/pure.cc -g -I deps/v8/include/ -o pure -L lib/ -lv8_monolith -pthread -std=c++17 -DV8_COMPRESS_POINTERS -DV8_ENABLE_SANDBOX
#
# Fatal error in , line 0
# Check failed: GetProcessWidePtrComprCage()->IsReserved().
#
#
#
#FailureMessage Object: 0x16fc4aea8/bin/sh: line 1: 95665 Abort trap: 6           ./pure
问题解决:
lldb -- ./pure将会打印如下日志
* thread #1, queue = 'com.apple.main-thread', stop reason = signal SIGABRT
    frame #0: 0x00000001877799b8 libsystem_kernel.dylib`__pthread_kill + 8
libsystem_kernel.dylib`__pthread_kill:
->  0x1877799b8 <+8>:  b.lo   0x1877799d8               ; <+40>
    0x1877799bc <+12>: pacibsp
    0x1877799c0 <+16>: stp    x29, x30, [sp, #-0x10]!
    0x1877799c4 <+20>: mov    x29, sp
Target 0: (pure) stopped.thread backtrace将会打印如下日志, 即可找到源码开始报错的地方进行修复
* thread #1, queue = 'com.apple.main-thread', stop reason = signal SIGABRT
  * frame #0: 0x00000001877799b8 libsystem_kernel.dylib`__pthread_kill + 8
    frame #1: 0x00000001877aceb0 libsystem_pthread.dylib`pthread_kill + 288
    frame #2: 0x00000001876ea314 libsystem_c.dylib`abort + 164
    frame #3: 0x00000001000250b0 pure`v8::base::OS::Abort() at platform-posix.cc:677:3 [opt]
    frame #4: 0x000000010001aa30 pure`V8_Fatal(format=<unavailable>) at logging.cc:167:3 [opt]
    frame #5: 0x000000010037fce4 pure`v8::internal::IsolateAllocator::IsolateAllocator(this=0x0000000102704250) at isolate-allocator.cc:0 [opt]
    frame #6: 0x00000001001f92c4 pure`v8::internal::Isolate::New() [inlined] std::__1::__unique_if<v8::internal::IsolateAllocator>::__unique_single std::__1::make_unique<v8::internal::IsolateAllocator>() at unique_ptr.h:728:32 [opt]
    frame #7: 0x00000001001f92b8 pure`v8::internal::Isolate::New() [inlined] v8::internal::Isolate::Allocate(is_shared=false) at isolate.cc:3353:7 [opt]
    frame #8: 0x00000001001f92b8 pure`v8::internal::Isolate::New() at isolate.cc:3335:22 [opt]
    frame #9: 0x000000010000b380 pure`pure::PureMainInstance::PureMainInstance(this=0x000000016fdff128, event_loop=0x0000000101236858, args=size=0, exec_args=size=0) at pure_main_instance.cc:90:16
    frame #10: 0x000000010000b574 pure`pure::PureMainInstance::PureMainInstance(this=0x000000016fdff128, event_loop=0x0000000101236858, args=size=0, exec_args=size=0) at pure_main_instance.cc:88:3
    frame #11: 0x00000001000080e0 pure`pure::Start(argc=1, argv=0x000000016fdff398) at pure.cc:80:26
    frame #12: 0x000000010000b164 pure`main(argc=1, argv=0x000000016fdff398) at pure_main.cc:10:12
    frame #13: 0x00000001023050f4 dyld`start + 520
Undefined symbols for architecture arm64:
"pure::Environment::GetCurrent(v8::Isolate*)", referenced from:
pure::errors::PerIsolateMessageListener(v8::Local<v8::Message>, v8::Local<v8::Value>) in pure_errors-ecfe77.o
"pure::Environment::context() const", referenced from:
pure::errors::PerIsolateMessageListener(v8::Local<v8::Message>, v8::Local<v8::Value>) in pure_errors-ecfe77.o
ld: symbol(s) not found for architecture arm64
clang: error: linker command failed with exit code 1 (use -v to see invocation)问题解决: 通常是头文件中定义了类型, 却没有具体实现。找到未实现的定义, 在 .cc 或者 .inl.h 中实现即可。
node 中主要有 c++ 模块,lib 目录下的 js 模块,用户的 js 模块以及用户的 c++ 插件模块。其注册,运行,加载的机制都有所不同,下面让我们逐一讲解它们的实现
涉及的知识点
插件是用 C++ 编写的动态链接共享对象。 require() 函数可以将插件加载为普通的 Node.js 模块。 插件提供了 JavaScript 和 C/C++ 库之间的接口。
实现插件有三种选择:Node-API、nan 或直接使用内部 V8、libuv 和 Node.js 库。 除非需要直接访问 Node-API 未暴露的功能,否则请使用 Node-API。 有关 Node-API 的更多信息,请参阅使用 Node-API 的 C/C++ 插件。
其实无论是 Node-API 还是 node-addon-api,都是最基本的 c++ 插件写法的封装,本篇让我们去了解一下 基本的 c++ 插件实现
如下就是一个 c++ 插件的写法,module.exports 上导出了一个 hello 方法,其中 NODE_MODULE 宏主要是把该插件模块给注册到了内部的 modlist_internal 链表中,以便用户 require 的时候找到该模块
// hello.cc

#include <node.h>

namespace demo
{

  using v8::FunctionCallbackInfo;
  using v8::Isolate;
  using v8::Local;
  using v8::Object;
  using v8::String;
  using v8::Value;

  void Method(const FunctionCallbackInfo<Value> &args)
  {
    Isolate *isolate = args.GetIsolate();
    args.GetReturnValue().Set(String::NewFromUtf8(
                                  isolate, "world")
                                  .ToLocalChecked());
  }

  void Initialize(Local<Object> exports)
  {
    NODE_SET_METHOD(exports, "hello", Method);
  }

  NODE_MODULE(NODE_GYP_MODULE_NAME, Initialize)

}
构建运行 hello.cc 主要需要如下几步
npm install -g node-gyp
node-gyp 是一个用 Node.js 编写的跨平台命令行工具,用于为 Node.js 编译本机插件模块。它包含 Chromium 团队以前使用的 gyp-next 项目的供应商副本,扩展为支持 Node.js 原生插件的开发。
文件内容如下
{
  "targets": [
    {
      "target_name": "addon",
      "sources": [ "hello.cc" ]
    }
  ]
}
编写源代码后,必须将其编译为二进制 addon.node 文件。 为此,请在项目的顶层创建名为 binding.gyp 的文件,使用类似 JSON 的格式描述模块的构建配置。 该文件由 node-gyp 使用,这是一个专门为编译 Node.js 插件而编写的工具。
node-gyp configure
创建 binding.gyp 文件后,使用 node-gyp configure 为当前平台生成适当的项目构建文件。 这将在 build/ 目录中生成 Makefile(在 Unix 平台上)或 vcxproj 文件(在 Windows 上)。
node-gyp build
接下来,调用 node-gyp build 命令生成编译后的 addon.node 文件。 这将被放入 build/Release/ 目录。
构建完成后,可以通过将 require() 指向构建的 addon.node 模块在 Node.js 中使用二进制插件
// main.js

const addon = require('./build/Release/addon');

console.log(addon.hello());
// 打印: 'world'
当代码中 require 的是编译后的 c++ 插件 .node 文件时的处理函数如下
// lib/internal/modules/cjs/loader.js

Module._extensions['.node'] = function(module, filename) {
  if (policy?.manifest) {
    const content = fs.readFileSync(filename);
    const moduleURL = pathToFileURL(filename);
    policy.manifest.assertIntegrity(moduleURL, content);
  }
  // Be aware this doesn't use `content`
  return process.dlopen(module, path.toNamespacedPath(filename));
};
dlopen 主要用于动态打开一个 c++ 插件文件,运行其代码, 说 dlopen 之前我们先说一下动态链接。
如果拿 js 来举例的话, 正常运行一个 js 文件直接通过 script 直接引用交给浏览器运行即可,不需要额外的干预。比如你想动态加载运行一个 js, 就需要封装一个 dynamicImport 方法,等到实际会调用的时候才去动态加载运行,这个 dynamicImport 程序可能就是通过 document.createElement('script') 去实现
内容来自 C语言的静态链接与动态链接
什么是链接?
对于初学C语言的朋友,可能对链接这个概念有点陌生,这里简单介绍一下。我们的C代码编译生成可执行程序会经过如下过程:

1、什么是静态链接?
静态链接是由链接器在链接时将库的内容加入到可执行程序中的做法。链接器是一个独立程序,将一个或多个库或目标文件(先前由编译器或汇编器生成)链接到一块生成可执行程序。这里的库指的是静态链接库,Windows下以.lib为后缀,Linux下以.a为后缀。
2、什么是动态链接?
动态链接(Dynamic Linking),把链接这个过程推迟到了运行时再进行,在可执行文件装载时或运行时,由操作系统的装载程序加载库。这里的库指的是动态链接库,Windows下以.dll为后缀,Linux下以.so为后缀。值得一提的是,在Windows下的动态链接也可以用到.lib为后缀的文件,但这里的.lib文件叫做导入库,是由.dll文件生成的。
DLOpen 的实现过程主要为如下几步,后面我们在详细分析一下其中重要的步骤
// src/node_binding.cc

void DLOpen(const FunctionCallbackInfo<Value>& args) {
  Environment* env = Environment::GetCurrent(args);
  auto context = env->context();

  CHECK_NULL(thread_local_modpending);

  if (args.Length() < 2) {
    return THROW_ERR_MISSING_ARGS(
        env, "process.dlopen needs at least 2 arguments");
  }

  int32_t flags = DLib::kDefaultFlags;
  if (args.Length() > 2 && !args[2]->Int32Value(context).To(&flags)) {
    return THROW_ERR_INVALID_ARG_TYPE(env, "flag argument must be an integer.");
  }

  Local<Object> module;
  Local<Object> exports;
  Local<Value> exports_v;
  if (!args[0]->ToObject(context).ToLocal(&module) ||
      !module->Get(context, env->exports_string()).ToLocal(&exports_v) ||
      !exports_v->ToObject(context).ToLocal(&exports)) {
    return;  // Exception pending.
  }

  node::Utf8Value filename(env->isolate(), args[1]);  // Cast
  env->TryLoadAddon(*filename, flags, [&](DLib* dlib) {
    static Mutex dlib_load_mutex;
    Mutex::ScopedLock lock(dlib_load_mutex);

    const bool is_opened = dlib->Open();

    // Objects containing v14 or later modules will have registered themselves
    // on the pending list.  Activate all of them now.  At present, only one
    // module per object is supported.
    node_module* mp = thread_local_modpending;
    thread_local_modpending = nullptr;

    if (!is_opened) {
      std::string errmsg = dlib->errmsg_.c_str();
      dlib->Close();
#ifdef _WIN32
      // Windows needs to add the filename into the error message
      errmsg += *filename;
#endif  // _WIN32
      THROW_ERR_DLOPEN_FAILED(env, errmsg.c_str());
      return false;
    }

    if (mp != nullptr) {
      if (mp->nm_context_register_func == nullptr) {
        if (env->force_context_aware()) {
          dlib->Close();
          THROW_ERR_NON_CONTEXT_AWARE_DISABLED(env);
          return false;
        }
      }
      mp->nm_dso_handle = dlib->handle_;
      dlib->SaveInGlobalHandleMap(mp);
    } else {
      if (auto callback = GetInitializerCallback(dlib)) {
        callback(exports, module, context);
        return true;
      } else if (auto napi_callback = GetNapiInitializerCallback(dlib)) {
        napi_module_register_by_symbol(exports, module, context, napi_callback);
        return true;
      } else {
        mp = dlib->GetSavedModuleFromGlobalHandleMap();
        if (mp == nullptr || mp->nm_context_register_func == nullptr) {
          dlib->Close();
          char errmsg[1024];
          snprintf(errmsg,
                   sizeof(errmsg),
                   "Module did not self-register: '%s'.",
                   *filename);
          THROW_ERR_DLOPEN_FAILED(env, errmsg);
          return false;
        }
      }
    }

    // -1 is used for N-API modules
    if ((mp->nm_version != -1) && (mp->nm_version != NODE_MODULE_VERSION)) {
      // Even if the module did self-register, it may have done so with the
      // wrong version. We must only give up after having checked to see if it
      // has an appropriate initializer callback.
      if (auto callback = GetInitializerCallback(dlib)) {
        callback(exports, module, context);
        return true;
      }
      char errmsg[1024];
      snprintf(errmsg,
               sizeof(errmsg),
               "The module '%s'"
               "\nwas compiled against a different Node.js version using"
               "\nNODE_MODULE_VERSION %d. This version of Node.js requires"
               "\nNODE_MODULE_VERSION %d. Please try re-compiling or "
               "re-installing\nthe module (for instance, using `npm rebuild` "
               "or `npm install`).",
               *filename,
               mp->nm_version,
               NODE_MODULE_VERSION);

      // NOTE: `mp` is allocated inside of the shared library's memory, calling
      // `dlclose` will deallocate it
      dlib->Close();
      THROW_ERR_DLOPEN_FAILED(env, errmsg);
      return false;
    }
    CHECK_EQ(mp->nm_flags & NM_F_BUILTIN, 0);

    // Do not keep the lock while running userland addon loading code.
    Mutex::ScopedUnlock unlock(lock);
    if (mp->nm_context_register_func != nullptr) {
      mp->nm_context_register_func(exports, module, context, mp->nm_priv);
    } else if (mp->nm_register_func != nullptr) {
      mp->nm_register_func(exports, module, mp->nm_priv);
    } else {
      dlib->Close();
      THROW_ERR_DLOPEN_FAILED(env, "Module has no declared entry point.");
      return false;
    }

    return true;
  });

  // Tell coverity that 'handle' should not be freed when we return.
  // coverity[leaked_storage]
}
// src/env-inl.h

inline void Environment::TryLoadAddon(
    const char* filename,
    int flags,
    const std::function<bool(binding::DLib*)>& was_loaded) {
  loaded_addons_.emplace_back(filename, flags);
  if (!was_loaded(&loaded_addons_.back())) {
    loaded_addons_.pop_back();
  }
}
bool DLib::Open() {
  handle_ = dlopen(filename_.c_str(), flags_);
  if (handle_ != nullptr) return true;
  errmsg_ = dlerror();
  return false;
}
运行完上面的 dlib->Open 函数,用户的代码也被加载且运行了,如同上面的 c++ 插件例子中调用 NODE_MODULE 宏主要用于注册模块
插件的注册的实现主要是 node_module_register 函数,其实就是向链表 modlist_internal 中插入了一项数据,但是下面 NODE_C_CTOR 宏能让我们学到不少知识
// src/node.h

#define NODE_MODULE(modname, regfunc)                                 \
  NODE_MODULE_X(modname, regfunc, NULL, 0)  // NOLINT (readability/null_usage)

#define NODE_MODULE_X(modname, regfunc, priv, flags)                  \
  extern "C" {                                                        \
    static node::node_module _module =                                \
    {                                                                 \
      NODE_MODULE_VERSION,                                            \
      flags,                                                          \
      NULL,  /* NOLINT (readability/null_usage) */                    \
      __FILE__,                                                       \
      (node::addon_register_func) (regfunc),                          \
      NULL,  /* NOLINT (readability/null_usage) */                    \
      NODE_STRINGIFY(modname),                                        \
      priv,                                                           \
      NULL   /* NOLINT (readability/null_usage) */                    \
    };                                                                \
    NODE_C_CTOR(_register_ ## modname) {                              \
      node_module_register(&_module);                                 \
    }                                                                 \
  }

#define NODE_C_CTOR(fn)                                               \
  NODE_CTOR_PREFIX void fn(void) __attribute__((constructor));        \
  NODE_CTOR_PREFIX void fn(void)

# define NODE_CTOR_PREFIX static
NODE_C_CTOR 宏这段实现可有点优秀,其主要是声明了一个动态函数 register ## modname,并且立马调用了 register ## modname 函数,其作用类似于下面的例子, 例子放在了该 git 仓库 demo_NODE_C_CTOR.cpp
通过 NODE_C_CTOR 宏声明了 register 函数,且通过 attribute((constructor)) 使得 register 函数 运行会在 main 函数之前
#include <iostream>

# define NODE_CTOR_PREFIX static

#define NODE_C_CTOR(fn)                                               \
  NODE_CTOR_PREFIX void fn(void) __attribute__((constructor));        \
  NODE_CTOR_PREFIX void fn(void)

using namespace std;

NODE_C_CTOR(_register_) {                              \
    std::cout << "before main function" << std::endl;                               \
}

int main()
{
  char site[] = "Hello, world!";
  cout << site << endl;
  return 0;
}
如果用户没有调用 NODE_MODULE 宏注册, 发现会进入 auto callback = GetInitializerCallback(dlib) 这个代码逻辑
// src/node_binding.cc

inline InitializerCallback GetInitializerCallback(DLib* dlib) {
  const char* name = "node_register_module_v" STRINGIFY(NODE_MODULE_VERSION);
  return reinterpret_cast<InitializerCallback>(dlib->GetSymbolAddress(name));
}

void* DLib::GetSymbolAddress(const char* name) {
  return dlsym(handle_, name);
}
所以说如果用户没有显示调用 NODE_MODULE 宏注册,会查看 c++ 插件中是否有 node_register_module_v95 函数,如果有的话则主动调用该函数,后面找到了这个 node 实现的 commit 3828fc62
如果不用 NODE_MODULE 宏注册则可以通过下面的例子去实现, 例子放在了该 git 仓库 demo_NODE_MODULE_INITIALIZER.cc
#include <node.h>
#include <v8.h>

static void Method(const v8::FunctionCallbackInfo<v8::Value>& args) {
  v8::Isolate* isolate = args.GetIsolate();
  args.GetReturnValue().Set(v8::String::NewFromUtf8(
        isolate, "world").ToLocalChecked());
}

// NODE_MODULE_EXPORT 宏等同于 __attribute__((visibility("default")))
// NODE_MODULE_INITIALIZER 宏等同于 "node_register_module_v" STRINGIFY(NODE_MODULE_VERSION)

extern "C" NODE_MODULE_EXPORT void
NODE_MODULE_INITIALIZER(v8::Local<v8::Object> exports,
                        v8::Local<v8::Value> module,
                        v8::Local<v8::Context> context) {
  NODE_SET_METHOD(exports, "hello", Method);
}
其出现这种情况的原因为 dlopen 多次运行后面就不会再运行 c++ 插件里面的代码,类比于 node 的 require 机制,所以 NODE_MODULE 宏第二次直接就没有注册,而通过 NODE_MODULE_INITIALIZER 声明了一个函数,后面每次通过 dlsym 获取到该函数引用地址去主动调用一次该函数就好了,下面是官网 | 上下文感知的插件 的解释
在某些环境中,可能需要在多个上下文中多次加载 Node.js 插件。 例如,Electron 运行时在单个进程中运行多个 Node.js 实例。 每个实例都有自己的 require() 缓存,因此当通过 require() 加载时,每个实例都需要原生插件才能正确运行。 这意味着插件必须支持多个初始化。
可以使用宏 NODE_MODULE_INITIALIZER 构建上下文感知插件,该宏扩展为 Node.js 在加载插件时期望找到的函数的名称。
在 DLOpen 函数中 GetInitializerCallback 后还有另一个分支逻辑 GetNapiInitializerCallback 函数的调用,其实两个函数的作用是类似的, 这里的看函数名字应该是为 napi 留下的口子
// src/node_binding.cc

inline napi_addon_register_func GetNapiInitializerCallback(DLib* dlib) {
  const char* name =
      STRINGIFY(NAPI_MODULE_INITIALIZER_BASE) STRINGIFY(NAPI_MODULE_VERSION);
  return reinterpret_cast<napi_addon_register_func>(
      dlib->GetSymbolAddress(name));
}
napi 插件的例子, 代码放在了该 git 仓库 demo_NAPI_MODULE_INIT.cc
#include <assert.h>
#include <node_api.h>

// 调用 NAPI_MODULE_INIT 注册插件的例子

static int32_t increment = 0;

static napi_value Hello(napi_env env, napi_callback_info info) {
  napi_value result;
  napi_status status = napi_create_int32(env, increment++, &result);
  assert(status == napi_ok);
  return result;
}

NAPI_MODULE_INIT() {
  napi_value hello;
  napi_status status =
      napi_create_function(env,
                           "hello",
                           NAPI_AUTO_LENGTH,
                           Hello,
                           NULL,
                           &hello);
  assert(status == napi_ok);
  status = napi_set_named_property(env, exports, "hello", hello);
  assert(status == napi_ok);
  return exports;
}
起因是自己写的一个 FaaS 接口,当前 qps 在 30 左右,在监控上发现系统内存是随着时间缓慢上升 📈, 这个接口 qps 预期全量会达到 1000 左右,现在就有内存泄漏可要赶紧排查出来 !
一开始我的想法是在接口上开个口子,比如查询的时候 url 拼上参数 get_v8_heapSnapshot 就返回当前进程 v8 堆的快照,隔一段时间拉取几次来去分析
后面发现自动接入了 Easy-Monitor 里面就能非常快速的满足这个需求, 可以直接点击 devtools 在线分析也能下载到本地分析快照

后面对比了几个不同时间的快照发现无明显变化,看堆空间趋势图也无明显波动,确认为物理机其他进程程序所致是预期内的,我们的 node 进程没有内存泄漏

该 c++ 插件的实现在 X-Profiler/xprofiler 仓库, 更多介绍见文章 Easy-Monitor 3.0 开源 - 基于 Addon 的 Node.js 性能监控解决方案, 算是最佳实践了, 给大佬们打 call 👏
node 中运行一个 c++ 插件的实现主要是在 DLOpen 函数中,DLOpen 核心是调用了下面几个函数
函数介绍来自于文章 采用dlopen、dlsym、dlclose加载动态链接库
#include <dlfcn.h>

// dlopen以指定模式打开指定的动态连接库文件
void *dlopen(const char *filename, int flag);

// dlerror返回出现的错误
char *dlerror(void);

// dlsym通过句柄和连接符名称获取函数名或者变量名
void *dlsym(void *handle, const char *symbol);

// dlclose来卸载打开的库
int dlclose(void *handle);
近期 iOS 客户端反映 WebView 中打开 h5 页面存在明显的白屏时间, 于是打算把后端接口延时高(> 150ms)的 h5 项目由现在的 SSR 改成 html 请求达到 Node 时率先返回构建时生成的骨架屏 html 主体, 然后再异步请求后端接口数据, 获取到接口数据后再追加到 html 响应流中。这样 Node 能够 1ms 内响应实际内容让用户先看到页面框架, 通过内网并发聚合的接口数据也能让客户端直接复用这部分数据更快展示出最终屏。
按理来说 h5 不再受限于后端接口的响应时长, 能够第一时间渲染出骨架屏页面, 但是体验后白屏时间好像没怎么缩短? 最后反复删减代码测试发现了一个残酷的现实 👇
iOS WKWebView 不支持流式渲染(分块渲染), 安卓 WebView 与 PC Chrome 是支持的。
即表示 IOS 中会等待 html 请求彻底结束后才开始渲染, 如下是安卓与 IOS 中的效果演示视频,希望其他同学不要再踩坑 🤯
2022-06-20 更新,经过大佬提醒,IOS 中如果返回的 data 是普通文本文字,或返回的数据中包含普通文本文字,那只需要达到非空 200 字节即可以触发渲染,详细见 iOS之深入解析WKWebView加载的生命周期与代理方法
所以 IOS chrome 与 safari 也是支持流式渲染(分块渲染),App 中没有效果是有效内容没有达到 200 字节 (innerText)
h5 页面首屏文字等内容达到 200+ 字节还是较少的,设置为 display: none 来凑数的 div 不会被计数进去,相关代码实现见
// https://github.com/WebKit/webkit/blob/main/Source/WebCore/page/FrameView.h#L975

static const unsigned visualCharacterThreshold = 200;
// https://github.com/WebKit/WebKit/blob/ed7fed17c5ac886890859f1fc8682dba06424616/Source/WebCore/page/FrameView.cpp#L4685
void FrameView::checkAndDispatchDidReachVisuallyNonEmptyState()
{
// ...
// The first few hundred characters rarely contain the interesting content of the page.
if (m_visuallyNonEmptyCharacterCount > visualCharacterThreshold)
return true;
}
void FrameView::incrementVisuallyNonEmptyCharacterCount(const String& inlineText)
{
if (m_visuallyNonEmptyCharacterCount > visualCharacterThreshold && m_hasReachedSignificantRenderedTextThreshold)
return;
auto nonWhitespaceLength = [](auto& inlineText) {
auto length = inlineText.length();
for (unsigned i = 0; i < inlineText.length(); ++i) {
if (isNotHTMLSpace(inlineText[i]))
continue;
--length;
}
return length;
};
m_visuallyNonEmptyCharacterCount += nonWhitespaceLength(inlineText);
++m_textRendererCountForVisuallyNonEmptyCharacters;
}2022-06-26 更新,最后给 body 标签插入了一个塞了 200 个空格字符的 div 来强制 WKWebView 进行刷新缓存实时渲染,经过一周多的测试,白屏时间明显减少甚至不见 🎉
const IOS_200 = `<div style="height:0;width:0;">\u200b\u200b\u200b\u200b\u200b\u200b\u200b\u200b\u200b\u200b\u200b\u200b\u200b\u200b\u200b\u200b\u200b\u200b\u200b\u200b\u200b\u200b\u200b\u200b\u200b\u200b\u200b\u200b\u200b\u200b\u200b\u200b\u200b\u200b\u200b\u200b\u200b\u200b\u200b\u200b\u200b\u200b\u200b\u200b\u200b\u200b\u200b\u200b\u200b\u200b\u200b\u200b\u200b\u200b\u200b\u200b\u200b\u200b\u200b\u200b\u200b\u200b\u200b\u200b\u200b\u200b\u200b\u200b\u200b\u200b\u200b\u200b\u200b\u200b\u200b\u200b\u200b\u200b\u200b\u200b\u200b\u200b\u200b\u200b\u200b\u200b\u200b\u200b\u200b\u200b\u200b\u200b\u200b\u200b\u200b\u200b\u200b\u200b\u200b\u200b\u200b\u200b\u200b\u200b\u200b\u200b\u200b\u200b\u200b\u200b\u200b\u200b\u200b\u200b\u200b\u200b\u200b\u200b\u200b\u200b\u200b\u200b\u200b\u200b\u200b\u200b\u200b\u200b\u200b\u200b\u200b\u200b\u200b\u200b\u200b\u200b\u200b\u200b\u200b\u200b\u200b\u200b\u200b\u200b\u200b\u200b\u200b\u200b\u200b\u200b\u200b\u200b\u200b\u200b\u200b\u200b\u200b\u200b\u200b\u200b\u200b\u200b\u200b\u200b\u200b\u200b\u200b\u200b\u200b\u200b\u200b\u200b\u200b\u200b\u200b\u200b\u200b\u200b\u200b\u200b\u200b\u200b\u200b\u200b\u200b\u200b\u200b\u200b\u200b\u200b\u200b\u200b\u200b\u200b\u200b\u200b\u200b\u200b\u200b\u200b</div>`
开始写一些博客主要是在看完代码后再温故总结一遍, 也是为了后面回头也能查阅。本系列会从官网的例子出发, 尽可能以链路追踪的方式记录其中源码核心模块的实现, 本篇例子来源
涉及的知识点
libuv采用了异步的、事件驱动的编程方式。它的核心工作是提供一个事件循环和基于回调的I/O和其他活动的通知。libuv提供了一些核心工具,如计时器、非阻塞网络支持、异步文件系统访问、子进程等等。
听上去就像 node 的特性, 确实读懂了 libuv, 才能真正了解 node 。
注册一个 idle 阶段的回调的事件循环的例子
#include <stdio.h>
#include <uv.h>

int64_t counter = 0;

void wait_for_a_while(uv_idle_t* handle) {
    counter++;

    if (counter >= 10e6)
        uv_idle_stop(handle);
}

int main() {
	// 声明一个结构体
    uv_idle_t idler;

    uv_idle_init(uv_default_loop(), &idler);
    uv_idle_start(&idler, wait_for_a_while);

    printf("Idling...\n");
    uv_run(uv_default_loop(), UV_RUN_DEFAULT);

    uv_loop_close(uv_default_loop());
    return 0;
}
这是一个事件循环 Idling 阶段的一个例子, 下面我们从 main 函数中逐个被调用的函数的实现看看这个完整的过程。
main > uv_idle_init
首先在 vscode 中搜索 uv_idle_init 的定义, 发现没有, 其实是通过宏定义了一些通用的方法生成的代码, 作为一位 c, c++ 初学者还是疑惑了好一阵子 ...
可以发现 uv_##name##_init 函数一般为初始化 handle 上挂载的回调函数以及调用了 uv__handle_init 函数。

main > uv_idle_init > uv__handle_init
和函数名一样, 对 handle 上的属性做一些数据初始化的操作以及与事件循环结构 loop 进行一个绑定。后面判断事件循环 loop 是否已经结束, 该 loop 上的 handle 必须先被关闭才行。
接着看看 QUEUE_INSERT_TAIL 队列相关的实现
#define uv__handle_init(loop_, h, type_)                                      \
  do {                                                                        \
    (h)->loop = (loop_);                                                      \
    (h)->type = (type_);                                                      \
    (h)->flags = UV_HANDLE_REF;  /* Ref the loop when active. */              \
    QUEUE_INSERT_TAIL(&(loop_)->handle_queue, &(h)->handle_queue);            \
    uv__handle_platform_init(h);                                              \
  }                                                                           \
  while (0)
main > uv_idle_init > uv__handle_init > QUEUE_INSERT_TAIL
其中我们发现 libuv 是通过一组宏定义实现的队列, 代码主要在 deps/uv/src/queue.h

这个表达式看似复杂,其实它就相当于"(*q)[0]",也就是代表QUEUE数组的第一个元素,那么它为什么要写这么复杂呢,主要有两个原因:类型保持、成为左值。
// deps/uv/src/queue.h

#define QUEUE_INSERT_TAIL(h, q)                                               \
  do {                                                                        \
    QUEUE_NEXT(q) = (h);                                                      \
    QUEUE_PREV(q) = QUEUE_PREV(h);                                            \
    QUEUE_PREV_NEXT(q) = (q);                                                 \
    QUEUE_PREV(h) = (q);                                                      \
  }                                                                           \
  while (0)
还需要进一步看看 QUEUE_NEXT 的实现
#define QUEUE_NEXT(q)       (*(QUEUE **) &((*(q))[0]))
#define QUEUE_PREV(q)       (*(QUEUE **) &((*(q))[1]))
#define QUEUE_PREV_NEXT(q)  (QUEUE_NEXT(QUEUE_PREV(q)))
#define QUEUE_NEXT_PREV(q)  (QUEUE_PREV(QUEUE_NEXT(q)))
让我们来拆解一下 ((QUEUE **) &(((q))[0])) 的实现
main > uv_idle_init > uv__handle_init > uv__handle_platform_init
uv__handle_platform_init 是在 uv__handle_init 函数的结尾处被调用, 根据不同平台初始化了 handle 上不同的属性
#if defined(_WIN32)
# define uv__handle_platform_init(h) ((h)->u.fd = -1)
#else
# define uv__handle_platform_init(h) ((h)->next_closing = NULL)
#endif
main > uv_idle_start
相比于 uv_##name##init 类型函数的初始化, uv##name##_start 类型函数主要用于保存用户传入的回调, 到事件循环的相应的阶段再取出来运行。
int uv_##name##_start(uv_##name##_t* handle, uv_##name##_cb cb) {           \
  // 判断 idler 是否活动状态
  if (uv__is_active(handle)) return 0;                                      \
  if (cb == NULL) return UV_EINVAL;                                         \
  // &handle->loop->idle_handles 头部插入一个队列
  QUEUE_INSERT_HEAD(&handle->loop->name##_handles, &handle->queue);         \
  // 设置回调函数
  handle->name##_cb = cb;                                                   \
  uv__handle_start(handle);                                                 \
  return 0;                                                                 \
}
main > uv_idle_start > uv__is_active
该 handle 是否已经关闭判断, 拿 (h)->flags & 0x00000004 进行与运算可知, 如当前要为 true, 则 (h)->flags 二进制表示应该是 1xx 即可。
#define uv__is_active(h)                                                      \
  (((h)->flags & UV_HANDLE_ACTIVE) != 0)


enum {
  /* Used by all handles. */
  UV_HANDLE_CLOSING                     = 0x00000001,
  UV_HANDLE_ACTIVE                      = 0x00000004,
  ...
};
main > uv_idle_start > uv__handle_start
设置了 (h)->flags 以及调用了 uv__active_handle_add 函数
#define uv__handle_start(h)                                                   \
  do {                                                                        \
    if (((h)->flags & UV_HANDLE_ACTIVE) != 0) break;                          \
    (h)->flags |= UV_HANDLE_ACTIVE;                                           \
    if (((h)->flags & UV_HANDLE_REF) != 0) uv__active_handle_add(h);          \
  }                                                                           \
  while (0)
main > uv_idle_start > uv__handle_start > uv__active_handle_add
活动计数 +1, 用于后续判断是否退出事件循环
#define uv__active_handle_add(h)                                              \
  do {                                                                        \
  	(h)->loop->active_handles++;                                              \
  }                                                                           \
while (0)
main > uv_run
开始进入 libuv 核心的事件循环运行主逻辑了, 其中 uv_run_mode 涉及三种
int uv_run(uv_loop_t* loop, uv_run_mode mode) {
  int timeout;
  int r;
  int ran_pending;
  // 判断事件循环是否已经结束
  r = uv__loop_alive(loop);
  if (!r)
    // 记录当前事件循环的事件,用于 timer 是否超时判断
    uv__update_time(loop);
  // 没有结束则开始运行
  while (r != 0 && loop->stop_flag == 0) {
    uv__update_time(loop);
    // 【阶段1】运行 timers
    uv__run_timers(loop);
    // 【阶段2】运行 pending
    ran_pending = uv__run_pending(loop);
    // 【阶段3】运行 idle
    uv__run_idle(loop);
    // 【阶段4】运行 prepar
    uv__run_prepare(loop);

    timeout = 0;
    if ((mode == UV_RUN_ONCE && !ran_pending) || mode == UV_RUN_DEFAULT)
      timeout = uv_backend_timeout(loop);

    uv__io_poll(loop, timeout);

    /* Run one final update on the provider_idle_time in case uv__io_poll
     * returned because the timeout expired, but no events were received. This
     * call will be ignored if the provider_entry_time was either never set (if
     * the timeout == 0) or was already updated b/c an event was received.
     */
    uv__metrics_update_idle_time(loop);
	// 【阶段5】运行 check
    uv__run_check(loop);
    // 【阶段6】运行 closing
    uv__run_closing_handles(loop);

    if (mode == UV_RUN_ONCE) {
      /* UV_RUN_ONCE implies forward progress: at least one callback must have
       * been invoked when it returns. uv__io_poll() can return without doing
       * I/O (meaning: no callbacks) when its timeout expires - which means we
       * have pending timers that satisfy the forward progress constraint.
       *
       * UV_RUN_NOWAIT makes no guarantees about progress so it's omitted from
       * the check.
       */
      uv__update_time(loop);
      uv__run_timers(loop);
    }

    r = uv__loop_alive(loop);
    if (mode == UV_RUN_ONCE || mode == UV_RUN_NOWAIT)
      break;
  }

  /* The if statement lets gcc compile it to a conditional store. Avoids
   * dirtying a cache line.
   */
  if (loop->stop_flag != 0)
    loop->stop_flag = 0;

  return r;
}

main > uv_run > uv__run_##name
从队列中取出来运行 uv##name##_start 设置的回调函数。
void uv__run_##name(uv_loop_t* loop) {                                        \
    uv_##name##_t* h;                                                         \
    QUEUE queue;                                                              \
    QUEUE* q;                                                                 \
    QUEUE_MOVE(&loop->name##_handles, &queue);                                \
    while (!QUEUE_EMPTY(&queue)) {                                            \
      q = QUEUE_HEAD(&queue);                                                 \
      h = QUEUE_DATA(q, uv_##name##_t, queue);                                \
      QUEUE_REMOVE(q);                                                        \
      QUEUE_INSERT_TAIL(&loop->name##_handles, q);                            \
      h->name##_cb(h);                                                        \
    }                                                                         \
  }
main > uv_run > uv__run_timers
从最小堆中取出一个已经超时的回调函数运行, 比如 setTimeout() 和 setInterval() 传入的回调。
void uv__run_timers(uv_loop_t* loop) {
  // 堆(Heap)是计算机科学中一类特殊的数据结构的统称。堆通常是一个可以被看做一棵完全二叉树的数组对象。https://baike.baidu.com/item/%E5%A0%86/20606834
  struct heap_node* heap_node;
  uv_timer_t* handle;

  for (;;) {
    // 堆中某个结点的值总是不大于或不小于其父结点的值;
    heap_node = heap_min(timer_heap(loop));
    if (heap_node == NULL)
      break;
    // container_of: https://zhuanlan.zhihu.com/p/54932270
    handle = container_of(heap_node, uv_timer_t, heap_node);
    // 取出最小节点,和当前事件循环记录的事件对比
    if (handle->timeout > loop->time)
      break;
	// 取出消费后,移出队列
    uv_timer_stop(handle);
    // 如果存在 repeat 属性,会新插入一个回调函数, 比如 setInterval
    uv_timer_again(handle);
    // 调用注册的回调
    handle->timer_cb(handle);
  }
}
main > uv_run > uv__run_timers > uv_timer_again
如具有 repeat 属性, 消费完一个回调用 uv_timer_again 继续注册一个, 比如 setInterval
int uv_timer_again(uv_timer_t* handle) {
  if (handle->timer_cb == NULL)
    return UV_EINVAL;

  // 如果存在 repeat 属性,会新插入一个回调函数
  if (handle->repeat) {
    uv_timer_stop(handle);
    uv_timer_start(handle, handle->timer_cb, handle->repeat, handle->repeat);
  }

  return 0;
}
lib/timers/promises.js
setTimeout, setInterval 都是调用的 Timeout, isRepeat 参数分别是 false, true。
这也是在事件循环中 setInterval 能够不断运行的原因。
其实无论是 setTimeout, setInterval, setImmediate, nextTick 的实现都是比较复杂的, 详细记录在 【node 源码学习笔记】微任务。
function Timeout(callback, after, args, isRepeat, isRefed) {
  after *= 1; // Coalesce to number or NaN
  ...
  this._timerArgs = args;
  this._repeat = isRepeat ? after : null;
  ...
  initAsyncResource(this, 'Timeout');
}

function setInterval(callback, repeat, arg1, arg2, arg3) {
  validateCallback(callback);
  let i, args;
  ...
  const timeout = new Timeout(callback, repeat, args, true, true);
  insert(timeout, timeout._idleTimeout);

  return timeout;
}

function setTimeout(callback, after, arg1, arg2, arg3) {
  validateCallback(callback);
  let i, args;
  ...
  const timeout = new Timeout(callback, after, args, false, true);
  insert(timeout, timeout._idleTimeout);

  return timeout;
}
在大多数情况下,所有的I/O回调都是在轮询I/O后立即调用。然而,在有些情况下,调用这样的回调会推迟到下一次循环迭代。如果上一次迭代推迟了任何I/O回调,它将在此时被运行。
static int uv__run_pending(uv_loop_t* loop) {
  QUEUE* q;
  QUEUE pq;
  uv__io_t* w;

  if (QUEUE_EMPTY(&loop->pending_queue))
    return 0;

  QUEUE_MOVE(&loop->pending_queue, &pq);

  while (!QUEUE_EMPTY(&pq)) {
    q = QUEUE_HEAD(&pq);
    QUEUE_REMOVE(q);
    QUEUE_INIT(q);
    w = QUEUE_DATA(q, uv__io_t, pending_queue);
    w->cb(loop, w, POLLOUT);
  }

  return 1;
}
发现主要是运行的 loop->pending_queue 队列中的函数, 可以通过调用 uv__io_feed 函数来注册。
void uv__io_feed(uv_loop_t* loop, uv__io_t* w) {
if (QUEUE_EMPTY(&w->pending_queue))
QUEUE_INSERT_TAIL(&loop->pending_queue, &w->pending_queue);
}
如 管道 i/o 连接失败回调就会通过 uv__io_feed注册, 然后在该阶段运行。
void uv_pipe_connect(uv_connect_t* req,
...
/* Force callback to run on next tick in case of error. */
if (err)
uv__io_feed(handle->loop, &handle->io_watcher);
}
本例子中注册的回调函数即为该阶段
src/env.cc 文件中搜索到一处调用, 其注释也很好的说明了它的使用目的, 用来阻止事件循环在轮询中被阻塞。
意思其实是让阶段五 Poll for I/O 知道, 当前事件循环还有任务在, 你不能阻塞直到下一个 timers 超时。
void Environment::ToggleImmediateRef(bool ref) {
if (started_cleanup_) return;
if (ref) {
// Idle handle is needed only to stop the event loop from blocking in poll.
uv_idle_start(immediate_idle_handle(), [](uv_idle_t*){ });
} else {
uv_idle_stop(immediate_idle_handle());
}
}
从阶段五开始进程将会进入 I/O 阻塞阶段, 故一些任务可以放在该阶段执行, 我的理解类似于 beforePollIO 的勾子函数。
在 src/env.cc 文件中搜索到调用的地方。
在阶段四设置 SetIdle(true), 然后在阶段六设置 SetIdle(false)
void Environment::StartProfilerIdleNotifier() {
uv_prepare_start(&idle_prepare_handle_, [](uv_prepare_t* handle) {
Environment* env = ContainerOf(&Environment::idle_prepare_handle_, handle);
env->isolate()->SetIdle(true);
});
uv_check_start(&idle_check_handle_, [](uv_check_t* handle) {
Environment* env = ContainerOf(&Environment::idle_check_handle_, handle);
env->isolate()->SetIdle(false);
});
}
main > uv_run > uv__io_poll
开始进行一些阻塞型 i/o 操作, 具体该操作阻塞的合适时间我们可以看一下实现
timeout = 0;
if ((mode == UV_RUN_ONCE && !ran_pending) || mode == UV_RUN_DEFAULT)
timeout = uv_backend_timeout(loop);
uv__io_poll(loop, timeout);
main > uv_run > uv__io_poll > uv_backend_timeout
下面条件都不成立的话会调用 uv__next_timeout 方法, 其中的第 3 步就是上面👆 阶段三 Call idle handles 使用 uv_idle_start 阻止该阶段被阻塞过久的例子。
int uv_backend_timeout(const uv_loop_t* loop) {
if (loop->stop_flag != 0)
return 0;
if (!uv__has_active_handles(loop) && !uv__has_active_reqs(loop))
return 0;
if (!QUEUE_EMPTY(&loop->idle_handles))
return 0;
if (!QUEUE_EMPTY(&loop->pending_queue))
return 0;
if (loop->closing_handles)
return 0;
return uv__next_timeout(loop);
}
main > uv_run > uv__io_poll > uv_backend_timeout > uv__next_timeout
如果上续条件都不满足, 超时的时间将会被设置为 下一个计时器 setTimeout 开始前的时间
int uv__next_timeout(const uv_loop_t* loop) {
const struct heap_node* heap_node;
const uv_timer_t* handle;
uint64_t diff;
heap_node = heap_min(timer_heap(loop));
if (heap_node == NULL)
return -1; /* block indefinitely */
handle = container_of(heap_node, uv_timer_t, heap_node);
if (handle->timeout <= loop->time)
return 0;
diff = handle->timeout - loop->time;
if (diff > INT_MAX)
diff = INT_MAX;
return (int) diff;
}
main > uv_run > uv__io_poll
设置完超时时间, 又回到 uv__io_poll 函数, 关于 epoll 及 i/o 的具体实现在 【libuv 源码学习笔记】2. 线程池与i/o 中有结合例子的详细介绍。
epoll_wait 函数中当 timeout 为 0 时,epoll_wait 永远会立即返回。而 timeout 为 -1 时,epoll_wait 会一直阻塞直到任一已注册的事件变为就绪。当 timeout 为一正整数时,epoll 会阻塞直到计时 timeout 毫秒终了或已注册的事件变为就绪。因为内核调度延迟,阻塞的时间可能会略微超过 timeout 毫秒。
当线程被阻塞住, 直到 epoll_wait 运行完成, 被注册的 i/o 观察者回调函数将会被调用, 比如异步 i/o 的回调 uv__async_io
void uv__io_poll(uv_loop_t* loop, int timeout) {
...
if (no_epoll_wait != 0 || (sigmask != 0 && no_epoll_pwait == 0)) {
nfds = epoll_pwait(loop->backend_fd,
events,
ARRAY_SIZE(events),
timeout,
&sigset);
if (nfds == -1 && errno == ENOSYS) {
uv__store_relaxed(&no_epoll_pwait_cached, 1);
no_epoll_pwait = 1;
}
} else {
nfds = epoll_wait(loop->backend_fd,
events,
ARRAY_SIZE(events),
timeout);
if (nfds == -1 && errno == ENOSYS) {
uv__store_relaxed(&no_epoll_wait_cached, 1);
no_epoll_wait = 1;
}
}
...
}
可以发现 uv__io_poll 阶段调用的是一些耗时的 i/o 操作的回调函数, 在代码的最后一行 h->async_cb(h);
static void uv__async_io(uv_loop_t* loop, uv__io_t* w, unsigned int events) {
...
QUEUE_MOVE(&loop->async_handles, &queue);
while (!QUEUE_EMPTY(&queue)) {
q = QUEUE_HEAD(&queue);
h = QUEUE_DATA(q, uv_async_t, queue);
QUEUE_REMOVE(q);
QUEUE_INSERT_TAIL(&loop->async_handles, q);
if (0 == uv__async_spin(h))
continue; /* Not pending. */
if (h->async_cb == NULL)
continue;
h->async_cb(h);
}
}
和阶段四其实是相对应的, 在阶段五进程被 I/O 阻塞结束后会运行的函数, 我的理解类似于 afterPollIO 的勾子函数。
setImmediate 注册的回调函数就是在该阶段运行。
// src/env.cc
void Environment::InitializeLibuv() {
...
uv_check_init(event_loop(), immediate_check_handle());
...
uv_check_start(immediate_check_handle(), CheckImmediate);
...
}
当前阶段会运行一些关闭的回调函数:一些关闭的回调函数,如:socket.on('close', ...)
void uv_close(uv_handle_t* handle, uv_close_cb close_cb) {
assert(!uv__is_closing(handle));
handle->flags |= UV_HANDLE_CLOSING;
handle->close_cb = close_cb;
switch (handle->type) {
case UV_NAMED_PIPE:
uv__pipe_close((uv_pipe_t*)handle);
break;
case UV_TTY:
uv__stream_close((uv_stream_t*)handle);
break;
case UV_TCP:
uv__tcp_close((uv_tcp_t*)handle);
break;
case UV_UDP:
uv__udp_close((uv_udp_t*)handle);
break;
case UV_PREPARE:
uv__prepare_close((uv_prepare_t*)handle);
break;
case UV_CHECK:
uv__check_close((uv_check_t*)handle);
break;
case UV_IDLE:
uv__idle_close((uv_idle_t*)handle);
break;
case UV_ASYNC:
uv__async_close((uv_async_t*)handle);
break;
case UV_TIMER:
uv__timer_close((uv_timer_t*)handle);
break;
case UV_PROCESS:
uv__process_close((uv_process_t*)handle);
break;
case UV_FS_EVENT:
uv__fs_event_close((uv_fs_event_t*)handle);
break;
case UV_POLL:
uv__poll_close((uv_poll_t*)handle);
break;
case UV_FS_POLL:
uv__fs_poll_close((uv_fs_poll_t*)handle);
/* Poll handles use file system requests, and one of them may still be
* running. The poll code will call uv__make_close_pending() for us. */
return;
case UV_SIGNAL:
uv__signal_close((uv_signal_t*) handle);
break;
default:
assert(0);
}
uv__make_close_pending(handle);
}
main > wait_for_a_while > uv_idle_stop
停止事件循环
前面我们看到 uv__run_timers 函数里面消费一个任务时会显示的调用 uv_timer_stop, 以免会让事件循环一直运行下去, 这个例子中满足一个条件后也会显示调用 uv_idle_stop 移出监听。
int uv_##name##_stop(uv_##name##_t* handle) { \
if (!uv__is_active(handle)) return 0; \
QUEUE_REMOVE(&handle->queue); \
uv__handle_stop(handle); \
return 0; \
}
uv_##name##_stop > uv__handle_stop
对应事件循环开始调用的 uv__handle_start, uv_##name##_stop 函数里会调用 uv__handle_stop, 使 uv_run 中能够及时退出。
#define uv__handle_stop(h) \
do { \
if (((h)->flags & UV_HANDLE_ACTIVE) == 0) break; \
(h)->flags &= ~UV_HANDLE_ACTIVE; \
if (((h)->flags & UV_HANDLE_REF) != 0) uv__active_handle_rm(h); \
} \
while (0)
main > uv_run > uv__loop_alive
当前 uv_run 函数即当前事件循环是否结束判断, 如果事件循环结束, 即可以运行 uv_run 下一行代码, 本例子中的 uv_loop_close 函数开始运行
static int uv__loop_alive(const uv_loop_t* loop) {
return uv__has_active_handles(loop) ||
uv__has_active_reqs(loop) ||
loop->endgame_handles != NULL;
}
#define uv__has_active_handles(loop) \
((loop)->active_handles > 0)
#define uv__has_active_reqs(loop) \
((loop)->active_reqs.count > 0)
main > uv_loop_close
开始进行数据初始化, 回收内存等操作, 运行完本例子程序运行结束。
int uv_loop_close(uv_loop_t* loop) {
QUEUE* q;
uv_handle_t* h;
#ifndef NDEBUG
void* saved_data;
#endif
if (uv__has_active_reqs(loop))
return UV_EBUSY;
QUEUE_FOREACH(q, &loop->handle_queue) {
h = QUEUE_DATA(q, uv_handle_t, handle_queue);
if (!(h->flags & UV_HANDLE_INTERNAL))
return UV_EBUSY;
}
uv__loop_close(loop);
#ifndef NDEBUG
saved_data = loop->data;
memset(loop, -1, sizeof(*loop));
loop->data = saved_data;
#endif
if (loop == default_loop_ptr)
default_loop_ptr = NULL;
return 0;
}
本节主要讲了一次事件循环的执行过程与实现。下面4句话也很形象的描述了事件循环
while there are still events to process:
e = get the next event
if there is a callback associated with e:
call the callback

收到告警通知,
进入终端调试后,发现了大量的 chrome defunct processes 🧟♀️🧟♂️ 僵尸进程。于是尝试在 puppeteer issue Zombie Process problem. #1825 中找一找答案。

按照 puppeteer issue 中的建议,在 browser.close() 后,新增了 ps.kill 去杀死可能会残留的相关进程。
await page.close();
await browser.close();
const psLookup = await ps.lookup({ pid: borwserPID });
for (let proc of psLookup) {
if (_.has(proc, 'pid')) {
await ps.kill(proc.pid, 'SIGKILL');
}
}然后又过了几天,又收到了告警通知,即本次并未解决该问题。最后又通过运行 puppeteer 时加上 --single-process 参数和定时调用 kill -9 [pid] 去杀死僵尸进程等方法都以失败告终 ❌ 。
const chromeFlags = [
'--headless',
'--no-sandbox',
"--disable-gpu",
"--single-process",
"--no-zygote"
]正当大家困惑的时候,同学 a 发来了一篇文章 一次 Docker 容器内大量僵尸进程排查分析,文章中进行了详细的科普,此时才真正认识了僵尸进程。
到这里给我的体会是,如果遇见了一筹莫展的问题,不妨先仔细了解一下该问题的定义与介绍。它的基础概念是什么?造成的本质原因是什么?了解完前因后果后或许能够事半功倍。
僵尸进程 - 维基百科: 在类UNIX系统中,僵尸进程是指完成执行(通过exit系统调用,或运行时发生致命错误或收到终止信号所致),但在操作系统的进程表中仍然存在其进程控制块,处于"终止状态"的进程。这发生于子进程需要保留表项以允许其父进程读取子进程的退出状态:一旦退出态通过wait系统调用读取,僵尸进程条目就从进程表中删除,称之为"回收"(reaped)。正常情况下,进程直接被其父进程wait并由系统回收。进程长时间保持僵尸状态一般是错误的并导致资源泄漏。
通俗的来讲,就像下面的程序一样。当子进程调用 exit 函数退出了,但是父进程没有给它收尸,于是它变成了杀不死的🧟♀️🧟♂️ ,因为它早就已经死了,现在只是在进程列表中占了一个坑位而已。
当该僵尸进程的父进程退出后,它就会被托管到 PID 为 1 的进程上面,通常 PID 为 1 的进程会扮演收尸的角色。
但是当 Node.js 为 PID 1 的进程时,不会进行收尸,从而导致了大量的僵尸进程的问题。
#include <stdio.h>
#include <stdlib.h>
#include <unistd.h>
int main() {
printf("pid %d\n", getpid());
int child_pid = fork();
if (child_pid == 0) {
printf("-----in child process: %d\n", getpid());
exit(0);
} else {
sleep(1000000);
}
return 0;
}当 Docker 中第一个运行的程序为 node xxx.js 时 Node 就成为了 PID 为 1 的进程,所以说问题的解决办法可以是让有能力收尸的进程为第一个运行的程序。
在 Docker and Node.js Best Practices 中官方也给出了解决方案
Node.js was not designed to run as PID 1 which leads to unexpected behaviour when running inside of Docker. For example, a Node.js process running as PID 1 will not respond to SIGINT (CTRL-C) and similar signals. As of Docker 1.13, you can use the --init flag to wrap your Node.js process with a lightweight init system that properly handles running as PID 1.
docker run -it --init nodeYou can also include Tini directly in your Dockerfile, ensuring your process is always started with an init wrapper.
现在让我们通过 Tini 来学习了一下收尸技术,可通过下面的方式让 Tini 去代理运行 Node 程序,使得 Node 成为 Tini 的子进程。
# Add Tini
ENV TINI_VERSION v0.19.0
ADD https://github.com/krallin/tini/releases/download/${TINI_VERSION}/tini /tini
RUN chmod +x /tini
ENTRYPOINT ["/tini", "--"]
# Run your program under Tini
CMD ["/your/program", "-and", "-its", "arguments"]
# or docker run your-image /your/program ...通过仔细阅读 Tini 的代码,我判断核心的收尸技术就是这个 waitpid 函数 了,其实在僵尸进程的定义中就有了如何收尸,所以先了解基础概念是非常重要的。
int reap_zombies(const pid_t child_pid, int* const child_exitcode_ptr) {
pid_t current_pid;
int current_status;
while (1) {
current_pid = waitpid(-1, ¤t_status, WNOHANG);
switch (current_pid) {
case -1:
if (errno == ECHILD) {
PRINT_TRACE("No child to wait");
break;
}
PRINT_FATAL("Error while waiting for pids: '%s'", strerror(errno));
return 1;
case 0:
PRINT_TRACE("No child to reap");
break;
default:
/* A child was reaped. Check whether it's the main one. If it is, then
* set the exit_code, which will cause us to exit once we've reaped everyone else.
*/
PRINT_DEBUG("Reaped child with pid: '%i'", current_pid);
if (current_pid == child_pid) {
// ...
} else if (warn_on_reap > 0) {
PRINT_WARNING("Reaped zombie process with pid=%i", current_pid);
}
// Check if other childs have been reaped.
continue;
}
/* If we make it here, that's because we did not continue in the switch case. */
break;
}
return 0;
}当然 Tini 作为父进程还有其他的优点,比如
当我们学到核心的收尸技术后,就可以来揭发完整的案发现场了 ~

➜ ~ docker run -t -i -v /test/tini:/test 97f7595bf6c4 node /test/main.jsTini 是一个 C 程序,这里先把 Tini 核心实现的代码复制过来,接着用 Node.js C++ 插件的方式来调用 C 这部分的代码
我们的 main.js 程序对外暴露了两个接口,来完成本次实验
// /test/mian.js
const http = require("http");
const { exec } = require("child_process");
const tini = require("./build/Release/addon.node");
const server = http.createServer((req, res) => {
if (req.url === "/make_zombie") {
console.log("make_zombie >>>");
exec("node /test/make_zombie.js", () => {});
res.end("hello");
} else if (req.url === "/kill_zombie") {
console.log("kill_zombie >>>");
console.log(tini.kill_zombie());
res.end("hello");
}
});
server.listen(3000);✅ 可见 Node 成为了 PID 为 1 的进程
➜ ~ docker exec -it 83a67a46ec13 /bin/bash
[root@83a67a46ec13 /]# ps -ef
UID PID PPID C STIME TTY TIME CMD
root 1 0 0 16:53 pts/0 00:00:00 node /test/main.js
root 14 0 1 16:53 pts/1 00:00:00 /bin/bash
root 28 14 0 16:53 pts/1 00:00:00 ps -ef
[root@83a67a46ec13 /]#✅ 子进程调用 exit 退出,父进程不收尸,使其顺利成为一具僵尸
[root@83a67a46ec13 /]# curl localhost:3000/make_zombie
hello[root@83a67a46ec13 /]# ps -ef
UID PID PPID C STIME TTY TIME CMD
root 1 0 0 16:53 pts/0 00:00:00 node /test/main.js
root 14 0 0 16:53 pts/1 00:00:00 /bin/bash
root 31 1 0 16:55 pts/0 00:00:00 node /test/make_zom
root 38 31 0 16:55 pts/0 00:00:00 [node] <defunct>
root 39 14 0 16:55 pts/1 00:00:00 ps -ef
[root@83a67a46ec13 /]#产生僵尸的代码为
napi_value make_zombie(napi_env env, napi_callback_info info)
{
printf("pid %d\n", getpid());
int child_pid = fork();
if (child_pid == 0)
{
printf("-----in child process: %d\n", getpid());
exit(0);
}
else
{
sleep(1000000);
}
return NULL;
}✅ 杀死僵尸进程的父进程,它就被 PID 为 1 的进程托管
[root@83a67a46ec13 /]# kill -9 31
[root@83a67a46ec13 /]# ps -ef
UID PID PPID C STIME TTY TIME CMD
root 1 0 0 16:57 pts/0 00:00:00 node /test/main.js
root 14 0 0 16:57 pts/1 00:00:00 /bin/bash
root 38 1 0 16:59 pts/0 00:00:00 [node] <defunct>
root 40 14 0 17:07 pts/1 00:00:00 ps -ef
[root@83a67a46ec13 /]#✅ kill -9 杀不死僵尸进程, 符合预期
[root@83a67a46ec13 /]# kill -9 38
[root@83a67a46ec13 /]# ps -ef
UID PID PPID C STIME TTY TIME CMD
root 1 0 0 16:57 pts/0 00:00:00 node /test/main.js
root 14 0 0 16:57 pts/1 00:00:00 /bin/bash
root 38 1 0 16:59 pts/0 00:00:00 [node] <defunct>
root 41 14 0 17:09 pts/1 00:00:00 ps -ef✅ 使用 waitpid 函数去收尸,僵尸进程消失
[root@83a67a46ec13 /]# curl localhost:3000/kill_zombie
hello[root@83a67a46ec13ps -ef
UID PID PPID C STIME TTY TIME CMD
root 1 0 0 16:57 pts/0 00:00:00 node /test/main.js
root 14 0 0 16:57 pts/1 00:00:00 /bin/bash
root 44 14 0 17:10 pts/1 00:00:00 ps -ef真正收尸的代码为下面,并且通过 Node-api 把本次收尸进程的 id 和 status 返回给了 js 调用方。
napi_value kill_zombie(napi_env env, napi_callback_info info)
{
int current_pid;
int current_status;
napi_status status;
current_pid = waitpid(-1, ¤t_status, WNOHANG);
napi_value n_pid;
napi_value n_status;
status = napi_create_int32(env, current_pid, &n_pid);
assert(status == napi_ok);
status = napi_create_int32(env, current_status, &n_status);
assert(status == napi_ok);
napi_value obj;
status = napi_create_object(env, &obj);
assert(status == napi_ok);
status = napi_set_named_property(env, obj, "pid", n_pid);
assert(status == napi_ok);
status = napi_set_named_property(env, obj, "status", n_status);
assert(status == napi_ok);
return obj;
}可见通过我们逐步的复盘,一切也都验证了我们最初的猜想。
其实僵尸进程的产生也是 puppeteer 程序的一个 bug, Node.js 不去处理也是情理之中,因为很难判断用户真正的行为,况且还要写一堆副作用的代码。
最后我们通过 docker --init 使用一个 init 进程去解决,这样进程间互相解藕,各司其职显得优雅一点。这也算践行了sidecar 模式吧 ~
开始写一些博客主要是在看完代码后再温故总结一遍, 也是为了后面回头也能查阅。本系列会从官网的例子出发, 尽可能以链路追踪的方式记录其中源码核心模块的实现, 本篇例子来源
涉及的知识点
创建一个子进程的例子。
uv_loop_t *loop;
uv_process_t child_req;
uv_process_options_t options;
int main() {
loop = uv_default_loop();
char* args[3];
args[0] = "mkdir";
args[1] = "test-dir";
args[2] = NULL;
options.exit_cb = on_exit;
options.file = "mkdir";
options.args = args;
int r;
// 🔥 开始创建子进程
if ((r = uv_spawn(loop, &child_req, &options))) {
fprintf(stderr, "%s\n", uv_strerror(r));
return 1;
} else {
fprintf(stderr, "Launched process with ID %d\n", child_req.pid);
}
return uv_run(loop, UV_RUN_DEFAULT);
}
这里还想记录一下以前看 thread-loader 的代码, 当时困惑的一个点本篇文章看完也能得到解释
// WorkerPool.js 主进程
this.worker = childProcess.spawn(process.execPath, [].concat(sanitizedNodeArgs).concat(workerPath, options.parallelJobs), {
detached: true,
stdio: ['ignore', 'pipe', 'pipe', 'pipe', 'pipe'],
});
const [, , , readPipe, writePipe] = this.worker.stdio;
this.readPipe = readPipe;
this.writePipe = writePipe;
// worker.js 子进程
const writePipe = fs.createWriteStream(null, { fd: 3 });
const readPipe = fs.createReadStream(null, { fd: 4 });
thread-loader 经常会从主进程拷贝大量的文件数据到子进程去交给 loader 处理, 结果又会传给主进程。
那么开阔额外的管道, 通过 pipe 的形式通信, 不但可以减小内存消耗又能提高效率。
// ipc 可以类比一次全部返回数据, pipe 类比于流的形式返回数据
ipc: fs.readFileSync('./big.file');
pipe: fs.createReadStream('./big.file');
main > uv_spawn
uv_spawn 创建一个子进程, 主要包括以下几步
// deps/uv/src/unix/process.c
int uv_spawn(uv_loop_t* loop,
uv_process_t* process,
const uv_process_options_t* options) {
#if defined(__APPLE__) && (TARGET_OS_TV || TARGET_OS_WATCH)
/* fork is marked __WATCHOS_PROHIBITED __TVOS_PROHIBITED. */
return UV_ENOSYS;
#else
int signal_pipe[2] = { -1, -1 };
int pipes_storage[8][2];
int (*pipes)[2];
int stdio_count;
ssize_t r;
pid_t pid;
int err;
int exec_errorno;
int i;
int status;
...
// 简单的数据初始化
uv__handle_init(loop, (uv_handle_t*)process, UV_PROCESS);
QUEUE_INIT(&process->queue);
// 确保标准输入,输出,错误
stdio_count = options->stdio_count;
if (stdio_count < 3)
stdio_count = 3;
err = UV_ENOMEM;
pipes = pipes_storage;
if (stdio_count > (int) ARRAY_SIZE(pipes_storage))
pipes = uv__malloc(stdio_count * sizeof(*pipes));
if (pipes == NULL)
goto error;
for (i = 0; i < stdio_count; i++) {
pipes[i][0] = -1;
pipes[i][1] = -1;
}
for (i = 0; i < options->stdio_count; i++) {
// 🔥 uv__process_init_stdio
err = uv__process_init_stdio(options->stdio + i, pipes[i]);
if (err)
goto error;
}
err = uv__make_pipe(signal_pipe, 0);
if (err)
goto error;
uv_signal_start(&loop->child_watcher, uv__chld, SIGCHLD);
/* Acquire write lock to prevent opening new fds in worker threads */
uv_rwlock_wrlock(&loop->cloexec_lock);
pid = fork();
if (pid == -1) {
err = UV__ERR(errno);
uv_rwlock_wrunlock(&loop->cloexec_lock);
uv__close(signal_pipe[0]);
uv__close(signal_pipe[1]);
goto error;
}
if (pid == 0) {
// 这段逻辑只有子进程才会被运行 !!!
uv__process_child_init(options, stdio_count, pipes, signal_pipe[1]);
// 上面的运行正常, abort 不会被调用
abort();
}
/* Release lock in parent process */
uv_rwlock_wrunlock(&loop->cloexec_lock);
uv__close(signal_pipe[1]);
process->status = 0;
exec_errorno = 0;
do
r = read(signal_pipe[0], &exec_errorno, sizeof(exec_errorno));
while (r == -1 && errno == EINTR);
if (r == 0)
; /* okay, EOF */
else if (r == sizeof(exec_errorno)) {
do
err = waitpid(pid, &status, 0); /* okay, read errorno */
while (err == -1 && errno == EINTR);
assert(err == pid);
} else if (r == -1 && errno == EPIPE) {
do
err = waitpid(pid, &status, 0); /* okay, got EPIPE */
while (err == -1 && errno == EINTR);
assert(err == pid);
} else
abort();
uv__close_nocheckstdio(signal_pipe[0]);
for (i = 0; i < options->stdio_count; i++) {
err = uv__process_open_stream(options->stdio + i, pipes[i]);
if (err == 0)
continue;
while (i--)
uv__process_close_stream(options->stdio + i);
goto error;
}
/* Only activate this handle if exec() happened successfully */
if (exec_errorno == 0) {
QUEUE_INSERT_TAIL(&loop->process_handles, &process->queue);
uv__handle_start(process);
}
process->pid = pid;
process->exit_cb = options->exit_cb;
if (pipes != pipes_storage)
uv__free(pipes);
return exec_errorno;
...
}
main > uv_spawn > uv__process_init_stdio
通过 options.stdio 参数的设置, 决定进程间通信使用的 fd
static int uv__process_init_stdio(uv_stdio_container_t* container, int fds[2]) {
int mask;
int fd;
mask = UV_IGNORE | UV_CREATE_PIPE | UV_INHERIT_FD | UV_INHERIT_STREAM;
switch (container->flags & mask) {
case UV_IGNORE:
return 0;
case UV_CREATE_PIPE:
assert(container->data.stream != NULL);
if (container->data.stream->type != UV_NAMED_PIPE)
return UV_EINVAL;
else
return uv__make_socketpair(fds);
case UV_INHERIT_FD:
case UV_INHERIT_STREAM:
if (container->flags & UV_INHERIT_FD)
fd = container->data.fd;
else
fd = uv__stream_fd(container->data.stream);
if (fd == -1)
return UV_EINVAL;
fds[1] = fd;
return 0;
default:
assert(0 && "Unexpected flags");
return UV_EINVAL;
}
}
main > uv_spawn > uv__process_init_stdio > uv__make_socketpair
主要是调用 socketpair 函数, 创建进程间通信的管道
关于进程通信, 先看看对于操作系统,进程是 task_struct 类型的结构体
struct task_struct {
// 进程状态
long state;
// 虚拟内存结构体
struct mm_struct *mm;
// 进程号
pid_t pid;
// 指向父进程的指针
struct task_struct __rcu *parent;
// 子进程列表
struct list_head children;
// 存放文件系统信息的指针
struct fs_struct *fs;
// 一个数组,包含该进程打开的文件指针
struct files_struct *files;
};
进程间通信的方式一般有哪些?
先说一下 nodejs 子进程 options.stdio 其中的两个选项
'pipe':在子进程和父进程之间创建管道。 管道的父端作为 child_process 对象上的 subprocess.stdio[fd] 属性暴露给父进程。 为文件描述符 0、1 和 2 创建的管道也可分别作为 subprocess.stdin、subprocess.stdout 和 subprocess.stderr 使用。
'ipc':创建 IPC 通道,用于在父进程和子进程之间传递消息或文件描述符。 一个 ChildProcess 最多可以有一个 IPC stdio 文件描述符。 设置此选项会启用 subprocess.send() 方法。 如果子进程是 Node.js 进程,则 IPC 通道的存在将会启用 process.send() 和 process.disconnect() 方法、以及子进程内的 'disconnect' 和 'message' 事件。
基于这个场景, socketpair 能够给到完美的支持
Linux实现了一个源自BSD的socketpair调用,可以实现在同一个文件描述符中进行读写的功能。
该系统调用能创建一对已连接的UNIX族socket。
在Linux中,完全可以把这一对socket当成pipe返回的文件描述符一样使用,唯一的区别就是这一对文件描述符中的任何一个都可读和可写,函数原型如下:
#include <sys/types.h>
#include <sys/socket.h>
int socketpair(int domain, int type, int protocol, int sv[2]);
关于 socketpair 创建的 Unix domain socket 补充知识
Unix domain socket 又叫 IPC(inter-process communication 进程间通信) socket,用于实现同一主机上的进程间通信。socket 原本是为网络通讯设计的,但后来在 socket 的框架上发展出一种 IPC 机制,就是 UNIX domain socket。虽然网络 socket 也可用于同一台主机的进程间通讯(通过 loopback 地址 127.0.0.1),但是 UNIX domain socket 用于 IPC 更有效率:不需要经过网络协议栈,不需要打包拆包、计算校验和、维护序号和应答等,只是将应用层数据从一个进程拷贝到另一个进程。这是因为,IPC 机制本质上是可靠的通讯,而网络协议是为不可靠的通讯设计的。
UNIX domain socket 是全双工的,API 接口语义丰富,相比其它 IPC 机制有明显的优越性,目前已成为使用最广泛的 IPC 机制,比如 X Window 服务器和 GUI 程序之间就是通过 UNIX domain socket 通讯的。
Unix domain socket 是 POSIX 标准中的一个组件,所以不要被名字迷惑,linux 系统也是支持它的。
// socketpair 通信的例子
#include <sys/types.h>
#include <sys/socket.h>
#include <stdlib.h>
#include <stdio.h>
int main ()
{
int fd[2];
int r = socketpair(AF_UNIX, SOCK_STREAM, 0, fd);
if (r < 0){
perror( "socketpair()" );
exit(1);
}
if (fork()){ /* 父进程 */
int val = 0;
close(fd[1]);
while (1){
sleep(1);
++val;
printf("发送数据: %d\n", val);
write(fd[0], &val, sizeof(val));
read(fd[0], &val, sizeof(val));
printf("接收数据: %d\n", val);
}
}else{ /*子进程*/
int val;
close(fd[0]);
while(1){
read(fd[1], &val, sizeof(val));
++val;
write(fd[1], &val, sizeof(val));
}
}
}
例子分析: 一开始由socketpair创建一个套接字对,父进程关闭fd[1],子进程关闭fd[0],父进程sleep(1)让子进程先执行,子进程read(fd[1], &val, sizeof(val))阻塞,
然后父进程write(fd[0]..)发送数据,子进程接收数据处理后再发送给父进程数据write(fd[1]..),父进程读取数据,打印输出。
既然 socketpair 返回的一对文件描述符中的任何一个都可读和可写,那么 nodejs options.stdio 设置为
下面是我写的一个简单的例子, 当我们在主进程中启动一个子进程时, stdio 其中一项设置为 ipc
// p.js
const { spawn } = require("child_process");
const p = spawn("node", ["c.js"], { stdio: ["pipe", "pipe", "pipe", "ipc"] });
p.send(1);
p.on("message", console.log);
function spawn(file, args, options) {
options = normalizeSpawnArguments(file, args, options);
...
const child = new ChildProcess();
child.spawn(options);
...
return child;
}
ChildProcess.prototype.spawn = function(options) {
let i = 0;
validateObject(options, 'options');
// If no `stdio` option was given - use default
let stdio = options.stdio || 'pipe';
stdio = getValidStdio(stdio, false);
const ipc = stdio.ipc;
const ipcFd = stdio.ipcFd;
stdio = options.stdio = stdio.stdio;
...
if (ipc !== undefined) {
...
ArrayPrototypePush(options.envPairs, `NODE_CHANNEL_FD=${ipcFd}`);
ArrayPrototypePush(options.envPairs,
`NODE_CHANNEL_SERIALIZATION_MODE=${serialization}`);
}
...
const err = this._handle.spawn(options);
...
for (i = 0; i < stdio.length; i++)
ArrayPrototypePush(this.stdio,
stdio[i].socket === undefined ? null : stdio[i].socket);
// Add .send() method and start listening for IPC data
if (ipc !== undefined) setupChannel(this, ipc, serialization);
return err;
};
关于写入子进程的环境变量中的 NODE_CHANNEL_FD
这里回顾一下 socketpair 的例子, 这个 fd 可以理解为例子中的 fd[1], 其实现主要是后面要讲的 uv__process_child_init 函数通过调用 dup2 函数把子进程中的 files 文件指针数组的第 3 个 fd 重定向到了 fd[1]!
下面的流程主要讲了
// c.js
process.on('message', data => {
process.send(data + 1)
process.exit(0)
})
提示: 以下涉及的 i/o 相关的实现已经忽略, 可以参考【libuv 源码学习笔记】2. 线程池与i/o
主进程通过 spawn 方法运行一个新的 node 子进程, 类似于新运行一个 node c.js 命令, 会走一遍初始化数据等流程, 其中一步会运行 lib/internal/bootstrap/pre_execution.js 中的 setupChildProcessIpcChannel 函数
function setupChildProcessIpcChannel() {
if (process.env.NODE_CHANNEL_FD) {
const assert = require('internal/assert');
const fd = NumberParseInt(process.env.NODE_CHANNEL_FD, 10);
...
require('child_process')._forkChild(fd, serializationMode);
assert(process.send);
}
}
function _forkChild(fd, serializationMode) {
// set process.send()
const p = new Pipe(PipeConstants.IPC);
p.open(fd);
p.unref();
const control = setupChannel(process, p, serializationMode);
process.on('newListener', function onNewListener(name) {
if (name === 'message' || name === 'disconnect') control.refCounted();
});
process.on('removeListener', function onRemoveListener(name) {
if (name === 'message' || name === 'disconnect') control.unrefCounted();
});
}
void PipeWrap::Open(const FunctionCallbackInfo<Value>& args) {
...
int err = uv_pipe_open(&wrap->handle_, fd);
wrap->set_fd(fd);
if (err != 0)
env->ThrowUVException(err, "uv_pipe_open");
}
int uv__stream_open(uv_stream_t* stream, int fd, int flags) {
...
stream->io_watcher.fd = fd;
return 0;
}
function setupChannel(target, channel, serializationMode) {
...
channel.readStart();
return control;
}
readStart: env->SetProtoMethod(t, "readStart", JSMethod<&StreamBase::ReadStartJS>);
ReadStartJS: int StreamBase::ReadStartJS(const FunctionCallbackInfo<Value>& args) {
return ReadStart();
}
ReadStart: int LibuvStreamWrap::ReadStart() {
return uv_read_start(stream(), [](uv_handle_t* handle,
size_t suggested_size,
uv_buf_t* buf) {
static_cast<LibuvStreamWrap*>(handle->data)->OnUvAlloc(suggested_size, buf);
}, [](uv_stream_t* stream, ssize_t nread, const uv_buf_t* buf) {
static_cast<LibuvStreamWrap*>(stream->data)->OnUvRead(nread, buf);
});
}
OnUvRead: void LibuvStreamWrap::OnUvRead(ssize_t nread, const uv_buf_t* buf) {
...
EmitRead(nread, *buf);
}
EmitRead: void StreamResource::EmitRead(ssize_t nread, const uv_buf_t& buf) {
DebugSealHandleScope seal_handle_scope;
if (nread > 0)
bytes_read_ += static_cast<uint64_t>(nread);
listener_->OnStreamRead(nread, buf);
}
OnStreamRead: void EmitToJSStreamListener::OnStreamRead(ssize_t nread, const uv_buf_t& buf_) {
...
stream->CallJSOnreadMethod(nread, buf.ToArrayBuffer());
}
CallJSOnreadMethod: MaybeLocal<Value> StreamBase::CallJSOnreadMethod(ssize_t nread,
Local<ArrayBuffer> ab,
size_t offset,
StreamBaseJSChecks checks) {
...
// 🔥 onread
Local<Value> onread = wrap->object()->GetInternalField(
StreamBase::kOnReadFunctionField);
CHECK(onread->IsFunction());
return wrap->MakeCallback(onread.As<Function>(), arraysize(argv), argv);
}
function handleMessage(message, handle, internal) {
if (!target.channel)
return;
const eventName = (internal ? 'internalMessage' : 'message');
process.nextTick(emit, eventName, message, handle);
}
提示: emit, on 为 event 事件触发器 的实现, 在 nodejs 中大部分类都继承于 event, 在前端浏览器端也能经常看到。

这里由于篇幅有限, 子进程发送信息给主进程, 其实上向环境变量拿到的 fd 写入数据, 正如我们上面看到的 socketpair 的例子, 子进程可以从 fd[1] 中读数据, 也可从 fd[1] 中写入数据, 当子进程向 fd[1] 写入数据后, 主进程的 fd[0] 就会有了数据被 epoll 捕获调用主进程 i/o 观察者相应的回调, 其机制和子进程收到父进程 的消息类似。
两次模式下, 读取另一个进程来的消息也是有区别的
recvmsg 其实是能接受更多的参数替代 read 的存在, 这个具体的原因也是查了很多的资料。其中一个重要原因是 recvmsg 中 msg_control 字段能够接受来自其他进程的 fd。那么与像 node 一样写入子进程环境变量 NODE_CHANNEL_FD 传递有何异同了?
通常,此操作称为“传递文件描述符”到另一个进程。但是,更准确地说,传递的是对打开文件的引用描述(参见open(2)),并在接收过程中可能会有不同的文件描述符编号用过的。在语义上,这个操作等价于将(dup(2))文件描述符复制到文件中另一个进程的描述符表。
原来是可以实现 fd 引用的传递, 在 node cluster 集群 模块的实现起到了重要的作用。后面需要单独写一篇 cluster 集群的实现来细说一下 node 进程的通信。
static void uv__read(uv_stream_t* stream) {
...
is_ipc = stream->type == UV_NAMED_PIPE && ((uv_pipe_t*) stream)->ipc;
while (stream->read_cb
&& (stream->flags & UV_HANDLE_READING)
&& (count-- > 0)) {
assert(stream->alloc_cb != NULL);
buf = uv_buf_init(NULL, 0);
stream->alloc_cb((uv_handle_t*)stream, 64 * 1024, &buf);
if (buf.base == NULL || buf.len == 0) {
/* User indicates it can't or won't handle the read. */
stream->read_cb(stream, UV_ENOBUFS, &buf);
return;
}
assert(buf.base != NULL);
assert(uv__stream_fd(stream) >= 0);
if (!is_ipc) {
do {
nread = read(uv__stream_fd(stream), buf.base, buf.len);
}
while (nread < 0 && errno == EINTR);
} else {
/* ipc uses recvmsg */
msg.msg_flags = 0;
msg.msg_iov = (struct iovec*) &buf;
msg.msg_iovlen = 1;
msg.msg_name = NULL;
msg.msg_namelen = 0;
/* Set up to receive a descriptor even if one isn't in the message */
msg.msg_controllen = sizeof(cmsg_space);
msg.msg_control = cmsg_space;
do {
nread = uv__recvmsg(uv__stream_fd(stream), &msg, 0);
}
while (nread < 0 && errno == EINTR);
}
if (nread < 0) {
/* Error */
...
} else {
/* Successful read */
ssize_t buflen = buf.len;
if (is_ipc) {
err = uv__stream_recv_cmsg(stream, &msg);
if (err != 0) {
stream->read_cb(stream, err, &buf);
return;
}
}
...
}
main > uv_spawn > uv__process_child_init
这里很关键的是使用 dup2 函数可以把将第二个参数fd指向第一个参数fd所指的文件,相当于重定向功能
类似于我们运行一个命令使其的标准输出重定向到一个文件中, 可以这样做
$ command > file.txt
// Tips: 根据 fork 的特性, 这个函数的只有子进程才会被运行
static void uv__process_child_init(const uv_process_options_t* options,
int stdio_count,
int (*pipes)[2],
int error_fd) {
...
if (options->flags & UV_PROCESS_DETACHED)
// 编写守护进程的一般步骤步骤:
// (1)在父进程中执行fork并exit推出;
// (2)在子进程中调用setsid函数创建新的会话;
// (3)在子进程中调用chdir函数,让根目录 ”/” 成为子进程的工作目录;
// (4)在子进程中调用umask函数,设置进程的umask为0;
// (5)在子进程中关闭任何不需要的文件描述符
setsid();
for (fd = 0; fd < stdio_count; fd++) {
use_fd = pipes[fd][1];
if (use_fd < 0 || use_fd >= fd)
continue;
pipes[fd][1] = fcntl(use_fd, F_DUPFD, stdio_count);
if (pipes[fd][1] == -1) {
uv__write_int(error_fd, UV__ERR(errno));
_exit(127);
}
}
for (fd = 0; fd < stdio_count; fd++) {
close_fd = pipes[fd][0];
use_fd = pipes[fd][1];
...
if (fd == use_fd)
uv__cloexec_fcntl(use_fd, 0);
else
// 🔥
fd = dup2(use_fd, fd);
if (fd == -1) {
uv__write_int(error_fd, UV__ERR(errno));
_exit(127);
}
if (fd <= 2)
uv__nonblock_fcntl(fd, 0);
if (close_fd >= stdio_count)
uv__close(close_fd);
}
for (fd = 0; fd < stdio_count; fd++) {
use_fd = pipes[fd][1];
if (use_fd >= stdio_count)
uv__close(use_fd);
}
// setuid,setuid的作用是让执行该命令的用户以该命令拥有者的权限去执行,
// 比如普通用户执行passwd时会拥有root的权限,这样就可以修改/etc/passwd这个文件了。
// 它的标志为:s,会出现在x的地方,例:-rwsr-xr-x 。而setgid的意思和它是一样的,即让执行文件的用户以该文件所属组的权限去执行。
if ((options->flags & UV_PROCESS_SETGID) && setgid(options->gid)) {
uv__write_int(error_fd, UV__ERR(errno));
_exit(127);
}
if ((options->flags & UV_PROCESS_SETUID) && setuid(options->uid)) {
uv__write_int(error_fd, UV__ERR(errno));
_exit(127);
}
if (options->cwd != NULL && chdir(options->cwd)) {
uv__write_int(error_fd, UV__ERR(errno));
_exit(127);
}
...
execvp(options->file, options->args);
uv__write_int(error_fd, UV__ERR(errno));
_exit(127);
}
上面的 for 循环, 实质上是对进程的文件指针数组的操作, 并使用 dup2 函数进行重定向。
for (fd = 0; fd < stdio_count; fd++) {
close_fd = pipes[fd][0];
use_fd = pipes[fd][1];
if (fd == use_fd)
uv__cloexec_fcntl(use_fd, 0);
else
// 重定向
fd = dup2(use_fd, fd);
将 newfd 指向 oldfd 所指的文件,相当于重定向功能。如果 newfd 已经指向一个已经打开的文件,那么他会首先关闭这个文件,然后在使newfd指向oldfd文件;
// 把进程的标准输出指向某个文件的一个例子
#include <stdio.h>
#include <unistd.h>
#include <fcntl.h>
#define file_name "dup_test_file"
int main(int argc, char *argv[])
{
//先调用dup将标准输出拷贝一份,指向真正的标准输出
int stdout_copy_fd = dup(STDOUT_FILENO);//此时stdout_copy_fd也指向标准输出
int file_fd = open(file_name, O_RDWR);//file_fd是文件"dup_test_file"的文件描述符
//让标准输出指向文件
dup2(file_fd, STDOUT_FILENO);//首先关闭1所指向的文件,然后再使文件描述符1指向file_fd
printf("hello");//使用stdout输出"hello",此时stdout已经被重定向到file_fd,相当于把其输出到文件中
fflush(stdout);//刷新缓冲区
//恢复标准输出
dup2(stdout_copy_fd, STDOUT_FILENO);
printf("world");
return 0;
}
main > uv_spawn > uv__make_pipe
Tips: libuv 为了保证 fork 出的子进程成功运行 execvp 函数才设置流的 i/o 观察者。
首先通过 uv__make_pipe 函数调用 pipe2 函数, 设置 flags = O_CLOEXEC, 即当 fork 出的子进程运行 execvp 函数后, 会发送一个退出信号, 主进程 read 函数返回 0, 主进程才能继续往下运行。
read: 一旦成功,将返回读取的字节数(0 表示文件结束)。文件结束),并且文件的位置被提前这个数字。如果这个数字比要求的字节数小,则不是错误。字节数,这不是错误;例如,这可能是因为现在可用的字节数较少这可能是因为现在实际可用的字节数较少(可能是因为我们已经接近可能是因为现在可用的字节数较少(可能是因为我们接近文件的末端,或者是因为我们正在从管道或从终端),或者因为read()被一个信号打断了。
int uv_pipe(uv_os_fd_t fds[2], int read_flags, int write_flags) {
uv_os_fd_t temp[2];
int err;
#if defined(__FreeBSD__) || defined(__linux__)
int flags = O_CLOEXEC;
if ((read_flags & UV_NONBLOCK_PIPE) && (write_flags & UV_NONBLOCK_PIPE))
flags |= UV_FS_O_NONBLOCK;
if (pipe2(temp, flags))
return UV__ERR(errno);
...
}
主进程 uv_spawn 中的 read
do
r = read(signal_pipe[0], &exec_errorno, sizeof(exec_errorno));
while (r == -1 && errno == EINTR);
main > uv_spawn > uv__process_open_stream
设置主进程的 i/o 观察者的 fd, 相当于 socketpair 例子中的 fd[0], 当 fd 有变化时, 即收到来自子进程的写入的数据
流相关实现参考 【libuv 源码学习笔记】网络与流
static int uv__process_open_stream(uv_stdio_container_t* container,
int pipefds[2]) {
int flags;
int err;
if (!(container->flags & UV_CREATE_PIPE) || pipefds[0] < 0)
return 0;
err = uv__close(pipefds[1]);
if (err != 0)
abort();
pipefds[1] = -1;
uv__nonblock(pipefds[0], 1);
flags = 0;
if (container->flags & UV_WRITABLE_PIPE)
flags |= UV_HANDLE_READABLE;
if (container->flags & UV_READABLE_PIPE)
flags |= UV_HANDLE_WRITABLE;
// 🔥 uv__stream_open 函数主要运行代码 stream->io_watcher.fd = fd;
return uv__stream_open(container->data.stream, pipefds[0], flags);
}
main > uv_spawn > uv_signal_start
通过 libuv 信号机制, 在子进程退出时, 调用例子中设置的 on_exit 回调函数, 程序运行结束
process->exit_cb = options->exit_cb;
信号相关实现参考 【libuv 源码学习笔记】信号

服务端渲染的项目本地模拟线上环境运行报了如下的一个错误,然而本地开发模式运行和真实的线上生产模式运行均没有问题。当听到这个问题描述时,我只觉得这个临床表现透露着诡异的氛围 😢
本地模拟线上环境是先构建出生产模式的代码,然后运行 SSR Server 。其目的是更接近真实的线上生产环境的效果, 通常用于复现与 debug 线上环境出现的问题。
// 错误信息
Invariant Violation: You should not use <Switch> outside a <Router>上面的错误信息造成原因通常有两个
服务端运行使用的其实是 StaticRouter, 服务端渲染的是一个请求 path 的页面快照, 不存在客户端路由会切换的情况
如果 react-router 有多个版本, 使用 Router 组件的 RouterContext 与使用 Switch 组件的 RouterContext 将会是在两个版本的文件中,造成 RouterContext 不是同一个引用,平时这一点较难发现
熟悉 React 的同学应该知道, 子组件要能从 RouterContext.Consumer 中获取到父组件 RouterContext.Provider 注入的数据, 其 RouterContext 必须是同一个对象才行
如下 react-router 的代码, 说明了 Switch 组件是需要从 Router 组件获取必要的 context 信息, context 不存在则抛错
// react-router
class Router extends React.Component {
render() {
return (
<RouterContext.Provider
value={{
history: this.props.history,
location: this.state.location,
match: Router.computeRootMatch(this.state.location.pathname),
staticContext: this.props.staticContext
}}
>
<HistoryContext.Provider
children={this.props.children || null}
value={this.props.history}
/>
</RouterContext.Provider>
);
}
}
class Switch extends React.Component {
render() {
return (
<RouterContext.Consumer>
{context => {
// 抛错处 👇
invariant(context, "You should not use <Switch> outside a <Router>");
const location = this.props.location || context.location;
let element, match;
// We use React.Children.forEach instead of React.Children.toArray().find()
// here because toArray adds keys to all child elements and we do not want
// to trigger an unmount/remount for two <Route>s that render the same
// component at different URLs.
React.Children.forEach(this.props.children, child => {
if (match == null && React.isValidElement(child)) {
element = child;
const path = child.props.path || child.props.from;
match = path
? matchPath(location.pathname, { ...child.props, path })
: context.match;
}
});
return match
? React.cloneElement(element, { location, computedMatch: match })
: null;
}}
</RouterContext.Consumer>
);
}
}从 yarn.lock 文件看出 react-router 确实只有一个版本,不过仍然存在 node_modules 文件缓存没有删除成功,导致残留了旧版本的可能性。此时我们需要分别在 Router 和 Switch render 时加上 debugger, 确认代码运行时 RouterContext.Provider 与 RouterContext.Consumer 是同一个 RouterContext 引用
通过 debugger 断点也确认了 RouterContext 是同一个引用, 那么子组件通过 Consumer 仍然拿不到 context 岂不是 React 的 bug ?
// react-router
class Switch extends React.Component {
render() {
return (
<RouterContext.Consumer>
{context => {
// 抛错处 👇
invariant(context, "You should not use <Switch> outside a <Router>");
// ...
</RouterContext.Consumer>
);
}
}此时我们还不能确认是 React 的 bug, 要先摆脱 react-router 的嫌疑。写了如下的 demo, 发现 console.log 依然没有值,不过把 demo 复制到相同 react 版本的另一个 SSR 项目中 console.log 是有值的,得出不是 React 的 bug
import React from 'react'
const MyRouterContext = React.createContext({})
function App() {
return (
<MyRouterContext.Provider value={{ test: 1 }}>
<MyRouterContext.Consumer>
{(ctx) => {
console.log(ctx)
return 11111
}}
</MyRouterContext.Consumer>
</MyRouterContext.Provider>
)
}排查了一圈下来发现大家都是被冤枉的 😢
最后只能和正常能运行的 SSR 项目来进行不同了,排查重点在于
在一阵对比后, 还是发现了关键的信息。本地模拟线上环境运行的是下面的命令
模拟线上 NODE_ENV 最好是应该设置成 production, 这里却设置成了 development
"co-start": "yarn build && NODE_ENV=development DOCKER=true yarn start"生产环境 yarn build 打包后,代码开始按如下顺序运行
在步骤1中, NODE_ENV 是 co-start 命令设置的 development, 该配置文件 import 了一个包 packageA, packageA 下某个包又 import 了 react , 所以此时 Node.js 缓存住了 react 模块, 其值为 development 环境的 ./cjs/react.development.js 的模块导出
// react/index.js
'use strict';
if (process.env.NODE_ENV === 'production') {
module.exports = require('./cjs/react.production.min.js');
} else {
module.exports = require('./cjs/react.development.js');
}
在步骤 2 中, 判断此时是生产模式运行就强制初始化 NODE_ENV 为 production, 使得后面运行的 import { renderToString } from 'react-dom/server' 部分的代码, react-dom 的值为 production 环境下 ./cjs/react-dom-server.node.production.min.js 的模块导出
react 和 react-dom 一个使用的是开发版本, 一个使用的是生产版本
此时我们篡改 node_modules 中 react-dom 与 react 的代码, 统一替换 process.env.NODE_ENV === 'production' 为 true 或者 false, 使得 react-dom 与 react 引用环境保持一致, 发现一切就能正常运行了 ✅
// react-dom/server.node.js
'use strict';
if (process.env.NODE_ENV === 'production') {
module.exports = require('./cjs/react-dom-server.node.production.min.js');
} else {
module.exports = require('./cjs/react-dom-server.node.development.js');
}
运行 react 与 react-dom 时的 process.env.NODE_ENV 的值不一致将会导致服务端渲染时 Consumer 组件拿不到 Provider 组件透传下来的 Context

无意间听到同学 A 说开发项目 B 这么久了, 开发时修改代码后页面内容未进行重新渲染, 甚至页面连刷新也没有 😨, 所以平时是手动刷新了一次浏览器, 惊讶之余就得快速解决这个问题。
不同于 nodejs 项目修改代码后 pm2, nodemon, forever 等会对进程进行一下重启生效, 前端代码修改后的热更新流程还是比较长的, 主要为 webpack-dev-server 通过 websocket 去通知到浏览器, 参考图如下

前端代码热更新除了上图其实还有另一种方式, 即没有使用 webpack-dev-server, 而是自己写的一个 dev-server, 热更新方面集成了 webpack-hot-middleware 实现, 后者通知到浏览器是使用了 SSE 服务器推送事件, 因为有 dev-server 去单向通知浏览器就可以了, 不需要双向的 websocket
本次有问题的项目是一个比较旧的 nextjs 项目, 其采用的就是后者 SSE 的方式, SSE 服务端的核心这里也简单说一下
// SSE 服务端实现
var headers = {
'Access-Control-Allow-Origin': '*',
'Content-Type': 'text/event-stream;charset=utf-8',
'Cache-Control': 'no-cache, no-transform',
'X-Accel-Buffering': 'no',
};
res.writeHead(200, headers);
res.write('\n');devtool 中查看如下图示

启动问题项目, 修改代码后也是在进行正常的重新编译, 编译完成后浏览器也貌似收到了信息, 最后的日志停止在了 [Fast Refresh] done, 就没有下文了, 页面内容没有进行更新, 浏览器也没刷新


这里就需要对 nextjs 客户端 SSE 部分的代码从起点开始进行一个 debug
// packages/next/client/dev/error-overlay/eventsource.js
source = new window.EventSource(options.path)
source.onopen = handleOnline
source.onerror = handleDisconnect
source.onmessage = handleMessagepackages/next/client/dev/error-overlay/hot-dev-client.js
function onFastRefresh(hasUpdates) {
DevOverlay.onBuildOk()
if (hasUpdates) {
DevOverlay.onRefresh()
}
console.log('[Fast Refresh] done')
}// packages/react-dev-overlay/src/client.ts
function onRefresh() {
Bus.emit({ type: Bus.TYPE_REFFRESH })
}// packages/react-dev-overlay/src/internal/ReactDevOverlay.tsx
const ReactDevOverlay: React.FunctionComponent = function ReactDevOverlay({
children,
}) {
const [state, dispatch] = React.useReducer<
React.Reducer<OverlayState, Bus.BusEvent>
>(reducer, { nextId: 1, buildError: null, errors: [] })
React.useEffect(() => {
Bus.on(dispatch)
return function () {
Bus.off(dispatch)
}
}, [dispatch])
const isMounted = hasBuildError || hasRuntimeErrors
return (
<React.Fragment>
<ErrorBoundary onError={onComponentError}>
{children ?? null}
</ErrorBoundary>
{isMounted ? (
<ShadowPortal>
<CssReset />
<Base />
<ComponentStyles />
{hasBuildError ? (
<BuildError message={state.buildError!} />
) : hasRuntimeErrors ? (
<Errors errors={state.errors} />
) : undefined}
</ShadowPortal>
) : undefined}
</React.Fragment>
)
}// packages/next/next-server/server/render.tsx
const AppContainer = ({ children }: any) => (
<RouterContext.Provider value={router}>
<AmpStateContext.Provider value={ampState}>
<HeadManagerContext.Provider
value={{
updateHead: (state) => {
head = state
},
updateScripts: (scripts) => {
scriptLoader = scripts
},
scripts: {},
mountedInstances: new Set(),
}}
>
<LoadableContext.Provider
value={(moduleName) => reactLoadableModules.push(moduleName)}
>
{children}
</LoadableContext.Provider>
</HeadManagerContext.Provider>
</AmpStateContext.Provider>
</RouterContext.Provider>
)
🐛 debug 问题比较重要的一点是分段排查, 就像网络了出了问题, 专业维修人员总会分段去检查, 直到排查到最近未通的线路
这里我们把 nextjs 内部的热更新监听的代码给搬移到我们自己的组件中来, 测试我们自己的线路, 然后在 TYPE_REFFRESH 事件后进行一个强制渲染的操作, 看是否能热更新生效
componentDidMount() {
if (process.env.NODE_ENV === "development") {
const Bus = require("@next/react-dev-overlay/lib/internal/bus")
Bus.on((event: Record<string, string>) => {
if (event.type === Bus.TYPE_REFFRESH) {
this.forceUpdate()
}
})
}
}❌ 答案是还是未能热更新, 其实到这里需要 🤔 思考一下 热更新的本质 ?
当客户端收到的 xxx.hot-update.js 代码执行后, 内存里面缓存所有模块的 installedModules 对象如下就会把 key 值为 @components/App 的值给更新了, 但是如果不在热更新的回调中重新 require 一次来取到最新赋的值, 其如果存在父组件等还是引用的是旧的值
// 一个简单的热替换的实现的例子
function __enableHotModuleReplacement() {
if (module.hot) {
if (module.hot._acceptedDependencies['@components/App']) {
console.warn('[${PKG_NAME}]: Hot updates have already been registered')
} else {
module.hot.accept('@components/App', () => {
const _App = require('@components/App').default
if (_App) {
ReactDOM.render(<_App />, document.getElementById('root'))
} else {
location.reload()
}
})
console.log('[${PKG_NAME}]: Hot Update Registration Successful')
}
}
}
__enableHotModuleReplacement()通过上面的例子的分析, 我们补丁代码需要下面的改动才能更新成功
componentDidMount() {
if (process.env.NODE_ENV === "development") {
const Bus = require("@next/react-dev-overlay/lib/internal/bus")
Bus.on((event: Record<string, string>) => {
if (event.type === Bus.TYPE_REFFRESH) {
const NewComponent = require('views').default
this.setState({ Component: NewComponent })
}
})
}
}
render() {
const { Component } = this.state
return <Component {...this.props}/>
}到这里我们在自己的代码中打了一个补丁, 修复了热更新的能力, 不过我们还需要测试一下该组件的孙子组件修改后, 是否也能正常生效 ?
❌ 答案是否定的, 孙子组件未能生效! 那么结论是 nextjs 内部组件没有出问题, 是谁把这个 installedModules 缓存给破坏了 ?
那么我们把上面的代码补丁继续完善一下, 自己手动清除所有模块缓存解决仅存的问题
componentDidMount() {
if (process.env.NODE_ENV === "development") {
const Bus = require("@next/react-dev-overlay/lib/internal/bus")
Bus.on((event: Record<string, string>) => {
if (event.type === Bus.TYPE_REFFRESH) {
Object.keys(require.cache).forEach(key => {
delete require.cache[key]
})
const NewComponent = require('views').default
this.setState({ Component: NewComponent })
}
})
}
}
render() {
const { Component } = this.state
return <Component {...this.props}/>
}
是的, 虽然我们此时还未找到真正的问题, 但是根据问题反映的种种现象使用一个粗糙的补丁给解决了。
到第 4 步, 本已经打算按现有的补丁结案, 不成想因为另一个小问题发现了热更新失败的真正原因
在 next.config.js 中有一个 externals 的配置, 有过了解的同学应该知道配置了 externals 是需要到模版的 html 中手动引入带有 externals 配置包的 cdn js 文件
// next.config.js
if (!isServer) {
const e = {
react: "React",
"react-dom": "ReactDOM"
}
config.externals.unshift(e)
}但是发现 nextjs 代码中尽然写死了 react, react-dom 作为 dll entry, 了解 dll 的同学应该知道, 它会把配置的入口前置构建一次, 且 autodll 插件会把它自动插入到模版 html 文件中

✅ 发现去掉补丁后, 热更新也能正常运行了, 问题解决 ~
老项目虽然有些坑, 尽量要做到通过一些粗糙的补丁基本解决问题, 有些黑盒不可能花过多时间去研究。其次是找异同点, 比如 nextjs 项目, 最大的不同无异于配置文件 next.config.js 与包的版本, 这些关键地方需要重点去排查。
开始写一些博客主要是在看完代码后再温故总结一遍, 也是为了后面回头也能查阅。本系列会从官网的例子出发, 尽可能以链路追踪的方式记录其中源码核心模块的实现, 本篇例子来源
涉及的知识点
cluster 使用的例子分析
const cluster = require('cluster');
const http = require('http');
const numCPUs = require('os').cpus().length;
if (cluster.isMaster) {
console.log(`主进程 ${process.pid} 正在运行`);
// 衍生工作进程。
for (let i = 0; i < numCPUs; i++) {
cluster.fork();
}
cluster.on('exit', (worker, code, signal) => {
console.log(`工作进程 ${worker.process.pid} 已退出`);
});
} else {
// 工作进程可以共享任何 TCP 连接。
// 在本例子中,共享的是 HTTP 服务器。
http.createServer((req, res) => {
res.writeHead(200);
res.end('你好世界\n');
}).listen(8000);
console.log(`工作进程 ${process.pid} 已启动`);
}
Node.js 的单个实例在单个线程中运行。 为了利用多核系统,用户有时会想要启动 Node.js 进程的集群来处理负载。
知识回顾: 在 ipc 通信的实现中如果判断是否是子进程就检查环境变量里面是否写入了 NODE_CHANNEL_FD, 其实就已经给了我们启发, 在 cluster 中的实现其实是类似的, 每 fork 一个子进程其环境变量中都会写入一个 NODE_UNIQUE_ID, 其值是一个自增长的整数值, 在进程中判断该环境变量有无来判断当前是否为子进程
Tips: process.env 的 value 类型皆为字符串, 即 0 为 "0", true 为 "true"。
通过代码的实现可发现主进程和子进程 require 的 cluster 文件其实是不一样的, 那么主进程 internal/cluster/primary module.exports.isMaster = true, 子进程 internal/cluster/child module.exports.isMaster = false 即可。
// lib/cluster.js
'use strict';
const childOrPrimary = 'NODE_UNIQUE_ID' in process.env ? 'child' : 'primary';
module.exports = require(`internal/cluster/${childOrPrimary}`);
其也只是简单的封装了 child_process.fork
为了充分利用多核系统, 可以的做法是主进程作为了一个反向代理服务器监听用户传入的端口, 然后启动若干个子进程继续监听不同的端口, 主进程把请求转发到子进程即可。
进程间解耦也是非常重要的, 如 Service Mesh 提出的 Sidecar 模式轻松无耦合的处理服务发现、负载均衡、请求熔断等, Service Mesh, Dapr 等知识后面可以好好学习一下
// lib/internal/cluster/primary.js
function createWorkerProcess(id, env) {
const workerEnv = { ...process.env, ...env, NODE_UNIQUE_ID: `${id}` };
const execArgv = [...cluster.settings.execArgv];
const debugArgRegex = /--inspect(?:-brk|-port)?|--debug-port/;
const nodeOptions = process.env.NODE_OPTIONS || '';
...
return fork(cluster.settings.exec, cluster.settings.args, {
cwd: cluster.settings.cwd,
env: workerEnv,
serialization: cluster.settings.serialization,
silent: cluster.settings.silent,
windowsHide: cluster.settings.windowsHide,
execArgv: execArgv,
stdio: cluster.settings.stdio,
gid: cluster.settings.gid,
uid: cluster.settings.uid
});
}
那么 node 集群是怎么做的了 ?
用 【libuv 源码学习笔记】网络与流 篇讲到知识翻译一遍上面的话即是
先说一下方法2的完整实现过程, 因为其实现与 nginx 多进程机制 “雷同”
不同点: 在 node 中不同的是步骤 3, 在 libuv 中没有找到互斥锁的使用, 我们先看 uv__server_io 函数, 其为 tcp 流的 i/o 观察者回调, 具体 i/o 相关可参考 【libuv 源码学习笔记】线程池与i/o
问题: 如果若干个子进程都监听的是同一个 socketFd, 故 uv__server_io 会在不同的进程里面在极短的时间内同时被调用, 没有互斥锁如何控制 ?
解决方案: 当被其中一个子进程率先处理后, 通过看下面的代码 err 此时是 < 0, 出现了 UV_EAGAIN, EWOULDBLOCK 错误, 紧接着错误后面的注释为 /* Not an error. */, 关于这两个错误的解释是套接字文件描述符设置了O_NONBLOCK,并且没有连接可以接受, 即如果一个子进程抢占失败则静默即可。
[EAGAIN] or [EWOULDBLOCK]: O_NONBLOCK is set for the socket file descriptor and no connections are present to be accepted .
// deps/uv/src/unix/stream.c
void uv__server_io(uv_loop_t* loop, uv__io_t* w, unsigned int events) {
...
err = uv__accept(uv__stream_fd(stream));
if (err < 0) {
if (err == UV_EAGAIN || err == UV__ERR(EWOULDBLOCK))
return; /* Not an error. */
if (err == UV_ECONNABORTED)
continue; /* Ignore. Nothing we can do about that. */
if (err == UV_EMFILE || err == UV_ENFILE) {
err = uv__emfile_trick(loop, uv__stream_fd(stream));
if (err == UV_EAGAIN || err == UV__ERR(EWOULDBLOCK))
break;
}
stream->connection_cb(stream, err);
continue;
}
...
}
来自 node 官网 的解释: 理论上方法2 应该是效率最佳的。 但在实际情况下,由于操作系统调度机制的难以捉摸,会使分发变得不稳定。 可能会出现八个进程中有两个分担了 70% 的负载。所以即使方法1 主进程做的事情比较多, 也会默认采用。
个人感觉可能是 uv__server_io 函数中到底哪个进程能够抢先调用 uv__accept 去处理一个连接的不确定性造成的上面说的问题。
node 暂未支持的特性,了解到方法3是从 theanarkh 大佬的从内核看SO_REUSEPORT的实现(基于5.9.9)这篇文章,其主要出现的原因为方法2会造成惊群现象,即一有新连接来了,所以进程都被唤醒了,然而成功的只有一个。SO_REUSEPORT 特性的实现主要是在内核层面去做一个负载均衡的调度。如果 SO_REUSEPORT 能被普遍兼容的话, node 集群就可以完全交给内核去做了。阅读更多推荐 使用socket so_reuseport提高服务端性能
如果 node 基于方法2模拟类似的功能的话,就需要方法2的 uv__server_io 函数中去维护一个队列,逐个去分配连接达到同样的效果,防止多线程竞争访问造成的问题。

在方法1与方法2中也提到了并不是所有的进程都需要真正的调用 listen 方法, 其原理与实现流程推荐阅读 Node.js:cluster原理简析。
核心的实现上面的文章大佬已经分析得很透彻了, 这里我就讲一下偏门一点的知识。
无论是方法1还是方法2都涉及到进程间如何更好的传递 fd。
回顾一下 【libuv 源码学习笔记】子进程与ipc 的实现
那么当方法1, 每当有一个新连接来时, 传递一个 acceptFd 到子进程按 ipc 的实现的话, 这里子进程已经生成就不能继续通过写入环境变量的方法, 可以通过 process.send {acceptFd: xxx}, 然后在走 ipc 一套也太麻烦了。
让我们看看 node 中 fd 的传递的实现。
如父进程向子进程发送一个 fd
如果 req->send_handle ( 为步骤1中的 new TCP(TCPConstants.SERVER)) 存在, 即代表此次是有 fd 传递的任务
其一个主要原因的 ipc 通信时, recvmsg 能够写入的数据可包含 cmsg 字段, 在文章 UNIX 域协议使用! 在进程间传递“文件描述符” 实例 中有清楚的例子讲解。
在 unix(7) — Linux manual page 中指出传递的其实是文件的引用描述, 直接省去了手动重定向等一批麻烦的事。
通常,此操作称为“传递文件描述符”到另一个进程。但是,更准确地说,传递的是对打开文件的引用描述(参见open(2)),并在接收过程中可能会有不同的文件描述符编号用过的。在语义上,这个操作等价于将(dup(2))文件描述符复制到文件中另一个进程的描述符表。
// deps/uv/src/unix/stream.c
static void uv__write(uv_stream_t* stream) {
...
if (req->send_handle) {
int fd_to_send;
struct msghdr msg;
struct cmsghdr *cmsg;
union {
char data[64];
struct cmsghdr alias;
} scratch;
if (uv__is_closing(req->send_handle)) {
err = UV_EBADF;
goto error;
}
fd_to_send = uv__handle_fd((uv_handle_t*) req->send_handle);
memset(&scratch, 0, sizeof(scratch));
assert(fd_to_send >= 0);
msg.msg_name = NULL;
msg.msg_namelen = 0;
msg.msg_iov = iov;
msg.msg_iovlen = iovcnt;
msg.msg_flags = 0;
msg.msg_control = &scratch.alias;
msg.msg_controllen = CMSG_SPACE(sizeof(fd_to_send));
cmsg = CMSG_FIRSTHDR(&msg);
cmsg->cmsg_level = SOL_SOCKET;
cmsg->cmsg_type = SCM_RIGHTS;
cmsg->cmsg_len = CMSG_LEN(sizeof(fd_to_send));
/* silence aliasing warning */
{
void* pv = CMSG_DATA(cmsg);
int* pi = pv;
*pi = fd_to_send;
}
do
n = sendmsg(uv__stream_fd(stream), &msg, 0);
while (n == -1 && RETRY_ON_WRITE_ERROR(errno));
/* Ensure the handle isn't sent again in case this is a partial write. */
if (n >= 0)
req->send_handle = NULL;
} else {
do
n = uv__writev(uv__stream_fd(stream), iov, iovcnt);
while (n == -1 && RETRY_ON_WRITE_ERROR(errno));
}
...
}
当主进程调用 uv__write 在 socketpair 一端写入数据后, 子进程通过 uv__read 读取
通过 uv__recvmsg 读取普通数据, 通过 uv__stream_recv_cmsg 方法读取 fd。
// deps/uv/src/unix/stream.c
static void uv__read(uv_stream_t* stream) {
...
is_ipc = stream->type == UV_NAMED_PIPE && ((uv_pipe_t*) stream)->ipc;
...
if (!is_ipc) {
do {
nread = read(uv__stream_fd(stream), buf.base, buf.len);
}
while (nread < 0 && errno == EINTR);
} else {
/* ipc uses recvmsg */
msg.msg_flags = 0;
msg.msg_iov = (struct iovec*) &buf;
msg.msg_iovlen = 1;
msg.msg_name = NULL;
msg.msg_namelen = 0;
/* Set up to receive a descriptor even if one isn't in the message */
msg.msg_controllen = sizeof(cmsg_space);
msg.msg_control = cmsg_space;
do {
nread = uv__recvmsg(uv__stream_fd(stream), &msg, 0);
}
while (nread < 0 && errno == EINTR);
}
if (nread < 0) {
...
} else {
/* Successful read */
ssize_t buflen = buf.len;
if (is_ipc) {
err = uv__stream_recv_cmsg(stream, &msg);
if (err != 0) {
stream->read_cb(stream, err, &buf);
return;
}
}
...
}
static int uv__stream_recv_cmsg(uv_stream_t* stream, struct msghdr* msg) {
struct cmsghdr* cmsg;
for (cmsg = CMSG_FIRSTHDR(msg); cmsg != NULL; cmsg = CMSG_NXTHDR(msg, cmsg)) {
char* start;
char* end;
int err;
void* pv;
int* pi;
unsigned int i;
unsigned int count;
if (cmsg->cmsg_type != SCM_RIGHTS) {
fprintf(stderr, "ignoring non-SCM_RIGHTS ancillary data: %d\n",
cmsg->cmsg_type);
continue;
}
/* silence aliasing warning */
pv = CMSG_DATA(cmsg);
pi = pv;
/* Count available fds */
start = (char*) cmsg;
end = (char*) cmsg + cmsg->cmsg_len;
count = 0;
while (start + CMSG_LEN(count * sizeof(*pi)) < end)
count++;
assert(start + CMSG_LEN(count * sizeof(*pi)) == end);
for (i = 0; i < count; i++) {
/* Already has accepted fd, queue now */
if (stream->accepted_fd != -1) {
err = uv__stream_queue_fd(stream, pi[i]);
if (err != 0) {
/* Close rest */
for (; i < count; i++)
uv__close(pi[i]);
return err;
}
} else {
stream->accepted_fd = pi[i];
}
}
}
return 0;
}
承接上面的 uv__stream_recv_cmsg 方法子进程读取到的 fd, 子进程接下来的处理
当上一个连接的数据被读取时, 通过 uv_pipe_pending_count 方法判断当前是否有 stream->queued_fds 或者 stream->accepted_fd, 如果有的话调用 AcceptHandle 去接受连接继续去处理。
值得关注的点: pending_obj 接收到了 AcceptHandle 方法返回的结果, 并且通过 object()->Set 写入了 context 中。
// src/stream_wrap.cc
void LibuvStreamWrap::OnUvRead(ssize_t nread, const uv_buf_t* buf) {
HandleScope scope(env()->isolate());
Context::Scope context_scope(env()->context());
uv_handle_type type = UV_UNKNOWN_HANDLE;
if (is_named_pipe_ipc() &&
uv_pipe_pending_count(reinterpret_cast<uv_pipe_t*>(stream())) > 0) {
type = uv_pipe_pending_type(reinterpret_cast<uv_pipe_t*>(stream()));
}
// We should not be getting this callback if someone has already called
// uv_close() on the handle.
CHECK_EQ(persistent().IsEmpty(), false);
if (nread > 0) {
MaybeLocal<Object> pending_obj;
if (type == UV_TCP) {
pending_obj = AcceptHandle<TCPWrap>(env(), this);
} else if (type == UV_NAMED_PIPE) {
pending_obj = AcceptHandle<PipeWrap>(env(), this);
} else if (type == UV_UDP) {
pending_obj = AcceptHandle<UDPWrap>(env(), this);
} else {
CHECK_EQ(type, UV_UNKNOWN_HANDLE);
}
if (!pending_obj.IsEmpty()) {
object()
->Set(env()->context(),
env()->pending_handle_string(),
pending_obj.ToLocalChecked())
.Check();
}
}
EmitRead(nread, *buf);
}
通过上面的方法至此子进程已经成功接收的自己所需的 fd, 然后子进程生成对应的 Handle 对象传给 js
template <class WrapType>
static MaybeLocal<Object> AcceptHandle(Environment* env,
LibuvStreamWrap* parent) {
static_assert(std::is_base_of<LibuvStreamWrap, WrapType>::value ||
std::is_base_of<UDPWrap, WrapType>::value,
"Can only accept stream handles");
EscapableHandleScope scope(env->isolate());
Local<Object> wrap_obj;
if (!WrapType::Instantiate(env, parent, WrapType::SOCKET).ToLocal(&wrap_obj))
return Local<Object>();
HandleWrap* wrap = Unwrap<HandleWrap>(wrap_obj);
CHECK_NOT_NULL(wrap);
uv_stream_t* stream = reinterpret_cast<uv_stream_t*>(wrap->GetHandle());
CHECK_NOT_NULL(stream);
if (uv_accept(parent->stream(), stream))
ABORT();
return scope.Escape(wrap_obj);
}
js 中的参数 pendingHandle 即是上面 AcceptHandle 生成的 TCP 实例对象。
pending_obj > pending_handle_string > pendingHandle
// lib/internal/child_process.js
channel.onread = function(arrayBuffer) {
const recvHandle = channel.pendingHandle;
channel.pendingHandle = null;
if (arrayBuffer) {
const nread = streamBaseState[kReadBytesOrError];
const offset = streamBaseState[kArrayBufferOffset];
const pool = new Uint8Array(arrayBuffer, offset, nread);
if (recvHandle)
pendingHandle = recvHandle;
for (const message of parseChannelMessages(channel, pool)) {
if (isInternal(message)) {
if (message.cmd === 'NODE_HANDLE') {
handleMessage(message, pendingHandle, true);
pendingHandle = null;
} else {
handleMessage(message, undefined, true);
}
} else {
handleMessage(message, undefined, false);
}
...
};
剩下的步骤
当看到某一个子进程退出时, 代码里面好像啥事也没干, 心想这不就瘸腿了吗 ...
// lib/internal/cluster/primary.js
worker.process.once('exit', (exitCode, signalCode) => {
/*
* Remove the worker from the workers list only
* if it has disconnected, otherwise we might
* still want to access it.
*/
if (!worker.isConnected()) {
removeHandlesForWorker(worker);
removeWorker(worker);
}
worker.exitedAfterDisconnect = !!worker.exitedAfterDisconnect;
worker.state = 'dead';
worker.emit('exit', exitCode, signalCode);
cluster.emit('exit', worker, exitCode, signalCode);
});
又仔细查阅了一下文档, 这文档 'exit' 事件 这有了说明, 需要把如下代码手动监听一下 exit 事件, 感觉是个比较隐秘的坑 ...
cluster.on('exit', (worker, code, signal) => {
console.log('工作进程 %d 关闭 (%s). 重启中...',
worker.process.pid, signal || code);
cluster.fork();
});
最后去 egg-cluster 也确认了一下, 有个 refork 选项看上去是我想查的, 接着去 cfork 即如果生产环境如果意外退出默认会通过 cluster.fork() 重启子进程, 大佬们还是都考虑到了 ~
// egg-cluster
cfork({
exec: this.getAppWorkerFile(),
args,
silent: false,
count: this.options.workers,
// don't refork in local env
refork: this.isProduction,
windowsHide: process.platform === 'win32',
});
// cfork
if (allow()) {
newWorker = forkWorker(worker._clusterSettings);
newWorker._clusterSettings = worker._clusterSettings;
log('[%s] [cfork:master:%s] new worker:%s fork (state: %s)',
utility.logDate(), process.pid, newWorker.process.pid, newWorker.state);
}
function allow() {
if (!refork) {
return false;
}
...
}
function forkWorker(settings) {
if (settings) {
cluster.settings = settings;
cluster.setupMaster();
}
return cluster.fork(attachedEnv);
}
cluster 集群的原理不少大佬已经讲得非常清楚了, 本篇就主要讲了一下冷门的 acceptFd, socketFd 进程间的传递的实现过程。
给我留言 ✉️

单元测试节点失败了, 点进来查看发现是一个内部的 Node.js C++ 插件运行时报错了 ❌, 错误信息为: undefined symbol: _ZN3leo6AppEnv9swimlane_B5cxx11E。
在计算机中,一个函数的指令被存放在一段内存中,当进程需要执行这个函数的时候,它必须知道要去内存的哪个地方找到这个函数,然后执行它的指令。也就是说,进程要根据这个函数的名称,找到它在内存中的地址,而这个名称与地址的映射关系,是存储在 “symbol table”中。
“symbol table”中的 symbol 就是这个函数的名称,进程会根据这个 symbol 找到它在内存中的地址,然后跳转过去执行。
了解到 symbol 的概念后, 我们知道了 symbol 记录了变量在内存中的地址, 那么 undefined symbol 可能就是找不到该地址或者是非法不匹配的地址。
先查阅一下 undefined symbol 可能的原因 来指引一下接下来的排查方向
依赖库未找到
链接的依赖库不一致
符号被隐藏
c++ abi 版本不一致
首先拉取出现问题的镜像开始本地复现问题, 然后使用 nm 命令来显示更多查找 symbol 时具体的信息
linux nm 命令 显示关于指定 File 中符号的信息,文件可以是对象文件、可执行文件或对象文件库.
本地也顺利复现了该问题
undefined symbol: _ZN3leo6AppEnv9swimlane_B5cxx11E
接着我们运行 nm 命令来查看详细信息
nm -D /xxx/build/Release/leo_client.node下面是截取的 nm 的输出日志, 可以看到 _ZN3leo6AppEnv9swimlane_B5cxx11E 的地址是缺失的
U _ZN3leo6AppEnv9swimlane_B5cxx11E
0000000000661c80 B _ZN3leo6AppEnv9swimlane_E
000000000026f34c W _ZN3leo6LeoKeyaSEOS0_
000000000026f6e0 W _ZN3leo6LeoKeyC1EOS0_
000000000026e3e2 W _ZN3leo6LeoKeyC1ERKS0_
000000000032eafc T _ZN3leo6LeoKeyC1ERKSs
000000000026e1d4 W _ZN3leo6LeoKeyC1ERKSsS2_
000000000026e188 W _ZN3leo6LeoKeyC1Ev
000000000026f6e0 W _ZN3leo6LeoKeyC2EOS0_
000000000026e3e2 W _ZN3leo6LeoKeyC2ERKS0_这些日志还不能让我们准确定位到源码, 接着继续加了 c++filt 命令来还原 C++ 编译后的函数名
c++filt(1) — Linux manual page C++ 和 Java 语言提供函数重载, 意味着您可以编写许多具有相同名称的函数, 前提是每个函数都采用不同类型的参数。 为了能够区分这些同名的 函数 C++ 和 Java 将它们编码为低级汇编程序 唯一标识每个不同版本的名称。这 过程称为重整。 c++filt 程序执行 逆映射:它将低级名称解码(解码)成 用户级别的名称,以便它们可以被读取。
nm -D /xxx/build/Release/leo_client.node | c++filt此时的日志已经可以让我们定位到对应源代码, 而错误处多了关键的 [abi:cxx11] 的信息, 似乎对应了上面所说的第4点 c++ abi 版本不一致
U leo::AppEnv::swimlane_[abi:cxx11]
0000000000661c80 B leo::AppEnv::swimlane_
000000000026f34c W leo::LeoKey::operator=(leo::LeoKey&&)
000000000026f6e0 W leo::LeoKey::LeoKey(leo::LeoKey&&)
000000000026e3e2 W leo::LeoKey::LeoKey(leo::LeoKey const&)
000000000032eafc T leo::LeoKey::LeoKey(std::basic_string<char, std::char_traits<char>, std::allocator<char> > const&)
000000000026e1d4 W leo::LeoKey::LeoKey(std::basic_string<char, std::char_traits<char>, std::allocator<char> > const&, std::basic_string<char, std::char_traits<char>, std::allocator<char> > const&)
000000000026e188 W leo::LeoKey::LeoKey()
000000000026f6e0 W leo::LeoKey::LeoKey(leo::LeoKey&&)
000000000026e3e2 W leo::LeoKey::LeoKey(leo::LeoKey const&)通过查看对应的源码找到了 swimlane_ 变量与其类型 std::string
// 报错的源码
static std::string swimlane_;接着继续查阅 [abi:cxx11] 关键词相关的文档 Dual ABI
在 GCC 5.1 版本中,libstdc++ 引入了一个新库 ABI,其中包括std::string和 std::list. 为了符合 2011 C++ 标准,这些更改是必要的,该标准禁止 Copy-On-Write 字符串并要求列表跟踪其大小。
为了保持与 libstdc++ 链接的现有代码的向后兼容性,库的 soname 没有更改,旧实现仍与新实现并行支持。这是通过在内联命名空间中定义新实现来实现的,因此它们具有不同的名称以用于链接目的,例如,新版本 std::list实际上定义为 std::__cxx11::list. 因为新实现的符号具有不同的名称,所以两个版本的定义可以存在于同一个库中。
看到这里我们这里知道了 GCC 5.1 版本后实现了新的 std::string 定义为了 std::__cxx11::string, 同时也保留了旧版本的 std::string, 5.1 版本后可以自主选择使用哪个版本, 而 5.1 版本之前就固定是旧版本了。
[abi:cxx11] 的报错则表明你正在尝试将使用不同版本编译的目标文件链接在一起, 当链接到使用旧版本 GCC 编译的第三方库时,通常会发生这种情况。如果第三方库不能用新的 ABI 重建,那么你需要用旧的 ABI 重新编译你的代码。
由此也印证了之前分享的 API 与 ABI 的区别 提到的维持 API 稳定容易, ABI 稳定就涉及太多要素。
_GLIBCXX_USE_CXX11_ABI 宏(请参阅宏)控制库头文件中的声明是使用旧 ABI 还是新 ABI。因此,可以为每个正在编译的源文件单独决定使用哪个 ABI。使用 GCC 的默认配置选项,宏的默认值为 1,这会导致新 ABI 处于活动状态,因此要使用旧 ABI,您必须在包含任何库头之前将宏显式定义为 0。 (请注意,某些 GNU/Linux 发行版对 GCC 5 的配置不同,因此宏的默认值为 0,用户必须将其定义为 1 才能启用新的 ABI。)
由上可知可以通过设置 _GLIBCXX_USE_CXX11_ABI 宏的值 0 为关闭, 1 为开启来决定采用旧版还是新版
。那我们的 Node.js C++ 插件如何设置这个宏的值了?
该插件根目录的 binding.gyp 的 defines 字段即可, 此时可以通过设置 _GLIBCXX_USE_CXX11_ABI=0 和 _GLIBCXX_USE_CXX11_ABI=1 分别进行编译一次, 这样就知道当前插件应该是用新还是旧才能和其他链接库兼容了, 最后设置 _GLIBCXX_USE_CXX11_ABI=0 后本地通过源码重新编译就能成功运行了 ✅ 。
- 'defines': [ 'NAPI_DISABLE_CPP_EXCEPTIONS' ],
+ 'defines': [ 'NAPI_DISABLE_CPP_EXCEPTIONS', '_GLIBCXX_USE_CXX11_ABI=0' ],
业务方反馈自己负责的服务端渲染项目出现了少量的 404 告警, 约 0.0677% 的量。听到这个问题描述还是比较惊讶, 印象中 404 可能是唯一不会出现的状态码, 原因如下
难道是 Node Server 代码在某种条件下主动设置了 statusCode 为 404 ?
答案是否定的 ❌, 类似如下模拟的 Node Server 最简实现, 从代码初步判断只可能出现 render 正常渲染设置的 200 或者渲染错误 error 设置的 500 状态码
on-finished: Execute a callback when a HTTP request closes, finishes, or errors.
onFinished 回调函数中为本次 404 告警上报处
// Node Server Demo
const Koa = require("koa");
const onFinished = require("on-finished")
function report(msg) {
console.log(msg)
}
async function error(ctx, next) {
try {
await next()
} catch (err) {
ctx.status = 500
report(`本次渲染出错: errorMsg: ${err.message}`)
}
}
async function render(ctx, next) {
await new Promise(res => {
setTimeout(() => {
ctx.body = "ok"
ctx.status = 200;
res()
}, 100) // 模拟服务端渲染等待 100ms
})
await next()
}
async function monitor(ctx, next) {
onFinished(ctx.res, (err, res) => {
// >>> 本次 404 告警处 <<<
report(`本次请求 success: ${!err && res.statusCode >= 200 && res.statusCode < 400}, statusCode: ${res.statusCode}`)
})
await next()
}
const app = new Koa();
app.use(error)
app.use(monitor)
app.use(render)
app.listen(3000)当然实际 Node Server 代码远比 Demo 复杂得多, 所以 k同学先在可能会抛错的代码与可能存在逻辑漏洞的代码处追加了日志, 反复上线了几次也没有找到比较有价值的线索
此时都在想是不是可以放弃排查了, 0.0677% 的量也不是很多, 但是对这种诡异的现象又充满了好奇
于是我陷入了一阵沉思与回想, 在 k同学严密的日志中问题应该会无所遁形才对, 那么 假设追加的日志所监控的代码就是一切正常没有抛错, 那么可能发生的情况就是错误在日志覆盖不到的地方或者是客户端的异常导致?
根据这个假设前提我就想到了一种可能, 比如用 Node 作为 Client 并且使用 AbortController 来提前终止 tcp 连接进行验证
// Node Client Demo
const fetch = require('node-fetch')
let controller = new AbortController()
const signal = controller.signal
setTimeout(() => {
controller.abort()
}, 50) // 小于 render 的 100ms 即可
fetch('http://localhost:3000', {
signal,
method: 'GET',
})按照如上作为验证的 Client Demo, 那么完整的事故过程就是
这里我们也可以把 Node.js Server Demo 的 render 时间从 100ms 改为 3s, 然后使用浏览器作为 Client 模拟用户打开 http://localhost:3000, 最后在 3s 内关闭网页 Tab 也能复现该过程 ✅
本次请求 success: false, statusCode: 404on-finished 函数很实用, 但是不要忽略了 aborted 的情况。后续可以优化为 aborted 后单独上报一条记录, 监控 aborted 的量在一定预值即可
async function monitor(ctx, next) {
onFinished(ctx.res, (err, res) => {
+ ctx.req.aborted && report("client aborted!")
+ report(`本次请求 success: ${ctx.req.aborted || (!err && res.statusCode >= 200 && res.statusCode < 400)}, statusCode: ${res.statusCode}`)
- report(`本次请求 success: ${!err && res.statusCode >= 200 && res.statusCode < 400}, statusCode: ${res.statusCode}`)
})
await next()
}on-finished: Execute a callback when a HTTP request closes, finishes, or errors.
其实回头想想, 如果能先彻底理解 on-finished 的定义与行为应该会少走一些弯路。一开始就下意识的认为 on-finished 只监听了 response 的 finish 事件, 仔细一瞧它的定义, 还包括了 close(aborted 是触发了该行为导致的连接提前关闭)以及 error 事件, on-finished 监听的所有事件见如下代码


Next.js 是约定式路由, 如果你的 pages 目录是下面这样
├── pages
│ ├── index.tsx
│ ├── blog
│ │ └── first-post.tsx
│ │ └── index.tsx那么将得到 3 个页面, 开发环境可通过如下链接去访问
实际上 Next.js 生成的 webpackConfig.entry 并不是如下这样简单
// webpackConfig.entry
{
"index": "./pages/index.tsx",
"blogIndex": "./pages/blog/index.tsx",
"blogFirstPost": "./pages/blog/first-post.tsx"
}而是具有一定的依赖关系 depenOn 属性的对象, 并且入口文件 pages/** 的内容还会被 next-client-pages-loader 代理修改

webpackConfig.entry.{xxx}.dependOn 表示当前入口文件依赖的入口文件, 必须在加载此入口文件之前加载它们。
根据 depenOn 的解释, 我们知道了 3 个页面实际都是依赖于 next/dist/client/next.js 先行执行, 然后再执行 pages/_app.tsx, 最后才是执行页面的 pages/**/.tsx
如页面 "./pages/blog/index.tsx" 被 next-client-pages-loader 代理修改后, 打包的入口内容变成了如下。所做的工作只是在 window.__NEXT_P 中 push 了一个数组, 相当于只进行了一个模块的注册
(window.__NEXT_P = window.__NEXT_P || []).push([
"/blog",
function () {
return require("private-next-pages/blog/index.tsx");
}
]);
if(module.hot) {
module.hot.dispose(function () {
window.__NEXT_P.push(["/blog"])
});
}到这里知道了 Next.js 多页应用的入口文件并非是最先执行的 js 代码, 而 next/dist/client/next.js 才是客户端执行的入口, 一切运行逻辑由它进行调度与初始化操作, Next.js 相当于很好的为多页应用制造了一个 CommonEntry 来存放公共逻辑。
既然 Next.js 是多页应用, 那么为什么通过 Link 组件能在页面不刷新的情况下从 Home 页面跳转到 Blog list 页面了, 完全类似于 SPA 的用户体验?
import Link from 'next/link'
function Home() {
return (
<ul>
<li>
<Link href="/">
<a>Home</a>
</Link>
</li>
<li>
<Link href="/blog">
<a>Blog list</a>
</Link>
</li>
<li>
<Link href="/blog/first-post">
<a>Blog first-post</a>
</Link>
</li>
</ul>
)
}
export default Home其实 Next.js 这里是类似于微前端的实现, 把多个页面给聚合在了一个容器 AppContainer 里面。比如在 Blog list 页面点击 Blog first-post, 此时会去通过动态创建一个 script 加载 pages/blog/first-post.js, script load 后拿到 js 文件的导出的 App 组件再渲染到页面
// next/client/index.tsx
function AppContainer({
children,
}: React.PropsWithChildren<{}>): React.ReactElement {
return (
<Container
fn={(error) =>
renderError({ App: CachedApp, err: error }).catch((err) =>
console.error('Error rendering page: ', err)
)
}
>
<RouterContext.Provider value={makePublicRouterInstance(router)}>
<HeadManagerContext.Provider value={headManager}>
<ImageConfigContext.Provider
value={process.env.__NEXT_IMAGE_OPTS as any as ImageConfigComplete}
>
{children}
</ImageConfigContext.Provider>
</HeadManagerContext.Provider>
</RouterContext.Provider>
</Container>
)
}如下的调用栈可以看到 Next.js 的渲染过程。

那么 Next.js 如何通过 /blog/first-post 这个页面地址就能准确找到对应的 first-post.js 的链接地址, 如果是生产环境则是带了 hash 的 first-post.{hash}.js 又该如何找到了?
真相是在构建时 Next.js 生成一份 _buildManifest.js, 里面携带了本次构建产物的信息, 功能类似于我们常见的 asset-manifest.json

不得不说 Next.js 在一个独立的应用中都能想到实现成微前端的模样 ~
SSR 中对于 SPA 应用, 多个子路由均不使用动态 import 而采用 require 或者静态 import 倒是无需额外兼容, 但为了性能考虑, 作为有追求的技术人显然要保留动态 import 来进行懒加载。
import Loadable from 'react-loadable'
const load = (loader: any) =>
Loadable({
loader,
loading: Loading
})
const routes = [
{
path: '/list',
component: load(() => import('./list'))
},
{
path: '/detail',
component: load(() => import('./detail'))
},
...
]那么你将面临如下的问题
所以 Next.js 未支持 SPA 多路由应用也算规避了这个问题, 亦或许是 Next.js 认为 SSR 场景下干脆就不需要 SPA 的概念了, 一切皆独立的页面。
那么有不修改源码的情况下解决这个问题么?
当然可以, 写一个 webpack plugin 对动态 import 语法的行为进行控制, 对于首屏的 cssChunk 进行重新分配即可, 这部分内容比较多以后有机会再介绍吧 ~

主要参考了 单独编译 V8 引擎 与 Building V8 on an M1 MacBook, 下面记录了一下构建过程中遇见的其他坑点, M1 编译 v8 为啥这么多坑 😢。
0> Failed to fetch file gs://chromium-gn/f08024240631f4974bb924b2f05712df185263ea for /Users/xxx/v8/buildtools/mac/gn, skipping. [Err: Traceback (most recent call last):
File "/Users/xxx/depot_tools/gsutil.py", line 182, in <module>
sys.exit(main())报错堆栈的代码在 depot_tools/gsutil.py 文件,也许是代理的问题

所以这里应该是要给 urllib 加上 http 代理, 然后查阅一下 python 如何给 urllib 设置代理
// depot_tools/gsutil.py
try:
import urllib2 as urllib
except ImportError: # For Py3 compatibility
import urllib.request as urllib
proxy_support = urllib.ProxyHandler({'http' : 'http://127.0.0.1:8118' })
opener = urllib.build_opener(proxy_support)
urllib.install_opener(opener)// depot_tools/gclient_scm.py
- Make sure the tree is clean; see git-rebase.sh for reference
- try:
- scm.GIT.Capture(['update-index', '--ignore-submodules', '--refresh'],
- cwd=self.checkout_path)
- except subprocess2.CalledProcessError:
- raise gclient_utils.Error('\n____ %s at %s\n'
- '\tYou have unstaged changes.\n'
- '\tPlease commit, stash, or reset.\n'
- % (self.relpath, revision))
- try:
- scm.GIT.Capture(['diff-index', '--cached', '--name-status', '-r',
- '--ignore-submodules', 'HEAD', '--'],
- cwd=self.checkout_path)
- except subprocess2.CalledProcessError:
- raise gclient_utils.Error('\n____ %s at %s\n'
- '\tYour index contains uncommitted changes\n'
- '\tPlease commit, stash, or reset.\n'
- % (self.relpath, revision))NOTICE: You have PROXY values set in your environment, but gsutilin depot_tools does not (yet) obey them.
Also, --no_auth prevents the normal BOTO_CONFIG environmentvariable from being used.
To use a proxy in this situation, please supply those settingsin a .boto file pointed to by the NO_AUTH_BOTO_CONFIG environmentvariable.[Boto]
proxy = 127.0.0.1
proxy_port = 8118
proxy_type = http
export NO_AUTH_BOTO_CONFIG=/Users/xxx/.botoconst Koa = require("koa");
const proxy = require("koa-proxies");
const httpsProxyAgent = require('https-proxy-agent')
const app = new Koa();
app.use(
proxy(/^\//, {
target: "https://commondatastorage.googleapis.com",
agent: new httpsProxyAgent('http://127.0.0.1:8118'),
logs: false,
changeOrigin: true,
headers: {
Origin: "https://commondatastorage.googleapis.com",
Host: "commondatastorage.googleapis.com",
Referer: "https://commondatastorage.googleapis.com",
},
secure: false,
events: {
// proxyRes: (proxyRes, _req, res) => {
// let removeSecure = (str) => str.replace(/;Secure/i, "");
// let set = proxyRes.headers["set-cookie"];
// if (set) {
// let result = Array.isArray(set)
// ? set.map(removeSecure)
// : removeSecure(set);
// res.setHeader("set-cookie", result);
// proxyRes.headers["set-cookie"] = result;
// }
// },
},
})
);
app.listen(3000)// v8/build/config/mac/BUILD.gn
if (host_os == "mac") {
common_mac_flags += [
"-arch",
clang_arch,
+ "-Qunused-arguments"
]
} else {
common_mac_flags += [ "--target=$clang_arch-apple-macos" ]
}# Fatal error in , line 0
# Embedder-vs-V8 build configuration mismatch. On embedder side pointer compression is DISABLED while on V8 side it's ENABLED.
#
#
#
#FailureMessage Object: 0x16fc2a918
g++ src/pure.cc -g -I deps/v8/include/ -o pure -L lib/ -lv8_monolith -pthread -std=c++17 -DV8_COMPRESS_POINTERS -DV8_ENABLE_SANDBOX# v8 目录下运行如下命令, 支持 arm64
echo "mac-arm64" > .cipd_client_platform
# v8 目录下运行如下命令, 支持 arm64
mkdir -p out.gn/arm64.release/
cat >> out.gn/arm64.release/args.gn <<EOF
dcheck_always_on = false
is_debug = false
target_cpu = "arm64"
v8_target_cpu = "arm64"
cc_wrapper="ccache"
EOF
# 使用 v8gen 生成 arm64 平台的编译配置
/Users/xxx/v8/tools/dev/v8gen.py arm64.release.sample
# 编译 arm64 平台的 V8 的静态库
ninja -C out.gn/arm64.release.sample v8_monolith不常见 api 偶尔在某些库中看到有使用, 只能回头看看 uv 代码与文档。隔一阵子又忘记了, 于是决定记录一下 📝
// demo
int err = uv_async_init(uv_default_loop(), &(l->async), (uv_async_cb) fuse_native_dispatch);
assert(err >= 0);
uv_unref((uv_handle_t *) &(l->async));在 uv 代码中看到 uv_unref 其实是把当前的活跃句柄给减 1, 活跃句柄的数量是决定事件循环是否继续 uv__loop_alive 判断的条件之一, 所以如果当前任务是事件循环中剩下的最后一个任务时, 则事件循环可以不用考虑该任务, 直接进入退出程序。
为什么少见 uv_ref 的调用, 可以认为 uv_async_init 等操作中已经包含了给活跃句柄加 1 的功能。
// uv 实现
void uv_unref(uv_handle_t* handle) {
uv__handle_unref(handle);
}
#define uv__handle_unref(h) \
do { \
if (((h)->flags & UV_HANDLE_REF) == 0) break; \
(h)->flags &= ~UV_HANDLE_REF; \
if (((h)->flags & UV_HANDLE_CLOSING) != 0) break; \
if (((h)->flags & UV_HANDLE_ACTIVE) != 0) uv__active_handle_rm(h); \
} \
while (0)
static int uv__loop_alive(const uv_loop_t* loop) {
return uv__has_active_handles(loop) ||
uv__has_active_reqs(loop) ||
loop->closing_handles != NULL;
}// demo
void on_close(uv_handle_t *handle)
{
delete handle;
}
void cleanup(void* data)
{
uv_close((uv_handle_t *)data, on_close);
}
void Start(const Napi::CallbackInfo &args)
{
Napi::Env env = args.Env();
uv_loop_t *loop;
v8::Isolate* isolate = v8::Isolate::GetCurrent();
napi_get_uv_event_loop(env, &loop);
uv_prepare_t* prepare_handle = new uv_prepare_t;
uv_prepare_init(loop, prepare_handle);
uv_unref((uv_handle_t *)prepare_handle);
uv_prepare_start(prepare_handle, [](uv_prepare_t *handle) {});
node::AddEnvironmentCleanupHook(isolate, cleanup, prepare_handle);
}可以使用 uv_close 轻易代替 uv_##name##close / uv##name##_stop, 通过如下 uv_close 的实现可知
// uv 实现
void uv_close(uv_handle_t* handle, uv_close_cb close_cb) {
assert(!uv__is_closing(handle));
handle->flags |= UV_HANDLE_CLOSING;
handle->close_cb = close_cb;
switch (handle->type) {
case UV_NAMED_PIPE:
uv__pipe_close((uv_pipe_t*)handle);
break;
case UV_TTY:
uv__stream_close((uv_stream_t*)handle);
break;
case UV_TCP:
uv__tcp_close((uv_tcp_t*)handle);
break;
case UV_UDP:
uv__udp_close((uv_udp_t*)handle);
break;
case UV_PREPARE:
uv__prepare_close((uv_prepare_t*)handle);
break;
case UV_CHECK:
uv__check_close((uv_check_t*)handle);
break;
case UV_IDLE:
uv__idle_close((uv_idle_t*)handle);
break;
case UV_ASYNC:
uv__async_close((uv_async_t*)handle);
break;
case UV_TIMER:
uv__timer_close((uv_timer_t*)handle);
break;
case UV_PROCESS:
uv__process_close((uv_process_t*)handle);
break;
case UV_FS_EVENT:
uv__fs_event_close((uv_fs_event_t*)handle);
break;
case UV_POLL:
uv__poll_close((uv_poll_t*)handle);
break;
case UV_FS_POLL:
uv__fs_poll_close((uv_fs_poll_t*)handle);
/* Poll handles use file system requests, and one of them may still be
* running. The poll code will call uv__make_close_pending() for us. */
return;
case UV_SIGNAL:
uv__signal_close((uv_signal_t*) handle);
break;
default:
assert(0);
}
uv__make_close_pending(handle);
}最终是调用 tcgetattr 函数与 tcsetattr 函数控制终端。 如果在某处通过 uv_tty_set_mode 修改了终端参数, 此处用于复原。
// src/node.cc
void ResetStdio() {
uv_tty_reset_mode();
#ifdef __POSIX__
for (auto& s : stdio) {
const int fd = &s - stdio;
struct stat tmp;
if (-1 == fstat(fd, &tmp)) {
CHECK_EQ(errno, EBADF); // Program closed file descriptor.
continue;
}
}
#endif // __POSIX__
}释放 uv 持有的任何全局状态。 uv 通常会在卸载时自动执行此操作,但可以指示它手动执行清理。调用
uv_library_shutdown() 后不能继续调用 uv 函数

同学 a 在 gitlab CI 上的单测运行失败了, 错误信息如下。于是他按照 jest/issues/8769 的建议,在运行单测的命令上加上了 --maxWorkers=2 的参数,发现不止没有报错了,单测运行的时间还快了 5 倍 ?! 所以询问我这是发生了什么化学反应🤔
● Test suite failed to run
Call retries were exceeded
at ChildProcessWorker.initialize (../node_modules/jest-worker/build/workers/ChildProcessWorker.js:193:21)
--maxWorkers 参数表示的是 jest 会开启多少个线程去完成所有的测试任务,默认值是 50% * os.cpus().length,相关的文档可见 Jest docs/cli#--maxworker。
其实早在之前, 同学 b 就告诉了我,咱们的机器规格很高,比如 xxx 服务就有 96 核。所以我首先打印了一下单测节点的机器的配置,发现有 64 核。那么本次单测线程数就有了 32 个。
我的猜想是 Jest 比如并行跑两个用例时,由于 Node 线程间内存不共享,每个线程中的用例如果 import 了同样的文件都会通过 tsTransform、babelTransform 去转译一次,做了大量的重复工作而导致的耗时严重。
Node 线程的实现可见之前写的一篇文章 【node 源码学习笔记】worker_threads 工作线程 ,另外关于如何提升 Node 线程之间大量数据交换的效率也是我近期一直关注学习的点,后面有机会整理分享一次。
接着我又去咨询运维的大佬,大佬说这里的 64 核是宿主机的,分配给单测节点的可能只有 5核。
那么这样看来, 多线程在需要大量共享数据的情况下会变慢,而现在更是运超了分到的 CPU 资源的 6 倍之多,造成速度如此之缓慢就是情理之中的。
接着我尝试搜索了一下 Node 如何能获取到 k8s 分配到的给容器的资源数量,没有搜索到可直接使用的方案, 仅下面的方案看上去比较接近一点。
该方案是把设置的 resources 参数通过环境变量 MY_CPU_LIMIT 的形式传递给容器,详细可见 Kubernetes 用 Container 字段作为环境变量的值
apiVersion: v1
kind: Pod
metadata:
name: dapi-envars-resourcefieldref
spec:
containers:
- name: test-container
image: k8s.gcr.io/busybox:1.24
command: [ "sh", "-c"]
args:
- while true; do
echo -en '\n';
printenv MY_CPU_REQUEST MY_CPU_LIMIT;
printenv MY_MEM_REQUEST MY_MEM_LIMIT;
sleep 10;
done;
resources:
requests:
memory: "32Mi"
cpu: "125m"
limits:
memory: "64Mi"
cpu: "250m"
env:
- name: MY_CPU_REQUEST
valueFrom:
resourceFieldRef:
containerName: test-container
resource: requests.cpu
- name: MY_CPU_LIMIT
valueFrom:
resourceFieldRef:
containerName: test-container
resource: limits.cpu
- name: MY_MEM_REQUEST
valueFrom:
resourceFieldRef:
containerName: test-container
resource: requests.memory
- name: MY_MEM_LIMIT
valueFrom:
resourceFieldRef:
containerName: test-container
resource: limits.memory
restartPolicy: Never有趣的是本地 Docker 容器中 os.cpus().length 不是宿主机中的核数,而是 Docker Desktop 中 Resources 设置的 CPUS。

同理现在的 Node 服务通过集群模式启动直接使用 os.cpus().length 也是有问题的,暂时写死并发的数量去解决。也在 CNode 社区提了一个问答 如何在容器内获取分配到的 cpu 资源数量, 看看有没有踩过坑的大佬有更好的办法 ~
经过评论区 @Kaijun 大佬指点, 借鉴 Go 的解决方案 https://github.com/uber-go/automaxprocs , 实现了一版 Node.js 方案 https://github.com/xiaoxiaojx/get_cpus_length ,多方测试后是可行的 ✅

开始写一些博客主要是在看完代码后再温故总结一遍, 也是为了后面回头也能查阅。本系列会从官网的例子出发, 尽可能以链路追踪的方式记录其中源码核心模块的实现, 本篇例子来源
涉及的知识点
一个耗时的 fs_open 任务如何异步的实现的例子。
int main(int argc, char **argv) {
uv_fs_open(uv_default_loop(), &open_req, argv[1], O_RDONLY, 0, on_open);
uv_run(uv_default_loop(), UV_RUN_DEFAULT);
uv_fs_req_cleanup(&open_req);
uv_fs_req_cleanup(&read_req);
uv_fs_req_cleanup(&write_req);
return 0;
}
main > uv_fs_open
开始向事件循环 uv_default_loop 中注册任务。
int uv_fs_open(uv_loop_t* loop,
uv_fs_t* req,
const char* path,
int flags,
int mode,
uv_fs_cb cb) {
// 🔥 进行一些数据初始化操作
INIT(OPEN);
// 🔥 对传入的文件路径参数检查
PATH;
req->flags = flags;
req->mode = mode;
POST;
}
main > uv_fs_open > INIT
#define INIT(subtype) \
do { \
if (req == NULL) \
return UV_EINVAL; \
UV_REQ_INIT(req, UV_FS); \
req->fs_type = UV_FS_ ## subtype; \
req->result = 0; \
req->ptr = NULL; \
req->loop = loop; \
req->path = NULL; \
req->new_path = NULL; \
req->bufs = NULL; \
req->cb = cb; \
} \
while (0)
main > uv_fs_open > POST
主要调用了 uv__work_submit 函数, 提交一个耗时的任务到线程池去完成。
#define POST \
do { \
if (cb != NULL) { \
// (loop)->active_reqs.count++;
uv__req_register(loop, req); \
uv__work_submit(loop, \
&req->work_req, \
UV__WORK_FAST_IO, \
// 🔥 调用 open 方法打开一个文件
uv__fs_work, \
// 🔥 调用 uv_fs_open 函数参数中传入的 on_open
uv__fs_done); \
return 0; \
} \
else { \
uv__fs_work(&req->work_req); \
return req->result; \
} \
} \
while (0)
其实对于任意一种耗时的任务, libuv 也提供另外一种叫工作队列的方法, 可以轻松的提交任意数量的耗时任务到线程池中去解决。
实现和上面的 POST 方法类似, 也是通过调用 uv__work_submit 去提交一个任务, 只不过这个任务就不是 uv__fs_work, 而可以是用户传入的任何任务。下面是一个 uv_queue_work 的例子
可以看见通过一个 for 循环, 轻易通过 uv_queue_work 提交了若干个 after_fib 任务到线程池
// uv_queue_work 的例子
int main() {
loop = uv_default_loop();
int data[FIB_UNTIL];
uv_work_t req[FIB_UNTIL];
int i;
for (i = 0; i < FIB_UNTIL; i++) {
data[i] = i;
req[i].data = (void *) &data[i];
uv_queue_work(loop, &req[i], fib, after_fib);
}
return uv_run(loop, UV_RUN_DEFAULT);
}
uv_queue_work 的使用方式看上去和 async 这个 npm 包十分类似, 只不过 async 是提交的任务还是在该线程运行, uv_queue_work 提交的会交给线程池去运行。
// async 的例子
async.parallel([
function(callback) { ... },
function(callback) { ... }
], function(err, results) {
// optional callback
});
main > uv_fs_open > POST > uv__work_submit
此时我们可以看下调用的 init_once 函数, 发现其主要是调用了 init_threads 函数
void uv__work_submit(uv_loop_t* loop,
struct uv__work* w,
enum uv__work_kind kind,
void (*work)(struct uv__work* w),
void (*done)(struct uv__work* w, int status)) {
uv_once(&once, init_once);
w->loop = loop;
w->work = work;
w->done = done;
// 🔥 调用 uv_cond_signal 唤醒一个线程, 开始干活了 ~
post(&w->wq, kind);
}
main > uv_fs_open > POST > uv__work_submit > init_once > init_threads
线程池的初始化, 由于代码较长, 去除了部分不太重要的代码, 对应源码在 /deps/uv/src/threadpool.c。
下面会讲一下初始化过程中调用的 uv_cond, uv_sem 的知识。最后讲一下线程的工作内容即 worker 函数。
static void init_threads(void) {
...
// 🔥 条件变量
if (uv_cond_init(&cond))
abort();
// 🔥 锁: 一个线程加的锁必须由该线程解锁
if (uv_mutex_init(&mutex))
abort();
QUEUE_INIT(&wq);
QUEUE_INIT(&slow_io_pending_wq);
QUEUE_INIT(&run_slow_work_message);
// 🔥 信号量
if (uv_sem_init(&sem, 0))
abort();
for (i = 0; i < nthreads; i++)
if (uv_thread_create(threads + i, worker, &sem))
abort();
for (i = 0; i < nthreads; i++)
uv_sem_wait(&sem);
uv_sem_destroy(&sem);
}
main > uv_fs_open > POST > uv__work_submit > init_once > init_threads > uv_cond
在这里线程池中的线程当任务队列为空时 pthread_cond_wait 会一直等待在这, 等到主线程提交一个任务后会调用 pthread_cond_signal 函数唤醒一个线程开始工作
// 线程一伪代码
pthread_mutex_lock(&mutex);
pthread_cond_signal(&cond);
pthread_mutex_unlock(&mutex);
// 线程二伪代码
pthread_mutex_lock(&mutex);
pthread_cond_wait(&cond, &mutex);
pthread_mutex_unlock(&mutex);
main > uv_fs_open > POST > uv__work_submit > init_once > init_threads > uv_sem
uv_sem_wait 也会使线程进入沉睡, 当有其他线程调用一次 uv_sem_post 后会运行一次, 这里的 uv_sem_wait 就是等所有 uv_thread_create 创建的 worker 都成功后代码才会继续往下执行, 其中每个 worker 函数里面会调用一次 uv_sem_post。
和 uv_cond 有类似的地方, 比如用 uv_cond 实现的话, 每创建一次 worker 计数一次, 当时最后一次创建的线程的 worker 里面调用一次 pthread_cond_signal 我觉得也是可行的。
main > uv_fs_open > POST > uv__work_submit > init_once > init_threads > worker
线程运行的函数, 当队列为空时该线程函数会一直沉睡在 uv_cond_wait 函数处, 当 uv__work_submit 提交了一个函数调用了 pthread_cond_signal 后, 一个线程开始工作 ~
static void worker(void* arg) {
...
// 🔥 通知主线程 uv_sem_wait 可以开始运行一次了
uv_sem_post((uv_sem_t*) arg);
arg = NULL;
uv_mutex_lock(&mutex);
for (;;) {
/* `mutex` should always be locked at this point. */
/* Keep waiting while either no work is present or only slow I/O
and we're at the threshold for that. */
while (QUEUE_EMPTY(&wq) ||
(QUEUE_HEAD(&wq) == &run_slow_work_message &&
QUEUE_NEXT(&run_slow_work_message) == &wq &&
slow_io_work_running >= slow_work_thread_threshold())) {
idle_threads += 1;
// 🔥 队列为空时, 线程会一直沉睡在这
uv_cond_wait(&cond, &mutex);
idle_threads -= 1;
}
...
uv_mutex_unlock(&mutex);
w = QUEUE_DATA(q, struct uv__work, wq);
// 🔥 开始执行 uv__fs_work 工作
w->work(w);
uv_mutex_lock(&w->loop->wq_mutex);
w->work = NULL; /* Signal uv_cancel() that the work req is done
executing. */
QUEUE_INSERT_TAIL(&w->loop->wq, &w->wq);
// 🔥 uv__fs_work 任务完成后, 开始通知对应 fd
uv_async_send(&w->loop->wq_async);
...
}
}
main > uv_fs_open > POST > uv__work_submit > init_once > init_threads > worker > uv_async_send
当该线程耗时的 w->work(即此例子的 uv__work_submit 中设置的 uv__fs_work)任务完成后, 该去通知主线程了
uv_async_send 会判断当前任务有没有其他线程在进行操作, 如果有其他线程正在调用 uv__async_send 发送消息, 则直接跳过, 最后有一个线程通知到主线程即可
该函数中调用的 cmpxchgi 函数实现又是干什么的了。
int uv_async_send(uv_async_t* handle) {
/* Do a cheap read first. */
if (ACCESS_ONCE(int, handle->pending) != 0)
return 0;
/* Tell the other thread we're busy with the handle. */
if (cmpxchgi(&handle->pending, 0, 1) != 0)
return 0;
/* Wake up the other thread's event loop. */
uv__async_send(handle->loop);
/* Tell the other thread we're done. */
if (cmpxchgi(&handle->pending, 1, 2) != 1)
abort();
return 0;
}
main > uv_fs_open > POST > uv__work_submit > init_once > init_threads > worker > uv_async_send > cmpxchgi
内联汇编语句看不懂不要紧, 我们可以看看等价的 __sync_val_compare_and_swap 函数的作用就好了
UV_UNUSED(static int cmpxchgi(int* ptr, int oldval, int newval)) {
#if defined(__i386__) || defined(__x86_64__)
int out;
__asm__ __volatile__ ("lock; cmpxchg %2, %1;"
: "=a" (out), "+m" (*(volatile int*) ptr)
: "r" (newval), "0" (oldval)
: "memory");
return out;
#elif defined(__MVS__)
unsigned int op4;
if (__plo_CSST(ptr, (unsigned int*) &oldval, newval,
(unsigned int*) ptr, *ptr, &op4))
return oldval;
else
return op4;
#elif defined(__SUNPRO_C) || defined(__SUNPRO_CC)
return atomic_cas_uint((uint_t *)ptr, (uint_t)oldval, (uint_t)newval);
#else
return __sync_val_compare_and_swap(ptr, oldval, newval);
#endif
}
main > uv_fs_open > POST > uv__work_submit > init_once > init_threads > worker > uv_async_send > cmpxchgi > __sync_val_compare_and_swap
提供原子的比较和交换,如果*ptr == oldval,就将 newval 写入 *ptr。看完解释还是能理解一点了, 类似于赋值操作, 那么回到主线看看 uv__async_send 函数吧
type __sync_val_compare_and_swap (type *ptr, type oldval type newval, ...)
main > uv_fs_open > POST > uv__work_submit > init_once > init_threads > worker > uv_async_send > uv__async_send
可见主要是在 loop->async_io_watcher.fd 上面写了数据, 此时 epoll 该登场了, 它就是负责观察所有通过 epoll_ctl 函数注册的 fd,当某个 fd 变化,就通知到对应的 i/o 观察者。
等等再说 epoll 之前, 先看一下我们的 i/o 观察者是在何时注册的 ?
static void uv__async_send(uv_loop_t* loop) {
const void* buf;
ssize_t len;
int fd;
int r;
buf = "";
len = 1;
fd = loop->async_wfd;
#if defined(__linux__)
if (fd == -1) {
static const uint64_t val = 1;
buf = &val;
len = sizeof(val);
// 🔥 注意该处的 fd 挂载在 loop->async_io_watcher.fd 上
fd = loop->async_io_watcher.fd; /* eventfd */
}
#endif
do
// 🔥 fd 上面写入数据, 通知主线程
r = write(fd, buf, len);
while (r == -1 && errno == EINTR);
if (r == len)
return;
if (r == -1)
if (errno == EAGAIN || errno == EWOULDBLOCK)
return;
abort();
}
main > uv_default_loop > uv_loop_init > uv_async_init > uv__async_start > uv__io_start
调用 uv__io_start 函数注册一个 i/o 观察者。那么该 i/o 观察者需要观察的 fd 是何时设置的了 ?
void uv__io_start(uv_loop_t* loop, uv__io_t* w, unsigned int events) {
...
if (QUEUE_EMPTY(&w->watcher_queue))
QUEUE_INSERT_TAIL(&loop->watcher_queue, &w->watcher_queue);
if (loop->watchers[w->fd] == NULL) {
loop->watchers[w->fd] = w;
loop->nfds++;
}
}
main > uv_default_loop > uv_loop_init > uv_async_init > uv__async_start > uv__io_init
注意本例子的目的是主线程希望知道什么时候子线程完成了任务, 所以我们需要先获得一个线程通信的 fd 用来观察就行了
可以看到在 uv__async_start 函数中是通过 eventfd 拿到线程通信的 fd, 然后通过调用 uv__io_init 给挂载在观察者上。同时设置了该观察者的回调函数为 uv__async_io 。
此时我们已经成功初始化了一个 i/o 观察者, 接下来就等着有数据写入时, epoll 捕获到调用观察者设置的回调函数就好了。
static int uv__async_start(uv_loop_t* loop) {
...
#ifdef __linux__
err = eventfd(0, EFD_CLOEXEC | EFD_NONBLOCK);
if (err < 0)
return UV__ERR(errno);
pipefd[0] = err;
pipefd[1] = -1;
#else
err = uv__make_pipe(pipefd, UV_NONBLOCK_PIPE);
if (err < 0)
return err;
#endif
uv__io_init(&loop->async_io_watcher, uv__async_io, pipefd[0]);
uv__io_start(loop, &loop->async_io_watcher, POLLIN);
loop->async_wfd = pipefd[1];
return 0;
}
uv__async_io 首先会把其他线程写入的数据给读完, 最后调用了 h->async_cb 函数。
其中的 h->async_cb 函数又是什么东西了?
static void uv__async_io(uv_loop_t* loop, uv__io_t* w, unsigned int events) {
char buf[1024];
ssize_t r;
QUEUE queue;
QUEUE* q;
uv_async_t* h;
assert(w == &loop->async_io_watcher);
for (;;) {
r = read(w->fd, buf, sizeof(buf));
if (r == sizeof(buf))
continue;
if (r != -1)
break;
if (errno == EAGAIN || errno == EWOULDBLOCK)
break;
if (errno == EINTR)
continue;
abort();
}
QUEUE_MOVE(&loop->async_handles, &queue);
while (!QUEUE_EMPTY(&queue)) {
q = QUEUE_HEAD(&queue);
h = QUEUE_DATA(q, uv_async_t, queue);
QUEUE_REMOVE(q);
QUEUE_INSERT_TAIL(&loop->async_handles, q);
if (0 == uv__async_spin(h))
continue; /* Not pending. */
if (h->async_cb == NULL)
continue;
h->async_cb(h);
}
}
main > uv_default_loop > uv_loop_init > uv_async_init
h->async_cb 函数发现是在 uv_async_init 中设置的, 需要再往上查找调用 uv_async_init 的地方才能知道第三个参数 async_cb 的真实的值。
int uv_async_init(uv_loop_t* loop, uv_async_t* handle, uv_async_cb async_cb) {
int err;
err = uv__async_start(loop);
if (err)
return err;
uv__handle_init(loop, (uv_handle_t*)handle, UV_ASYNC);
handle->async_cb = async_cb;
handle->pending = 0;
QUEUE_INSERT_TAIL(&loop->async_handles, &handle->queue);
uv__handle_start(handle);
return 0;
}
main > uv_default_loop > uv_loop_init
uv__async_io 函数的 h->async_cb(h),其实是 uv_loop_init 函数里面设置的 uv__work_done
int uv_loop_init(uv_loop_t* loop) {
....
err = uv_async_init(loop, &loop->wq_async, uv__work_done);
...
}
uv__work_done 主要是调用了 w->done(w, err), 等等, 这不就是 uv__work_submit 函数中设置的 uv__fs_done 函数吗!
void uv__work_done(uv_async_t* handle) {
...
while (!QUEUE_EMPTY(&wq)) {
q = QUEUE_HEAD(&wq);
QUEUE_REMOVE(q);
w = container_of(q, struct uv__work, wq);
err = (w->work == uv__cancelled) ? UV_ECANCELED : 0;
w->done(w, err);
}
}
uv__fs_done 函数主要调用的是 req->cb(req), 这就是 INIT 中设置的例子中的 on_open 函数了!
static void uv__fs_done(struct uv__work* w, int status) {
uv_fs_t* req;
req = container_of(w, uv_fs_t, work_req);
uv__req_unregister(req->loop, req);
if (status == UV_ECANCELED) {
assert(req->result == 0);
req->result = UV_ECANCELED;
}
req->cb(req);
}
epoll是Linux内核为处理大批量文件描述符而作了改进的poll,是Linux下多路复用IO接口select/poll的增强版本,它能显著提高程序在大量并发连接中只有少量活跃的情况下的系统CPU利用率。另一点原因就是获取事件的时候,它无须遍历整个被侦听的描述符集,只要遍历那些被内核IO事件异步唤醒而加入Ready队列的描述符集合就行了。epoll除了提供select/poll那种IO事件的水平触发(Level Triggered)外,还提供了边缘触发(Edge Triggered),这就使得用户空间程序有可能缓存IO状态,减少epoll_wait/epoll_pwait的调用,提高应用程序效率。
int epoll_create(int size);
int epoll_ctl(int epfd, int op, int fd, struct epoll_event *event);
int epoll_wait(int epfd, struct epoll_event *events,int maxevents, int timeout);
main > uv_default_loop > uv_loop_init > uv__platform_loop_init > epoll_create
如下图所示,当某个进程调用epoll_create方法时,内核会创建一个eventpoll对象(也就是程序中epfd所代表的对象)。eventpoll对象也是文件系统中的一员,和socket一样,它也会有等待队列。
可见 libuv 是在 uv__platform_loop_init 函数中进行创建的。
int uv__platform_loop_init(uv_loop_t* loop) {
int fd;
// 🔥 此处进行 epoll_create fd 的创建
fd = epoll_create1(O_CLOEXEC);
/* epoll_create1() can fail either because it's not implemented (old kernel)
* or because it doesn't understand the O_CLOEXEC flag.
*/
if (fd == -1 && (errno == ENOSYS || errno == EINVAL)) {
fd = epoll_create(256);
if (fd != -1)
uv__cloexec(fd, 1);
}
loop->backend_fd = fd;
loop->inotify_fd = -1;
loop->inotify_watchers = NULL;
if (fd == -1)
return UV__ERR(errno);
return 0;
}
main > uv_run > uv__io_poll >
创建epoll对象后,可以用epoll_ctl添加或删除所要监听的socket。以添加socket为例,如下图,如果通过epoll_ctl添加sock1、sock2和sock3的监视,内核会将eventpoll添加到这三个socket的等待队列中。
libuv 中在 uv__io_poll 函数里被调用。
uv__io_poll: 函数是上节 【libuv 源码学习笔记】1. 事件循环 事件循环中非常重要的一个阶段。
void uv__io_poll(uv_loop_t* loop, int timeout) {
...
while (!QUEUE_EMPTY(&loop->watcher_queue)) {
...
// 🔥 epoll_ctl - 事件注册函数,注册新的fd到epfd的epool对象空间中,并指明event可读写
if (epoll_ctl(loop->backend_fd, op, w->fd, &e)) {
if (errno != EEXIST)
abort();
assert(op == EPOLL_CTL_ADD);
/* We've reactivated a file descriptor that's been watched before. */
if (epoll_ctl(loop->backend_fd, EPOLL_CTL_MOD, w->fd, &e))
abort();
}
w->events = w->pevents;
}
...
}
main > uv_run > uv__io_poll >
当socket收到数据后,中断程序会给eventpoll的“就绪列表”添加socket引用。如下图展示的是sock2和sock3收到数据后,中断程序让rdlist引用这两个socket。
当程序执行到epoll_wait时,如果rdlist已经引用了socket,那么epoll_wait直接返回,如果rdlist为空,阻塞进程。
这也是上一节事件循环中, 如果没有其他阶段没有任务, 会使进程一直阻塞到一个 timer 超时的时间。
libuv 中在 uv__io_poll 函数里被调用。
void uv__io_poll(uv_loop_t* loop, int timeout) {
...
for (;;) {
//
if (no_epoll_wait != 0 || (sigmask != 0 && no_epoll_pwait == 0)) {
// 🔥 epoll_wait - 阻塞直到任一已注册的事件变为就绪
nfds = epoll_pwait(loop->backend_fd,
events,
ARRAY_SIZE(events),
timeout,
&sigset);
if (nfds == -1 && errno == ENOSYS) {
uv__store_relaxed(&no_epoll_pwait_cached, 1);
no_epoll_pwait = 1;
}
} else {
// 🔥 epoll_wait - 阻塞直到任一已注册的事件变为就绪
nfds = epoll_wait(loop->backend_fd,
events,
ARRAY_SIZE(events),
timeout);
if (nfds == -1 && errno == ENOSYS) {
uv__store_relaxed(&no_epoll_wait_cached, 1);
no_epoll_wait = 1;
}
}
...
// 🔥 遍历被内核IO事件异步唤醒而加入Ready队列的描述符集合
for (i = 0; i < nfds; i++) {
pe = events + i;
fd = pe->data.fd;
...
if (pe->events != 0) {
/* Run signal watchers last. This also affects child process watchers
* because those are implemented in terms of signal watchers.
*/
if (w == &loop->signal_io_watcher) {
have_signals = 1;
} else {
uv__metrics_update_idle_time(loop);
// 🔥 调用观察者注册的回调
w->cb(loop, w, pe->events);
}
nevents++;
}
}
...
}
main > uv_fs_req_cleanup
当 uv_fs_open 回调 on_open 被调用, 本例子中的事件循环 uv_run 函数运行结束, 代码开始运行 uv_fs_req_cleanup, 进行垃圾回收, 本次程序顺利退出。
A: 程序先会初始化一次线程池, 任务队列为空时线程都进入沉睡状态。当调用 uv_fs_open 方法提交一个 fs_open 任务时, 会通过 pthread_cond_signal 唤醒一个线程开始工作, 工作内容即为 fs_open, 在该线程内同步等待 fs_open 函数结束, 然后去通知主线程。
A: 耗时的任务原来交给了其他线程, 主线程被通知其实是首先通过 eventfd 获取到了一个线程通信的 fd, 然后通过 epoll 机制去注册一个 i/o 观察者, 当其他线程任务完成后, 向该 fd 写入数据。被 epoll 捕获到调用主线程早已设置好的回调函数就好了。
开始写一些博客主要是在看完代码后再温故总结一遍, 也是为了后面回头也能查阅。本系列会从官网的例子出发, 尽可能以链路追踪的方式记录其中源码核心模块的实现, 本篇例子来源
涉及的知识点
libuv 异步使用 BSD 套接字 的例子
libuv 中的网络和直接使用 BSD 套接字接口没有什么不同,有些事情更简单,都是无阻塞的,但概念都是一样的。此外,libuv 还提供了一些实用的函数来抽象出那些烦人的、重复的、低级的任务,比如使用BSD套接字结构设置套接字、DNS查询以及调整各种套接字参数。
int main() {
loop = uv_default_loop();
uv_tcp_t server;
uv_tcp_init(loop, &server);
uv_ip4_addr("0.0.0.0", DEFAULT_PORT, &addr);
uv_tcp_bind(&server, (const struct sockaddr*)&addr, 0);
int r = uv_listen((uv_stream_t*) &server, DEFAULT_BACKLOG, on_new_connection);
if (r) {
fprintf(stderr, "Listen error %s\n", uv_strerror(r));
return 1;
}
return uv_run(loop, UV_RUN_DEFAULT);
}
void on_new_connection(uv_stream_t *server, int status) {
if (status < 0) {
fprintf(stderr, "New connection error %s\n", uv_strerror(status));
// error!
return;
}
uv_tcp_t *client = (uv_tcp_t*) malloc(sizeof(uv_tcp_t));
uv_tcp_init(loop, client);
if (uv_accept(server, (uv_stream_t*) client) == 0) {
uv_read_start((uv_stream_t*) client, alloc_buffer, echo_read);
}
这是一个正常同步使用 BSD 套接字 的例子。
作为参照可以发现主要有如下几步
int main(void)
{
struct sockaddr_in stSockAddr;
int SocketFD = socket(PF_INET, SOCK_STREAM, IPPROTO_TCP);
if(-1 == SocketFD)
{
perror("can not create socket");
exit(EXIT_FAILURE);
}
memset(&stSockAddr, 0, sizeof(struct sockaddr_in));
stSockAddr.sin_family = AF_INET;
stSockAddr.sin_port = htons(1100);
stSockAddr.sin_addr.s_addr = INADDR_ANY;
if(-1 == bind(SocketFD,(const struct sockaddr *)&stSockAddr, sizeof(struct sockaddr_in)))
{
perror("error bind failed");
close(SocketFD);
exit(EXIT_FAILURE);
}
if(-1 == listen(SocketFD, 10))
{
perror("error listen failed");
close(SocketFD);
exit(EXIT_FAILURE);
}
for(;;)
{
int ConnectFD = accept(SocketFD, NULL, NULL);
if(0 > ConnectFD)
{
perror("error accept failed");
close(SocketFD);
exit(EXIT_FAILURE);
}
/* perform read write operations ... */
shutdown(ConnectFD, SHUT_RDWR);
close(ConnectFD);
}
close(SocketFD);
return 0;
}

main > uv_tcp_init
int uv_tcp_init(uv_loop_t* loop, uv_tcp_t* tcp) {
return uv_tcp_init_ex(loop, tcp, AF_UNSPEC);
}
int uv_tcp_init_ex(uv_loop_t* loop, uv_tcp_t* tcp, unsigned int flags) {
int domain;
/* Use the lower 8 bits for the domain */
domain = flags & 0xFF;
if (domain != AF_INET && domain != AF_INET6 && domain != AF_UNSPEC)
return UV_EINVAL;
if (flags & ~0xFF)
return UV_EINVAL;
uv__stream_init(loop, (uv_stream_t*)tcp, UV_TCP);
...
return 0;
}
main > uv_tcp_init > uv__stream_init
流的初始化函数使用的地方还是特别多的, 也特别重要。下述 i/o 的完整实现参考 【libuv 源码学习笔记】线程池与i/o
// queued_fds
1. 当收到其他进程通过 ipc 写入的数据时, 调用 uv__stream_recv_cmsg 函数
2. uv__stream_recv_cmsg 函数读取到进程传递过来的 fd 引用, 调用 uv__stream_queue_fd 函数保存。
3. queued_fds 被消费主要在 src/stream_wrap.cc LibuvStreamWrap::OnUvRead > AcceptHandle 函数中。
accept处理连接时,若出现 EMFILE 错误不进行处理,则内核间隔性尝试连接,导致整个网络设计程序崩溃
void uv__stream_init(uv_loop_t* loop,
uv_stream_t* stream,
uv_handle_type type) {
int err;
uv__handle_init(loop, (uv_handle_t*)stream, type);
stream->read_cb = NULL;
stream->alloc_cb = NULL;
stream->close_cb = NULL;
stream->connection_cb = NULL;
stream->connect_req = NULL;
stream->shutdown_req = NULL;
stream->accepted_fd = -1;
stream->queued_fds = NULL;
stream->delayed_error = 0;
QUEUE_INIT(&stream->write_queue);
QUEUE_INIT(&stream->write_completed_queue);
stream->write_queue_size = 0;
if (loop->emfile_fd == -1) {
err = uv__open_cloexec("/dev/null", O_RDONLY);
if (err < 0)
/* In the rare case that "/dev/null" isn't mounted open "/"
* instead.
*/
err = uv__open_cloexec("/", O_RDONLY);
if (err >= 0)
loop->emfile_fd = err;
}
#if defined(__APPLE__)
stream->select = NULL;
#endif /* defined(__APPLE_) */
uv__io_init(&stream->io_watcher, uv__stream_io, -1);
}
main > uv_tcp_init > uv__stream_init > uv__open_cloexec
同步调用 open 方法拿到了 fd, 也许你会问为啥不像 【libuv 源码学习笔记】线程池与i/o 中调用 uv_fs_open 异步获取 fd, 其实 libuv 中并不全部是异步的实现, 比如当前的例子启动 tcp 服务前的一些初始化, 而不是用户请求过程中发生的任务, 同步也是能接受的。
int uv__open_cloexec(const char* path, int flags) {
#if defined(O_CLOEXEC)
int fd;
fd = open(path, flags | O_CLOEXEC);
if (fd == -1)
return UV__ERR(errno);
return fd;
#else /* O_CLOEXEC */
int err;
int fd;
fd = open(path, flags);
if (fd == -1)
return UV__ERR(errno);
err = uv__cloexec(fd, 1);
if (err) {
uv__close(fd);
return err;
}
return fd;
#endif /* O_CLOEXEC */
}
main > uv_tcp_init > uv__stream_init > uv__stream_io
双工流的 i/o 观察者回调函数, 如调用的 stream->connect_req 函数, 其值是例子中 uv_listen 函数的最后一个参数 on_new_connection。
static void uv__stream_io(uv_loop_t* loop, uv__io_t* w, unsigned int events) {
uv_stream_t* stream;
stream = container_of(w, uv_stream_t, io_watcher);
assert(stream->type == UV_TCP ||
stream->type == UV_NAMED_PIPE ||
stream->type == UV_TTY);
assert(!(stream->flags & UV_HANDLE_CLOSING));
if (stream->connect_req) {
uv__stream_connect(stream);
return;
}
assert(uv__stream_fd(stream) >= 0);
if (events & (POLLIN | POLLERR | POLLHUP))
uv__read(stream);
if (uv__stream_fd(stream) == -1)
return; /* read_cb closed stream. */
if ((events & POLLHUP) &&
(stream->flags & UV_HANDLE_READING) &&
(stream->flags & UV_HANDLE_READ_PARTIAL) &&
!(stream->flags & UV_HANDLE_READ_EOF)) {
uv_buf_t buf = { NULL, 0 };
uv__stream_eof(stream, &buf);
}
if (uv__stream_fd(stream) == -1)
return; /* read_cb closed stream. */
if (events & (POLLOUT | POLLERR | POLLHUP)) {
uv__write(stream);
uv__write_callbacks(stream);
/* Write queue drained. */
if (QUEUE_EMPTY(&stream->write_queue))
uv__drain(stream);
}
}
main > uv_ip4_addr
uv_ip4_addr 用于将人类可读的 IP 地址、端口对转换为 BSD 套接字 API 所需的 sockaddr_in 结构。
int uv_ip4_addr(const char* ip, int port, struct sockaddr_in* addr) {
memset(addr, 0, sizeof(*addr));
addr->sin_family = AF_INET;
addr->sin_port = htons(port);
#ifdef SIN6_LEN
addr->sin_len = sizeof(*addr);
#endif
return uv_inet_pton(AF_INET, ip, &(addr->sin_addr.s_addr));
}
main > uv_tcp_bind
从 uv_ip4_addr 函数的实现, 其实是在 addr 的 sin_family 上面设置值为 AF_INET, 但在 uv_tcp_bind 函数里面却是从 addr 的 sa_family属性上面取的值, 这让 c 初学者的我又陷入了一阵思考 ...
sockaddr_in 和 sockaddr 是并列的结构,指向 sockaddr_in 的结构体的指针也可以指向 sockaddr 的结构体,并代替它。也就是说,你可以使用 sockaddr_in 建立你所需要的信息,然后用 memset 函数初始化就可以了memset((char*)&mysock,0,sizeof(mysock));//初始化
原来是这样, 这里通过强制指针类型转换 const struct sockaddr* addr 达到的目的, 函数的最后调用了 uv__tcp_bind 函数。
int uv_tcp_bind(uv_tcp_t* handle,
const struct sockaddr* addr,
unsigned int flags) {
unsigned int addrlen;
if (handle->type != UV_TCP)
return UV_EINVAL;
if (addr->sa_family == AF_INET)
addrlen = sizeof(struct sockaddr_in);
else if (addr->sa_family == AF_INET6)
addrlen = sizeof(struct sockaddr_in6);
else
return UV_EINVAL;
return uv__tcp_bind(handle, addr, addrlen, flags);
}
main > uv_tcp_bind > uv__tcp_bind
int uv__tcp_bind(uv_tcp_t* tcp,
const struct sockaddr* addr,
unsigned int addrlen,
unsigned int flags) {
int err;
int on;
/* Cannot set IPv6-only mode on non-IPv6 socket. */
if ((flags & UV_TCP_IPV6ONLY) && addr->sa_family != AF_INET6)
return UV_EINVAL;
err = maybe_new_socket(tcp, addr->sa_family, 0);
if (err)
return err;
on = 1;
if (setsockopt(tcp->io_watcher.fd, SOL_SOCKET, SO_REUSEADDR, &on, sizeof(on)))
return UV__ERR(errno);
...
errno = 0;
if (bind(tcp->io_watcher.fd, addr, addrlen) && errno != EADDRINUSE) {
if (errno == EAFNOSUPPORT)
return UV_EINVAL;
return UV__ERR(errno);
}
...
}
main > uv_tcp_bind > uv__tcp_bind > maybe_new_socket > new_socket
static int new_socket(uv_tcp_t* handle, int domain, unsigned long flags) {
struct sockaddr_storage saddr;
socklen_t slen;
int sockfd;
int err;
err = uv__socket(domain, SOCK_STREAM, 0);
if (err < 0)
return err;
sockfd = err;
err = uv__stream_open((uv_stream_t*) handle, sockfd, flags);
...
return 0;
}
main > uv_tcp_bind > uv__tcp_bind > maybe_new_socket > new_socket > uv__stream_open
主要用于设置 stream->io_watcher.fd 为参数传入的 fd。
int uv__stream_open(uv_stream_t* stream, int fd, int flags) {
#if defined(__APPLE__)
int enable;
#endif
if (!(stream->io_watcher.fd == -1 || stream->io_watcher.fd == fd))
return UV_EBUSY;
assert(fd >= 0);
stream->flags |= flags;
if (stream->type == UV_TCP) {
if ((stream->flags & UV_HANDLE_TCP_NODELAY) && uv__tcp_nodelay(fd, 1))
return UV__ERR(errno);
/* TODO Use delay the user passed in. */
if ((stream->flags & UV_HANDLE_TCP_KEEPALIVE) &&
uv__tcp_keepalive(fd, 1, 60)) {
return UV__ERR(errno);
}
}
#if defined(__APPLE__)
enable = 1;
if (setsockopt(fd, SOL_SOCKET, SO_OOBINLINE, &enable, sizeof(enable)) &&
errno != ENOTSOCK &&
errno != EINVAL) {
return UV__ERR(errno);
}
#endif
stream->io_watcher.fd = fd;
return 0;
}
main > uv_listen
主要调用了 uv_tcp_listen 函数。
int uv_listen(uv_stream_t* stream, int backlog, uv_connection_cb cb) {
int err;
err = ERROR_INVALID_PARAMETER;
switch (stream->type) {
case UV_TCP:
err = uv_tcp_listen((uv_tcp_t*)stream, backlog, cb);
break;
case UV_NAMED_PIPE:
err = uv_pipe_listen((uv_pipe_t*)stream, backlog, cb);
break;
default:
assert(0);
}
return uv_translate_sys_error(err);
}
main > uv_listen > uv_tcp_listen
int uv_tcp_listen(uv_tcp_t* tcp, int backlog, uv_connection_cb cb) {
...
if (listen(tcp->io_watcher.fd, backlog))
return UV__ERR(errno);
tcp->connection_cb = cb;
tcp->flags |= UV_HANDLE_BOUND;
/* Start listening for connections. */
tcp->io_watcher.cb = uv__server_io;
uv__io_start(tcp->loop, &tcp->io_watcher, POLLIN);
return 0;
}
main > uv_listen > uv_tcp_listen > uv__server_io
tcp 流的 i/o 观察者回调函数
void uv__server_io(uv_loop_t* loop, uv__io_t* w, unsigned int events) {
...
while (uv__stream_fd(stream) != -1) {
assert(stream->accepted_fd == -1);
err = uv__accept(uv__stream_fd(stream));
if (err < 0) {
if (err == UV_EAGAIN || err == UV__ERR(EWOULDBLOCK))
return; /* Not an error. */
if (err == UV_ECONNABORTED)
continue; /* Ignore. Nothing we can do about that. */
if (err == UV_EMFILE || err == UV_ENFILE) {
err = uv__emfile_trick(loop, uv__stream_fd(stream));
if (err == UV_EAGAIN || err == UV__ERR(EWOULDBLOCK))
break;
}
stream->connection_cb(stream, err);
continue;
}
UV_DEC_BACKLOG(w)
stream->accepted_fd = err;
stream->connection_cb(stream, 0);
...
}
main > uv_listen > uv_tcp_listen > uv__server_io > uv__emfile_trick
在上面的 uv__stream_init 函数中, 我们发现 loop 的 emfile_fd 属性上通过 uv__open_cloexec 方法创建一个指向空文件(/dev/null)的 idlefd 文件描述符。
当出现 accept (EMFILE错误)即文件描述符用尽时的错误时
首先将 loop->emfile_fd 文件描述符, 使其能 accept 新连接, 然后我们新连接将其关闭,以使其低于EMFILE的限制。接下来,我们接受所有等待的连接并关闭它们以向客户发出信号,告诉他们我们已经超载了--我们确实超载了,但是我们仍在继续工作。
static int uv__emfile_trick(uv_loop_t* loop, int accept_fd) {
int err;
int emfile_fd;
if (loop->emfile_fd == -1)
return UV_EMFILE;
uv__close(loop->emfile_fd);
loop->emfile_fd = -1;
do {
err = uv__accept(accept_fd);
if (err >= 0)
uv__close(err);
} while (err >= 0 || err == UV_EINTR);
emfile_fd = uv__open_cloexec("/", O_RDONLY);
if (emfile_fd >= 0)
loop->emfile_fd = emfile_fd;
return err;
}
当收到一个新连接, 例子中的 on_new_connection 函数被调用
void on_new_connection(uv_stream_t *server, int status) {
if (status < 0) {
fprintf(stderr, "New connection error %s\n", uv_strerror(status));
// error!
return;
}
uv_tcp_t *client = (uv_tcp_t*) malloc(sizeof(uv_tcp_t));
uv_tcp_init(loop, client);
if (uv_accept(server, (uv_stream_t*) client) == 0) {
uv_read_start((uv_stream_t*) client, alloc_buffer, echo_read);
}
on_new_connection > uv_accept
根据不同的协议调用不同的方法, 该例子 tcp 调用 uv__stream_open 方法
uv__stream_open 设置给初始化完成的 client 流设置了 i/o 观察者的 fd。该 fd 即是 uv__server_io 中提到的 ConnectFD 。
int uv_accept(uv_stream_t* server, uv_stream_t* client) {
int err;
assert(server->loop == client->loop);
if (server->accepted_fd == -1)
return UV_EAGAIN;
switch (client->type) {
case UV_NAMED_PIPE:
case UV_TCP:
err = uv__stream_open(client,
server->accepted_fd,
UV_HANDLE_READABLE | UV_HANDLE_WRITABLE);
if (err) {
/* TODO handle error */
uv__close(server->accepted_fd);
goto done;
}
break;
case UV_UDP:
err = uv_udp_open((uv_udp_t*) client, server->accepted_fd);
if (err) {
uv__close(server->accepted_fd);
goto done;
}
break;
default:
return UV_EINVAL;
}
client->flags |= UV_HANDLE_BOUND;
done:
/* Process queued fds */
if (server->queued_fds != NULL) {
uv__stream_queued_fds_t* queued_fds;
queued_fds = server->queued_fds;
/* Read first */
server->accepted_fd = queued_fds->fds[0];
/* All read, free */
assert(queued_fds->offset > 0);
if (--queued_fds->offset == 0) {
uv__free(queued_fds);
server->queued_fds = NULL;
} else {
/* Shift rest */
memmove(queued_fds->fds,
queued_fds->fds + 1,
queued_fds->offset * sizeof(*queued_fds->fds));
}
} else {
server->accepted_fd = -1;
if (err == 0)
uv__io_start(server->loop, &server->io_watcher, POLLIN);
}
return err;
}
on_new_connection > uv_read_start
开启一个流的监听工作
uv_read_start 主要是调用了 uv__read_start 函数。开始了普通流的 i/o 过程。
int uv__read_start(uv_stream_t* stream,
uv_alloc_cb alloc_cb,
uv_read_cb read_cb) {
assert(stream->type == UV_TCP || stream->type == UV_NAMED_PIPE ||
stream->type == UV_TTY);
/* The UV_HANDLE_READING flag is irrelevant of the state of the tcp - it just
* expresses the desired state of the user.
*/
stream->flags |= UV_HANDLE_READING;
/* TODO: try to do the read inline? */
/* TODO: keep track of tcp state. If we've gotten a EOF then we should
* not start the IO watcher.
*/
assert(uv__stream_fd(stream) >= 0);
assert(alloc_cb);
stream->read_cb = read_cb;
stream->alloc_cb = alloc_cb;
uv__io_start(stream->loop, &stream->io_watcher, POLLIN);
uv__handle_start(stream);
uv__stream_osx_interrupt_select(stream);
return 0;
}
开始写一些博客主要是在看完代码后再温故总结一遍, 也是为了后面回头也能查阅。本系列会从官网的例子出发, 尽可能以链路追踪的方式记录其中源码核心模块的实现, 本篇例子来源
涉及的知识点
创建了两个子线程, 而 linux 提供的 sigaction 函数一个 signum 只能有一个监听函数, 那么多进程多线程如何做到只设置一次通知所有监听函数了?
#include <stdio.h>
#include <stdlib.h>
#include <unistd.h>
#include <uv.h>
uv_loop_t* create_loop()
{
uv_loop_t *loop = malloc(sizeof(uv_loop_t));
if (loop) {
uv_loop_init(loop);
}
return loop;
}
void signal_handler(uv_signal_t *handle, int signum)
{
printf("Signal received: %d\n", signum);
uv_signal_stop(handle);
}
// two signal handlers in one loop
void thread1_worker(void *userp)
{
uv_loop_t *loop1 = create_loop();
uv_signal_t sig1a, sig1b;
uv_signal_init(loop1, &sig1a);
uv_signal_start(&sig1a, signal_handler, SIGUSR1);
uv_signal_init(loop1, &sig1b);
uv_signal_start(&sig1b, signal_handler, SIGUSR1);
uv_run(loop1, UV_RUN_DEFAULT);
}
// two signal handlers, each in its own loop
void thread2_worker(void *userp)
{
uv_loop_t *loop2 = create_loop();
uv_loop_t *loop3 = create_loop();
uv_signal_t sig2;
uv_signal_init(loop2, &sig2);
uv_signal_start(&sig2, signal_handler, SIGUSR1);
uv_signal_t sig3;
uv_signal_init(loop3, &sig3);
uv_signal_start(&sig3, signal_handler, SIGUSR1);
while (uv_run(loop2, UV_RUN_NOWAIT) || uv_run(loop3, UV_RUN_NOWAIT)) {
}
}
int main()
{
printf("PID %d\n", getpid());
uv_thread_t thread1, thread2;
uv_thread_create(&thread1, thread1_worker, 0);
uv_thread_create(&thread2, thread2_worker, 0);
uv_thread_join(&thread1);
uv_thread_join(&thread2);
return 0;
}
关于该例子中的 SIGUSR1 信号, 为用户自定义信号1
$ kill -10 12345
$ kill -SIGUSR1 12345
thread1_worker > uv_signal_init
对 loop 和 handle 进行一些数据初始化操作, 主要调用了 uv__signal_loop_once_init 函数。
int uv_signal_init(uv_loop_t* loop, uv_signal_t* handle) {
int err;
err = uv__signal_loop_once_init(loop);
if (err)
return err;
uv__handle_init(loop, (uv_handle_t*) handle, UV_SIGNAL);
handle->signum = 0;
handle->caught_signals = 0;
handle->dispatched_signals = 0;
return 0;
}
thread1_worker > uv_signal_init > uv__signal_loop_once_init
pipe2: 创建一个管道,一个单向的数据通道,可以 用于进程间通信。数组 pipefd 用于 返回两个指向管道末端的文件描述符。 pipefd[0] 指的是管道的读取端。 pipefd[1] 指的是 到管道的写端。写入到写端的数据 管道由内核缓冲,直到从 read 中读取 管道的末端。
static int uv__signal_loop_once_init(uv_loop_t* loop) {
int err;
/* Return if already initialized. */
if (loop->signal_pipefd[0] != -1)
return 0;
err = uv__make_pipe(loop->signal_pipefd, UV_NONBLOCK_PIPE);
if (err)
return err;
uv__io_init(&loop->signal_io_watcher,
uv__signal_event,
loop->signal_pipefd[0]);
uv__io_start(loop, &loop->signal_io_watcher, POLLIN);
return 0;
}
thread1_worker > uv_signal_start
uv_signal_start 函数里面主要是调用了 uv_signal_start 方法, libuv 中有大量相似度极高的函数名 ...
static int uv__signal_start(uv_signal_t* handle,
uv_signal_cb signal_cb,
int signum,
int oneshot) {
...
if (signum == handle->signum) {
handle->signal_cb = signal_cb;
return 0;
}
/* If the signal handler was already active, stop it first. */
if (handle->signum != 0) {
uv__signal_stop(handle);
}
uv__signal_block_and_lock(&saved_sigmask);
first_handle = uv__signal_first_handle(signum);
if (first_handle == NULL ||
(!oneshot && (first_handle->flags & UV_SIGNAL_ONE_SHOT))) {
err = uv__signal_register_handler(signum, oneshot);
if (err) {
/* Registering the signal handler failed. Must be an invalid signal. */
uv__signal_unlock_and_unblock(&saved_sigmask);
return err;
}
}
handle->signum = signum;
if (oneshot)
handle->flags |= UV_SIGNAL_ONE_SHOT;
RB_INSERT(uv__signal_tree_s, &uv__signal_tree, handle);
uv__signal_unlock_and_unblock(&saved_sigmask);
handle->signal_cb = signal_cb;
uv__handle_start(handle);
return 0;
}
thread1_worker > uv_signal_start > uv__signal_block_and_lock
通过 pthread_sigmask 的例子可以看见主要是对信号集进行了初始化的操作, 然后调用了 uv__signal_lock 函数。
//pthread_sigmask 的例子
sigemptyset(&set);
sigaddset(&set, SIGQUIT);
sigaddset(&set, SIGUSR1);
s = pthread_sigmask(SIG_BLOCK, &set, NULL);
static void uv__signal_block_and_lock(sigset_t* saved_sigmask) {
sigset_t new_mask;
if (sigfillset(&new_mask))
abort();
/* to shut up valgrind */
sigemptyset(saved_sigmask);
if (pthread_sigmask(SIG_SETMASK, &new_mask, saved_sigmask))
abort();
if (uv__signal_lock())
abort();
}
thread1_worker > uv_signal_start > uv__signal_block_and_lock > uv__signal_lock
通过 read 读取 uv__signal_lock_pipefd[0], 当出现 EINTR 出错时, 就会尝试轮询重试。EINTR 错误一般出现在当正在进行系统调用时, 此时发送了一个 signal。
如果在系统调用正在进行时发生信号,许多系统调用将报告 EINTR 错误代码。实际上没有发生错误,只是因为系统无法自动恢复系统调用而以这种方式报告。这种编码模式只是在发生这种情况时重试系统调用,以忽略中断。
static int uv__signal_lock(void) {
int r;
char data;
do {
r = read(uv__signal_lock_pipefd[0], &data, sizeof data);
} while (r < 0 && errno == EINTR);
return (r < 0) ? -1 : 0;
}
那么何时 read 到数据让程序继续往下运行了 ?
此时感觉头绪有点断了, 那么从一开始在理一下, 是不是忽略了什么细节。最后在 create_loop > uv_loop_init > uv__signal_global_once_init > uv__signal_global_init 函数中找到了 write 数据的地方。
uv__signal_global_init 分析
函数里面调用了如果 uv__signal_lock_pipefd 未设置, 则调用 pthread_atfork 函数
pthread_atfork 前两个参数是调用 fork 函数产生子进程时的before, after 父进程里面会运行的勾子函数, 第三个参数是子进程会运行的勾子函数。
原来是创建子进程时会调用 uv__signal_global_reinit 一次, 本例子是创建了线程故不会进入这个场景, 最后只运行了一次 uv__signal_global_reinit 函数。
static void uv__signal_global_init(void) {
if (uv__signal_lock_pipefd[0] == -1)
// https://man7.org/linux/man-pages/man3/pthread_atfork.3.html
if (pthread_atfork(NULL, NULL, &uv__signal_global_reinit))
abort();
uv__signal_global_reinit();
}
create_loop > uv_loop_init > uv__signal_global_once_init > uv__signal_global_init > uv__signal_global_reinit
原来是一个主线程里面会调用一次 uv__signal_global_reinit 函数, 去通过 uv__make_pipe 创建一个通信的管道, 并且最后会调用 uv__signal_unlock 去 write 一次数据。 这样在上面说到的当有一个线程进入 uv__signal_lock 逻辑时就会 read 到数据, 程序继续往下运行, 其他线程则会继续陷入等待, 达到互斥锁的目的。有点没想明白不直接使用互斥锁的原因 ...
当pthread_mutex_lock()返回时,该互斥锁已被锁定。线程调用该函数让互斥锁上锁,如果该互斥锁已被另一个线程锁定和拥有,则调用该线程将阻塞,直到该互斥锁变为可用为止。
static void uv__signal_global_reinit(void) {
uv__signal_cleanup();
if (uv__make_pipe(uv__signal_lock_pipefd, 0))
abort();
if (uv__signal_unlock())
abort();
}
static int uv__signal_unlock(void) {
int r;
char data = 42;
do {
r = write(uv__signal_lock_pipefd[1], &data, sizeof data);
} while (r < 0 && errno == EINTR);
return (r < 0) ? -1 : 0;
}
thread1_worker > uv_signal_start > uv__signal_first_handle
回到主线, 通过 RB_NFIND 查找该 signum 是否已经设置监听函数, 主要是确保一个 signum 只有一个监听函数。其主要原因是上面说的 sigaction 只能给一个 signum 绑定一个监听函数。
static uv_signal_t* uv__signal_first_handle(int signum) {
/* This function must be called with the signal lock held. */
uv_signal_t lookup;
uv_signal_t* handle;
lookup.signum = signum;
lookup.flags = 0;
lookup.loop = NULL;
handle = RB_NFIND(uv__signal_tree_s, &uv__signal_tree, &lookup);
if (handle != NULL && handle->signum == signum)
return handle;
return NULL;
}
thread1_worker > uv_signal_start > uv__signal_first_handle > RB_NFIND
和 QUEUE 一样都是通过一组宏定义实现的, 代码在 deps/uv/include/uv/tree.h 文件中。
在这里 signum 都是数字形式, 通过红黑树结构能够高效的查找于遍历。
thread1_worker > uv_signal_start > uv__signal_register_handler
设置该 signum 的信号处理函数为 uv__signal_handler
sa_flags:用来设置信号处理的其他相关操作,下列的数值可用。可用OR 运算(|)组合
static int uv__signal_register_handler(int signum, int oneshot) {
/* When this function is called, the signal lock must be held. */
struct sigaction sa;
/* XXX use a separate signal stack? */
memset(&sa, 0, sizeof(sa));
if (sigfillset(&sa.sa_mask))
abort();
sa.sa_handler = uv__signal_handler;
sa.sa_flags = SA_RESTART;
if (oneshot)
sa.sa_flags |= SA_RESETHAND;
/* XXX save old action so we can restore it later on? */
if (sigaction(signum, &sa, NULL))
return UV__ERR(errno);
return 0;
}
thread1_worker > uv_signal_start > uv__signal_register_handler > uv__signal_handler
作为唯一的信号处理函数, 让我们来看看 uv__signal_handler 的实现
static void uv__signal_handler(int signum) {
...
for (handle = uv__signal_first_handle(signum);
handle != NULL && handle->signum == signum;
handle = RB_NEXT(uv__signal_tree_s, &uv__signal_tree, handle)) {
int r;
msg.signum = signum;
msg.handle = handle;
/* write() should be atomic for small data chunks, so the entire message
* should be written at once. In theory the pipe could become full, in
* which case the user is out of luck.
*/
do {
r = write(handle->loop->signal_pipefd[1], &msg, sizeof msg);
} while (r == -1 && errno == EINTR);
assert(r == sizeof msg ||
(r == -1 && (errno == EAGAIN || errno == EWOULDBLOCK)));
if (r != -1)
handle->caught_signals++;
}
uv__signal_unlock();
errno = saved_errno;
}
thread1_worker > uv_signal_init > uv__signal_loop_once_init > uv__signal_event
信号 i/o 设置的回调函数。
static void uv__signal_event(uv_loop_t* loop,
uv__io_t* w,
unsigned int events) {
uv__signal_msg_t* msg;
uv_signal_t* handle;
char buf[sizeof(uv__signal_msg_t) * 32];
size_t bytes, end, i;
int r;
bytes = 0;
end = 0;
do {
r = read(loop->signal_pipefd[0], buf + bytes, sizeof(buf) - bytes);
if (r == -1 && errno == EINTR)
continue;
if (r == -1 && (errno == EAGAIN || errno == EWOULDBLOCK)) {
/* If there are bytes in the buffer already (which really is extremely
* unlikely if possible at all) we can't exit the function here. We'll
* spin until more bytes are read instead.
*/
if (bytes > 0)
continue;
/* Otherwise, there was nothing there. */
return;
}
/* Other errors really should never happen. */
if (r == -1)
abort();
bytes += r;
/* `end` is rounded down to a multiple of sizeof(uv__signal_msg_t). */
end = (bytes / sizeof(uv__signal_msg_t)) * sizeof(uv__signal_msg_t);
for (i = 0; i < end; i += sizeof(uv__signal_msg_t)) {
msg = (uv__signal_msg_t*) (buf + i);
handle = msg->handle;
if (msg->signum == handle->signum) {
assert(!(handle->flags & UV_HANDLE_CLOSING));
handle->signal_cb(handle, handle->signum);
}
handle->dispatched_signals++;
if (handle->flags & UV_SIGNAL_ONE_SHOT)
uv__signal_stop(handle);
}
bytes -= end;
/* If there are any "partial" messages left, move them to the start of the
* the buffer, and spin. This should not happen.
*/
if (bytes) {
memmove(buf, buf + end, bytes);
continue;
}
} while (end == sizeof buf);
}
只需在第一个调用 uv__signal_start 函数的时候注册一个信号处理函数, 当收到信号时, 该函数会遍历红黑树中所有关注该 signum 的 handle, 然后向该 handle 通过 pipe2 申请的通信 fd 的写端写入数据, 事件循环阶段被 epoll 捕获通知到该 handle 的 i/o 观察者, 最后调用观察者的回调, 达到通知所有监听函数的目的。

现有的服务端渲染(Server-side rendering,简称 SSR)的原理是当 HTML 请求到达 Node 端时先等待后端接口数据请求完成(30~300ms),然后再进行渲染(2~5ms),最后再响应渲染完成的页面给浏览器。
大致流程是: fetch data (server) → render to HTML (server) → load code (client) → hydrate (client)
如本文用作示例的商品管理页面,需要并发8个后端接口请求,最慢的接口 /api/xxx/goodsList 延时为 246.6 ms,导致Step1阶段用户看到的页面白屏时间至少是 246.6ms + 5ms。

💡 Step2 截图为灰色仅为了区别于 Step3 可交互状态,实际用户看到的效果与 Step3 无差异
为了解决后端接口延时不可控造成的 Step1 阶段白屏时间过长的问题,于是我们开发了渐进式渲染功能,优化后的渲染链路变成了如下

React18 新的 Suspense SSR 架构允许你在服务端使用 Suspense 组件,比如你的 Comments 组件是需要后端接口的数据,那么可以做到后端接口数据仅阻塞 Comments 组件,不会阻塞整个 App 组件的渲染与提前返回
<Layout>
<NavBar />
<Sidebar />
<RightPane>
<Post />
<Suspense fallback={<Spinner />}>
<Comments />
</Suspense>
</RightPane>
</Layout>新 Suspense SSR 架构下的渲染链路变成了如下

你可能想到部分可交互状态时,如果客户端其他组件响应了事件导致 Comment 组件的 props 变化,而服务端是根据 initProps 对 Comment 进行的渲染,那么 React 会如何取舍
function Content() {
const [count, setCount] = useState(0);
return (
<Layout>
<NavBar />
<Sidebar />
<RightPane>
<Post />
<h2
onClick={() => {
setCount(count + 1)
console.log("setCount 点击事件测试, count: ", count);
}}
>
setCount 点击事件测试
</h2>
<Suspense fallback={<Spinner />}>
<Comments count={count}/>
</Suspense>
</RightPane>
</Layout>
);
}
function Comments({ count }) {
const comments = useData();
return (
<>
<span>count: {count}</span>
{comments.map((comment, i) => (
<p className="comment" key={i}>
{comment}
</p>
))}
</>
);
}从测试结果来看 Props 发生变化后 React 会以客户端最新渲染的结果为准, 与此同时抛出Uncaught Error: This Suspense boundary received an update before it finished hydrating.错误

因为 Suspense 支持对于单个组件进行的延迟渲染,首先我们需要对页面组件进行拆分,同时使用 Suspense 进行包裹

如果升级到了新 Suspense SSR 架构下的渲染链路变成了如下

如果发现升级后页面没有进行分块渲染, 或许你要继续阅读 👉 服务端流式渲染 iOS 中踩坑记

使用 napi 时经常要通过 napi_xxx 函数的返回值去判断一下本次操作是否成功, 于是就需要写大量的 assert 断言去保证程序始终是按预期之内运行的
// napi exapmle
static napi_value CreateObject(napi_env env, const napi_callback_info info) {
napi_status status;
size_t argc = 1;
napi_value args[1];
status = napi_get_cb_info(env, info, &argc, args, NULL, NULL);
assert(status == napi_ok);
napi_value obj;
status = napi_create_object(env, &obj);
assert(status == napi_ok);
status = napi_set_named_property(env, obj, "msg", args[0]);
assert(status == napi_ok);
return obj;
}而使用 node-addon-api 实现同样的功能的代码则比较简洁
// node-addon-api exapmle
Napi::Object CreateObject(const Napi::CallbackInfo& info) {
Napi::Env env = info.Env();
Napi::Object obj = Napi::Object::New(env);
obj.Set(Napi::String::New(env, "msg"), info[0].ToString());
return obj;
}node-addon-api 其实是在每个操作函数中都内置了错误处理, 如下面代码的 NAPI_THROW_IF_FAILED 宏就是完成错误处理的任务
// napi-inl.h
inline Object Object::New(napi_env env) {
napi_value value;
napi_status status = napi_create_object(env, &value);
NAPI_THROW_IF_FAILED(env, status, Object());
return Object(env, value);
}而 NAPI_THROW_IF_FAILED 宏定义又有两种表现形式, 根据是否开启了 NAPI_CPP_EXCEPTIONS 来决定当前抛出的是一个 C++ 层面的错误还是 Js 层面的错误
// napi-inl.h
#ifdef NAPI_CPP_EXCEPTIONS
#define NAPI_THROW_IF_FAILED(env, status, ...) \
if ((status) != napi_ok) throw Napi::Error::New(env);
#else // NAPI_CPP_EXCEPTIONS
#define NAPI_THROW_IF_FAILED(env, status, ...) \
if ((status) != napi_ok) { \
Napi::Error::New(env).ThrowAsJavaScriptException(); \
return __VA_ARGS__; \
}既然抛出的 Js 错误不会终止 C++ 程序运行, 那么后面运行的 C++ 代码如果更好的判断上一次操作是否正确返回了值。于是 MaybeOrValue 类承担了这个精准而又不失优雅的任务, MaybeOrValue 类在 Node 以及 v8 代码中也是比较常见的
如下面的 Value().Get 操作, 如果 napi_get_named_property 函数操作失败, 就会出现预期外的错误
inline MaybeOrValue<Napi::Value> ObjectReference::Get(
const char* utf8name) const {
EscapableHandleScope scope(_env);
MaybeOrValue<Napi::Value> result = Value().Get(utf8name);
#ifdef NODE_ADDON_API_ENABLE_MAYBE
if (result.IsJust()) {
return Just(scope.Escape(result.Unwrap()));
}
return result;
#else
if (scope.Env().IsExceptionPending()) {
return Value();
}
return scope.Escape(result);
#endif
}
inline MaybeOrValue<Value> Object::Get(const char* utf8name) const {
napi_value result;
napi_status status = napi_get_named_property(_env, _value, utf8name, &result);
NAPI_RETURN_OR_THROW_IF_FAILED(_env, status, Value(_env, result), Value);
}经过进一步的展开宏定义的实现, 发现如果操作成功运行的是 Napi::Just, 否则是 Napi::Nothing
#define NAPI_RETURN_OR_THROW_IF_FAILED(env, status, result, type) \
NAPI_MAYBE_THROW_IF_FAILED(env, status, type); \
return Napi::Just<type>(result);
#define NAPI_MAYBE_THROW_IF_FAILED(env, status, type) \
NAPI_THROW_IF_FAILED(env, status, Napi::Nothing<type>())
#define NAPI_THROW_IF_FAILED(env, status, ...) \
if ((status) != napi_ok) { \
Napi::Error::New(env).ThrowAsJavaScriptException(); \
return __VA_ARGS__; \
}template <class T>
inline Maybe<T> Nothing() {
return Maybe<T>();
}
template <class T>
inline Maybe<T> Just(const T& t) {
return Maybe<T>(t);
}
template <class T>
Maybe<T>::Maybe() : _has_value(false) {}
template <class T>
Maybe<T>::Maybe(const T& t) : _has_value(true), _value(t) {}MaybeOrValue 类则提供了如下的实用属性来表示当前的状态
template <class T>
bool Maybe<T>::IsNothing() const {
return !_has_value;
}
template <class T>
bool Maybe<T>::IsJust() const {
return _has_value;
}
template <class T>
void Maybe<T>::Check() const {
NAPI_CHECK(IsJust(), "Napi::Maybe::Check", "Maybe value is Nothing.");
}
template <class T>
T Maybe<T>::Unwrap() const {
NAPI_CHECK(IsJust(), "Napi::Maybe::Unwrap", "Maybe value is Nothing.");
return _value;
}这里说一个题外话, 一开始看叉了, 发现返回值不是 MaybeOrValue 类, 而是 napi_xxx 函数返回的原始值。其实是因为会根据是否开启了 NODE_ADDON_API_ENABLE_MAYBE 来决定返回值是否经过 MaybeOrValue 包裹, 而 vscode 跳转则定位到了返回的原始值的宏定义处
#ifdef NODE_ADDON_API_ENABLE_MAYBE
#define NAPI_MAYBE_THROW_IF_FAILED(env, status, type) \
NAPI_THROW_IF_FAILED(env, status, Napi::Nothing<type>())
#define NAPI_RETURN_OR_THROW_IF_FAILED(env, status, result, type) \
NAPI_MAYBE_THROW_IF_FAILED(env, status, type); \
return Napi::Just<type>(result);
#else
#define NAPI_RETURN_OR_THROW_IF_FAILED(env, status, result, type) \
NAPI_MAYBE_THROW_IF_FAILED(env, status, type); \
return result;
#endif当时想了很久没有整明白 Value().Get(utf8name) 返回的明明不是 MaybeOrValue 类型, 难道是 MaybeOrValue 类的什么 operator 接口触发了类型转换 ?
MaybeOrValue<Napi::Value> result = Value().Get(utf8name);随着对上面疑惑的探索, 如下的代码中的 A a1 = 1 代码中的 1 不是 A 类型也能赋值成功是因为触发了 C++ 的隐性转换, 这里的 1 其实就被当成了构造函数的参数了
而构造函数加了 explicit 关键字的 B 类则不能进行上面的隐性转换, 不过还是能通过 static_cast 等进行显性转换
struct A
{
A(int) { } // 转换构造函数
A(int, int) { } // 转换构造函数(C++11)
operator bool() const { return true; }
};
struct B
{
explicit B(int) { }
explicit B(int, int) { }
explicit operator bool() const { return true; }
};
int main()
{
A a1 = 1; // OK:复制初始化选择 A::A(int)
A a2(2); // OK:直接初始化选择 A::A(int)
A a3 {4, 5}; // OK:直接列表初始化选择 A::A(int, int)
A a4 = {4, 5}; // OK:复制列表初始化选择 A::A(int, int)
A a5 = (A)1; // OK:显式转型进行 static_cast
if (a1) ; // OK:A::operator bool()
bool na1 = a1; // OK:复制初始化选择 A::operator bool()
bool na2 = static_cast<bool>(a1); // OK:static_cast 进行直接初始化
// B b1 = 1; // 错误:复制初始化不考虑 B::B(int)
B b2(2); // OK:直接初始化选择 B::B(int)
B b3 {4, 5}; // OK:直接列表初始化选择 B::B(int, int)
// B b4 = {4, 5}; // 错误:复制列表初始化不考虑 B::B(int,int)
B b5 = (B)1; // OK:显式转型进行 static_cast
if (b2) ; // OK:B::operator bool()
// bool nb1 = b2; // 错误:复制初始化不考虑 B::operator bool()
bool nb2 = static_cast<bool>(b2); // OK:static_cast 进行直接初始化
}binding.gyp 文件中可通过如下配置开启 NAPI_CPP_EXCEPTIONS 与 NODE_ADDON_API_ENABLE_MAYBE 特性
{
"targets": [
{
"target_name": "addon",
"cflags!": [ "-fno-exceptions" ],
"cflags_cc!": [ "-fno-exceptions" ],
"sources": [ "addon.cc" ],
"include_dirs": [
"<!@(node -p \"require('node-addon-api').include\")"
],
'defines': [ 'NAPI_CPP_EXCEPTIONS', 'NODE_ADDON_API_ENABLE_MAYBE' ],
'msvs_settings': {
'VCCLCompilerTool': {
'ExceptionHandling': 1,
'EnablePREfast': 'true',
},
},
'xcode_settings': {
'CLANG_CXX_LIBRARY': 'libc++',
'MACOSX_DEPLOYMENT_TARGET': '10.7',
'GCC_ENABLE_CPP_EXCEPTIONS': 'YES',
},
}
]
}
v8::Localv8::Value 是 v8 和 Node-Api 中十分常见的一种类型。Local 创建了一个指向 js 对象的本地引用, 如下的代码可通过 V8LocalValueFromJsValue 函数从一个 js 对象中返回一个 Local 对象
// src/js_native_api_v8.h
inline v8::Local<v8::Value> V8LocalValueFromJsValue(napi_value v) {
v8::Local<v8::Value> local;
memcpy(static_cast<void*>(&local), &v, sizeof(v));
return local;
}刚开始看见这个代码比较疑惑, 因为对于一个没有经过 new 关键词生成的 local 实例, 其内存是分配在栈中, 类似于一个结构体
于是写了如下的 demo 开始验证, 当 getTest 函数返回一个结构体时会有如何的表现
#include <stdio.h>
typedef struct
{
int age;
} Test;
Test getTest()
{
Test test;
test.age = 100;
printf("getTest test age %d", &test.age);
return test;
}
int main()
{
Test test = getTest();
printf("main test age %d", &test.age);
return 0;
}最后程序是能正常运行的, 从运行结果来看, 两个 age 字段的地址是不同的
这样我大概得出了 getTest 函数中有一个临时性结构体 test,test 也确实会在 getTest 函数返回时被释放,但由于 test 被当做“值”进行返回,因此编译器将保证 getTest 的返回值对于 getTest 的调用者(caller)来说是有效的, 所以调用者 main 函数里面的 test 将得到一份被复制的数据, 于是表现出相同的 age 字段地址其实是不一样的
➜ c ./a.out
getTest test age -385596360main test age -385596328% 那接下来继续再验证一下如果是 inline Test getTest() 的话, 两个字段的地址会不会是一样了 ?
答案是加上了 inline 后 age 字段地址还是不一样的。这样我开始明白了 inline 不是像宏定义那样进行的简单的文本替换, 于是单独学习了一下 inline 函数, 总结如下, 具体推荐阅读文章 C++ 内联函数 inline
最后的验证, 如果 getTest 返回的是指针了 ?
#include <stdio.h>
typedef struct
{
int age;
} Test;
Test* getTest()
{
Test test;
test.age = 100;
printf("getTest test age %d", &test.age);
return &test;
}
int main()
{
Test* test = getTest();
printf("main test age %d", &test->age);
return 0;
}由 demo 运行结果可见, age 字段的地址是一致的。说明平时我们在写代码时尽量不要传递结构体等实体, 因为将会花费一定的时间去复制数据, 而返回指针则会快捷很多
➜ c ./a.out
getTest test age -277670872main test age -277670872% 到这里其实我还有最后一个疑惑的点, Local 创建了一个指向 js 对象的本地引用, 那么为何上面的 V8LocalValueFromJsValue 却是复制了一份数据而非引用关系了 ?
// v8/include/v8-local-handle.h
template <class T>
class Local {
public:
V8_INLINE Local() : val_(nullptr) {}
template <class S>
V8_INLINE Local(Local<S> that) : val_(reinterpret_cast<T*>(*that)) {
/**
* This check fails when trying to convert between incompatible
* handles. For example, converting from a Local<String> to a
* Local<Number>.
*/
static_assert(std::is_base_of<T, S>::value, "type check");
}
T* val_;
// ...
}于是只能查看了一下 v8 中关于 Local 的定义, Local 有一个 val_ 属性, 是一个指针数据, 此时我猜测 V8LocalValueFromJsValue 函数中使用 memcpy 复制数据时, 如果遇见了指针类型, 只会复制一下地址, 所以新的 local 对象持有的 val_ 引用的是原 js 对象
#include <stdio.h>
#include <string.h>
typedef struct
{
int age;
} my_local_value;
typedef struct
{
int age;
my_local_value *_val;
} my_local;
int main()
{
my_local_value local_value;
my_local local1;
my_local local2;
local1._val = &local_value;
memcpy(&local2, &local1, sizeof(local1));
printf("is_eq: %d \n", local2._val == local1._val ? 1 : 2);
return 0;
}于是写了上面的验证 demo, 运行结果也证实了 _val 值的是相等的
➜ c ./a.out
is_eq: 1// v8/include/v8-local-handle.h
/**
* An object reference managed by the v8 garbage collector.
*
* All objects returned from v8 have to be tracked by the garbage collector so
* that it knows that the objects are still alive. Also, because the garbage
* collector may move objects, it is unsafe to point directly to an object.
* Instead, all objects are stored in handles which are known by the garbage
* collector and updated whenever an object moves. Handles should always be
* passed by value (except in cases like out-parameters) and they should never
* be allocated on the heap.
*/v8::Localv8::Value 既是非常常见也是非常重要的一个概念, 后面需要继续深入探究一下其实现与原理

Module parse failed: Unexpected token (1:6518)
You may need an appropriate loader to handle this file type, currently no loaders are configured to process this file. See https://webpack.js.org/concepts#loaders一开始注意力都在 You may need an appropriate loader to handle this file type 这个报错信息上, 通常这个错误是因为 ts、css、png 等非 js 文件没有设置对应的 loader。但是这里看上去是一个打包好的 umd 的 js 文件, 按理来说 webpack 能识别 js 文件。
其实真正的错误信息是第一句 Module parse failed: Unexpected token (1:6518), 找到报错定位的代码发现有如下可选链操作符 ?. 的语法
let a = window?.b所以真正的原因为 webpack 进行依赖分析的 AST 遍历时未能识别可选链操作符的语法, 即下面的 parse 函数抛错
// webpack/lib/NormalModule.js
try {
const result = this.parser.parse(
this._ast || this._source.source(),
{
current: this,
module: this,
compilation: compilation,
options: options
},
(err, result) => {
if (err) {
handleParseError(err);
} else {
handleParseResult(result);
}
}
);
if (result !== undefined) {
// parse is sync
handleParseResult(result);
}
} catch (e) {
handleParseError(e);
}上面的 parser 其实是 acornParser, 可以说 babel 等都是 acorn 衍生出来的。
babel/issues/11393 @babel/parser was born as a fork of Acorn, but it has been completely rewritten. However, we still use some of its algorithms (for example, to handle expressions precedence).
// webpack/lib/Parser.js
const acorn = require("acorn");
const acornParser = acorn.Parser;
const defaultParserOptions = {
ranges: true,
locations: true,
ecmaVersion: 11,
sourceType: "module",
onComment: null
};通过上面的参数 ecmaVersion 可知, 当前只会识别 ES 11 (2020), 而可选链操作符 还是 Stage 4 阶段

修改 babel-loader 的 include 字段, 将含有较高语法的 npm 包经过 babel 编译一次, 到 webpack 处理时就是兼容性良好的 e5 代码了
// webpack.config.js
// Process application JS with Babel.
// The preset includes JSX, Flow, TypeScript, and some ESnext features.
{
test: /\.(js|mjs|jsx|ts|tsx)$/,
include: paths.appSrc,
loader: require.resolve('babel-loader'),
options: {
// ...
}
}
开发同学反馈 Next.js 项目 next dev 命令启动后浏览器访问页面 css 样式有丢失,表现为 style 标签的内容不是 css 样式而是一个 url 😨
<style>/_next/static/media/globals.23a96686.css</style>面对这个略显奇葩的问题该如何排查了 ?

Rule.oneOf : An array of Rules from which only the first matching Rule is used when the Rule matches.
同时根据 Rule.oneOf 的定义确认了只会从 oneOf 数组中找到一个匹配到的规则就会停止, 那么 loader 应该是都被正确设置了
loader 正常是按从下到上, 从右到左的顺序执行, 即如上配置会按从 postcss-loader > css-loader > next-style-loader 来依次处理。
// packages/next/build/webpack/loaders/next-style-loader/index.js
import path from 'path'
import isEqualLocals from './runtime/isEqualLocals'
import { stringifyRequest } from '../../stringify-request'
const loaderApi = () => {}
loaderApi.pitch = function loader(request) {
// ...
}
module.exports = loaderApi但是由于 next-style-loader 导出了 pitch 属性, loader 的顺序将会变成首先运行 pitch 函数, 相关文档见 Pitching Loader
|- next-style-loader `pitch`
|- requested module is picked up as a dependency
|- postcss-loader normal execution
|- css-loader normal execution
|- next-style-loader normal execution那么我们先从 next-style-loader 的 pitch 函数开始排查, 然后发现了如下语句
// packages/next/build/webpack/loaders/next-style-loader/index.js
var content = require(${stringifyRequest(this, `!!${request}`)});上面语句补充上变量的值后相当于如下
var content = require('!!xxx/css-loader/src/index.js??xxx/postcss-loader/src/index.js??ruleSet[1].rules[3].oneOf[6].use[2]!./globals.css')♻️ 这里的依赖关系先简单理一下, 比如 _app.tsx 引用了 globals.css
// pages/_app.tsx
import '../styles/globals.css'globals.css 模块的内容被 next-style-loader 处理后的内容类似于下面这样
// styles/globals.css
var content = require('!!xxx/css-loader/src/index.js??xxx/postcss-loader/src/index.js??ruleSet[1].rules[3].oneOf[6].use[2]!./globals.css')
const style = document.createElement('style');
style.appendChild(document.createTextNode(content));
document.head.append(style)所以 style 标签里面的 content 的源头其实是 require 的 !!xxx/css-loader/src/index.js??xxx/postcss-loader/src/index.js??ruleSet[1].rules[3].oneOf[6].use[2]!./globals.css 模块提供
// !!xxx/css-loader/src/index.js??xxx/postcss-loader/src/index.js??ruleSet[1].rules[3].oneOf[6].use[2]!./globals.css
module.exports = ?那么对于 !!xxx/css-loader/src/index.js??xxx/postcss-loader/src/index.js??ruleSet[1].rules[3].oneOf[6].use[2]!./globals.css 这个路径上带有 loader 的模块其文件后缀依然为 .css, 那么不还得命中 oneOf 数组索引为 6 的规则么 🤔 ?
经过 debug webpack 的代码发现结果是意外的 ❌, 它命中的是 oneOf 数组索引为 8 的规则

Rule.issuer: A Condition to match against the module that issued the request. In the following example, the issuer for the a.js request would be the path to the index.js file.
关于 Rule.issuer: 比如 pages/_app.tsx 文件里面 import 或者 require 了 globals.css, 那么对于 globals.css 而言, 它的 issuer 为 pages/_app.tsx
让我们回头查看一下为什么没有命中索引为 6 的规则, 发现索引为 6 规则非常重要的一点是要求引用该文件的 issuer 必须只能是 pages/_app.tsx, 见下图红圈的 issuer.and 字段

而 !!xxx/css-loader/src/index.js??xxx/postcss-loader/src/index.js??ruleSet[1].rules[3].oneOf[6].use[2]!./globals.css 模块其实是被 next-style-loader 代理后的 globals.css 所 require, 所以它的 issuer 竟然为 styles/globals.css 🤯
至此 !!xxx/css-loader/src/index.js??xxx/postcss-loader/src/index.js??ruleSet[1].rules[3].oneOf[6].use[2]!./globals.css 模块经过 postcss-loader > css-loader 处理后, 最后还要被 webpack 内置的文件类型 asset/resource 处理(相当于 file-loader), 最终处理完成它的 module.exports 其实为如下👇
// '!!xxx/css-loader/src/index.js??xxx/postcss-loader/src/index.js??ruleSet[1].rules[3].oneOf[6].use[2]!./globals.css'
module.exports = "/_next/static/media/globals.23a96686.css"所以被 next-style-loader 处理后的 styles/globals.css 模块最后 append 了一个 url 字符串到了 style 标签中造成了本次 css 样式的异常 !!!
// styles/globals.css
var content = require('!!xxx/css-loader/src/index.js??xxx/postcss-loader/src/index.js??ruleSet[1].rules[3].oneOf[6].use[2]!./globals.css')
const style = document.createElement('style');
style.appendChild(document.createTextNode(content));
document.head.append(style)对于 styles/globals.css 模块而言只选择了一次即 oneOf 数组索引为 6 的规则, 而经过 next-style-loader 的代理修改后的 require 语句又产生了新的模块 !!xxx/css-loader/src/index.js??xxx/postcss-loader/src/index.js??ruleSet[1].rules[3].oneOf[6].use[2]!./globals.css, 于是新的模块又进行了一次规则 pick, 所以并不算违背了 Rule.oneOf 的定义

即便新的模块又命中了 oneOf 数组索引为 6 的规则, 由于新的模块路径前缀已经包含了 postcss-loader 与 css-loader 也会因为如上图红圈的 if 条件判断不满足而不会被添加重复的 loader
根据如下 Next.js 对应的代码可知, Next.js 的预期是 issuer 为 *.css 的模块将要被 asset/resource(类似于 file-loader) 给处理, 比如 globals.css 有一行代码为 background-image: url("./xxx.png"), 那么此时 xxx.png 就要被 asset/resource 给处理
// next/dist/build/webpack/config/blocks/css/index.js
markRemovable({
// This should only be applied to CSS files
issuer: regexLikeCss,
// Exclude extensions that webpack handles by default
exclude: [
/\.(js|mjs|jsx|ts|tsx)$/,
/\.html$/,
/\.json$/,
/\.webpack\[[^\]]+\]$/,
],
// `asset/resource` always emits a URL reference, where `asset`
// might inline the asset as a data URI
type: 'asset/resource'
}), Next.js 没想到被 next-style-loader 修改后还存在 .css 文件 require .css 文件的情况, .css 文件被 asset/resource 处理后返回一个 url 就导致了本次的 bug 🐛
其实 .css 中 require 的图片、字体等文件被 asset/resource 处理是符合预期, 如果被 require 的是 .css 文件就得排除, 更多见next.js/pull/42283 与 webpack/pull/16477
issuer: regexLikeCss,
// Exclude extensions that webpack handles by default
exclude: [
+ /\.(css|sass|scss)$/,
/\.(js|mjs|jsx|ts|tsx)$/,
/\.html$/,
/\.json$/,
Node-API 的基本概念里面提到了 ABI, 前端开发的同学对这个词语可能就比较陌生,和平时经常提到的 API 有什么区别?
Node-API(以前称为 N-API)是用于构建原生插件的 API。它独立于底层 JavaScript 运行时(例如,V8)并作为 Node.js 本身的一部分进行维护。此 API 将在 Node.js 的各个版本中保持稳定的应用程序二进制接口 (ABI)。它旨在将插件与底层 JavaScript 引擎中的更改隔离开来,并允许为一个主要版本编译的模块无需重新编译即可在 Node.js 的后续主要版本上运行
这是从应用程序/库公开的一组公共类型/变量/函数。 在 C/C++ 中,这是应用程序附带的头文件中公开的内容。
这就是编译器构建应用程序的方式。 它定义了事物(但不限于):
下面的 main.c 程序依赖了 mylib 这个库, mylib 这个库对外暴露了 mylib_init 这个接口, 该接口的出参与入参可以看 mylib.h 中的类型定义。
// main.c
#include <assert.h>
#include <stdlib.h>
#include "mylib.h"
int main(void) {
mylib_mystruct *myobject = mylib_init(1);
assert(myobject->old_field == 1);
free(myobject);
return EXIT_SUCCESS;
}// mylib.c
#include <stdlib.h>
#include "mylib.h"
mylib_mystruct* mylib_init(int old_field) {
mylib_mystruct *myobject;
myobject = malloc(sizeof(mylib_mystruct));
myobject->old_field = old_field;
return myobject;
}// mylib.h
#ifndef MYLIB_H
#define MYLIB_H
typedef struct {
int old_field;
} mylib_mystruct;
mylib_mystruct* mylib_init(int old_field);
#endif现在 mylib 这个库进行了 v2 版本的升级。v2 版本修改了 mylib_mystruct 的定义, 新增加了 new_field 字段,新的定义如下
// mylib.h
typedef struct {
int new_field;
int old_field;
} mylib_mystruct;此时我们只重新编译 mylib, 不重新编译 main.c 主程序。然后运行 main.out, 发现 main 函数里面的 assert 错误了...
// main.c
assert(myobject->old_field == 1);因为 myobject 还是访问的第一个字段, 但是现在第一个字段为 new_field 了,程序中并没有为它赋值。此时对于用户来说 API 没有造成 break change, 可以不用修改代码来适配。但是由于 ABI 的 break change 导致需要重新编译主程序,所以 ABI 的稳定性的维持是高于 API 的。
如果把新增 new_field 放在 old_field 之后了,发现程序运行是没有问题的。mylib 通过后者的方式去升级 v2 版本,即使新增了字段,ABI 依然是稳定的。
// mylib.h
typedef struct {
int old_field;
int new_field;
} mylib_mystruct;下面所示的使用 Node-API 开发的 c++ 插件的代码例子, 对于我来说就比较好奇 napi_value 的定义
// demo
napi_status status;
napi_value object, string;
status = napi_create_object(env, &object);
if (status != napi_ok) {
napi_throw_error(env, ...);
return;
}
status = napi_create_string_utf8(env, "bar", NAPI_AUTO_LENGTH, &string);
if (status != napi_ok) {
napi_throw_error(env, ...);
return;
}
status = napi_set_named_property(env, object, "foo", string);
if (status != napi_ok) {
napi_throw_error(env, ...);
return;
}最后我们在 js_native_api_types.h 文件找到了 napi_value 的定义。napi_value 是 struct napi_value__ 类型的指针,其实 napi_value__ 是未定义的。从源码中的注释可知, 编译时 undefined structs 会比 void* 更加安全。
// src/js_native_api_types.h
// JSVM API types are all opaque pointers for ABI stability
// typedef undefined structs instead of void* for compile time type safety
typedef struct napi_value__* napi_value;实测上面的 napi_value__ 是 undefined 编译是会通过的,实际使用的时候强制类型转换为目标类型即可。
stream 流是许多 nodejs 核心模块的基类, 在讲解它们之前还是要认真说一下 nodejs stream 的实现。其实在 【libuv 源码学习笔记】网络与流 中 BSD 套接字 中就开始提到 c 中的流, nodejs 的 c++ 代码的实现更多的是作为一个胶水层, 实际调用的 js 层面的 stream 实例的方法。
流是用于在 Node.js 中处理流数据的抽象接口。 stream 模块提供了用于实现流接口的 API。
Node.js 提供了许多流对象。 例如,对 HTTP 服务器的请求和 process.stdout 都是流的实例。
流可以是可读的、可写的、或两者兼而有之。 所有的流都是 EventEmitter 的实例。
可读流的例子包括:
所有可读流都实现了 stream.Readable 类定义的接口。
实现一个可读流的核心是继承 Readable, 并至少实现一个 _read 方法。
// lib/internal/streams/readable.js
function Readable(options) {
if (!(this instanceof Readable))
return new Readable(options);
// Checking for a Stream.Duplex instance is faster here instead of inside
// the ReadableState constructor, at least with V8 6.5.
const isDuplex = this instanceof Stream.Duplex;
this._readableState = new ReadableState(options, this, isDuplex);
if (options) {
if (typeof options.read === 'function')
this._read = options.read;
if (typeof options.destroy === 'function')
this._destroy = options.destroy;
if (typeof options.construct === 'function')
this._construct = options.construct;
if (options.signal && !isDuplex)
addAbortSignalNoValidate(options.signal, this);
}
Stream.call(this, options);
destroyImpl.construct(this, () => {
if (this._readableState.needReadable) {
maybeReadMore(this, this._readableState);
}
});
}
const { Readable } = require('stream');
const myReadable = new Readable({
read(size) {
// ...
}
});
ReadStream 是继承于 Readable, 其中的 options 参数可以传入, 也可以在 ReadStream 中自己实现 options 需要的 _read, _destroy, _construct 方法
可以看见对于一个文件的可读流的 _read 方法, 就是不断的类似 slice 一样, 从偏移量为 0, 一次读取 n 长度, 直到读取完成文件的长度
其中的核心主要为读取到数据或者说是生产出数据后需要调用 this.push 方法把数据发送出来, 其中约定参数为 null 时表示已经读取完成。
所有可读流都开始于暂停模式,可以通过以下方式切换到流动模式, 流动模式后就会不断调用 _read 方法
// lib/internal/streams/readable.js
ReadStream.prototype._read = function(n) {
n = this.pos !== undefined ?
MathMin(this.end - this.pos + 1, n) :
MathMin(this.end - this.bytesRead + 1, n);
if (n <= 0) {
this.push(null);
return;
}
const buf = Buffer.allocUnsafeSlow(n);
this[kIsPerformingIO] = true;
this[kFs]
.read(this.fd, buf, 0, n, this.pos, (er, bytesRead, buf) => {
this[kIsPerformingIO] = false;
// Tell ._destroy() that it's safe to close the fd now.
if (this.destroyed) {
this.emit(kIoDone, er);
return;
}
if (er) {
errorOrDestroy(this, er);
} else if (bytesRead > 0) {
if (this.pos !== undefined) {
this.pos += bytesRead;
}
this.bytesRead += bytesRead;
if (bytesRead !== buf.length) {
// Slow path. Shrink to fit.
// Copy instead of slice so that we don't retain
// large backing buffer for small reads.
const dst = Buffer.allocUnsafeSlow(bytesRead);
buf.copy(dst, 0, 0, bytesRead);
buf = dst;
}
this.push(buf);
} else {
this.push(null);
}
});
};
_destroy 方法对于文件的可读流来说主要处理好的是关闭打开的 fd, 一般是在流结束的时候被调用。
其中我们看到如下代码会有一个 this[kIsPerformingIO] 判断, 其原因在对于一个 fs.open, fs.read 等操作, 在【libuv 源码学习笔记】线程池与i/o 详细说到过是通过线程池中取出一个线程同步去完成。如果主线程在其他线程同步过程中直接关闭可能会有预期外的错误, 可以看见在 _read 方法中, 在开始 read 前会设置为 true, 读取回调中设置为 false, 所以 kIsPerformingIO 为 true 的场景下会等待其成功后再进行关闭 fd 的操作。
// lib/internal/streams/readable.js
ReadStream.prototype._destroy = function(err, cb) {
if (this[kIsPerformingIO]) {
this.once(kIoDone, (er) => close(this, err || er, cb));
} else {
close(this, err, cb);
}
};
发现 _destroy 还有一个隐秘的自动被调用的地方, 其逻辑是基类 EventEmitter 模块的一个功能, 如下实现了EE.captureRejectionSymbo 接口的话
// lib/internal/streams/readable.js
Readable.prototype[EE.captureRejectionSymbol] = function(err) {
this.destroy(err);
};
此时 emit 某一个事件, 如 end, close 等, 如果监听函数返回值是个 Promise, 且未进行 catch 操作, 当出现错误会自动调用 EE.captureRejectionSymbo 这个接口, 调用栈如下
// lib/events.js
EventEmitter.captureRejectionSymbol = kRejection;
function emitUnhandledRejectionOrErr(ee, err, type, args) {
if (typeof ee[kRejection] === 'function') {
ee[kRejection](err, type, ...args);
} else {
// ...
}
}
construct 主要用于确保流已经准备就绪, 如文件可读流在构造阶段就需要先通过 fs.open 获取到 fd 才算就绪。
function _construct(callback) {
const stream = this;
if (typeof stream.fd === 'number') {
callback();
return;
}
if (stream.open !== openWriteFs && stream.open !== openReadFs) {
// Backwards compat for monkey patching open().
const orgEmit = stream.emit;
stream.emit = function(...args) {
if (args[0] === 'open') {
this.emit = orgEmit;
callback();
ReflectApply(orgEmit, this, args);
} else if (args[0] === 'error') {
this.emit = orgEmit;
callback(args[1]);
} else {
ReflectApply(orgEmit, this, args);
}
};
stream.open();
} else {
stream[kFs].open(stream.path, stream.flags, stream.mode, (er, fd) => {
if (er) {
callback(er);
} else {
stream.fd = fd;
callback();
stream.emit('open', stream.fd);
stream.emit('ready');
}
});
}
}
流最典型的调用就是 readableStream.pipe(writableStream), 通过调用 pipe 方法能让其开始流动模式。
让流处于流动模式的核心是 pipe 方法中 src.on('data', ondata) 让可读流监听了 onData 事件, 当监听该事件时会调用流的 resume 方法, 接着调用 _read 方法开始产生数据, 产生的数据通过 src 可读流的回调函数 ondata 继续调用 dest.write(chunk) 可写流去消费数据。
在这里 pipe 还很好的解决了参数 dest 可写流可能出现的积压问题
有太多的例子证明有时 Readable 传输给 Writable 的速度远大于它接受和处理的速度!
如果发生了这种情况,消费者开始为后面的消费而将数据列队形式积压起来。写入队列的时间越来越长,也正因为如此,更多的数据不得不保存在内存中知道整个流程全部处理完毕。
写入磁盘的速度远比从磁盘读取数据慢得多,因此,当我们试图压缩一个文件并写入磁盘时,积压的问题也就出现了。因为写磁盘的速度不能跟上读磁盘的速度。
可以看见如下代码的 ondata 函数, 当 dest 可写流 dest.write(chunk) 返回 false 时, 会调用 src 可读流的 pause 方法使其停止继续生产数据
// lib/internal/streams/readable.js
Readable.prototype.pipe = function(dest, pipeOpts) {
const src = this;
const state = this._readableState;
if (state.pipes.length === 1) {
/ ...
dest.on('unpipe', onunpipe);
function onunpipe(readable, unpipeInfo) {
// ...
}
function onend() {
debug('onend');
dest.end();
}
let ondrain;
let cleanedUp = false;
function cleanup() {
// ...
}
function pause() {
// If the user unpiped during `dest.write()`, it is possible
// to get stuck in a permanently paused state if that write
// also returned false.
// => Check whether `dest` is still a piping destination.
if (!cleanedUp) {
if (state.pipes.length === 1 && state.pipes[0] === dest) {
debug('false write response, pause', 0);
state.awaitDrainWriters = dest;
state.multiAwaitDrain = false;
} else if (state.pipes.length > 1 && state.pipes.includes(dest)) {
debug('false write response, pause', state.awaitDrainWriters.size);
state.awaitDrainWriters.add(dest);
}
src.pause();
}
if (!ondrain) {
// When the dest drains, it reduces the awaitDrain counter
// on the source. This would be more elegant with a .once()
// handler in flow(), but adding and removing repeatedly is
// too slow.
ondrain = pipeOnDrain(src, dest);
dest.on('drain', ondrain);
}
}
src.on('data', ondata);
function ondata(chunk) {
debug('ondata');
const ret = dest.write(chunk);
debug('dest.write', ret);
if (ret === false) {
pause();
}
}
function onerror(er) {
// ...
}
// Make sure our error handler is attached before userland ones.
prependListener(dest, 'error', onerror);
// Both close and finish should trigger unpipe, but only once.
function onclose() {
dest.removeListener('finish', onfinish);
unpipe();
}
dest.once('close', onclose);
function onfinish() {
debug('onfinish');
dest.removeListener('close', onclose);
unpipe();
}
dest.once('finish', onfinish);
function unpipe() {
debug('unpipe');
src.unpipe(dest);
}
// Tell the dest that it's being piped to.
dest.emit('pipe', src);
// Start the flow if it hasn't been started already.
if (dest.writableNeedDrain === true) {
if (state.flowing) {
pause();
}
} else if (!state.flowing) {
debug('pipe resume');
src.resume();
}
return dest;
};
让我们窥探一下何时 write 会返回 false, 如下可知是当前内存的数据 state.length > state.highWaterMark, 即在没有错误或者摧毁的情况的下已经出现了积压的问题
function writeOrBuffer(stream, state, chunk, encoding, callback) {
const len = state.objectMode ? 1 : chunk.length;
state.length += len;
// stream._write resets state.length
const ret = state.length < state.highWaterMark;
// ...
return ret && !state.errored && !state.destroyed;
}
随着内存中的数据被消费, dest 可写流在写入一次数据后都会判断是不是可以触发 drain 事件, 使其能够继续接受src 可读流发送来的数据, 如果此时是低于 highWaterMark, 就会触发 drain 事件, 调用回调 pipeOnDrain 函数, pipeOnDrain 内部调用 flow(src) 让可读流继续处于流动状态。
_read 方法 push 的数据的流向是怎样的你可能会有疑问
如下的 readableAddChunk 方法主要最后调用了 addChunk 方法
对于可读流来说也是需要注意是否此时已经产生了积压问题, 主要查看 push 方法的返回值, 即 readableAddChunk 的返回值, 如果返回了 false, 在实现自己的可读流的 _read 方法时, 最好是调用 pause 方法, 防止数据的堆积。当数据下降触发 readable 事件, 调用 resume 方法使其继续变成流动模式。
// lib/internal/streams/readable.js
Readable.prototype.push = function(chunk, encoding) {
return readableAddChunk(this, chunk, encoding, false);
};
function readableAddChunk(stream, chunk, encoding, addToFront) {
// ...
return !state.ended &&
(state.length < state.highWaterMark || state.length === 0);
}
function addChunk(stream, state, chunk, addToFront) {
if (state.flowing && state.length === 0 && !state.sync &&
stream.listenerCount('data') > 0) {
// Use the guard to avoid creating `Set()` repeatedly
// when we have multiple pipes.
if (state.multiAwaitDrain) {
state.awaitDrainWriters.clear();
} else {
state.awaitDrainWriters = null;
}
stream.emit('data', chunk);
} else {
// Update the buffer info.
state.length += state.objectMode ? 1 : chunk.length;
if (addToFront)
state.buffer.unshift(chunk);
else
state.buffer.push(chunk);
if (state.needReadable)
emitReadable(stream);
}
maybeReadMore(stream, state);
}
on 方法是比较暴力的拦截了原始的 EventEmitter 的 on 方法, 当收到 data 事件时调用了 resume 方法。
当收到 readable 事件时, 会触发 emitReadable 继而触发 readable 事件使流转变为流动状态
// lib/internal/streams/readable.js
Readable.prototype.on = function(ev, fn) {
const res = Stream.prototype.on.call(this, ev, fn);
const state = this._readableState;
if (ev === 'data') {
// Update readableListening so that resume() may be a no-op
// a few lines down. This is needed to support once('readable').
state.readableListening = this.listenerCount('readable') > 0;
// Try start flowing on next tick if stream isn't explicitly paused.
if (state.flowing !== false)
this.resume();
} else if (ev === 'readable') {
if (!state.endEmitted && !state.readableListening) {
state.readableListening = state.needReadable = true;
state.flowing = false;
state.emittedReadable = false;
debug('on readable', state.length, state.reading);
if (state.length) {
emitReadable(this);
} else if (!state.reading) {
process.nextTick(nReadingNextTick, this);
}
}
}
}
return res;
};
主动调用 resume 方法让流开始流动起来, 流动的原因是 resume 的调用栈的最后调用了 flow 方法, 里面的 while 语句不断的调用 stream.read 方法, 使其产生数据。
// lib/internal/streams/readable.js
Readable.prototype.resume = function() {
const state = this._readableState;
if (!state.flowing) {
debug('resume');
// We flow only if there is no one listening
// for readable, but we still have to call
// resume().
state.flowing = !state.readableListening;
resume(this, state);
}
state[kPaused] = false;
return this;
};
function flow(stream) {
const state = stream._readableState;
debug('flow', state.flowing);
while (state.flowing && stream.read() !== null);
}
其完整的实现在 lib/internal/streams/from.js 文件中, 代码100来行, 传入一个迭代器就能帮你快速生成一个可读流。
实现可读流的核心就是不断调用 read 方法, 通过迭代器实现即 push 一次数据, 调用一次 iterator.next() 即可。
iterable 迭代器的每一项数据可以是普通的字符串也可以是 Promise 对象, 可能你已经想到不少实用场景, 比如作者本人21年初给内部的 SSR 框架写的流式渲染功能, 通过 Readable.from 传入一个数组就可以生成一个可读流, header 部分即是静态的字符串能立马吐出, body 部分会请求接口数据后再渲染出 html 片段延后返回的 Promise, 达到 node 端 1ms 内返回内容, 流式渲染浏览器与服务器能够并行工作, 接入页面有 100+ 也证明稳定性也不错。而传统的 nextjs 架构需要串行同步等待接口返回成功及同步渲染完成后才能返回数据, node 端一般会花费 50ms 左右才返回内容。
iterable 参数也可以传一个字符串或者 Buffer, 这种情况相当于只 this.push 了一次数据
// lib/internal/streams/readable.js
Readable.from = function(iterable, opts) {
return from(Readable, iterable, opts);
};
// lib/internal/streams/from.js
async function next() {
for (;;) {
try {
const { value, done } = isAsync ?
await iterator.next() :
iterator.next();
if (done) {
readable.push(null);
} else {
const res = (value &&
typeof value.then === 'function') ?
await value :
value;
if (res === null) {
reading = false;
throw new ERR_STREAM_NULL_VALUES();
} else if (readable.push(res)) {
continue;
} else {
reading = false;
}
}
} catch (err) {
readable.destroy(err);
}
break;
}
}
本文主要讲了可读流基类 Readable 的实现, fs.ReadStream 可读流的实现, 快速生成一个可读流以及数据流积压问题的处理实现。

TypeError: n.e is not a function a 同学说我写的 npm 包 @xxfe/pkg 在 x 项目使用时发布到测试环境报了如上的错误, 但是开发环境没有报错。接着我看了一下 node_modules 中这个包的代码, 这个 Promise 都没 await 咋会被 catch 且还真的被捕获打印了错误日志 🤯, 这是什么瞎猫碰见死耗子的操作 ...
// node_modules/@xxfe/pkg
try {
this.aesUtilPromise = import('../aes-util')
} catch (e) {
console.info('123 ========', e);
}仅看 node_modules 中的代码并未发现明显的错误, 其实我们应该看的是 @xxfe/pkg 打包后的代码
// dist/static/js/xxx.js
try {
this.aesUtilPromise=n.e(3)
} catch(r) {
console.info("123 ========",r)
}打包后的代码就发现了错误的源头 n.e
熟悉 webpack 的同学就知道动态 import 函数打包后会被 webpack_require.e 函数给替换, 其原理就是通过动态创建一个 script 标签来加载一个 js, 如下即函数的代码
/******/ __webpack_require__.e = function requireEnsure(chunkId) {
/******/ var promises = [];
/******/
/******/
/******/ // JSONP chunk loading for javascript
/******/
/******/ var installedChunkData = installedChunks[chunkId];
/******/ if(installedChunkData !== 0) { // 0 means "already installed".
/******/
/******/ // a Promise means "currently loading".
/******/ if(installedChunkData) {
/******/ promises.push(installedChunkData[2]);
/******/ } else {
/******/ // setup Promise in chunk cache
/******/ var promise = new Promise(function(resolve, reject) {
/******/ installedChunkData = installedChunks[chunkId] = [resolve, reject];
/******/ });
/******/ promises.push(installedChunkData[2] = promise);
/******/
/******/ // start chunk loading
/******/ var script = document.createElement('script');
/******/ var onScriptComplete;
/******/
/******/ script.charset = 'utf-8';
/******/ script.timeout = 120;
/******/ if (__webpack_require__.nc) {
/******/ script.setAttribute("nonce", __webpack_require__.nc);
/******/ }
/******/ script.src = jsonpScriptSrc(chunkId);
/******/ if (script.src.indexOf(window.location.origin + '/') !== 0) {
/******/ script.crossOrigin = "anonymous";
/******/ }
/******/ // create error before stack unwound to get useful stacktrace later
/******/ var error = new Error();
/******/ onScriptComplete = function (event) {
/******/ // ...
/******/ };
/******/ var timeout = setTimeout(function(){
/******/ onScriptComplete({ type: 'timeout', target: script });
/******/ }, 120000);
/******/ script.onerror = script.onload = onScriptComplete;
/******/ document.head.appendChild(script);
/******/ }
/******/ }
/******/ return Promise.all(promises);
/******/ };那么为什么代码中用到了 import 函数, webpack 却没有注入 webpack_require.e 函数的实现了 ?
此时我们只能看 webpack 的代码实现, 可以发现当 Object.keys(chunkMaps.hash).length 条件为 true 时, 才会注入 ${this.requireFn}.e 函数
// webpack/lib/MainTemplate.js
this.hooks.requireExtensions.tap("MainTemplate", (source, chunk, hash) => {
const buf = [];
const chunkMaps = chunk.getChunkMaps();
// Check if there are non initial chunks which need to be imported using require-ensure
if (Object.keys(chunkMaps.hash).length) {
buf.push("// This file contains only the entry chunk.");
buf.push("// The chunk loading function for additional chunks");
buf.push(`${this.requireFn}.e = function requireEnsure(chunkId) {`);
buf.push(Template.indent("var promises = [];"));
buf.push(
Template.indent(
this.hooks.requireEnsure.call("", chunk, hash, "chunkId")
)
);
buf.push(Template.indent("return Promise.all(promises);"));
buf.push("};");
}
// ...
}顺着函数调用顺序发现关键是 getAllAsyncChunks 函数返回值 chunks 集合不为空即可
// webpack/lib/Chunk.js
getAllAsyncChunks() {
const queue = new Set();
const chunks = new Set();
const initialChunks = intersect(
Array.from(this.groupsIterable, g => new Set(g.chunks))
);
for (const chunkGroup of this.groupsIterable) {
for (const child of chunkGroup.childrenIterable) {
queue.add(child);
}
}
for (const chunkGroup of queue) {
for (const chunk of chunkGroup.chunks) {
if (!initialChunks.has(chunk)) {
chunks.add(chunk);
}
}
for (const child of chunkGroup.childrenIterable) {
queue.add(child);
}
}
return chunks;
}chunks 集合只有一处往集合增加数据的逻辑。initialChunks 可以理解为首屏 html 中 script 标签的 js, 通常是 main.js 及其运行前依赖的 js, 比如 main.js 需要依赖 react, react-dom 等 js 的前置运行。
if (!initialChunks.has(chunk)) {
chunks.add(chunk);
}因为业务项目 webpackConfig.optimizationa.splitChunks 的配置把 a 同学写的 @xxfe/pkg 包都打入到了 xxfe_vendor 文件中, 而 @xxfe/ scope 下的依赖被业务项目大量使用, 所以无疑是业务项目 main.js 前置依赖的一个 js, 故 xxfe_vendor 在首屏 html 中 script 标签的 js 中
所以 xxfe_vendor 是 initialChunks 中的其中一个, 故此处 if 为 false
xxfe_vendor: {
name: 'xxfe_vendor',
chunks: 'all',
priority: 8,
enforce: true,
test: (module) => {
const resource = getModulePath(module)
if (/@xxfe(\\|\/)/.test(resource)) {
return true
}
return false
},
},至此我们理清了导致问题的原因, @xxfe/pkg 中的 import 函数引用的 js 及其自身代码由于分包的 splitChunks 设置都被打入到了 xxfe_vendor 中, 而 xxfe_vendor 又是业务项目 main.js 前置运行依赖的 js, 故 webpack 错误的认为你不需要 webpack_require.e 函数
Q: 这个算谁的 bug ?
A: webpack 的 bug。因为不能说用户需要加载的 js 如果在首屏其中之一, 就不注入 webpack_require.e 函数的实现。业务项目通过 splitChunks 进行分包不是 npm 包的作者所能决定, 是否注入 webpack_require.e 函数的实现应该由是否有 import 函数语法来决定。
Q: 为什么开发环境没有报错 ?
A: 业务项目的 splitChunks 设置了只在生产构建生效
将如下的 chunks 字段由 all 改为了 initial, 表示该分包设置将不要影响到动态 import 函数异步加载的 js (该类型为 async chunks), 使得 @xxfe/pkg 将不会被合入 xxfe_vendor 文件中, 那么如上的 initialChunks 也将不包含 @xxfe/pkg, 从而 webpack 也会如约注入 webpack_require.e 函数的实现
xxfe_vendor: {
name: 'xxfe_vendor',
chunks: 'initial',
priority: 8,
enforce: true,
test: (module) => {
const resource = getModulePath(module)
if (/@xxfe(\\|\/)/.test(resource)) {
return true
}
return false
},
},
最近偶尔有同学说项目运行出错了, 一排查往往是切换了 node 版本, 比如需要重新编译一下 node-sass (其实脚手架早换成了 dart-sass, 太低版本突然升级有些许风险), 以及少部分使用 windows 开发的同学因为删除 node_modules 清缓存时常出现“假删”的现象, 想着是否有必要本地开发使用 CI 构建的镜像来保证环境的一致性, 况且其他大厂的 云IDE 听说也是进行得比较火热, 我们只是落地本地 docker 开发或许会容易很多
考虑到大部分同学对 docker 不是很了解, 本次的目标希望是能够一行命令让 docker 把项目运行起来
每次进入 docker 都需要重新配置下环境, 终究还是不妥当, 后面想了一会决定通过 docker 数据卷 volumes 去把本地的 .ssh 目录给映射到 docker, 让本机和 docker 共享一份配置
其实和上面问题的解决办法是一致的, 再把 .npmrc 文件也通过 docker 数据卷 volumes 去映射一下

如果大家是在 docker 中编写代码的话, 可能需要比较厚实的 vim 功底, 还是通过 vscode 的 VS Code Remote Development 去做了,感觉比较麻烦,况且现在都在本机,不如还是通过 docker 数据卷 volumes 把当前项目的目录给映射过去, 大家还是保持现在的 vscode 开发, 图示的内容我们都没有做 😅
最后也是顺利运行起了 docker 命令, 但发现本地浏览器访问开发的地址始终是服务无响应, 问题出在哪了 ?

起一个简单的 http server 就能验证了, 最后发现下面的方式是能有响应的。
const http = require('http')
const server = http.createServer((req, res) => {
res.end('Hello World!');
});
server.listen(8000);WebpackDevServer 启动的代码类似于下面, 和上面的简单的 http server 的区别在于 listen 参数 host 传了值
const devServer = new WebpackDevServer(compiler, devServerConfig)
devServer.listen(port, host, err => {
if (err) {
return console.log(err)
}
})debug 一看这里的 host 值为 localhost, 而 localhost 只是一个本地通常使用的域名, 在 /etc/hosts 文件中进行了绑定, 它的背后其实是 127.0.0.1
127.0.0.1 localhost即如果 docker 中监听 127.0.0.1 将会造成上面说的本机访问服务无响应的问题
现在让我们回头再看简单的 http server 不传 host 参数默认值会是什么, 通过下面的代码也发现了默认会去绑定 :: 或者 0.0.0.0, 后面我们以 0.0.0.0 为例, 关于 ip 协议可以继续阅读 是时候说说到底什么是IPv4和IPv6了!
// lib/net.js
// Try binding to ipv6 first
err = handle.bind6(DEFAULT_IPV6_ADDR, port, flags);
if (err) {
handle.close();
// Fallback to ipv4
return createServerHandle(DEFAULT_IPV4_ADDR, port);
}
const DEFAULT_IPV4_ADDR = '0.0.0.0';
const DEFAULT_IPV6_ADDR = '::';可以仔细阅读一下两者的官方解释, 简单概括就是
127.0.0.1是回送地址,指本地机,一般用来测试使用。回送地址(127.x.x.x)是本机回送地址(Loopback Address),即主机IP堆栈内部的IP地址,主要用于网络软件测试以及本地机进程间通信,无论什么程序,一旦使用回送地址发送数据,协议软件立即返回,不进行任何网络传输。
0.0.0.0,在这里意味着 "本地机器上的所有IP地址"(实际上可能是 "本地机器上的所有IPv4地址")。因此,如果你的webserver机器有两个IP地址,192.168.1.1和10.1.2.1,而你允许像apache这样的webserver守护程序监听0.0.0.0,它在这两个IP地址上都可以到达。但是,只有能与这些IP地址和网络端口联系的才可以。

到这里终于可以愉快的在 docker 中进行开发了, 最后记录下 docker 运行的命令
docker run -t -i \
-v ~/.ssh:/root/.ssh \
-v ~/.npmrc:/root/.npmrc \
-v $(pwd):/temp \
-p 3000:3000 \
00eb8ccbb6d0 \
/bin/bashdocker 中构建时间会明显长一些, 编译大型项目有些许卡顿, 快速运行一个 puppeteer 镜像进行一些测试是个不错的选择~
Creates a new try/catch block and registers it with v8.
v8docs 中就很简单的介绍了一句「在一个作用域内注册一个 try catch」。光看文档很难明白, 除非接触过类似的实现才能够联想到这里的实际使用场景, 所以不够了解的时候还是得多看代码。
如下 Node.js 中的代码可知, TryCatch 主要用于在 C++ 中捕获 JavaScript 调用的异常。在创建 try_catch 实例后, 你可以获取 C++ 代码中调用 JavaScript 函数的状态, 比如通过 try_catch 的 HasCaught 的返回值判断运行 JavaScript 函数是否抛错。
// src/inspector_agent.cc
void Agent::ToggleAsyncHook(Isolate* isolate, Local<Function> fn) {
// Guard against running this during cleanup -- no async events will be
// emitted anyway at that point anymore, and calling into JS is not possible.
// This should probably not be something we're attempting in the first place,
// Refs: https://github.com/nodejs/node/pull/34362#discussion_r456006039
if (!parent_env_->can_call_into_js()) return;
CHECK(parent_env_->has_run_bootstrapping_code());
HandleScope handle_scope(isolate);
CHECK(!fn.IsEmpty());
auto context = parent_env_->context();
v8::TryCatch try_catch(isolate);
USE(fn->Call(context, Undefined(isolate), 0, nullptr));
if (try_catch.HasCaught() && !try_catch.HasTerminated()) {
PrintCaughtException(isolate, context, try_catch);
FatalError("\nnode::inspector::Agent::ToggleAsyncHook",
"Cannot toggle Inspector's AsyncHook, please report this.");
}
}Set verbosity of the external exception handler. By default, exceptions that are caught by an external exception handler are not reported. Call SetVerbose with true on an external exception handler to have exceptions caught by the handler reported as if they were not caught.
有些代码中创建 try_catch 实例后紧接着会调用 SetVerbose 函数, 看了文档的解释后, 也不够清楚, 于是继续看看代码。
// demo
static inline void trigger_fatal_exception(
napi_env env, v8::Local<v8::Value> local_err) {
v8::TryCatch try_catch(env->isolate);
try_catch.SetVerbose(true);
env->isolate->ThrowException(local_err);
node::FatalException(env->isolate, try_catch);
}上面的代码手动抛出了一个错误, 然后调用 node::FatalException 函数, node::FatalException 函数里面又调用了 TriggerUncaughtException 函数。从而我们可以知道 SetVerbose 为 true 后, 此时代码将不会继续往下走。
// src/node_errors.cc
void TriggerUncaughtException(Isolate* isolate, const v8::TryCatch& try_catch) {
// If the try_catch is verbose, the per-isolate message listener is going to
// handle it (which is going to call into another overload of
// TriggerUncaughtException()).
if (try_catch.IsVerbose()) {
return;
}
// If the user calls TryCatch::TerminateExecution() on this TryCatch
// they must call CancelTerminateExecution() again before invoking
// TriggerUncaughtException() because it will invoke
// process._fatalException() in the JS land.
CHECK(!try_catch.HasTerminated());
CHECK(try_catch.HasCaught());
HandleScope scope(isolate);
TriggerUncaughtException(isolate,
try_catch.Exception(),
try_catch.Message(),
false /* from_promise */);
}情况一 SetVerbose 为 false 一直运行到最后调用 TriggerUncaughtException 函数。
情况二 SetVerbose 为 true TriggerUncaughtException 函数直接被 return, 错误将由创建 try_catch 实例传入的 isolate 实例上通过 AddMessageListenerWithErrorLevel 注册的错误监听函数 PerIsolateMessageListener 处理
// src/api/environment.cc
void SetIsolateErrorHandlers(v8::Isolate* isolate, const IsolateSettings& s) {
if (s.flags & MESSAGE_LISTENER_WITH_ERROR_LEVEL)
isolate->AddMessageListenerWithErrorLevel(
errors::PerIsolateMessageListener,
Isolate::MessageErrorLevel::kMessageError |
Isolate::MessageErrorLevel::kMessageWarning);
auto* abort_callback = s.should_abort_on_uncaught_exception_callback ?
s.should_abort_on_uncaught_exception_callback :
ShouldAbortOnUncaughtException;
isolate->SetAbortOnUncaughtExceptionCallback(abort_callback);
auto* fatal_error_cb = s.fatal_error_callback ?
s.fatal_error_callback : OnFatalError;
isolate->SetFatalErrorHandler(fatal_error_cb);
if ((s.flags & SHOULD_NOT_SET_PREPARE_STACK_TRACE_CALLBACK) == 0) {
auto* prepare_stack_trace_cb = s.prepare_stack_trace_callback ?
s.prepare_stack_trace_callback : PrepareStackTraceCallback;
isolate->SetPrepareStackTraceCallback(prepare_stack_trace_cb);
}
}PerIsolateMessageListener 函数根据 ErrorLevel 进行不同的处理, 如果是 kMessageWarning 则是通过 ProcessEmitWarningGeneric 函数触发 JavaScript 上的 process.on('warn') 事件, 否则通过 TriggerUncaughtException 触发 JavaScript 上的 process.on('uncaughtException') 事件
// src/node_errors.cc
void PerIsolateMessageListener(Local<Message> message, Local<Value> error) {
Isolate* isolate = message->GetIsolate();
switch (message->ErrorLevel()) {
case Isolate::MessageErrorLevel::kMessageWarning: {
Environment* env = Environment::GetCurrent(isolate);
if (!env) {
break;
}
Utf8Value filename(isolate, message->GetScriptOrigin().ResourceName());
// (filename):(line) (message)
std::stringstream warning;
warning << *filename;
warning << ":";
warning << message->GetLineNumber(env->context()).FromMaybe(-1);
warning << " ";
v8::String::Utf8Value msg(isolate, message->Get());
warning << *msg;
USE(ProcessEmitWarningGeneric(env, warning.str().c_str(), "V8"));
break;
}
case Isolate::MessageErrorLevel::kMessageError:
TriggerUncaughtException(isolate, error, message);
break;
}
}在 libuv 系列文章写完后, 发现每一篇文章都过长, 内容过于臃肿, 因为里面涉及到主流程实现的都讲解了一遍, 反而没有把核心的原理给表现出来, 所以后面的文章都会着重讲解核心的原理部分
其实在 【libuv 源码学习笔记】线程池与i/o 这一节就讲了线程在 libuv 中的实现, 其创建一个线程的调用栈为 uv_thread_create > uv_thread_create_ex > pthread_create, 最后是通过 pthread_create 函数去创建的一个新线程, 其例子类似于下面这样
#include <iostream>
// 必须的头文件
#include <pthread.h>
using namespace std;
#define NUM_THREADS 5
// 线程的运行函数
void* say_hello(void* args)
{
cout << "Hello Runoob!" << endl;
return 0;
}
int main()
{
// 定义线程的 id 变量,多个变量使用数组
pthread_t tids[NUM_THREADS];
for(int i = 0; i < NUM_THREADS; ++i)
{
//参数依次是:创建的线程id,线程参数,调用的函数,传入的函数参数
int ret = pthread_create(&tids[i], NULL, say_hello, NULL);
if (ret != 0)
{
cout << "pthread_create error: error_code=" << ret << endl;
}
}
//等各个线程退出后,进程才结束,否则进程强制结束了,线程可能还没反应过来;
pthread_exit(NULL);
}
而使用过 node 的 worker_threads 工作线程的同学会发现, node 中创建一个线程是通过传入一个文件名 new Worker(__filename) 的方式, 有点像 【node 源码学习笔记】cluster 集群 的实现
const {
Worker, isMainThread, parentPort, workerData
} = require('worker_threads');
if (isMainThread) {
module.exports = function parseJSAsync(script) {
return new Promise((resolve, reject) => {
const worker = new Worker(__filename, {
workerData: script
});
worker.on('message', resolve);
worker.on('error', reject);
worker.on('exit', (code) => {
if (code !== 0)
reject(new Error(`Worker stopped with exit code ${code}`));
});
});
};
} else {
const { parse } = require('some-js-parsing-library');
const script = workerData;
parentPort.postMessage(parse(script));
}
一个是通过 pthread_create 函数运行子线程的代码, 一个是通过 Worker 类传入一个文件路径实现, 两者的原理是否一样了 ?
核心的创建线程在 StartThread 函数中其实还是是调用的 uv_thread_create_ex, 子线程的运行的代码主要为 w->Run() 函数的内容
原来 node 的 worker_threads 原理还是通过 pthread_create 去运行了子线程的代码, 子线程的代码其实是创建一个 v8 实例去运行传入的 js 路径的文件
// src/node_worker.cc
void Worker::StartThread(const FunctionCallbackInfo<Value>& args) {
// ...
int ret = uv_thread_create_ex(&w->tid_, &thread_options, [](void* arg) {
w->Run();
// ...
}
在子线程的运行的代码中, 主要包含了下面几个步骤
// src/node_worker.cc
void Worker::Run() {
std::string name = "WorkerThread ";
name += std::to_string(thread_id_.id);
TRACE_EVENT_METADATA1(
"__metadata", "thread_name", "name",
TRACE_STR_COPY(name.c_str()));
CHECK_NOT_NULL(platform_);
Debug(this, "Creating isolate for worker with id %llu", thread_id_.id);
WorkerThreadData data(this);
if (isolate_ == nullptr) return;
CHECK(data.loop_is_usable());
Debug(this, "Starting worker with id %llu", thread_id_.id);
{
Locker locker(isolate_);
Isolate::Scope isolate_scope(isolate_);
SealHandleScope outer_seal(isolate_);
DeleteFnPtr<Environment, FreeEnvironment> env_;
auto cleanup_env = OnScopeLeave([&]() {
// TODO(addaleax): This call is harmless but should not be necessary.
// Figure out why V8 is raising a DCHECK() here without it
// (in test/parallel/test-async-hooks-worker-asyncfn-terminate-4.js).
isolate_->CancelTerminateExecution();
if (!env_) return;
env_->set_can_call_into_js(false);
{
Mutex::ScopedLock lock(mutex_);
stopped_ = true;
this->env_ = nullptr;
}
env_.reset();
});
if (is_stopped()) return;
{
HandleScope handle_scope(isolate_);
Local<Context> context;
{
// We create the Context object before we have an Environment* in place
// that we could use for error handling. If creation fails due to
// resource constraints, we need something in place to handle it,
// though.
TryCatch try_catch(isolate_);
context = NewContext(isolate_);
if (context.IsEmpty()) {
// TODO(addaleax): This should be ERR_WORKER_INIT_FAILED,
// ERR_WORKER_OUT_OF_MEMORY is for reaching the per-Worker heap limit.
Exit(1, "ERR_WORKER_OUT_OF_MEMORY", "Failed to create new Context");
return;
}
}
if (is_stopped()) return;
CHECK(!context.IsEmpty());
Context::Scope context_scope(context);
{
env_.reset(CreateEnvironment(
data.isolate_data_.get(),
context,
std::move(argv_),
std::move(exec_argv_),
static_cast<EnvironmentFlags::Flags>(environment_flags_),
thread_id_,
std::move(inspector_parent_handle_)));
if (is_stopped()) return;
CHECK_NOT_NULL(env_);
env_->set_env_vars(std::move(env_vars_));
SetProcessExitHandler(env_.get(), [this](Environment*, int exit_code) {
Exit(exit_code);
});
}
{
Mutex::ScopedLock lock(mutex_);
if (stopped_) return;
this->env_ = env_.get();
}
Debug(this, "Created Environment for worker with id %llu", thread_id_.id);
if (is_stopped()) return;
{
CreateEnvMessagePort(env_.get());
Debug(this, "Created message port for worker %llu", thread_id_.id);
if (LoadEnvironment(env_.get(), StartExecutionCallback{}).IsEmpty())
return;
Debug(this, "Loaded environment for worker %llu", thread_id_.id);
}
}
{
Maybe<int> exit_code = SpinEventLoop(env_.get());
Mutex::ScopedLock lock(mutex_);
if (exit_code_ == 0 && exit_code.IsJust()) {
exit_code_ = exit_code.FromJust();
}
Debug(this, "Exiting thread for worker %llu with exit code %d",
thread_id_.id, exit_code_);
}
}
Debug(this, "Worker %llu thread stops", thread_id_.id);
}
在上面的 Worker::Run 函数的逻辑中, 通过 WorkerThreadData 实例化一个 data 时会调用 isolate_data_->set_worker_context(w_), 这个调用使得 isMainThread 变为了 false, 所以在运行子线程代码时可以通过提供的 isMainThread 变量判断当前是否为主线程
// src/node_worker.cc
target
->Set(env->context(),
FIXED_ONE_BYTE_STRING(env->isolate(), "isMainThread"),
Boolean::New(env->isolate(), env->is_main_thread()))
.Check();
inline bool Environment::is_main_thread() const {
return worker_context() == nullptr;
}
线程间通信的核心还是 【libuv 源码学习笔记】线程池与i/o 中提到的 epoll 与 eventfd 配合来进行线程间消息通知
在创建子线程时,会创建两个 MessageChannel 用于线程间通信, 其中一个比较直接的在 Worker 的构造函数中, 用于提供给用户去进行通信
// lib/internal/worker.js
const { port1, port2 } = new MessageChannel();
另一个 this[kPort] 这个通信主要用于 node 内部的一些信息收发, 其使用方式和用户端的是一致的, 下面我们以内部线程间通信的过程来讲解其中的实现
如下代码通过 this[kPort] 向子线程发送一条消息, 注意 postMessage 的参数是个 object, 这里就还需要 node 序列化才能正确被传送, 没简单的通过 JSON.stringify 进行序列化是因为里面传输的内容可能还有 c++ 对象等, node 对 MessagePort 这样的 c++ 对象及普通的 js 对象有专门的序列化机制
// lib/internal/worker.js
this[kPort].postMessage({
argv,
type: messageTypes.LOAD_SCRIPT,
filename,
doEval,
cwdCounter: cwdCounter || workerIo.sharedCwdCounter,
workerData: options.workerData,
publicPort: port2,
manifestURL: getOptionValue('--experimental-policy') ?
require('internal/process/policy').url :
null,
manifestSrc: getOptionValue('--experimental-policy') ?
require('internal/process/policy').src :
null,
hasStdin: !!options.stdin
}, transferList);
当在主线程中实例化一个 Worker 对象时, 就会生成一个 MessagePort 挂载在 this[kPort] 上, 并且会把用于子线程的 child_port_data_ 进行 MessagePort::Entangle, 即相互之间进行一个关联, 形成了一个隐秘的 MessageChannel
// src/node_worker.cc
parent_port_ = MessagePort::New(env, env->context());
if (parent_port_ == nullptr) {
// This can happen e.g. because execution is terminating.
return;
}
child_port_data_ = std::make_unique<MessagePortData>(nullptr);
MessagePort::Entangle(parent_port_, child_port_data_.get());
object()->Set(env->context(),
env->message_port_string(),
parent_port_->object()).Check();
上面也说了 postMessage 传参数为一个对象, 是通过 ValueSerializer 进行的序列化, 与 JSON.stringify 的区别为
ValueSerializer 的实现在 v8 中, 实现类似于 HTML 结构化克隆算法, 比如 js 对象的 proto 等属性将不会被保存, 最后这部分序列化成功的数据保存在了 Message 对象的 main_message_buf_ 属性上面
Maybe<bool> Message::Serialize(Environment* env,
Local<Context> context,
Local<Value> input,
const TransferList& transfer_list_v,
Local<Object> source_port) {
HandleScope handle_scope(env->isolate());
Context::Scope context_scope(context);
// Verify that we're not silently overwriting an existing message.
CHECK(main_message_buf_.is_empty());
SerializerDelegate delegate(env, context, this);
ValueSerializer serializer(env->isolate(), &delegate);
delegate.serializer = &serializer;
std::vector<Local<ArrayBuffer>> array_buffers;
for (uint32_t i = 0; i < transfer_list_v.length(); ++i) {
Local<Value> entry = transfer_list_v[i];
if (entry->IsObject()) {
// See https://github.com/nodejs/node/pull/30339#issuecomment-552225353
// for details.
bool untransferable;
if (!entry.As<Object>()->HasPrivate(
context,
env->untransferable_object_private_symbol())
.To(&untransferable)) {
return Nothing<bool>();
}
if (untransferable) continue;
}
// Currently, we support ArrayBuffers and BaseObjects for which
// GetTransferMode() does not return kUntransferable.
if (entry->IsArrayBuffer()) {
Local<ArrayBuffer> ab = entry.As<ArrayBuffer>();
// If we cannot render the ArrayBuffer unusable in this Isolate,
// copying the buffer will have to do.
// Note that we can currently transfer ArrayBuffers even if they were
// not allocated by Node’s ArrayBufferAllocator in the first place,
// because we pass the underlying v8::BackingStore around rather than
// raw data *and* an Isolate with a non-default ArrayBuffer allocator
// is always going to outlive any Workers it creates, and so will its
// allocator along with it.
if (!ab->IsDetachable()) continue;
if (std::find(array_buffers.begin(), array_buffers.end(), ab) !=
array_buffers.end()) {
ThrowDataCloneException(
context,
FIXED_ONE_BYTE_STRING(
env->isolate(),
"Transfer list contains duplicate ArrayBuffer"));
return Nothing<bool>();
}
// We simply use the array index in the `array_buffers` list as the
// ID that we write into the serialized buffer.
uint32_t id = array_buffers.size();
array_buffers.push_back(ab);
serializer.TransferArrayBuffer(id, ab);
continue;
} else if (env->base_object_ctor_template()->HasInstance(entry)) {
// Check if the source MessagePort is being transferred.
if (!source_port.IsEmpty() && entry == source_port) {
ThrowDataCloneException(
context,
FIXED_ONE_BYTE_STRING(env->isolate(),
"Transfer list contains source port"));
return Nothing<bool>();
}
BaseObjectPtr<BaseObject> host_object {
Unwrap<BaseObject>(entry.As<Object>()) };
if (env->message_port_constructor_template()->HasInstance(entry) &&
(!host_object ||
static_cast<MessagePort*>(host_object.get())->IsDetached())) {
ThrowDataCloneException(
context,
FIXED_ONE_BYTE_STRING(
env->isolate(),
"MessagePort in transfer list is already detached"));
return Nothing<bool>();
}
if (std::find(delegate.host_objects_.begin(),
delegate.host_objects_.end(),
host_object) != delegate.host_objects_.end()) {
ThrowDataCloneException(
context,
String::Concat(env->isolate(),
FIXED_ONE_BYTE_STRING(
env->isolate(),
"Transfer list contains duplicate "),
entry.As<Object>()->GetConstructorName()));
return Nothing<bool>();
}
if (host_object && host_object->GetTransferMode() !=
BaseObject::TransferMode::kUntransferable) {
delegate.AddHostObject(host_object);
continue;
}
}
THROW_ERR_INVALID_TRANSFER_OBJECT(env);
return Nothing<bool>();
}
if (delegate.AddNestedHostObjects().IsNothing())
return Nothing<bool>();
serializer.WriteHeader();
if (serializer.WriteValue(context, input).IsNothing()) {
return Nothing<bool>();
}
for (Local<ArrayBuffer> ab : array_buffers) {
// If serialization succeeded, we render it inaccessible in this Isolate.
std::shared_ptr<BackingStore> backing_store = ab->GetBackingStore();
ab->Detach();
array_buffers_.emplace_back(std::move(backing_store));
}
if (delegate.Finish(context).IsNothing())
return Nothing<bool>();
// The serializer gave us a buffer allocated using `malloc()`.
std::pair<uint8_t*, size_t> data = serializer.Release();
CHECK_NOT_NULL(data.first);
main_message_buf_ =
MallocedBuffer<char>(reinterpret_cast<char*>(data.first), data.second);
return Just(true);
}
回顾一下向子线程发送的消息第二个参数 transferList 值为 [port2], 其实现也在上面的代码中, 对于 ValueSerializer 不认识的 c++ MessagePort 等对象, 其实每一种需要序列化的对象都是需要实现自己的 Serialize 与 Deserialize。 比如 webpack 对于一个 Module 对象的序列化, 对于 getSource 函数属性的保存, 由于函数不能直接被序列化, 其实只需要保存编译后的代码字符串即可, 当反序列化时构建一个名为 getSource 的函数, 其返回值为文件中读到的编译后的代码字符串即可
对于 c++ 对象的序列化就只是存入了 host_objects_ 队列中, serializer 的数据就只保存了队列的索引值, 当子线程的 js 收到消息即可以通过该索引值去 host_objects_ 队列中找到存入的 c++ 对象即可
Maybe<bool> WriteHostObject(BaseObjectPtr<BaseObject> host_object) {
BaseObject::TransferMode mode = host_object->GetTransferMode();
if (mode == BaseObject::TransferMode::kUntransferable) {
ThrowDataCloneError(env_->clone_unsupported_type_str());
return Nothing<bool>();
}
for (uint32_t i = 0; i < host_objects_.size(); i++) {
if (host_objects_[i] == host_object) {
serializer->WriteUint32(i);
return Just(true);
}
}
if (mode == BaseObject::TransferMode::kTransferable) {
THROW_ERR_MISSING_TRANSFERABLE_IN_TRANSFER_LIST(env_);
return Nothing<bool>();
}
CHECK_EQ(mode, BaseObject::TransferMode::kCloneable);
uint32_t index = host_objects_.size();
if (first_cloned_object_index_ == SIZE_MAX)
first_cloned_object_index_ = index;
serializer->WriteUint32(index);
host_objects_.push_back(host_object);
return Just(true);
}
序列化完成的数据将会保存在 data_->sibling_ 中, 这里会发现这里的 data_->sibling_ 其实是上面 MessagePort::Entangle 函数干的, 在 Entangle 函数中就把主线程与子线程的共享的 c++ 变量进行了绑定, MessageChannel 其实也是通过 Entangle 实现的两个 MessagePort 的绑定
// src/node_messaging.cc
data_->sibling_->AddToIncomingQueue(std::move(msg));
void MessagePortData::Entangle(MessagePortData* a, MessagePortData* b) {
CHECK_NULL(a->sibling_);
CHECK_NULL(b->sibling_);
a->sibling_ = b;
b->sibling_ = a;
a->sibling_mutex_ = b->sibling_mutex_;
}
至此其实主线程发送的数据已经保存在共享的内存对象中, 此时子线程是不能感应到的, 这里的通知机制完整实现可以参考 【libuv 源码学习笔记】线程池与i/o
在调用 AddToIncomingQueue 函数后, 调用栈中继续调用了 TriggerAsync > uv_async_send, 看到了 uv_async_send 我们就清楚了,即通过向 eventfd 的一端 fd 写入数据, 而被 【libuv 源码学习笔记】事件循环
中提到的【阶段五 Poll for I/O 】的 epoll 给捕获到, 从而调用提前注册的 i/o 回调函数
// src/node_messaging.cc
void MessagePortData::AddToIncomingQueue(Message&& message) {
// This function will be called by other threads.
Mutex::ScopedLock lock(mutex_);
incoming_messages_.emplace_back(std::move(message));
if (owner_ != nullptr) {
Debug(owner_, "Adding message to incoming queue");
owner_->TriggerAsync();
}
}
void MessagePort::TriggerAsync() {
if (IsHandleClosing()) return;
CHECK_EQ(uv_async_send(&async_), 0);
}
子线程的 i/o 回调函数其实就是下面 uv_async_init 中传入的 onmessage 函数, 至此子线程开始响应执行
// src/node_messaging.c
auto onmessage = [](uv_async_t* handle) {
// Called when data has been put into the queue.
MessagePort* channel = ContainerOf(&MessagePort::async_, handle);
channel->OnMessage();
};
CHECK_EQ(uv_async_init(env->event_loop(),
&async_,
onmessage), 0);
上面说过主线程序列化的数据存在了 main_message_buf_ 属性中, 其实就是通过 ValueDeserializer 把 main_message_buf_ 反序列化成 js 对象
// src/node_messaging.c
ValueDeserializer deserializer(
env->isolate(),
reinterpret_cast<const uint8_t*>(main_message_buf_.data),
main_message_buf_.size,
&delegate);
其实也是序列化时说过, 对于 c++ 对象存入了 host_objects_ 队列中, 序列化传过来的数据其实只有 c++ 对象的索引值, 即通过索引从 host_objects_ 中取出数据即可
// src/node_messaging.cc
MaybeLocal<Object> ReadHostObject(Isolate* isolate) override {
// Identifying the index in the message's BaseObject array is sufficient.
uint32_t id;
if (!deserializer->ReadUint32(&id))
return MaybeLocal<Object>();
CHECK_LE(id, host_objects_.size());
return host_objects_[id]->object(isolate);
}
数据都已经成功接收到且反序列化成 js 对象了,那么该如何通知到 js 的代码中了,看下面的代码只看到了 emit_message 函数的调用, 看上去有点像 emit('message', data) 的意思了,不过我们还是链路追踪一下
// src/node_messaging.c
MakeCallback(emit_message, arraysize(argv), argv)
emit_message 的赋值来自于 GetEmitMessageFunction 函数, 看样子是从 GetPerContextExports 的返回值中取出的 emitMessage 属性
// src/node_messaging.c
MaybeLocal<Function> GetEmitMessageFunction(Local<Context> context) {
Isolate* isolate = context->GetIsolate();
Local<Object> per_context_bindings;
Local<Value> emit_message_val;
if (!GetPerContextExports(context).ToLocal(&per_context_bindings) ||
!per_context_bindings->Get(context,
FIXED_ONE_BYTE_STRING(isolate, "emitMessage"))
.ToLocal(&emit_message_val)) {
return MaybeLocal<Function>();
}
CHECK(emit_message_val->IsFunction());
return emit_message_val.As<Function>();
}
而继续追踪 GetEmitMessageFunction 的调用栈发现了 InitializePrimordials 函数的调用, 该函数会在子进程中运行 js 文件 internal/per_context/messageport, 果然这个文件导出了 emitMessage 函数, 对于 js 中的 Worker 类都是继承于 EventEmitter 类, EventEmitter 类是有如下的 kHybridDispatch 的接口, kHybridDispatch 接口其作用是类似于 emit('message', data) 的作用, 至此子线程接收到了数据
// lib/internal/per_context/messageport.js
exports.emitMessage = function(data, type) {
if (typeof this[kHybridDispatch] === 'function') {
this[kHybridDispatch](data, type, undefined);
return;
}
const event = new MessageEvent(data, this, type);
if (type === 'message') {
if (typeof this.onmessage === 'function')
this.onmessage(event);
} else {
// eslint-disable-next-line no-lonely-if
if (typeof this.onmessageerror === 'function')
this.onmessageerror(event);
}
};
上面说到通过 EventEmitter 类的 kHybridDispatch 接口, 子线程的 port.on('message' 就会触发, 从而完成消息的接收, 其子线程的入口代码如下
在子线程中进行了很多初始化操作, 其核心 evalScript 运行了主线程发送过来的 js 文件路径的代码, evalScript 其实是 【node 源码学习笔记】lib 模块运行 提到的运行第一个 js 文件同样的逻辑
// lib/internal/main/worker_thread.js
port.on('message', (message) => {
if (message.type === LOAD_SCRIPT) {
port.unref();
const {
argv,
cwdCounter,
filename,
doEval,
workerData,
publicPort,
manifestSrc,
manifestURL,
hasStdin
} = message;
setupTraceCategoryState();
initializeReport();
if (manifestSrc) {
require('internal/process/policy').setup(manifestSrc, manifestURL);
}
initializeDeprecations();
initializeWASI();
initializeCJSLoader();
initializeESMLoader();
const CJSLoader = require('internal/modules/cjs/loader');
assert(!CJSLoader.hasLoadedAnyUserCJSModule);
loadPreloadModules();
initializeFrozenIntrinsics();
if (argv !== undefined) {
process.argv = process.argv.concat(argv);
}
publicWorker.parentPort = publicPort;
publicWorker.workerData = workerData;
// The counter is only passed to the workers created by the main thread, not
// to workers created by other workers.
let cachedCwd = '';
let lastCounter = -1;
const originalCwd = process.cwd;
process.cwd = function() {
const currentCounter = Atomics.load(cwdCounter, 0);
if (currentCounter === lastCounter)
return cachedCwd;
lastCounter = currentCounter;
cachedCwd = originalCwd();
return cachedCwd;
};
workerIo.sharedCwdCounter = cwdCounter;
if (!hasStdin)
process.stdin.push(null);
debug(`[${threadId}] starts worker script ${filename} ` +
`(eval = ${eval}) at cwd = ${process.cwd()}`);
port.postMessage({ type: UP_AND_RUNNING });
if (doEval === 'classic') {
const { evalScript } = require('internal/process/execution');
const name = '[worker eval]';
// This is necessary for CJS module compilation.
// TODO: pass this with something really internal.
ObjectDefineProperty(process, '_eval', {
configurable: true,
enumerable: true,
value: filename,
});
process.argv.splice(1, 0, name);
evalScript(name, filename);
} else if (doEval === 'module') {
const { evalModule } = require('internal/process/execution');
evalModule(filename).catch((e) => {
workerOnGlobalUncaughtException(e, true);
});
} else {
// script filename
// runMain here might be monkey-patched by users in --require.
// XXX: the monkey-patchability here should probably be deprecated.
process.argv.splice(1, 0, filename);
CJSLoader.Module.runMain(filename);
}
} else if (message.type === STDIO_PAYLOAD) {
const { stream, chunks } = message;
for (const { chunk, encoding } of chunks)
process[stream].push(chunk, encoding);
} else {
assert(
message.type === STDIO_WANTS_MORE_DATA,
`Unknown worker message type ${message.type}`
);
const { stream } = message;
process[stream][kStdioWantsMoreDataCallback]();
}
});
workerData 的实现类似于 parentPort
在最上面的例子中 worker_threads 模块导出了 parentPort 变量
// 例子
const {
Worker, isMainThread, parentPort, workerData
} = require('worker_threads');
而我们看 worker_threads 文件发现 parentPort 等于 null
module.exports = {
// ...
parentPort: null
};
此时我们重新阅读一下子线程入口的代码, 尽然在 worker_thread 模块中粗暴的改写了 parentPort 的属性为主线程发送过来的 publicPort, 我认为这种粗暴的篡改不可取, 至少在 worker_threads 模块中提供一个修改函数, 在一个模块中直接修改另一个模块的变量可读性太差了
// lib/internal/main/worker_thread.js
const publicWorker = require('worker_threads');
port.on('message', (message) => {
// ...
publicWorker.parentPort = publicPort;
}
本文主要讲了 node 中 worker_threads 的实现, 包括线程间通信及接口 isMainThread, parentPort, workerData 的实现
可能大部分同学已经忘记了 C 语言相关的语法及知识,建议先阅读一下基础的语法与概念
主要记录一下在 Node 中出现的一些 C 语言知识,一般是没有出现在基础教程中,为阅读时记录的笔记,可通过复制对应语法 / 函数名称等直接在网页上搜索 🔍 定位来查阅目标内容
node 中经常会出现一些宏定义,其值为构建时决定
// src/node_main.cc
#if defined(__POSIX__) && defined(NODE_SHARED_MODE)
如 POSIX 在 node.gypi 的配置文件 node.gypi, conditions 字段决定, 可认为下面简化为一个 if (OS=="win") else { 'defines': [ 'POSIX' ] } 语句, 所以非 win 系统 defined(POSIX) 都为 true
可移植操作系统接口(英语:Portable Operating System Interface,缩写为POSIX)是IEEE为要在各种UNIX操作系统上运行软件,而定义API的一系列互相关联的标准的总称,其正式称呼为IEEE Std 1003,而国际标准名称为ISO/IEC 9945, 查看更多 可移植操作系统接口
// node.gypi
'conditions': [
[ 'OS=="win"', {
'defines!': [
'NODE_PLATFORM="win"',
],
'defines': [
'FD_SETSIZE=1024',
# we need to use node's preferred "win32" rather than gyp's preferred "win"
'NODE_PLATFORM="win32"',
# Stop <windows.h> from defining macros that conflict with
# std::min() and std::max(). We don't use <windows.h> (much)
# but we still inherit it from uv.h.
'NOMINMAX',
'_UNICODE=1',
],
'msvs_precompiled_header': 'tools/msvs/pch/node_pch.h',
'msvs_precompiled_source': 'tools/msvs/pch/node_pch.cc',
'sources': [
'<(_msvs_precompiled_header)',
'<(_msvs_precompiled_source)',
],
}, { # POSIX
'defines': [ '__POSIX__' ],
}]
]
和 POSIX 是类似的,在 node.gypi 中定义
// node.gypi
[ 'node_shared=="true"', {
'defines': [
'NODE_SHARED_MODE',
],
}]
那么 node_shared 何时为 true 了,追溯到 configure.py 文件
// configure.py
o['variables']['node_shared'] = b(options.shared)
parser.add_option('--shared',
action='store_true',
dest='shared',
help='compile shared library for embedding node in another project. ' +
'(This mode is not officially supported for regular applications)')
所以说我们看见,如果构建 node 时运行的命令 ./configure --shared 带上 --shared 这个版本的 node NODE_SHARED_MODE 就会被定义, 这种情况一般出现你的 c++ 项目需要把 node 作为依赖的时候。
inline 函数在 node-addon-api 中出现了特别多次, 查看更多 C++ 内联函数 inline
// napi-inl.h
inline Object Env::Global() const {
napi_value value;
napi_status status = napi_get_global(*this, &value);
NAPI_THROW_IF_FAILED(*this, status, Object());
return Object(*this, value);
}
通常,在模块的头文件中对本模块提供给其它模块引用的函数和全局变量以关键字extern声明, 查看更多 extern “C”用法详解
// demo_NODE_MODULE_INITIALIZER.cc
extern "C" NODE_MODULE_EXPORT void
NODE_MODULE_INITIALIZER(v8::Local<v8::Object> exports,
v8::Local<v8::Value> module,
v8::Local<v8::Context> context) {
NODE_SET_METHOD(exports, "hello", Method);
}
void(*)(int)代表一个无返回值的且具有一个整型参数的函数指针类型(这里是一个空函数),整个语句表示将“0”强制类型转换为无返回值且具有一个整型参数的函数指针, 查看更多 #define SIG_DFL ((void(*)(int))0)
// signal.h
#define SIG_DFL (void (*)(int))0
例子放在 demo_NODE_C_CTOR.cpp
attribute ((constructor))会使函数在main()函数之前被执行
attribute ((destructor))会使函数在main()退出后执行
GNU C 的一大特色就是attribute 机制。
试想这样的情景,程序调用某函数A,A函数存在于两个动态链接库liba.so,libb.so中,并且程序执行需要链接这两个库,此时程序调用的A函数到底是来自于a还是b呢?
这取决于链接时的顺序,比如先链接liba.so,这时候通过liba.so的导出符号表就可以找到函数A的定义,并加入到符号表中,链接libb.so的时候,符号表中已经存在函数A,就不会再更新符号表,所以调用的始终是liba.so中的A函数。
为了避免这种混乱,所以使用, 查看更多 attribute((visibility("default")))
__attribute__((visibility("default"))) //默认,设置为:default之后就可以让外面的类看见了。
__attribute__((visibility("hideen"))) //隐藏
A a; // a存在栈上
A* a = new a(); // a存在堆中
CTest* pTest = new CTest();
delete pTest;
如 Node.js 中 . 的使用, 访问命名空间 per_process用::中某个不用 new 的实例的方法用.
// src/debug_utils.cc
namespace per_process {
EnabledDebugList enabled_debug_list;
}
// src/node.cc
per_process::enabled_debug_list.Parse(nullptr);
如 Node.js 中 -> 的使用
// src/node_options.cc
namespace per_process {
Mutex cli_options_mutex;
std::shared_ptr<PerProcessOptions> cli_options{new PerProcessOptions()};
}
// src/node.cc
per_process::cli_options->v8_thread_pool_size)
其中我们发现 libuv 是通过一组宏定义实现的队列, 代码主要在 deps/uv/src/queue.h
这个表达式看似复杂,其实它就相当于"(*q)[0]",也就是代表QUEUE数组的第一个元素,那么它为什么要写这么复杂呢,主要有两个原因:类型保持、成为左值。
// deps/uv/src/queue.h
#define QUEUE_INSERT_TAIL(h, q) \
do { \
QUEUE_NEXT(q) = (h); \
QUEUE_PREV(q) = QUEUE_PREV(h); \
QUEUE_PREV_NEXT(q) = (q); \
QUEUE_PREV(h) = (q); \
} \
while (0)
还需要进一步看看 QUEUE_NEXT 的实现
#define QUEUE_NEXT(q) (*(QUEUE **) &((*(q))[0]))
#define QUEUE_PREV(q) (*(QUEUE **) &((*(q))[1]))
#define QUEUE_PREV_NEXT(q) (QUEUE_NEXT(QUEUE_PREV(q)))
#define QUEUE_NEXT_PREV(q) (QUEUE_PREV(QUEUE_NEXT(q)))
让我们来拆解一下 ((QUEUE **) &(((q))[0])) 的实现
查看更多 点操作符和箭头操作符
每个线程都有自己独立的signal mask,但所有线程共享进程的signal action。这意味着,你可以在线程中调用pthread_sigmask(不是sigmask)来决定本线程阻塞哪些信号。但你不能调用sigaction来指定单个线程的信号处理方式。如果在某个线程中调用了sigaction处理某个信号,那么这个进程中的未阻塞这个信号的线程在收到这个信号都会按同一种方式处理这个信号。另外,注意子线程的mask是会从主线程继承而来的, 查看更多 pthread_sigmask sigaction
// src/node_main.cc
// 定义一个结构体 act
struct sigaction act;
// memset: 可以方便的清空一个结构类型的变量或数组, 指针的为NULL, 其他为0
// memset: https://blog.csdn.net/faihung/article/details/90707367
memset(&act, 0, sizeof(act));
// 设置新的信号处理函数
act.sa_handler = SIG_IGN;
// tips: 结构体和函数是可以同名的
// sigaction: 函数的功能是检查或修改与指定信号相关联的处理动作
sigaction(SIGPIPE, &act, nullptr);
getauxval() 函数从辅助函数中检索值 向量,内核的 ELF 二进制加载器使用的一种机制 当程序运行时将某些信息传递给用户空间 执行
个人理解是从内核中获取当前程序的一些基础的信息, 比如传参为 AT_BASE 时是获取程序解释器的基地址, 查看更多 getauxval(3) — Linux manual page
// src/node_main.cc
#if defined(__linux__)
// 辅助向量(auxiliary vector),一个从内核到用户空间的信息交流机制,它一直保持透明。然而,在GNU C库(glibc)2.16发布版中添加了一个新的库函数”getauxval()”
// http://www.voidcn.com/article/p-flcjdfbd-bu.html https://man7.org/linux/man-pages/man3/getauxval.3.html
node::per_process::linux_at_secure = getauxval(AT_SECURE);
setvbuf: C 库函数 int setvbuf(FILE *stream, char *buffer, int mode, size_t size) 定义流 stream 应如何缓冲。
_IONBF: 无缓冲:不使用缓冲。每个 I/O 操作都被即时写入。buffer 和 size 参数被忽略。
nullptr: C++中有个nullptr的关键字可以用作空指针,既然已经有了定义为0的NULL,为何还要nullptr呢?这是因为定义为0的NULL很容易引起混淆,尤其是函数重载调用时, 查看更多 C/C++中的NULL与nullptr
// src/node_main.cc
setvbuf(stdout, nullptr, _IONBF, 0);
setvbuf(stderr, nullptr, _IONBF, 0);
可以简单理解为 unsigned int, 其主要是为了解决平台的可移植性问题,查看更多 为什么size_t重要?(Why size_t matters)
// src/node_worker.h
size_t stack_size_ = 4 * 1024 * 1024;
// src/node_worker.h
static constexpr size_t kStackBufferSize = 192 * 1024;
当我们同时编译多个文件时,所有未加 static 前缀的全局变量和函数都具有全局可见性, 查看更多 C 语言中 static 的作用
// src/node_worker.h
static constexpr size_t kStackBufferSize = 192 * 1024;
在声明变量的时候可根据变量初始值的数据类型自动为该变量选择与之匹配的数据类型
// src/node.cc
for (auto& s : stdio) {
}
在 node 以及 libuv 中经常出现 errno == EINTR 重试的代码,其原因是如果在系统调用正在进行时发生信号,许多系统调用将报告 EINTR 错误代码。实际上没有发生错误,只是因为系统无法自动恢复系统调用而以这种方式报告。这种编码模式只是在发生这种情况时重试系统调用,以忽略中断。
static int uv__signal_lock(void) {
int r;
char data;
do {
r = read(uv__signal_lock_pipefd[0], &data, sizeof data);
} while (r < 0 && errno == EINTR);
return (r < 0) ? -1 : 0;
}
node 中经常会有变量名后加 () 以及 {} 或者 = 的初始化方式,让人倍感疑惑 🤔, 一般来说
std::unique_ptr<PlatformWorkerData>
worker_data(static_cast<PlatformWorkerData*>(data));
std::unique_ptr<uv_thread_t> t { new uv_thread_t() };
| 关键字 | 字节(字节) | 范围 | 格式化字符串 | 硬件层面的类型 | 备注 |
|---|---|---|---|---|---|
char |
1bytes | 通常为-128至127或0至255,与体系结构相关 | %c | 字节(Byte) | 大多数情况下即signed char;
在极少数1byte != 8bit或不使用ASCII字符集的机器类型上范围可能会更大或更小。其它类型同理。 |
unsigned char |
1bytes | 通常为0至255 | %c、%hhu | 字节 | |
signed char |
1bytes | 通常为-128至127 | %c、%hhd、%hhi | 字节 | |
int |
2bytes(16位系统) 或 4bytes |
-32768至32767或 -2147483648至2147483647 |
%i、%d | 字(Word)或双字(Double Word) | 即signed int(但用于bit-field时,int可能被视为signed int,也可能被视为unsigned int)
|
unsigned int |
2bytes 或 4bytes |
0至65535 或 0至4294967295 |
%u | 字或双字 | |
signed int |
2bytes 或 4bytes |
-32768至32767 或 -2147483648至2147483647 |
%i、%d | 字或双字 | |
short int |
2bytes | -32768至32767 | %hi、%hd | 字 | 即signed short
|
unsigned short |
2bytes | 0至65535 | %hu | 字 | |
signed short |
2bytes | -32768至32767 | %hi、%hd | 字 | |
long int |
4bytes 或 8bytes[1] |
-2147483648至2147483647 或 -9223372036854775808至9223372036854775807 |
%li、%ld | 长整数(Long Integer) | 即signed long
|
unsigned long |
4bytes 或 8bytes |
0至4294967295 或 0至18446744073709551615 |
%lu | 整数(Unsigned Integer)或
长整数(Unsigned Long Integer) |
依赖于实现 |
signed long |
4bytes或 8bytes |
-2147483648至2147483647 或 -9223372036854775808至9223372036854775807 |
%li、%ld | 整数(Signed Integer)或
长整数(Signed Long Integer) |
依赖于实现 |
long long |
8bytes | -9223372036854775808至9223372036854775807 | %lli、%lld | 长整数(Long Integer) | |
unsigned long long |
8bytes | 0至18446744073709551615 | %llu | 长整数(Unsigned Long Integer) | |
float |
4bytes | 2.939x10−38至3.403x10+38 (7 sf) | %f、%e、%g | 浮点数(Float) | |
double |
8bytes | 5.563x10−309至1.798x10+308 (15 sf) | %lf、%e、%g | 双精度浮点型(Double Float) | |
long double |
10bytes或 16bytes |
7.065x10-9865至1.415x109864 (18 sf或33 sf) | %lf、%le、%lg | 双精度浮点型(Double Float) | 在大多数平台上的实现与double相同,实现由编译器定义。
|
_Bool
|
1byte | 0或1 | %i、%d | 布尔型(Boolean) |
char 类型用于存储字符(如,字母或标点),但从技术层面看,char是整数类型。因为char类型实际上存储的是整数而不是字符。计算机使用数字编码来处理字符,即用特定的整数表示特定的字符。美国最常用的编码是ASCLL编码。例如,在ASCLL编码中,整数65代表大写字母A。因此,存储字母A实际存储的是整数65。
标准ASCLL码的范围是0~127,只需7位二进制数即可表示。通常,char类型被定义为8位的存储单元,因此容纳标准ASCII码绰绰有余。许多其他系统(如IMB PC和苹果macOS)还提供ASCLL码,也是在8位的表示范围之内。一般而言,C语言会保证char类型足够大,以存储系统(实现C语言的系统)的基本字符集。
C语言提供了许多有用的整数类型。但是,某些类型名在不同系统中的功能不一样。C99新增了两个头文件stdint.h和inttypes.h,以确保C语言的类型名在各系统中的功能相同。
C语言为现有类型创建了更多类型名。这些新的类型名定义在stdint.h头文件中。例如,int32_t表示整型类型的宽度正好是32位。在使用32位int的系统中,头文件会把int32_t作为int的别名。不同的系统也可以定义定义相同的类型名。例如,int为16位、long为32位的系统会把int32_t作为long的别名。然后,使用int32_t类型编写程序,并包含stdint.h头文件时,编译器会把int或long替换成与当前系统匹配的类型。
计算机刚刚发明时,只支持ascii码,也就是说只支持英文,随着计算机在全球兴起,各国创建了属于自己的编码来显示本国文字,中文首先使用GB2132编码,它收录了6763个汉字,平日里我们工作学习大概只会用到3千个汉字,因此日常使用已经足够,GBK收录了21003个汉字,远超日常汉字使用需求,不管是日用还是商用都能轻松搞定,因此从windows95开始就将GBK作为默认汉字编码,而GB18030收录了27533个汉字,为汉字研究、古籍整理等领域提供了统一的信息平台基础,平时根本使用不到这种编码。这些中文编码本身兼容ascii,并采用变长方式记录,英文使用一个字节,常用汉字使用2个字节,罕见字使用四个字节。后来随着全球文化不断交流,人们迫切需要一种全球统一的编码能够统一世界各地字符,再也不会因为地域不同而出现乱码,这时Unicode字符集就诞生了,也称为统一码,万国码。新出来的操作系统其内核本身就支持Unicode,由万国码的名称就可以想象这是一个多么庞大的字符集,为了兼容所有地区的文字,也考虑到空间和性能,Unicode提供了3种编码方案:
utf-8由于是变长方案,类似GB2132和GBK量体裁衣,最节省空间,但要通过第一个字节决定采用几个字节储存,编码最复杂,且由于变长要定位文字,就得从第一个字符开始计算,性能最低。utf-32由于是定长方案,字节数固定因此无需解码,性能最高但最浪费空间。utf-16是个怪胎,它将常用的字放在编号0 ~ FFFF之间,不用进行编码转换,对于不常用字的都放在10000~10FFFF编号之后,因此自然的解决变长的问题。注意对于这3种编码,只有utf-8兼容ascii,utf-32和utf-16都不支持单字节,由于utf-8最省流量,兼容性好,后来解码性能也得到了很大改善,同时新出来的硬件也越来越强,性能已不成问题,因此很多纯文本、源代码、网页、配置文件等都采用utf-8编码,从而代替了原来简陋的ascii。再来看看utf-16,对于常见字2个字节已经完全够用,很少会用到4个字节,因此通常也将utf-16划分为定长,一些操作系统和代码编译器直接不支持4字节的utf-16。Unicode还分为大端和小端,大端就是将高位的字节放在低地址表示,后缀为BE;小端就是将高位的字节放在高地址表示,后缀为LE,没有指定后缀,即不知道其是大小端,所以其开始的两个字节表示该字节数组是大端还是小端,FE FF表示大端,FF FE表示小端。Windows内核使用utf-16,linux,mac,ios内核使用的是utf-8,我们就不去争论谁好谁坏了。另外虽然windows内核为utf-16,但为了更好的本地化,控制面板提供了区域选项,如果设置为简体就是GBK编码,在win10中,控制台和记事本默认编码为gbk,其它第三方软件就不好说了,它们默认编码各不相同。

最近更文较少, 主要忙于各大团购群买菜 + 做饭 + 做核酸 + 远程办公。从 3月30号 到今天小区已经封了 11 天, 上海疫情又创了新高 1015 + 22609 例。只希望这波疫情赶紧结束, 不要再出负面新闻了 😓 。图片来自封控前的一次囤货外出。
近期在对 SSR 项目进行 CDN和域名灾备 的改造, 同学 a 负责的 Next.js 项目改造测试时发现 CDN 没有预期内的动态切换。这个项目一直有历史包袱, 我想着不会线上 Node 一直是挂的吧, 难道长久以来都是 Nginx 返回的静态兜底页面?
本地启动了该项目, 发现无论是服务端渲染请求还是健康检查 Node 服务都没有异常。得出 Node 大概率是一直正常运行的, 那么会是其他什么原因导致的一直返回的是静态资源而非实时的 SSR 直出了?
真正的原因是当你的 src/pages/_app.tsx 文件中导出的 App 组件或者某个 Page 组件没有定义 getInitialProps 或者 getServerSideProps 这个静态方法, 意味着你其实是不需要在服务端进行注水(比如拉取用户的某个真实数据接口, 然后实时渲染直出)。
// demo
function Page({ stars }) {
return <div>Next stars: {stars}</div>
}
Page.getInitialProps = async (ctx) => {
const res = await fetch('https://api.github.com/repos/vercel/next.js')
const json = await res.json()
return { stars: json.stargazers_count }
}
export default Page此时 Next.js 会在打包构建阶段预渲染一个静态 html, 到项目发布成功 Node 服务开始运行的时候直接返回该静态 html 即可。因为不需要注水, html 的最终形态构建时就能决定下来了, 没必要服务端再实时渲染, 既能减少 CPU 消耗又能难缩短 rt。
后面查阅了一下文档, Next.js 称这个优化点为 Automatic Static Optimization。
可以看到 isStatic 的值为 true 的条件, 即导出的 App 组件没有定义 getStaticProps、 getInitialProps、getServerSideProps 任意一个静态方法
// packages/next/build/utils.ts
export async function isPageStatic(
// ...
}> {
return isPageStaticSpan.traceAsyncFn(async () => {
try {
const mod = await loadComponents(distDir, page, serverless)
const Comp = mod.Component
const hasFlightData = !!(mod as any).__next_rsc__
const hasGetInitialProps = !!(Comp as any).getInitialProps
const hasStaticProps = !!mod.getStaticProps
const hasStaticPaths = !!mod.getStaticPaths
const hasServerProps = !!mod.getServerSideProps
// ...
return {
isStatic:
!hasStaticProps &&
!hasGetInitialProps &&
!hasServerProps &&
!hasFlightData,
isHybridAmp: config.amp === 'hybrid',
// ...
}
} catch (err) {
if (isError(err) && err.code === 'MODULE_NOT_FOUND') return {}
throw err
}
})
}对于 isStatic 的值为 true 的页面 (staticPages) 和定义了 getStaticProps(ssgPages) 静态方法的页面就会通过 exportApp 方法进行预渲染生成静态 html。
// packages/next/build/index.ts
export default async function build(
dir: string,
conf = null,
reactProductionProfiling = false,
debugOutput = false,
runLint = true
): Promise<void> {
// ...
const combinedPages = [...staticPages, ...ssgPages]
if (combinedPages.length > 0 || useStatic404 || useDefaultStatic500) {
// ...
const exportApp: typeof import('../export').default =
require('../export').default
const exportOptions = {
// ...
}
const exportConfig: any = {
// ...
}
await exportApp(dir, exportOptions, nextBuildSpan, exportConfig)
// ...
}构建阶段生成好静态的 html 文件, 服务运行时直接返回即可

对于定义了 getInitialProps 或者 getServerSideProps 静态方法的组件构建阶段则只会生成服务端运行时需要的 js 文件

如果发现所需组件是一个 html 文件, requirePage 方法就会返回该 html 的字符串。如果是一个 js 文件则正常返回该模块的 module.exports, 然后服务端渲染该组件生成 html 字符串
// packages/next/server/load-components.ts
export async function loadComponents(
distDir: string,
pathname: string,
serverless: boolean,
serverComponents?: boolean
): Promise<LoadComponentsReturnType> {
if (serverless) {
const ComponentMod = await requirePage(pathname, distDir, serverless)
if (typeof ComponentMod === 'string') {
return {
Component: ComponentMod as any,
pageConfig: {},
ComponentMod,
} as LoadComponentsReturnType
}
let {
default: Component,
getStaticProps,
getStaticPaths,
getServerSideProps,
} = ComponentMod
Component = await Component
getStaticProps = await getStaticProps
getStaticPaths = await getStaticPaths
getServerSideProps = await getServerSideProps
const pageConfig = (await ComponentMod.config) || {}
return {
Component,
pageConfig,
getStaticProps,
getStaticPaths,
getServerSideProps,
ComponentMod,
} as LoadComponentsReturnType
}
// ...
}代码看到这里我们知道了
通过下面的代码可以看见可以通过 Next.js 注入的 NEXT_DATA 的 gsp, gssp, gip 等值即可以快速判断当前页面是何种方式进行的渲染方式
// packages/next/server/render.tsx
export async function renderToHTML(
req: IncomingMessage,
res: ServerResponse,
pathname: string,
query: NextParsedUrlQuery,
renderOpts: RenderOpts
): Promise<RenderResult | null> {
// ...
const htmlProps: HtmlProps = {
__NEXT_DATA__: {
props, // The result of getInitialProps
nextExport: nextExport === true ? true : undefined, // If this is a page exported by `next export`
autoExport: isAutoExport === true ? true : undefined, // If this is an auto exported page
gsp: !!getStaticProps ? true : undefined, // whether the page is getStaticProps
gssp: !!getServerSideProps ? true : undefined, // whether the page is getServerSideProps
rsc: isServerComponent ? true : undefined, // whether the page is a server components page
customServer, // whether the user is using a custom server
gip: hasPageGetInitialProps ? true : undefined, // whether the page has getInitialProps
appGip: !defaultAppGetInitialProps ? true : undefined, // whether the _app has getInitialProps
// ...
},
}
// ...
return new RenderResult(chainStreams(streams))
}知道如何区分后回头看看该项目返回的 html 就可以快速知道该页面是没有定义 getStaticProps、getInitialProps、getServerSideProps 任意一个静态方法的即 isStatic 为 true 的静态页面

由于没有定义 getInitialProps、getServerSideProps 任意一个静态方法故 Node 实时的获取 CDN 配置信息以及渲染的逻辑没有运行, 该页面的请求都是 Node 直接返回的静态 html。

最近一段时间陆续有同学吐槽,现有的开发环境打包 📦 太慢了,原话如下
也确实,3 分 45 秒 🐢🐢🐢 的等待时间谁又受得了 😣! 那么我们现在的脚手架的问题出在哪里 🤔?
现有脚手架是基于 webpack 打包,对于 babel,TypeScript 等编译做了缓存优化,甚至 hard-source 这样的持久缓存。但是由于业务需求的快速迭代,一切换分支导致大量 node_modules 依赖变化使得大部分缓存都未能命中 ❌
所以当现有的优化手段都命中 ✅ 的时候,时间才能勉强减少到 40 秒 🐢 左右。

webpack5 也尝试去解决慢的这个问题,比如新增了比较重量级的持久缓存 cache.type: filesystem 功能以及仍在实验中的懒编译 experiments.lazyCompilation 功能,不过从 esbuild 官方给大家的数据来看,webpack5 却是最慢的 😢!
关于 webpack 的 experiments.lazyCompilation 功能, 在内网的同学可以继续阅读 2019-09-10 凯多 动态路由插件 分享, 其实两年前我已经实现了该功能来解决巨石应用的打包慢的问题,只是最后的提升很有限。
这可能是 webpack5 被黑得最惨的一次... 因为第一次打包有一部分时间是在生成与写入缓存,怎么不拿第二次缓存生效后的时间来遛一遛比一比了?在这种情况下,我们升级 webpack5 可能还是解决不了痛点,频繁的分支切换又会回到解放前 !
当项目逐渐膨胀时,似乎是已经到了 webpack 的瓶颈,近期特别火的 Vite 与 Snowpack 或许才是真正的解决方案 🤔?

最初我想到的是接入 Vite 或者 Snowpack 解决现有的问题,关于提到的这些工具的原理,有不少文章都讲得很好了,这里就不做过多的介绍。
Snowpack 刚出来不久就认真充满好奇的读了它的代码,发现里面有不少 hack 的实现,比如 define 是通过字符串的替换去实现(这明显就会误伤无辜),css 文件中的 import 也没处理,最近作者说会交给社区去维护,自己有些力不从心了。
Real-world testing is super important. I'm sure that sounds cliche,but its true. We had a few starter projects that we could test Snowpack against,but they were all small and simple. This created a huge experience gap between our internal projects and our actual users.
文章出自 6 More Things I Learned Building Snowpack to 20,000 Stars (Part 2),而我们就是实际的业务,近 100 个大型项目,包含各类系统与 h5,几乎能踩完所有的坑。
To be honest,I'm not sure where Snowpack goes from here. I burnt out on it at the end of last year,and haven't found the energy to return. Usage and downloads began to trend down and the community has gotten quieter.
At the same time,Vite (that Snowpack alternative that now powers SvelteKit) is taking off. To their credit,they do a lot of things really well. The good news is that two tools are very similar and easy to switch out. Even Astro is experimenting with moving from Snowpack to Vite in a future release.
虽如此 Snowpack 依然是个可敬的先行者 ❤️
所以综合体验下来还是 Vite 值得信赖,如果此时是新项目毫无疑问我推荐大家使用 Vite,但是我们这是老项目...
何为老项目? 就是前阵子升级了一个 ts-loader 的大版本,有俩项目测试环境白屏了 😨。在试图接入 Vite 时遇见了各种奇怪的编译错误 ❌ 以及未能正确找到目标 js 与 scss 文件路径 ❌ 等问题。
到这里我认为 Vite 是没有任何问题的,有些稀奇古怪,百花齐放的问题的代码就得你自己去改,当然实际继续挣扎下去可能会发现更多的奇葩问题,其解决沟通成本和时间成本是无法估计的。

最终我决定自己开发,并且业务项目可以随意切换新的 ES Module 开发模式与现有的 webpack 开发模式。
nopack 将以全局安装的形式存在,即对现有项目 0 侵入,对线上环境 0 危险, 0 修改 即可接入。
| 名称 | nopack | Vite |
|---|---|---|
| 定位 | 让存量 webpack 强绑定的项目开发体验由 🐢 变为 ⚡️ | 功能全面,下一代前端构建工具 ⚡️ |
| 开发环境 | ✅ ES Module + esbuild 编译 | ✅ ES Module + esbuild 编译 |
| 生产环境 | ❌ 不支持( |
✅ rollup 打包(💡 类似于 webpack 的生产打包) |


只想做一个纯净的文件转译服务(理念类似于 esm.sh),竭尽全力的不打包 ❌📦 。想法还是天真了,因为有太多 CommonJs 的 npm 包, 而 CommonJs to ES Module 又是一个不成立的事情,require 是运行时的,import 是静态的,可能你想到了 import() 函数不也是运行时的吗 ? 不过 import() 返回的却是 Promise ...
只想做转译的想法行不通 ❌

packageA/es/a.js 这种或许也是 ES Module 就不进行预构建了。这样下来比如 a 项目 🔍 扫描到了 336 个 npm 包,最后只会对 199 个包进行预构建 📦 。刷新页面的等待时间会慢一点
对性能有一定的要求
esbuild 不会对 ts 类型进行检查

选择编译器的时候,调研了 swc 与 esbuild

Vite 与 Snowpack 都是使用的 esbuild。
目前仅发现范型函数赋值给变量编译会有问题。

下面是 webpack 模式下测试 esbuild 与 swc 相关的测试数据

编译兼容:
小结:
站在巨人的肩膀总是能看得更远,首先感谢 Vite 与 Snowpack 从 CommonJs 到 ES Module 过渡时期提供的各种解决方案,最后感谢背后的 esbuild 与 swc 提供的强大心脏 ⚡️

谢谢阅读 ~
A declarative, efficient, and flexible JavaScript library for building user interfaces.
🖖 Vue.js is a progressive, incrementally-adoptable JavaScript framework for building UI on the web.
TypeScript is a superset of JavaScript that compiles to clean JavaScript output.
An Open Source Machine Learning Framework for Everyone
The Web framework for perfectionists with deadlines.
A PHP framework for web artisans
Bring data to life with SVG, Canvas and HTML. 📊📈🎉
JavaScript (JS) is a lightweight interpreted programming language with first-class functions.
Some thing interesting about web. New door for the world.
A server is a program made to process requests and deliver data to clients.
Machine learning is a way of modeling and interpreting data that allows a piece of software to respond intelligently.
Some thing interesting about visualization, use data art
Some thing interesting about game, make everyone happy.
We are working to build community through open source technology. NB: members must have two-factor auth.
Open source projects and samples from Microsoft.
Google ❤️ Open Source for everyone.
Alibaba Open Source for everyone
Data-Driven Documents codes.
China tencent open source team.