
Visit a Website · Download for macOS · Download for Windows · Download for Linux · Install with Homebrew
Auto-reconnect
Kube Forwarder watches for connection status and always tries reconnect on failure
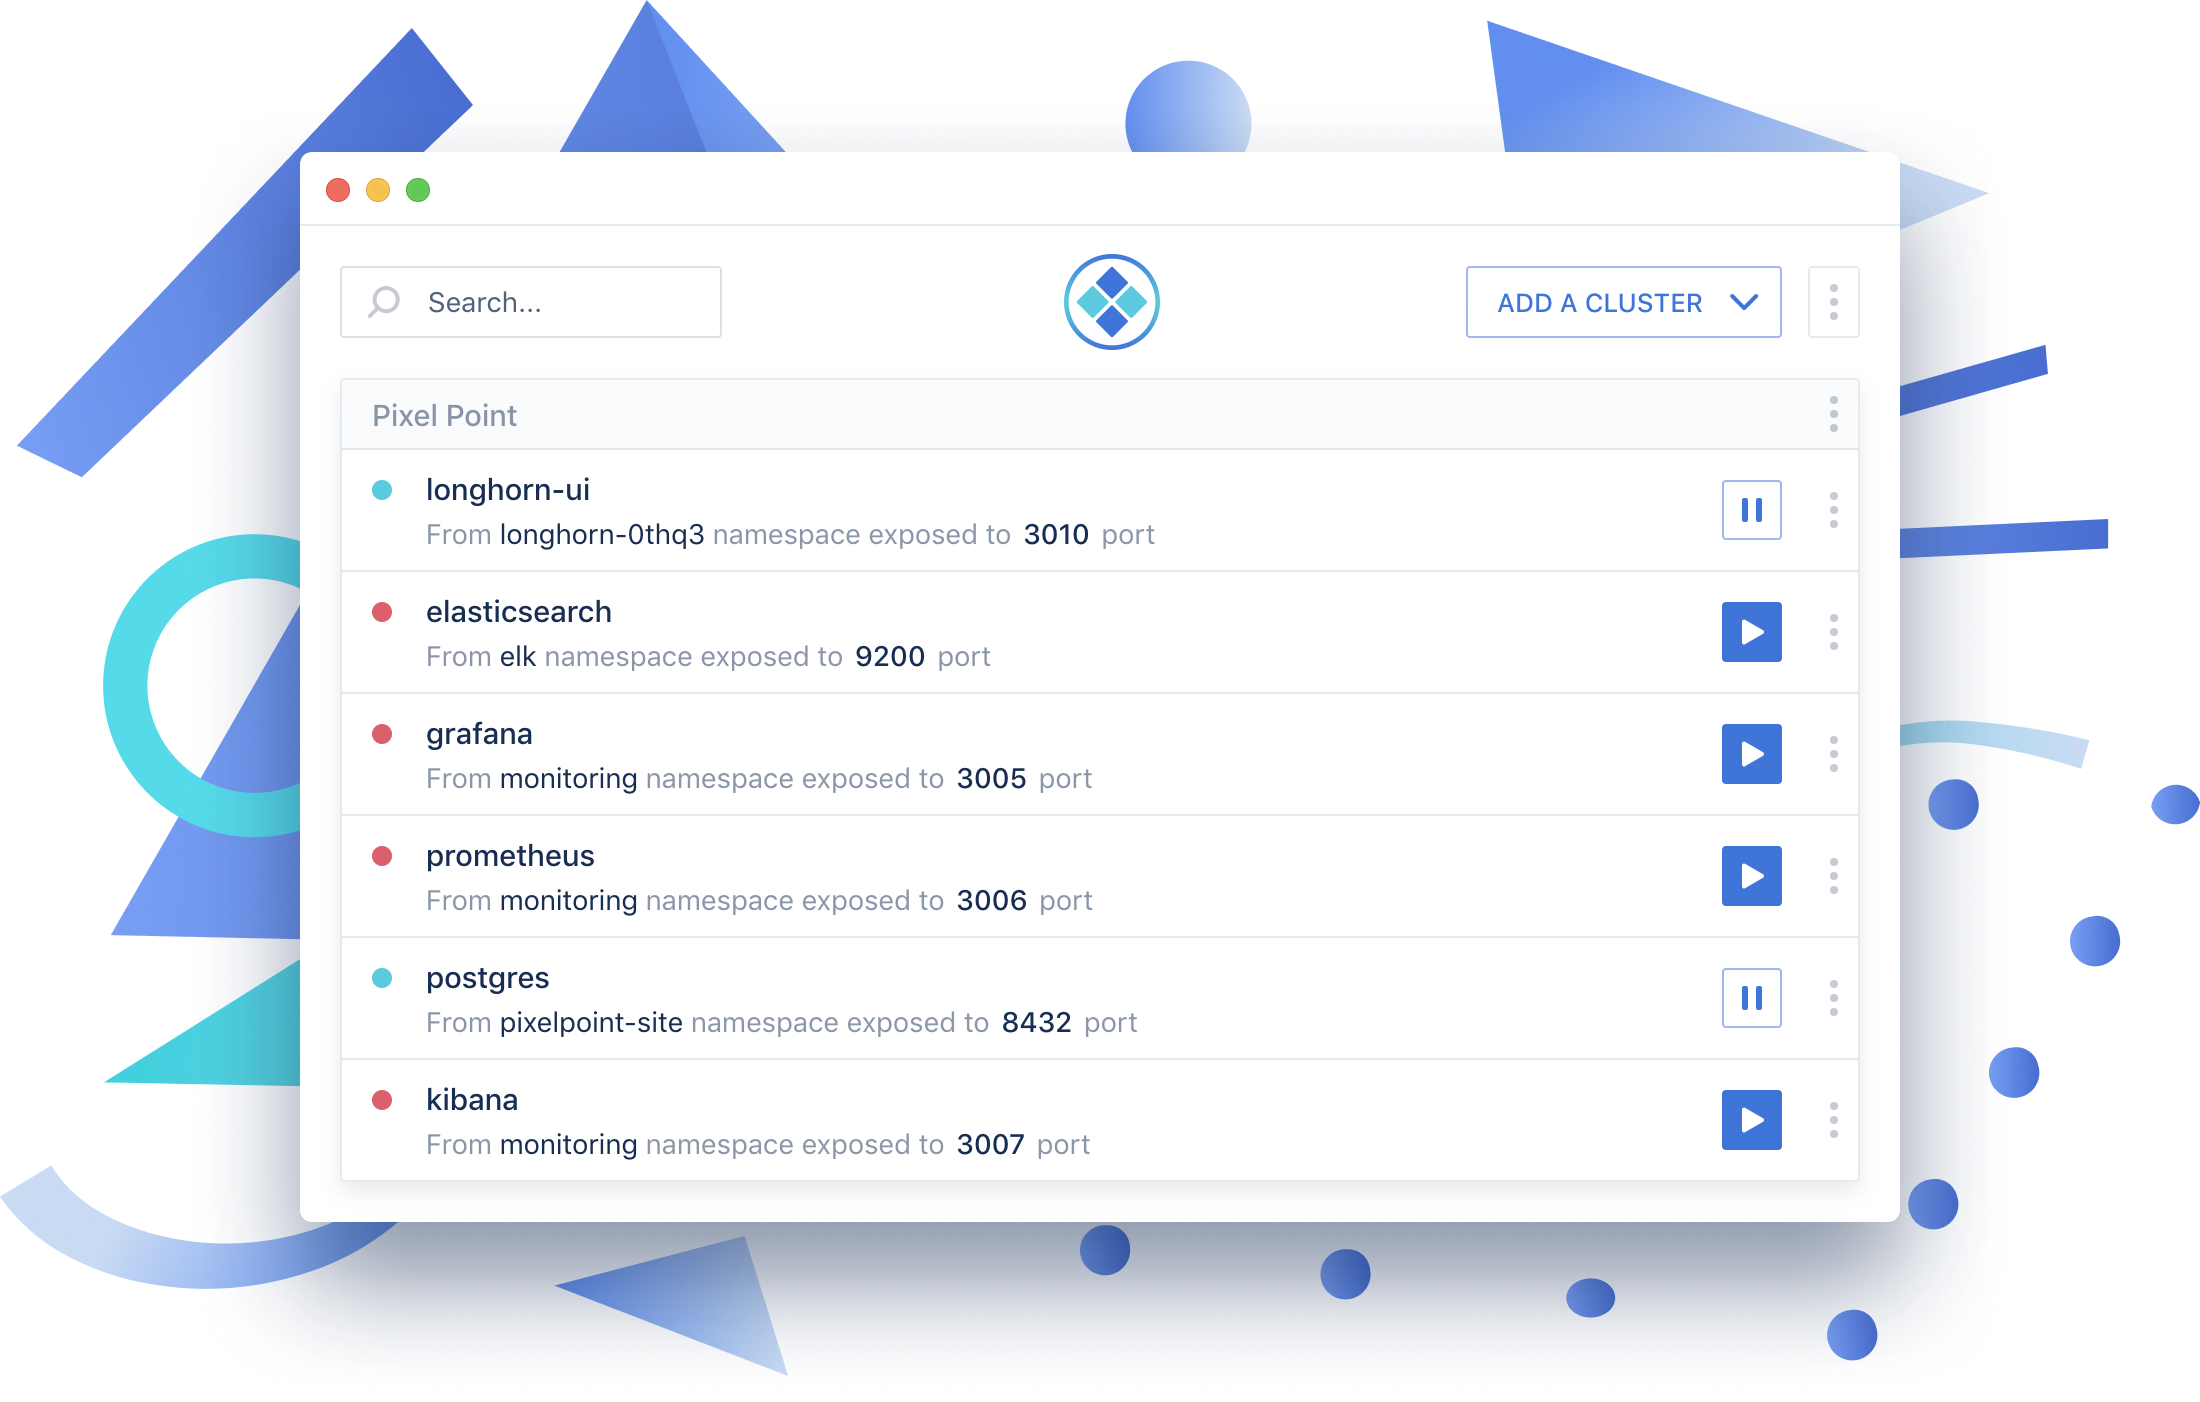
Multiple clusters support
Bookmark and forward Kubernetes services from multiple clusters easily like never before
Share bookmarks
Use import and export functionality to share bookmarked services with your team or simply backup it
Zero native dependencies
Use port-forwarding without installing kubectl and avoid explanations to developers on how to use it
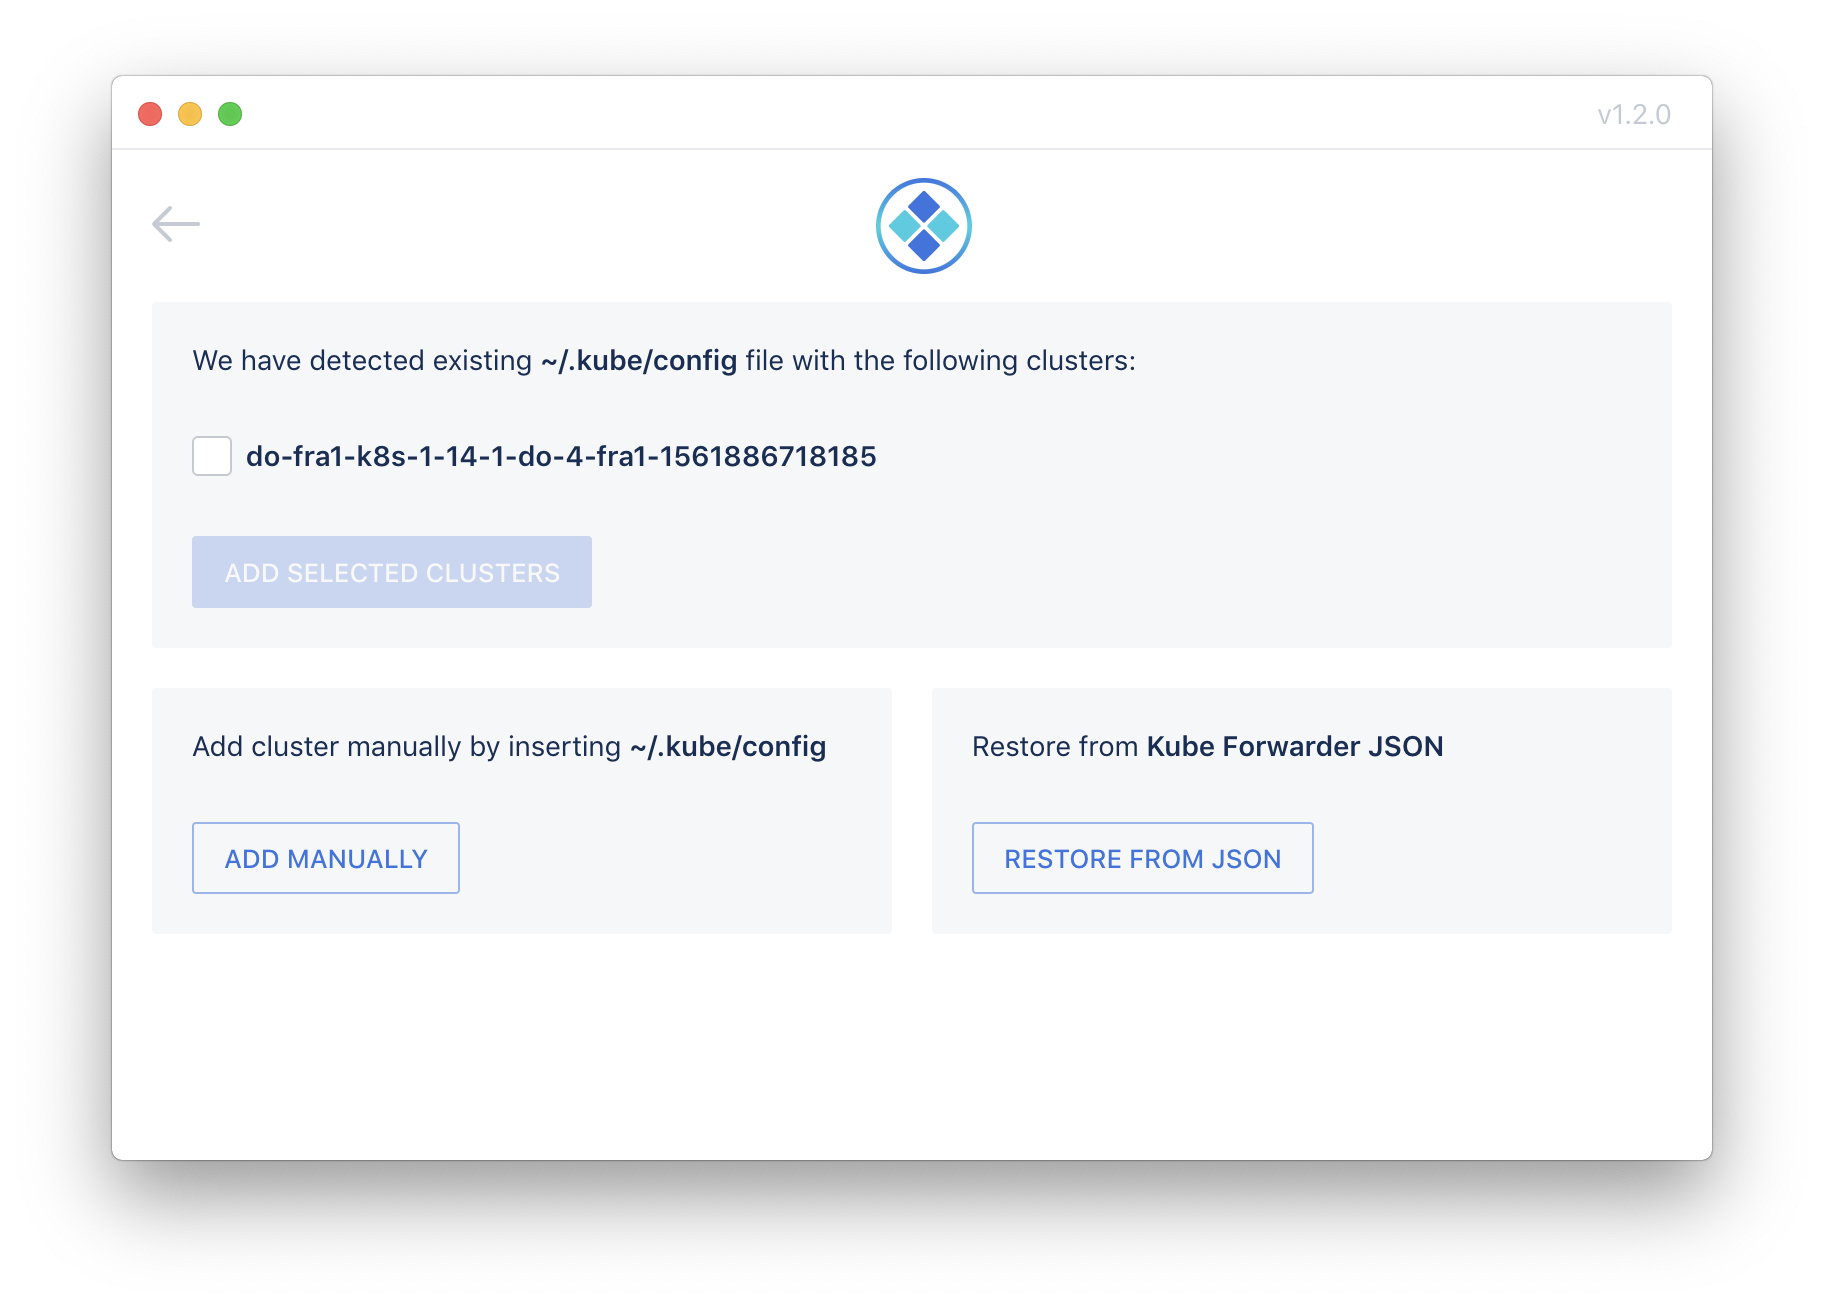
Before you start forwarding interal resources to your local machine, you have to add cluster configuration. To do this we have 3 different options in the app:
- Auto-detection of ~/.kube/config file and parsing settings from it
- Manual adding of Kubernetes config
- Import of the JSON file that could be generated via Kube Forwarder export functionality
When you add a new cluster via auto-detection or manually, we could parse config and if there are multiple contexts inside we will suggest you to add multiple clusters to the app. Few examples of yaml files we expect to have you could find there
Kube Forwarder supports forwarding of all types of resources that supported by kubectl – Pod, Deployment, Service.
We ask you to fill the form with the following fields:
Cluster Name - pick a cluster from one of the added clusters.
Namespace - the namespace of the resource you plan to forward.
Kind – pick one of the options Pod, Deployment or Service.
Name - name of the Pod, Deployment or Service.
Alias - alternative name of the resource that will be displayed on the homepage(optional)
Port Forwarding - Fill two fields. Local port - port from your local machine where the resource will be forwarded. Resource port - port of the resource from the Kubernetes cluster

Kube Forwarder allows you export cluster configuration in JSON that you could use to share with your team members or for the backup purpose. You could easily store it on Github. When you export cluster, you could export it with or without confidential information.

brew cask install kube-forwarder
We encourage you to contribute to Kube Forwarder!
We expect contributors to abide by our underlying code of conduct. All conversations and discussions on GitHub (issues, pull requests) must be respectful and harassment-free.
This project was generated with electron-vue@8fae476 using vue-cli. Documentation about the original structure can be found here.
- Fork the project & clone locally. Follow the initial setup here.
- Create a branch, naming it either a feature or bug:
git checkout -b feature/that-new-featureorbug/fixing-that-bug - Code and commit your changes. Bonus points if you write a good commit message:
git commit -m 'Add some feature' - Push to the branch:
git push origin feature/that-new-feature - Create a pull request for your branch 🎉
- Node 10.8+
- MacOS (if you want to build
.dmgtarget) - Docker (if you want to run tests)
- ImageMagick (to build app icon)
Fork Kube Forwarder repository (https://github.com/pixel-point/kube-forwarder/fork)
# Clone source code
git clone https://github.com/<your-username>/kube-forwarder

# install dependencies
npm install

# prepare .env files
cp .env.example .env
cp .env.example .env.production

# serve with hot reload in Electron Dev app
npm run dev

# serve WEB version with hot reload at localhost:9081
npm run web
Build an application for production
# Build a target for current OS
npm run build

# Build a target for Windows
npm run build -- -- --win

# Build a target for Linux
npm run build -- -- --linux

# You can mix targets
npm run build -- -- --win --linux

# You can build static and target separately
npm run build:dist
npm run build:target -- --win
A built version will be appear in build directory.
We are using Cypress to run integration tests. There are visual regression tests. It's important to run them inside docker container to get same screenshots as in Drone CI.
npm run test:cypress
Or you can run it manually on a local machine.
# Run the web version to test it
npm run web

# Run this command in a separate terminal tab
npm run test:cypress:onhost

# Or you can open Cypress GUI
npm run test:cypress:open
- Be sure that you created
.env.productionand filled it in the right way. - Update the version in
package.json. - Push to
releasebranch. Drone(pixel-point/kube-forwarder) will build packages for Windows and Linux and upload them to releases - Run
npm run releaseon a Mac computer to build.dmgtarget. It will be automatically pushed to releases at Github. - Go to Releases in the repository. Make sure that the created draft is OK and release it (Edit -> Release).
Notes:
.dmgtarget is added to release by your mac computer..AppImageand.exehave to be added to the release by drone CI.- A release tag (for example:
v1.0.3) will be added automatically by Github when you release your draft.
Use tiffutil -cathidpicheck bg.png [email protected] -out bg.tiff to build a tiff
background for .DMG

|
 |
This project is licensed under the MIT License - see the LICENSE.md file for details


