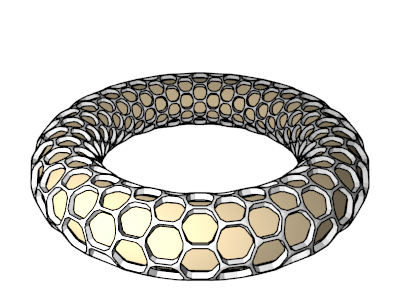
Now there is no excuse not to tessellate your favorite 2D manifolds with triangles or hexagons or whatever.
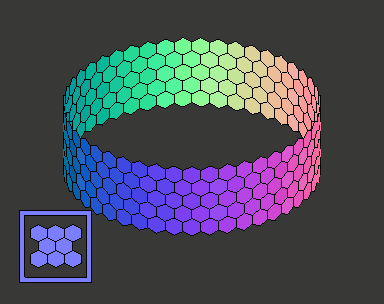
(Individual images from the above gif are below.)
Check out the repository and look in the demo directory.
- Blender: you'll find a blender file and
tessagon_blender_demo.pywhich creates the meshes in the demo. The demo has examples of each tessagon class, and an example that uses tessagon with one of my other projects,.
- VTK: Take a look at
tessagon_vtk_demo.pyfor a script that creates all of the current tessagon classes.
Three things are needed to use tessagon to tessellate the surface of a 2D-manifold (or more accurately, a patch on a 2D-manifold in 3-space):
- Tessagon provides a bunch of classes (subclasses of a class called
Tessagon) that will tessellate a portion of UV-space with mesh patterns. Parameters provide the details of the bounds in UV-space, the resolution of the tiling, whether the tiling is cyclic, whether a cyclic domain "twists" (think a topological identification space, like a Mobius strip or a Klein bottle), whether it is rotated, etc. These classes are in thetessagon.typesmodule. - The programmer must provide a function that maps UV-space into 3-dimensional space that is defined on the tiled domain. There are some demo functions in
tessagon.misc.shapes. - Finally, an adaptor is chosen to create a mesh in a supported 3D software package. Currently only Blender and VTK are supported:
- adaptor
BlenderAdaptorfrom the moduletessagon.adaptors.blender - adaptor
VtkAdaptorfrom the moduletessagon.adaptors.vtk
- adaptor
The reader should check out the demos, but here is some very basic usage using blender:
from tessagon.types.hex_tessagon import HexTessagon
from tessagon.adaptors.blender_adaptor import BlenderAdaptor

def my_func(u,v):
  return [u, v, u**2 + v**2]

options = {
    'function': my_func,
    'u_range': [0.0, 1.0],
    'v_range': [0.0, 1.0],
    'u_num': 8,
    'v_num': 20,
    'u_cyclic': False,
    'v_cyclic': False,
    'adaptor_class' : BlenderAdaptor
  }
tessagon = HexTessagon(**options)

bmesh = tessagon.create_mesh()

# Do something with the bmesh ...Additional tessagon classes can be added by deconstructing how a tessellation fits within a rectangular patch in the plane (check out the ASCII art in each source file in tessagon.types). The current Tessagon subclasses include:


Each tessagon class is initialized with number of keyword options, e.g.:
from tessagon.types.dodeca_tessagon import DodecaTessagon
from tessagon.adaptors.vtk_adaptor import VtkAdaptor
tessagon = DodecaTessagon(function=my_func,
                          u_range=[0.0, 1.0],
                          v_range=[0.0, 1.0],
                          u_num=8,
                          v_num=20,
                          u_cyclic=True,
                          v_cyclic=False,
                          adaptor_class=VtkAdaptor)
poly_data = tessagon.create_mesh()
The create_mesh() method creates a tessellated mesh using your provided function and the tile type corresponding to the tessagon class used. The chosen adaptor dictates the 3D data type the mesh will be (for the BlenderAdaptor the output is BMesh, for the VTKAdaptor the output is vtkPolyData).
Here are the options:
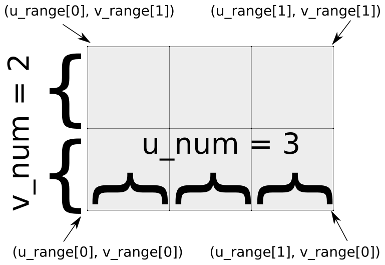
function: the function to be used to generate the geometry. This is a function that takes two argumentsu, vand returns a list of three items[x, y, z]u_range: a list with two items indicating the minimum and maximum values for u (the first argument to the function passed);v_range: a list with two items indicating the minimum and maximum values for v (the second argument to the function passed);u_num: the number of tiles to be created in the u-direction;v_num: the number of tiles to be created in the v-direction;
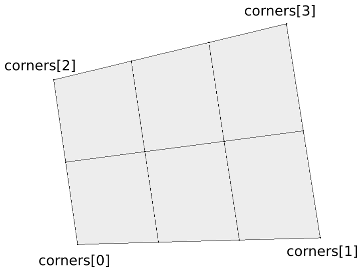
corners: instead of usingu_rangeandv_range, you can also specify your domain in the uv plain as a quadrilateral by specifying the corners of the region you would like to map. This is a list of four tuples in the following order: bottom-left, bottom-right, top-left, top-right.
-
u_cyclic: a boolean indicating whether the u-direction is cyclic (wraps around to the beginning again). You're function needs to be periodic in the u-direction for this to look nice. Note: the default for this isTrue, so set it toFalseif you don't want things to be cyclic -
v_cyclic: a boolean indicating whether the v-direction is cyclic. Default:True -
rot_factor: this is an integer greater than zero that allows you to rotate the tiles in the UV-domain is such a way that the tiling can still be cyclic.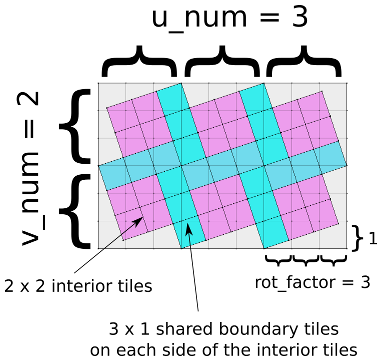
The
rot_factorspecifies how many tiles you go across before you go up one unit (essentially the reciprocal of the slope of the grid lines. The image depicts arot_factorof three, which generates 45 tiles (the purple interior and the blue boundary squares, each of which is blasted with the tessellation pattern when the function is applied). Here the meaning ofu_numandv_numare interpreted differently: whereas in the non-rotated case,u_num = 3andv_num = 2would yeild 6 tiles, here we have 45 tiles. Niether U nor V are cyclic in the picture; had they both been cyclic, 60 tiles whould have been generated. The interior tiles form groups of(rot_factor-1)**2tiles (here each group is 2 x 2, for 24 total interior tiles), and each boundary sharesrot_factor x 1tiles with it's neighbors (there are 7 such boundaries, so 21 boundary tiles).It hurt my brain developing this feature, so don't feel bad if it does't make any sense for you. Play around with it, and keep in mind that the number of tiles generated is somewhere between
u_num * v_num * (rot_factor - 1)**2andu_num * v_num * (rot_factor**2 + 1)(depending on which tiles have neighbors, due to periodicity), so you typically want to setu_numandv_numto be a lot lower than you would in the non-rotated case. -
u_twist: this is used withv_cyclic(note that saysv_cyclicnotu_cyclic). As thevvalues wrap around, theuvalues reconnect in the opposite direction: the lowuvalues connect to the highuvalues, and vice versa. This allows you to make things like Möbius strips and Klein bottles. -
v_twist: works withu_cyclic, analogous to howu_twistworks.
All tesselations are found in the types module, so check out the source code there for numerous examples. The source code documentation in hex_tessagon is more verbose than the others, which hopefully will aid understanding.
Each tessellation involve two classes: a tile class (a child of Tile) and a child of class Tessagon. The Tessagon subclass is easy (it just declares which tile class with be used), so writing the tile class will take most of your time.
(The FloretTessagon is an exception because the math is more complex.)
There are five methods that you will want to write:
-
__init__: typically you will want to call the constructor of the super-class. You can declare your tile class to be symmetric in either the u-direction or the v-direction, which will help you greatly if you have structured your vertices and faces well. -
init_verts: here you define the structure of your verts in a nested hash. You can use any combination of keys you want as pathways to addressing your vertices. If you declared your class to be u-symmetric, then the wordsleftandrightwill have significance in your pathways. Creating a vertex with the wordleftin it's pathway will automagically also create the symmetricrightvertex, halfing the amount of work you need to do. For v-symmetric tiles, the wordstopandbottomhave meaning, in an analogous way. If the tile is both u-symmetric and v-symmetric, then each vert created that has a combination of bothleft/rightandtop/bottomin it's pathway will actually create four symmetric vertices. -
init_faces: here you define the structure of your faces in a nested hash. As with vertices, you can reduce your work by exploiting symmetry and usingleft,right,topandbottomwhen addressing your faces. -
calculate_verts: here you define the locations of the vertices in the tiling, via theadd_vertmethod. The method takes an array of keys to indicate which vertex is being defined, and a location expressed as au_ratioand av_ratio, both between 0 and 1. Au_ratioof 0 isleftand au_ratioof 1 is right. Av_ratioof 0 isbottomand av_ratioof 1 istop. The symmetry of the tile may cause additional reflected vertices to be defined. Using the boolean keywordsu_boundary,v_boundaryandcorner, you can tell the system whether the vert is shared with neighboring tiles (this reduces the work that needs to be done, and can also keep the model topologically sound and water-tight). -
calculate_faces: here you define the faces for the tiling using the previously defined vertices, via theadd_facemethod. The method takes an array of face to indicate which face is being defined, and an array of vertex keys that indicate which vertices are in the face. These vertices are either on the current tile, or some of them can being on neighboring tiles (in which case the keys for the neighboring tile are also included). The symmetry of the tile may cause other reflected faces to be defined. Using the boolean keywordsu_boundary,v_boundaryandcorner, you can tell the system whether the face is shared with neighboring tiles.
Check out my other project wire_skin to add some interesting effects to the tessellated manifolds you create:
https://github.com/cwant/wire_skin
I primarily use Tessagon to create objects for 3D printing (on Shapeways). I tag my models with the keyword tessagon. If you also use Shapeways to print models made with Tessagon, feel free to use this tag -- I'd be very interested to see what you make!


