vorondesign / voron-trident Goto Github PK
View Code? Open in Web Editor NEWVoron Trident CoreXY 3D Printer design
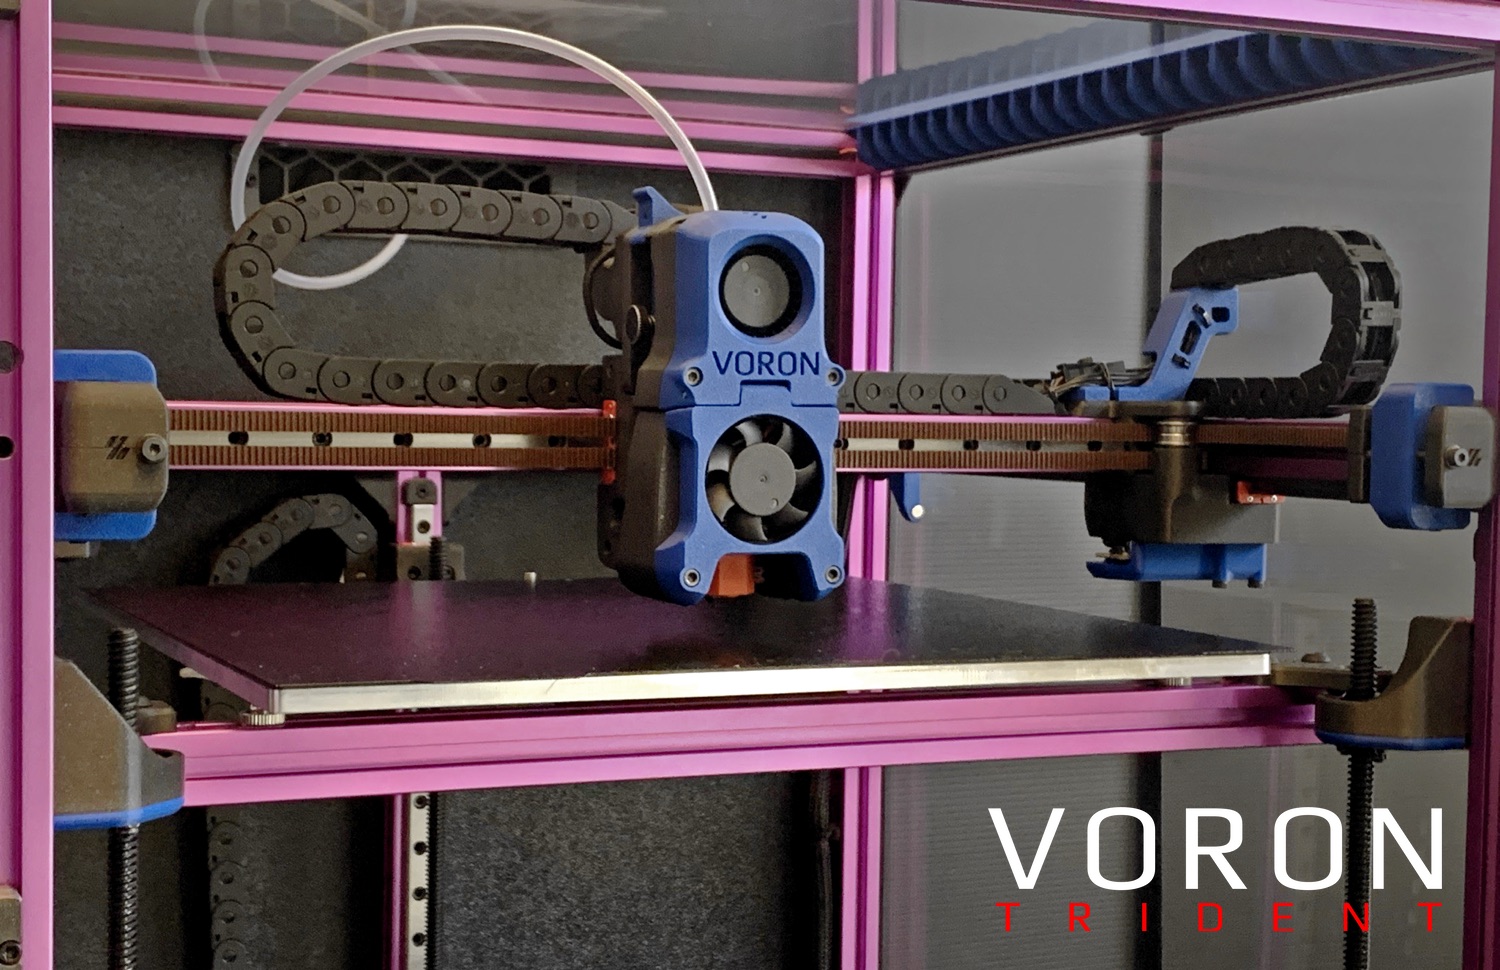
Voron Trident CoreXY 3D Printer design


Just wanted to mention that the diagram on page 215 confused me. I may be wrong, but it appears the AC supply socket is wired to the ‘Load’ side of the SSR. Please refer also to page 211.
I think all the other wiring diagrams are perfectly clear, but this one I feel could be clearer. Thanks!


Page 17 "Alternatively you can print the spacer that is included in the released files"
Page 216: "Power Inlet" title is not aligned correctly, so it is off the page.
Page 217: Roll-in M3 nuts are missing from the diagram for the power inlet printed part mounting to the frame.
Page 232: Controller board jumper settings steps 3 and 4 do not match the highlighted section of the board. They should be switched around. In the diagram, 3 is the probe voltage setting, and 4 is the fan section.
seems like page 147 is pointing G as F and F as G extrusion
When I open the any of the files in Drawings_DXFs/Panels, they load with the units seemingly scaled incorrectly by a factor of 25.4:1.
For example, the Trident 350 back panel opens with a width of 12,166.6 mm. If I then change the units to inches, I get the correct mm values, but with the wrong units. For example, the above becomes 479 inches.
This happens in both SolidWorks and eDrawings Pro. The 2.4 DXFs open just fine.
The text in the Trident assembly manual is gray, and extremely hard to read for those of us with diminishing eyesight. I know gray is fashionable and "cool", but black on white is easier to read, and ADA compliant.
Hi,
on pages 127 - 128, there's no clear indication to which side of the bed the heater and magnet should be attached. When comparing the diagrams, I can see the holes under the magnets to be slightly larger, indicating a countersink (the hole for the screw head: I hope this is the correct term), and the holes under the heater slightly smaller, but nothing points out the distinction, and the diagrams are on separate pages, making the comparison hard.
The issue is made worse by the fact that both the magnet and the heater are glued to the bed, making fixing an eventual mistake impossible without damaging both, or devising a workaround. (Guess how I found out. Even after discovering my mistake and rechecking the manual, I can see myself doing the same mistake again: it really isn't clear.)
I would recommend adding a cutout showing a hole profile and both the heater and the bed clearly marked, including the blue circle used to point out important details.
The manual p.203 suggests 150mm of wire for the end stop switches. Not. clear what is intended for where this length is supposed to get you. It would be better to leave the XY end stop pod wiring until later when the Y drag chain is in place so the wire length can be measured out (or give actual wire lengths for the standard builds.
Hi Voron Team.
It seems that the bolt head is only recessed by 2,2mm.


SHCS M3 bolts require 3mm to be flush installed.


The Extruder assembly is the Galileo type but the backplate should be the same on where the issue is.
Hi all,
Just a quick note about using the "E-Extrusion" for setting the height of the "A-Extrusions" (on Page 19/20).
It only works when using the 250mm frame size... (I am building a 350mm frame size Trident)
If the height needs to be exactly equal, maybe the process should change to construct the the left and right "A-Frames" (B+A+A+B) by two, using the "H-Extrusion" as the height guide.
Then joining these two "A-Frames" with the front and back (H+C) and (A) Extrusions to give you the full base.
Then no matter the frame size, as the "H-Extrusion" is common and 330mm in all designs, it works.
Does that make sense?
Being that the one manual is being used for the three primary designs, it actually only works for the 250mm frame size.
So, maybe, on Page 19/20, put a note say the E-Extrusion can only be used on a 250mm frame size, all others require the printed spacer or manual measure.
Many thanks.
Cheers.
It would be helpful to call out the process for magnet installation for the hall effect sensor on pages 50 and 109. Page 50 states "HALL EFFECT ENDSTOP? If you are using a Hall Effect Endstop board remove the highlighted part and insert a magnet in its place". This infers that it should be done as part of prep but the Hall Effect endstop setup document on the Voron web site instructs to wait to install the magnets until the sensor can be powered up and correct magnet polarity determined. I am not the first to install the magnets during the build in advance of being able to power and test the sensor. If you get it wrong you pretty much need to reprint the endstop and/or the x_carriage_frame_right parts. Thanks, Glenn.
The spider mount provided could not be fully secured to v2.2 board due to interference with fuse F7 under the terminal blocks.


When using the Power_inlet_adamtech.stl The latches to hold it in place are located on the inside frame instead of the outside. It will latch if you put it in backwards :)
Also assembly manual should be updated for using the adamtech.
I just finished my build. I thought the manual was great, super clear, clearly a ton of work went into it. Still there were a few places I had notes or nitpicks.
p. 10/11/12 - little tables with lengths for each model would be helpful (or formulas e.g. "370 + D" where D is 0, 50, 100 for 250, 300, 350 builds)
p. 18 - 175 + D/2
P. 54 - 175 + D/2
p. 115 - will this procedure really make gantry square without removing hall endstop mount? for me that hits first! Edit: See also #43
p. 121 - a table of "typical" and "maximum" belt lengths for each frame size would be really useful. (for 300 build: https://discord.com/channels/460117602945990666/551488536256184331/926551021193408524)
p. 121 - mention correct tensioner position for this procedure (e.g. position tensioner in the middle of its range of motion minimum tension before measuring)
p. 127 - mention cutting holes for 3 screws in the magnet if not already die cut
p.130 - for me this was not a press fit. but heating up the ABS with heat gun made for easy fit
p.132 - Labelling of extrusions is wrong (https://discord.com/channels/460117602945990666/551488536256184331/918558358896775199) Edit: fixed in #15
p. 149 - mention which direction to install heater and thermistor (its implied on p152.., see https://discord.com/channels/460117602945990666/551488536256184331/926588851298906163)
p. 150 - chamfer ptfe tube?
p.157 - mention set screw on drive gear
p.199 - mention m4x6 screws for omron?
p.209 - N and L are reversed for RS-25-5 Edit: See also #41
I see that some of these are already filed as issues in the github, sorry about the duplicates but this is the list of what I saw in my build.
Page 17 "MIND ACCESS HOLE POSITION" -> "BLIND ACCESS HOLE POSITION"
This issue can be used to track all neccessary corrections to the manual.
Please add any corrections as a new comment :-)

^ contributed by Vapour3D Samuel#5741
Per the Mean Well datasheet linked in the manual here and the labeling on the part itself, the pin labeling and wiring shown on pages 211 and 216 is incorrect. The manual shows L/N/G in terminals 9, 8, and 7, while the spec sheet places them in 1, 2, and 3. Similarly, +V and -V are flipped on the output terminals.
On page 16 it says:
PREPARE 8 EXTRUSIONS
8 of the 9 extrusions are going to be used in this section. Prepare them as shown above.
However this doesn't seem correct to me. Assuming it is referring only to A Extrusions, there are 9 of them, but as far as I can tell all 9 need preparing in the same way:
All of them seem to be prepared with screws in each end. It's not clear to me why it says "8 of 9".

Page 209 of the manual has the neutral and live wire reversed on the PSU. Live should be pin 1 and neutral pin2.
My understanding is this has no negative consequences but it doesnt match watch is printed on the PSU itself and should be fixed for clarity.
The readme states that you can find the "build of materials", but I believe this should read as "bill of materials". "Web site" is most often spelled as one word as well, but this isn't as big of an issue. The two-word variant is possibly influenced by the word "web page"
I know everyone wants to contribute to the VORON project and be well compensated. I'll take my payment in either Voron parts or thoughts and prayers!!!
"# Voron Trident
The official release of the Voron Trident 3D printer. You can find the Build of Materials in the configurator located at the Voron Design web site. The recommended sizes for this printer are 250x250x250, 300x300x250 and 350x350x250."
Recommended Filtered Power Inlet TE 10EGG1-2 requires two fuses, while the BOM only lists one. Additionally, NA code prohibits fusing of neutral.
I have found it hard to cross reference the right lengths to convert a 1.8 frame to a Trident frame for a 300mm printer. I also suggest that the Trident letter frame be added to the Sourcing guide for each extrusion.
Link on page 121 doesn't work due to a space in the text of the link after link/
On page 248 of the Assembly Manual one of the links is broken. https://voron.link/m6wtwnl
It's in this text on the page:
If you are using a “FYSETC mini12864” please review section 3.3 of the FYSETC Spider documentation (https://voron.link/m6wtwnl).
Note: I just did a search for voron.link within the PDF and tested all the links, the rest are currently working.
There is a gentyl instead of gently on page 130.
The sourcing guide notes that a BAT85 diode and 6+ stepper board is required while the assembly guide uses the Fysetc Spider specifically. The assembly guide has the probe directly connected to the Z+ port on the Spider without BAT85 diode. Some users might be unaware that the Spider has a BAT85 diode built in and connect the probe without diode to a board which does not support that. Including a note in the assembly should give users a heads up to be aware of what their configuration is and if they need to include the diode or not.
Hate to post this in multiple places ( I put it in an engineering ticket on Discord, as well ), but this seemed important.
on page 208 of the Trident Assembly Manual, it shows the neutral on the left, and the hot on the right, when the ground lug is down:

these should be reversed, as shown on the inlet diagram itself:

this may not be 100% necessary in countries with reversible outlet plugs, but in North America, it's mandatory to comply with the National Electrical Code.
I looked at the manuals for the other Voron models. Only the 2.4 uses the same inlet, and the colors are correctly called out in the 2.4 manual.
edit: spelling
When trying to download "https://github.com/VoronDesign/Voron-Trident/blob/main/Manual/Assembly_Manual_Trident.pdf" through a browser, I get an error "something went wrong".
The message is a little less cryptic with Adobe Acrobat Reader :

No problem at all with the other PDF "Frame Upgrade Trident"
Specification and installation of the 2 M3 hex nuts on the carriage halves, corresponding to the M3x40 and M3x30 S.H.C.S.'s are missing.
I would assume that, for ease of installation, the nuts would be pushed into the holes in a previous step, but page 132 is where the corresponding screws are installed
I humbly suggest that placement of the 2 M3 hex nuts be added to page 122.
I am still new to github however when I try and download either AB Drive unit lower STLs I get a new tab opened with text and not the file itself.
https://github.com/VoronDesign/Voron-Trident/blob/VTr1/STLs/Gantry/chain_wire_anchor_a_3hole.stl
chain_wire_anchor_a_3hole.stl => chain_wire_anchor_a_2hole.stl
After the question coming up a couple times on Discord, I would like to humbly suggest that a label indicating the proper clip and correct thickness foam be added to pages 254, 256, 257, 259, and 261.
The rear and top panels (pgs 254 and 261) should indicate 1mm thick foam, corner_panel_clip_4mm, and midspan_panel_clip_4mm
The side panels (pgs 256, 257, and 259) should indicate 3mm thick foam tape, corner_panel_clip_6mm, and midspan_panel_clip_6mm

I noticed the bottom hex nut hole has a round cut going into it some depth.
Since all the other carriages have plain hex holes for the nuts, I'm guessing this is an error. It's an easy fix and I don't mind putting in a pull request, but I wanted to check if someone might have intentionally made it that way first.
The same also applies to the V2.4 MGN12 mod.
https://github.com/VoronDesign/VoronUsers/tree/master/printer_mods/arkeet/mgn12
Hi Voron Team.
I have assembled the Trident MGN12 assembly on my 2.4.
The clearance between the Probe and nozzle is causing me issues. I looked in both the Afterburner CAD and the Trident CAD to se the difference. Here is what i found:
The new MGN12 leaves 1mm of clearance:

The Old Afterburner leaves around 3mm of clearance:

My build:
The probe is a bit deformed by the heat but the left and back part shows the original shape. I could maby install the probe a tiny bit higher but it does not solve my problem.


It seems that the clearance of 1mm is a bit to small to account for assembly tollerances.
In the manual on page 118, we are instructed to move the gantry back to the A/B drives to square the gantry. The gantry hits the Y endstop block before hitting the A/B drives. This makes the travel on the right side shorter than the left and had me wondering how in the world I could rack the gantry but always have the left side not be the one stopping.
The manual needs to indicate two M5x10 BHCS are used to attach the exhaust mount. Also, two M5 t-nuts should be inserted in the extrusion for the screws.
For the Trident STLs, the deck_support_3mm_x8 and deck_support_4mm_x8 are backwards.
The motor is pictured but without a label. It's the NEMA17 Motor 17HS08-1004S and is used for the BMG extruder.
As a first time voron builder, I found this page to not be clear enough that the vertical extrusion will then be offset from the horizontal extrusion, and in which way (in or out) from the extrusion. After some questions on the discord, I have found that other folks believe this to not be 100% clear either.
Thus I would like to propose a "red circle" around the corner piece highlighting the outward (way from the print bed) offset of the vertical extrusion relative to the horizontal extrusion.
Pg 132 incorrectly calls out H Extrusion for a second time, with this time being part of the bed frame. This should be G Extrusion.
H is called out correctly on pg 18, and pg 12 indicates there should only be 1 H. Since H is 330mm and the only extrusion whose side remains constant regardless of X,Y dimensions the pg 18 reference must be correct making the pg 132 reference incorrect.
When attempting to download the STL files for the A and B drive Frames (Only the Lowers), Clicking "Download" on either of these two files, results in no download initiated, just a display of a raw ASCII text file.

Missing Value for BOM (M3 T-nut) in Configurator
The BOM in the Configurator shows NaN for the M3 T-nuts

This is originally for the V2, but it was suggested in the engineering ticket on Discord to submit the issue for Trident since it has the most recent gantry.
Issue: The recess for the M5x40 BHCS bolts in the XY joints are chamfered. This causes the bolts to slowly creep for me, which means I continuously need to re-tighten them
Fix: I used the "bridging trick" which resolved the creeping.
I'm happy to contribute my fix if possible.
Thank you for updating the inlet, switch, and 5V PSU wiring.
The SSR wiring on page 115 just needs an update to be consistent with the updated wiring on pgs 210 and 211
Pages 210 and 211 - blue on left of switch:


Page 215 - blue on right of switch:

The connector should be labelled JST 3 pin male (B3B-XH-A)
In the assembly manual and the upgrade manual there is no mention to the drill size for the access holes that need to be drilled in the extrusion.
Hello not an issue but i wonder anyone made or have MGN12 design for this printer?

Fork crimp terminals are not included
Seems as if the electronics bay brackets use a different naming convention to the standard file structure, as when compared to the rest of the repo. Maybe remove the 2pc part, or something?
This may cause confusion to end users, especially legacy ones
Congrats on your release!
A declarative, efficient, and flexible JavaScript library for building user interfaces.
🖖 Vue.js is a progressive, incrementally-adoptable JavaScript framework for building UI on the web.
TypeScript is a superset of JavaScript that compiles to clean JavaScript output.
An Open Source Machine Learning Framework for Everyone
The Web framework for perfectionists with deadlines.
A PHP framework for web artisans
Bring data to life with SVG, Canvas and HTML. 📊📈🎉
JavaScript (JS) is a lightweight interpreted programming language with first-class functions.
Some thing interesting about web. New door for the world.
A server is a program made to process requests and deliver data to clients.
Machine learning is a way of modeling and interpreting data that allows a piece of software to respond intelligently.
Some thing interesting about visualization, use data art
Some thing interesting about game, make everyone happy.
We are working to build community through open source technology. NB: members must have two-factor auth.
Open source projects and samples from Microsoft.
Google ❤️ Open Source for everyone.
Alibaba Open Source for everyone
Data-Driven Documents codes.
China tencent open source team.