- Introduction
- Exercise 1: Digital I/O
- a. Case Converter
- b. Caesar Cypher
- c. Substitution Cypher
- Exercise 2: Serial Interface
- a. Digital I/O
- b. LED Bit-mask
- c. LED count loop with Input button
- d. Alphabet instance LED counter
- Exercise 3: Timer Interface
- a. Transmit
- b. Receive
- c. Combined Transmit and Receive
- d. Communicate with changed clock speed
- e. 3D with 'port forwarding'
- Exercise 4: Integration Task
- a. Hardware delay
- b. Timing with pre-scaler
- c. Preload function and delay
- Group Information
The GitHub repository is the collection of work committed during the 2024 Sem-1 MTRX2700 unit group05; The included codes are programmed to be compatible with the STMicroelectronics 32_f3_discovery microcontroller with the interactions performed through the STM32CubeIDE. The assignment requirements are mentioned in the file " 2024_MTRX2700_CLab_V1.pdf" that includes assignment information and 4 assessment exercises.
- Digital I/O
- Serial Interface
- Timers Interface
- Integration Task
These tasks demands programming that configures interrupts and callbacks with certain programming requirements that makes the project file more modular. With UART communication between the PC and STM.
Exercise 1 includes tasks that require modulation of string based on their ascii values, their quality of either being Uppercase or Lowercase, and even including concepts of encoding: Caesar Cipher, Substitution Cipher. It is important to note certain interesting instances regarding how ascii characters are represented in binary and hex.
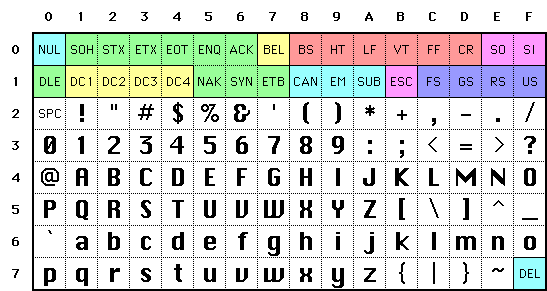
Ascii characters with their Hex values
-
The task demands a transformation of a string to be converted into only uppercase or only lowercase. The code works by iterating through the string bit by bit, the converted char then replaces the original char to progress through the entire string:
-
1|convert_loop: 2| LDRB R3, [R1], #1 //Loads Bit from string R1 to R3 ... 29| STRB R3, [R1, #-1] // Store the modified character back (R1 was already incremented) 30| B convert_loop // Continue the loop -
This is followed by functions that check whether the letter stored in R3 "needs" to be converted (i.e. if it's already uppercase/lowercase). In the example of converting to lowercase, R3 is compared to the Hex value range between 'A' and 'Z'. If they are within that range; #65 and #90 respectively, the characters are altered by adding #32 to R3 which makes it lowercase.
1| to_lowercase: 2| CMP R3, #65 // Check if the letter is uppercase ('A') 3| BLT no_change // If R3 is less than 'A', no change 4| CMP R3, #90 // Check if the letter is within 'A'-'Z' 5| BGT no_change // If R3 is greater than 'Z', no change 6| ADD R3, R3, #32 // Convert to lowercase by adding 32 7| B store_char // Jump to store the modified character -
vice-versa for uppercase conversions, once the conversion is completed, the code stops any computation by entering a branch only loop.
-
Inputs: Edit the string "Hello World!" as your user input, edit R2 to convert to uppercase (#1) or lowercase (#0).
-
Outputs: Register R1 is converted.
-
Testing: Check the memory browser based on the register R1.
The task demands a transformation of a string to be converted into only uppercase or only lowercase. The code works by iterating through the string bit by bit:
1| MOV R2, #3 // Shift value: positive numbers are encoded, negative numbers are decoded
According to Caesar Cypher's definition, each letter is fixed offset and only uppercase letters will be involved in encoding and decoding. For example, according to the code shown above, A would be encoded as D, but the lowercase a or other non-capital letters would remain unchanged.
            1|// Handles only the letters A to Z
            2|CMP R3, #65 // Checks if a character is greater than or equal to letter A
            3|BLT store_char  // If less than, skip
            4|CMP R3, #90 // Checks if a character is less than or equal to letter Z
            5|BGT store_char  // If greater than, skip
When we need to deal with end letters, such as Z or A, we need to go through a wrap-around. Check if wrap-around is required
            1|// Apply Caesar cipher shift
            2|ADD R3, R3, R2  // R3 = R3 + R2 Plus displacement values
            3|CMP R3, #65 // Checks if a character is greater than or equal to letter A
            4|BLT wrap_add // If it's over, go back down
            5|CMP R3, #90 // Checks if a character is less than or equal to letter Z
            5|BGT wrap_sub // If it's bigger than that, go back up wrap-around function
            6|wrap_sub:
            7|    SUB R3, R3, #26
            8|    B store_char
            9|wrap_add:
           10|    ADD R3, R3, #26
           11|    B store_char
           12|store_char:
           13|    STRB R3, [R1, #-1]
           14|    B continue
The cypher involves a straight swap between the alphabet, and its corresponding substitute in a substitution table, storing the encoded/decoded string in a buffer, without editing the original string. The chosen substitution table is:
"Ilovepnrbacdfghjkmqsuwxyzt\0"
Because why not show a bit of love?
Encoding (Mode 0): The function takes in a user-defined input string, checks the encode value and reroutes to the encoder loop. The code then iterates over an alphabet table to identify the current alphabet in “input_identifier”. It then finds the corresponding index in the substitution table, and stores the substitute in a buffer. When the character is identified, encoded and stored, it restarts the loop to check the next character in the input string, building the encoded string character by character.
Decoding (Mode 1): The decoding flows in a similar fashion to the encoding. It iterates over the substitute table and identifies the character, and finds the corresponding value in the alphabet table, storing it in a buffer.
Encode N times then Decode: The code can also encode the string more than once, with the number of encodes specified by the user in “encode_toggle”. It encodes the string and stores it in a buffer, and then proceeds to loop over the buffer, overwriting the encoded values N times. After this point, it starts to decode the buffer, iterating over it N times, to finally give back the original string in the buffer.
- Input: ascii string
- Output: Encoded/decoded string in buffer
- Testing: Majority testing was performed by checking memory using breakpoints, and comparing the string in the buffer with the input string. Iteration was checked using breakpoints and memory.
Heading Exercise 2 interacts with general input and output features of the microprocessor and how to enable them using the language assembly. All of the tasks would depend more on the definitions and initialise files that configures the microcontroller.
-
         1| @ registers for enabling clocks
         2| .equ AHBENR, 0x14  @ enable peripherals
         3| .equ APB1ENR, 0x1C
         4| .equ APB2ENR, 0x18
         5|
         6| @ bit positions for enabling GPIO in AHBENR
         7| .equ GPIOA_ENABLE, 17
         8| .equ GPIOC_ENABLE, 19
         9| .equ GPIOE_ENABLE, 21
        10| @ GPIO register base addresses
        11| .equ GPIOA, 0x48000000	@ base register for GPIOA (pa0 is the button)
        12| .equ GPIOC, 0x48000800	@ base register for GPIOC is used for UART4
        13| .equ GPIOE, 0x48001000	@ base register for GPIOE (pe8-15 are the LEDs)
        14|
        15|  @ GPIO register offsets
        16| .equ MODER, 0x00	@ register for setting the port mode (in/out/etc)
        17| .equ ODR, 0x14	@ GPIO output register
        18| .equ IDR, 0x10	@ GPIO input register
        19|
        20| .equ TIM7, 0x40001400	@ base register for timer 7
        21| @ registers for enabling clocks
        22| .equ AHBENR, 0x14  @ enable peripherals
        23| .equ APB1ENR, 0x1C @ enable peripherals on bus 1
        24| .equ APB2ENR, 0x18 @ enable peripherals on bus 2
        25|
        26| @ bit positions for enabling GPIO in AHBENR
        27| .equ GPIOA_ENABLE, 17
        28| .equ GPIOC_ENABLE, 19
This is a standard definitions.s file in the STM package, the file is responsible for enabling all the peripheral GPIO ports, by starting with enabling their clocks and then defining bit positions or addresses.

Using the STM32F3-Discovery-hardware-details.pdf we can identify the pins for the LEDs and Push-buttons, with the image above we can identify that the pins pe8 to pe15 regulates the Red, Blue, and Green lights on the board. The pa0 is responsible for the the USER Push-buttons that will be used through-out the assignment.

Once the pins were identified, the AHB peripheral clock enable register (RCC_AHBENR) is enabled with the address offset 0x14; and the A, B and C I/O pins are on the bit positions 17, 19 and 21. The mode of the pin is set with using the MODER command which is read and write, with their input and output registers defined as well. Then in the initialise.s file, these peripherals are enabled.
           1| enable_peripheral_clocks:
           2|	LDR R0, =RCC  @ load the address of the RCC address boundary (for enabling the IO clock)
           3|	LDR R1, [R0, #AHBENR]  @ load the current value of the peripheral clock registers
           4|	ORR R1, 1 << GPIOA_ENABLE | 1 << GPIOC_ENABLE | 1 << GPIOE_ENABLE  @ 21st bit is enable GPIOE clock, 17 is GPIOA clock
           5|	STR R1, [R0, #AHBENR]  @ store the modified register back to the submodule
           6|	BX LR @ return from function call
           1|light:
           2|   LDR R2, =GPIOE
           3|   STRB R1, [R2, #ODR + 1]
           4|	B light
- Input- Change the R1 register to the required bit-mask
- Output- Lights of the board turn on/off according to the bit-mask
- Testing- If the pattern of the bit-mask and the pattern of the lights on the board match, the code is working as designed.
2b content is to turn on one led by reading the user input button until all LEDs are turned on.
Names and Functionality: waitForButton_on: This function is responsible for detecting whether a particular button is pressed or not, and deciding what to do next based on the button's state. This function does this by constantly checking the state of an input register
pressed_on: This is the function that is used to handle specific behaviour when a button is pressed. When a button is pressed, this function updates the system state by manipulating registers and calling a delay function to turn on the LEDs.
delay_function: This function is a simple software-implemented delay function used to create a fixed-length delay before performing subsequent operations.
not_finished_yet: It is a key part of implementing the software delay function and identifies the starting point of a loop that is used to gradually decrement the counter until zero.
- Input- Button being pressed
- Output- The pattern of LEDs being lit
- Testing- If an additional LED lights up after the button has been pressed, the code is working as intended.
2b content is following the 2b, after all the LEDs are turned on, the state should change to turn off the LEDs by each press of the button until all the LEDs are turned off. Then back to the original state that turns on the LEDs.
waitForButton_off -> This function is responsible for detecting whether a particular button is pressed or not, and deciding what to do next based on the button's state. This function does this by constantly checking the state of an input register
pressed_off -> This is the function that is used to handle specific behavior when a button is pressed. When a button is pressed, this function updates the system state by manipulating registers and calling a delay function to turn off the LEDs.
delay_function & not_finshed_yet -> same as the 2b.
- Input: user input button
- Output: LEDs
- Testing: Firstly check whether the LED is all on when the button is not pressed. Secondly, press the button to check if only one LEDs is turned off. Then repeat it until all the LEDs are off. Repeat the steps to check if the LED light is turned on and off continuously。
This task takes an input and measures how many instances of a case-insensitive alphabet are present in alphabetical order. The count must be displayed physically as the number of LEDs on the board turned on. As the Hex value of the ascii string are in the pattern between 0x41 to 0x5A and 0x61 to 0x7A, the comparing register has to loop between those ranges.
           1|string_loop:
           2|   LDRB R3, [R0, R2]
           3|	  CMP R3, R5 //Check if R3 is the matching Uppercase alphabet
           4|  BEQ Adder // Add number of LEDs on
           5|	  CMP R3, R11 // Check if R3 is the matching Lowercase alphabet
           6|  BEQ Adder // Add number of LEDs on
           7|	  CMP R3, #0 // Check if R0 is empty
           8|   BEQ finished_everything // Finish and loop
           9|	  ADD R2, #1 // Increase offset
          10| 	  B string_loop
The count of each letter must iterate through all the alphabets, including characters that are capitalised. The iteration must occur only after an instance of the user button being pushed. The code below is an artificial delay by halting code progression by looping inside a function until the push-button is pressed and released, this is to remove the risk of false positives of the code running even when the button isn't released.
			1|button_loop:
			2|	LDR R7, =GPIOA
			3|	LDR R8, [R7, IDR] // Store value of push-button on R8
			4|	ORR R10, R8, R9 // Parse
			5|	CMP R10, R6 // Check if its being pressed or not
			6|	BEQ pressed // Exit loop and enter function "pressed"
			7|	B button_loop
			8|
			9|pressed:
		   10|	LDR R7, =GPIOA
	       11|	LDR R8, [R7, IDR] // Store value of push-button on R8
		   12|	ORR R10, R8, R9 // Parse
		   13|	LDR R2, =0x00 // Reset string offset
		   14|	CMP R10, R6 // Check if its being pressed or not
		   15|	BEQ pressed // If its still held down, loop
		   16|	B string_loop // Check next letter again
- Input- The variable "ascii_string" defined in the beginning of the code, stored in register R0. Press the push-button to iterate through the alphabet
- Output- The number of LEDs turned on
- Testing- Count the number of times a letter is written, in both upper- and lower-case, and match it with the number of lit LEDs . If the count matches, the code is working as expected.
Exercise 3 is based on Serial communication, which is done through the UART (incl USART) protocol that stands for universal asynchronous receiver / transmitter. The UART protocol being used in this exercise is mainly UART4 and UART5 in examples of port-forwarding, with USART1 being used while in connection with a PC. The platform used to interact with the PC's terminal/command line and the microcontroller are minicom and PuTty.
		   1|@ register addresses and offsets for general UARTs
		   2|.equ USART_CR1, 0x00
		   3|.equ USART_BRR, 0x0C
		   4|.equ USART_ISR, 0x1C @ UART status register offset
		   5|.equ USART_ICR, 0x20 @ UART clear flags for errors
		   6|
		   7|.equ UART_TE, 3	@ transmit enable bit
		   8|.equ UART_RE, 2	@ receive enable bit
		   9|.equ UART_UE, 0	@ enable bit for the whole UART
		  10|.equ UART_ORE, 3 @ Overrun flag
		  11|.equ UART_FE, 1 @ Frame error
		  @ function to enable a UART device - this requires:
		  @  setting the alternate pin functions for the UART (select the pins you want to use)
		  @ BAUD rate needs to change depending on whether it is 8MHz (external clock) or 24MHz (our PLL setting)
		  enable_uart:
		  	@make a note about the different ways that we set specific bits in this configuration section
		  		@ select which UART you want to enable
LDR R0, =GPIOC
	@ set the alternate function for the UART pins (what ever you have selected)
LDR R1, =0x77
STRB R1, [R0, AFRL + 2]

@ modify the mode of the GPIO pins you want to use to enable 'alternate function mode'
LDR R1, [R0, GPIO_MODER]
ORR R1, 0xA00 @ Mask for pins to change to 'alternate function mode'
STR R1, [R0, GPIO_MODER]

@ modify the speed of the GPIO pins you want to use to enable 'high speed'
LDR R1, [R0, GPIO_OSPEEDR]
ORR R1, 0xF00 @ Mask for pins to be set as high speed
STR R1, [R0, GPIO_OSPEEDR]

@ Set the enable bit for the specific UART you want to use
@ Note: this might be in APB1ENR or APB2ENR
@ you can find this out by looking in the datasheet
LDR R0, =RCC @ the base address for the register to turn clocks on/off
LDR R1, [R0, #APB2ENR] @ load the original value from the enable register
ORR R1, 1 << UART_EN  @ apply the bit mask to the previous values of the enable the UART
STR R1, [R0, #APB2ENR] @ store the modified enable register values back to RCC

@ this is the baud rate
MOV R1, #0x46 @ from our earlier calculations (for 8MHz), store this in register R1
LDR R0, =UART @ the base address for the register to turn clocks on/off
STRH R1, [R0, #USART_BRR] @ store this value directly in the first half word (16 bits) of
						  	 @ the baud rate register

@ we want to set a few things here, lets define their bit positions to make it more readable
LDR R0, =UART @ the base address for the register to set up the specified UART
LDR R1, [R0, #USART_CR1] @ load the original value from the enable register
ORR R1, 1 << UART_TE | 1 << UART_RE | 1 << UART_UE @ make a bit mask with a '1' for the bits to enable,
												   @ apply the bit mask to the previous values of the enable register

STR R1, [R0, #USART_CR1] @ store the modified enable register values back to RCC

BX LR @ return
The task 3A is to test transmitting using USART1, this is done by running the transmit operation after pressing the push-button.
tx_loop:
	LDR R0, =UART
	LDR R3, =tx_string // Load in user string to R3
	LDR R4, =tx_length
	LDR R4, [R4]
tx_uart:
	LDR R5 , [R0, USART_ISR]
	ANDS R5 , 1 << UART_TXE // Check if transmission
	BEQ tx_uart // If nothing to transmit, loop
	LDRB R1, [R3], #1 // Load first bit of string on R1
	STRB R1, [R0, USART_TDR] // Transmit R1 through USART
	SUBS R4, #1
	BGT tx_uart //If the complete string is not transmitted, complete the next word
	BL delay_loop
	B tx_loop //If the complete string is transmitted, restart
- Input- The tx_string is the input that will be sent to the receiver, Button presses iterate transmit.
- Output- The word will appear on the terminal
- Testing- Once the button is pressed and minicom/putty is operational, if the word appears after pressing the button, and the word is the same as the string typed. Code is functioning as expected
STM32 microcontrollers to receive a string of characters via UART, store the received characters in a buffer, and terminate the reading process upon encountering a user-defined terminating character.
Polling USART1's status register (USART_ISR) to check for new data and errors.
If the receive buffer is not empty (UART_RXNE bit is set), the received character is loaded from USART_RDR.
loop_forever:
	LDR R0, =USART1 @ the base address for the register to set up UART
	LDR R1, [R0, USART_ISR] @ load the status of the UART

	TST R1, 1 << UART_ORE | 1 << UART_FE  @ 'AND' the current status with the bit mask that we are interested in
	BNE clear_error

	TST R1, 1 << UART_RXNE @ 'AND' the current status with the bit mask that we are interested in
	BEQ loop_forever @ loop back to check status again if the flag indicates there is no byte waiting

	LDRB R3, [R0, USART_RDR] @ load the lowest byte (RDR bits [0:7] for an 8 bit read)
	LDR R9, =terminating_char
	LDRB R9, [R9]
	CMP R9, R3
	BEQ finished_everything

	CMP R7, R8
	BGT no_reset
	MOV R8, 0x00
The code checks for the presence of any information that might have been transmitted and is ready to be received, if there isn't any
- Input: The transmitted string from putty
- output: LED representation of the hex values of the letters being transmitted
- testing: The board is connected to putty, and words are typed slow enough that the change in hex pattern of LED's are visible, if the patterns are repeatable and changing along the user's typing; Code functions properly.
This task outlines the procedure to change the clock source of the microcontroller to an external high-speed oscillator (HSE) and adjust the baud rate register accordingly. This ensures that the microcontroller can maintain communication with another device at the same baud rate even after the clock source change.
In order to use an external high-speed clock, the system clock needs to be switched to HSE. The following is the setup code:
change_clock_speed:
	@ step 1, set clock to HSE (the external clock)
	@ enable HSE (and wait for complete)
	LDR R0, =RCC @ the base address for the register to turn clocks on/off
	LDR R1, [R0, #RCC_CR] @ load the original value from the enable register
	LDR R2, =1 << HSEBYP | 1 << HSEON @ make a bit mask with a '1' in the 0th bit position
	ORR R1, R2 @ apply the bit mask to the previous values of the enable register
	STR R1, [R0, #RCC_CR] @ store the modified enable register values back to RCC
	@ wait for the changes to be completed
- Test: Check whether there is normal transmission between the two boards
Combining the transmission and receiving functions using two separate boards is just the combination of the two codes shown. This is done by connecting the transmit board's PC10 pin to the PC11 pin of the receiving board, the signal is transferred under the same ground voltage.
- Input: Transmitted signal from transmitter board, button pressed to send the message.
- output: Both boards show LED ascii patterns of the letters being transferred
Port forwarding is the act of receiving data from a pre-defined protocol, for example USART1 from a PC to the microcontroller, and transmitting that data in a completely different protocol such as UART4. This is done by enabling both the UARTs and storing the buffer on the board.
waitReceive_transmit:
	LDR R3, =UART4_Rxbuffer         // Load Rx buffer address
	LDR R4, =UART4_Rxcounter        // Load address of Rx counter
	LDR R4, [R4]                    // Dereference Rx counter
	MOV R5, #0x00

receive:
 	LDR R0, =UART4
	LDR R1, [R0, #USART_ISR]
	ANDS R1, 1 << UART_RXNE    // Check RXNE bit to see if new data is available in the receive buffer
	BEQ receive   // If RXNE=0 (no new data), loop back
	LDR R1, [R0, #USART_RDR]  // Read data from receive buffer
	STRB R1, [R3, R5]         // Save to UART4_Rxbuffer
	ADD R5, #1
	CMP R1,#TERMINATING_CHAR
    BEQ prepareTransmit   // If terminating character received, prepare to transmit
	CMP R4, R5
	BGT receive            // If Rx buffer is not full, keep receiving
The data is received in UART4, and transmitted in USART1
prepareTransmit:
	LDR R3, =UART4_Rxbuffer         // Load Rx buffer address
transmit:
	LDR R0, =USART1
	LDR R1, [R0, #USART_ISR]  // Load status register
	ANDS R1, 1 << UART_TXE    // Check if transmit data register is empty
	BEQ transmit              // Loop until it is empty
	LDRB R6, [R3], #1         // Load next character to transmit and increment pointer
	STRB R6, [R0, #USART_TDR] // Transmit the character
	SUBS R5, #1               // Decrement character count
	BGT transmit              // If more characters to send, loop back
	CMP R6, #TERMINATING_CHAR
    BEQ waitReceive_transmit    // If terminating character transmitted, loop back to receive
	B waitReceive_transmit         // Start all over again
- Input: Data from the transmittion board, received as UART4
- Output: USART1 of the same string onto the PC
- Testing: Connect the boards as 3D, press the button on the transmitting board, the light patterns of the board reflect the hex value of the character. The data is re-transmitted using USART to putty and must have the same string as the one that was originally transmitted
The task requires the DELAY TIME to be set to any microsecond, we chose 1 microsecond here. If we want the delay time to be 1 microsecond, we need to set the prescaler to 7, so that the clock frequency can be reduced from the original 8MHz to 1MHz, and then the delay time will be 1 microsecond. Here is the code to set the prescaler.
           1|// set prescaler to 7, so that the frequency of clock 8MHz/(1+7) = 1MHz,
           2|// delay period is 1/1MHz = 1 microsecond
           3|LDR R0, =TIM2 @ load the base address for the timer
           3|MOV R1, #0x07 @ put a prescaler in R1
           4|STR R1, [R0, TIM_PSC] @ set the prescaler register
In the delay function, R2 is responsible for fetching the present number of the CNT and comparing it with the number set by R1, and if it does not exceed R1 then the delay continues delay:
           1|// set prescaler to 7, so that the frequency of clock
           LDR R1, =5000000
           LDR R2, [R0, TIM_CNT]  // read current time
           @ if R1 > R2, continue delay
           CMP R1, R2
           BGT delay
- Input: There is no input
- Output: There is no output just a delay function
- Test: After 5s, all led light.
This task requires the use of a hardware timer with a delay period of 0.1 milliseconds set by the prescaler setting, which has a delay time of 1s. Here is the code to set the prescaler.
           @ set prescaler to 7, so that the frequency of clock 8MHz/(1+7) = 1MHz, delay period is 1/1MHz = 1 microsecond
           @ set prescaler to 799(31F), so that the frequency of clock 8MHz/(1+799) = 10000Hz, delay period is 1/10000Hz = 1 ms
           @ set prescaler to 7999999(0x7A11FF), so that the frequency of clock 8MHz/(1+7999999) = 1Hz, delay period is 1/1Hz = 1 s
           @ set prescaler to 2.85e10, so that the frequency of clock 8MHz/(1+2.85e10) = 0.00028Hz, delay period is 1/0.00028Hz = 3600 s = 1 h
           LDR R0, =TIM2 @ load the base address for the timer
           MOV R1, #0x31F @ put a prescaler in R1
           STR R1, [R0, TIM_PSC] @ set the prescaler register
In the delay function, R2 is responsible for fetching the present number of the CNT and comparing it with the number set by R1, and if it does not exceed R1 then the delay continues delay:
           LDR R1, =10000
           LDR R2, [R0, TIM_CNT]  // read current time
           @ if R1 > R2, continue delay
           CMP R1, R2
           BGT delay
- Input: The delay time and delay period can be changed by changing the parameters of the prescaler setting or the number set by R1.
- Output: one second delay
- Test: See if the led will keep blinking at a frequency of one second.
This task requires us to make a more accurate delay function, by using TIMx_ARR. Here is the code to set up TIMx_ARR. Note that the settings for prescaler and TIMx_ARR need to be set before TIMx_ARR enable.
Setting prescaler:
           LDR R0, =TIM2  @ load the base address for the timer
           MOV R1, #0x31F @ put a prescaler in R1
           STR R1, [R0, TIM_PSC] @ set the prescaler register
           Setting TIMx_ARR:
           LDR R0, =TIM2  @ load the base address for the timer
           LDR R1, =10000 @ make the timer overflow after counting to 10000
           STR R1, [R0, TIM_ARR] @ set the ARR register

           LDR R8, =0x00
           STR R8, [R0, TIM_CNT] @ reset the clock
           Enable counter and ARR:
           // enable the counter and ARR
           LDR R0, =TIM2  @ load the base address for the timer
           LDR R1, [R0, #TIM_CR1] @ load the current value of the TIM2 value
           ORR R1, 1 << 0 | 1 << 7 // 0st bit is enable CEN, 7 is APRE
           STR R1, [R0, #TIM_CR1] @ enable the counter and ARR
- Input: The delay time and delay period can be changed by changing the parameters of the prescaler setting or the number set by R1.
- Output: a very accurate 1s delay
- Test: See if the LED lights up for one second and turns off for one second, in a cycle like this.
The integration package runs with 2 assembly functions, one for transmission and the other for receival. It also includes initialisation and definitions files that initialize the necessary GPIO ports and clocks for USART1, UART4 and LEDs.
The transmission on board one takes in USART1 serial input through “usart_receive”, and stores it as a string in a buffer. As the input is typed on a PC, the LEDs can be seen flashing the ASCII value of the character in binary. When a user-defined terminating character is received, the code flows to the encoding loop.
usart_receive:
	LDR R9, =terminating_char
	LDRB R9, [R9]
	STRB R3, [R6, R8] //store received val in buffer
	CMP R9, R3 //compare received val to terminating char
	BEQ initiate_encode
In “initiate_encode”, the encoding process is identical to the one mentioned in 1C. The string is iterated through and every character is mapped to a corresponding substitution character, and overwritten. When the terminating character is identified, it flows to UART4 transmission.
In “initiate_transmit”, the start of the transmission is communicated to the user through all the LEDs turning on.
As the buffer is iterated through, every byte is iteratively stored in the USART transmit register and transmitted through PC10. The letter being transmitted is displayed on the LEDs in binary.
transmit:
	LDRB R3, [R6, R9] //load the byte in r3
	LDR R0, =UART4
	STRB R3, [R0, #USART_TDR] // Transmit the character
	LDR R10, =GPIOE
	STRB R3, [R10, #ODR +1] //display char on LED

BL delay_loop
	LDR R12, =terminating_char
	LDRB R12, [R12]
	CMP R12, R3
	BEQ transmit_complete
	ADD R9, #1
	B transmit
- Input: USART1 input, characters through PuTty
- Output: encoded UART4 character transmission
- Testing: LEDs to check ASCII values, if transmission is initialised LEDs flash, every transmitted char is displayed on LEDs
On board 2, data is received in UART4 serial through PC11, and stored in a buffer, through “uart_receive”.
uart4_receive:
	LDRB R3, [R0, USART_RDR] @ load the lowest byte (RDR bits [0:7] for an 8 bit read)
	STRB R3, [R6, R8] //store received val in buffer
	LDR R9, =GPIOE
	STRB R3, [R9, #ODR +1] //display on led
	LDR R9, =terminating_char
	LDRB R9, [R9]
	CMP R9, R3
	BEQ initiate_decode
Each character received is displayed on the LEDs. Once the terminating character is received, the code flows to the decoding function.
Similar to encoding and task 1c, the decoder simply iterates through the buffer, finds the character in the substitution table, and finds the corresponding character in the alphabet table. Finally, it overwrites the buffer. When the terminating character is reached, USART1 transmission begins.
transmit:
	LDRB R3, [R6, R9] //load the byte in r3
	STRB R3, [R0, #USART_TDR] // Transmit the character
	LDR R10, =GPIOE
	STRB R3, [R10, #ODR +1] //display char on LED
	BL delay_loop
Every transmitted character is displayed on the LEDs. As transmission occurs, each letter is displayed on a USART1 receiver, with PuTty being used to test.
Finally, once the terminating character is transmitted, the code proceeds to count the iteration of every alphabet in the string, as in task 2d. These are displayed on the LEDs with a 500ms delay using a hardware timer with a prescaler.
trigger_prescaler:
	@ Use (TIMx_EGR) instead (to reset the clock)
	@ This is a hack to get the prescaler to take affect
	@ the prescaler is not changed until the counter overflows
	@ the TIMx_ARR register sets the count at which the overflow
	@ happens. Here, the reset is triggered and the overflow
	@ occurs to make the prescaler take effect.
	@ you should use a different approach to this !
	@ In your code, you should be using the ARR register to
	@ set the maximum count for the timer
	@ store a value for the prescaler
	LDR R0, =TIM2  @ load the base address for the timer
	LDR R1, =5000 @ make the timer overflow after counting to 20000
- Input: encoded UART4 character transmission
- Output: LED pattern of the count of letters
- Testing: LEDs show the count of the decoded alphabets at the required delay in the specifications
The group of 4 people:
- Vivaan Chawla [510401472]
- Angad Chawla [520455542]
- Jason Zhou [510068345]
- Chenguxan Cai [500011665]
