Code Monkey home page Code Monkey logo

fullstack-nanodegree-vm's Introduction

Full Stack Web Developer Nanodegree program virtual machine

Udacity logo

Virtual machine for the Relational Databases and Full Stack Foundations courses in the Full Stack Web Developer Nanodegree program

Table of Contents

Intro

In the next part of this course, you'll use a virtual machine (VM) to run an SQL database server and a web app that uses it. The VM is a Linux server system that runs on top of your own computer. You can share files easily between your computer and the VM; and you'll be running a web service inside the VM which you'll be able to access from your regular browser.

We're using tools called Vagrant and VirtualBox to install and manage the VM. You'll need to install these to do some of the exercises. The instructions on this page will help you do this.

Conceptual overview

This video offers a conceptual overview of virtual machines and Vagrant. You don't need to watch it to proceed, but you may find it informative.

Use a terminal

You'll be doing these exercises using a Unix-style terminal on your computer. If you are using a Mac or Linux system, your regular terminal program will do just fine. On Windows, we recommend using the Git Bash terminal that comes with the Git software. If you don't already have Git installed, download Git from git-scm.com.

For a refresher on using the Unix shell, look back at our Shell Workshop.

If you'd like to learn more about Git, take a look at our course about Git.

Installation

Install VirtualBox

VirtualBox is the software that actually runs the virtual machine. You can download it from virtualbox.org, here. Install the platform package for your operating system. You do not need the extension pack or the SDK. You do not need to launch VirtualBox after installing it; Vagrant will do that.

Currently (October 2017), the supported version of VirtualBox to install is version 5.1. Newer versions do not work with the current release of Vagrant.

Ubuntu users: If you are running Ubuntu 14.04, install VirtualBox using the Ubuntu Software Center instead. Due to a reported bug, installing VirtualBox from the site may uninstall other software you need.

Install Vagrant

Vagrant is the software that configures the VM and lets you share files between your host computer and the VM's filesystem. Download it from vagrantup.com. Install the version for your operating system.

Windows users: The Installer may ask you to grant network permissions to Vagrant or make a firewall exception. Be sure to allow this.

vagrant --version

If Vagrant is successfully installed, you will be able to run vagrant --version in your terminal to see the version number. The shell prompt in your terminal may differ. Here, the $ sign is the shell prompt.

Download the VM configuration

Use Github to fork and clone, or download, the repository https://github.com/udacity/fullstack-nanodegree-vm.

You will end up with a new directory containing the VM files. Change to this directory in your terminal with cd. Inside, you will find another directory called vagrant. Change directory to the vagrant directory:

vagrant-directory

Navigating to the FSND-Virtual-Machine directory and listing the files in it. This picture was taken on a Mac, but the commands will look the same on Git Bash on Windows.

Instructions

Start the virtual machine

From your terminal, inside the vagrant subdirectory, run the command vagrant up. This will cause Vagrant to download the Linux operating system and install it. This may take quite a while (many minutes) depending on how fast your Internet connection is.

vagrant-up-start

Starting the Ubuntu Linux installation with vagrant up. This screenshot shows just the beginning of many, many pages of output in a lot of colors.

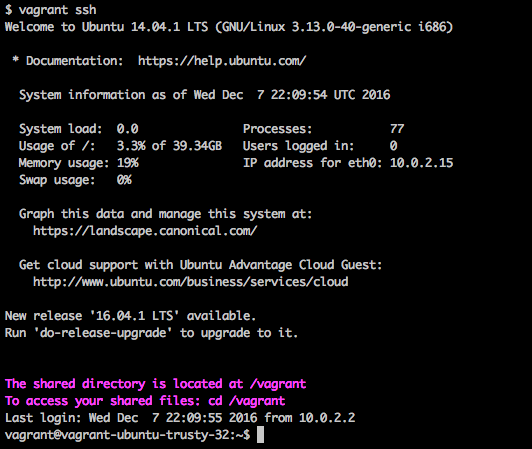
When vagrant up is finished running, you will get your shell prompt back. At this point, you can run vagrant ssh to log in to your newly installed Linux VM!

linux-vm-login

Logging into the Linux VM with vagrant ssh.

Logged in

If you are now looking at a shell prompt that starts with the word vagrant (as in the above screenshot), congratulations — you've gotten logged into your Linux VM.

If not, take a look at the Troubleshooting section below.

The files for this course

Inside the VM, change directory to /vagrant and look around with ls.

The files you see here are the same as the ones in the vagrant subdirectory on your computer (where you started Vagrant from). Any file you create in one will be automatically shared to the other. This means that you can edit code in your favorite text editor, and run it inside the VM.

Files in the VM's /vagrant directory are shared with the vagrant folder on your computer. But other data inside the VM is not. For instance, the PostgreSQL database itself lives only inside the VM.

Running the database

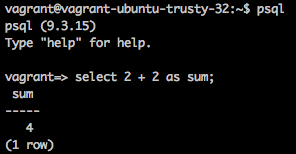
The PostgreSQL database server will automatically be started inside the VM. You can use the psql command-line tool to access it and run SQL statements:

linux-vm-PostgreSQL

Running psql, the PostgreSQL command interface, inside the VM.

Logging out and in

If you type exit (or Ctrl-D) at the shell prompt inside the VM, you will be logged out, and put back into your host computer's shell. To log back in, make sure you're in the same directory and type vagrant ssh again.

If you reboot your computer, you will need to run vagrant up to restart the VM.

Troubleshooting

I'm not sure if it worked

If you can type vagrant ssh and log into your VM, then it worked! It's normal for the vagrant up process to display a lot of text in many colors, including sometimes scary-looking messages in red, green, and purple. If you get your shell prompt back at the end, and you can log in, it should be OK.

vagrant up is taking a long time

Because it's downloading a whole Linux operating system from the Internet.

I'm on Windows, and when I run vagrant ssh, I don't get a shell prompt

Some versions of Windows and Vagrant have a problem communicating the right settings for the terminal. There is a workaround: Instead of vagrant ssh, run the command winpty vagrant ssh instead.

I'm on Windows and getting an error about virtualization

Sometimes other virtualization programs such as Docker or Hyper-V can interfere with VirtualBox. Try shutting these other programs down first.

In addition, some Windows PCs have settings in the BIOS or UEFI (firmware) or in the operating system that disable the use of virtualization. To change this, you may need to reboot your computer and access the firmware settings. A web search can help you find the settings for your computer and operating system. Unfortunately there are so many different versions of Windows and PCs that we can't offer a simple guide to doing this.

Why are we using a VM, it seems complicated

It is complicated. In this case, the point of it is to be able to offer the same software (Linux and PostgreSQL) regardless of what kind of computer you're running on.

I got some other error message

If you're getting a specific textual error message, try looking it up on your favorite search engine. If that doesn't help, take a screenshot and post it to the discussion forums, along with as much detail as you can provide about the process you went through to get there.

If all else fails, try an older version

Udacity mentors have noticed that some newer versions of Vagrant don't work on all operating systems. Version 1.9.2 is reported to be stabler on some systems, and version 1.9.1 is the supported version on Ubuntu 17.04. You can download older versions of Vagrant from the Vagrant releases index.

Supporting Materials

Virtual machine repository on GitHub

(Back to TOC)

fullstack-nanodegree-vm's People

Contributors

abdennour avatar alzubaiditurki avatar forbiddenvoid avatar karlud avatar lobrown avatar pmallory avatar runar-rkmedia avatar stevewooding avatar sudkul avatar wcouturiaux avatar

Stargazers

 avatar  avatar  avatar  avatar  avatar  avatar  avatar  avatar  avatar  avatar  avatar  avatar  avatar  avatar  avatar  avatar  avatar  avatar  avatar  avatar  avatar  avatar  avatar  avatar  avatar  avatar  avatar  avatar  avatar  avatar  avatar  avatar  avatar  avatar  avatar  avatar  avatar  avatar  avatar  avatar  avatar  avatar  avatar  avatar  avatar  avatar  avatar  avatar  avatar  avatar  avatar  avatar  avatar  avatar  avatar  avatar  avatar  avatar  avatar  avatar  avatar  avatar  avatar  avatar  avatar  avatar  avatar  avatar  avatar  avatar  avatar  avatar  avatar  avatar  avatar  avatar  avatar  avatar  avatar  avatar  avatar  avatar  avatar  avatar  avatar  avatar  avatar  avatar  avatar  avatar  avatar  avatar  avatar  avatar  avatar  avatar  avatar  avatar  avatar  avatar

Watchers

 avatar  avatar  avatar  avatar  avatar  avatar  avatar  avatar  avatar  avatar  avatar  avatar  avatar  avatar  avatar  avatar  avatar  avatar  avatar  avatar  avatar  avatar  avatar  avatar  avatar  avatar  avatar  avatar  avatar  avatar  avatar

fullstack-nanodegree-vm's Issues

cannot see api_server.py

Hi

I am relatively newer to this HTTP server config. (if right phrase to start with), however was able to get to the step

  • vagrant ssh
    however I don't see anywhere "api_server.py" file so could carry out the Lesson2:5th section (Sending API Requests),

Could someone guide me along,

thanks

Steps carried out so far (apart from some good troubleshooting :) )

...........

  1. git clone http://github.com/udacity/fullstack-nanodegree-vm fullstack
  2. cd fullstack/vagrant
  3. vagrant up
  4. vagrant ssh
  5. ls
    Inside ALL I see:
  • API (directory that I created 'manually' after comming in SSH)
  • fullstack (directory)
  • redis-stable (directory)
  • redis-stable.tar.gz

NO "api_server.py" file

Forking not working

I am clicking on the fork but nothing appears except a spinner. Its been like 4 days no luck so far. I there anyonther way to do it.

I tried to fork in Safari, Chrome, Firefox and incognito mode.

Also is it mandatory to do it this way? Can I only clone for now to get started because forking has wasted my 4 days.

can't vargant up

C:\Users\Hima\fullstack>vagrant up
Bringing machine 'default' up with 'virtualbox' provider...
==> default: Box 'base' could not be found. Attempting to find and install...
default: Box Provider: virtualbox
default: Box Version: >= 0
==> default: Box file was not detected as metadata. Adding it directly...
==> default: Adding box 'base' (v0) for provider: virtualbox
default: Downloading: base
default:
An error occurred while downloading the remote file. The error
message, if any, is reproduced below. Please fix this error and try
again.

Couldn't open file /C:/Users/Hima/fullstack/base

any suggestions ?

Unable to access shared folders in VM

After following instructions and spending several hours of trying to track down how to make shared folders work between the VM and my machine, I am unable to see the shared folders on the VM that are located inside my vagrant folder on my local machine. I am currently running Yosemite on my MBP, and my virtual box version is 4.3.22. I also tried installing the vagrant plugin "vagrant-vbguest" to no avail.

vagrant up

Please help. I don't know what I am doing wrong.
The version of Vagrant I installed was 2.2.3 and I am running version 6.3 of Windows 8.
Let me copy below what I wrote into git bash and what the result was.

I WROTE:
yishai and shira vagrant $ vagrant up

THE RESULT WAS:
Bringing machine 'default' up with 'virtualbox' provider...
==> default: Box 'bento/ubuntu-16.04' could not be found. Attempting to find and install...
default: Box Provider: virtualbox
default: Box Version: = 2.3.5
The box 'bento/ubuntu-16.04' could not be found or
could not be accessed in the remote catalog. If this is a private
box on HashiCorp's Vagrant Cloud, please verify you're logged in via
vagrant login. Also, please double-check the name. The expanded
URL and error message are shown below:

URL: ["https://vagrantcloud.com/bento/ubuntu-16.04"]
Error: SSL certificate problem: unable to get local issuer certificate

Getting Import errors when running pip install requests on a vagrant box and errors on pip itself

Refer to my code base and the vagrant file in the below link. @br3ndonland

github link

Vagrant version:vagrant_2.2.16
VirtualBox vesion:6.1.22

when creating the VM from the vagrant file i can see there are errors popping out. there for i had run the necessary installation steps as shown on different issues raised in stack overflow.

after creating the vagrant vm i logged in to the vm and ran the following from sqlalchemy import create_engine code in python.

and i get the following error.

Traceback (most recent call last): File "<stdin>", line 1, in <module> ImportError: No module named sqlalchemy

when i try to install sqlalchemy with pip install sqlalchemy i get the following error.

Traceback (most recent call last): File "/usr/local/bin/pip", line 7, in <module> from pip._internal.cli.main import main File "/usr/local/lib/python2.7/dist-packages/pip/__init__.py", line 1, in <module> from typing import List, Optional ImportError: No module named typing

And i'm unable to install typing.
Following a suggestion on github i ran the following code vagrant plugin install vagrant-vbguest and ran vagrant reload command but i am still getting the same issue as above.

Other than the above i also tried to upgrade the full set to python 3 and many other suggestion on the web such as uninstalling and reinstalling versions of vb guest but i cant seem to find any solution.

apt-get update and apt-get upgrade do not get run

Hello,

In the new version of the Vagrantfile, there are these lines that are suppose to update the VM:

apt-get update
apt-get upgrade

However, without the -y option, these command wait for user input, then defaults to not doing anything. It would be probably best to use the options that were in the old pg_config.sh to fix this:

apt-get -qqy update
apt-get -qqy upgrade

This will keep things quiet and run the commands.

Let me know if you want me to file a pull request.

Regards,

Steve.

can not vagrant up

$ vagrant up
Bringing machine 'default' up with 'virtualbox' provider...
==> default: Box 'bento/ubuntu-16.04-i386' could not be found. Attempting to fin d and install...
default: Box Provider: virtualbox
default: Box Version: = 2.3.5
==> default: Loading metadata for box 'bento/ubuntu-16.04-i386'
default: URL: https://vagrantcloud.com/bento/ubuntu-16.04-i386
==> default: Adding box 'bento/ubuntu-16.04-i386' (v2.3.5) for provider: virtual box
default: Downloading: https://vagrantcloud.com/bento/boxes/ubuntu-16.04-i386 /versions/2.3.5/providers/virtualbox.box
default:
An error occurred while downloading the remote file. The error
message, if any, is reproduced below. Please fix this error and try
again.

Failed to connect to vagrantcloud-files-production.s3.amazonaws.com port 443: Ti med out

couldn't vagrant up

I cloned the repository to my PC, and runvagrant up in Git Bash, but I got this message:

Vagrant cannot forward the specified ports on this VM, since they
would collide with some other application that is already listening
on these ports. The forwarded port to 8000 is already in use
on the host machine.

To fix this, modify your current project's Vagrantfile to use another
port. Example, where '1234' would be replaced by a unique host port:

  config.vm.network :forwarded_port, guest: 8000, host: 1234

What can I do to kill this error?

vagrant up not working

i get this message when i try to use vagrant ssh although i already did vagrant up
"VM must be created before running this command. Run vagrant up first."
capture
is there any one who can help?

I can't launch a vm using vagrant and I'm stuck on my tutorial.

I'm on ubuntu 22.04, and I can't deploy my vm (bento/ubuntu-21.04).
When I run the vagrant up command, I get this error:
No usable default provider could be found for your system.

Vagrant relates on interactions with 3rd party systems, known as
"providers", to provide Vagrant with resources to run development
environments. Examples are VirtualBox, VMware, Hyper-V.

The easiest solution to this message is to install VirtualBox, which
is available for free on all major platforms.

If you believe you already have a provider available, make sure it
is properly installed and configured. You can see more details about
why a particular provider isn't working by forcing usage with
vagrant up --provider=PROVIDER, which should give you a more specific
error message for that particular provider.
When I enter the command vagrant up --provider=virtualbox I get this error:
The provider 'virtualbox' that was requested to back the machine
'default' is reporting that it isn't usable on this system. Tea
reason is shown below:

VirtualBox is complaining that the installation is incomplete. Please
run VBoxManage --version to see the error message which should contain
instructions on how to fix this error.
I have an error of incomplete installation of virtualbox and when I type VBoxManage --version, I have:
WARNING: The character device /dev/vboxdrv does not exist.
Please install the virtualbox-dkms package and the appropriate
headers, most likely linux-headers-generic.

You will not be able to start VMs until this problem is fixed.
6.1.38_Ubuntur153438
I installed the headers with this command: sudo apt-get install linux-headers-$( uname -r ) build-essential dkms

Not able to use 'psql' command in the virtual machine.

I'm working on the free Introduction to Relational Databases course, and I am stuck on the last section of the second module (Elements of SQL > Installing the Virtual Machine).

In the explanation it says I need to instal Vagrant and VirtualBox to set up a virtual machine and run PostgreSQL:

Installing the Virtual Machine

In the next part of this course, you'll use a virtual machine (VM) to run an SQL database server and a web app that uses it. The VM is a Linux server system that runs on top of your own computer. You can share files easily between your computer and the VM; and you'll be running a web service inside the VM which you'll be able to access from your regular browser.

We're using tools called Vagrant and VirtualBox to install and manage the VM. You'll need to install these to do some of the exercises. The instructions on this page will help you do this.

I am able to install both of these, and they run fine. The version of Vagrant is 2.3.4 and the version of VirtualBox is 7.0.4r154605.

Further down the page, it clearly states that the PostgreSQL server should be automatically available in the VM:

The files for this course

Inside the VM, change directory to /vagrant and look around with ls*.*

The files you see here are the same as the ones in the vagrant subdirectory on your computer (where you started Vagrant from). Any file you create in one will be automatically shared to the other. This means that you can edit code in your favorite text editor, and run it inside the VM.

Files in the VM's /vagrant directory are shared with the vagrant folder on your computer. But other data inside the VM is not. For instance, the PostgreSQL database itself lives only inside the VM.

Running the database

The PostgreSQL database server will automatically be started inside the VM*. You can use the* psql command-line tool to access it and run SQL statements:

[IMAGE OF PSQL RUNNING IN THE VIRTUAL MACHINE]

[IMG CAPTION]Running psql*, the PostgreSQL command interface, inside the VM.*

Here is where I run into a problem. I don't think it is actually installing or running PostgreSQL. When I type the 'psql' command, the commandline returns the following:

vagrant@vagrant:/vagrant$ psql
-bash: psql: command not found

Am I missing something? Was I supposed to install PostgreSQL myself? When I tried installing it myself, I could only install it on the local machine and don't know how to do so on the virtual machine...

Typo in Kevitsa DC Forward Similation

performed is misspelled in the first line of the paragraph under the survey heading.

Survey
Direct current (DC) resisistivity and IP survey have been perforemd by using Titan24

Forum crashes on empty post

In forum.py, it seems that POST() is trying to check if the post contains no content, and avoid saving it in that case, however when submitting a blank post, I get the following error, which would suggest that the empty post checking is failing.

Traceback (most recent call last):
  File "/usr/lib/python2.7/wsgiref/handlers.py", line 85, in run
    self.result = application(self.environ, self.start_response)
  File "forum.py", line 95, in Dispatcher
    return DISPATCH[page](env, resp)
  File "forum.py", line 73, in Post
    content = fields['content'][0]

Incorrect Vagrantfile

Please, take a look on this topic: https://discussions.udacity.com/t/incorrect-vagrantfile/651521
Copy of message:
"Please, update your archive FSND-Virtual-Machine.zip with actual Vagrantfile. This archive is stored there: https://d17h27t6h515a5.cloudfront.net/topher/2017/August/59822701_fsnd-virtual-machine/fsnd-virtual-machine.zip and link to it I found on this page: Lesson 2: Elements of SQL, 17. Installing the Virtual Machine, section Download the VM configuration.
Problem with this file that it lead to an error when you try vagrant up (“bento/ubuntu… could not be found”).

I found the solution by changing this Vagrantfile with the one which is on the github page https://github.com/udacity/fullstack-nanodegree-vm/tree/master/vagrant"

local host refused to connect

my file is working fine but when i open my browser while forum.py is running local host refuses to connect on the same port
firewall turned off

Only Python3 packages are getting installed - not Python2 ones

Hi Karl,

Unfortunately with Ubuntu 16.04, the pip command installs the Python3 packages, so it is the same as running pip3.

To install Python2 packages, the command pip2 needs to be run. So you could change this section of the Vagrantfile to:

    apt-get -qqy install python python-pip
    pip2 install --upgrade pip
    pip2 install flask packaging oauth2client redis passlib flask-httpauth
    pip2 install sqlalchemy flask-sqlalchemy psycopg2 bleach

Though strangely, a side affect after these commands is that pip then points to Python2 afterwards. Not sure why that would be.

Regards,

Steve.

Could not vagrant up

Do I have to log in? When I want to sign up, I found there is no way to do that.

image

Command `python` does not work

Hello,

With Ubuntu 16, Python 2 is not installed out of the box. From the use of pip3 in the latest Vagrantfile, it seems the move to Python 3 is deliberate. However, the videos in the Tournament project still refer to the python command, which is not present on the system, as Python2 is not installed by default.

If we are moving to Python 3, then this extra line in the Vagrantfile would fix the issue of the missing python command:

update-alternatives --install /usr/bin/python python /usr/bin/python3 1

An insight to the thinking behind the latest changes might be useful.

Cheers,

Steve.

flask needed

i am trying to run forum.py file in both the VM and localy but it shows the following error:

File "forum.py", line 5, in
from flask import Flask, request, redirect, url_for
ImportError: No module named flask

should i install flask, and how i can do that?

can not vagrant up: vboxmange error

There was an error while executing `VBoxManage`, a CLI used by Vagrant
for controlling VirtualBox. The command and stderr is shown below.

Command: ["startvm", "ce1968e4-92d7-4daa-9bf9-18e78b40fb96", "--type", "headless"]

Stderr: VBoxManage: error: The virtual machine 'vagrant_default_1513317478781_12036' has terminated unexpectedly during startup with exit code 1 (0x1)
VBoxManage: error: Details: code NS_ERROR_FAILURE (0x80004005), component MachineWrap, interface IMachine

anyone solve this issue? I tried different versions of vagrant and virtualbox with no success.

Could not resolve host

It seems that the url is not valid anymore?

`$~/Downloads/DS/Udacity_DB_course/vagrant$ vagrant up
Bringing machine 'default' up with 'virtualbox' provider...
==> default: Box 'bento/ubuntu-16.04' could not be found. Attempting to find and install...
default: Box Provider: virtualbox
default: Box Version: = 2.3.5
==> default: Loading metadata for box 'bento/ubuntu-16.04'
default: URL: https://vagrantcloud.com/bento/ubuntu-16.04
==> default: Adding box 'bento/ubuntu-16.04' (v2.3.5) for provider: virtualbox
default: Downloading: https://vagrantcloud.com/bento/boxes/ubuntu-16.04/versions/2.3.5/providers/virtualbox.box
default: Download redirected to host: vagrantcloud-files-production.s3.amazonaws.com
An error occurred while downloading the remote file. The error
message, if any, is reproduced below. Please fix this error and try
again.

Could not resolve host: vagrantcloud-files-production.s3.amazonaws.com`

The psycopg2 wheel package will be renamed from release 2.8

Getting the following issue after running the python script that imports psycopg2.

vagrant@vagrant:/vagrant/forum$ python3 test_connection.py 
/usr/local/lib/python3.5/dist-packages/psycopg2/__init__.py:144: UserWarning: The psycopg2 wheel package will be renamed from release 2.8; in order to keep installing from binary please use "pip install psycopg2-binary" instead. For details see: <http://initd.org/psycopg/docs/install.html#binary-install-from-pypi>.
  """)
vagrant@vagrant:/vagrant/forum$ python test_connection.py 
/usr/local/lib/python2.7/dist-packages/psycopg2/__init__.py:144: UserWarning: The psycopg2 wheel package will be renamed from release 2.8; in order to keep installing from binary please use "pip install psycopg2-binary" instead. For details see: <http://initd.org/psycopg/docs/install.html#binary-install-from-pypi>.

The error message is clear. I will fix it and send a PR.

Can not vagrant up

It said
Bringing machine 'default' up with 'virtualbox' provider...
==> default: Box 'ubuntu/trusty32' could not be found. Attempting to find and install...
default: Box Provider: virtualbox
default: Box Version: >= 0
The box 'ubuntu/trusty32' could not be found or
could not be accessed in the remote catalog. If this is a private
box on HashiCorp's Atlas, please verify you're logged in via
vagrant login. Also, please double-check the name. The expanded
URL and error message are shown below:

URL: ["https://atlas.hashicorp.com/ubuntu/trusty32"]
Error:
How to solve it?
Thx

Update readme.md file

Project Title

One Paragraph of project description goes here

Getting Started

These instructions will get you a copy of the project up and run on your local machine for development and testing purposes. See deployment for notes on how to deploy the project on a live system.

Prerequisites

What things you need to install the software and how to install them

Give examples

Installing

A step by step series of examples that tell you to have to get a development end running

Say what the step will be

Give the example

And repeat

until finished

End with an example of getting some data out of the system or using it for a little demo

Running the tests

Explain how to run the automated tests for this system

Break down into end to end tests

Explain what these tests test and why

Give an example

License

This project is licensed under the MIT License - see the LICENSE.md file for details

Acknowledgments

  • Hat tip to anyone who's code was used
  • Inspiration
  • etc

And also you can add contribute.md file which is written in markdown language.

Contributing to the project

Please take a moment to review this document in order to make the contribution
process easy and effective for everyone involved.

Following these guidelines helps to communicate that you respect the time of
the developers managing and developing this open source project. In return,
they should reciprocate that respect in addressing your issue, assessing
changes, and helping you finalize your pull requests.

As for everything else in the project, the contributions to this project are governed by our team.

Bug reports

A bug is a demonstrable problem that is caused by the code in the repository.
Good bug reports are extremely helpful - thank you!

Guidelines for bug reports:

  1. Use the GitHub issue search — check if the issue has already been
    reported.

  2. Check if the issue has been fixed — try to reproduce it using the
    latest master or next branch in the repository.

  3. Isolate the problem — ideally, create a reduced test case.

A good bug report shouldn't leave others needing to chase you up for more
information. Please try to be as detailed as possible in your report. What is
your environment? What steps will reproduce the issue? What OS experiences the
problem? What would you expect to be the outcome? All these details will help
people to fix any potential bugs.

Example:

Short and descriptive example bug report title

A summary of the issue and the browser/OS environment in which it occurs. If
suitable, include the steps required to reproduce the bug.

  1. This is the first step
  2. This is the second step
  3. Further steps, etc.

<url> - a link to the reduced test case

Any other information you want to share that is relevant to the issue being
reported. This might include the lines of code that you have identified as
causing the bug, and potential solutions (and your opinions on their
merits).

Feature requests

Feature requests are welcome. But take a moment to find out whether your idea
fits with the scope and aims of the project. It's up to you to make a strong
case to convince the project's developers of the merits of this feature. Please
provide as much detail and context as possible.

Pull requests

Good pull requests - patches, improvements, new features - are a fantastic
help. They should remain focused in scope and avoid containing unrelated
commits.

Please ask first before embarking on any significant pull request (e.g.
implementing features, refactoring code), otherwise you risk spending a lot of
time working on something that the project's developers might not want to merge
into the project.

For new Contributors

If you never created a pull request before, welcome: tada: : smile: Here is a great tutorial
on how to send one :)

  1. Fork the project, clone your fork,
    and configure the remotes:

    # Clone your fork of the repo into the current directory
    git clone https://github.com/<your-username>/<repo-name>
    # Navigate to the newly cloned directory
    cd <repo-name>
    # Assign the original repo to a remote called "upstream"
    git remote add upstream https://github.com/this projecthq/<repo-name>
  2. If you cloned a while ago, get the latest changes from upstream:

    git checkout master
    git pull upstream master
  3. Create a new topic branch (off the main project development branch) to
    contain your feature, change, or fix:

    git checkout -b <topic-branch-name>
  4. Make sure to update, or add to the tests when appropriate. Patches and
    features will not be accepted without tests. Run npm test to check that all
    tests pass after you've made changes. Look for a Testing section in the
    project’s README for more information.

  5. If you added or changed a feature, make sure to document it accordingly in
    the README.md file.

  6. Push your topic branch up to your fork:

    git push origin <topic-branch-name>
  7. Open a Pull Request
    with a clear title and description.

For Members of the this project Contributors Team

  1. Clone the repo and create a branch

    git clone https://github.com/this projecthq/<repo-name>
    cd <repo-name>
    git checkout -b <topic-branch-name>
  2. Make sure to update, or add to the tests when appropriate. Patches and
    features will not be accepted without tests. Run npm test to check that all tests
    pass after you've made changes. Look for a Testing section in
    the project’s README for more information.

  3. If you added or changed a feature, make sure to document it accordingly in
    the README.md file.

  4. Push your topic branch up to our repo

    git push origin <topic-branch-name>
  5. Open a Pull Request using your branch with a clear title and description.

Optionally, you can help us with these things. But don’t worry if they are too
complicated, we can help you out and teach you as we go :)

  1. Update your branch to the latest changes in the upstream master branch. You
    can do that locally with

    git pull --rebase upstream master

    Afterward, force push your changes to your remote feature branch.

  2. Once a pull request is good to go, you can tidy up your commit messages using
    Git's interactive rebase.
    Please follow our commit message conventions shown below, as they are used by
    semantic-release to automatically
    determine the new version and release to npm. In a nutshell:

Issues

Issue open :
It is not just fun.If there is really the bug or issue or suggestion the create an issue or make a pull request.

vagrant up failed - split: bad URI

I suspect having a path with a space causes this split to fail in vagrant up?

David Kaplita vagrant-crud
$ vagrant.exe up
Bringing machine 'default' up with 'virtualbox' provider...
==> default: Box 'base' could not be found. Attempting to find and install...
default: Box Provider: virtualbox
default: Box Version: >= 0

C:/HashiCorp/Vagrant/embedded/mingw64/lib/ruby/2.4.0/uri/rfc3986_parser.rb:67:in split': bad URI(is not URI?): file:///C:/Users/David Kaplita/Desktop/vagrant-crud/base (URI::InvalidURIError) from C:/HashiCorp/Vagrant/embedded/mingw64/lib/ruby/2.4.0/uri/rfc3986_parser.rb:73:in parse'

    from C:/HashiCorp/Vagrant/embedded/mingw64/lib/ruby/2.4.0/uri/common.rb:231:in `parse'
    from C:/HashiCorp/Vagrant/embedded/gems/2.2.4/gems/vagrant-2.2.4/lib/vagrant/action/builtin/box_add.rb:485:in `metadata_url?'
    from C:/HashiCorp/Vagrant/embedded/gems/2.2.4/gems/vagrant-2.2.4/lib/vagrant/action/builtin/box_add.rb:91:in `block in call'
    from C:/HashiCorp/Vagrant/embedded/gems/2.2.4/gems/vagrant-2.2.4/lib/vagrant/action/builtin/box_add.rb:89:in `map'
    from C:/HashiCorp/Vagrant/embedded/gems/2.2.4/gems/vagrant-2.2.4/lib/vagrant/action/builtin/box_add.rb:89:in `call'
    from C:/HashiCorp/Vagrant/embedded/gems/2.2.4/gems/vagrant-2.2.4/lib/vagrant/action/warden.rb:50:in `call'
    from C:/HashiCorp/Vagrant/embedded/gems/2.2.4/gems/vagrant-2.2.4/lib/vagrant/action/builtin/before_trigger.rb:23:in `call'
    from C:/HashiCorp/Vagrant/embedded/gems/2.2.4/gems/vagrant-2.2.4/lib/vagrant/action/warden.rb:50:in `call'
    from C:/HashiCorp/Vagrant/embedded/gems/2.2.4/gems/vagrant-2.2.4/lib/vagrant/action/builder.rb:116:in `call'
    from C:/HashiCorp/Vagrant/embedded/gems/2.2.4/gems/vagrant-2.2.4/lib/vagrant/action/runner.rb:102:in `block in run'
    from C:/HashiCorp/Vagrant/embedded/gems/2.2.4/gems/vagrant-2.2.4/lib/vagrant/util/busy.rb:19:in `busy'
    from C:/HashiCorp/Vagrant/embedded/gems/2.2.4/gems/vagrant-2.2.4/lib/vagrant/action/runner.rb:102:in `run'
    from C:/HashiCorp/Vagrant/embedded/gems/2.2.4/gems/vagrant-2.2.4/lib/vagrant/action/builtin/handle_box.rb:82:in `handle_box'
    from C:/HashiCorp/Vagrant/embedded/gems/2.2.4/gems/vagrant-2.2.4/lib/vagrant/action/builtin/handle_box.rb:42:in `block in call'
    from C:/HashiCorp/Vagrant/embedded/gems/2.2.4/gems/vagrant-2.2.4/lib/vagrant/action/builtin/handle_box.rb:36:in `synchronize'
    from C:/HashiCorp/Vagrant/embedded/gems/2.2.4/gems/vagrant-2.2.4/lib/vagrant/action/builtin/handle_box.rb:36:in `call'
    from C:/HashiCorp/Vagrant/embedded/gems/2.2.4/gems/vagrant-2.2.4/lib/vagrant/action/warden.rb:50:in `call'
    from C:/HashiCorp/Vagrant/embedded/gems/2.2.4/gems/vagrant-2.2.4/lib/vagrant/action/builtin/before_trigger.rb:23:in `call'
    from C:/HashiCorp/Vagrant/embedded/gems/2.2.4/gems/vagrant-2.2.4/lib/vagrant/action/warden.rb:50:in `call'
    from C:/HashiCorp/Vagrant/embedded/gems/2.2.4/gems/vagrant-2.2.4/lib/vagrant/action/warden.rb:121:in `block in finalize_action'
    from C:/HashiCorp/Vagrant/embedded/gems/2.2.4/gems/vagrant-2.2.4/lib/vagrant/action/warden.rb:50:in `call'
    from C:/HashiCorp/Vagrant/embedded/gems/2.2.4/gems/vagrant-2.2.4/lib/vagrant/action/builder.rb:116:in `call'
    from C:/HashiCorp/Vagrant/embedded/gems/2.2.4/gems/vagrant-2.2.4/lib/vagrant/action/runner.rb:102:in `block in run'
    from C:/HashiCorp/Vagrant/embedded/gems/2.2.4/gems/vagrant-2.2.4/lib/vagrant/util/busy.rb:19:in `busy'
    from C:/HashiCorp/Vagrant/embedded/gems/2.2.4/gems/vagrant-2.2.4/lib/vagrant/action/runner.rb:102:in `run'
    from C:/HashiCorp/Vagrant/embedded/gems/2.2.4/gems/vagrant-2.2.4/lib/vagrant/action/builtin/call.rb:53:in `call'
    from C:/HashiCorp/Vagrant/embedded/gems/2.2.4/gems/vagrant-2.2.4/lib/vagrant/action/warden.rb:50:in `call'
    from C:/HashiCorp/Vagrant/embedded/gems/2.2.4/gems/vagrant-2.2.4/lib/vagrant/action/builtin/before_trigger.rb:23:in `call'
    from C:/HashiCorp/Vagrant/embedded/gems/2.2.4/gems/vagrant-2.2.4/lib/vagrant/action/warden.rb:50:in `call'
    from C:/HashiCorp/Vagrant/embedded/gems/2.2.4/gems/vagrant-2.2.4/lib/vagrant/action/builtin/after_trigger.rb:26:in `call'
    from C:/HashiCorp/Vagrant/embedded/gems/2.2.4/gems/vagrant-2.2.4/lib/vagrant/action/warden.rb:50:in `call'
    from C:/HashiCorp/Vagrant/embedded/gems/2.2.4/gems/vagrant-2.2.4/plugins/providers/virtualbox/action/check_virtualbox.rb:26:in `call'
    from C:/HashiCorp/Vagrant/embedded/gems/2.2.4/gems/vagrant-2.2.4/lib/vagrant/action/warden.rb:50:in `call'
    from C:/HashiCorp/Vagrant/embedded/gems/2.2.4/gems/vagrant-2.2.4/lib/vagrant/action/builtin/before_trigger.rb:23:in `call'
    from C:/HashiCorp/Vagrant/embedded/gems/2.2.4/gems/vagrant-2.2.4/lib/vagrant/action/warden.rb:50:in `call'
    from C:/HashiCorp/Vagrant/embedded/gems/2.2.4/gems/vagrant-2.2.4/lib/vagrant/action/builder.rb:116:in `call'
    from C:/HashiCorp/Vagrant/embedded/gems/2.2.4/gems/vagrant-2.2.4/lib/vagrant/action/runner.rb:102:in `block in run'
    from C:/HashiCorp/Vagrant/embedded/gems/2.2.4/gems/vagrant-2.2.4/lib/vagrant/util/busy.rb:19:in `busy'
    from C:/HashiCorp/Vagrant/embedded/gems/2.2.4/gems/vagrant-2.2.4/lib/vagrant/action/runner.rb:102:in `run'
    from C:/HashiCorp/Vagrant/embedded/gems/2.2.4/gems/vagrant-2.2.4/lib/vagrant/machine.rb:238:in `action_raw'
    from C:/HashiCorp/Vagrant/embedded/gems/2.2.4/gems/vagrant-2.2.4/lib/vagrant/machine.rb:209:in `block in action'
    from C:/HashiCorp/Vagrant/embedded/gems/2.2.4/gems/vagrant-2.2.4/lib/vagrant/environment.rb:615:in `lock'
    from C:/HashiCorp/Vagrant/embedded/gems/2.2.4/gems/vagrant-2.2.4/lib/vagrant/machine.rb:195:in `call'
    from C:/HashiCorp/Vagrant/embedded/gems/2.2.4/gems/vagrant-2.2.4/lib/vagrant/machine.rb:195:in `action'
    from C:/HashiCorp/Vagrant/embedded/gems/2.2.4/gems/vagrant-2.2.4/lib/vagrant/batch_action.rb:82:in `block (2 levels) in run'

default: Box 'bento/ubuntu-16.04' could not be found.

==> default: Box 'bento/ubuntu-16.04' could not be found. Attempting to find and install...
    default: Box Provider: virtualbox
    default: Box Version: = 2.3.5
==> default: Loading metadata for box 'bento/ubuntu-16.04'
    default: URL: https://vagrantcloud.com/bento/ubuntu-16.04
The box you're attempting to add has no available version that
matches the constraints you requested. Please double-check your
settings. Also verify that if you specified version constraints,
that the provider you wish to use is available for these constraints.

Box: bento/ubuntu-16.04
Address: https://vagrantcloud.com/bento/ubuntu-16.04
Constraints: = 2.3.5
Available versions: 201801.02.0, 201802.02.0, 201803.24.0, 201806.08.0, 201807.12.0, 201808.24.0, 201812.15.0, 201812.27.0, 201906.18.0, 201910.20.0, 201910.21.0, 201910.31.0, 201912.03.0, 201912.04.0, 201912.15.0, 202002.04.0

this is the error which i'm getting.

`vagrant up` doesn’t complete because of `grub-pc` installation prompt

@karlud Students are currently reporting issues [1,2] with launching Vagrant and getting an error message referring to Setting up grub-pc. I came across this post [3] that has resolved this issue for one of the students so far. Perhaps this change should be added to the Vagrantfile here in this Udacity repo?

[1] https://discussions.udacity.com/t/vagrant-up-doesnt-complete-because-of-grunt-pc-installation-prompt/274252
[2] https://discussions.udacity.com/t/vagrant-up-stuck-in-the-middle-and-never-complete/275599
[3] chef/bento#661 (comment)

Vagrant cannot forward the specified ports on this VM, since they would collide with some other application that is already listening on these ports.

I'm getting the above error and no answer I'm getting here or on stack overflow is helping. Reload isn't helping and neither is changing my ports on virtualbox unless I'm doing it wrong. Could I have a step by step answer that'd be easy for me to follow?
Here's the full error message:
"Vagrant cannot forward the specified ports on this VM, since they
would collide with some other application that is already listening
on these ports. The forwarded port to 8080 is already in use
on the host machine.

To fix this, modify your current project's Vagrantfile to use another
port. Example, where '1234' would be replaced by a unique host port:

config.vm.network :forwarded_port, guest: 8080, host: 1234

Sometimes, Vagrant will attempt to auto-correct this for you. In this
case, Vagrant was unable to. This is usually because the guest machine
is in a state which doesn't allow modifying port forwarding. You could
try 'vagrant reload' (equivalent of running a halt followed by an up)
so vagrant can attempt to auto-correct this upon booting. Be warned
that any unsaved work might be lost."

vagrant up fails - ‘replace’: can’t modify frozen String (RuntimeError)

I have Vagrant 2.0.3 and VirtualBox 5.2.8 installed. I cloned my fork of the fullstack-nanodegree-vm github project into a directory named fullstack. When I try to run vagrant up in fullstack/vagrant I get the following error:

.../fullstack/vagrant/Vagrantfile:5:in `replace': can't modify frozen String (RuntimeError)
	from .../fullstack/vagrant/Vagrantfile:5:in `block in <top (required)>'
	from /opt/vagrant/embedded/gems/2.0.3/gems/vagrant-2.0.3/lib/vagrant/config/v2/loader.rb:37:in `load'
	from /opt/vagrant/embedded/gems/2.0.3/gems/vagrant-2.0.3/lib/vagrant/config/loader.rb:126:in `block (2 levels) in load'
	from /opt/vagrant/embedded/gems/2.0.3/gems/vagrant-2.0.3/lib/vagrant/config/loader.rb:119:in `each'
	from /opt/vagrant/embedded/gems/2.0.3/gems/vagrant-2.0.3/lib/vagrant/config/loader.rb:119:in `block in load'
	from /opt/vagrant/embedded/gems/2.0.3/gems/vagrant-2.0.3/lib/vagrant/config/loader.rb:116:in `each'
	from /opt/vagrant/embedded/gems/2.0.3/gems/vagrant-2.0.3/lib/vagrant/config/loader.rb:116:in `load'
	from /opt/vagrant/embedded/gems/2.0.3/gems/vagrant-2.0.3/lib/vagrant/vagrantfile.rb:28:in `initialize'
	from /opt/vagrant/embedded/gems/2.0.3/gems/vagrant-2.0.3/lib/vagrant/environment.rb:771:in `new'
	from /opt/vagrant/embedded/gems/2.0.3/gems/vagrant-2.0.3/lib/vagrant/environment.rb:771:in `vagrantfile'
	from /opt/vagrant/embedded/gems/2.0.3/gems/vagrant-2.0.3/lib/vagrant/environment.rb:517:in `host'
	from /opt/vagrant/embedded/gems/2.0.3/gems/vagrant-2.0.3/lib/vagrant/environment.rb:185:in `block in action_runner'
	from /opt/vagrant/embedded/gems/2.0.3/gems/vagrant-2.0.3/lib/vagrant/action/runner.rb:33:in `run'
	from /opt/vagrant/embedded/gems/2.0.3/gems/vagrant-2.0.3/lib/vagrant/environment.rb:504:in `hook'
	from /opt/vagrant/embedded/gems/2.0.3/gems/vagrant-2.0.3/lib/vagrant/environment.rb:753:in `unload'
	from /opt/vagrant/embedded/gems/2.0.3/gems/vagrant-2.0.3/bin/vagrant:154:in `ensure in <main>'
	from /opt/vagrant/embedded/gems/2.0.3/gems/vagrant-2.0.3/bin/vagrant:154:in `<main>'

Has anyone else experienced this? How do I fix it?

vagrant up box version issues

michelle@michelle-PC MINGW64 ~/FullStack/vagrant (master)
$ vagrant up
Bringing machine 'default' up with 'virtualbox' provider...
==> default: Box 'bento/ubuntu-16.04' could not be found. Attempting to find and install...
default: Box Provider: virtualbox
default: Box Version: = 2.3.5
==> default: Loading metadata for box 'bento/ubuntu-16.04'
default: URL: https://vagrantcloud.com/bento/ubuntu-16.04
The box you're attempting to add has no available version that
matches the constraints you requested. Please double-check your
settings. Also verify that if you specified version constraints,
that the provider you wish to use is available for these constraints.

Box: bento/ubuntu-16.04
Address: https://vagrantcloud.com/bento/ubuntu-16.04
Constraints: = 2.3.5
Available versions: 201801.02.0, 201802.02.0, 201803.24.0, 201806.08.0, 201807.12.0, 201808.24.0, 201812.15.0, 201812.27.0, 201906.18.0, 201910.20.0, 201910.21.0, 201910.31.0, 201912.03.0, 201912.04.0, 201912.15.0

Recommend Projects

  • React photo React

    A declarative, efficient, and flexible JavaScript library for building user interfaces.

  • Vue.js photo Vue.js

    🖖 Vue.js is a progressive, incrementally-adoptable JavaScript framework for building UI on the web.

  • Typescript photo Typescript

    TypeScript is a superset of JavaScript that compiles to clean JavaScript output.

  • TensorFlow photo TensorFlow

    An Open Source Machine Learning Framework for Everyone

  • Django photo Django

    The Web framework for perfectionists with deadlines.

  • D3 photo D3

    Bring data to life with SVG, Canvas and HTML. 📊📈🎉

Recommend Topics

  • javascript

    JavaScript (JS) is a lightweight interpreted programming language with first-class functions.

  • web

    Some thing interesting about web. New door for the world.

  • server

    A server is a program made to process requests and deliver data to clients.

  • Machine learning

    Machine learning is a way of modeling and interpreting data that allows a piece of software to respond intelligently.

  • Game

    Some thing interesting about game, make everyone happy.

Recommend Org

  • Facebook photo Facebook

    We are working to build community through open source technology. NB: members must have two-factor auth.

  • Microsoft photo Microsoft

    Open source projects and samples from Microsoft.

  • Google photo Google

    Google ❤️ Open Source for everyone.

  • D3 photo D3

    Data-Driven Documents codes.