Code Monkey home page Code Monkey logo

neural-style-transfer's Introduction

Neural Style Transfer & Neural Doodles

Implementation of Neural Style Transfer from the paper A Neural Algorithm of Artistic Style in Keras 2.0+

INetwork implements and focuses on certain improvements suggested in Improving the Neural Algorithm of Artistic Style.

Color Preservation is based on the paper Preserving Color in Neural Artistic Style Transfer.

Masked Style Transfer is based on the paper Show, Divide and Neural: Weighted Style Transfer

Colaboratory Support

This codebase can now be run directly from colaboratory using the following link, or by opening NeuralStyleTransfer.ipynb and visiting the Colab link.

Colab link supports almost all of the additional arguments, except of the masking ones. They will probably be added at a later date.

NOTE : Make sure you use a GPU in Colab or else the notebook will fail. To change Runtimes : Runtime -> Change Runtime type ->. Here select Python 3 and GPU as the hardware accelerator.

Guide

See the guide for details regarding how to use the script to achieve the best results

It also explains how to setup Theano (with GPU support) on both Windows and Linux. Theano on Windows is a long and tedious process, so the guide can speed up the process by simply letting you finish all the steps in the correct order, so as not to screw up the finicky Theano + Windows setup.

The Script Helper program can be downloaded from the Releases tab of this repository, Script Helper Releases. Extract it into any folder and run the Neural Style Transfer.exe program. On Linux, you will need to install Mono C# to run the script helper program.
Examples

Single Style Transfer

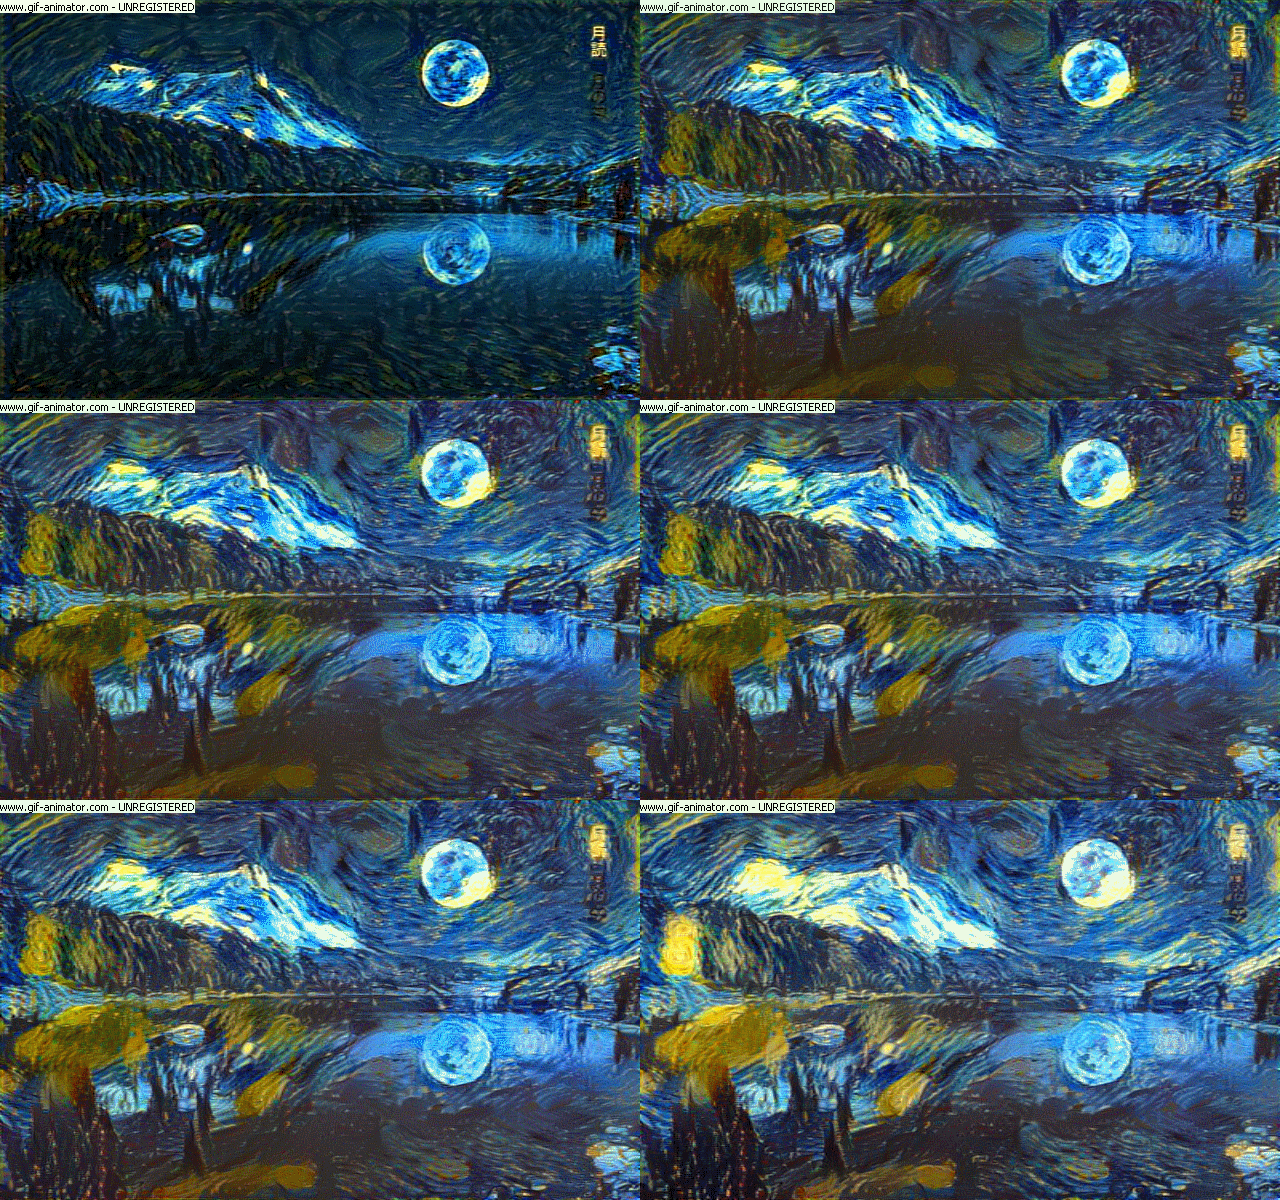
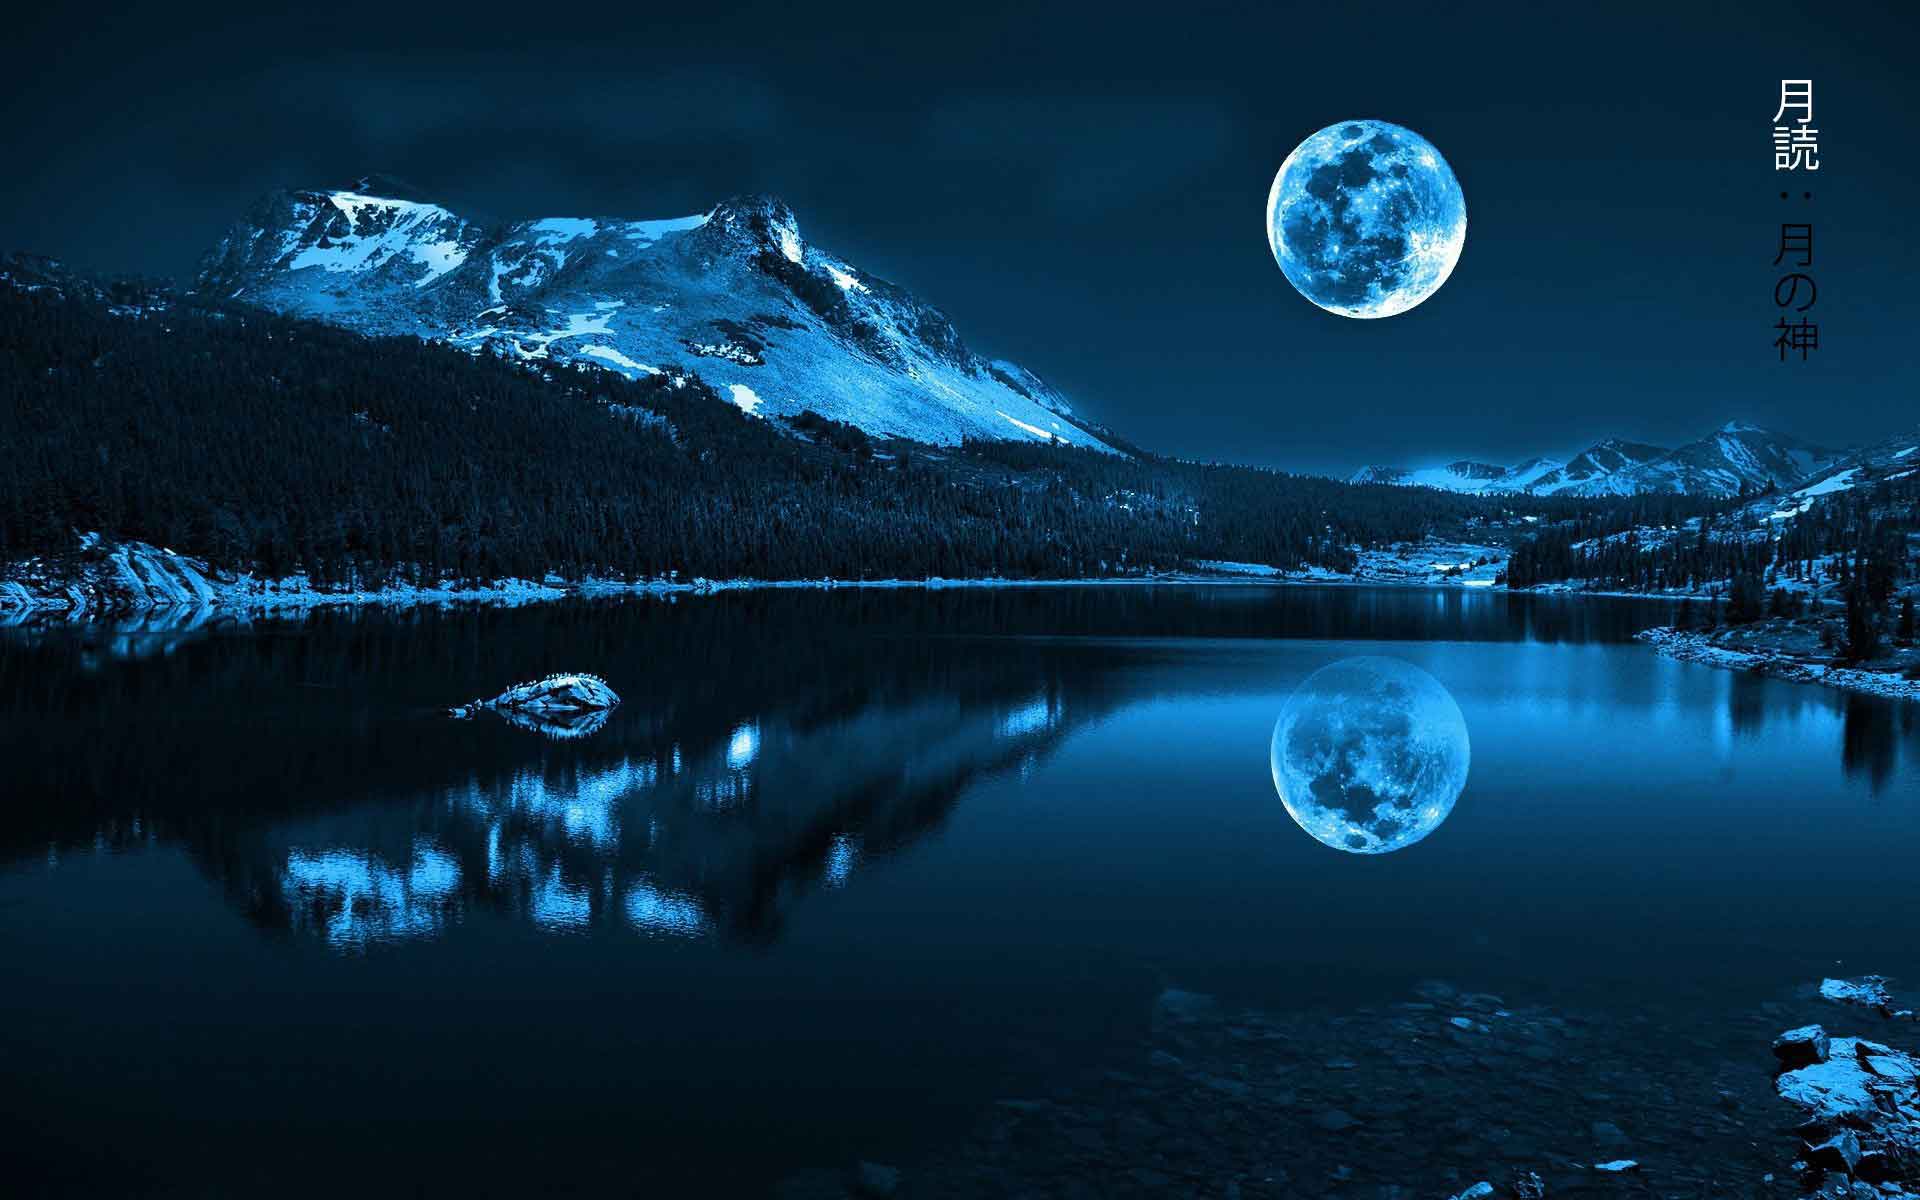
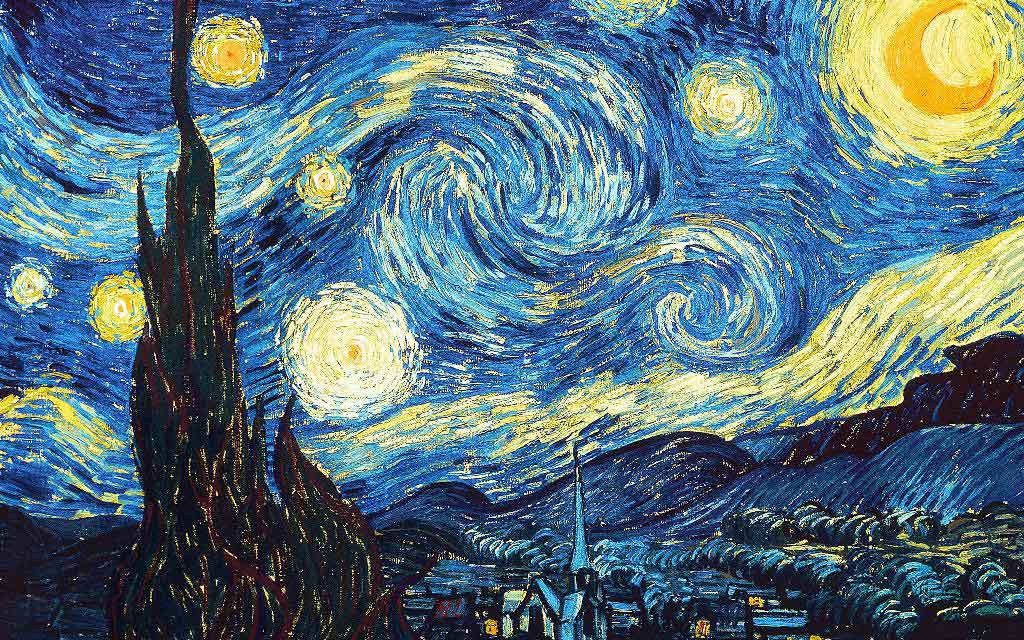
blue moon lake starry night

Results after 100 iterations using the INetwork
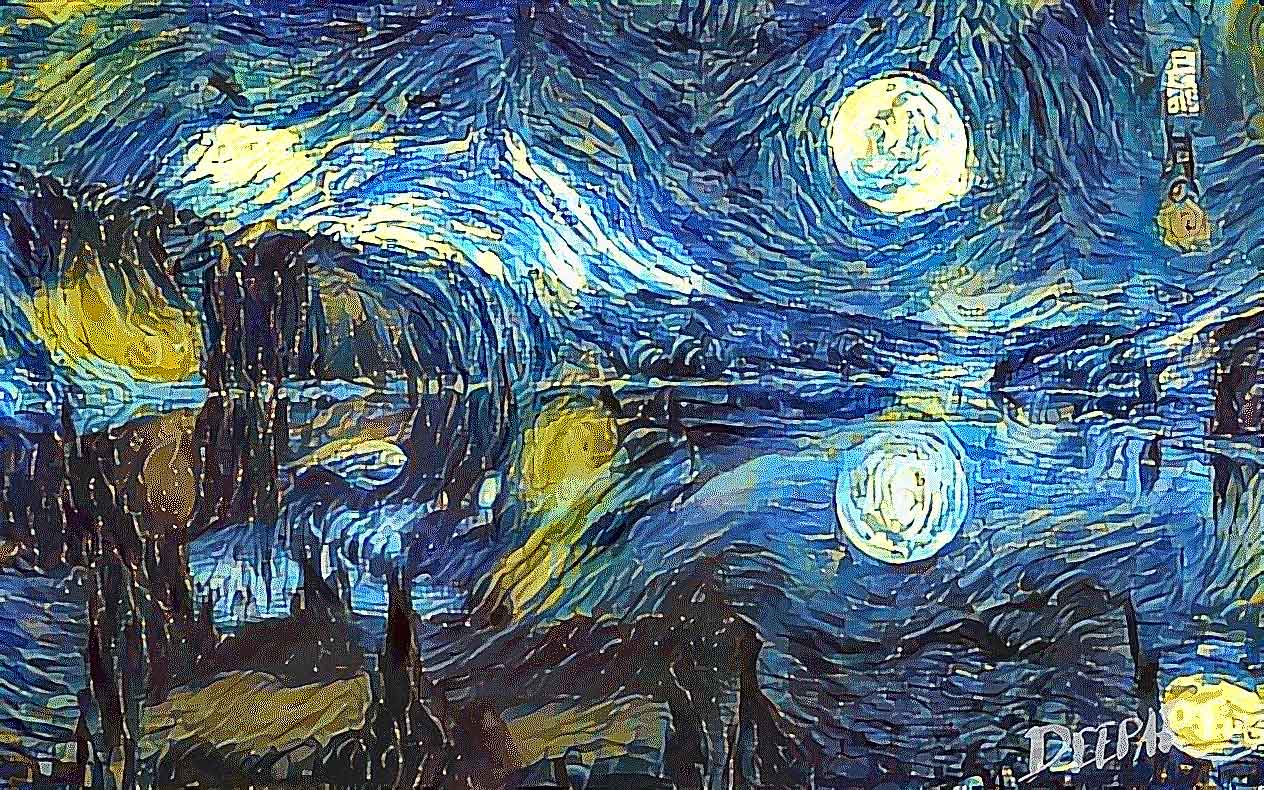
blue moon lake style transfer

DeepArt.io result (1000 iterations and using improvements such as Markov Random Field Regularization)
Style Transfer with Color Preservation

An example of color preservation with Kinkaku-ji, a Buddhist temple, as the content image and Monet's "Water Lilies" as the art style:


Kinkaku color preservation kinkaku style transfer

As an example, here are two images of the Sagano Bamboo Forest with the "pattened-leaf" style, with and without color preservation

sagano bamboo forest style transfer color preservation sagano bamboo forest style transfer

Color preservation can also be done using a mask. Using the color_transfer.py script and supplying a mask image, in which white regions will allow the content's colors to be transfered and black regions will keep the style-generated colors.

Below, the content image is "Sunlit Mountain", with the style image as "Seated Nude" by Picasso. Notice that the color preservation mask ensures that color transfer occurs only for the sky region, while the mountains are untouched.

Style Interpolation

Style weight and Content weight can be manipulated to get drastically different results.

Leonid Afremov's "Misty Mood" (Original Source: https://afremov.com/) is the style image and "Dipping Sun" is the content image :

Style=1, Content=1000 Style=1, Content=1 Style=1000, Content=1

Multiple Style Transfer

The next few images use the Blue Moon Lake as a content image and Vincent Van Gogh's "Starry Night" and Georgia O'Keeffe's "Red Canna" as the style images:

The below are the results after 50 iterations using 3 different style weights :

Starry Night : 1.0, Red Canna 0.2 Starry Night : 1.0, Red Canna 0.4 Starry Night : 1.0, Red Canna 1.0

Masked Style Transfer

Supplying an additional binary mask for each style, we can apply the style to a selected region and preserve the content in other regions.We can also use multiple masks to apply 2 different styles in 2 different regions of the same content image.

Note that with the mask_transfer.py script, a single content image can be masked with 1 mask to preserve content in blackend regions and preserve style transfer in whitened regions in the generated image. Currently, only content can be transfered in a post processed manner.

"The Starry Night" is used as the style image in the below images. The mask tries to preserve the woman's shape and color, while applying the style to all other regions. Results are very good, as "The Starry Night" has a tendency to overpower the content shape and color.
dawn sky anime

dawn sky style transfer anime


Another example of masked style transfer is provided below. "Winter Wolf" is used as the content image and "Bamboo Forest" is used as the style image. The mask attempts to preserve the darkened cloudy sky, and apply the style only to the mountains and the wolf itself.

winter wolf style transfer


These last few images use "Cherry Blossoms" as the content image, and uses two styles : "Candy Style" and Monet's "Water Lillies" using their respective masks to create an image with unique results.

Silhouette Transfer

Using Masked Transfer, one can post process image silhouettes to generate from scratch artwork that is sharp, clear and manipulates the style to conform to the shape of the silhouette itself.

First we discuss the use of a silhouette of the content vs the content image itself. A silhouette offers a chance to generate new artwork in the artistic vein of the style, while conforming only to the shape of the content, and disregarding the content itself. Combined with post process masking, it is easy to generate artwork similar to the style image itself.

For this image, Starry Night was used as the Style Image.

Content Mask Generated

For this example, we use "Blue Strokes" as the style image

Content Style

Texture Transfer

Utilizing a style image with a very distinctive texture, we can apply this texture to the content without any alterating in the algorithm. It is to be noted that the style image must possess a very strong texture to transfer correctly.

The below is an example of the content image "Aurea Luna", with the texture images which are available in the /style/metals directory, which are Silver and Gold. Color Preservation is applied to both images, and a mask is applied on the "Burnt Gold" image to style just the circle and not the entire square image.

aurea luna golden moon clow reed

molten silver moon burnt gold moon

All Transfer Techniques

Each of these techniques can be used together, or in stages to generate stunning images.

In the folowing image, I have used Masked style transfer in a multi scale style transfer technique - with scales of 192x192, 384x384, 768x768, applied a super resolution algorithm (4x and then downscaled to 1920x1080), applied color transfer and mask transfer again to sharpen the edges, used a simple sharpening algorithm and then finally denoise algorithm.

ancient city japanese

Result :
ancient city japanese

Various results with / without Color Preservation

Example of various styles (with and without color preservation). Images of the "Lost Grounds" from .Hack G.U.

Neural Doodle Examples

Renoit Style + Content Image

Monet Style + Doodle Creation

Van Gogh + Doodle Creation

Weights (VGG 16)

Weights are now automatically downloaded and cached in the ~/.keras (Users//.keras for Windows) folder under the 'models' subdirectory. The weights are a smaller version which include only the Convolutional layers without Zero Padding Layers, thereby increasing the speed of execution.

Note: Requires the latest version of Keras (1.0.7+) due to use of new methods to get files and cache them into .keras directory.

Modifications to original implementation :

  • Uses 'conv5_2' output to measure content loss. Original paper utilizes 'conv4_2' output

  • Initial image used for image is the base image (instead of random noise image) This method tends to create better output images, however parameters have to be well tuned. Therefore their is a argument 'init_image' which can take the options 'content' or 'noise'

  • Can use AveragePooling2D inplace of MaxPooling2D layers The original paper uses AveragePooling for better results, but this can be changed to use MaxPooling2D layers via the argument --pool_type="max". By default MaxPooling is used, since if offers sharper images, but AveragePooling applies the style better in some cases (especially when style image is the "Starry Night" by Van Gogh).

  • Style weight scaling

  • Rescaling of image to original dimensions, using lossy upscaling present

  • Maintain aspect ratio of intermediate and final stage images, using lossy upscaling

Improvements in INetwork

  • Improvement 3.1 in paper : Geometric Layer weight adjustment for Style inference
  • Improvement 3.2 in paper : Using all layers of VGG-16 for style inference
  • Improvement 3.3 in paper : Activation Shift of gram matrix
  • Improvement 3.5 in paper : Correlation Chain

These improvements are almost same as the Chain Blurred version, however a few differences exist :

  • Blurring of gram matrix G is not used, as in the paper the author concludes that the results are often not major, and convergence speed is greatly diminished due to very complex gradients.
  • Only one layer for Content inference instead of using all the layers as suggested in the Chain Blurred version.
  • Does not use CNN MRF network, but applies these modifications to the original algorithm.
  • All of this is applied on the VGG-16 network, not on the VGG-19 network. It is trivial to extrapolate this to the VGG-19 network. Simply adding the layer names to the feature_layers list will be sufficient to apply these changes to the VGG-19 network.

Script Helper

It is a C# program written to more easily generate the arguments for the python script Network.py or INetwork.py (Using Neural Style Transfer tab) and neural_doodle.py or improved_neural_doodle.py script (Using Neural Doodle Tab)

Benefits

  • Allows Style Transfer, Neural Doodles, Color Transfer and Masked Style Transfer easily
  • Automatically executes the script based on the arguments.
  • Easy selection of images (Content, Style (Multiple Selection allowed), Output Prefix)
  • Easy parameter selection
  • Easily generate argument list, if command line execution is preferred.
  • Creates log folders for each execution so settings can be preserved
  • Runs on Windows (Native) and Linux (Using Mono)

To use multiple style images, when the image choice window opens, select all style images as needed. Pass multiple style weights by using a space between each style weight in the parameters section.

Usage

Neural Style Transfer

Both Network.py and INetwork.py have similar usage styles, and share all parameters.

Network.py / INetwork.py

python network.py/inetwork.py "/path/to/content image" "path/to/style image" "result prefix or /path/to/result prefix"

To pass multiple style images, after passing the content image path, seperate each style path with a space

python inetwork.py "/path/to/content image" "path/to/style image 1" "path/to/style image 2" ... "result prefix or /path/to/result prefix" --style_weight 1.0 1.0 ... 

There are various parameters discussed below which can be modified to alter the output image. Note that many parameters require the command to be enclosed in double quotes ( " " ).

Example:

python inetwork.py "/path/to/content image" "path/to/style image" "result prefix or /path/to/result prefix" --preserve_color "True" --pool_type "ave" --rescale_method "bicubic" --content_layer "conv4_2"

To perform color preservation on an already generated image, use the color_transform.py as below. It will save the image in the same folder as the generated image with "_original_color" suffix.

python color_transfer.py "path/to/content/image" "path/to/generated/image"

A mask can also be supplied to color preservation script, using the --mask argument, where the white region signifies that color preservation should be done there, and black regions signify the color should not be preserved here.

python color_transfer.py "path/to/content/image" "path/to/generated/image" --mask "/path/to/mask/image"

A note on mask images:

  • They should be binary images (only black and white)
  • White represents parts of the image that you want style transfer to occur
  • Black represents parts of the image that you want to preserve the content
  • Be careful of the order in which mask images are presented in Multi Style Multi Mask generation. They have a 1 : 1 mapping between style images and style masks.
  • When using the Script Helper program, it may happen that the masks are being ordered incorrectly due to name-wise sorting. Therefore, rename the masks in alphabetic order to correct this flaw.

As a general example, here is the list of parameters to generate a multi style multi mask image:

python network.py "Japanese-cherry-widescreen-wallpaper-Picture-1366x768.jpg" "candy-style.jpg" "water-lilies-1919-2.jpg" \
"Cherry Blossom" --style_masks "cherry-blossom-1.jpg" "cherry-blossom-2.jpg" --content_weight 5 --style_weight 1.0 1.0 \
--num_iter 20 --model "vgg16" --content_loss_type 0

Like Color Transfer, single mask style transfer can also be applied as a post processing step instead of directly doing so in the style transfer script. You can preserve some portion of the content image in the generated image using the post processing script mask_transfer.py.

Example:

python mask_transfer.py "path/to/content/image" "path/to/generated/image" "path/to/content/mask"

Neural Doodles

Both the neural_doodle.py and improved_neural_doodle.py script share similar usage styles.

neural_doodle.py & improved_neural_doodle.py

python neural_doodle.py --nlabels -style-image --style-mask --target-mask --content-image --target-image-prefix

Example 1 : Doodle using a style image, style mask and target mask (from keras examples)

python neural_doodle.py --nlabels 4 --style-image Monet/style.png \
    --style-mask Monet/style_mask.png --target-mask Monet/target_mask.png \
    --target-image-prefix generated/monet

Example 2: Doodle using a style image, style mask, target mask and an optional content image.

 python neural_doodle.py --nlabels 4 --style-image Renoir/style.png \
    --style-mask Renoir/style_mask.png --target-mask Renoir/target_mask.png \
    --content-image Renoir/creek.jpg \
    --target-image-prefix generated/renoir

Multiple phases Example : Doodle using a style image, style mask, target mask and using it multiple times to acheive better results.

  • Assume that an image has a size (400 x 600).
  • Divide the image size by 4 (100 x 125)
  • Create 1st doodle according to the below script #1 (--img_size 100)
  • Create 2nd doodle according to the below script #2 (Note that we pass 1st doodle as content image here) (--img_size 200)
  • Create 3rd and last doodle acc to below script #3 (Note we pass 2nd doodle as content image here) (Do not put img_size parameter)
# Script 1
python improved_neural_doodle.py --nlabels 4 --style-image srcl.jpg --style-mask srcl-m.png --target-mask dst-m.png  --target-image-prefix ./doodle3-100 --num_iter 50 --img_size 100 --min_improvement 5.0

# Script 2
python improved_neural_doodle.py --nlabels 4 --style-image srcl.jpg --style-mask srcl-m.png --target-mask dst-m.png  --target-image-prefix ./doodle3-200 --num_iter 50 --content-image ./doodle3-100_at_iteration_XXXX.png --img_size 200 --min_improvement 2.5

############# Replace XXXX by last iteration number ################

# Script 3 
python improved_neural_doodle.py --nlabels 4 --style-image srcl.jpg --style-mask srcl-m.png --target-mask dst-m.png  --target-image-prefix ./doodle3-500 --num_iter 50 --content-image ./doodle3-200_at_iteration_XXXX.png

############# Replace XXXX by last iteration number ################

Color Transfer (Post Processing)

Color transfer can be performed after the stylized image has already been generated. This can be done via the color_transfer.py script or via the Color Transfer tab in the Script Helper. Note that the script will save the image in the same folder as the generated image with "_original_color" suffix.

Example:

python color_transfer.py "path/to/content/image" "path/to/generated/image"

A mask can also be supplied to color preservation script, using the --mask argument, where the white region signifies that color preservation should be done there, and black regions signify the color should not be preserved here.

python color_transfer.py "path/to/content/image" "path/to/generated/image" --mask "/path/to/mask/image"

Using the --hist_match parameter set to 1, it will perform histogram color matching instead of direct color transfer

python color_transfer.py "path/to/content/image" "path/to/generated/image" --hist_match 1

Please note that for masks for color preservation and for style transfer have different representations. Color preservations will preserve white areas as content colors, and mask transfer will preserve black areas as content image.

Masked Style Transfer (Post Processing)

If the general requirement is to preserve some portions of the content in the stylized image, then it can simply be done as a post processing step using the mask_transfer.py script or the Mask Transfer tab of the Script Helper.

For now, only the content can be preserved (by coloring the area black in the mask). To perform multi style multi mask style transfer, you must supply the styles and masks to the neural style script and let it run for several iterations. This cannot be done as a post processing step.

Example:

python mask_transfer.py "path/to/content/image" "path/to/generated/image" "path/to/content/mask"

Parameters (Neural Style)

--style_masks : Multiple style masks may be provided for masking certain regions of an image for style transfer. Number of 
  style_weight parameters must match number of style masks.
--color_mask : A single color mask, which defines the region where the color must be preserved. 

--image_size : Allows to set the Gram Matrix size. Default is 400 x 400, since it produces good results fast. 
--num_iter : Number of iterations. Default is 10. Test the output with 10 iterations, and increase to improve results.
--init_image : Can be "content", "noise" or "gray". Default is "content", since it reduces reproduction noise. "gray" is useful when you want only the color of the style to be used in the image.
--pool_type : Pooling type. MaxPooling ("max") is default. For smoother images, use AveragePooling ("ave").

--model : Can be "vgg16" or "vgg19". Changes between use of VGG 16 or VGG 19 model.
--content_loss_type : Can be 0, 1 or 2. 
                      0 does not add any scaling of the loss. 
                      1 = 1 / (2 * sqrt(channels) * sqrt(width * height))
                      2 = 1 / (channels * width * height)
--preserve_color : Preserves the original color space of the content image, while applying only style. Post processing technique on final image, therefore does not harm quality of style.
--min_improvement : Sets the minimum improvement required to continue training. Default is 0.0, indicating no minimum threshold. Advised values are 0.05 or 0.01

--content_weight : Weightage given to content in relation to style. Default if 0.025
--style_weight : Weightage given to style. Default is 1. When using multiple styles, seperate each style weight with a space
--style_scale : Scales the style_weight. Default is 1. 
--total_variation_weight : Regularization factor. Smaller values tend to produce crisp images, but 0 is not useful. Default = 8.5E-5

--rescale_image : Rescale image to original dimensions after each iteration. (Bilinear upscaling)
--rescale_method : Rescaling algorithm. Default is bilinear. Options are nearest, bilinear, bicubic and cubic.
--maintain_aspect_ratio : Rescale the image just to the original aspect ratio. Size will be (gram_matrix_size, gram_matrix_size * aspect_ratio). Default is True
--content_layer : Selects the content layer. Paper suggests conv4_2, but better results can be obtained from conv5_2. Default is conv5_2.

Parameters (Neural Doodle)

--nlabels : Number of colors or labels in mask image
--image_size : Allows to set the Gram Matrix size. Default is -1, which means that it uses style image size automatically. 
--num_iter : Number of iterations. Default is 10. Test the output with 10 iterations, and increase to improve results.
--preserve_color : Preserves the original color space of the content image, while applying only style. Post processing technique on final image, therefore does not harm quality of style. Works only when using content image for guided style transfer
--min_improvement : Minimum improvement in percentage required to continue training. Set to 0.0 to disable.

--content_weight : Weightage given to content in relation to style. Default if 0.1
--style_weight : Weightage given to style in relation to content. Default is 1. 
--total_variation_weight : Regularization factor. Smaller values tend to produce crisp images, but 0 is not useful. Default = 8.5E-5
--region_style_weight : Weight for region style regularization. Keep it set to 1.0 unless testing for experimental purposes.

Parameters (Color Transfer)

--masks : Optional, performs masked color transfer
--hist_match : Performs histogram color matching if set to 1. Default is 0.

Network.py in action

Alt Text

Requirements

  • Theano / Tensorflow
  • Keras
  • CUDA (GPU) -- Recommended
  • CUDNN (GPU) -- Recommended
  • Numpy
  • h5py
  • Scipy + PIL + Scikit-image

Speed

On a 980M GPU, the time required for each epoch depends on mainly image size (gram matrix size) :

For a 400x400 gram matrix, each epoch takes approximately 8-10 seconds.
For a 512x512 gram matrix, each epoch takes approximately 15-18 seconds.
For a 600x600 gram matrix, each epoch takes approximately 24-28 seconds.

For Masked Style Transfer, the speed is now same as if using no mask. This was acheived by preventing gradient computation of the mask multiplied with the style and content features.

For Multiple Style Transfer, INetwork.py requires slightly more time (~2x single style transfer as shown above for 2 styles, ~3x for 3 styles and so on). Results are better with INetwork.py in multiple style transfer.

For Multi Style Multi Mask Style Transfer, the speed is now same as if using multiple styles only. It was acheived by preventing gradient computation of the mask multiplied with the style and content features.

  • For multi style multi mask network, Network.py requires roughly 24 (previously 72) seconds per iteration, whereas INetwork.py requires 87 (previously 248) seconds per iteration

Issues

  • Due to usage of content image as initial image, output depends heavily on parameter tuning.
    Test to see if the image is appropriate in the first 10 epochs, and if it is correct, increase the number of iterations to smoothen and improve the quality of the output.
  • Due to small gram sizes, the output image is usually small.
    To correct this, use the implementations of this paper "Image Super-Resolution Using Deep Convolutional Networks" http://arxiv.org/abs/1501.00092 to upscale the images with minimal loss.
    Some implementations of the above paper for Windows : https://github.com/lltcggie/waifu2x-caffe/releases
    (Download the waifu2x-caffe.zip and extract, program supports English)
  • Implementation of Markov Random Field Regularization and Patch Match algorithm are currently being tested. MRFNetwork.py contains the basic code, which need to be integrated to use MRF and Patch Match as in Image Analogies paper Combining Markov Random Fields and Convolutional Neural Networks for Image Synthesis

neural-style-transfer's People

Contributors

7yl4r avatar abhaygupta97 avatar amrzv avatar brchristian avatar meghpal avatar minihat avatar schneiderl avatar stonecypher avatar supertobi avatar titu1994 avatar velikodniy avatar

Stargazers

 avatar  avatar  avatar  avatar  avatar  avatar  avatar  avatar  avatar  avatar  avatar  avatar  avatar  avatar  avatar  avatar  avatar  avatar  avatar  avatar  avatar  avatar  avatar  avatar  avatar  avatar  avatar  avatar  avatar  avatar  avatar  avatar  avatar  avatar  avatar  avatar  avatar  avatar  avatar  avatar  avatar  avatar  avatar  avatar  avatar  avatar  avatar  avatar  avatar  avatar  avatar  avatar  avatar  avatar  avatar  avatar  avatar  avatar  avatar  avatar  avatar  avatar  avatar  avatar  avatar  avatar  avatar  avatar  avatar  avatar  avatar  avatar  avatar  avatar  avatar  avatar  avatar  avatar  avatar  avatar  avatar  avatar  avatar  avatar  avatar  avatar  avatar  avatar  avatar  avatar  avatar  avatar  avatar  avatar  avatar  avatar  avatar  avatar  avatar  avatar

Watchers

 avatar  avatar  avatar  avatar  avatar  avatar  avatar  avatar  avatar  avatar  avatar  avatar  avatar  avatar  avatar  avatar  avatar  avatar  avatar  avatar  avatar  avatar  avatar  avatar  avatar  avatar  avatar  avatar  avatar  avatar  avatar  avatar  avatar  avatar  avatar  avatar  avatar  avatar  avatar  avatar  avatar  avatar  avatar  avatar  avatar  avatar  avatar  avatar  avatar  avatar  avatar  avatar  avatar  avatar  avatar  avatar  avatar  avatar  avatar  avatar  avatar  avatar  avatar  avatar  avatar  avatar  avatar  avatar  avatar

neural-style-transfer's Issues

(Not a issue) could Neural-Style-Transfer do as good as ostagram does?

hi @titu1994
It is a really great and convenience repo!!!
I use this project generated a lot of good images.
Thank you !

Recently I found a software named ostagram .It can give a better result in some cases.
I think maybe Neural-Style-Transfer could do as well as ostagram.right?

My question is : is there a way to generate images as well as ostagram?For example,something like parameters adjusting,network structure modification,etc.
I also notice that ostagram can change only 2 parameters: style_scale and style weight.
I think there must be a simple way to do that.

I am new to deep learning and if my question is stupid I apologize here.
Thank you for your great work again!

network.py error

Hi there !
I've downloaded your Neural-Style_Transfer,and try to transfer some pictures. but got an error while computing.
could you help to take a look, thanks a lot.
capture

Probably simple error

Hi there,

Sorry this may be very obvious but as a new user of Theano I haven't seen this error before. I appreciate your help.

Command:
python Network.py "/images/inputs/content/golden_gate.jpg" "/images/inputs/style/picasso_selfport1907.jpg" "/myouts/output"

Error:
Using Theano backend.
Traceback (most recent call last):
File "Network.py", line 109, in
if len(style_image_paths) != len(args.style_weight):
TypeError: object of type 'int' has no len()

having trouble getting the script helper to run

mono and wine are both installed

john@siniforce-l:~/script_helper$ ./Neural\ Style\ Transfer.exe

Unhandled Exception:
System.Reflection.TargetInvocationException: Exception has been thrown by the target of an invocation. ---> System.ComponentModel.Win32Exception: No valid icon entry were found.
  at System.Drawing.Icon.InitFromStreamWithSize (System.IO.Stream stream, System.Int32 width, System.Int32 height) [0x001f3] in <c8087fd0c5714edeb9fb2de6813dd471>:0 
  at System.Drawing.Icon..ctor (System.Runtime.Serialization.SerializationInfo info, System.Runtime.Serialization.StreamingContext context) [0x00095] in <c8087fd0c5714edeb9fb2de6813dd471>:0 
  at (wrapper managed-to-native) System.Reflection.MonoCMethod.InternalInvoke(System.Reflection.MonoCMethod,object,object[],System.Exception&)
  at System.Reflection.MonoCMethod.InternalInvoke (System.Object obj, System.Object[] parameters) [0x00002] in <9bbab8f8a2a246e98480e70b0839fd67>:0 
   --- End of inner exception stack trace ---
  at System.Reflection.MonoCMethod.InternalInvoke (System.Object obj, System.Object[] parameters) [0x00014] in <9bbab8f8a2a246e98480e70b0839fd67>:0 
  at System.Reflection.MonoCMethod.DoInvoke (System.Object obj, System.Reflection.BindingFlags invokeAttr, System.Reflection.Binder binder, System.Object[] parameters, System.Globalization.CultureInfo culture) [0x0007a] in <9bbab8f8a2a246e98480e70b0839fd67>:0 
  at System.Reflection.MonoCMethod.Invoke (System.Object obj, System.Reflection.BindingFlags invokeAttr, System.Reflection.Binder binder, System.Object[] parameters, System.Globalization.CultureInfo culture) [0x0002f] in <9bbab8f8a2a246e98480e70b0839fd67>:0 
  at System.Reflection.MethodBase.Invoke (System.Object obj, System.Object[] parameters) [0x00000] in <9bbab8f8a2a246e98480e70b0839fd67>:0 
  at System.Reflection.RuntimeConstructorInfo.SerializationInvoke (System.Object target, System.Runtime.Serialization.SerializationInfo info, System.Runtime.Serialization.StreamingContext context) [0x00000] in <9bbab8f8a2a246e98480e70b0839fd67>:0 
  at System.Runtime.Serialization.ObjectManager.CompleteISerializableObject (System.Object obj, System.Runtime.Serialization.SerializationInfo info, System.Runtime.Serialization.StreamingContext context) [0x00059] in <9bbab8f8a2a246e98480e70b0839fd67>:0 
  at System.Runtime.Serialization.ObjectManager.FixupSpecialObject (System.Runtime.Serialization.ObjectHolder holder) [0x00088] in <9bbab8f8a2a246e98480e70b0839fd67>:0 
  at System.Runtime.Serialization.ObjectManager.DoFixups () [0x0005a] in <9bbab8f8a2a246e98480e70b0839fd67>:0 
  at System.Runtime.Serialization.Formatters.Binary.ObjectReader.Deserialize (System.Runtime.Remoting.Messaging.HeaderHandler handler, System.Runtime.Serialization.Formatters.Binary.__BinaryParser serParser, System.Boolean fCheck, System.Boolean isCrossAppDomain, System.Runtime.Remoting.Messaging.IMethodCallMessage methodCallMessage) [0x00077] in <9bbab8f8a2a246e98480e70b0839fd67>:0 
  at System.Runtime.Serialization.Formatters.Binary.BinaryFormatter.Deserialize (System.IO.Stream serializationStream, System.Runtime.Remoting.Messaging.HeaderHandler handler, System.Boolean fCheck, System.Boolean isCrossAppDomain, System.Runtime.Remoting.Messaging.IMethodCallMessage methodCallMessage) [0x000a2] in <9bbab8f8a2a246e98480e70b0839fd67>:0 
  at System.Runtime.Serialization.Formatters.Binary.BinaryFormatter.Deserialize (System.IO.Stream serializationStream, System.Runtime.Remoting.Messaging.HeaderHandler handler, System.Boolean fCheck, System.Runtime.Remoting.Messaging.IMethodCallMessage methodCallMessage) [0x00000] in <9bbab8f8a2a246e98480e70b0839fd67>:0 
  at System.Runtime.Serialization.Formatters.Binary.BinaryFormatter.Deserialize (System.IO.Stream serializationStream, System.Runtime.Remoting.Messaging.HeaderHandler handler, System.Boolean fCheck) [0x00000] in <9bbab8f8a2a246e98480e70b0839fd67>:0 
  at System.Runtime.Serialization.Formatters.Binary.BinaryFormatter.Deserialize (System.IO.Stream serializationStream, System.Runtime.Remoting.Messaging.HeaderHandler handler) [0x00000] in <9bbab8f8a2a246e98480e70b0839fd67>:0 
  at System.Runtime.Serialization.Formatters.Binary.BinaryFormatter.Deserialize (System.IO.Stream serializationStream) [0x00000] in <9bbab8f8a2a246e98480e70b0839fd67>:0 
  at System.Resources.ResourceReader.DeserializeObject (System.Int32 typeIndex) [0x00019] in <9bbab8f8a2a246e98480e70b0839fd67>:0 
  at System.Resources.ResourceReader._LoadObjectV2 (System.Int32 pos, System.Resources.ResourceTypeCode& typeCode) [0x0035c] in <9bbab8f8a2a246e98480e70b0839fd67>:0 
  at System.Resources.ResourceReader.LoadObjectV2 (System.Int32 pos, System.Resources.ResourceTypeCode& typeCode) [0x00000] in <9bbab8f8a2a246e98480e70b0839fd67>:0 
  at System.Resources.ResourceReader.LoadObject (System.Int32 pos, System.Resources.ResourceTypeCode& typeCode) [0x00022] in <9bbab8f8a2a246e98480e70b0839fd67>:0 
  at System.Resources.RuntimeResourceSet.GetObject (System.String key, System.Boolean ignoreCase, System.Boolean isString) [0x000be] in <9bbab8f8a2a246e98480e70b0839fd67>:0 
  at System.Resources.RuntimeResourceSet.GetObject (System.String key, System.Boolean ignoreCase) [0x00000] in <9bbab8f8a2a246e98480e70b0839fd67>:0 
  at System.Resources.ResourceManager.GetObject (System.String name, System.Globalization.CultureInfo culture, System.Boolean wrapUnmanagedMemStream) [0x0008e] in <9bbab8f8a2a246e98480e70b0839fd67>:0 
  at System.Resources.ResourceManager.GetObject (System.String name) [0x00000] in <9bbab8f8a2a246e98480e70b0839fd67>:0 
  at Neural_Dream.MainForm.InitializeComponent () [0x03ec5] in <e3cb198a3d414b4aaefce478acd0faa0>:0 
  at Neural_Dream.MainForm..ctor () [0x00011] in <e3cb198a3d414b4aaefce478acd0faa0>:0 
  at (wrapper remoting-invoke-with-check) Neural_Dream.MainForm..ctor()
  at Neural_Dream.Program.Main () [0x0000b] in <e3cb198a3d414b4aaefce478acd0faa0>:0 
[ERROR] FATAL UNHANDLED EXCEPTION: System.Reflection.TargetInvocationException: Exception has been thrown by the target of an invocation. ---> System.ComponentModel.Win32Exception: No valid icon entry were found.
  at System.Drawing.Icon.InitFromStreamWithSize (System.IO.Stream stream, System.Int32 width, System.Int32 height) [0x001f3] in <c8087fd0c5714edeb9fb2de6813dd471>:0 
  at System.Drawing.Icon..ctor (System.Runtime.Serialization.SerializationInfo info, System.Runtime.Serialization.StreamingContext context) [0x00095] in <c8087fd0c5714edeb9fb2de6813dd471>:0 
  at (wrapper managed-to-native) System.Reflection.MonoCMethod.InternalInvoke(System.Reflection.MonoCMethod,object,object[],System.Exception&)
  at System.Reflection.MonoCMethod.InternalInvoke (System.Object obj, System.Object[] parameters) [0x00002] in <9bbab8f8a2a246e98480e70b0839fd67>:0 
   --- End of inner exception stack trace ---
  at System.Reflection.MonoCMethod.InternalInvoke (System.Object obj, System.Object[] parameters) [0x00014] in <9bbab8f8a2a246e98480e70b0839fd67>:0 
  at System.Reflection.MonoCMethod.DoInvoke (System.Object obj, System.Reflection.BindingFlags invokeAttr, System.Reflection.Binder binder, System.Object[] parameters, System.Globalization.CultureInfo culture) [0x0007a] in <9bbab8f8a2a246e98480e70b0839fd67>:0 
  at System.Reflection.MonoCMethod.Invoke (System.Object obj, System.Reflection.BindingFlags invokeAttr, System.Reflection.Binder binder, System.Object[] parameters, System.Globalization.CultureInfo culture) [0x0002f] in <9bbab8f8a2a246e98480e70b0839fd67>:0 
  at System.Reflection.MethodBase.Invoke (System.Object obj, System.Object[] parameters) [0x00000] in <9bbab8f8a2a246e98480e70b0839fd67>:0 
  at System.Reflection.RuntimeConstructorInfo.SerializationInvoke (System.Object target, System.Runtime.Serialization.SerializationInfo info, System.Runtime.Serialization.StreamingContext context) [0x00000] in <9bbab8f8a2a246e98480e70b0839fd67>:0 
  at System.Runtime.Serialization.ObjectManager.CompleteISerializableObject (System.Object obj, System.Runtime.Serialization.SerializationInfo info, System.Runtime.Serialization.StreamingContext context) [0x00059] in <9bbab8f8a2a246e98480e70b0839fd67>:0 
  at System.Runtime.Serialization.ObjectManager.FixupSpecialObject (System.Runtime.Serialization.ObjectHolder holder) [0x00088] in <9bbab8f8a2a246e98480e70b0839fd67>:0 
  at System.Runtime.Serialization.ObjectManager.DoFixups () [0x0005a] in <9bbab8f8a2a246e98480e70b0839fd67>:0 
  at System.Runtime.Serialization.Formatters.Binary.ObjectReader.Deserialize (System.Runtime.Remoting.Messaging.HeaderHandler handler, System.Runtime.Serialization.Formatters.Binary.__BinaryParser serParser, System.Boolean fCheck, System.Boolean isCrossAppDomain, System.Runtime.Remoting.Messaging.IMethodCallMessage methodCallMessage) [0x00077] in <9bbab8f8a2a246e98480e70b0839fd67>:0 
  at System.Runtime.Serialization.Formatters.Binary.BinaryFormatter.Deserialize (System.IO.Stream serializationStream, System.Runtime.Remoting.Messaging.HeaderHandler handler, System.Boolean fCheck, System.Boolean isCrossAppDomain, System.Runtime.Remoting.Messaging.IMethodCallMessage methodCallMessage) [0x000a2] in <9bbab8f8a2a246e98480e70b0839fd67>:0 
  at System.Runtime.Serialization.Formatters.Binary.BinaryFormatter.Deserialize (System.IO.Stream serializationStream, System.Runtime.Remoting.Messaging.HeaderHandler handler, System.Boolean fCheck, System.Runtime.Remoting.Messaging.IMethodCallMessage methodCallMessage) [0x00000] in <9bbab8f8a2a246e98480e70b0839fd67>:0 
  at System.Runtime.Serialization.Formatters.Binary.BinaryFormatter.Deserialize (System.IO.Stream serializationStream, System.Runtime.Remoting.Messaging.HeaderHandler handler, System.Boolean fCheck) [0x00000] in <9bbab8f8a2a246e98480e70b0839fd67>:0 
  at System.Runtime.Serialization.Formatters.Binary.BinaryFormatter.Deserialize (System.IO.Stream serializationStream, System.Runtime.Remoting.Messaging.HeaderHandler handler) [0x00000] in <9bbab8f8a2a246e98480e70b0839fd67>:0 
  at System.Runtime.Serialization.Formatters.Binary.BinaryFormatter.Deserialize (System.IO.Stream serializationStream) [0x00000] in <9bbab8f8a2a246e98480e70b0839fd67>:0 
  at System.Resources.ResourceReader.DeserializeObject (System.Int32 typeIndex) [0x00019] in <9bbab8f8a2a246e98480e70b0839fd67>:0 
  at System.Resources.ResourceReader._LoadObjectV2 (System.Int32 pos, System.Resources.ResourceTypeCode& typeCode) [0x0035c] in <9bbab8f8a2a246e98480e70b0839fd67>:0 
  at System.Resources.ResourceReader.LoadObjectV2 (System.Int32 pos, System.Resources.ResourceTypeCode& typeCode) [0x00000] in <9bbab8f8a2a246e98480e70b0839fd67>:0 
  at System.Resources.ResourceReader.LoadObject (System.Int32 pos, System.Resources.ResourceTypeCode& typeCode) [0x00022] in <9bbab8f8a2a246e98480e70b0839fd67>:0 
  at System.Resources.RuntimeResourceSet.GetObject (System.String key, System.Boolean ignoreCase, System.Boolean isString) [0x000be] in <9bbab8f8a2a246e98480e70b0839fd67>:0 
  at System.Resources.RuntimeResourceSet.GetObject (System.String key, System.Boolean ignoreCase) [0x00000] in <9bbab8f8a2a246e98480e70b0839fd67>:0 
  at System.Resources.ResourceManager.GetObject (System.String name, System.Globalization.CultureInfo culture, System.Boolean wrapUnmanagedMemStream) [0x0008e] in <9bbab8f8a2a246e98480e70b0839fd67>:0 
  at System.Resources.ResourceManager.GetObject (System.String name) [0x00000] in <9bbab8f8a2a246e98480e70b0839fd67>:0 
  at Neural_Dream.MainForm.InitializeComponent () [0x03ec5] in <e3cb198a3d414b4aaefce478acd0faa0>:0 
  at Neural_Dream.MainForm..ctor () [0x00011] in <e3cb198a3d414b4aaefce478acd0faa0>:0 
  at (wrapper remoting-invoke-with-check) Neural_Dream.MainForm..ctor()
  at Neural_Dream.Program.Main () [0x0000b] in <e3cb198a3d414b4aaefce478acd0faa0>:0 

Colab Error

Error when running the vanilla colab from the page:

Using TensorFlow backend.
Traceback (most recent call last):
  File "Neural-Style-Transfer/INetwork.py", line 301, in <module>
    base_image = K.variable(preprocess_image(base_image_path, True, read_mode=read_mode))
  File "Neural-Style-Transfer/INetwork.py", line 218, in preprocess_image
    if K.image_dim_ordering() == "th":
AttributeError: module 'keras.backend' has no attribute 'image_dim_ordering'

ImportError: cannot import name 'imread' from 'scipy.misc'

py Network.py "./images/inputs/1.jpg" "./images/inputs/style.jpg" C:\Users\flamesoff\AppData\Local\Programs\Python\Python37\lib\site-packages\numpy\_distributor_init.py:32: UserWarning: loaded more than 1 DLL from .libs: C:\Users\flamesoff\AppData\Local\Programs\Python\Python37\lib\site-packages\numpy\.libs\libopenblas.IPBC74C7KURV7CB2PKT5Z5FNR3SIBV4J.gfortran-win_amd64.dll C:\Users\flamesoff\AppData\Local\Programs\Python\Python37\lib\site-packages\numpy\.libs\libopenblas.TXA6YQSD3GCQQC22GEQ54J2UDCXDXHWN.gfortran-win_amd64.dll stacklevel=1) Traceback (most recent call last): File "Network.py", line 5, in <module> from scipy.misc import imread, imresize, imsave, fromimage, toimage ImportError: cannot import name 'imread' from 'scipy.misc' (C:\Users\flamesoff\AppData\Local\Programs\Python\Python37\lib\site-packages\scipy\misc\__init__.py)

Everything is installed in accordance with requirements from readme.md.

Resulting style does not really match source

I am running into a strange issue with the code. The output in some case never "converge" to look like the source style. Here is an example:

https://goo.gl/photos/Vf76NHAa4Pj5Nyw87

See how the result after 50 epoch is still far from looking like the source? Way too much green and dark brue areas. It is possible something is wrong? I am using the following parameters to generate she output:

python INetwork.py ../in/t5/dst.png ../in/t5/src4.jpg ./res4b --image_size "476" --content_weight 0.01 --num_iter 50 --min_improvement 0.05

usage of maintain aspect ratio

I may be doing something wrong here, but I also see the latest commit mentions a change to maintain_aspect_ratio. Using the latest build all images are coming out square. I've tried passing --maintain_aspect_ratio 1 as well, but no luck.

If someone can confirm it isn't just me being dumb, this line in the last commit may be the culprit.

multiple source files

I believe that when trying to apply a style on multiple target files, the script tries to import them all at once in the GPU RAM.

Issue with Running on Colab

When running the application through the Collab link I'm getting this error on line 35:

/bin/sh: 1: Syntax error: "(" unexpected

!python {dir_path}/{NETWORK} {CONTENT_IMAGE_FN} {STYLE_IMAGE_FN} {RESULT_PREFIX}
--image_size {IMAGE_SIZE} --content_weight {CONTENT_WEIGHT} --style_weight
{STYLE_WEIGHT} --style_scale {STYLE_SCALE} --total_variation_weight
{TOTAL_VARIATION_WEIGHT} --content_loss_type {CONTENT_LOSS_TYPE} --num_iter
{NUM_ITERATIONS} --model {MODEL} --rescale_image {RESCALE_IMAGE}
--maintain_aspect_ratio {MAINTAIN_ASPECT_RATIO} --content_layer {CONTENT_LAYER}
--init_image {INITIALIZATION_IMAGE} --pool_type {POOLING_TYPE} --preserve_color
{PRESERVE_COLOR} --min_improvement {MIN_IMPROVEMENT}

Not able to reproduce the results

Hi,

With all default settings in the jupyter notebook, the generated results does not look any similar to the results you posted.
I did not use google.colab to import content and style images, instead, the image are directly set by
CONTENT_IMAGE_FN = "../deepArt.ai/test/blue-moon-lake.jpg"
STYLE_IMAGE_FN = "../deepArt.ai/test/starry_night.jpg"

gen_at_iteration_10

several issues

1.On linux, when I ran the project, it show "no module named tensorflow",evenif I had installed Theano. How to change it to theano?
2.I tried to install tensorflow and run again, then I received this:
Traceback (most recent call last):
File "Network.py", line 257, in
base_image = K.variable(preprocess_image(base_image_path, True, read_mode=read_mode))
File "Network.py", line 141, in preprocess_image
img = imread(image_path, mode=mode) # Prevents crashes due to PNG images (ARGB)
TypeError: imread() got an unexpected keyword argument 'mode'

3.I changed "img = imread(image_path, mode=mode)" to "img = imread(image_path, mode)" and ran it again, I encounted the 3rd problem:

Traceback (most recent call last):
File "Network.py", line 257, in
base_image = K.variable(preprocess_image(base_image_path, True, read_mode=read_mode))
File "Network.py", line 160, in preprocess_image
img = img[:, :, ::-1]
IndexError: too many indices for array

  1. To run the project,should all the path be from root?

Look forward to your reply, thank you

Image only blurs when run through INetwork

I am trying to run the INetwork keras code, but am running into an issue where the image only seems to blur, but does not take any style from the other image. I have tried tweaking the parameters as suggested in your guide to no seeming effect.

The images that I am using are
haydog

for the source and

haystacks-in-provence

for the style.

The most recent parameters attempted are

content weight: .025
style_weight: 1.0
style_scale: 1
tv_weight: .000085
content layer conv5_2
max pooling

The image looks like this after 1
haydoggie_at_iteration_10
0 iterations.

Easy Linux Install

This project is, by far, the easiest to set up of the nn style transfer repos I've encountered. It might be nice to include in the guide a brief example of a conda environment setup that works on Ubuntu (with anaconda):

conda create -n nst numpy scipy pil h5py keras tensorflow-gpu

As long as you have an NVIDIA GPU and latest driver installed ahead of time, this will relieve you of the need to manually install CUDA and cuDNN.

InvalidArgumentError: Tensor add_17:0, specified in either feed_devices or fetch_devices was not found in the Graph

Hi,

I'm getting error when i send multiple request to tensorflow keras module.

Error:

File "/usr/lib/python2.7/dist-packages/tensorflow/python/keras/backend.py", line 3289, in call
self._make_callable(feed_arrays, feed_symbols, symbol_vals, session)
File "/usr/lib/python2.7/dist-packages/tensorflow/python/keras/backend.py", line 3222, in _make_callable
callable_fn = session._make_callable_from_options(callable_opts)
File "/usr/lib/python2.7/dist-packages/tensorflow/python/client/session.py", line 1489, in _make_callable_from_options
return BaseSession._Callable(self, callable_options)
File "/usr/lib/python2.7/dist-packages/tensorflow/python/client/session.py", line 1446, in init
session._session, options_ptr)

InvalidArgumentError: Tensor add_17:0, specified in either feed_devices or fetch_devices was not found in the Graph

Please suggest.

multiple style transfer

After read #21 , I have a question about the masked style transfer.
If Mask A has combined with style A and so on for Mask B, then how to combine both images as a output?

Thanks and best regards

Question about improved style loss

Could you briefly explain, please, why you are using difference between sl1 and sl2 here? I cannot find this approach in the article.

And why do you divide by powers of 2 here, although the article proposes to use they as weights?

Error with line 316 of Network.py

Hey, I'm trying to run your style transfer code, but I keep getting an error with line 316 in Network.py . I have keras 1.2.2. Here's what I'm running in the terminal (base image, style image, and output directory):

$python Network.py ~/Desktop/orange_wall.jpg ~/Desktop/picasso_blue-nude.jpg ~/Desktop/PracticeOutput/

And here's the error:
Traceback (most recent call last): File "Network.py", line 316, in <module> x = Convolution2D(64, (3, 3), activation='relu', name='conv1_1', padding='same')(ip) TypeError: __init__() takes at least 4 arguments (4 given)

Can anyone help me out? @titu1994

IndexError: tuple index out of range

Tried your suggested keras upgrade. Ran the same command as before and got:
Traceback (most recent call last): File "Network.py", line 316, in <module> x = Convolution2D(64, (3, 3), activation='relu', name='conv1_1', padding='same')(ip) File "/anaconda/lib/python2.7/site-packages/keras/engine/topology.py", line 615, in __call__ output_shape = self.compute_output_shape(input_shape) File "/anaconda/lib/python2.7/site-packages/keras/layers/convolutional.py", line 191, in compute_output_shape self.kernel_size[i], IndexError: tuple index out of range

Any suggestions, @titu1994 ?

add estimate of gpu memory needed to guide

guide.md states "Large image sizes require a lot more time per epoch, and very large images may not even fit in GPU memory causing the script to crash."

Any idea how much memory is too little for a given image size? I tried generating with image-size=1000 and was surprised to run into this issue since I should have ~12GB of gpu memory available.

Here's what the error looks like btw:

Limit:                 11353969050
InUse:                  8724098048
MaxInUse:              11317668352
NumAllocs:                     594
MaxAllocSize:           2592000000

W tensorflow/core/common_runtime/bfc_allocator.cc:270] *************x_____**************x**********************************_***********___**_________*****x
W tensorflow/core/common_runtime/bfc_allocator.cc:271] Ran out of memory trying to allocate 1.07GiB.  See logs for memory state.
W tensorflow/core/framework/op_kernel.cc:968] Resource exhausted: OOM when allocating tensor with shape[3,1000,1501,64]

Question about multiple style transfer

Hello.

I working on project which require multiple style transfer, but now i started from lasagne recipe implementation.

Can you describe or share information how to implement multiple style transfer in efficient manner?

Thanks and best regards

Low-res results are better than hi-res ones

Hello,

I am using your tool to change the style of a high-res image (about 1k x 1k).
When I run it with --image_size = 400 I get very nice results, but then if I run it with --image_size = 1000 the results are not as good since they are too similar to the content image.

I tried to increase num_iter and to increase style_weight and decrese content_weight but I seem to get nothing really different.

Do you have any suggestion about how to get in hi-res similar results to what I have in low-res?

Thank you

UnicodeDecodeError

I followed the installation guide on Windows (I'm using Win7 x64). Tried using both the script helper and the console command but I get the following error:

Using Theano backend.
Using gpu device 0: GeForce GTX 760 (CNMeM is enabled with initial size: 80.0% of memory, cuDNN None)
Traceback (most recent call last):
File "inetwork.py", line 8, in
from keras.models import Sequential
File "C:\Anaconda3\lib\site-packages\keras_init_.py", line 2, in
from . import backend
File "C:\Anaconda3\lib\site-packages\keras\backend_init_.py", line 66, in
from .theano_backend import *
File "C:\Anaconda3\lib\site-packages\keras\backend\theano_backend.py", line 1, in
import theano
File "C:\Anaconda3\lib\site-packages\theano_init_.py", line 111, in
theano.sandbox.cuda.tests.test_driver.test_nvidia_driver1()
File "C:\Anaconda3\lib\site-packages\theano\sandbox\cuda\tests\test_driver.py", line 31, in test_nvidia_driver1
profile=False)
File "C:\Anaconda3\lib\site-packages\theano\compile\function.py", line 320, in function
output_keys=output_keys)
File "C:\Anaconda3\lib\site-packages\theano\compile\pfunc.py", line 479, in pfunc
output_keys=output_keys)
File "C:\Anaconda3\lib\site-packages\theano\compile\function_module.py", line 1777, in orig_function
defaults)
File "C:\Anaconda3\lib\site-packages\theano\compile\function_module.py", line 1641, in create
input_storage=input_storage_lists, storage_map=storage_map)
File "C:\Anaconda3\lib\site-packages\theano\gof\link.py", line 690, in make_thunk
storage_map=storage_map)[:3]
File "C:\Anaconda3\lib\site-packages\theano\gof\vm.py", line 1003, in make_all
no_recycling))
File "C:\Anaconda3\lib\site-packages\theano\sandbox\cuda_init_.py", line 256, in make_thunk
compute_map, no_recycling)
File "C:\Anaconda3\lib\site-packages\theano\gof\op.py", line 970, in make_thunk
no_recycling)
File "C:\Anaconda3\lib\site-packages\theano\gof\op.py", line 879, in make_c_thunk
output_storage=node_output_storage)
File "C:\Anaconda3\lib\site-packages\theano\gof\cc.py", line 1200, in make_thunk
keep_lock=keep_lock)
File "C:\Anaconda3\lib\site-packages\theano\gof\cc.py", line 1143, in compile
keep_lock=keep_lock)
File "C:\Anaconda3\lib\site-packages\theano\gof\cc.py", line 1595, in cthunk_factory
key=key, lnk=self, keep_lock=keep_lock)
File "C:\Anaconda3\lib\site-packages\theano\gof\cmodule.py", line 1142, in module_from_key
module = lnk.compile_cmodule(location)
File "C:\Anaconda3\lib\site-packages\theano\gof\cc.py", line 1506, in compile_cmodule
preargs=preargs)
File "C:\Anaconda3\lib\site-packages\theano\sandbox\cuda\nvcc_compiler.py", line 362, in compile_str
nvcc_stdout, nvcc_stderr = decode_iter(p.communicate()[:2])
File "C:\Anaconda3\lib\site-packages\theano\compat_init_.py", line 46, in decode_iter
yield x.decode()
UnicodeDecodeError: 'utf-8' codec can't decode byte 0xe1 in position 44: invalid continuation byte

I probably made a stupid mistake somewhere.

Looking forward to your reply. Thank you.

Selecting Anaconda python.exe in Linux

When I am running the script GUI with Ubuntu+Mono and I hit Compute, it prompts me for the Anaconda python as expected. However, it only accepts 'python.exe'. I switch the dropdown to All Files and select /path/to/anaconda2/bin/python2.7. It didn't work though, and it renders the Compute button useless :\

So was I supposed to download Anaconda for Windows and save it alongside my Linux Anaconda?

ImportError: cannot import name 'imread' in google colab

This is a marvelous labor, but unfortunately i'm unable to do actually run this command on google colab.

!python {dir_path}/{NETWORK} -h

It throw an error

Traceback (most recent call last):gf
  File "Neural-Style-Transfer/INetwork.py", line 5, in <module>
    from scipy.misc import imread, imresize, imsave, fromimage, toimage
ImportError: cannot import name 'imread'

But the name of the lib is right.
https://docs.scipy.org/doc/scipy-0.18.1/reference/generated/scipy.misc.imread.html

I'm kind of new in python. So idk what could it be :/

Multi scale transfer

Hello,

I am interested in the multi-scale transfer you showed. I couldn't however understand the process very well. Could you list the steps you did? especially, how do you combine the different scales (192x192, 384x384, 768x768)?

Thank you!

"IndexError: tuple index out of range"

I'm running the sample images (using either the theano or tensorflow backends) and get the following error: IndexError: tuple index out of range

~/arts/Neural-Style-Transfer$ python Network.py images/inputs/content/Japanese-cherry-widescreen-wallpaper-Picture-1366x768.jpg images/inputs/style/candy-style.jpg images/inputs/style/water-lilies-1919-2.jpg "Cherry Blossom" --style_masks images/inputs/mask/cherry-blossom-1.jpg images/inputs/mask/cherry-blossom-2.jpg --content_weight 5 --style_weight 1.0 1.0 --num_iter 20 --model vgg16 --content_loss_type 0
Using TensorFlow backend.
Traceback (most recent call last):
  File "Network.py", line 319, in <module>
    x = Convolution2D(64, (3, 3), activation='relu', name='conv1_1', padding='same')(ip)
  File "/home/artcade/anaconda2/lib/python2.7/site-packages/keras/engine/topology.py", line 615, in __call__
    output_shape = self.compute_output_shape(input_shape)
  File "/home/artcade/anaconda2/lib/python2.7/site-packages/keras/layers/convolutional.py", line 193, in compute_output_shape
    self.kernel_size[i],
IndexError: tuple index out of range

I've installed the following versions of CUDA and cuDNN:

cuda_8.0.61_375.26_linux.run
cudnn-8.0-linux-x64-v6.0.tgz

I'm running this on Linux, on an NVidia 1080 GPU.

I suspect I'm doing something simple but wrong. Any idea where to look?

Invalid float

  1. Run Programm
  2. Programm say "XXX not in standard format"
  3. Сhange all "." to ","
  4. ???
  5. python say "invalid float value"
    proofpics

Fix it please.

Doodle giving some odd result

Running:

python improved_neural_doodle.py --nlabels 4 --style-image ../in/vg/srcl.jpg --style-mask ../in/vg/srcl-m.png --target-mask ../in/vg/dst-m.png --target-image-prefix ./doodle1

Result is:

http://imgur.com/a/0CYLB

Currently trying with tweaked parameters:

python improved_neural_doodle.py --nlabels 4 --style-image ../in/vg/srcl.jpg --style-mask ../in/vg/srcl-m.png --target-mask ../in/vg/dst-m.png --target-image-prefix ./doodle1 --content_weight 0 --num_iter 50

GPU vs CPU

How do I know if it is using the GPU instead of the CPU. Right now it takes 165s for 1 epoch using default 400x400 matrix... is this normal?

I usually run 50 iterations in neural-style in about 15 seconds on the same machine.

Issues with scipy/pil [Win10]

Followed the installation guide to a T on windows and entered the following command:

\Neural-Style-Transfer-master>python inetwork.py "A:\Dev\Deepdream\images\B.jpg" "A:\Dev\Deepdream\images\A.jpg" "A:\Dev\Deepdream\images\C.jpg" --image_size 600 --content_weight 0.025 --style_weight 1 --total_variation_weight 0.0001 --style_scale 1 --num_iter 20 --rescale_image "False" --rescale_method "bilinear" --maintain_aspect_ratio "True" --content_layer "conv5_2" --init_image "content" --pool_type "max" --preserve_color "False" --min_improvement 0

I got back an execution error:

Traceback (most recent call last):
  File "inetwork.py", line 1, in <module>
    from scipy.misc import imread, imresize, imsave, fromimage, toimage
ImportError: cannot import name 'imread'

After doing some research I found out that scipy relies on PIL but doesn't actually come with it in the download recommended. SO I tried >pip install pil but that resulted in a "No distribution found for pil". Frustrated I found out that pillow is a replacement for PIL that should work. So... >pip install pillow. I then executed the same command as before and got 1065 lines of raw code put onto my screen along with the following error message:

Problem occurred during compilation with the command line below:
A:\Dev\TDM-GCC-64\bin\g++.exe -shared -g -march=haswell -mmmx -mno-3dnow -msse -msse2 -msse3 -mssse3 -mno-sse4a -mcx16 -msahf -mmovbe -maes -mno-sha -mpclmul -mpopcnt -mabm -mno-lwp -mfma -mno-fma4 -mno-xop -mbmi -mbmi2 -mno-tbm -mavx -mavx2 -msse4.2 -msse4.1 -mlzcnt -mno-rtm -mno-hle -mrdrnd -mf16c -mfsgsbase -mno-rdseed -mno-prfchw -mno-adx -mfxsr -mxsave -mxsaveopt -mno-avx512f -mno-avx512er -mno-avx512cd -mno-avx512pf -mno-prefetchwt1 -mno-clflushopt -mno-xsavec -mno-xsaves -mno-avx512dq -mno-avx512bw -mno-avx512vl -mno-avx512ifma -mno-avx512vbmi -mno-clwb -mno-pcommit --param l1-cache-size=32 --param l1-cache-line-size=64 --param l2-cache-size=6144 -mtune=haswell -DNPY_NO_DEPRECATED_API=NPY_1_7_API_VERSION -m64 -DMS_WIN64 -IA:\Dev\Miniconda\lib\site-packages\numpy\core\include -IA:\Dev\Miniconda\include -IA:\Dev\Miniconda\lib\site-packages\theano\gof -o C:\Users\MBahr\AppData\Local\Theano\compiledir_Windows-10-10.0.14393-Intel64_Family_6_Model_60_Stepping_3_GenuineIntel-3.4.5-64\lazylinker_ext\lazylinker_ext.pyd C:\Users\MBahr\AppData\Local\Theano\compiledir_Windows-10-10.0.14393-Intel64_Family_6_Model_60_Stepping_3_GenuineIntel-3.4.5-64\lazylinker_ext\mod.cpp -LA:\Dev\Miniconda\libs -LA:\Dev\Miniconda -lpython34
A:\Dev\Miniconda\libs/python34.lib: error adding symbols: File in wrong format
collect2.exe: error: ld returned 1 exit status

Traceback (most recent call last):
  File "A:\Dev\Miniconda\lib\site-packages\theano\gof\lazylinker_c.py", line 74, in <module>
    raise ImportError()
ImportError

During handling of the above exception, another exception occurred:

Traceback (most recent call last):
  File "A:\Dev\Miniconda\lib\site-packages\theano\gof\lazylinker_c.py", line 91, in <module>
    raise ImportError()
ImportError

During handling of the above exception, another exception occurred:

Traceback (most recent call last):
  File "inetwork.py", line 7, in <module>
    from keras.models import Sequential
  File "A:\Dev\Miniconda\lib\site-packages\keras\__init__.py", line 2, in <module>
    from . import backend
  File "A:\Dev\Miniconda\lib\site-packages\keras\backend\__init__.py", line 61, in <module>
    from .theano_backend import *
  File "A:\Dev\Miniconda\lib\site-packages\keras\backend\theano_backend.py", line 1, in <module>
    import theano
  File "A:\Dev\Miniconda\lib\site-packages\theano\__init__.py", line 63, in <module>
    from theano.compile import (
  File "A:\Dev\Miniconda\lib\site-packages\theano\compile\__init__.py", line 9, in <module>
    from theano.compile.function_module import *
  File "A:\Dev\Miniconda\lib\site-packages\theano\compile\function_module.py", line 22, in <module>
    import theano.compile.mode
  File "A:\Dev\Miniconda\lib\site-packages\theano\compile\mode.py", line 12, in <module>
    import theano.gof.vm
  File "A:\Dev\Miniconda\lib\site-packages\theano\gof\vm.py", line 638, in <module>
    from . import lazylinker_c
  File "A:\Dev\Miniconda\lib\site-packages\theano\gof\lazylinker_c.py", line 126, in <module>
    preargs=args)
  File "A:\Dev\Miniconda\lib\site-packages\theano\gof\cmodule.py", line 2204, in compile_str
    (status, compile_stderr.replace('\n', '. ')))
. collect2.exe: error: ld returned 1 exit status A:\Dev\Miniconda\libs/python34.lib: error adding symbols: File in wrong format

No clue what I did here. I'm doing the miniconda forced downgrade to Python 3.4 because Anaconda 2.2 was crashing whenever I tried to do upgrade --all. The python version is Python 3.4.5. Here's what pip list returns:

conda (4.1.12)
conda-env (2.5.0a0)
Keras (1.0.8)
menuinst (1.4.1)
numpy (1.11.1+mkl)
Pillow (3.3.1)
pip (8.1.2)
pycosat (0.6.1)
pycrypto (2.6.1)
PyYAML (3.11)
requests (2.11.1)
ruamel-yaml (-VERSION)
scipy (0.18.0)
setuptools (26.1.1)
six (1.10.0)
statsmodels (0.6.1)
Theano (0.8.2)
wheel (0.29.0)

It looks like I have the packages you'd listed installed but I'm getting nowhere with my bumbling about. Any suggestions?

environment.yml

I recommend adding an environment.yml file so conda can easily be used to install everything.

is this commend right?

python Network.py '/home/ekse/Pictures/QQphoto.jpeg' '/home/ekse/Pictures/starry_night.jpg' '' --image_size 400 --content_weight 0.025 --style_weight 1 --total_variation_weight 1E-05 --style_scale 1 --num_iter 1 --rescale_image "False" --rescale_method "billinear" --maintain_aspect_ratio "True" --content_layer "conv5_2" --init_image "content" --pool_type "ave"

but it took me half hour and no result.

thank you.

Cannot reproduce example outputs

The program seems not to work as intended even when I try to reproduce the example outputs.

python Network.py images/inputs/content/sagano_bamboo_forest.jpg images/inputs/style/patterned_leaves.jpg images/output/test3 --num_iter 50

Epoch 10:
test3_at_iteration_10

Epoch 20:
test3_at_iteration_20

Epoch 30:
test3_at_iteration_30

Epoch 40:
test3_at_iteration_40

Epoch 50:
test3_at_iteration_50

I've tried running on Ubuntu 16.04 with an Nvidia GeForce GTX 670, and also OSX 10.10.4 CPU-only. Tensorflow backend in both cases. I see similar results in both cases.

ImportError: cannot import name imread

Traceback (most recent call last):
File "Network.py", line 2, in
from scipy.misc import imread, imresize, imsave, fromimage, toimage
ImportError: cannot import name imread

version:scipy-0.18.1
system:Ubuntu 14.04
PIL was installed,but still it didn't work.

I tried to change "from scipy.misc import imread, imresize, imsave, fromimage, toimage " to "from scipy.misc import * "
then there were other problems:
Traceback (most recent call last):
File "Network.py", line 10, in
from keras.models import Sequential
File "/home/chaoxin/miniconda2/envs/tensorflow/lib/python2.7/site-packages/keras/init.py", line 2, in
from . import backend
File "/home/chaoxin/miniconda2/envs/tensorflow/lib/python2.7/site-packages/keras/backend/init.py", line 69, in
from .tensorflow_backend import *
File "/home/chaoxin/miniconda2/envs/tensorflow/lib/python2.7/site-packages/keras/backend/tensorflow_backend.py", line 1, in
import tensorflow as tf
File "/home/chaoxin/miniconda2/envs/tensorflow/lib/python2.7/site-packages/tensorflow/init.py", line 23, in
from tensorflow.python import *
File "/home/chaoxin/miniconda2/envs/tensorflow/lib/python2.7/site-packages/tensorflow/python/init.py", line 45, in
from tensorflow.python import pywrap_tensorflow
File "/home/chaoxin/miniconda2/envs/tensorflow/lib/python2.7/site-packages/tensorflow/python/pywrap_tensorflow.py", line 28, in
_pywrap_tensorflow = swig_import_helper()
File "/home/chaoxin/miniconda2/envs/tensorflow/lib/python2.7/site-packages/tensorflow/python/pywrap_tensorflow.py", line 24, in swig_import_helper
_mod = imp.load_module('_pywrap_tensorflow', fp, pathname, description)
ImportError: libcudart.so.7.5: cannot open shared object file: No such file or directory

Expecting a int32? Gets a Variable?

Running in Ubuntu and calling just the Network.py
Looked all over but can't seem to find the answer?

(Neural-Style-Transfer-master) maxss280@ubuntu:~/Scripts/Neural-Style-Transfer$ python ./Network.py ./our_img.jpg ./style.jpg ./output
Using TensorFlow backend.
W tensorflow/core/platform/cpu_feature_guard.cc:45] The TensorFlow library wasn't compiled to use SSE3 instructions, but these are available on your machine and could speed up CPU computations.
W tensorflow/core/platform/cpu_feature_guard.cc:45] The TensorFlow library wasn't compiled to use SSE4.1 instructions, but these are available on your machine and could speed up CPU computations.
W tensorflow/core/platform/cpu_feature_guard.cc:45] The TensorFlow library wasn't compiled to use SSE4.2 instructions, but these are available on your machine and could speed up CPU computations.
W tensorflow/core/platform/cpu_feature_guard.cc:45] The TensorFlow library wasn't compiled to use AVX instructions, but these are available on your machine and could speed up CPU computations.
W tensorflow/core/platform/cpu_feature_guard.cc:45] The TensorFlow library wasn't compiled to use FMA instructions, but these are available on your machine and could speed up CPU computations.
Traceback (most recent call last):
  File "./Network.py", line 307, in <module>
    input_tensor = K.concatenate(image_tensors, axis=0)
  File "/usr/local/lib/python2.7/dist-packages/Keras-1.0.7-py2.7.egg/keras/backend/tensorflow_backend.py", line 669, in concatenate
    return tf.concat(axis, tensors)
  File "/usr/local/lib/python2.7/dist-packages/tensorflow/python/ops/array_ops.py", line 1047, in concat
    dtype=dtypes.int32).get_shape(
  File "/usr/local/lib/python2.7/dist-packages/tensorflow/python/framework/ops.py", line 651, in convert_to_tensor
    as_ref=False)
  File "/usr/local/lib/python2.7/dist-packages/tensorflow/python/framework/ops.py", line 716, in internal_convert_to_tensor
    ret = conversion_func(value, dtype=dtype, name=name, as_ref=as_ref)
  File "/usr/local/lib/python2.7/dist-packages/tensorflow/python/framework/constant_op.py", line 176, in _constant_tensor_conversion_function
    return constant(v, dtype=dtype, name=name)
  File "/usr/local/lib/python2.7/dist-packages/tensorflow/python/framework/constant_op.py", line 165, in constant
    tensor_util.make_tensor_proto(value, dtype=dtype, shape=shape, verify_shape=verify_shape))
  File "/usr/local/lib/python2.7/dist-packages/tensorflow/python/framework/tensor_util.py", line 367, in make_tensor_proto
    _AssertCompatible(values, dtype)
  File "/usr/local/lib/python2.7/dist-packages/tensorflow/python/framework/tensor_util.py", line 302, in _AssertCompatible
    (dtype.name, repr(mismatch), type(mismatch).__name__))
TypeError: Expected int32, got <tensorflow.python.ops.variables.Variable object at 0x7fb232043810> of type 'Variable' instead.

Error in line 320 INetwork.py (Expected int32, got variable)

I am using the latest versions of tensorflow-gpu (0.12.1) and keras (2.0.5) but don't get your scripts to work properly :(

This is the output I am getting (arguments generated by your script-helper):

python INetwork.py "C:\Users\wottpal\Desktop\Neural Style Transfer\Images\uniturm_jena.jpg" "C:\Users\wottpal\Desktop\Neural Style Transfer\Images\cathedral-of-socialism-1919.jpg" "" --image_size 400 --content_weight 0.025 --style_weight 1.0 --total_variation_weight 8.5E-05 --style_scale 1 --num_iter 10 --rescale_image "False" --rescale_method "bicubic" --maintain_aspect_ratio "True" --content_layer "conv5_2" --init_image "content" --pool_type "max" --preserve_color "False" --min_improvement 0 --model "vgg16" --content_loss_type 0
Using TensorFlow backend.
I c:\tf_jenkins\home\workspace\release-win\device\gpu\os\windows\tensorflow\stream_executor\dso_loader.cc:128] successfully opened CUDA library cublas64_80.dll locally
I c:\tf_jenkins\home\workspace\release-win\device\gpu\os\windows\tensorflow\stream_executor\dso_loader.cc:128] successfully opened CUDA library cudnn64_5.dll locally
I c:\tf_jenkins\home\workspace\release-win\device\gpu\os\windows\tensorflow\stream_executor\dso_loader.cc:128] successfully opened CUDA library cufft64_80.dll locally
I c:\tf_jenkins\home\workspace\release-win\device\gpu\os\windows\tensorflow\stream_executor\dso_loader.cc:128] successfully opened CUDA library nvcuda.dll locally
I c:\tf_jenkins\home\workspace\release-win\device\gpu\os\windows\tensorflow\stream_executor\dso_loader.cc:128] successfully opened CUDA library curand64_80.dll locally
Traceback (most recent call last):
  File "INetwork.py", line 320, in <module>
    input_tensor = K.concatenate(image_tensors, axis=0)
  File "C:\Users\wottpal\AppData\Local\Programs\Python\Python35\lib\site-packages\keras\backend\tensorflow_backend.py", line 1721, in concatenate
    return tf.concat([to_dense(x) for x in tensors], axis)
  File "C:\Users\wottpal\AppData\Local\Programs\Python\Python35\lib\site-packages\tensorflow\python\ops\array_ops.py", line 1075, in concat
    dtype=dtypes.int32).get_shape(
  File "C:\Users\wottpal\AppData\Local\Programs\Python\Python35\lib\site-packages\tensorflow\python\framework\ops.py", line 669, in convert_to_tensor
    ret = conversion_func(value, dtype=dtype, name=name, as_ref=as_ref)
  File "C:\Users\wottpal\AppData\Local\Programs\Python\Python35\lib\site-packages\tensorflow\python\framework\constant_op.py", line 176, in _constant_tensor_conversion_function
    return constant(v, dtype=dtype, name=name)
  File "C:\Users\wottpal\AppData\Local\Programs\Python\Python35\lib\site-packages\tensorflow\python\framework\constant_op.py", line 165, in constant
    tensor_util.make_tensor_proto(value, dtype=dtype, shape=shape, verify_shape=verify_shape))
  File "C:\Users\wottpal\AppData\Local\Programs\Python\Python35\lib\site-packages\tensorflow\python\framework\tensor_util.py", line 367, in make_tensor_proto
    _AssertCompatible(values, dtype)
  File "C:\Users\wottpal\AppData\Local\Programs\Python\Python35\lib\site-packages\tensorflow\python\framework\tensor_util.py", line 302, in _AssertCompatible
    (dtype.name, repr(mismatch), type(mismatch).__name__))
TypeError: Expected int32, got <tensorflow.python.ops.variables.Variable object at 0x00000279CD505A90> of type 'Variable' instead.

about Neural Style Transfer.exe

I read the reference. and it said i should download mono C# to use Neural Style Transfer.exe. After all the requirements i installed, i still can not run “Neural Style Transfer.exe”. Besides, i used linux and keras theano bankend . So my question is how to run “Neural Style Transfer.exe”, how to open it? I tried to just click it, or 'mono “Neural Style Transfer.exe”'. It did not use.
thanks

aspect ratio

Hi, nice code and thank you for sharing it!
Why do you say (and require) that Gram matrix is square?
In fact your code seems to work even when this requirement is dropped out (thanks for keeping widths and heights separate).

Error when running new doodle code

When running:

bernard@linux-imac:~/Neural-Style-Transfer$ python neural_doodle.py --nlabels 4 --style-image ../in/vg/srcl.jpg --style-mask ../in/vg/srcl-m.png --target-mask ../in/vg/dst-m.png --target-image-prefix ./doodle1

I get:

Using Theano backend.
Using gpu device 0: GeForce GTX 780M (CNMeM is enabled with initial size: 80.0% of memory, cuDNN 5103)
/home/bernard/anaconda2/lib/python2.7/site-packages/theano/sandbox/cuda/__init__.py:600: UserWarning: Your cuDNN version is more recent than the one Theano officially supports. If you see any problems, try updating Theano or downgrading cuDNN to version 5.
  warnings.warn(warn)
Traceback (most recent call last):
  File "neural_doodle.py", line 12, in <module>
    from keras.applications import vgg16
ImportError: No module named applications

Tried updating conda packages but still getting the error.

Recommend Projects

  • React photo React

    A declarative, efficient, and flexible JavaScript library for building user interfaces.

  • Vue.js photo Vue.js

    🖖 Vue.js is a progressive, incrementally-adoptable JavaScript framework for building UI on the web.

  • Typescript photo Typescript

    TypeScript is a superset of JavaScript that compiles to clean JavaScript output.

  • TensorFlow photo TensorFlow

    An Open Source Machine Learning Framework for Everyone

  • Django photo Django

    The Web framework for perfectionists with deadlines.

  • D3 photo D3

    Bring data to life with SVG, Canvas and HTML. 📊📈🎉

Recommend Topics

  • javascript

    JavaScript (JS) is a lightweight interpreted programming language with first-class functions.

  • web

    Some thing interesting about web. New door for the world.

  • server

    A server is a program made to process requests and deliver data to clients.

  • Machine learning

    Machine learning is a way of modeling and interpreting data that allows a piece of software to respond intelligently.

  • Game

    Some thing interesting about game, make everyone happy.

Recommend Org

  • Facebook photo Facebook

    We are working to build community through open source technology. NB: members must have two-factor auth.

  • Microsoft photo Microsoft

    Open source projects and samples from Microsoft.

  • Google photo Google

    Google ❤️ Open Source for everyone.

  • D3 photo D3

    Data-Driven Documents codes.