For your convenience, you can download a ready to use version of the plugin directly from our website. If you do so, you can skip the installation instructions and jump directly to the Enabling and configuring the plugin section.
Before using this plugin, you should be familiar with NoesisGUI. Please, refer to our online documentation.
This document will guide you through the process of setting up the NoesisGUI Unreal Engine plugin, and how to get started using NoesisGUI in your Unreal Engine project.
NoesisGUI is a hardware accelerated, vector graphics User Interface solution based on XAML.
Some knowledge of both Unreal Engine as well as the NoesisGUI SDK is assumed, but this document attempts to be as thorough as possible.
After you read this document, we have a few samples so you can see some of the concepts in action:
-
HelloWorld: A minimal sample showing how to present the contents of a XAML on the screen.
-
Buttons: A simple game that shows how you can use
Bindings to implementCommands asBlueprintfunctions. -
Widget3D: A similar UI, but this time presented in 3D using Unreal Engine's
WidgetComponent. -
Login: A slightly more elaborated sample that uses
Bindings to data and functions in aBlueprint, combined with some C++ code for more advanced functions. -
QuestLog: This samples shows how to use
Bindings to more complex data, such asTextures andArrays ofObjects. -
Scoreboard: This sample shows more advanced ways to expose data on
Blueprints so that it can be used inBindings, such as using Getter functions and manually notifying property changes. -
Localization: A sample showing a way to implement content localization using
ResourceDictionarys. -
UserControl: This sample shows how to implement an
UserControlusing a XAML and a C++ code-behind class, and how to use it from another XAML. -
Menu3D: This sample shows how to use
UserControls to implement a multi-panel game main menu. -
TicTacToe: This sample shows how to use XAML and
Blueprints to implement the classic pen and paper game tic-tac-toe. -
Inventory: This sample shows how to implement a drag and drop inventory system UI.
-
ShooterGame: This sample replaces the UI from Epic's ShooterGame sample with NoesisGUI. Some changes were dome to the source code in order to expose data and functionality, but otherwise the UI is done completely in
Blueprint.
In order to use NoesisGUI in your UE4 project, you're going to need:
-
Unreal Engine, with source code. This can be either a pre-built version installed through the Epic Games Launcher, or a version built by yourself from the source in GitHub. To install a pre-built version of Unreal Engine, please refer to the document Installing Unreal Engine and follow the instructions there. For instructions on how to get a copy of the Unreal Engine source code and how to build it, please refer to the README.md document on their GitHub repository.
-
This Unreal Engine plugin.
-
The NoesisGUI SDK version 2.2.2. You can download it from our website.
-
Python with some additional modules to run the installation script (tested with Python 2.7 and 3.6).
The plugin works with versions of Unreal Engine installed trough the Epic Games Launcher as well as those built by yourself from the source code in GitHub.
With versions of Unreal Engine built from the source code in GitHub you can use the NoesisGUI Unreal Engine plugin as either an Engine plugin or a Project (Game) plugin. However, if you're using an Epic Games Launcher version of the engine, you can only install the plugin as a Project plugin. For more information about Unreal Engine Plugins, please refer to the Plugins documentation.
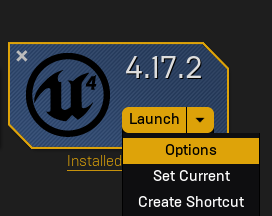
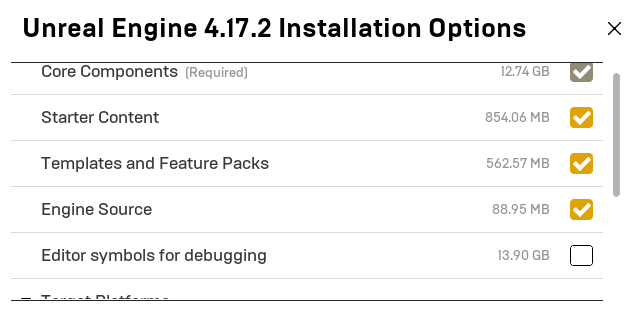
- If you're using a version of Unreal Engine installed trough the Epic Games Launcher, make sure you have the engine source code installed. To verify you do, go to the Unreal Engine tab in the Epic Games Launcher, then go to your library of installed components. From there, at the top, look for the Unreal Engine version with which you wish to use NoesisGUI, and from the drop down list next to the Launch button, select options. Make sure the Engine Source option is selected. If it isn't, click on the tick box next to it and then click Apply to download it.
- Download and install Python. Additionally, you need to install the following modules:
configparser(both on Windows and Mac),pywin32(on Windows) andpyobjc(on Mac). If you're not sure how to do this, for your convenience we provideInstallPythonPrerequisites.batandInstallPythonPrerequisites.commandthat will check these prerequisites and will install the required packages for you. Please, read the following section Plugin installation for more details. The installation scripts have been tested with Python 2.7 and 3.6. Other versions may work, but they are untested.
-
Copy the contents of this repository into
[UE4Root]/Engine/Plugins/NoesisGUIif you want to use it as an Engine plugin, or[ProjectRoot]/Plugins/NoesisGUIif you choose to use it as a Project plugin. We'll refer to the directory where you install the plugin as[NoesisGUIRoot]from now on.[UE4Root]is the directory where you installed the engine from the Epic Games Launcher, or the directory where you cloned the GitHub repository. -
Download the NoesisGUI SDK version 2.2.2 from our developer portal and extract it into
[NoesisGUIRoot]/Source/Noesis/NoesisSDK. -
If you haven't installed the required Python modules, or you want to verify they are correctly installed, you can execute
InstallPythonPrerequisites.batandInstallPythonPrerequisites.commandfrom the Command Prompt on Windows or Terminal on Mac. Navigate to the plugin directory and execute them from there. These will test whether the required modules are installed or not, and will install them if they're not present. You only need to install them once, so you don't need to perform this step every time you update the plugin or Unreal Engine. -
Install the plugin by executing
InstallPlugin.batfrom the Command Prompt on Windows orInstallPlugin.commandfrom the Terminal on Mac. If you're targeting more than one platform, you can pass them as arguments like this:InstallPlugin.command Mac IOS. The installer uses the same platform names as Unreal. The valid platform names areWin64,Mac,IOS,Android,PS4andXboxOne. The host platform (Win64orMac) is always built, as those binaries are required to run the editor. If you've installed the plugin as a project plugin the installer will enable it automatically by adding it to your.uprojectfile, as described in Enabling and configuring the plugin. IMPORTANT: You will need to perform this step every time you update Unreal Engine or get a new version of this plugin or the NoesisGUI SDK. -
Even after these steps, sometimes the Editor will warn you that the modules NoesisRuntime and NoesisEditor are out of date when you try to launch it. This may happen if you're running a configuration other than Development or if you've changed to a different engine version. Just click accept so the modules are rebuilt to target the correct version of Unreal Engine.
If all the steps so far have been successful, your Unreal Engine install should contain the following directories. Please note that only the directories relevant to the NoesisGUI plugin are listed here, and that your installation may contain additional files and directories that have been omitted here for clarity.
[NoesisGUIRoot]
+-- Binaries
+-- Content
+-- Intermediate
+-- Resources
+-- Shaders
+-- Source
    +-- Noesis
        +-- NoesisSDK
            +-- Bin
            +-- Include
            +-- Lib
            +-- version.txt
    +-- NoesisEditor
    +-- NoesisRuntime
+-- NoesisGUI.uplugin
At this point the plugin should be ready to use, so we can proceed to enable it and configure some settings for your project.
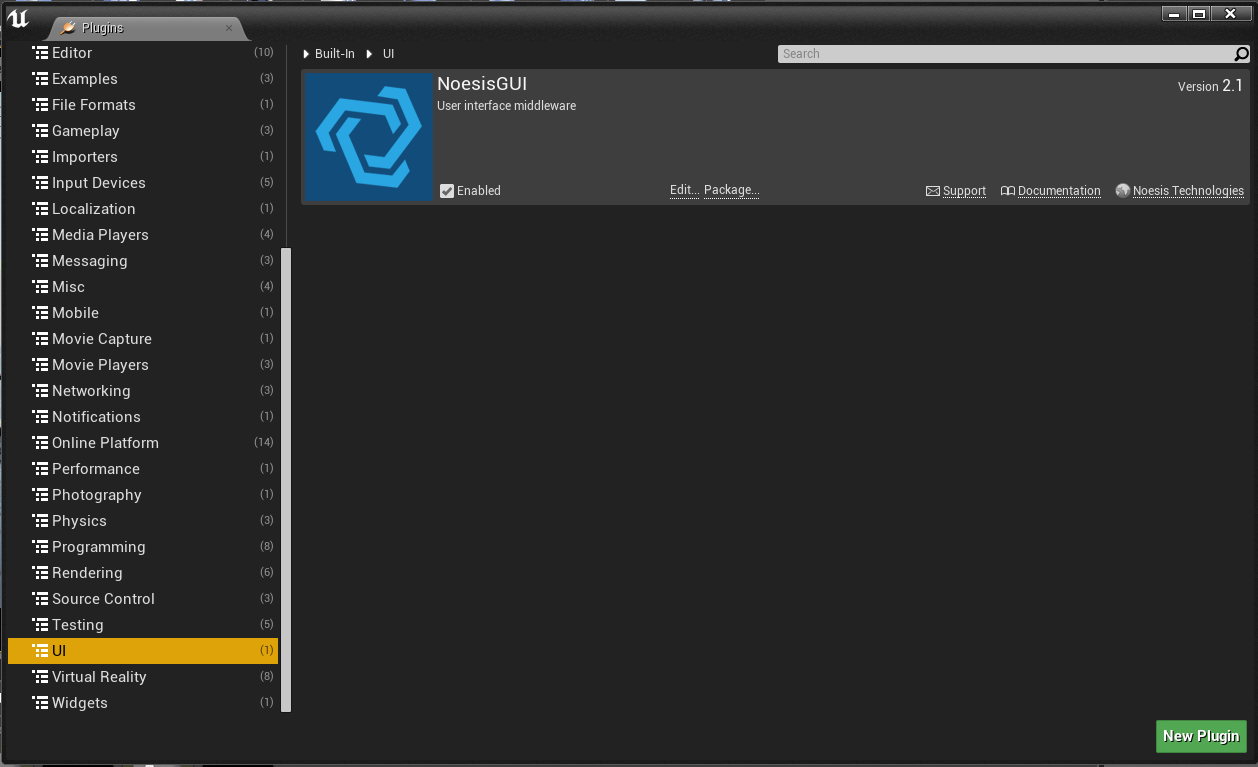
- Run the Unreal Engine editor. You may get an alert on the bottom right corner alerting you that new plugins have been installed. If you don't, open the Plugins dialog from the Edit menu, and selecting UI from the category list on the left. You can enable the plugin from the right hand panel.
You can also do this manually by modifying your Project's .uproject file to add the plugin dependency, like this:
"Plugins": [
    {
        "Name": "NoesisGUI",
        "Enabled": true
    }
]
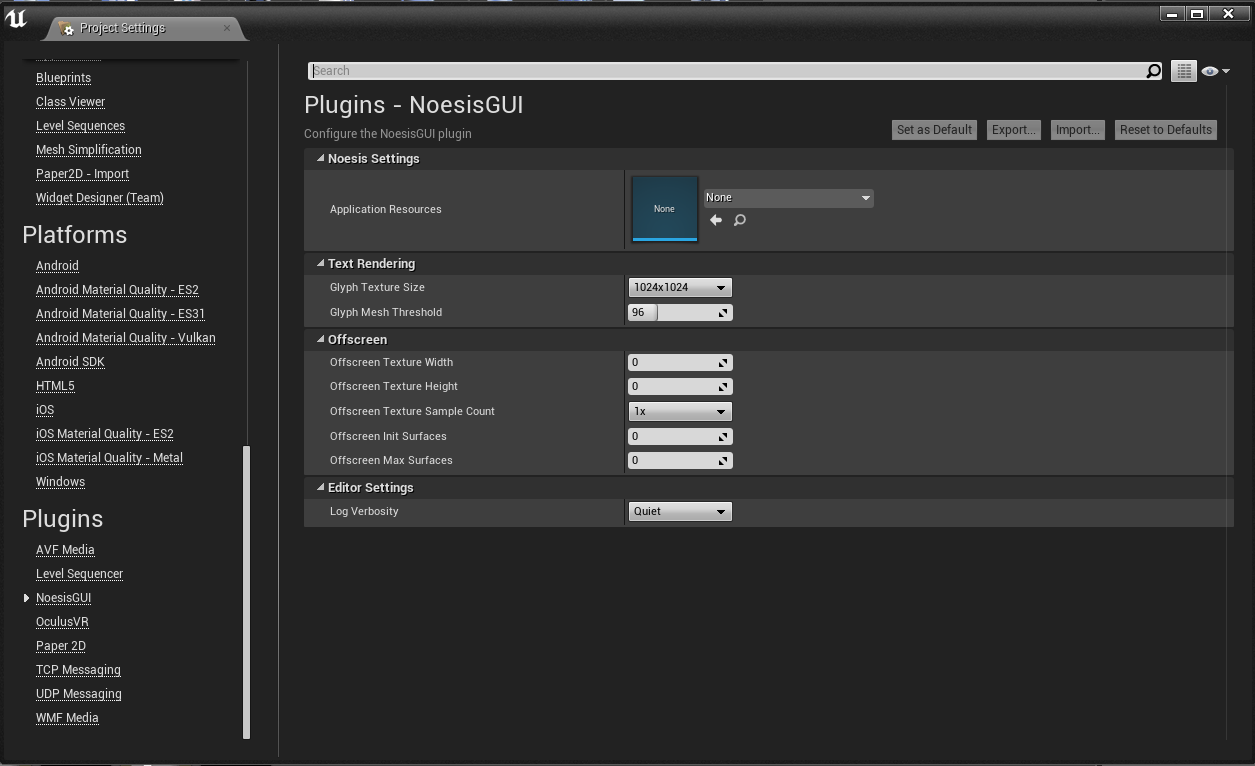
- With the plugin enabled, you can configure some NoesisGUI global settings for your project. You can find them by opening the Project Settings dialog from the Edit menu, then scrolling down to the Plugins section on the left panel, and finally NoesisGUI. These settings have sensible default values, so if you're unsure about them you can just leave them as they are. If you modify these settings you will have to restart the editor for the changes to take effect.
The process to set up you project to work with NoesisGUI depends on whether it is a Blueprint Only project or a C++ project.
For a Blueprint Only project, enabling the plugin as described above is all you need to do.
For a C++ project, there are two additional steps. First, you must add the module dependencies to your project. To do that, simply add the following line to you module's ModuleRules derived class (in your module's .Build.cs file):
PrivateDependencyModuleNames.AddRange(new string[] { "Noesis", "NoesisRuntime" });
Next, you have to #include the necessary headers for your project. To simplify this we've created a single header file you can include, preferably in your game project's PCH file. Just add the following line:
#include "NoesisRuntime.h"
With the NoesisGUI plugin for Unreal Engine you have all the power of the native NoesisGUI SDK at your disposal. There are a few particularities about the use that will be explained later, but the bottom line is that everything that can be done with the native SDK will work in Unreal Engine.
But we wanted to provide an easy way to allow users to leverage the power of NoesisGUI using Unreal Engine's Blueprints. A mechanism is provided that allows Bindings to Blueprint properties, without having to write a signle line of C++ code.
With this approach NoesisGUI will be more accesible for everyone, but at the same time will allow more advanced users to use the native SDK directly, with the complete set of features available to them as in any other platform.
At this point you're ready to start using NoesisGUI in your project. The first step is importing your assets. These will consist of XAML files, fonts and images. The best way to work with NoesisGUI assets in Unreal Engine is to put them in your game's Content folder. They will be automatically imported into Unreal Engine, and any modifications you make will be automatically re-imported. After import, your XAML files will appear in Unreal Engine's Content Browser as NoesisXaml assets, while your images will appear as Texture2Ds and fonts will appear as Fonts and FontFaces.

When importing your XAML files, these may contain references to other XAML files, as well as images and fonts, as stated above. These references may be in the form of relative or absolut URIs. When working with absolute URIs in Unreal Engine, by default these are considered as relative to the Content folder of your game project.
Alternatively, the plugin relies on Unreal Engine`s Auto Reimport feature to map source asset directories to folders in the Content Browser. If you want to keep your XAML project separate from your game's assets, add a new entry to the Auto Reimport settings. You can find them by opening the Editor Preferences dialog from the Edit menu, then scrolling down to the General section on the left panel, and finally Loading & Saving. The settings are in the Auto Reimport category, hidden by default on the extended options.

Within each mapped folder, absolute URIs will be placed directly in the mount point folder in the Content Browser.
If files outside of these folders (Autor Reimport folders and the game's Content folder), the Content folder will be considered its root, and the assets will be placed in folders starting with __, which is the result of making the source paths relative to the Content folder.
Please refer to the document URIs in NoesisGUI for more information.
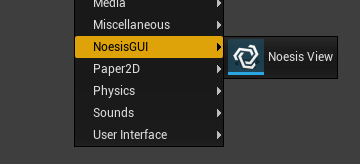
Now that we have our assets imported into the game, we have to create a View for it. We do this from the Content Browser, by using either the Add New button or by right clicking on the Content Browser itself. Then choose NoesisGUI and Noesis View.
After naming the newly created asset, open it. You will be presented with the familiar Blueprint Class editor. Click on the Class Settings button at the top, where you will find the NoesisGUI properties.

The most important of all is the XAML property. Here you'll reference the NoesisXaml for which you want to create hte View. Enable PPAA allows you to enable per-primitive antialiasing, in case you're not using multisampling on your main render target. Tessellation Quality lets you select the degree of subdivision for your path geometry.

After compiling and saving your NoesisView, we are ready to use it.
A NoesisView is also an Unreal Engine UMG Widget. This means that you can use it wherever a native UMG Widget is used, so if you're familiar with Unreal Engine's UMG system it will be very simple to get up and running with NoesisGUI. Please, refer to the document Creating Widgets for information about how to add a NoesisView to your viewport and how to handle input. Because a NoesisView is also an UMG Widget it means you can also create 3D UI elements by using a Widget Component. Please, refer to the document Widget Components for more information.

One of the most powerful features of NoesisGUI is the support for a Model-View-ViewModel pattern through Data Binding This is made even more powerful in Unreal Engine by combining it with the graphical scripting capabilities provided by Blueprints.
When you create a NoesisView for a NoesisXaml and you create a Widget from it, the instantiated object itself is set as the Data Context. You can also override this behaviour by calling the function Set Data Context on the NoesisView itself and specifying a different Unreal Engine Object.
Whether you decide to use the NoesisView or any other Object as the Data Context, you can define in in properties that can be bound to your XAML, as described in the aforementioned document. You can define a property in two ways:
- As a variable. The name of the property for binding purposes will be the name of the variable.

- As a Get function that has no input parameters and a single output parameter, with alternatively a Set function with no output parameters and a single input parameter of the same type as the output parameter of the Get function. The name of the property for binding purposes will be .

Here's a table with the types supported for Data Binding and the corresponding native NoesisGUI SDK types. Whenever there was a native Unreal Engine type that could work we've decided to use that instead of creating a new type.
| Unreal Engine Type | NoesisGUI Type |
|---|---|
| Boolean | bool |
| Integer | int32_t |
| Float | float |
| String | NsString |
| Text | NsString |
| Color | Noesis::Color |
| Vector2D | Noesis::Point |
| NoesisRect | Noesis::Rect |
| NoesisSize | Noesis::Size |
| NoesisThickness | Noesis::Thickness |
| NoesisCornerRadius | Noesis::CornerRadius |
| NoesisTimeSpan | Noesis::TimeSpan |
| NoesisDuration | Noesis::Duration |
| NoesisKeyTime | Noesis::KeyTime |
| Texture2D | Noesis::ImageSource |
| TextureRenderTarget2D | Noesis::ImageSource |
The plugin also supports custom Blueprint Enums, Structures and Classes. Blueprint Structures and Classes work similarly and they both expose their members as subproperties. The difference is that Structures are treated as atomic objects, and the performance characteristics are different. We recommend you use Blueprint Classes for long lived objects, and Blueprint Structures for small objects with shorter lifespans that don't require a full Blueprint Class.
We also support Arrays of the aforementioned types, which are exposed as a List to the Binding system.
Additionally we support binding of Blueprint functions to NoesisGUI Commands. A function that either takes no parameters, or takes a parameter of a compatible Unreal Engine Type from the table above, and has no output function will be turned into a functor implementing the Noesis::ICommand interface. If you also add a function with the same name but prefixed with CanExecute that takes no parameters and returns a Boolean, it will be used to decide whether the command can be executed.

Performance is a key concern of NoesisGUI. For this reason, instead of polling all the data sources for all bound properties in every update, it uses a reactive model in which the user notifies NoesisGUI that a property has changed and the system updates the minimum possible set of its internal structures affected by that change.
In the NoesisGUI Native SDK this is achieved by having your classes implement the Noesis::INotifyPropertyChanged or Noesis::INotifyCollectionChanged interfaces. The typical implementation exposes Set functions that compare the new value with the old and notify any potential listeners if they are different.
To simplify this in Unreal Engine, we've provided custom nodes that you can use in your Blueprint code that replace the standard Set Property and array operations with custom versions that, additionally notify listeners if necessary. Here's a table with the native Unreal Engine nodes and the corresponding NoesisGUI ones:
| Unreal Engine Node | NoesisGUI Node |
|---|---|
| Set | Set w/ NotifyChanged |
| Add (Array) | Add w/ NotifyArrayChanged |
| Add Unique (Array) | Add Unique w/ NotifyArrayChanged |
| Shuffle (Array) | Shuffle w/ NotifyArrayChanged |
| Append Array (Array) | Append Array w/ NotifyArrayChanged |
| Insert (Array) | Insert w/ NotifyArrayChanged |
| Remove Index (Array) | Remove Index w/ NotifyArrayChanged |
| Remove Item (Array) | Remove Item w/ NotifyArrayChanged |
| Clear (Array) | Clear w/ NotifyArrayChanged |
| Resize (Array) | Resize w/ NotifyArrayChanged |
| Set Array Elem (Array) | Set Array Elem w/ NotifyArrayChanged |
Using this function is the most convenient way to notify NoesisGUI of changes in your data. But sometimes it is necessary to manually notify that a property has changed. This is the case, for example, when a property is implemented as a pair of Get/Set functions, that are not bound to a variable and therefore don't allow you to use these nodes. For these situations you can manually call the functions NotifyChanged and NotifyArrayChanged, passing the name of the property.

If following the previous steps you still can't see your NoesisGUI interface, the first step would be to take a look at the Output Log window. You can select the verbosity of the output from the plugin settings, as described above. The default setting is Quiet, and won't output anything. Normal will allow you to discover common errors, and Binding also provides extra information about the Binding system which is separated form the rest as it can be quite detailed.
Additionally logging messages in NoesisGUI have several levels of verbosity. Here is a table with the levels defined by NoesisGUI and how they map to Unreal Engine:
| NoesisGUI Verbosity Level | Unreal Engine Verbosity |
|---|---|
| Trace | VeryVerbose |
| Debug | Verbose |
| Info | Log |
| Warning | Warning |
| Error | Error |
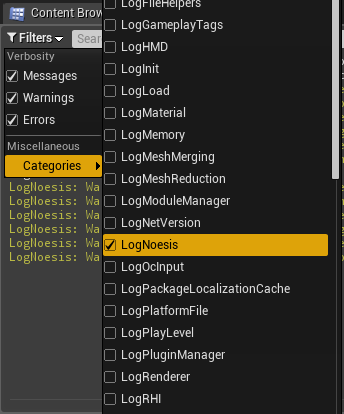
You can filter the NoesisGUI log messages by selecting the LogNoesis category from the Categories drop down list.
There are a couple of issues of which we are aware of and are either out of our control or we are working to resolve.
- It is not possible to change the cursor to use with a NoesisView generated Widget by using the Set Cursor function. This will be fixed in a future release.

-
When you try to build, package or launch your project you get an error complaining about missing libraries
UE4-NoesisRuntime.liborUE4-NoesisRuntime-Win64-Shipping.lib(UE4-NoesisRuntime.aorUE4-NoesisRuntime-Mac-Shipping.aon Mac).- Make sure you ran the installation script, as described in the Plugin installation section.
-
When starting your project editor you get an error because your game module could not be loaded.
- Make sure you enabled the plugin for your project before adding the dependency to the module
NoesisRuntime. If you already had a project created, simply add the dependency manually as described in the section Enabling and configuring the plugin.
- Make sure you enabled the plugin for your project before adding the dependency to the module
-
In windows, you get an error stating that
NoesisRuntimecannot be loaded bcauseNoesis.dllcannot be found.- Make sure you ran the installation script, as described in the Plugin installation section.


