Code Monkey home page Code Monkey logo

therealkasumi / nikolight Goto Github PK

View Code? Open in Web Editor NEW
17.0 5.0 1.0 26.39 MB

NikoLight is a DIY ambient light project specialized for cars. It is based on a ESP32 microcontroller board and completely open source. Please feel free to support the project by contributing to it.

License: GNU General Public License v3.0

C++ 79.03% C 1.85% HTML 0.13% JavaScript 1.25% CSS 0.01% TypeScript 17.74%
ambient diy esp32 esp32-arduino led led-controller led-strips light ws2812b car

nikolight's Introduction

NikoLight

latest release PlatformIO Build UI Build NUP Build

Disclaimer for Hardware 2.2

Currently I am rewriting the firmware from scratch including many improvements and new features. The release was planned for Christmas 2023. Even when many parts of the new firmware are already working, I am currently a little time limited and will not be able to finish it in time. Instead, I added experimental support for the v2.2 hardware to the current firmware. This does not come with all the new software and hardware features but it allows you to use the new (2.2) NikoLight boards with a significantly higher power output and the overall improved hardware.

The hardware version can be adjusted in the SystemConfiguration.h. Again, keep in mind that this experimental and there might be some hidden issues.

Introduction

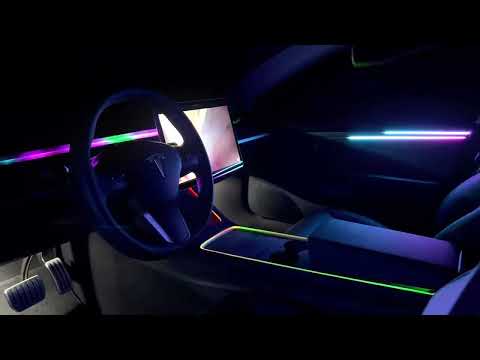
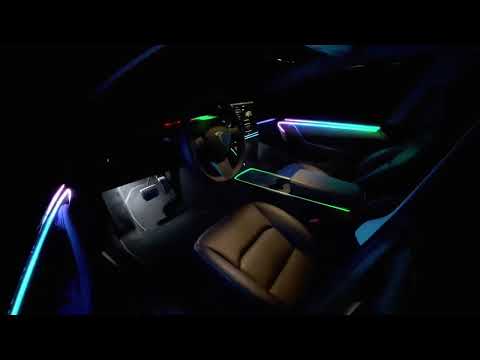
NikoLight is an open source ambient light that you can build yourself. The project is primarily aimed at people who are not looking for a ready-made solution and prefer to tinker, modify, extend and work on it as a community. As the name suggests, the project was started primarily for Tesla vehicles. The focus is on the Model 3 and Model Y. However, it can also be used for other cars with some small modifications.

With NikoLight you can control up to 8 zones with a variable number of WS2812-type LEDs. For example, the 4 doors, the center console, the footwell lights and a light bar under the dashboard. In total, several hundred LEDs can be controlled individually.

Since there should be an easy way to control all these LEDs, there are many different effects for each zone. These can display a simple color, color gradients or even animations in the individual zones. Since the controller has a motion sensor, some effects are even interactive. The effects are expandable in the future and can be adapted to your wishes over time. Even fully customized animation are possible. You can create these on your computer and play them back in the car.

NikoLight can be easily integrated into your Tesla (and other cars). There is a sensor that can be connected to the lighting around the footwell. This way, NikoLight switches on and off automatically when you open or lock the car. It is also possible to regulate the brightness together with the factory-installed lights or via the display. The controller is also expandable and could support additional hardware in the future. For example, there could be a CAN adapter to get more information from the vehicle. How relevant these extensions will be, depends a little bit on the community and the support I will receive.

Once built and installed, NikoLight can be configured via a browser-based UI. When starting the controller, a Wi-Fi hotspot is created, which you can connect to with any device. The user interface can be accessed via a normal browser thanks to the integrated web server. The project is therefore mostly platform-independent.

Here is a short summary of the currently most interesting features:

  • Individual control of each LED installed in the car
  • Hundreds of LEDs are possible
  • Compatible with all WS2812-type LEDs (and LEDs with the same protocol)
  • Fiber cables, light bars and normal LED strips are supported
  • Up to 8 individual zones
  • Currently 18 different effects that can be selected and further customized for each zone
  • Browser based user interface
  • Switching on/off as well as dynamic brightness via the existing lighting in the footwell
  • Rotation and acceleration sensors
  • Interactive effects
  • Light shows
  • Fully customized animations can be created on your PC (playback of fseq 1.0 files from xLights)
  • OTA (wireless) updates
  • Hardware is upgradeable via extensions in the future

Some Videos and Pictures

NikoLight Demo 2

(click to watch on YouTube)

NikoLight Demo 1

(click to watch on YouTube)

App

PCB

Planning

It is recommended to read the planning document before you start the project. There are some important considerations and decisions you have to make first. This will save you some trouble and makes it easier to buy the right parts.

Part List

A list of required and optional parts can be found here.

Build Guide

The build guide can be found here.

One Request

A lot of our time, effort and money went into this project. Nevertheless, we share it publicly with you. You can use it for free, modify it and even earn a coffee by building the parts for other people as long as you are a private person without commercial intentions. But please don't steal our work, be a little respectful and give credits. That said, I hope you have a lot of fun and great experience with NikoLight! Thank youπŸ’–!

Contributors


TheRealKasumi
TheRealKasumi

πŸ› bug
πŸ’» code
πŸ–‹ content
πŸ“– doc
🎨 design
πŸ’‘ example
πŸ€” ideas
πŸš‡ infra
🚧 maintenance
πŸ§‘β€πŸ« mentoring
πŸ“¦ platform
πŸ”Œ plugin
πŸ“† projectManagement
πŸ“£ promotion
πŸ’¬ question
πŸ”¬ research
πŸ‘€ review
πŸ›‘οΈ security
πŸ”§ tool
⚠️ test
βœ… tutorial
πŸ“Ή video


danielbayerlein
danielbayerlein

πŸ› bug
πŸ’» code
🎨 design
πŸ€” ideas
πŸš‡ infra
🚧 maintenance
πŸ“† projectManagement
πŸ’¬ question
πŸ‘€ review
🌍 translation
⚠️ test


JakobLichterfeld
JakobLichterfeld

πŸ› bug
πŸ’» code
πŸ“– doc
πŸ€” ideas
πŸš‡ infra
🚧 maintenance
πŸ§‘β€πŸ« mentoring
πŸ“† projectManagement
πŸ’¬ question
πŸ‘€ review
⚠️ test
βœ… tutorial


heyitsmarlon
heyitsmarlon

πŸ“– doc


MathiasSeifert
MathiasSeifert

πŸ“– doc


PhilippDenn
PhilippDenn

πŸ› bug
πŸ€” ideas


rgrae81
rgrae81

🎨 design

Disclaimer

Please be careful when working on the project and especially your car. I am not a professional electrical engineer and only doing this as a hobby on the side. Use this project at your own risk.

nikolight's People

Contributors

danielbayerlein avatar dependabot[bot] avatar heyitsmarlon avatar jakoblichterfeld avatar mathiasseifert avatar rgrae81 avatar therealkasumi avatar

Stargazers

 avatar  avatar  avatar  avatar  avatar  avatar  avatar  avatar  avatar  avatar  avatar  avatar  avatar  avatar  avatar  avatar

Watchers

 avatar  avatar  avatar  avatar  avatar

Forkers

nor24o

nikolight's Issues

Design a new case for the upgraded hardware

In #36 we want to introduce a new hardware version. Since the board dimensions changed, a new case should be designed to properly fit it.

  • Once the boards are there, design a new case
  • Make sure it can easily be 3D printed
  • Provide it as stl file(s)

Switch to json based API

Based on a few experiments I think we can switch to a json based API.

  • Implement json based API
  • OpenAPI document
  • Swagger
  • Test if it works
  • Test if memory is a issue

DevOps: Linting

As a developer, the pushed code shut be linted automatically.

Api endpoint for frontend related settings

The UI should support a dark theme and multiple languages #71 #70. For that we need a way to save these settings. I would propose to add a settings endpoint to the mcu to store these.

  • Add UI Settings endpoint
  • Value for fw version
  • Value for theme
  • Value for language
  • Value for expert mode
  • Add to OpenApi document and swagger

@danielbayerlein any more values I should add for the future? Anything you need for the UI?

Introduce profiles to save different configurations

Currently there is no way to save more than one configuration. Since it can be quite annoying to reconfigure all settings, it would be nice to store all settings in profiles so that they can be switched easily.

  • Implement profiles on MCU side
  • Implement profiles on UI side

Create a new frontend

The current frontend is not really suitable for all use cases anymore. Also it's not nice looking. I want to come up with a new frontend together with BlackBeaver.eu.

  • Create a new frontend design
  • Setup a project with ReactJS
  • Port the design to the ReactJS project
  • Implement the frontend logic and provide all features we had before
  • Add a mockserver for easier development
  • Add an option to access the log via the Ui
  • Update documentation

Implement OTA updates

The controller is creating a WiFi hotspot when it is started. This connection should be used to transfer a new firmware to the controller. Since there also is a frontend, this firmware should be a package containing the executable code and the frontend.

  • Come up with a suitable package format, no compression
  • Create a tool to build these packages
  • Implement endpoint to upload the package to the controller
  • Implement a class to install the update
  • Remove the WiFi client functionality since no longer needed
  • Add frontend option to upload TUP files
  • Export new Postman collection under documentation

Documentation: Installation in the car

Installation guide for Tesla Model 3 and Model Y should be added to the documentation.

  • Remove the panels from the car
  • How to get power from the CAN connector in the center console
  • Install the TesLight controller in the center console
  • Install the fibre cable around the center console
  • Install the LED strip under the dash board
  • Install the LEDs in the front doors
  • Install the LEDs in the rear doors
  • Connect the TesLight controller to the oem ambient light
  • Close everything up and test it

Bug in timer for light sensor

In the main loop there is bug in the timer related to the light sensor. There millis() instead of micros() is used. This isn't breaking anything but should be fixed.

Documentation: Build guide

After the planning (#2) and parts (#3) were documented, it's time to write the build guide.

  • How to order the PCB and printed parts
  • Build the TesLight controller
  • Build the LED injectors
  • Upload the software
  • Prepare the SD card
  • Test run
  • Link it to the readme

"Fan on" button

A simple button for switching the fan on (full power or adjustable) regardless of the temperature

Save motion sensor calibration to configuration

Calibrating the motion sensor at each start of the controller is not the best solution. When the car is not parked on an even ground, this can lead to miscalibration. To solve this issue, the calibration should be saved to the configuration and a recalibration via the UI should be possible.

  • Save the calibration data to the configuration
  • Only calibrate the sensor when no calibration data exists or the user is triggering the calibration via the UI

Documentation: Planning

Before building the TesLight project some consideration and planning is required. These should be documented to support users to get started with the build.

  • Document knowledge that is required before the build
  • Document required planning before starting the project
  • Link it to the readme

Performance issues when reading pixels from fseq file

After updating to the latest core, the performance of reading single pixels from the fseq file dropped significantly. This is dues to optimizations inside the SD lib. It's now always reading a number of bytes for better performance when reading more than one byte.

  • Adjust FseqLoader and FseqAnimator to read all pixels at once into the pixel buffer

Calculation of the RGB effect should use a trapezoidal wave form

Currently the rainbow animators use an approximate cosine wave with a 120Β° shift to achieve the RGB effect. Due to the rounded wave form this causes unwanted and unpleasant looking side effects on low brightness settings. The solution should be to use a trapezoidal wave form.

grafik

  • try this solution and see if it works better

Move to new hardware version 2

Recently a new hardware prototype was designed. It should solve flickering issues with some types of LEDs due to a too low signal voltage. Also it now gives the option to use a second voltage regulator and so split the load. Allowing for a total power output of around 30W. As a request from the community, two more output channels were added. A 4 pin connector, exposing an I2C BUS is now available as well. It might be used for hardware extensions.

  • Test the new boards once they arrive
  • Analyze the level-shifted data signal
  • Test the I2C BUS
  • Test the dual regulator setup
  • Adjust the software to support two more channels
  • Close #37 before closing this issue
  • Close #38 before closing this issue

Create endpoint exposing system and hardware information

Like discussed earlier it would be interesting to have an endpoint that is exposing some system information. Also with the new audio analyzer we are bringing more optinal hardware into the project. With this, some features might not be available for everyone. Having a list of available hardware, the UI can hide unavailable settings and options.

  • Collect system and hardware information inside a SystemInformation class
  • Include: RPS, FPS, power consumption, temps, fan, memory usage
  • Collect information about available hardware: Audio analyzer, BH1750, MPU6050 (yes we can make it optional with that step), installed regulators

Bug: Cache disabled but cached memory region accessed

I recently experienced different, randomly appearing crashes like:

Guru Meditation Error: Core  1 panic'ed (Cache disabled but cached memory region accessed). 

Core  1 register dump:
PC      : 0x4011b968  PS      : 0x00060035  A0      : 0x800814ae  A1      : 0x3ffbf1fc
A2      : 0x00000002  A3      : 0x00000001  A4      : 0xbad00bad  A5      : 0x00000000  
A6      : 0x00000006  A7      : 0x00000000  A8      : 0x8011b963  A9      : 0x3ffbf1dc  
A10     : 0x00000001  A11     : 0xffffffff  A12     : 0x000f8023  A13     : 0x00000006  
A14     : 0x007bf2a8  A15     : 0x00000000  SAR     : 0x0000000f  EXCCAUSE: 0x00000007
EXCVADDR: 0x00000000  LBEG    : 0x00000000  LEND    : 0x00000000  LCOUNT  : 0x00000000  


Backtrace:0x4011b965:0x3ffbf1fc |<-CORRUPTED

  #0  0x4011b965:0x3ffbf1fc in xPortEnterCriticalTimeoutSafe at /Users/ficeto/Desktop/ESP32/ESP32S2/esp-idf-public/components/freertos/port/xtensa/include/freertos/portmacro.h:590
      (inlined by) vPortEnterCriticalSafe at /Users/ficeto/Desktop/ESP32/ESP32S2/esp-idf-public/components/freertos/port/xtensa/include/freertos/portmacro.h:599
      (inlined by) rmt_set_tx_intr_en at /Users/ficeto/Desktop/ESP32/ESP32S2/esp-idf-public/components/driver/rmt.c:497
Guru Meditation Error: Core  1 panic'ed (Cache disabled but cached memory region accessed). 

Core  1 register dump:
PC      : 0x4011bae0  PS      : 0x00060035  A0      : 0x800817f2  A1      : 0x3ffbf22c  
A2      : 0x3ffc3220  A3      : 0x00000002  A4      : 0x0ffd114c  A5      : 0xfffffffe  
A6      : 0x0000001a  A7      : 0x00000008  A8      : 0x800813d5  A9      : 0x00000008  
A10     : 0x00000002  A11     : 0x00000000  A12     : 0x00000010  A13     : 0x00000000  
A14     : 0x00000003  A15     : 0x00060323  SAR     : 0x00000012  EXCCAUSE: 0x00000007  
EXCVADDR: 0x00000000  LBEG    : 0x00000000  LEND    : 0x00000000  LCOUNT  : 0x00000000  


Backtrace:0x4011badd:0x3ffbf22c |<-CORRUPTED

  #0  0x4011badd:0x3ffbf22c in rmt_set_tx_thr_intr_en at ??:?
Guru Meditation Error: Core  1 panic'ed (Cache disabled but cached memory region accessed). 

Core  1 register dump:
PC      : 0x4011b92c  PS      : 0x00060035  A0      : 0x800817f2  A1      : 0x3ffbf22c
A2      : 0x3ffc3080  A3      : 0x0028800a  A4      : 0x0ffd114c  A5      : 0xfffffffe  
A6      : 0x0000001a  A7      : 0x00000008  A8      : 0x800814ae  A9      : 0x3ffbf20c  
A10     : 0x00000002  A11     : 0x00000001  A12     : 0x3ff56ac8  A13     : 0x00000000  
A14     : 0x00000006  A15     : 0x00000000  SAR     : 0x00000007  EXCCAUSE: 0x00000007  
EXCVADDR: 0x00000000  LBEG    : 0x00000000  LEND    : 0x00000000  LCOUNT  : 0x00000000  


Backtrace:0x4011b929:0x3ffbf22c |<-CORRUPTED

  #0  0x4011b929:0x3ffbf22c in rmt_module_enable at /Users/ficeto/Desktop/ESP32/ESP32S2/esp-idf-public/components/driver/rmt.c:130

I have no clue at the moment, why this is happening, what exactly is causing it and how to fix it. But we need to do something about this otherwise I see the project at risk. Unfortunately, I can't provide any code that is constantly reproducing it. click. Using WiFi in STA mode seems to trigger it more frequently. Same for using the Os optimization flag. Also, it seems to be related to the rmt driver. At least it can be found in almost every stack trace.

Maybe related, but should be fixed in the meantime: espressif/esp-idf#9487

Alternatives to turn on/off TesLight

Currently there are two ways to turn on/off the LEDs with TesLight. This is by measuring the voltage of the footwell lights or by using a BH1750 light sensor which can be plugged into the I2C connector. Since some Teslas don't have the footwell lighting, it would be good to have alternatives.

  • Try if the motion sensor can be used
  • Try if Bluetooth could be an option (for example detecting the phone)

Hardware 2.1

With the hardware update 2.1 the following features should be introduced.

  • Upgraded board design
  • Fan control
  • Temperature sensors
  • Temperature check of regulators
  • Reduce brightness when reacahing a high temperature
  • Values configurable in the UI
  • Implementation of the BH1750 light sensor

  • Implement fan controller
  • Implement temperature sensor
  • Implement overheat protection
  • Make it configurable via the UI
  • Update documentation
  • More hardware abstraction
  • Implementation of the BH1750 light sensor
  • Test the chaos you created...

Add a power limit option

It would be good if there is an option to configure a power limit for the LEDs to protect the voltage regulator.

  • Implement power limiting feature for the controller
  • Make it configurable via the settings
  • Expose settings to the Ui

Part List: Add recommended length

For Tesla Model 3:

Location length of LED stripe
Front Doors top MY 2019 100 cm, and shorten about 10 cm
Rear Doors top 75 cm, and shorten a bit
Front and Rear Doors around handle 100 cm
Dashboard 130 cm, connect 2* 75 cm in series and shorten a bit
Center console MY2019 Fibre Wire, tbd LED stripe
Center console MY2021 Fibre Wire, tbd LED stripe

Missing documentation for C2 and C3

It was mentioned that there is no documentation for the capacitors C2 and C3 which is correct.

  • Add documentation and build steps for these two components

Access log via rest API and UI

The log file created by the controller should accessible via the rest API and UI. This should allow to access it easily without removing the MicroSD card. Also, it makes it easier to report and trace bugs.

  • Get the log via rest API
  • Clear the log via rest API
  • Make it accessible via the UI

Documentation: Parts list

Building the TesLight project requires different hardware parts. The PCBs and 3D prints may be ordered online. There should be a part list in the documentation and the ordering process should be described.

  • Part list (split in required and optional)
  • Describe how to order PCBs and 3D prints
  • Link it to the readme

Controll the brightness by Teslas OEM ambient light

In the Tesla there already is an existing ambient light in the foot area. TesLight is connected to this to capture the signal.

  • Use the signal to turn on/off TesLight
  • Fade control, no rapid on/off
  • Automatically adjust the brightness based on the signal
  • Add configuration options to TesLight and expose them via api
  • clean main.cpp
  • Adjust the UI

Brightness can’t be changed when custom animation is active

When a custom animation is played, the brightness settings for the zones can't be accessed. This issue is only related to the UI and has nothing to do with the mcu. This should be fixed until 24.12 because then custom animations will be available to everyone.

  • Add a option to the UI to adjust brightness while playing a custom animation.

DevOps: Auto build for Update Packages

As a developer, the build of the update package should be triggered automatically for every commit. Docu fixes should be excluded.

  • build the TesLight Update Packaging Tool in workflow
  • build the packagws with the tool

Recommend Projects

  • React photo React

    A declarative, efficient, and flexible JavaScript library for building user interfaces.

  • Vue.js photo Vue.js

    πŸ–– Vue.js is a progressive, incrementally-adoptable JavaScript framework for building UI on the web.

  • Typescript photo Typescript

    TypeScript is a superset of JavaScript that compiles to clean JavaScript output.

  • TensorFlow photo TensorFlow

    An Open Source Machine Learning Framework for Everyone

  • Django photo Django

    The Web framework for perfectionists with deadlines.

  • D3 photo D3

    Bring data to life with SVG, Canvas and HTML. πŸ“ŠπŸ“ˆπŸŽ‰

Recommend Topics

  • javascript

    JavaScript (JS) is a lightweight interpreted programming language with first-class functions.

  • web

    Some thing interesting about web. New door for the world.

  • server

    A server is a program made to process requests and deliver data to clients.

  • Machine learning

    Machine learning is a way of modeling and interpreting data that allows a piece of software to respond intelligently.

  • Game

    Some thing interesting about game, make everyone happy.

Recommend Org

  • Facebook photo Facebook

    We are working to build community through open source technology. NB: members must have two-factor auth.

  • Microsoft photo Microsoft

    Open source projects and samples from Microsoft.

  • Google photo Google

    Google ❀️ Open Source for everyone.

  • D3 photo D3

    Data-Driven Documents codes.