
A CDK Construct for creating a serverless Discord bot. All you need to do is supply your code to handle the commands!
This is the architecture for how this project is laid out server-side. The tools used to create these diagrams are:
The bot has a fairly straightforward setup:
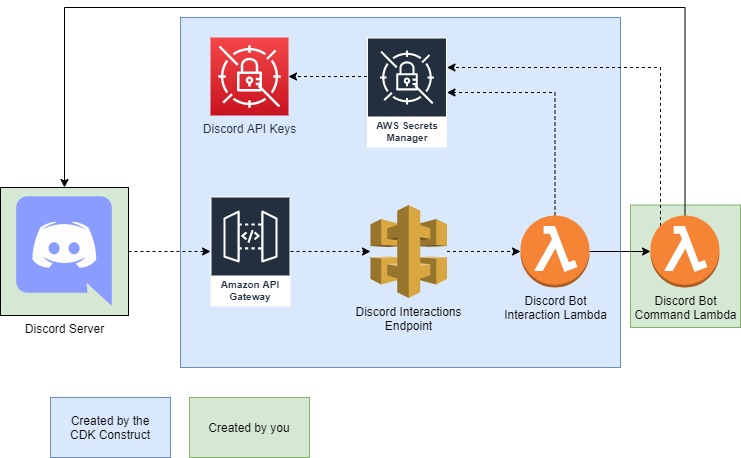
The biggest confusion likely stems from the use of two Lambda functions instead of one. This is to ensure that the initial request can respond within Discord's 3 second time limit and return a proper response to the user.
The usage is split into two parts: The AWS CDK stack that will be used, and a "commands" script that actually handles responding. It's recommended that you are familiar with CDK first before diving into using this.
For handling commands, you just need to provide a Lambda function for sending response to Discord's Web APIs. As an example of how this can be done:
import axios from 'axios';
import {Context, Callback} from 'aws-lambda';
import { DiscordEventRequest, DiscordResponseData, getDiscordSecrets} from 'discord-bot-cdk-construct';

export async function handler(event: DiscordEventRequest, context: Context,
  callback: Callback): Promise<string> {
  const response = {
    tts: false,
    content: 'Hello world!',
    embeds: [],
    allowed_mentions: [],
  };
  if (event.jsonBody.token && await sendResponse(response, event.jsonBody.token)) {
    console.log('Responded successfully!');
  } else {
    console.log('Failed to send response!');
  }
  return '200';
}

async function sendResponse(response: DiscordResponseData,
  interactionToken: string): Promise<boolean> {
  const discordSecret = await getDiscordSecrets();
  const authConfig = {
    headers: {
      'Authorization': `Bot ${discordSecret?.authToken}`
    }
  };

  try {
    let url = `https://discord.com/api/v8/webhooks/${discordSecret?.clientId}/${interactionToken}`;
    return (await axios.post(url, response, authConfig)).status == 200;
  } catch (exception) {
    console.log(`There was an error posting a response: ${exception}`);
    return false;
  }
}To create a stack to make use of the above script, you can create a stack like so:
import {Runtime} from '@aws-cdk/aws-lambda';
import {NodejsFunction} from '@aws-cdk/aws-lambda-nodejs';
import {Construct, Duration, Stack} from '@aws-cdk/core';
import * as path from 'path';
import {DiscordBotConstruct} from 'discord-bot-cdk-construct';

/**
 * Creates a sample Discord bot endpoint that can be used.
 */
export class SampleDiscordBotStack extends Stack {
  /**
   * The constructor for building the stack.
   * @param {Construct} scope The Construct scope to create the stack in.
   * @param {string} id The ID of the stack to use.
   */
  constructor(scope: Construct, id: string) {
    super(scope, id);

    // Create the Commands Lambda.
    const discordCommandsLambda = new NodejsFunction(this, 'discord-commands-lambda', {
      runtime: Runtime.NODEJS_14_X,
      entry: path.join(__dirname, '../functions/DiscordCommands.ts'),
      handler: 'handler',
      timeout: Duration.seconds(60),
    });

    const discordBot = new DiscordBotConstruct(this, 'discord-bot-endpoint', {
      commandsLambdaFunction: discordCommandsLambda,
    });
  }
}
This can of course then be used in your CDK application like so:
import { App } from '@aws-cdk/core';
import { SampleDiscordBotStack } from './stacks/sample-discord-bot-stack';

const app = new App();
const startAPIStack = new SampleDiscordBotStack(app, 'SampleDiscordBotStack');A full example project utilzing this construct can be found here. Specifically, the start-api-stack.ts file uses the construct, with DiscordCommands.ts being the commands file (like shown above).
npm run buildcompile typescript to jsnpm run watchwatch for changes and compilenpm run testperform the jest unit testsnpm run lintperform a lint check across the codenpm run fix-lintfix any lint issues automatically where possiblecdk deploydeploy this stack to your default AWS account/regioncdk diffcompare deployed stack with current statecdk synthemits the synthesized CloudFormation template