Code Monkey home page Code Monkey logo

roommates's Introduction

Build Status

codecov

Instructions

The cornerstone of the project has been set !

You should have node.js installed on your machine.

After pulling filles, you need to download dependencies (such as Express) by running:
npm install
inside the project main directory.

To run the tests type:
npm test

site url: https://powerful-tundra-42649.herokuapp.com/

Heroku deployment instructions:

Download heroku cli.

Login to heroku from project directory using:
heroku login
username: [email protected]
password: ***********

Add remote to local reposiroty:
heroku git:remote -a powerful-tundra-42649

Commit changes:
git add .
git commit -m "..."

Push to heroku:
git push heroku master

roommates's People

Contributors

alonttal avatar chananbental avatar danielohayon avatar idanyadgar avatar omrihuller avatar orabramovich avatar

Stargazers

 avatar  avatar  avatar  avatar

Watchers

 avatar  avatar  avatar  avatar  avatar  avatar  avatar

roommates's Issues

Idan Weekly Report

Semester 1

11.11 - 18.11

  • Learning Webpack and Vue
  • Writing a Vue + Webpack tutorial: #35

20.11 - 27.11

  • Writing a REST tutorial: #41

10.12 - 16.12

  • Designing the main page (apartments search)

17.12 - 23.12

  • Re-organizing the frontend environment (project structure)
  • Developing and coding the main page and linking it to the other pages

24.12 - 30.12

  • Working on re-styling the main page, according to the new template.
  • Working with bootstrap-vue (bootstrap for vue) and vue-awesome (font-awesome for vue).

31.12 - 06.01

  • Finished working on the main page.
  • Created a logo and a favicon.
  • Header design & development.
  • Footer design & development.
  • Re-structuring front-end files.

07.01 - 13.01

  • Working on google-maps integration in the front-end.
  • Finishing some main features in the main page (map location picker, fetching tags from file and adding icons).
  • Added custom icon for balcony and elevator tags.

14.01 - 22.01

  • Adding "entrance date" field for the main page search area.
  • Going over all of the pages and fixing errors, bugs and other wrong code.
  • Going over all of the pages (except Apartment page) and fixing layouts and styling (including colors).
  • Added necessary parameter for "GET /apartments" route (my first work on the server side in this project).
  • Updated test according to the changes in "GET /apartments".
  • Making vue-resource work with our authentication system and handling unauthorized accesses.
  • Make "Add Apartment" work (a BUG fix).
  • Making the search section interact with the server. The results are now fetches from the server.
  • Adding the option of searching by apartment tags (extending "GET /apartments" route) and writing tests.

Semester 2

17.04 - 23.04

  • Document: Design private messaging feature #195

08.05 - 14.05

  • Integrate with Azure image storage #428

15.05 - 21.05

  • BUG: cant use AC tag in apartment upload #446
  • Birthday lower bound should be upper bound #437
  • Add forms errors #431

22.05 - 28.05

  • Document: Update mid semester POC presentation design #448

29.05 - 04.06

  • Added full PayPal integration #512
  • Document the flow of closing the deal #504
  • Front-end: locations review feature implementation - first phase #412

05.06 - 11.06

  • Design private messaging layout in Front end #498
  • Implement private messaging design #532

12.06 - 18.06

  • Front-end: Connect the chat page to the back-end #564

19.06 - 25.06

  • Front-end: Search doesn't work on chat page #622
  • Back end: connect the payment page to the flow of close-the-deal #521
  • Make floor filter disabled by default #653
  • Rebuild to payment page (642c63f)
  • Added chat notification tone (a957e3e)
  • Bug: Weird chat behavior #617
  • Bug: Prevent payment until 2 first steps are done #652
  • Bug: When a new chat message arrival indication #640
  • Bug: Apartment contract shows "Apartment Contract" link to google #636
  • Bug: Chat icon in group section should not be shown for self #628
  • Bug: The first conversation is not selected by default in the chat #623
  • Bug: chat button in group does nothing #615
  • Bug: Cant update apartment address #581
    Bug: Apartment floor field is optional but searching for apartment without a floor returns empty result #494
  • Bug: Gallery bug fix (26a8720)

Profile setup guidelines

  • Use a picture, photo or distinct avatar. Don''t use an automatic icon:
Example Score Why?
image Bad Anonymous
image OK Personal trademark
  • Excellent:
  • Make sure you present yourself by a readable nick
Example Score Why?
Moshe Levy II Super Clear identification
YossiGil Excellent You identify yourself by full name
IDabran Good == Itai Dabran
yogi OK Well known nick
j1046 Bad Who the hell are you?
zm&4jk Worse Not even pronnounceable
r2d2 Terrible We are not playing games here
ghost Disaster Are you a troll or what?
  • Bad: j10463 / r2d2 / bb8 / biscuit / the destroyer
  • Ok: yogi (Yossi Gil), idarban (Itai Darban)
  • Describe yourself in the bio page; FYI, here is my description:
    image
  • State that you are (not) in search for a job, i.e., mark, or unmark this box:
    image
    14162e.png)
  • State that you are (not) in search for a job, i.e., mark, or unmark this box:
    image

Alon Weekly Report

Weekly Report

Step B

Week 1

Week 2

  • Prioritized the opened issues (with all the team).
  • wrote the Project Article with @OrAbramovich . #197

Back-end:

  • Added new errors to the Errors Module.
  • Added "Account Verification" functionality: #204
    ~ Added 2 routes:
    PATCH /users/verify/:token. #209
    POST /users/verify. #210
    ~ Added Verifcation service.
  • Added tests for PATCH /users/verify/:token. #220
  • Added tests for POST /users/verify #220
  • Added "Reset Password" functionality: #202
    ~ Added 3 routes:
    POST /users/forgot-password #221
    GET /users/reset-password/:token #222
    PATCH /users/reset-password/:token #223
    ~ Added Reset Password service. #224
  • Added Tests for POST /users/forgot-password. #226
  • Added Tests for GET /users/reset-password/:token. #226
  • Added Tests for PATCH /users/reset-password/:token. #226
  • Modified Register and Login Routes to adjust to the new verification constraint. #212
  • Updated the Registration and Login tests. #214
  • Added 404 default route - GET *. #211
  • Added test for GET *. #234
  • User Schema: New property added - isVerified. #212
  • User Schema: New method added - resetPassword(). #225
  • Created a New mail service for sending mails by the server. #213
  • image Fixed a bug where invalid ObjectID could be send through GET
    /apartments route for _createdBy and _id, which could lead to
    crashing.

Front-end:

  • Refactoring: Created a new "configuration" dir to store all related configuration.
  • Refactoring: Changed imports to use "import" instead of "require".
  • Created vuex-store for global data management. #228
  • Changed the searched apartments to be managed by vuex.
  • Updated "Main.vue" "SearchSection.vue" & "SearchResults.vue" to use vuex.
  • Fixed the annoying warning that was shown when running Vue development environment. #229
  • fixed Vue Dev mode containing to accept dots (".") in URL. #235
  • Added new component "VerificationRequest". #236
  • Added new component "VerificationApproval". #236
  • Updated "RegistrationForm" & "LoginForm" logic the adjust the new changes. #237

Week 3

Back end:

  • image Removed _publishedApartments property from PATCH /users/self patchable attributes. #227

Front end:

  • New front-end responsive design! #255
    ~ Integrated Vuex-store for global data management. #228
    ~ Verification Request + Approval pages. #236
    ~ Navigation guards: AuthRequired, VerifyRequired, AuthRejected, VerifyRejected. #237 #289
    ~ Login page. #256
    ~ Registration page. #256
    ~ User profile page. #271
    ~ Logout mechaism. #290
    ~ Main page. #291
    ~ Search section. #291
    ~ Added persistency to user and token objects (so they will be saved between sessions). #292

Week 4

Back-end:

  • Changed "GET /apartments" expected query representation. #278
  • Updated PATCH /users/verify/:token to returned the verified user. #281
  • Major Update to Apartment Model findByProperties method. #282
  • Updated Apartment tests upon "findByProperties" update. #287
  • Minor bug fixes, small twiks to apartment's schema structure and renaming. #288
  • Updated user token's expiration time to be integrated as part of the jwt token. #296
  • Fixed PATCH /users/self failing tests #297
  • Updated reset password routes. #300

Front-end:

  • Activated "apartments search" functionality to communicate with back-end. #298
  • Activated "express interest" functionality to communicate with back-end. #299
  • Added forgot password machanism & pages. #203
  • Added Auto complete to search form. #305
  • Added Auto complete to publish apartment address form. #305
  • Added Google Maps service module. #306
  • Added search with map feature. #306
  • Added location in map for apartment ad. #306

Week 5

Back-end:

  • Changed comments to be saved from new to old instead of old to new.
  • Updated reset password routes:
    ~ authentication is no longer required.
    ~ email needs to be sent as part of request body.
  • Merge new view with the master branch. #333
  • image Fix logger sometimes throwing exception. #334
  • Fixed failing tests after merge. #336
  • Removed "title" from apartment properties. #331
  • Updated how GET /users route created the users map. #317

Front-end:

  • Added Comments section to apartment ads. #315
  • Added Interested section to apartment ads. #321
  • Created an Upload component. #322
  • Created Publish Apartment Page: made it responsive + Improved Design. #323
  • Organized directories and source.
  • Added Verify Account page & accept email-verification requests. #327
  • Added Reset Password page & accept email-reset requests. #328
  • "Publish Apartment page" now communicates with back end. #330
  • Route user to his ad after publishing an apartment. #330

Week 6

Back-end:

  • updated GET /users route to not return error when some ids are invalid. #356

Front-end:

  • Researched how to include socket.io in Front-end. #348
  • Linked users in interested list to their profile. #341
  • Hide edit icons in other users' profile. #340
  • Created sort panel. #339
  • Made User Profile Page Responsive + Improve Design #271
  • Made User Profile page communicate with back-end. #338
  • Created Share Apartment panel. #364
  • Made Vue rerender page when accessing the same router path. #352
  • Made comments show publisher name to instead of ids. #353
  • Made interested list tile show user's name instead of his id. #354
  • image Fixed a bug where interested section were not showing "no interested users" text where there are not interests. #355
  • Created Share Apartment panel. #364
  • Created apartment publisher card. #366
  • Made apartment publisher card communicated with back-end. #366

Week 7

  • Created Weekly Meeting Minutes Document. #393
  • Back-end-Front-end: integrated Notifications feature with @OrAbramovich . #382

Back-end:

  • Support authentication with second roundtrip in sockets-server with @OrAbramovich . #386
  • Added notifications to the user json with @OrAbramovich . #387
  • Changed user "saveNewNotification" method to push new notification to start of list instead of end. #396
  • Changed socketServer to return notification as object instead of string. #397
  • Fixed failing Notifications tests. #398

Front-end:

  • Created Notifications component. #378
    ~ Added name of notifiers #378
    ~ Added linkage to the object the notification is related to. #378
    ~ Added all current supported notification types. #378
    ~ Added header and footer. #378
    ~ Added notifiers tooltip. #378
    ~ Added notifiers dialog. #406
    ~ Added link to notifiers' profile. #407
    ~ Mark notification as "read". #408
  • image Fixed a bug where sort options are were not aligned well in small screens. #379
  • Added fetch self on creation with @OrAbramovich . #388
  • image Fixed a bug where apartment was added twice on publishment. #389
  • Added edit personal info page #191
  • Moved socket management to Vuex. #399
  • Removed local token if token expires. #400
  • Added socket management: connect to socket server on login, register and when entering site (when logged in). #401

Week 8

  • Created Weekly Meeting Minutes Document. #430

Back-end:

  • Changed GET /apartment route to allow seding list of apartment ids (as well as String). #411
  • image Fixed a bug in POST /review where route wasn't returning after finding out that the same review was already published by the same user causing an exception to be thrown. #414
  • Fixed Unstable tests. #445

Front-end:

  • Changed the date format for date inputs. #432
  • Added lower bounds to date inputs #433
  • Created Image dialog (modal) containing carousel with the images of the apartment ad. #435
  • image Fixed min attribute and added start-date attribute to Calendar. #437
  • Added avatars to comments section. #440
  • Added avatar in favors list. #439
  • image Fixed email being (sometimes) cut in publisher card. #438
  • Updated image switch transition of ads and background-size to be scoped. #441
  • Fixed notification update following PATCH /user/notification route change in back-end. #427
  • Changed "Publishes" section in user profile to show apartment details instead of IDs. #442
  • Changed "Interested" section in user profile to show apartment details instead of IDs. #442

Week 9

  • Prepared mid semester POC demo scope. #454

Back-end:

  • Fixed tests following (#446 tags) change. #467
  • image Fixed notifications created by self are sent to self. #466
  • Created Image-Service which allows uploading and fetch images to remote server. #436
  • Implemented support for uploading user profile picture and updated relevant routes. #469
  • image Fixed a bug where expired jwt tokens were not removed from DB. #470
  • Fixed failing tests after image-service addition. #471

Front-end:

  • image Fixed a bug In user profile, where all apartments in db are shown when there are no interested or published apartments. #461
  • image Fixed a bug where the entrance date of a newly published apartment was always set to Thu Jan 01 1970. #462
  • image Fixed a bug there weirdly appeared where input wasn't not filled with the address selected from the autocomplete list . #464
  • Updated interested-apartments and published-apartments lists when expressing interest and publishing apartment (respectively), so the apartment is then shown in the user profile. #465
  • image Fixed various Avatar bugs (see issue). #468
  • Implemented profile picture upload feature. #458
  • image Fixed a bug where sliders in advertise apartment page jumped between values when changed. #473
  • image Fixed capability of inputing invalid values in advertise apartment page. #475
  • image Fixed a bug in publisher card where the publisher avatar was not clickable, meaning it is not possible to go to his profile. #478
  • image Fixed a bug where certain text of sites were not shown when using autocomplete #485
  • Removed default form values for the POC #486
  • Made advertise apartment steps clickable. #487
  • Changed default apartment and user images. #488
  • image Fixed a bug where we were losing the user profile image when updating other attributes. #489

Week 10

  • Created the Project Fair poster. #519

Back-end:

  • Added GET /apartments/:id/groups route #511
  • refactored createGroup methods to be more readable. #505

Front-end:

  • image Fixed a bug on advertise page where sliders were stuck at "0" (sometimes). #496
  • image Fixed a bug on profile page where birthday date showed a constant value and updating it didn't work. #495
  • image Fixed a small inconsistency on advertise page where total roommates number could be higher than 11 while it wasn't possible to search for such numbers. #479
  • image Fixed a bug where error messages were not showing in advertise page. #475
  • Added Close-The-Deal page: #507
    ~ Created a new AppGroup component, which represents a single group.
    ~ Created MyGroup Component, to create new groups.
    ~ Added initiale drag and drops mechanism for creating "my-group" option.
    ~ Added the server's suggested groups lists.
    ~ Added accept and decline group buttons.
    ~ Added formating to group tiles.
    ~ Added member's opt-in/opt-out/not-selected statuses.
    ~ Added approve-progress-bars.
    ~ Added "Add Group" and "clear" Buttons to My Group.
    ~ fromatted My-Group list.
    ~ Added functionality for adding members to My-Group in small screens.
    ~ Added "Are you sure?" modals for accepting and declining group membership.
    ~ Added "Close The Deal" button.
    ~ Added toolbars to group cards.
    ~ Added Group Statistics icon with tooltip.
    ~ Added fetching grroup members from server.
    ~ Added link from group member -> profile.
  • Integrated The Payment methods into the groups page. #512
  • Improved Apartment page layout for the close The Deal feature #536

Week 11

Back-end:

  • Added GET /apartmets/:id/groups route. #529
  • Added GET /apartmets/:id/groups tests. #537
  • Added POST /apartmets/:id/groups route. #529
  • Added POST /apartmets/:id/groups tests. #537
  • Added PATCH /apartments/:id/groups route. #529
  • Added PATCH /apartments/:id/groups tests. #537
  • Updated Group Schema. #526
  • Updated createGroup method. #538
  • Updated Apartment Schema to correctly use the Group Schema. #526
  • Changed group statuses to be more convinient. #526
  • Added new static method to User schema isValidId.
  • Added group tests that checks group status invariants. #537
  • Added updateMemberStatus method to apartment model. #526
  • Added new errors: #151
    ~ groupNotFound,
    ~ groupMemberNotFound,
    ~ apartmentNotFound,
    ~ groupCreationFailed,
    ~ userNotFound
  • Modified group building by best matching members. #528
  • Added notifying users about a group opened for them. #506 #539
  • image Fixed a bug that caused log in to fail when a user had expired auth tokens. #525
  • Stable tests after groups addition. #542

Front-end:

  • Groups front-end - back end integration - communication between both sides. #530
  • Updated the group components after back-end group api changed. #530
  • Interested lists in "my group builder" is now showing names instead of ids. #530

Week 12

Back-end:

  • Added new route - PATCH /apartments/:id/groups/sign for "signing" a group. #586
  • Added tests for PATCH /apartments/:id/groups/sign. #587
  • Completed "Close The Deal" feature. #585

Front-end:

  • Rebuilt Apartment Page. #543
  • Created Image Gallery Component. #545
  • Created Attribut List Component. #546
  • Created Tags List Component. #547
  • Created Map Icon Component. #548
  • Created Publisher Card Component. #553
  • Added Interested section to Apartment Page. #554
  • Added Comments Section to Apartment Page. #555
  • Fixed Reviews Page layout so It aligns well with Apartment Page. #556
  • Added Reviews to Apartment Page. #557
  • Added Groups (close the deal) to Apartment Page. #558
  • Created Interested Icon Component. #561
  • Added Recommendation Section to Apartment Page. #562
  • Created vuex action to fetch apartments without changing search results. #567
  • Created vuex action for updating apartment. #567
  • Added Edit Apartment Functionality to Apartment Page. #568
  • Created share Icon Component. #569
  • image Fixed a bug where name error message in Registeration form showed "password must be a least 2 characters" instead of "name must be...". #571
  • image Fixed a bug where start-date attribute for the calendar component was of String type instead of Number. #573
  • image Add error message for password reset email field #574
  • image Fixed a bug: changing password did not logout user. #583
  • image Fixed a bug in Reset Password page - error when trying to use Vuex snackbar #582
  • image Fixed apartment number and street number uncaught exception in Publish page. #584
  • image Fixed a bug in Publish Apartment page - not showing error message for "price" and "apartment number" correctly. #577
  • image Fixed a bug where floor number can be higher than total floors without an error message. #578
  • image Improved error details when editing attributes in user profile. #579
  • image Fixed a bug where long emails caused register/login page to crash. #588

Week 13:

  • Azure Deployment with @OrAbramovich . #608
  • Create dedicated branch for automatic deployment. #597
  • Fixed "Share" buttons linking to "localhost" on Azure. #596
  • Wrote server deployment guide. #594
  • Tested some sensitive functionality on Azure. #589

Front end:

  • Edited links to footer #646
  • image Found bug: Notification should redirect to apartment page and not to search results #625
  • image Found bug: Enable notifications are sent to localhost instead of server address. #624
  • image Fixed bug where user is notified on his own likes. #609
  • image Fixed a bug no connection to socket server after login. #638
  • image Fixed a bug where steppers were not working well in Apartment Page (sometimes). #641
  • image Fixed a bug where recommendation list is too long when there are many recommendations. #644
  • Ordered group member suggestions ordered by matching. #648
  • Added About us page. #651
  • image Fixed image gallery buttons not clickable

Step A

Week 1

Week 2

  • Created github Roomates repository.
  • Made an introduction to MongoDB in order to decide between MongoDB and ElasticSearch.

Week 3

  • summed up weekly meetings points.
  • created a Spring starter guide. #26

Week 4

  • wrote HLD v1 with @OrAbramovich. #31
  • added "Our Guides" section on Wiki and under it, all our guides so far.
  • started learning Vue.js.
  • Checked alternative for Spring - Node.JS & Express.JS with @OrAbramovich. #36
  • HLD document updated to version 2.2 with @OrAbramovich.

Week 5

  • studied javascript & node.js extensively.
  • uploaded the Initial server-side source code.
  • open an account on Heroku and deployed the application there. #42
  • created tests directory & uploaded basic test example.
  • created short Mocha guide for testing. #43
  • create Back-End API Document with @OrAbramovich. #48

Week 6

  • studied javascript & node.js extensively.
  • added and updated server-config.js & server-config.json file which includes currently server configurations.
  • added config to heroku-web-service to use aws instance as it's mongodb server (check by using "heroku config" in CL).
  • User Schema pushed to github
  • ApartmentAd Schema pushed to github.
  • Bug fix for findApartments geo-location query with @OrAbramovich. #55, #58
  • Added tests for findApartments with @OrAbramovich. #56

Week 7

  • Added connection to db. #57
  • Added POST /users route. #62 #65
  • Added POST /users/login route. #67 #68
  • Added POST /users tests.
  • Added POST /users/login tests.
  • Added password encryption. #66
  • Refactoring - change file names, directory hierarchy, renaming schema ApartmentAd -> Apartment, renaming methods names, and others.
  • studied Vue.js extensively.

Week 8

  • Added POST /apartments route. #69
  • Added POST /apartments tests. #83
  • Added authentication mechanism. #84
  • Added GET /apartments route. #86
  • Added GET /apartments tests. #86

Week 9

  • Integrated between front-end and back-end. #54 #95
  • Added GET /users/:id route. #89
  • Added GET /users/:id tests. #98
  • image Fixed geolocation OVER_LIMIT bug. #90
  • Created guidelines to Heroku deployment.
  • Added new functionality to helpers - remove falsy properties.
  • Added eslint checks and fixed all errors.
  • image Fixed a bug in user model which allowed registering without password. #104
  • Refactored some functions. Moved some functions from apartment model to user model.
  • Added GET /users/self route. #101
  • Added GET /users/self tests. #103
  • image Fixed a bug where published apartment were not added to user's published apartments list. #106
  • Added PATCH /users/self route. #99
  • Added PATCH /users/self tests. #102

Week 10

  • Created POC Presentation. #113
  • Presented the POC.
  • 148878 1Startend working on front end
  • Extensive HTML study.
  • Extensive CSS study.
  • Extensive Vue.js study.
  • Beautified the main page.
  • Improved login form.
  • Added registeration form.
  • Moved search bar to header.
  • Redisigned apartment list item.
  • Changed search and filter buttons.
  • Reorganized folders and files.

    Week 11

Back-end:

  • Added users/:id/interested route. #139
  • Added users/:id/interested tests. #141
  • Added users/:id/published route. #140
  • Added users/:id/published tests. #142

Front-end:

  • Create AddApartment view: #126 route.
    ~ first step: done.
    ~ second step: done.
    ~ third step: done.
    ~ forth step: done.
    ~step-bar: done.
    ~ next & prev buttons: done.
    ~ send http request to server: done.
  • Create upload-image component #130
  • Add new Tags and Hobbies #131

    Week 12

Back end:

  • Added ticket module - for improving authentication.
  • Added expired time to tickets. #146
  • Auto remove expired tickets from db. #150
  • Added error module for handling errors. #151
  • Added /apartments route to support find apartments by coords. #147

Front-end:

  • Added Interested page. #138
  • Added apartment tags js file. #137
  • Improved Add Apartment page design.
  • Added authentication mechanism in front end #145
  • Added Login + Register page. #152
    ~ Login design - done.
    ~ Register design - done.
    ~ Login talk with back end - done.
    ~ Register talk with back end - done.
  • Added navigation gaurds (forVisitors, forAuth). #153
  • Added Event Bus for passing events between components.
  • Updated header to be refresh upon login & logout. #154

    Week 13

  • Edited Developer Guide
  • Deploy server (and vue.js) to heroku. #180

Back-end:

  • Modify POST /apartments route error responds. #171
  • Added documentation to back-end files. #179

Front-end:

  • Added error message on failed Add Apartment submission. #170
  • Added route to success page on successful Add Apartment submission. #164
  • Added loading message on Add Apartment submission. #167
  • image Fixed a bug in Add Apartment page form 2 where default entrence date weren't showing up . #168
  • image Fixed a bug in Add Apartment page form 3 where checkbox values were wrong tag values. #169
  • image Fixed a bug in Image Uploader component where adding new image whould trigger an error. #172
  • Added Apartment page. #185
    ~ image gallery - done.
    ~ data section - done.
    ~ description section - done.
    ~ publisher section - done.
    ~ interests section - done.
    ~ comments section - done.
    ~ integration with back end - done.
    ~ error handling - done.
    ~ show google map & location - done.
  • imageFixed a bug where tags were incorrect in apartment page with @OrAbramovich . #188
  • imageFixed a bug were interested page wasn't drawn with @OrAbramovich . #189
  • Assisted @OrAbramovich in the end of semster project presentation.

Design: Choose geo-location services provider

According to the client's request - the project has to support the following geo-location abilities:
- Calculating distance between 2 points.
- Locating a point in a map (and saving its geo-location data/displaying it by a geo-location data).

There are various of aspects should be considered:

  • Licnese type.
  • There is an API to get distance between 2 points.
  • There is an API to get/set the geolocation of a point from/on a map.
  • There is an API to get current location.
  • Ease of use (zoom, Display modes: Satellite/Terrain... ).

RESTful API Tutorial

In this tutorial I will explain a little about RESTful APIs and how they work.
Our server in the project will expose a RESTful API to the client-side application and using this API the client will be able to interact with the server.

Introduction

REST is an idea, not a protocol. It goes well with HTTP although it doesn't have to, and in this tutorial I will present an HTTP implementation of a RESTful API.
It requires a basic understanding of HTTP in order to understand this tutorial.

Resources

RESTful API is an API that is based on resources. We have different independent resources in our system on which we can perform actions. The actions we can invoke are create, read, update and delete (CRUD).

Each resource is represented using a URI.
For example, /apartments/3 represents the apartment with the ID of 3.

Actions

We will send an HTTP request with the URI of a specific resource on which the action is invoked, and we will use one of the following HTTP methods: GET, POST, PUT, DELETE.

GET - fetches the resource from the server.
POST - creates a new resource.
PUT - updates a resource.
DELETE - deletes a resource.

Examples:

GET /apartment/5                  -> fetches the apartment with the ID of 5 from the server.
POST /apartments                  -> creates an apartment.
PUT /apartments/7                 -> updates the apartment with the ID of 5.
DELETE /apartments/ 2             -> deletes the apartment with the ID of 5.

Server's Response

REST does not limit us with the format we use to present the data. We can use JSON, XML or any other format. I will use JSON in the examples in this tutorial.

The server should respond according to the request method:

  • GET: The response is a representation of the wanted resource.
  • POST: The response should contain the ID of the created resource.
  • PUT: The response should contain an indication of whether the update was successful.
  • DELETE: - Same as PUT.

Response Codes

REST APIs that use HTTP make a big use of HTTP response codes.

For example, if we have apartments with IDs 1,2 and 3:

GET /apartments/6       -> 404 Not Found
POST /apartments/       -> 201 Created
PUT / apartments/4      -> 200 OK
DELETE /apartments/5      -> 404 Not Found
DELETE /apartments/1      -> 403 Forbidden (suppose the user can't delete this apartment)

Examples of requests and responses:

POST /apartments/

{
    "location": "Technion",
    "rooms": 3
}
-----------------------------------------------
201 Created

{
    "apartment-id": 1
}
GET /apartments/1
-----------------------------------------------
200 OK

{
    "apartment-id": 1,
    "location": "Technion",
    "rooms": 3
}
PUT /apartments/1

{
    "location": "Tel Aviv"
}
-----------------------------------------------
200 OK
GET /apartments/1
-----------------------------------------------
200 OK

{
    "apartment-id": 1,
    "location": "Tel Aviv",
    "rooms": 3
}
DELETE /apartments/1
-----------------------------------------------
200 OK
GET /apartments/1
-----------------------------------------------
404 Not Found

POST vs. PUT

Sometimes we will use PUT in order to create a new resource and not POST. We will do so when we know the ID of the resource we want to create.

For example, suppose we have users in our system, and users/idan is the user with the username "idan".
If we would like to create a new user with the username "adi", we would send a PUT request to "users/adi".
If we sent a POST request to "users/" we wouldn't have control over the username of the created user.

Filters

We can use the query string in order to pass filters, parameters to the servers.

For example, if we want to fetch all the apartments that have 3 rooms in the Technion:

GET /apartments/?rooms=3&location=Technion
-----------------------------------------------------------
200 OK

[
    {
        "apartment-id": 1,
        "rooms": 3,
        "location": "Technion"
    },
    {
        "apartment-id": 5,
        "rooms": 3,
        "location": "Technion"
    }
]

Summary

REST is very flexible and doesn't limit us when we need to choose a format or when we need to implement it. Also, it is very supported and there are many libraries we can use that support it.

Design: DB design

Database design is the process of producing a detailed data model of database. This data model contains all the needed logical and physical design choices and physical storage parameters needed to generate a design in a data definition language, which can then be used to create a database. A fully attributed data model contains detailed attributes for each entity (https://en.wikipedia.org/wiki/Database_design).

This issue is the topic issue of the following sub tasks:

  • Design: Determining data to be stored & actions & data relationships ( #19 )
  • Design: determine DB engine must-have features ( #20 )
  • Design: Choose DB engine - #5 (includes: research about the available libs and the ways to work with the DB - the ways to store/load data, handling geo-location data.
  • Tutorial about the selected DB ( #28 )
  • Design: DB structure ( #22 )

Tutorial: MongoDB

A ~20 pages tutorial which contains a collection of the information read about: MongoDB and the integration of it with Java (with Java Driver and Spring Data) - The tutorial (which is mostly copy-pasted) covers the core ideas of the above issues alongside practical information relevant to our interests (e.g handling geolocation data, installing on Amazon Linux platform…)

The tutorial includes information about -

Overview
Installation
Querying
Etc

The tutorial is attached as a pdf file (the version attached here is the first one and it will be updated during the work):
MongoDB Tutorial.pdf

Design: Choose the delivered product

The client story requires us to implement an interactive solution that supports multiple users. The product has to reflect changes made by one user to others so the product has to include both - client & server side.

Client Side -
The options are:

  • Application for PCs
  • website
  • mobile application

Server Side -
The options are:

  • dedicated server Linux OS based.
  • dedicated server Windows OS based.
  • dedicated server iOS based.

Daniel's Weekly Report

Weekly report for the spring semester

week 2

Gathered together to discuss the next stages of the project and we started working on the paper we had to submit.

  • Prioritised all of the issues with the team.
  • Planned the roommate finding algorithm.
    Total time spent working this week: 9 hours.

Week 3

  • Had a group meeting about our current progress. We discussed the roommate finding algorithm in great detail.
  • Researched how to work on the backend in order to work on the roommate finding algorithm.
    Total time spent working this week: 9 hours.

week 5

  • Took a week of vacation out of the two we are given for the semester.

Week 6

  • Took second the week of vacation out of the two we are given for the semester.

Week 7

  • I was team leader so I reorganised the backlog and assigned everyone assignments
  • Early research for azure integration. What is Azure, how to use is, what it can give us and which features should we explore. Result was that the two most appropriate features for us to use were either Azure Functions or Azure Load Balancer.
  • Testing - reviewed started working on test plans and checked for unknown bugs at the time.
    Total time spent working this week: 9 hours.

Week 8

  • Back end: I researched how to add support for new hobbies information. So i Changed the UserSchema in the backend module to include a new array of hobbies that are blockers called blockers. Meaning that every hobby in the array hobbies is considered as a yes, every hobby in the blockers array is considered as a firm no, meaning a blocker. And finally every hoody that is not in the hobbies array and not in the blockers array is considered as a "Don't Care". #251
  • Testing: I was given the task of testing the entire website and I had done so extremely well. I spent a lot of time going over everything in the website and found a lot of bugs and some inconsistencies which are also important to take care of. All the bugs I found are at: #473 and #474 and #475 and #476 and #477 and #478 and #479 and #480.
    The issue containing it and describing the task is: #451
    Total time spent working this week: 9 hours.

Week 9

  • Met with the entire team and David to discuss next weeks goals and objectives.
  • Because it is required to work with Azure in the project I was given the task of deciding if we should work with Azur's load balancer or with functions. Researched the pros and cons of working with a load balancing. I researched a lot online by reading articles and the formal documentation and the conclusion I had reached and the explanation behind it can be found here: #421
  • Close Mid semester version. Finished #457
  • Document: Update mid semester POC presentation with UC diagram. I had created two variants of the POC because time was valuable so I let the team decide which one they liked better. I created the POC according to the discussion we had with the entire team and it turned out great. #447
    Total time spent working this week: 9 hours.

Week 10

  • Started working on setting up Azure. I read a lot of articles on how to deploy a website to azure
  • Started setting up the servers and the load balancer and everything needed to have the servers distribute the work between them. I set up the virtual network they would work on and researched how to have them work together. Everything I had done regarding this which is a very detailed account is at: #503
  • IMPORTANT: I had actually spent a lot of time this week working in vane because I had made a lot of progress setting up the servers on my Azure account which I had from a previous project in ransomware. But then realised that for some reason because it was with the campus email it couldn't be a part of the team we set up for roommates at Azure and there was no way around it. So I created a new account and had to do a lot of the work again.
    Total time spent working this week: 12 hours.

week 11

This week was focused on integrating azure and deploying our website to Azure.

  • I had continued to researched how to create a load balancer and deploy a website to Azure.
  • I continued setting up the servers and configuring them to distribute the work between themselves.
  • A VERY detailed account of what I had done can be found in the matching issue. I wanted to document this in order to help anyone else who would like to read it: #531
    Total time spent working this week: 10 hours.

Week 12

  • met with the team for another briefing and reassigned issues.
  • started working on the user manual. I started with creating a user manual in Hebrew but then I realised that it should be in english so I rewrote everything I had wrote up until that time. #207 and #429 and #637
  • Found a bug with the Advertise Apartment page.
    Total time spent working this week: 9 hours.

Week 13

This week I was the team leader

  • Closed all of the issues that were still in progress from the previous week.
  • Created new followup issues according to the progress made on the issues that were still in progress and the ones we still had to complete. #607 #606 #605 #604 #603
  • reorganised the backlog and moved all of the issues that needed to be completed this week to the TODO tab and assigned teammates to complete them.
  • Finished creating the user manual. I went over it with all of the team members to get their feed back and then changed it accordingly. I added a lot of images to make it clearer and redesigned the document to look professional. Finished #603 and #429 and #637, #627
    Total time spent working this week: 11 hours.

decide on interface

decide on interface, taking into consideration: components, functionality & looks. #25

Interface Draft.pdf

current pages:

  • home page: search fields. login & register or user profile.
  • register page: user fields
  • search results page: preview of search results in pages.
  • apartment page: apartment details, photos, comments, interested users and owner profile link
  • my profile: describes the logged in user profile and allows editing
  • user profile: describes another user, search together option
  • about/contact us: short paragraph about us and contact info
    EDIT: as a result of our weekly meeting we will add a search option for roommates in addition to the apartment search

additional features:

  • login pop-up
  • add comment pop-up
  • show address on map pop-up
  • terms of service pop-up
  • navigation menu: currently on the left, can be on the top instead. need to decide about collapsible.

Design: Determining data to be stored & actions & data relationships

"A database design starts with a list of the data that you want to include in your database and what you want to be able to do with the database later on. This can all be written in your own language, without any SQL. In this stage you must try not to think in tables or columns, but just think: "What do I need to know?" Don't take this too lightly, because if you find out later that you forgot something, usually you need to start all over. Adding things to your database is mostly a lot of work.

Identifying Entities
The types of information that are saved in the database are called 'entities'. These entities exist in four kinds: people, things, events, and locations. Everything you could want to put in a database fits into one of these categories. If the information you want to include doesn't fit into these categories, than it is probably not an entity but a property of an entity, an attribute. The data elements that you want to save for each entity are called 'attributes'.

The next step is to determine the relationships between the entities and to determine the cardinality of each relationship. The relationship is the connection between the entities, just like in the real world: what does one entity do with the other, how do they relate to each other? For example, customers buy products, products are sold to customers, a sale comprises products, a sale happens in a shop.
The cardinality shows how much of one side of the relationship belongs to how much of the other side of the relationship. First, you need to state for each relationship, how much of one side belongs to exactly 1 of the other side. For example: How many customers belong to 1 sale?; How many sales belong to 1 customer?; How many sales take place in 1 shop?"

(http://www.datanamic.com/support/lt-dez005-introduction-db-modeling.html)

Or Weekly Report

Semester B

25.03.2018 - 31.03.2018

  1. Integrated GitHub projects into our project.
  2. Created issues following the meeting with David.
  3. Prioritized the opened issues (with all the team).
  4. Added first meeting summary to the Wiki.
  5. Back-end: Added edit apartment route (#193).
  6. Testing: Created tests for PATCH /apartments/id (#208).
  7. Testing: Disable logger while running tests - added threshold (#215).
  8. Back-end: Made log level configurable and environment dependent (#216).
  9. Back-end: Added support of default entry to the server config file (#217).
  10. Design: Document: Designed notifications feature alternatives (#199).

01.04.2018 - 07.04.2018 (Passover)

  1. Front-end: Added social media share buttons to ads (#219)
  2. Document: wrote the "Roommates" article with @alonttal (#197 )
  3. Raised ways to improve our matching algorithm accuracy (#240 ).
  4. Participated in the discussion (comments) raised by team members.
  5. Back-end: wrote the visit module (#232 ).
  6. Testing: Back-end: wrote tests for the visit module (#241 ).

08.04.2018 - 14.04.2018

  1. Searched for bugs in the project (e.g: #246, #249 )
  2. Fixed bug: Front-end: Added missing entrance date information to the apartment page (#246).
  3. Fixed bug: Front-end: The "WHEN" filter doesn't work (#249) .
  4. Implemented: DB: Apartment schema has to support the visits data (#231).
  5. Implemented: Back-end: notification module (#257 ).
  6. Testing: Back-end: created unit tests for the otification module (#258 ).
  7. Implemented: Back-end: Notifications aggregation policy module (#259 ).
  8. Testing: Back-end: Created unit tests for the notifications aggregation policy module (#260 ).
  9. DB: Back-end: Changed DB schemas to support notifications feature (#262).
  10. Back-end: Added relevant functionalities to current models to support notifications (#263).
  11. Back-end: Added notifier module (#264).

15.04.2018 - 21.04.2018

  1. Testing: Back-end: Added notifications related data to the seed file (infrastructure for notifications feature testing)
  2. Testing: Back-end: Created tests for the notifier module (#269).
  3. Back-end: Modified current routes to push notifications (#273).
  4. Testing: Back-end: Added tests for route: PUT /apartments/:id/subscription (#272)
  5. Back-end: Added route: PUT /apartments/:id/subscription (#270)
  6. Back-end: Added route: PATCH /users/notifications/:id (#279).
  7. Testing: Back-end: Added tests for route: PATCH /users/notifications/:id (#280).
  8. Testing: Fixed notifier module tests (#293 )
  9. Document: Wrote a document explaining the way to work with the sockets server (#301 ).
  10. Back-end: Made socket server port configurable and environment dependent (#302)
  11. Back-end: Integrated the new socket server into our web application (#303).
  12. Back-end: Completed the implementation of a new module/server - sockets server - first phase (#294).

22.04.2018 - 28.04.2018

  1. Back-end: Implemented the second phase of the sockets server (i.e. authentication) (#304).
  2. Document: Updated the "Working with the socket server" tutorial with the new parameters presented in the second phase of implementation (#307)
  3. Testing: Back-end: Added and modified tests according to the new notifications aggregation policy (#314).
  4. Back-end: Changed notifications aggregation policy (#312).
  5. Document: Updated Back-end API document with the new notifications routes (#308).
  6. Document: Wrote notifications feature document (#309).
  7. DB: Back-end: Added time to notification schema (#311).
  8. Back-end: Changed current functionality to support "time" property of notification (#313).
  9. Testing: Modified & added tests to validate "time" property of notification (#318).
  10. Back-end: Integrated notifications feature with the sockets server (#295).
  11. Back-end: completed the notification system implementation (#253 ).
  12. Back-end: re-committed (and new commits of local changes) all visit feature code (#285 ): #231, #232, #233, #241 , #242 , #243 , #244 , #250 so the "sched a visit" (#230 ) feature is done on back-end.
  13. Back-end: Testing: Resolved the errors in the TravisCI builds so now we can use it again (#324 ).
  14. Bug: Back-end: Assisted Alon solving logger exception (#334 ).
  15. Back-end: Created route for fetching users list by ids (#317).
  16. Testing: Back-end: Modified current & created new tests for fetching users list by ids (#337)

29.04.2018 - 05.05.2018

  1. Document: Design: Sockets server: Wrote private messaging and notifications functionalities design ( #320).
  2. Back-end: Added functionality of "notification_read" message to the sockets server (#346).
  3. Back-end: Changed current flow & added supported messages of the sockets server according to the new design I wrote (#345).
  4. Back-end: Fixed Bug: Some functions in user & apartment models don't check correctly equality of objects (#349).
  5. Back-end: Separated the functionality of the sockets server from the sockets server file (#350).
  6. Back-end: Implemented: Sockets-server: Has to provide functionality and not an enum (#357).
  7. Back-end: Added changing notification read state functionality to the notification module (#359).
  8. Back-end: Bug: Fixed an undesired recursion caused by the merge (#361)
  9. Testing: Back-end: Added tests for changing notification read state functionality (#360).
  10. Testing: Back-end: Wrote tests for current functionalities of the sockets server (#351).
  11. Testing: Back-end: Fixed unstable test in the notifier service (#365).
  12. Back-end: Wrote Design document: Support private messaging (chat) (#358).
  13. Back-end: DB: Created private messaging entities DB schema (#367).
  14. Back-end: Added private messaging module (#368).
  15. Testing: Back-end: Created tests for the private messaging module (#369).
  16. Document: Updated the back-end API with the new schemas (#373).

06.05.2018 - 12.05.2018

  1. Testing: Back-end: Fixed failing tests so the CI builds can pass (#376).
  2. Testing: Back-end: Fixed unstable tests (#381).
  3. Back-end: Added notifications to the user json (#387).
  4. Back-end: Front-end: Notifications feature integration (back-end & front-end) with @alonttal (#382).
  5. Back-end: Sockets-server: Support authentication with second roundtrip with @alonttal (#386).
  6. Front-end: Fetched self on creation with @alonttal (#388)
  7. Back-end: Fixed: build is broken (#390).
  8. DB: Back-end: Updated user schema with the new private messaging properties (#370).
  9. Back-end: Updated user module with relevant functionalities for the private messaging feature (#374).
  10. Testing: Back-end: Created tests for the user module private messaging functionalities (#375)

13.05.2018 - 19.05.2018

  1. Back-end: sockets server: added: handle private message request (#404).
  2. Testing: Back-end: sockets server: Created tests for private message request (#405).
  3. Back-end: sockets server: added: handle private message read request (#409).
  4. Testing: Back-end: sockets server: Created tests for private message read request #410
  5. Back-end: Implemented route delete '/users/conversation' #423
  6. Testing: Back-end: Created tests for route delete '/users/conversation' #424
  7. Back-end: Fixed Bug: User model function doesn't properly handle missing id when fetching notification #443
  8. Back-end: Added support multiple ids on PATCH /users/notifications/:id #418
  9. Back-end: Updated modules following the #418 changes #444
  10. Testing: Back-end: Created tests for PATCH /users/notification/:id #426

20.05.2018 - 26.05.2018

  1. Document: Wrote Weekly Meeting Minutes 22-05-18 (#463).
  2. Back-end: Fixed: sockets server: Send private message read to front-end as object instead of string (#472).
  3. Back-end: Fixed: sockets server: Send private message to front-end as object instead of string (#416).
  4. Wrote mid semester presentation (#449).
  5. Searched for bugs in the system (before mid semester presentation) - #484, #483, #481
  6. Prepared the mid semester POC speech #456
  7. Back-end: Added private messaging functionality to the sockets server #319

27.05.2018 - 02.06.2018

  1. Searched for bugs in the system (before mid semester presentation) - #494 , #495 , #496
  2. Document: Mid semester presentation polishes #491
  3. Must: Prepared the mid semester POC speech - polishes #456
  4. Must: Demo dress rehearsal #492 with Alon
  5. Must: Prepare users for the demo with Alon (#493)
  6. Front-end: Added search review component (#514 ).
  7. Back-end: Added route to fetch all reviews (without aggregation) (#516).
  8. Fixed: Back-end: Reviews routes should return the format expected by the front-end (#513).
  9. Testing: Added tests to the new route which fetches all reviews (without aggregation) (#517).

03.06.2018 - 09.06.2018

  1. Front-end: Provided search functionality in the reviews page (#514).
  2. Front-end: Integrated reviews page with back-end (#501).
  3. Front End: added the ability to add reviews in review page (#499).
  4. Front-end: Fixed Bug: Reviews pros and cons are not displayed in front end (#527).
  5. Assisted Alon with last polishes to the project poster (#519 ).
  6. Back-end: Email is case sensitive. #477 - fixed this bug.

10.06.2018 - 16.06.2018

  1. Email is case sensitive. #477 - wrote unit tests for the fix.
  2. Started working on the apartment page - two weeks job (Alon continues) - It has now the same template as the apartment details card displayed in the main page (collapsed).

Planned the architecture of the integration with Azure + implemented it:

  1. Back-end & Front-end:Azure: Deployed server to azure (#551) + Azure configuration
  2. DB: Azure: Deployed DB to azure (#549) + Azure configuration
  3. Back-end: DB: Azure: Configure back-end to communicate with DB on cloud #550
  4. Started: Back-end & Front-end : Azure: Configure server to work in azure #552
  5. Started: Document: DB: Azure: Write Azure DB deployment guide #566
  6. Started: Testing: Test integration with Azure #589 (opened bug #590 )

17.06.2018 - 25.06.2018

Continue with the Azure integration:

  1. Back-end & Front-end:Azure: Deployed server to azure (#551) + Azure configuration - fixed issues from past week.
  2. Continued with: Back-end & Front-end : Azure: Configure server to work in azure #552
  3. Finished: Testing: Test integration with Azure #589 (opened bug #595 , #596 , #598 )
  4. Fixed: Server: Azure: WebSockets don't work #595

Additional items:

  1. Front-end: Removed "enable notifications" from profile component and added it to apartment page. #600
  2. Front-end: Activated option to subscribe to apartment page #599
  3. The 2 above fixes the bug: Apartment page: enable notifications #593
  4. Fixed Bug: Azure: Back-end: Reset password mail is sent with "localhost" address #598
  5. Looking for bugs for the final presentation (examples for findings #618 , #619, #621, #622, #631 , #632 , #633 .
  6. Fixed Bug: Front-end: When user clicks on "accept" a group it is considered as "declined" #618
  7. Fixed Bug: User not notified when he's in a group #614
  8. Back-end: Front-end: Added new notification type "group accepted" #619
  9. Fixed Bug: Front-end: Wrong error "apartment's floor number is more than the total building floors" #621
  10. Fixed bug: owner isn't notified when a new full group is available #610, #508
  11. Fixed bug: Front-end: Main details date, address #576
  12. Fixed bug: Weird chat behavior #617
  13. Fixed bug: Front-end: Enable notifications sent request to localhost instead of server address #624
  14. Improved: Front-end: Notification should redirect to apartment page and not to search results #625
  15. Fixed bug: Create Your Own Group section should not be shown if not logged in (and verified) #626
  16. Fixed bug: Both search and add review modals can be opened in reviews page #629
  17. Fixed bug: Group style is not change after owner closes a deal. The Ad should be marked as "Deal Closed" #630
  18. Fixed bug: Front-end: Redundant caption of "ranking" appears under publisher name #633
  19. Fixed bug: Front-end: No reason to allow creating groups once a group was closed #632
  20. Fixed bug: Front-end: Clicking on "clear" group doesn't return group members to the available list #631
  21. Implemented: Back-end: Azure: Send logs to accessible resource #601
  22. Wrote document: Design: Back-end: Create component diagram #634
  23. Wrote document: Design: Back-end: Create general deployment +azure deployment diagrams #635
  24. Done: Testing: Improve coverage #620
  25. Wrote document: DB: Azure: Write Azure DB deployment guide
  26. Fixed bug: Front-end: All buttons of groups should be disabled once a group is completed #642
  27. Fixed bug: Front-end: Close the deal button doesn't trigger the route that changes group status #643
  28. Did testing: Test integration with Azure #589
  29. Implemented Back-end: Created Route for fetching Users ordered by BestMatching #377
  30. Implemented Back-end: Send mail to users once group is signed #649
  31. Implemented back-end side of: Fix: Order group member suggestions ordered by matching #648
  32. Document: Wrote business flow #656
  33. Document: Fixed mistakes in the user's manual #603

--------

Semester A

29.10.2017 - 04.11.2017

  1. Created issues & participated in the discussion (comments) raised by them ( #4 #5 #6 #7 #8 #12 #13).
  2. Made an introduction to ElasticSearch in order to decide between MongoDB and ElasticSearch ( #18 ).
  3. Added first meeting summary to the Wiki.

05.11.2017 - 11.11.2017

  1. Created issues & participated in the discussion (comments) raised by them ( #19 #20 #21 #22 #23 ).
  2. Analyzed & defined the main data entities in the problem domain and the relationships between them ( #19 ).
  3. Defined the DB must have features in order to choose the most suitable DB for our project ( #20 )
  4. Collected the information I read and wrote a ~20 pages tutorial about: MongoDB and the integration of it with Java (with Java Driver and Spring Data) - [MongoDB tutorial] (https://github.com/TechnionYearlyProject/Roommates/files/1462328/MongoDB.Tutorial.pdf) ( #28 )
  5. Planned the DB structure ( #22 )

12.11.2017 - 18.11.2017

  1. Wrote HLD v1 with @alonttal ( #31 )
  2. Wrote a brief introduction to Amazon S3 ( #32 )
  3. Created a storage design ( #34 )
  4. Added weekly meeting summary to the Wiki.
  5. Checked alternative for Spring - Node.JS & Express.JS with @alonttal ( #36 )
  6. Updated HLD to v2 with @alonttal

19.11.2017 - 25.11.2017

  1. Added weekly meeting summary to the Wiki.
  2. Defined back-end-UI API functionalities ( #38 ).
  3. Studied JavaScript & Node.JS
  4. Configured DB instance to work with external back-end ( #44 ).
  5. Wrote initial draft of the DB communicator component in order to test integration of logic server and DB server ( #45 ).
  6. Created Back-end API document with @alonttal ( #48 )

26.11.2017 - 02.12.2017

  1. Added weekly meeting summary to the Wiki.
  2. Integrated project with Travis-CI ( #50 )
  3. Added test coverage analysis tool ( #51 )
  4. Wrote DB server deployment script ( #46 )
  5. Wrote DB server deployment procedure ( #47 )

03.12.2017 - 09.12.2017

  1. Added apartment geo-location query (#55, #58 )
  2. Added apartment geo-location query tests + general testing utils (#56 )
  3. Added back-end connection to the DB ( #57 )
  4. Configured TravisCI with a mongoDB service so we can perform DB tests on it ( #50 )
  5. Configured the server to work with Google Map API in order to get geo-location data for a query (#61 )
  6. Wrote Geo location unit tests (#64 )
  7. Configured geo-location service to work with Roommates token (and not ip based) (#70 )
  8. Started working on calculating interested matching result (#60 )

10.12.2017 - 16.12.2017

  1. Fixed geo-location test (#79).
  2. Wrote array functions wrapper ( #80 ).
  3. Wrote unit tests for array functions wrapper ( #81 ).
  4. Updated back-end API with new routes ( #73 )
  5. Created hobbies module (#71)
  6. Created matcher module (#60 )
  7. Modified user schema to have a reference to hobbie insted of embedded hobbie (ref to the hobbies module - #71 )
  8. Wrote functions in apartment & user schema that calculate and sort interested matching result - #60 .
  9. Updated the seed with data that can help us support more complex tests.
  10. Wrote unit tests for Hobbie module (#75 ).
  11. Wrote unit tests for Matcher module (part of #76 )
  12. Wrote user & apartment modules unit tests for interested matching ( #76 )

17.12.2017 - 23.12.2017 (Hanukkah)

  1. Fixed CI integration - builds are not triggered by push (#88)
  2. Fixed CI to run all tests (#91 )
  3. Integrated CI with codecov - CI sends the report to codecov.io automatically (on each successful build). (#92 ).
  4. Wrote apartment tags module (#72 ).
  5. Updated apartment schema to work with the tags module (#72)
  6. Wrote unit tests & added route tests for the tag module (#107 )
  7. Wrote POC presentation (general & backend content) with @alonttal (#111 , #113 )

24.12.2017 - 30.12.2017

  1. Updated POC presentation (general & backend content) with @alonttal (#111 , #113 )
  2. Found template which is going to be the goal of the UI (#112 )
  3. Wrote "add comment" route (#96 )
  4. Wrote "add comment" route tests (#115 )
  5. Wrote "remove apartment" route (#97 )
  6. Wrote "remove apartment" route tests (#117 )
  7. Started learning HTML & CSS in order to help UI tasks.
  8. Wrote "return all user tags" route (#120 ).
  9. Added new functionality to helpers.
  10. Mapped the status of all routes (#125 )

31.12.2017 - 06.01.2018

  1. Wrote "return all apartment tags" route (#121 ).
  2. Wrote "return all user tags" route tests (#122 ).
  3. Wrote "return all apartment tags" route tests (#123 ).
  4. Wrote generic card component for the Front End (#128 ).
  5. Wrote generic multiple select list component for the Front End (#129 )
  6. Wrote user control panel page - Front End(#133)
  7. Wrote user profile page (including sub componenets) - Front End (#135 ).
  8. Wrote tags selection page - Front End (#136 ).
  9. Refactoring of some Front End components.

07.01.2018 - 13.01.2018

  1. Changed user profile page components to support dynamic data fetch from server (part of #135).
  2. Changed user profile page to support dynamic data fetch from server (part of #135).
  3. Bug fixes in user profile page (part of #135 ).
  4. Bug fixes in user profile page components (part of #135 ).
  5. Hobbies selection page to fetch data dynamically from server (part of #136 ).
  6. Modified user panel to fetch data dynamically from server and to send it to pages accessible from it (part of #133).
  7. Added routes to new pages.
  8. Bug fixes in profile tags (part of #135 )
  9. Fixed minor UI issues in the profile page (following our conversation) (#144 )
  10. Fixed minor UI issues in the control panel page (following our conversation) (#143 )
  11. Added error logs (to the console) in user profile page and hobbies selection page.
  12. Make the buttons (submit & cancel) work against server in the hobbies selection page.
  13. Back-end - added "toggling interested state" route (including apartment & users member functions) (#119 ).
  14. Added tests to the "toggle interested state" route (#124)
  15. Linked new pages to the user control panel page (part of #133).
  16. Started creating "my apartments" page (#149 ).

14.01.2018 - 22.01.2018

  1. Front-end: integrated control panel with the login mechanism (#155)
  2. Front-end: added status message to the hobbies selection page (#156)
  3. Finished hobbies selection page (#136 ).
  4. Front-end: Fixed bug : display readable birth-date in the profile page (not unix timestamp) (#157 ).
  5. Front-end: Fixed missing "profile" icon in control panel (#158).
  6. Front-end: (initial) wrote my apartments page + dynamic data fetch (#149 ).
  7. Added weekly meeting summary to the Wiki.
  8. Front-end: integrated my apartments page to the control panel (part of #149).
  9. Back-end: Created a logger module (#59 ).
  10. Back-end: Created default exception handler (#165 )
  11. Wrote developer guide (#162 ).
  12. Back-end: Added HTTP requests auto logger (#166)
  13. Converted console prints to logger prints (part of #59 ).
  14. Back-end: Fixed bug: Server crash (#173).
  15. Back-end: fixed bug: not all HTTP errors are recorded (#174)
  16. Front-end: Fixed: published apartments list should be updated on delete - status message was added (#175)
  17. Front-end: Fixed all errors in control panel page (#176).
  18. Front-end: Fixed all errors in user profile page (#177).
  19. Back-end: Improved & enriched HTTP requests logger (#178).
  20. Front-end: Fixed bug: Enable user to express interest (#181).
  21. Worked on the final presentation (#161 ).
  22. Wrote route of get interested by match (#182 ).
  23. Wrote unit tests for route - get interested by match (#183 )
  24. Fixed back-end: bug: Filter by tags doesn't require all tags to match (#184)
  25. Added data to the demo
  26. Added some documentation to back-end #179
  27. Fixed front-end: Bug: Apartment page carousel doesn't work #186
  28. Fixed Front-end: Bug: Apartment header isn't refreshed on search (main page) #187.
  29. Fixed Front-end: Bug: Tags are incorrect in apartment page #188
  30. Fixed: Front end: Bug: interested page isn't drawn #189.
  31. Testing: performed manual tests on the website.
  32. Presentation: preparations for the end of semster presentation.

Classes Definition

In this issue we will decide the final structure of our classes.

Apartment

This class will represent an apartment.

  1. String: ID
  2. String: City
  3. String: Street
  4. String: Building Number
  5. String: Apartment Number
  6. String: Floor
  7. String: Rent Price
  8. String: Number of Rooms
  9. String: Number of Showers
  10. String: Number of Bathrooms
  11. List tags //
  12. List Apartment Pictures
  13. List Residents // A list of all the residents IDs
  14. List Interested // A list of all the interested users IDs
  15. List comments //comments on this apartment by renting users
  16. String FreeTextDescription
  17. String: Owner's ID In Our Database

User

This class will be an abstract class the User-Owner and User-Renter will inherit from.

  1. String: ID
  2. String: Name
  3. String: Email
  4. String: Password
  5. String: Phone Number

User-Owner - Inherits form User

This class will represent a user that posts apartments for rent.

  1. List apartments ID's he has posted for rent
  2. List reviews // reviews of this renter

User-Renter - Inherits form User

This class will represent a user that is looking for a place to rent and can review apartments and renters.

  1. String DateOfBirth
  2. String gender
  3. Boolean dogOwner // Owns and wants to bring a dog
  4. Boolean catOwner // Owns and wants to bring a cat
  5. Boolean dogAllergy // Allergic to dogs
  6. Boolean catAllergy // Allergic to cats
  7. List interests
  8. Sting Occupation // this will be from a set multi-choice of student/ employee
  9. String studying // if he is a student this will be relevant and is chosen from a multi-choice of all the possible degrees
  10. String freeTextDescription
  11. List images // images the user would like to upload of himself
  12. NEEDS DEBATING: List comments about this user // comments left on this resident by other residents who have lived with him

Comment

This class will represent a comment that will be stored in a list in either Apartment, User-Owner or User-Renter.

  1. String ID //comment's id
  2. Sting PosterID // poster's id
  3. String content
  4. String Date // date of posting

ApartmentTag

This will be an Enum with the following set values.

  1. No Elevator
  2. Pet Free
  3. Comes Furnished
  4. Has Oven
  5. Has Stove

InterestTag

This will be an Enum with the following set values.

  1. Likes Basketball
  2. Likes Football
  3. Plays an instrument
  4. Likes to cook
  5. Likes to workout
  6. Likes to watch realityTV
  7. Like to watch tv shows
  8. Likes to watch movies

Image

This class will represent an image.

  1. String ID
  2. String Image
  3. int pixelHeight
  4. int pixelWidth

Introduction to Vue

Intro

Vue is a progressive framework for building UI. It is component oriented and uses templates in order to create and view layer of the application.
Vue, like other frameworks (like Angular) adds more power to the HTML and allows us to write more declarative code which is generated, by Vue, to a valid HTML code that browsers understand.

Comparing to other frameworks - Why Vue?

Here I will refer only to the differences that are more likely to be relevant to our needs, for a fuller comparison click here.

AngularJS

  • Easy to learn: AngularJS is harder to learn and considered more complex. Learning Vue for our needs takes less time,
  • Flexibility: AngularJS is stricter. It makes our app be structured in a specific way. Vue is more flexible, which may sound like a thing that might lead to a messy project. In order to prevent such a situation we can use Webpack and write out components in a structured way and still have the benefits in Vue flexibility.
  • Performance: Vue has better performance because of the way it implements its watches. They are asynchronous and there is no need in re-evaluating all of them anytime something changes.

React

  • Templates vs JSX: React uses JSX, which is a way to write HTML in the Javascript, and use Javscript to manipulate it - which is a powerful tool. Vue also supports using JSX, but also offers the templates alternative. We can take any valid HTML code and use it as our template right away. Moreover, I find writing HTML templates cleaner.
  • Scoped Style: This concept means creating a styling for each component and not worrying about different style definitions from other components that might break our definitions. Vue (with Webpack) gives a very easy platform to use this concept - with the known HTML style elements.
  • Mobile: React has React Native which allows us to write mobile applications using the same component model. Vue also has it, using Weex we can take our vue-components and write with them an app.

Angular

I won't get into details here because I believe that Angular is irrelevant in our case - it is too heavy and hard to learn for our case.

Writing a Small Appication

I believe that the best way to learn something is by using examples. Here I will build a simple application which displays a list of apartments and allows removing and deleting apartments from the list.

Using Webpack

Using this tool is not obligatory, but using it allows us to write our components in a more organized way.

Webpack is a bundling tool. It get as an input a Javascript file in our case, and then goes after all its dependencies, "compiles" them and outputs a single bundle - a single script file. We can think about it like compiling many C files into one executable file.
Vue provides vue-loader for Webpack. This extension to Webpack allows us to write single-file-components, which are eventually "compiled" into a valid Javascript code that browsers can execute.

In order to use this, we will use NPM. We can go to https://nodejs.org, download and install it and now we have Node Package Manager which will be used to installing and running Webpack.

After installation finishes, we will navigate to the path where we want to open a directory for our project. Then we will open our CLI and run the following:
npm install -g vue-cli
vue init webpack-simple roomates
cd roomates
npm install
npm run dev

Our default browser should open at this point and display a page with Vue logo.

Understanding what's going on

For this tutorial, we will look at the index.html file and it the src folder. index.html file is our base file, this file contains a single element with "app" id.
In the src folder we have main.js:

import Vue from 'vue'
import App from './App.vue'

new Vue({
  el: '#app',
  render: h => h(App)
})

Here we import Vue and App component. Then we create a new Vue instance and inform Vue that the element with the "app" id is our application element. Vue will now replace this element with our App component.

Now we will go and explore src/App.vue which contains our application:

<template>
  <div id="app">
    <img src="./assets/logo.png">
    <h1>{{ msg }}</h1>
    <h2>Essential Links</h2>
    <ul>
      <li><a href="https://vuejs.org" target="_blank">Core Docs</a></li>
      <li><a href="https://forum.vuejs.org" target="_blank">Forum</a></li>
      <li><a href="https://chat.vuejs.org" target="_blank">Community Chat</a></li>
      <li><a href="https://twitter.com/vuejs" target="_blank">Twitter</a></li>
    </ul>
    <h2>Ecosystem</h2>
    <ul>
      <li><a href="http://router.vuejs.org/" target="_blank">vue-router</a></li>
      <li><a href="http://vuex.vuejs.org/" target="_blank">vuex</a></li>
      <li><a href="http://vue-loader.vuejs.org/" target="_blank">vue-loader</a></li>
      <li><a href="https://github.com/vuejs/awesome-vue" target="_blank">awesome-vue</a></li>
    </ul>
  </div>
</template>

In the template tag we will write our template. This is HTML code that has some additional features added by Vue. we will learn about them later.

<script>
export default {
  name: 'app',
  data () {
    return {
      msg: 'Welcome to Your Vue.js App'
    }
  }
}
</script>

Here we export our component. The data function returns an object which contains the data that will be injected to our template.

<style>
#app {
  font-family: 'Avenir', Helvetica, Arial, sans-serif;
  -webkit-font-smoothing: antialiased;
  -moz-osx-font-smoothing: grayscale;
  text-align: center;
  color: #2c3e50;
  margin-top: 60px;
}

h1, h2 {
  font-weight: normal;
}

ul {
  list-style-type: none;
  padding: 0;
}

li {
  display: inline-block;
  margin: 0 10px;
}

a {
  color: #42b983;
}
</style>

These are standard CSS rules. We can change <style> to <style scoped>` to get scoped styling.

Starting to Code

Firstly we will delete the template and style tags contents.
We want our app to contain a text field, which adds an apartment to a displayed list of apartments when we hit enter,
For our example, each list item will also be a component.

ListItem component

In the src folder we will create a new components folder. In this folder we will create a ListItem.vue file:

<template>
    <li>
        {{ text }}
        <button @click="removeMe">x</button>
    </li>
</template>

Our template is a simple list item HTML element with some Vue options.
{{ text }} means "write here the value of the text variable".
@click means "onclick", when clicking we invoke the removeMe method.

<script>
    export default {
        name: 'list-item',
        props: ['itemIndex', 'itemText'],
        data: function() {
            return {
                text: this.itemText,
                index: this.itemIndex
            }
        },
        methods: {
            removeMe: function() {
                this.$emit('remove', this.index);
            }
        }
    }
</script>

Here we export our component.

  • The props element is an array that defines variables parameters the parent component can pass.
  • data is a function return a object that contains the variables of the component (such as text).
  • methods is an object that contains the methods defined in this component.

So, we receive the index and the text of this list element. We display the text of the item and a button for removing it. When the button is clicked we run removeMe.
$emit is a function that triggers an event. The parent will listen to this event and will handle it. Here we trigger an event named "remove" (we can use any name we want) and pass our index as a parameter.

Using our component

Now we will open src/App.vue:

<template>
    <div>
        <input type="text" @keyup.enter="addItem" />
        <ul>
            <li
                    is="list-item"
                    v-for="(apartment, index) in apartments"
                    :item-index="index"
                    :item-text="apartment"
                    @remove="removeItem"
            ></li>
        </ul>
    </div>
</template>

We define here an input element and a list.
We declare that when a keybourd key up event is triggered and the key pressed is enter we invoke addItem.
Also we define a list. Each list item is a ListItem component according to the is attribute. Generally we would use a <list-item> tag instead of the is attribute. Here we must use li tag because we are in a ul so we use the is attribute.

  • v-for="(apartment, index) in apartments" means that we iterate over the apartment variable and for each iteration we display another list item, where apartment is the current element and index is its index.
  • :item-index="index" means we pass the index (the colon at the beginning replaces the v-bind and indicates that index is a variable and not a string literal) to the item-index prop of the list-item component.
  • :item-text="apartment" same. We pass the apartment variable to the item-text prop.
  • @remove="removeItem" - when remove event triggers we invoke the removeItem method.
<script>
    import ListItem from './components/ListItem.vue'

    export default {
        name: 'app',
        components: {
            ListItem
        },
        data () {
            return {
                apartments: ['ex1', 'ex2', 'ex3']
            }
        },
        methods: {
            removeItem: function(index) {
                this.apartments.splice(index, 1);
            },
            addItem: function(e) {
                this.apartments.push(e.target.value);
            }
        }
    }
</script>

Here we import our component and name it as ListItem. We register it in the components field.
At the beginning we have 3 example apartments in the list.

  • removeItem goes to the apartment array and just removes the element in the specified index. The beauty here is the fact that mutating the array will automatically change the UI, Vue does that for us.
  • addItem just adds a new item to the array, and again the list is updated automatically.

That's it! We can now remove and add items to our list. We built a small application with components and used Webpack.
There are many more options that Vue offers, you can read more here.

Introduction to Spring

Hello.
I hope you will find this guide useful. Please let me know if you see any unclear wording or mistakes. #24

.
.
image

Introduction

Spring is an open source framework created to address the difficulty and complexity of a major application development. It is heavily based on two design principles – Dependency Injection (DI) and Aspect Oriented Programming (AOP) which we will cover later.

.
.
image

  • Tool that helps managing java projects. it configures how .java file get compiled into .class, manage CLASSPATH, and so on.
  • Practically, Maven will download all libraries we'll need and integrate it into our project.

.
.
image
An important thing we need to understand before we dive into the technical stuff is what exactly a REST API is. REST stands for Representational State Transfer. It is an architecture style for designing networked applications. REST API usually works the same as a website does – when you make a call to the server you eventually receive data back over HTTP protocol. REST API treats objects on the server side as resources that can be created, update and destroyed. It basically uses 4 main HTTP request methods:

  • GET: get data from the server
  • POST: send data to the server
  • PUT: update a resource on the server
  • DELETE: delete a resource on a server
    A request could look something like this:
    https:// roommates.com/rest/ apartments/43545
  • https means we are using a secured http protocol
  • roommates.com/rest is the endpoint url which means we refer to roomates.com REST API
  • apartments will list all of the apartments in the server's database
  • 43545 filter the apartment with id=43545
    Usually the response is returned in JSON format so it can be used in our application.

.
.
image
One if the things Spring provides is a layered architecture, which helps in breaking our application into different logical units. This is a type of software architecture pattern called Model-View-Controller (MVC). In this pattern, each component has a different responsibility in the overall app:
The Model is the core of the application, containing its data and logic – the thing which gives our app it's personality. The model does not communicate directly with the view.
The View objects are the "pretty face" of the app. The window, buttons, menus and so on, are all view object. They all displayed on the user screen and respond to the user's actions. Even though a view may get a request to handle an event that involved with data, the view won't talk to the model directly. The model will also never talk directly to the view.
To connect between these two snobs, we need a mediator, one that is called a Controller. Controller objects connect the app's view to its core logic and data. in other words, they deliver objects from the model to the view and vise-versa. this method creates a responsive and modular app.

.
.

Setting up a Spring Project

  1. In this tutorial, I use an Eclipse IDE called Spring tool Suite (STS). You can download it at the following link: https://spring.io/tools/sts/all. Examples presented below are from 3.9.1 release. Of course you do not have to use STS and there are other alternatives.
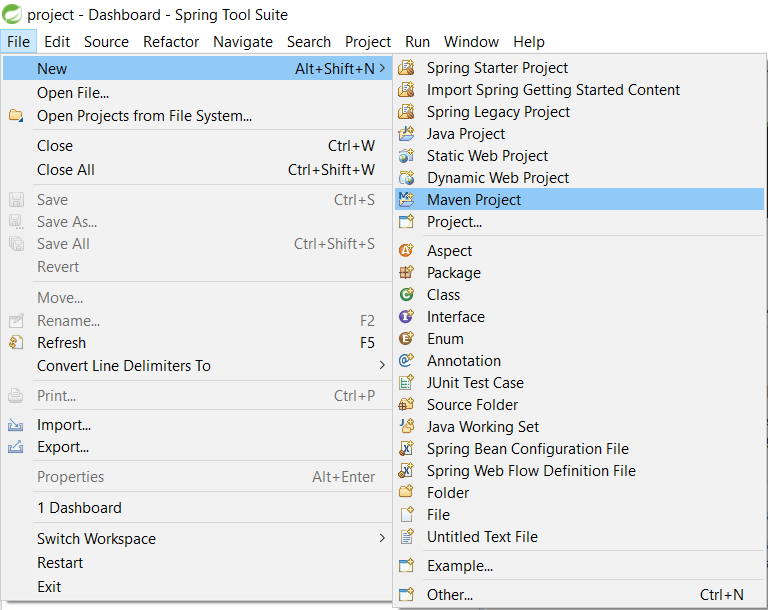
  2. Click New -> Maven Project
    image
  3. Check "Create a simple project (skip archetype selection)".
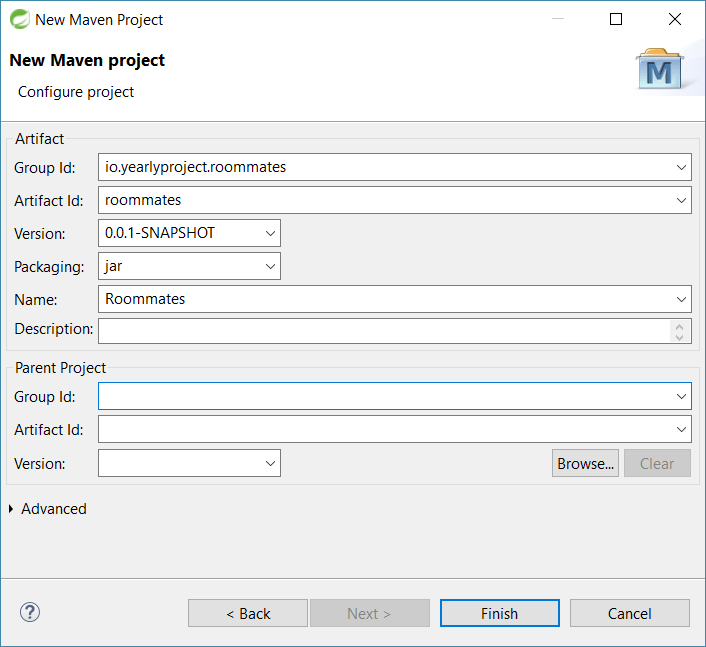
  4. Fill up your Maven project configuration.
    Group id – main package of the project
    Artifact id – name of your project
    Version –the initial version of your project. just keep it as is.
    image
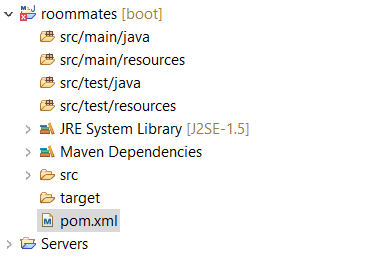
  5. After clicking finish STS will create Maven structured project. On the bottom right you may see that it is downloading some files, those are the initial files required for setting up your environment.
    from the project explorer, open up pom.xml. this file contains all of our Maven project setting and dependencies. We can already see that the initial information we entered are written there:
 	<modelVersion>4.0.0</modelVersion>
	<groupId>io.yearlyproject.roommates</groupId>
	<artifactId>roommates</artifactId>
	<version>0.0.1-SNAPSHOT</version>
	<name>Roommates</name>
  1. Next, add this to pom.xml:
	<parent>
		<groupId>org.springframework.boot</groupId>
		<artifactId>spring-boot-starter-parent</artifactId>
		<version>1.5.8.RELEASE</version>
	</parent>

What is it? This XML code declares our project as a child of Springboot framework.
Spring sets up a lot of things under the wood. Our project, as a child of Springboot, inherits it all.

  1. In order to make a web application we'll need a bunch of jars to add to our application. All we need to do is to add a meta-dependency that includes almost all we need in order to make a basic web application. Copy and paste the following:
	<dependencies>
		<dependency>
			<groupId>org.springframework.boot</groupId>
			<artifactId>spring-boot-starter-web</artifactId>
		</dependency>
	</dependencies>
  1. Hit save (ctrl+s). you will see the maven is downloading some files. When it finishes you will be able to see that "Maven Dependencies" workspace was added.
    image
  2. You're also able to see that that the JDK version is 1.5. that is really old and we don’t want to use it. To change it we need to add to pom.xml:
	<properties>
		<jave.version>1.8</jave.version>
	</properties>
  1. The last step (for now) is to update our project with all the Maven configuration we've just set up. Hit Alt+F5 in order to set everything up.

Creating main

What we're going to do now is creating the project's main class.

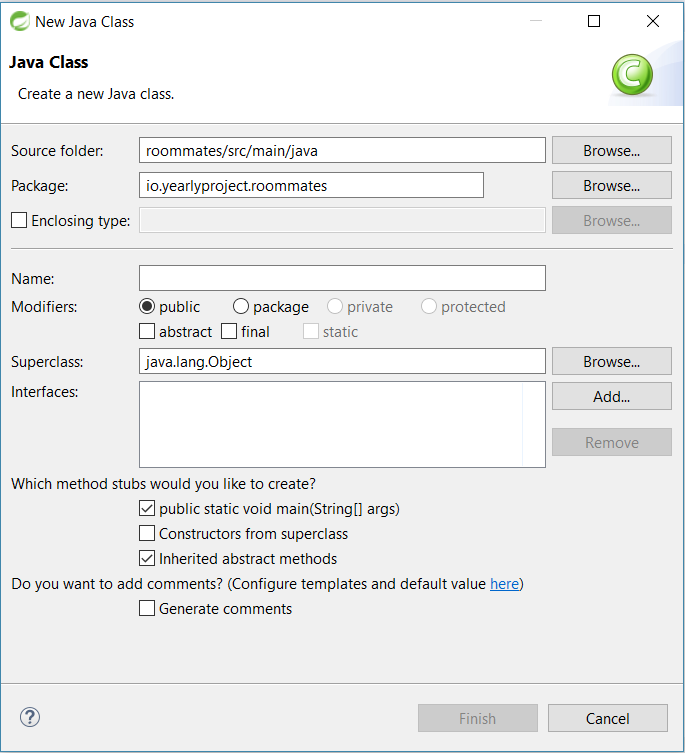
  1. Create a class in src/main/java directory and add a main to it
    image
  2. Next, we need to tell Spring that this class implements a Spring application. There is an builtin annotation for exactly that purpose. All we need to do is to write @SpringBootApplication above the app class name
  3. Now, we will tell Spring to run this application, which is in our case "RoommatesApp", then create a servlet container and host this application in this servlet container. It might sound like a lot of work, but turns out that Spring has a builtin static method that does all this job:
    SpringAplication.run(RoommatesApp.class, args);
    The first argument of this method is the main class of our application. The second argument is the args that we pass to main which we might want to send to our Spring application.
  4. That’s it. We now have a Spring application (that doesn’t do anything)! If we click run, and go to http://localhost:8080/ we will see that we get an error page. We haven't defined a mapping to the url, so we're redirected to /error, but since there is also no redirection to /error we get an error page like this.

.
.

Writing a Controller

What a controller does is to decide what to return the client when a request is sent to the server. In java, a controller is basically a class marked with some fancy annotations. It contains code that manages which method to run when a URL access is requested.
Let's add a controller to our project, that what it does is each time we access the localhost we'll receive a greeting.

  1. First let's create a new class
    image
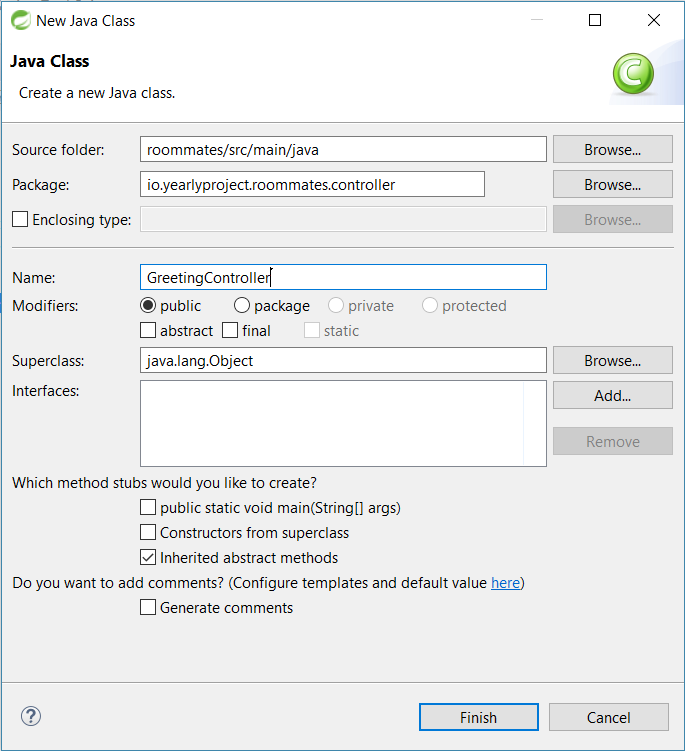
  2. Next, we need to tell Spring that this class is a RESTful controller. To do that we need to add the annotation @RestController above the class name.
  3. Next let’s add this method:
	public String greetGuests() {
		return "Welcome to Roommates website!";
	}

Spring needs to know on which pages this method needs to be called. In order to do that, we need to use another annotation. By adding @RequestMapping("/") above the class name we tell Spring that each time there is a HTTP request (GET,POST,.. ) to the main page of our website it has to excute this method. If we would have written "/greetings" inside the annotation bracket Spring would execute this method every time a client requested /greetings url.
4. Compile and run the application to check the results of what we have done so far.
.

Next we are going to add users to our project. For that we'll need to create 3 classes:

  1. User class: this will be a POJO class for user
public class User {
	private int id;
	private String name;
	private List<String> appartmentsPublished;
	
	public User(int id, String name, List<String> appartmentsPublished) {
		this.id = id;
		this.name = name;
		this.appartmentsPublished = appartmentsPublished;
	}

	public int getId() {
		return id;
	}

	public String getName() {
		return name;
	}

	public List<String> getAppartmentsPublished() {
		return appartmentsPublished;
	}

}
  1. UserService class: this is the class UserController is going to depend on when doing stuff with users. It is a better practice to extract the business service from the controller itself, and move it to services.
@Service
public class UserService {

	private List<User> usersList = new ArrayList<>(Arrays.asList(
				new User(1,"Alon", Arrays.asList("1","3")),
				new User(2,"Or", Arrays.asList("2")),
				new User(3,"Oren", Arrays.asList(""))
			));
	
	public List<User> getUsers() {
		return usersList;
	}
}

Note the usage of @Service above the class name. when Spring sees @service it creates a singleton of the class during the app initialization. Imagine in the future how this getUsers() method can do all kinds of more advance things, like getting all the users from the database and such.
3. UserController class: this class is going to handle REST requests for users.

@RestController
public class UserController {
	
	@Autowired
	private UserService userService;

	@RequestMapping("/users")
	public List<User> getUsers(){
		return userService.getUsers();
	}
}

Note the @RestController and @RequestMapping annotations which we've already covered. Besides that, notice @Autowired marked above userService variable. This is a Spring annotation which markes the variable as needs a dependency injection. Spring will inject the singleton instance it created for UserService and inject it into this userService variable.
Now that we run the application and go to localhost:8080/users we will see all the hard-coded users in JSON format.
this is what we've got so far:
image
.

Let's make things a bit more complicated. What if we don’t want to get ALL the users, but we want to get a specific user from the server? Spring allows us to also do that, and we will now see how.

  1. First let's add a getUser method to UserService class, that receives an id parameter and returns the user with that id:
	public Optional<User> getUser(int id) {
		return usersList.stream().filter(user -> user.getId() == id).findFirst();
	}
  1. Secondly, we renovate UserController class with the a new getUser method:
	@RequestMapping("/users/{id}")
	public User getUser(@PathVariable int id) {
		return userService.getUser(id).orElse(null);
	}

So what did we do here? You can see that now @RequestMapping argument has this {id} in it. This tell Spring that the URI contains an argument which is going to be used in this method. this parameter needs to be marked with @PathVariable, as you can see in the example above.
3. Now if we compile and run the app, and then go to http://localhost:8080/users/1 we will see that we only get Alon's record. If we try to go to http://localhost:8080/users/5 we'll receive a blank page since there is not user with id "5".
.

POST

image
before we start, download Postman from chrome store. This tool will help us do POST requests to the server without the need of a UI.
.

  1. The procedure is very alike to what we did with GET requests. We need to add a method to UserService that will add a user to the list:
	public void addUser(User user) {
		usersList.add(user);
	}
  1. After that, we create a new method in the controller. But how do we specify that this method is for POST calls? If we only annotate it with RequestMapping("/users") it will be a GET request by default.
    Turns out that RequestMapping can get a requestMethod argument that specifies the type of the request.
	@RequestMapping(method=RequestMethod.POST, value="/users")
	public void addUser(@RequestBody User user) {
		userService.addUser(user);
	}

Again, we also need to annotate the parameter with @RequestBody. This annotation tells Spring that the POST data can be found in the HTTP request payload.
3. We also need User to have a default constructor:
public User() {}
Because we don't have an UI yet, will use Postman to send a POST request to our server.

  1. In the upper bar we need to type the URL of the POST request
    image
  2. In the header tab we need to specify that this HTTP request is in JSON format
    Key: Content-Type ; value: application/json
    image
  3. In the body tab we write the user that we want to add in raw JSON format.
    image
  4. Then hit send.
  5. When we do a GET request on localhost:8080/users we can now see that Daniel was added to the list of users!
    image

DI

let's start with an example:

public class User {
	private Email email = new Email();
	
	public void sendMessage(String msg) {
		this.email.send(msg); 
	}
}

In this scenario, email is hard-coded into the User class body. This means that if we'll want to change the email service to some other (maybe more advance) service in the future it will be a harder task. Not to mention the difficulty if it is used in more classes. Another thing to consider is changing this email service to maybe Facebook or Whatsapp messaging – this will require a complete redesign of the class.
Even more importantly, testing can become very irritating. Because the User class is so strictly bounded to the Email class it cannot be tested without testing both of them. Imaging how it will feel like to see our mailbox blown up by emails sent by ourselves after a few sunny days of testing. Do we really want to send a real email every time we run a test? Apparently, there is no way to mock emails with the current implementation.
Let's do a second try:

public class User {
	private MessageService msgSrv;
	
	public User(MessageService msgSrv){
		this. msgSrv = msgSrv;
	}
	public void sendMessage(String msg) {
		this.msgSrv.send(msg); 
	}
}

We also need to make sure that Email implements MessageService. With this implementation, we are solving all of the above-mentioned problems.
But it still has a downside – every user creation requires many more lines of code now! i.e. the code becomes very verbose, especially if we decide to add more parameters to the User's constructor.
DI is a design pattern which we used in the above example. We removed the dependency resolution from compile-time to runtime and improved our classes to be loosely coupled, extendable and maintainable.

Spring DI

  1. I've edited the User class so it can take advantage of the Spring DI, shall we take a look at it again:
@Component
public class User {
	//@Autowired
	private MessageService msgSrv;
	
	@Autowired
	public User(MessageService msgSrv){
		this. msgSrv = msgSrv;
	}

	//@Autowired
	//public void setMessageService(MessageService msgSrv){
	//	this. msgSrv = msgSrv;
	//}

	public void sendMessage(String msg) {
		this.msgSrv.send(msg); 
	}
}

Every Spring application has a Spring Container. By adding @component annotations above the class definition, we are adding these classes into the Spring Container. this allows Spring to be aware of them and manage them for us. Classes which are inside the Spring Container are called Spring Beans. Other annotations for Spring beans are: @repository, @service, @controller, each one having a different meaning to the Spring framework.
We also need to add @component above MessageService class so Spring will be able to inject it.
The @Autowired annotation tells Spring where we want the injection to be applied. The entities which are able to be marked using Spring DI annotations are: fields, constructors and setters. In the above example I'm showing all the options, in this case I chose to annotate the constructor.
2. The next thing we need to do is to create a configuration class that will configure what type of objects we want to inject.

@Configuration
@ComponentScan(value={…})
Public class DIConfiguration{

	@Bean
	Public MessageService getMessageService(){
		return new HomingPigeon();
	}

}

This division to configuration classes allows us to specify different configurations for different purposes. For instance, we can write a configuration that will be used in development, another one that will be used in production and other for testing.
@Configuration tells Spring to treat this class as a configuration class. When that being interpreted into the Spring framework and can look for @bean inside it.
The @ComponentScan the comes right after that defines where (in what packages) Spring should look for beans that require injects particular to this configuration.
Lastly @Bean are the configuration itself. methods are used in order to match the interface to its implementation. In the above example, it injects HomingPigeon each time MessageService is required.
3. To drive everything up, we need to add the following code (note the in JUnit testing the methid is a bit different):

	AnnotationConfigApplicationContext context = new AnnotationConfigApplicationContext(DIConfiguration.class);
	User user = context.getBean(User.class);
	
	//we do things with user, like:
	user.sendMessage("Your apartment ad was published successfully.");

	//a bit of boilerplate for closing the context
	context.close();

with the few annotations we used previously, AnnotationConfigApplicationContext can do its trick.
There is also a way to do DI with Spring using XML configuration file, which I will not cover here.

AOP

In OOP modularity of application is achieved by creating seperation of concerns between different classes. For example, if we have a User class we can create a Logger class to monitor user actions. Anyhow, the logger's methods will have to be called explicitly somewhere inside the user method to perform the logging. The problem with this design is that we have to add service code lines to the user's methods that are not linked to thier core buisness logic. In addition to that, we would probably want to use the logger in many other methods and class, making us to write the same code over and over again.
This is where AOP comes into play. We can use it to increase modularity by adding additional behavior (logging, security, transactions) without dirty the buisness code itself. It allows us to write separate pointcut specifications that specify what happens before or after the target-method executes! For example we can say: "log all methods calls that are annotated with @ log' or "run encryption code on data returned by methods which their names start with 'secured' ".
Before diving into implementation details, we have to get familiar with AOP terminology:

  • Aspect: is a special class the defines advices. In other words, it has methods that add additional behavior to target-method.
  • Joinpoint: a point in the app where method of an aspect is triggered. In Spring joinpoint is always the execution of a method.
  • Advice: method of an aspect class that is called at joinpoints.
  • Pointcut: defines where an advice needs to be called. In other words, in which joinpoints an advice needs to be called.

Spring AOP & AspectJ

In order to use AspectJ, include these 3 dependencies to pom.xml

		<dependency>
			<groupId>org.aspectj</groupId>
			<artifactId>aspectjrt</artifactId>
			<version>1.8.12</version>
		</dependency>
		<dependency>
			<groupId>org.aspectj</groupId>
			<artifactId>aspectjweaver</artifactId>
			<version>1.8.12</version>
		</dependency>
		<dependency>
			<groupId>aopalliance</groupId>
			<artifactId>aopalliance</artifactId>
			<version>1.0</version>
		</dependency>

Spring provides five kinds of advice

  1. @Before - run advice before the execution of join point.
  2. @After - run advice after the execution of join point (obviously). The advice will be executed both after method return and exception throw.
  3. @AfterReturning – only after regular return of method.
  4. @AfterThrowing – only after exception is thrown.
  5. @Around – wraps the join point method and is executed before and after it.
    Springs supports both annotation based aspect and XML based aspect to implement aspects. In this tutorial, I will go over the annotation style library called AspectJ. If you are interested in the XML schema I suggest you start googling.
    To start feeling it, let's see some code examples:
    In our app we have an Apartment class like so:
Public class Apartment {
	private String id;
	private int price = 0;
	
	public Apartment(String id){
		this.id = id;
	}
	public void getID(){
		return id;	
	}
	public void setPrice(int price){
		if(price < 0){
			throw new RuntimeException();
		}else{
			this.price = price;
		}
	}
}

Our ambition is to create a simple logger to track apartments usage, Let's do it!

@Component
@Aspect
@EnableAspectJAutoProxy
Public class LoggerAspect{
	@AfterReturning("execution(path.to.Apartment.*(*)")
	public void logAfter(JoinPoint jp){
System.out.println(jp.getSignature().getName() +" in " + jp.getTarget().getClass() + " finished successfully");
	}
	
	@AfterThrowing("within(path.to.Apartment)")
	public void logFailures(JoinPoint jp){
System.out.prinln(jp.getSignature().getName()+" with args: "+jp.getArgs()+"  in " + jp.getTarget().getClass() + " failed")
	}
}

Here we've created a simple aspect class that logs every successful method execution of the Apartment class. The advice can recieve a JoinPoint object as parameter which can help dredge useful information regards the joinpoint object. We have also created an aspect that logs every method of Apartment class each time it throws an exception.
Few things to note:

  • the aspect is annotated with @component to define it as Spring Bean.
  • the aspect is annotated with @asppect mark Spring this is a special class.
  • the aspect is also annotated with @EnableAspectJAutoProxy, to enable AOP.
  • pointcut definition can include regular expressions.
  • the 'execution' keyword in the pointcut definition means that the advice is triggered on every execution of the applicable target-method.
  • the 'within' keyword in the pointcut defenition means that the advice is triggered within every method call of the specified class.
    Let's add another advice to our logger:
@Component
@Aspect
@EnableAspectJAutoProxy
Public class LoggerAspect{
	//…
	@Around(@annotation(path.to.anotation.TimeMeasured)")
	Public Object logTime(ProceedingJoinPoint pjp)
		int startMillies = System.currentTimeMillis();
		try{
			value = pjp.proceed();
		} catch( Throwable e) {
			e.printStackTrace();
		}
		Int endMillies = System.currentTimeMillis();
System.out.prinln(jpj.getSignature().getName() + " took " + (endMillies  - startMillies) + " milliseconds.");
		Return value;
	}
}

@around advice is required to include ProceedingJoinPoint as parameter. The proceed() method invokes the target joinpoint. It is also the advice responsibility to return the target's value. So basically, the advice precede and follows the target-method execution.
I hope you noticed the use of @annotation in the pointcut definition. In this context it means "run the advice every time you see a method annotated with @TimeMeasured".
Spring AspectJ can only work on Spring Beans, so we have to always remember to define the joinpoint classes as Beans.
lastly we can run our application:

	//Config.class is some random class configuring which package should be scanned by Spring
	ApplicationContext context = new AnnotationConfigurationApplicationContext(Config.class)
	Apartment apartment = context.getBean("apartment",1);
	
	//.. do some things with apartment
	
	context.close();

Research: Compare DB alternatives: MongoDB & MySQL

Following the discussion we had on the weekly meeting (06.11.2017) and the research about MongoDB and ElasticSearch we have to decide between two candidates: MongoDB and MySQL so we have to read about MongoDB & MySQL and make a comparison between them in order to answer the question what is the best DB for our purposes. All information has to be documented here. (Note - there is an issue about MongoDB - #16 ).

The comparison should include the following criteria:

  • The ability & ease of storing geo-location data.
  • Performance & scalability.
  • Dependencies & minimal system requirements - does it meet the server side delivered product (see #4 )?.
  • Integration with the selected programming language (see #6 ).
  • Does it meet the must have features as defined in #20

chanan weekly report

6/11/17-13/11-17:
1. composed a short comparision between MySQL and MongoDB to futher strengthen our choise of MongoDB (#16).
2. helped Or with the MongoDB tutorial (#28).

13/11/17-20/11/17:
1. working on DB infersturcter (#29).
2. opened Amazon account for virtual machine and open one
the virtual machine is of ubuntu OS and for the MongoDB to work on.
3. sent account and machine info to the rest of the team.

20/11/17 - 26/11/17:
1. finshed DB infersturcter.
2. reserched mongodb queries and started to implement DB API (#49)

27/11/17 - 3/12/17:
1. worked on queries (#55 )

2/12/17-10/12/27:
1. more queries (#82 )
had a heavy workload this week

11/12/17 - 17/12/17:
1. making UI for Apartment page (part of #74 )

18/12/17-24/12/17:
1. finished base of #74".mypart"
2. making changes acording to #108
3. making some mockup forntend pages for #113

25/12/17-7/1/18:
this is all part of #108
1. GUI for apartment page:
a. spliting up parts of the page to make for shorter and clearer code.
b. switched a lot of code to bootstrap templates.
c. comment section and intersted users section now page instead of just a long list.
2. updatedthe apartment model:
a. added a few field regarding the types of rooms in the apartment.
b. added 2 field referring to other costs of the apartment (vaad-bayit and Arnona).
c. added a few more tags to apartment tags.
3.need to connect page to db (pull data from db rather then static dta in page).

8/1/18-15/1/18:
no substantial progress on project on my side because i was unable to install it on my computer

16/1/17 - 22/1/17:
apartment page improvments:
1. part of #108 :
a. split in to componnents
b. better layout, similar to OG mock GUI
2. part of #163 :
a. apartment page is fully dynamic now

Spring semester:
25-31/3/18:
1. reshearched solution for location review feature (#194 )
document with the final result is in the mentioned issue.
8-15/4/18:
1. finished the design for street reviews (#247 #248 #265 #266)
16-23/4/18:
* head of team for the week
1. changed review design acoording to last weeks meeting (#267)
2. implementing 2 of the routes (#276 #274 #275 )
3. tests for the routes

24-30/4/18:
1. added route PATCH /reviews/:id (#277 ):
1.1: updated user scheme to support given reviews.
1.2: updated tests acoordantly.
1.3: added actual route.
1.4 added tests for route.
2. added route DELETE /reviews/:id (#347):
2.3: added actual route.
2.4 added tests for route.
1-7/5/18:
1. researched cleen up protocol for review freshness (#325 ) and started implemeting (#384)
8-14/5/18:
1. implementing cleap protocol:
1. finshed updating existing test.
2. added new reviews for tests. (#391).
3. updated existing routes to support the cleen up (get /reviews and patch /reviews) (#385).
4. finished implementing the protocol in the GET /revies/:lat/:long route (#395 ).
* issues of the week : #385 #391 #392 #394 #395 (if i forgot to mention any of them).
15-22/5/18:
researching Azure functions (serverless) and load balancer.
23-28/5/18:
1. apartment recomandation design (#335 ).
2. preparing data for POC (#455 ).
29/5/18 - 4/6/18:
my week off ;)
5-11/6/18:
* head of team for the week
1. finished apartment notifiaction design #335 .
2. started implementation of design (#335) #534 .
12-18/6/18:
1. finished routes for #534 : POST /searchs and GET:
* GET is the main dunction of the feature
2. opened Azure resource for timed function of GET
19-24/6/18:
in progress:
1. connetcting POST /searchs to frontend #559 #604
2. adding the GET to the timed resource #560 #605 - posponed indefently see #605 for more details
3. added to user manual #603
4. added apartments and users to db for presentation (#613 )

Omri Weekly Report

Semester B

week 1

week 2

  • started the suggest roommates group feature #196
  • created the document explaining about the feature and selecting a solution #196
  • chose suggest roommates group triggers #238
  • designed the suggest roommates group section #239
  • created a draft of the section #239

week 3

  • Prioritizing weekly tasks for the team and assigning them
  • Search for known solutions in the literature to problems similar to our grouping algorithm
  • Define final design as result of the research and David's feedback #196
  • Wrote the basic score algorithm for pairs
  • Wrote the basic "merge" function

week 4

  • Finished the score algorithm #254
  • Working on permutations algorithm for the Group Finding #332

week 5

  • As Instructed, leaving the specific implementation of Find Groups for now and starting with the things surrounding it
  • Create basic group model #344
  • Added group model functionality #344
  • Started route #363

week 6

  • Basic implementation of get group route #363
  • Added group data to seed for testing

week 7

  • Test for the group route basic implementation
  • Created POC presentation skeleton #425

week 8

  • Testing our site for POC, found: #446, #461, #462
  • Creating apartment page #459 (about 10 hours overall)
  • Learning Vuetify in order to build the apartment page
  • Edit apartment page #192

week 9

  • manage weekly meeting
  • merge version with master #482
  • create the final group schema #505, #518
  • add group functionality to "toggle to interested" route (create new groups with the user) #505
  • added group functionality to "remove interest" route (delete all groups with the user) #505
  • added basic tests for the updated routes #505
  • changed existing tests according to the new data added #524

week 10

  • #520 built payment page:
    design, add contracts in dialogs, payment function
  • #509 modify appearance when the owner is in that page.

week 11

week 12

  • final meeting to decide on the last changes before the code freeze and client challenge (2 hours)
  • final testing and bug finding #607:
    #609
    #610
    #611
    #612
    #613
    #614
    #615
    #616
  • decide on flow of close the deal button (0.5 hours)


``

Semester A

05.11.2017 - 11.11.2017

  • Drafted the interface draft document #27

12.11.2017 - 18.11.2017

  • Updated the interface draft #27 as a result of last weeks meeting
  • Wrote a Bootstrap tutorial #33

19.11.2017 - 25.11.2017

  • Studied JavaScript and Node.JS
  • Wrote the use cases of our website and the I/O #40

26.11.2017 - 02.12.2017

  • started working with vueJS and VueJS guides
  • wrote the use cases tests #52

03.12.2017 - 09.12.2017

  • using VueJS with the cli and webpack #77
  • integrating VueJS and bootstrap, using a premade template #78

10.12.2017 - 16.12.2017

  • Frontend Environment Set Up #93
  • Structure of main page #93
  • Starting to integrate Front-end with Back-end

17.12.2017 - 23.12.2017 (Hanukkah)

  • Create Main Searching Page #94
  • Main page design setup #94
  • finishing the integration with the back-end (with Idan, Alon and Or)

24.12.2017 - 31.12.2017

  • Test plan document #114
  • Presentation Structure meeting
  • Registration & Login improvements
  • Home page design improvement

31.12.2017 - 06.01.2018

  • Main page components update
  • Image carousel component deleted & rewritten
  • Apartment list item deleted & rewritten
  • Footer & header update
  • Styling changed to match the template
  • Layout breaks fix
  • Map modal
  • Finished working on the main page.

7.12.2017 - 14.01.2018

  • Search section connects to Result section
  • Main page updates
  • Empty results added
  • Refresh animations
  • Login layout fixes
  • Tags file created
  • Server side changed search apartment function
  • Front end changed search parameters
  • Add apartment fixes
  • Cookie added to requests #160
  • Apartment search interacts with server & gets the results #159

15.12.2017 - 21.01.2018

  • Back-end supports apartment tags
  • Presentation preparation #161
  • Apartment page fixes and restructuring according to template
  • Fixing errors, bugs problematic code in the Frontend

21.12.2017 - 28.01.2018

  • Finished the main Search function with all required features
  • Apartment search interacts with server & gets the results based on tags #159

How to test our project

I did some research regarding testing.
It seems to be simplier than i thought. Below I will show some simple example i made.

The library I used is called 'Mocha'.
I've already added it to package.json as "devDependencies" so you only have to run "npm install" to automatically download it to your project directory.

to run the test run "npm test" from the project directory. This will execute the command:
mocha tests/*.test.js
as it is defined in package.json. This command will search all the files in the project's tests directory matching the regex *.test.js and run it.

simple example of a test:

it('should succeed', () => {
    if(1 !== 1) {
        throw new Error('it should not happen');
    }
});

This is the result after running it:
image

Inside the it() function should be a short informative description about what the test suppose to check.
for example:
it('should add 2 numbers')
it('should log the user')
it('should add an appartment to the list')

Another example is for asynchronose code. This time we need to pass 'done' to the function argument and call it when we finish the test. Note that if you do not use 'done' the 'it' function might finish before the callback runs which then let Mocha assume that the test has passed. Also notice the 'expect' function call I'm using it is another library called "expect" which helps in writing more readable tests. I will not cover it here.

it('should async add two numbers', (done) => {
    utils.asyncAdd(4, 3, (sum) => {
        expect(sum).toBe(7).toBeA('number');
        done();
    });
})

the results:
image

The time the tests took is displayed inside the parentheses. This is exceptional! Mocha letting us know that the test took a long time to finish, so something might be laggy in our code.

Weekly Meeting Minutes 30/10/2017

Status Updates:
- First meeting - no status updates.

Open issues and AIs for next week:
- Each team member ( @alonttal @chananbental @iiddaannyy @Danielohayon @omrihuller @OrAbramovich ) has to create issues in the GitHub repository describing/raising a discussion about the general features/modules (Back End, DB, etc.) in the project. Anyone who can contribute to one of the discussions has to make a comment in the relevant issue.

General:
- @AdiOmari introduced us the client story and the general requirements for the project - developing a roommates finding platform.
- Good luck!

Introduction to Elasticsearch

General Information

Elasticsearch is a document oriented database. The Elasticsearch provides a distributed, multitenant-capable full-text search engine with an HTTP web interface and schema-free JSON documents that includes filtering, aggregate statistics and analysis capabilities. Elasticsearch is developed in Java and is released as open source under the terms of the Apache License. Official clients are available in Java, .NET (C#), PHP, Python, Apache Groovy and many other languages. Elasticsearch is the most popular enterprise search engine. Elasticsearch is also easily scalable, supporting clustering and leader election out of the box.

The core of Elasticsearch's intelligent search engine is largely another software project: Lucene. It is perhaps easiest to understand elasticsearch as a piece of infrastructure built around Lucene’s Java libraries. Everything in elasticsearch that pertains to the actual algorithms for matching text and storing optimized indexes of searchable terms is implemented by Lucene. Elasticsearch itself provides a more useable and concise API, scalability, and operational tools on top of Lucene’s search implementation.

Since Elasticsearch is a standalone Java application, getting up and running is a cinch on almost any platform. You’ll want Java 1.7 or newer.

About the set up of Elasticsearch

The smallest individual unit of data in Elasticsearch is a field, which has a defined type and has one or many values of that type. A field contains a single piece of data, like the number 42 or the string "Hello, World!", or a single list of data of the same type, such as the array [5, 6, 7, 8].

Documents are collections of fields, and comprise the base unit of storage in Elasticsearch; something like a row in a traditional RDBMS. The reason a document is considered the base unit of storage is because, peculiar to Lucene, all field updates fully rewrite a given document to storage (while preserving unmodified fields). So, while from an API perspective the field is the smallest single unit, the document is the smallest unit from a storage perspective.

The primary data-format Elasticsearch uses is JSON. Given that, all documents must be valid JSON values. A simple document might look like:

{
"_id": 1,
"handle": "ron",
"age": 28,
"hobbies": ["hacking", "the great outdoors"],
"computer": {"cpu": "pentium pro", "mhz": 200}
}

The hobbies and computer fields specifically are rich types; an array and an object (dictionary) respectively, while the other fields are simple string and numeric types.

Elasticsearch reserves some fields for special use. We’ve specified one of these fields in this example: the _id field. A document’s id is unique, and if unassigned will be created automatically. An elasticsearch id would be a primary key in RDBMS parlance.

Each document in Elasticsearch must conform to a user-defined type mapping, analogous to a database schema.A type’s mapping both defines the types of its fields (say integer, string, etc.) and the way in which those properties are indexed. Types are defined with the Mapping API, which associates type names to property definitions e.g:

{
"user": {
"properties": {
"handle": {"type": "string"},
"age": {"type": "integer"},
"hobbies": {"type": "string"},
"computer": {
"properties": {
"cpu": {"type": "string"},
"speed": {"type": "integer"}}}}}

}

Available types:

Type Definition
string Text
integer 32 bit integers
long 64 bit integers
float IEEE float
double Double precision floats
boolean true or false
date UTC Date/Time (JodaTime)
geo_point Latitude / Longitude

There is nothing to declare regarding a field’s array-ness in the mapping. An important thing to remember, however, is that elasticsearch arrays cannot store mixed types. If a field is declared as an integer, it can store one or many integers, but never a mix of types.

The largest single unit of data in elasticsearch is an index. Indexes are logical and physical partitions of documents within elasticsearch. Documents and document types are unique per-index. Indexes have no knowledge of data contained in other indexes. elasticsearch supports cross-index searches. Elasticsearch indexes are most similar to the ‘database’ abstraction in the relational world. An elasticsearch index is a fully partitioned universe within a single running server instance. Documents and type mappings are scoped per index, making it safe to re-use names and ids across indexes.

Full usage example:

// Create an index named 'planet'
PUT /planet
// Create a type called 'hacker'
PUT /planet/hacker/_mapping
{
"hacker": {
"properties": {
"handle": {"type": "string"},
"age": {"type": "long"}}}}
// Create a document
PUT /planet/hacker/1
{"handle": "jean-michel", "age": 18}
// Retrieve the document
GET /planet/hacker/1
// Update the document's age field
POST /planet/hacker/1/_update
{"doc": {"age": 19}}
// Delete the document
DELETE /planet/hacker/1

Integration with programming languages

As said - official clients are available in Java, .NET (C#), PHP, Python, Apache Groovy and many other languages e.g:

C# client:

var client = new ElasticsearchClient();
//index a document under /myindex/mytype/1
var indexResponse = client.Index("myindex","mytype","1", new { Hello = "World" });

Java client:

SearchResponse response = client.prepareSearch("index1", "index2")
.setTypes("type1", "type2")
.setSearchType(SearchType.DFS_QUERY_THEN_FETCH)
.setQuery(QueryBuilders.termQuery(field, text)) // Query
.setPostFilter(QueryBuilders.rangeQuery("age").from(12).to(18)) // Filter
.setFrom(0).setSize(60).setExplain(true)
.get();

Elasticsearch and geolocation data

Elasticsearch offers two ways of representing geolocations: latitude-longitude points using the geo_point field type, and complex shapes defined in GeoJSON, using the geo_shape field type.

Geo-points allow you to find points within a certain distance of another point, to calculate distances between two points for sorting or relevance scoring, or to aggregate into a grid to display on a map (a geo-point is a single latitude/longitude point on the Earth’s surface).

Example for quering locations within a given distance (Java client):

GeoDistanceFilterBuilder filter = FilterBuilders.geoDistanceFilter("location").point(latitude, longitude).distance(distance,DistanceUnit.KILOMETERS);
SearchQuery searchQuery = new NativeSearchQueryBuilder()
            .withFilter(filter)
            .withSort(SortBuilders.geoDistanceSort("site.location").point(latitude, longitude).order(SortOrder.ASC)).build();

searchQuery.addIndices(channelKey);
searchQuery.addTypes("site");

In terms of scaling, an index is divided into one or more shards. This is specified when the index is created and cannot be changed. Thus, an index should be sharded proportionally with the anticipated growth. As more nodes are added to an Elasticsearch cluster, it does a good job at reallocating and moving shards around. As such, Elasticsearch is very easy to scale out.

Limitations

Elasticsearch does not have transactions - there is no way to rollback a submitted document, and you cannot submit a group of documents and have either all or none of them indexed.
Elasticsearch (and the components it's made of) does not currently handle OutOfMemory-errors very well - It is very important to provide Elasticsearch with enough memory and be careful before running searches with unknown memory requirements on a production cluster.
Elasticsearch does not have any features for authentication or authorization.

More detaild information about basic concepts of Elasticsearch can be found here: https://www.elastic.co/guide/en/elasticsearch/reference/current/_basic_concepts.html

(based on https://www.elastic.co/guide/en/elasticsearch/client/index.html)

Introducing MongoDB

Introduction to MongoDB

Why MongoDB?

  • Open-source document database and leading NoSQL database.
    document database is a database designed to store data in a semi-structure format, typically in JSON or XML. In MongoDB, the information is stored in JSON format.
  • JSON document support makes life easier for developers to serialize and load objects, so coding is done on higher (than RSBMS DBs) abstraction.
  • No frustrating joins.
  • Ease of scale-out.
  • All this leads to faster, more agile development!

How Does MongoDB Stores Data?

  • First layer – database: the database is spread out among several files and holds as a physical container for collections.
  • Second layer - collection: Collection is the equivalent of table in the traditional RDBMS, but opposed to that it does not enforce a fix schema. Documents within a collection can have different fields (useful?).
  • Third layer - Document: a set of key-value pairs, equivalent of RDBMS' row.

Official Drivers

MongoDB is available in C++, C#, Java, Node.js and more…
See: https://docs.mongodb.com/ecosystem/drivers/

Data Modeling

As already said, the data is saved in JSON format and documents in the same collection do not need to have the same structure.
For example, let's write a small collection of apartments:

{
	_id: APARTMENT_ID
	author: USER_1
	picture: 'house.jpg'
	 price: 1500
	address: 
	  {
		city: 'HAIFA', 
		street: 'TRUMPELDOR'
		number: 10
	  }
	description:  'looking for another friendly roommate for the best apartment in town!'
	likes: 2
	tags: [AIR_CONDITION, NO_SMOKING, NO_PETS]
	comments: [
	  {
		User: USER_2
		Message: 'how far is it from the closest market?'
	  },
	  {
		User: USER_1,
		Message: '2 minutes by foot'
	  }
	]
}

As we can see, all the information can be stored in a single collection, while our RDBMS fellow needs: a table to store apartments data, a table to store comments, and a table to store tags. Was it convincing enough?

Some Features

  • Insert document to collection: each object is automatically given a unique _id.
    db.COLLECTION_NAME.insert(document)
  • Update document: all documents with CRITERIA will be updated. It is also easily possible to update the first occurrence.
    db.COLLECTION_NAME.update(CRITERIA, UPDATED_VALUE)
    Delete document: all documents with CRITERIA will be removed. Using justOne() will remove the first occurrence with CRITERIA.
    db.COLLECTION_NAME.remove(CRITERIA)
    db.COLLECTION_NAME.remove(CRITERIA).justOne()
  • Find document: find will display all documents. Optionally add CRITERIA to be more specific. Using binary operators is also possible.
    db.COLLECTION_NAME.find([CRITERIA])
  • Sorting documents: will sort by document FIELD_NAME in ascending order.
    Db.COLLECTION_NAME.find().sort({"FIELD_NAME":1})
  • Aggregate: process documents and return computed results. Includes sum, avg, min, max, etc. for example, let's say we have a collection of apartments and we want to find the cheapest one.
[
{
	…
	Price: 1300
},
{
	…
	Price: 2000
},
…
]

In order to do so, we will write:
db.apartments.aggregate([{$group : {_id : "$_id", min_price : {$min : "$price"}}}])

  • Create backup:
    mongodump
  • There is a lot more, meanwhile I'll keep it simple…

@OrAbramovich comment on MongoDB:

  • License: MongoDB is available at no cost under the GNU Affero General Public License.
  • Storing geo-location data: has native support: MongoDB has built in spacial functions, so finding relevant data from specific locations is fast and accurate. In MongoDB, we can store geospatial data as GeoJSON objects or as legacy coordinate pairs (https://docs.mongodb.com/manual/geospatial-queries/).
  • Performance: this DB has better performance than RDBMS DBs because by default prefers high insert rate over transaction safety.
  • Other features: supports replication as well.
  • Dependencies & minimal system requirements: cross-platform.

Design: Choose DB engine to be used in the project

The project implementation must include a DB to store its data e.g: registered users details, apartments details, etc...

There are various of aspects should be considered:

  • License type.
  • The ability & ease of storing geo-location data.
  • Performance.
  • Dependencies & minimal system requirements - does it meet the server side delivered product (see #4 )?.
  • Integration with the selected programming language (see #6 ).

Design: Choose programming language & framework to be used in the project

There are various of aspects should be considered:

  • License type.
  • Performance.
  • Dependencies & minimal system requirements - does it meet the client & server side delivered product (see #4 )?
  • Integration with the DB (see #5 ).
  • Integration with the UI.
  • language has to support exception handling (as it is a requirement of the course)
  • language has to be one of the approved by the course staff

Design: determine DB engine must-have features

We have to define the "must-have" features of the DB engine in order to choose the relevant one.

Features examples:

  • Disaster recovery & high availability.
  • Backup & restore functionality.

Controller - Tasks

Controller - Tasks:

this is our taks for this week:

  • research and make informative guide for Spring.
  • we need to decide on the controller interface, i.e which services to expose.
  • think which class we need and design the connections between them.

let's Rock !

Design: DB structure

We have to design the structure of our DB i.e. tables, fields, relations, indexes, keys, fields types, etc ...

Design: UI design

UI tasks for the 06.11.2017 - 12.11.2017 (based on the weekly meeting protocol):

  • decide on interface, taking into consideration: components, functionality & looks.
  • research and make a guide on Bootstrap.
  • decide, research & make a guide on tools that will ease implementation. options: JQuery. vue.js - easy to learn. Not compatible to making mobile app. Angular (Ionic) - harder to learn. Compatible to making mobile app.

Project definition

The goal:
Finding a good roommate can be a challenge. If you’re moving to a new city or simply don’t know anyone who is looking for a roommate, you may have to take your roommate search online. The project is about developing a friendly & powerful roommate search service for students. The service is going to be focused on the student needs.

The platform will let the students to :
- Post / view available apartments.
- Use search filters to find relevant apartments/roommmates.

First phase - plan and design the infrastructure of the platform:
- Choosing the main must have features (see #8 )
- Choosing geo-location services provider (see #7 )
- Choosing programming language & framework to be used in the project (see #6 )
- Choosing DB engine to be used in the project (see #5 )
- Choosing the delivered product (see #4 )

Recommend Projects

  • React photo React

    A declarative, efficient, and flexible JavaScript library for building user interfaces.

  • Vue.js photo Vue.js

    🖖 Vue.js is a progressive, incrementally-adoptable JavaScript framework for building UI on the web.

  • Typescript photo Typescript

    TypeScript is a superset of JavaScript that compiles to clean JavaScript output.

  • TensorFlow photo TensorFlow

    An Open Source Machine Learning Framework for Everyone

  • Django photo Django

    The Web framework for perfectionists with deadlines.

  • D3 photo D3

    Bring data to life with SVG, Canvas and HTML. 📊📈🎉

Recommend Topics

  • javascript

    JavaScript (JS) is a lightweight interpreted programming language with first-class functions.

  • web

    Some thing interesting about web. New door for the world.

  • server

    A server is a program made to process requests and deliver data to clients.

  • Machine learning

    Machine learning is a way of modeling and interpreting data that allows a piece of software to respond intelligently.

  • Game

    Some thing interesting about game, make everyone happy.

Recommend Org

  • Facebook photo Facebook

    We are working to build community through open source technology. NB: members must have two-factor auth.

  • Microsoft photo Microsoft

    Open source projects and samples from Microsoft.

  • Google photo Google

    Google ❤️ Open Source for everyone.

  • D3 photo D3

    Data-Driven Documents codes.