🧩 Handling and maintain your a UI view component easily
![]()
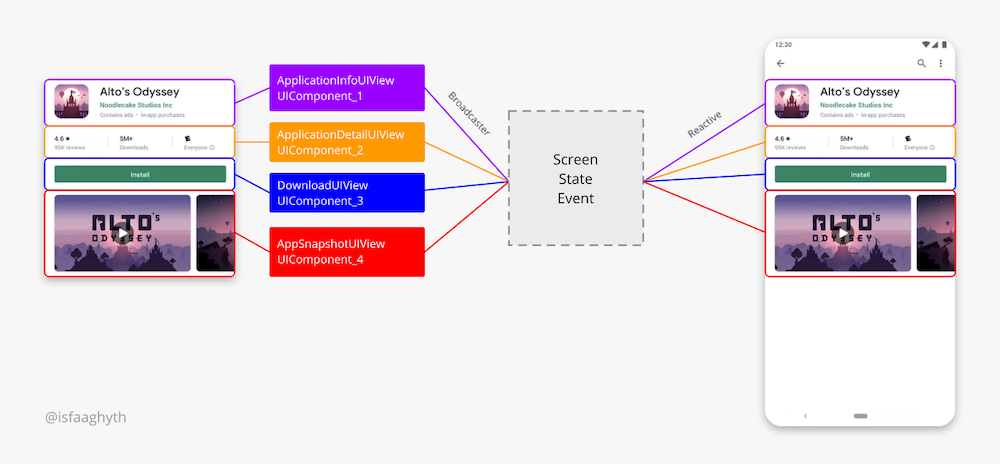
An UI view component architecture for handling state of widget view component using event broadcaster. Floppy comes from the problem when we had a lot of widget view in Fragment or Activity and we must handling a lot of state as well. With floppy, you can separate a lot of your widget stack into a new UIComponent independently, and you can maintain easily the state and data delivery.
Floppy has several component you should have, such as:
| name | description | required |
|---|---|---|
| UIView | define your resource widget and binding the data | yes |
| UIComponent | handling the lifecycle and UI state of UIView | yes |
| InteractionEvent | state interaction event to handling behaviour of view | no |
| StateEvent | your central data state for all of UIComponent | yes |
let's take look an example of playstore app:
- Coroutines
- Android Lifecycle
- Viewmodel
- EventBusFactory (required, event broadcaster)
- Reusable UI component in any containers
- Preventing a boilerplate code
- Centralize behaviour and state management
- Maintain a huge view component easily
let's breakdown the example of playstore app detail above.
first, assume, you've view_application_info.xml, looks like this:
<androidx.constraintlayout.widget.ConstraintLayout
    ...
    android:id="@+id/container_app_info"
    ...
    >

    <!-- something cardView -->

</androidx.constraintlayout.widget.ConstraintLayout>
then, create the UIView for that one, like this:
class ApplicationInfoUIView(
    container: ViewGroup
): UIView(container) {
    private val view: View = LayoutInflater
        .from(container.context)
        .inflate(R.layout.view_application_info, container, true)
        .findViewById(R.id.container_app_info)

    override val containerId: Int = view.id

    private val icApplication: ImageView = view.findViewById(R.id.ic_application)
    private val txtName: TextView = view.findViewById(R.id.txt_name)

    fun bind(info: ApplicationInfo) {
        icApplication.load(info.icon)
        txtName.text = info.name
    }

    override fun show() {
        view.visibility = View.VISIBLE
    }

    override fun hide() {
        view.visibility = View.GONE
    }
}
after that, create an UIComponent for an ApplicationInfo
class ApplicationInfoComponent(
    container: ViewGroup,
    private val bus: EventBusFactory,
    coroutineScope: CoroutineScope,
    dispatcher: DispatcherProvider
): UIComponent<Unit>, CoroutineScope by coroutineScope {

    @VisibleForTesting(otherwise = VisibleForTesting.PRIVATE)
    val uiView = initView(container)

    private fun initView(container: ViewGroup): ApplicationInfoUIView {
        return ApplicationInfoUIView(container)
    }

    init {
        launch(dispatcher.immediate()) {
            bus.getSafeManagedFlow(ScreenStateEvent::class.java)
                .collect {
                    when (it) {
                        ScreenStateEvent.Init -> uiView.hide()
                        is ScreenStateEvent.SetApplicationInfo -> {
                            setApplicationInfo(it.appInfo)
                        }
                    }
                }
        }
    }

    private fun setApplicationInfo(info: ApplicationInfo) {
        uiView.bind(info)
        uiView.show()
    }

    override fun containerId(): Int = uiView.containerId

    override fun interactionEvents(): Flow<Unit> {
        //if there's no interactionEvent
        return emptyFlow()
    }
}
and this is your central stateEvent looks like, ScreenStateEvent.kt
sealed class ScreenStateEvent: ComponentEvent {
    object Init : ScreenStateEvent()
    data class SetApplicationInfo(val appInfo: ApplicationInfo): ScreenStateEvent()
}
after created the UIComponent, UIView, and defined the event state of ApplicationInfo, you can use it like this.
create the container's UI component in fragment_app_detail.xml:
<RelativeLayout
    ...
    >

    <androidx.coordinatorlayout.widget.CoordinatorLayout
        android:id="@+id/container_app_detail"
        android:layout_width="match_parent"
        android:layout_height="match_parent" />

</RelativeLayout>
then, attach the ApplicationInfo's card like this:
class AppDetailFragment: Fragment(), CoroutineScope {

    ...

    private lateinit var appInfoComponent: UIComponent<*>

    override fun onCreateView(
        inflater: LayoutInflater,
        container: ViewGroup?,
        savedInstanceState: Bundle?
    ): View? {
        val view = inflater.inflate(R.layout.fragment_app_detail, container, false)
        initComponents(view.findViewById(R.id.container_app_detail) as ViewGroup)
        return view
    }

    override fun onActivityCreated(savedInstanceState: Bundle?) {
        super.onActivityCreated(savedInstanceState)
        setPersonInfo(ApplicationInfo(
            icon = "icon.png",
            name = "Alto's Odyssey"
        ))
    }

    private fun initComponents(container: ViewGroup) {
        appInfoComponent = initApplicationInfoComponent(container)

        initialState()
    }

    private fun initialState() {
        launch(dispatchers.immediate()) {
            EventBusFactory.get(viewLifecycleOwner).emit(
                ScreenStateEvent::class.java,
                ScreenStateEvent.Init
            )
        }
    }

    private fun setPersonInfo(info: ApplicationInfo) {
        launch {
            EventBusFactory.get(viewLifecycleOwner)
                .emit(
                    ScreenStateEvent::class.java,
                    ScreenStateEvent.SetApplicationInfo(info)
                )
        }
    }

    fun initApplicationInfoComponent(
        container: ViewGroup
    ): UIComponent<Unit> {
        val detailComponent = DetailComponent(
            container,
            EventBusFactory.get(viweLifecycleOwner),
            coroutineScope,
            dispatchers
        ).also(lifecycleOwner.lifecycle::addObserver)

        coroutineScope.launch {
            detailComponent.interactionEvents()
        }

        return pinnedComponent
    }

    override fun onDestroyView() {
        super.onDestroyView()
        job.cancel()
    }

}
and finally, you can see your ApplicationInfoCard on your AppDetailFragment! 🎉
Support it by joining stargazers for this repository. ⭐
Copyright 2020 isfaaghyth (Muh Isfhani Ghiath)

Licensed under the Apache License, Version 2.0 (the "License");
you may not use this file except in compliance with the License.
You may obtain a copy of the License at

   http://www.apache.org/licenses/LICENSE-2.0

Unless required by applicable law or agreed to in writing, software
distributed under the License is distributed on an "AS IS" BASIS,
WITHOUT WARRANTIES OR CONDITIONS OF ANY KIND, either express or implied.
See the License for the specific language governing permissions and
limitations under the License.


