KRActivityIndicatorView is a collection of awesome loading animations for OSX apps written in Swift 4
This is a fork from NVActivityIndicatorView, which is made for iOS. Amazing code made by Vinh Nguyen!
The original code for the NVActivityIndicatorView is not 100% compatible with OSX. And the project has some amazing loaders, so I decided to port the code in order for it to work in OSX. Fortunately, KRActivityIndicatorView maintains most of the functionality and all the animations of the iOS counterpart.
| Type | Type | Type | Type |
|---|
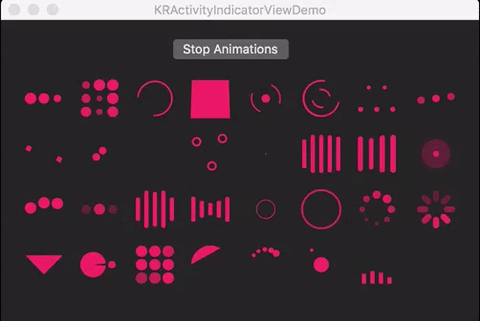
- BallPulse | 2. BallGridPulse | 3. BallClipRotate | 4. SquareSpin
- BallClipRotatePulse | 6. BallClipRotateMultiple | 7. BallPulseRise | 8. BallRotate
- CubeTransition | 10. BallZigZag | 11. BallZigZagDeflect | 12. BallTrianglePath
- BallScale | 14. LineScale | 15. LineScaleParty | 16. BallScaleMultiple
- BallPulseSync | 18. BallBeat | 19. LineScalePulseOut | 20. LineScalePulseOutRapid
- BallScaleRipple | 22. BallScaleRippleMultiple | 23. BallSpinFadeLoader | 24. LineSpinFadeLoader
- TriangleSkewSpin | 26. Pacman | 27. BallGridBeat | 28. SemiCircleSpin
- BallRotateChase | 30. Orbit | 31. AudioEqualizer
Install Carthage if need be.
$ brew update
$ brew install carthage
Add KRActivityIndicatorView in your Cartfile.
github "henryforce/KRActivityIndicatorView" >= 1.0.5If you are using Swift 3, add KRActivityIndicatorView in your Cartfile like this:
github "henryforce/KRActivityIndicatorView" == 1.0.4Run carthage to build the framework and drag the built KRActivityIndicatorView.framework into your Xcode project.
To install the "KRActivityIndicatorView" framework using the Swift Package Manager, follow these steps:
- Open your project in Xcode.
- Click on the "File" menu and select "Swift Packages > Add Package Dependency..."
- In the search bar, enter the URL of the repo
- Make sure that the "Branch" field is set to "master".
- Click "Next" and then "Finish" to complete the installation process.
Once the installation is complete, you should be able to import "KRActivityIndicatorView" in your Swift code using the import statement.
Copy KRActivityIndicatorView folder to your project. That's it.
Note: Make sure that all files in KRActivityIndicatorView are included in Compile Sources in Build Phases.
Firstly, import KRActivityIndicatorView.
import KRActivityIndicatorViewThen, there are two ways you can create KRActivityIndicatorView:
- By storyboard, changing class of any
NSViewtoKRActivityIndicatorView.
Note: Set Module to KRActivityIndicatorView.
- By code, using initializer. All parameters other than
frameare optional andKRActivityIndicatorView.DEFAULT_*are used as default values.
KRActivityIndicatorView(frame: frame, type: type, color: color, padding: padding)Start animating.
activityIndicatorView.startAnimating()Stop animating.
activityIndicatorView.stopAnimating()Determine if it is animating.
animating = activityIndicatorView.animatingIn storyboard, you can change all properties in Attributes inspector tab of Utilities panel.
Note: Use one of values (case-insensitive) in Animation types for Type Name.
All properties are public so you can change them all after initiating.
Note: All changes must be made before calling startAnimating().
Thanks to Connor Atherton for designing the loaders and Danil Gontovnik and Vinh Nguyen for the base code.
The MIT License (MIT)
2017 Henry Serrano @HenrySerrano20