A copy of https://github.com/torvalds/linux/blob/master/tools/spi/spidev_test.c (becasue I can never find it when I need it), with the following changes:
- The default device was changed from
/dev/spidev1.1to/dev/spidev0.0 - The SPI modes were changed from
SPI_IOC_WR_MODE32andSPI_IOC_RD_MODE32toSPI_IOC_WR_MODEandSPI_IOC_RD_MODErespectively.
If you are experiencing issues with the SPI bus on Raspberry Pi or other Linux-based single-board computers, this program (plus a single jumper or wire) will confirm whether SPI is working properly.
Download the code from github and compile with:
$ git clone https://github.com/rm-hull/spidev-test
$ cd spidev-test
$ gcc spidev_test.c -o spidev_test
By default, the SPI kernel driver is NOT enabled on the Raspberry Pi Raspian image. You can confirm whether it is enabled using the shell commands below::
$ lsmod | grep -i spi
spi_bcm2835             7424  0
Depending on the hardware/kernel version, this may report spi_bcm2807 rather than spi_bcm2835 - either should be adequate.
Check whether the devices are successfully installed in /dev:
$ ls -l /dev/spi*
crw------- 1 root root 153, 0 Jan  1  1970 /dev/spidev0.0
crw------- 1 root root 153, 1 Jan  1  1970 /dev/spidev0.1
If you have no /dev/spi files and nothing is showing using lsmod then this
implies the kernel SPI driver is not loaded. Enable the SPI as follows (steps
taken from https://learn.sparkfun.com/tutorials/raspberry-pi-spi-and-i2c-tutorial#spi-on-pi):
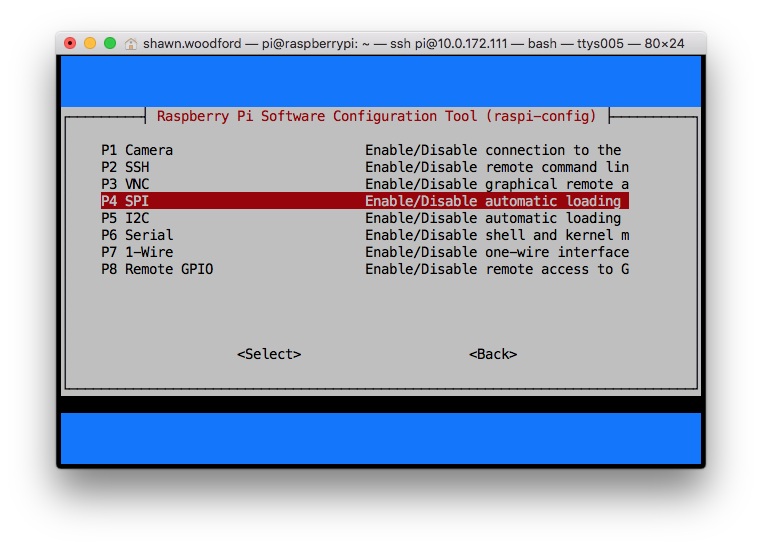
- Run
sudo raspi-config - Use the down arrow to select
9 Advanced Options - Arrow down to
A6 SPI. - Select yes when it asks you to enable SPI,
- Also select yes when it asks about automatically loading the kernel module.
- Use the right arrow to select the button.
- Select yes when it asks to reboot.
After rebooting re-check that the lsmod | grep -i spi command shows whether
SPI driver is loaded before proceeding. If you are stil experiencing problems, refer to the official
Raspberry Pi SPI troubleshooting guide
On RPi and other pin-compatible boards, connect pin 19 (BCM 10 = MOSI) to pin 21 (BCM 9 = MISO) to form a loopback connection. See https://pinout.xyz for further details.
Run the compiled executable:
$ ./spidev_test -v
spi mode: 0x0
bits per word: 8
max speed: 500000 Hz (500 KHz)
TX | FF FF FF FF FF FF 40 00 00 00 00 95 FF FF FF FF FF FF FF FF FF FF FF FF FF FF FF FF FF FF F0 0D  | ......@....?..................?.
RX | FF FF FF FF FF FF 40 00 00 00 00 95 FF FF FF FF FF FF FF FF FF FF FF FF FF FF FF FF FF FF F0 0D  | ......@....?..................?.
(run with sudo if it shows an error about permissions)
With the MOSI (master out, slave in) pin connected to the MISO (master in, slave out), the received data should be exactly the same as the transmitted data, as in the above example.
If received data is all zero as below:
$ ./spidev_test -v
spi mode: 0x0
bits per word: 8
max speed: 500000 Hz (500 KHz)
TX | FF FF FF FF FF FF 40 00 00 00 00 95 FF FF FF FF FF FF FF FF FF FF FF FF FF FF FF FF FF FF F0 0D  | ......@....?..................?.
RX | 00 00 00 00 00 00 00 00 00 00 00 00 00 00 00 00 00 00 00 00 00 00 00 00 00 00 00 00 00 00 00 00  | ................................
This implies the pins MOSI and MISO aren't connected.
Use the -? flag to show all the available options:
$ ./spidev_test -?
usage: ./spidev_test [-DsbdlHOLC3]
-D --device   device to use (default /dev/spidev1.1)
-s --speed    max speed (Hz)
-d --delay    delay (usec)
-b --bpw      bits per word
-i --input    input data from a file (e.g. "test.bin")
-o --output   output data to a file (e.g. "results.bin")
-l --loop     loopback
-H --cpha     clock phase
-O --cpol     clock polarity
-L --lsb      least significant bit first
-C --cs-high  chip select active high
-3 --3wire    SI/SO signals shared
-v --verbose  Verbose (show tx buffer)
-p            Send data (e.g. "1234\xde\xad")
-N --no-cs    no chip select
-R --ready    slave pulls low to pause
-2 --dual     dual transfer
-4 --quad     quad transfer