The main goal of this project is to understand the working of NextJs, not to write whole application code.
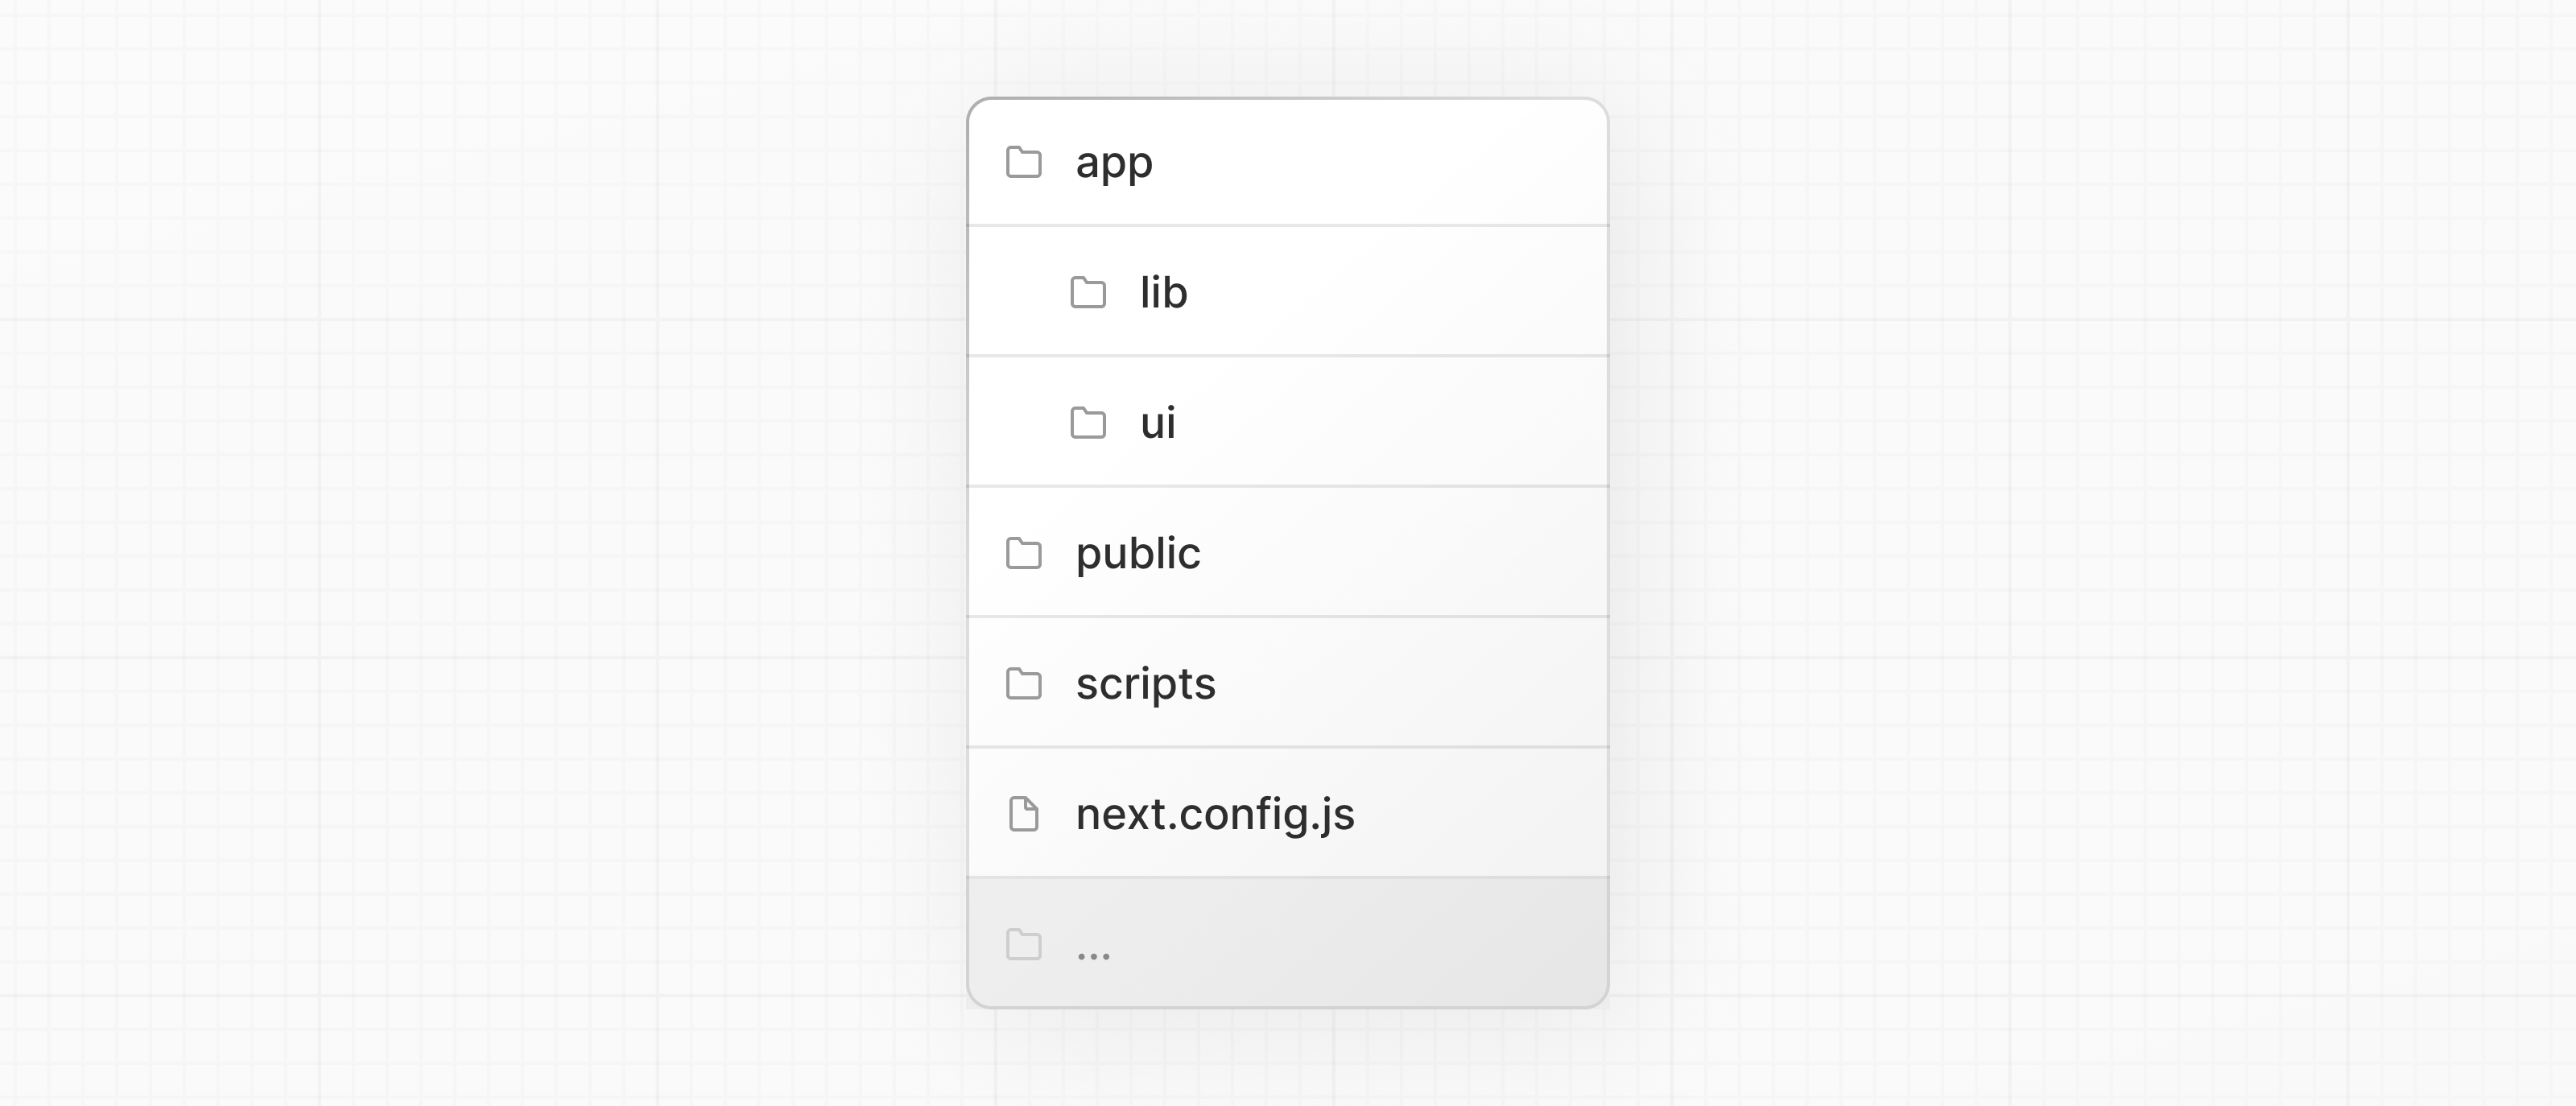
/app: Contains all the routes, components, and logic for your application, this is where you'll be mostly working from.
/app/lib: Contains functions used in your application, such as reusable utility functions and data fetching functions.
/app/ui: Contains all the UI components for your application, such as cards, tables, and forms. To save time, we've pre-styled these components for you.
/public: Contains all the static assets for your application, such as images.
/scripts: Contains a seeding script that you'll use to populate your database in a later chapter.
Config Files: You'll also notice config files such as next.config.js at the root of your application. Most of these files are created and pre-configured when you start a new project using create-next-app. You will not need to modify them in this course.
You can import global.css in any component in your application, but it's usually good practice to add it to your top-level component. In Next.js, this is the root layout (more on this later).
Add global styles to your application by navigating to /app/layout.tsx and importing the global.css file, because of this approach we dont need to import global css file in every component because every page is rendering inside layout.tsx so when we import global.css direct into layout so it will on every component/page .
it is another way for styling but right now we are not using it we are going to use global css.
clsx (or classnames) is a utility library commonly used in React applications to conditionally apply CSS class names to elements.
Instead of directly manipulating styles in JavaScript, clsx allows you to conditionally apply CSS classes based on dynamic conditions.
It provides a convenient way to manage conditional class names without cluttering JSX code with complex ternary expressions or conditional logic.
clsx takes care of joining class names together while handling conditional and boolean values elegantly.
This approach promotes cleaner and more maintainable code by separating concerns: CSS for styling and JavaScript/JSX for logic and behavior.
clsx (or classnames) doesn't handle the actual styling; it's focused on managing class names efficiently.
Next.js supports different ways of styling your application, including:
Global CSS: Simple to use and familiar for those experienced with traditional CSS, but can lead to larger CSS bundles and difficulty managing styles as the application grows.
CSS Modules: Create locally scoped CSS classes to avoid naming conflicts and improve maintainability.
Tailwind CSS: A utility-first CSS framework that allows for rapid custom designs by composing utility classes.
Sass: A popular CSS preprocessor that extends CSS with features like variables, nested rules, and mixins.
CSS-in-JS: Embed CSS directly in your JavaScript components, enabling dynamic and scoped styling.
Next.js automatically optimizes fonts in the application when you use the next/font module. It downloads font files at build time and hosts them with your other static assets. This means when a user visits your application, there are no additional network requests for fonts which would impact performance.
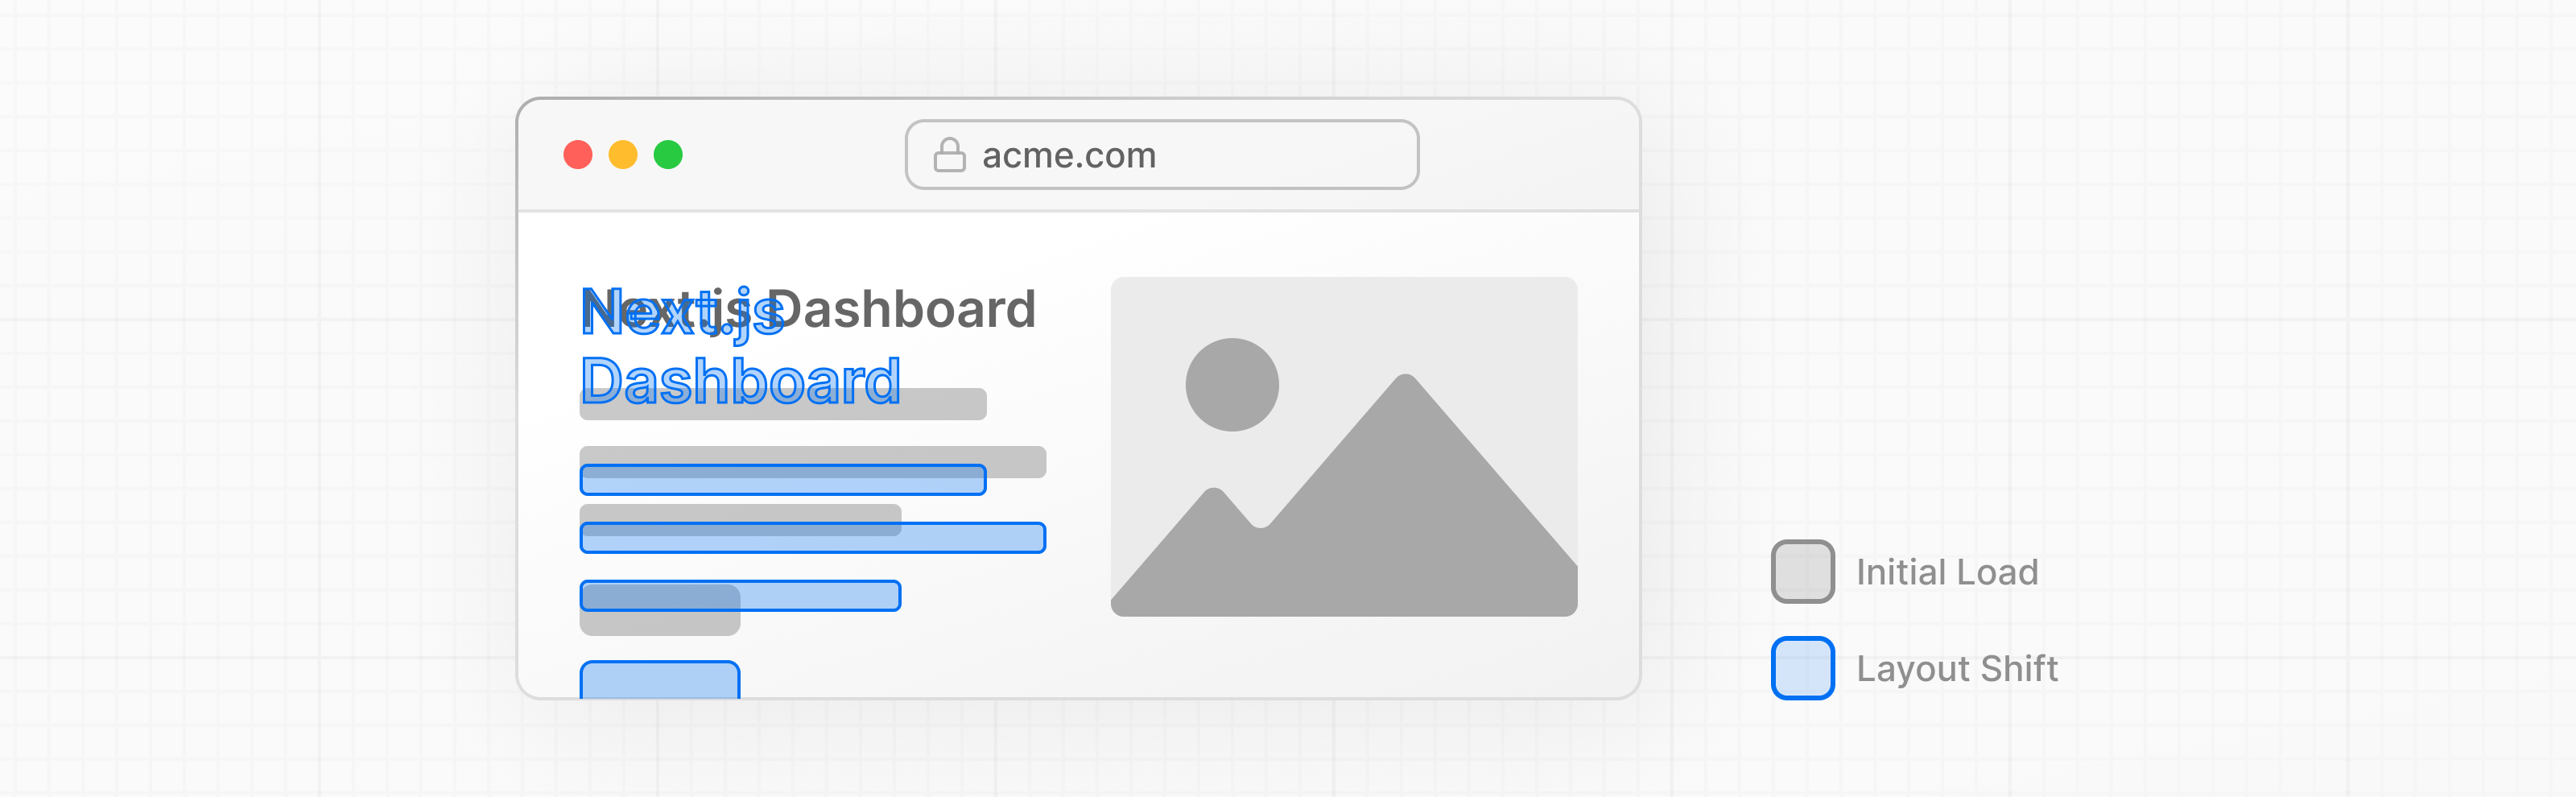
Basically, it happens like when user initially come at page so if font, images are not optimized then browser load that font, images and at that time the layout is different which means that the font size or image size is different but the moment at which the font and images loaded so layout shift (in simple word layout shake),like its happening in above pic.
imagine you're reading a webpage and suddenly the text you're looking at moves around unexpectedly. That's what we call a layout shift.
Now, sometimes when a webpage loads, it might show the text in one basic font first, and then quickly switch to a fancier font once it's fully loaded. This font switch can cause the text to move, which can be annoying for users because it messes with the layout of the page.
Google uses a metric(unit for measurement) called Cumulative Layout Shift (CLS) to measure how much this kind of shifting happens on a webpage. It helps them understand how stable and user-friendly a site is. The lower the CLS score, the better, because it means less annoying shifting for users!
for more: understanding Cumulative layout shift
Adding a primary font (its mean adding a font directly in layout.tsx so that will apply on whole application)
1-import Roboto (it can be any fonName) from "next/font/google"
2-call the fontName, because in actual it works like a function for e.g:
import Roboto from "next/font/google"
const myFont1= Roboto({ subsets:latin , weight:300 , ... })
A font subset is like a mini version of a font. It includes only the characters that a website needs to display its text correctly. Instead of loading the entire font with all its characters.
3-then simply access className property from myFont1 in className prop of element like this className={myFont1.className}
Adding a secondary font (its mean adding a font in specific components, but the steps will remain same)
Note: before adding any font see its documentation, it will help you to define that which arguments you have to pass to function of that specific font.
Why optimize images?
Next.js can serve static assets, like images, under the top-level /public folder. Files inside /public can be referenced in your application.
The Component is an extension of the HTML
tag, and comes with automatic image optimization, such as:
Preventing layout shift automatically when images are loading. Resizing images to avoid shipping large images to devices with a smaller viewport.
Lazy loading images by default (images load as they enter the viewport).
Serving images in modern formats, like WebP and AVIF, when the browser supports it.
-
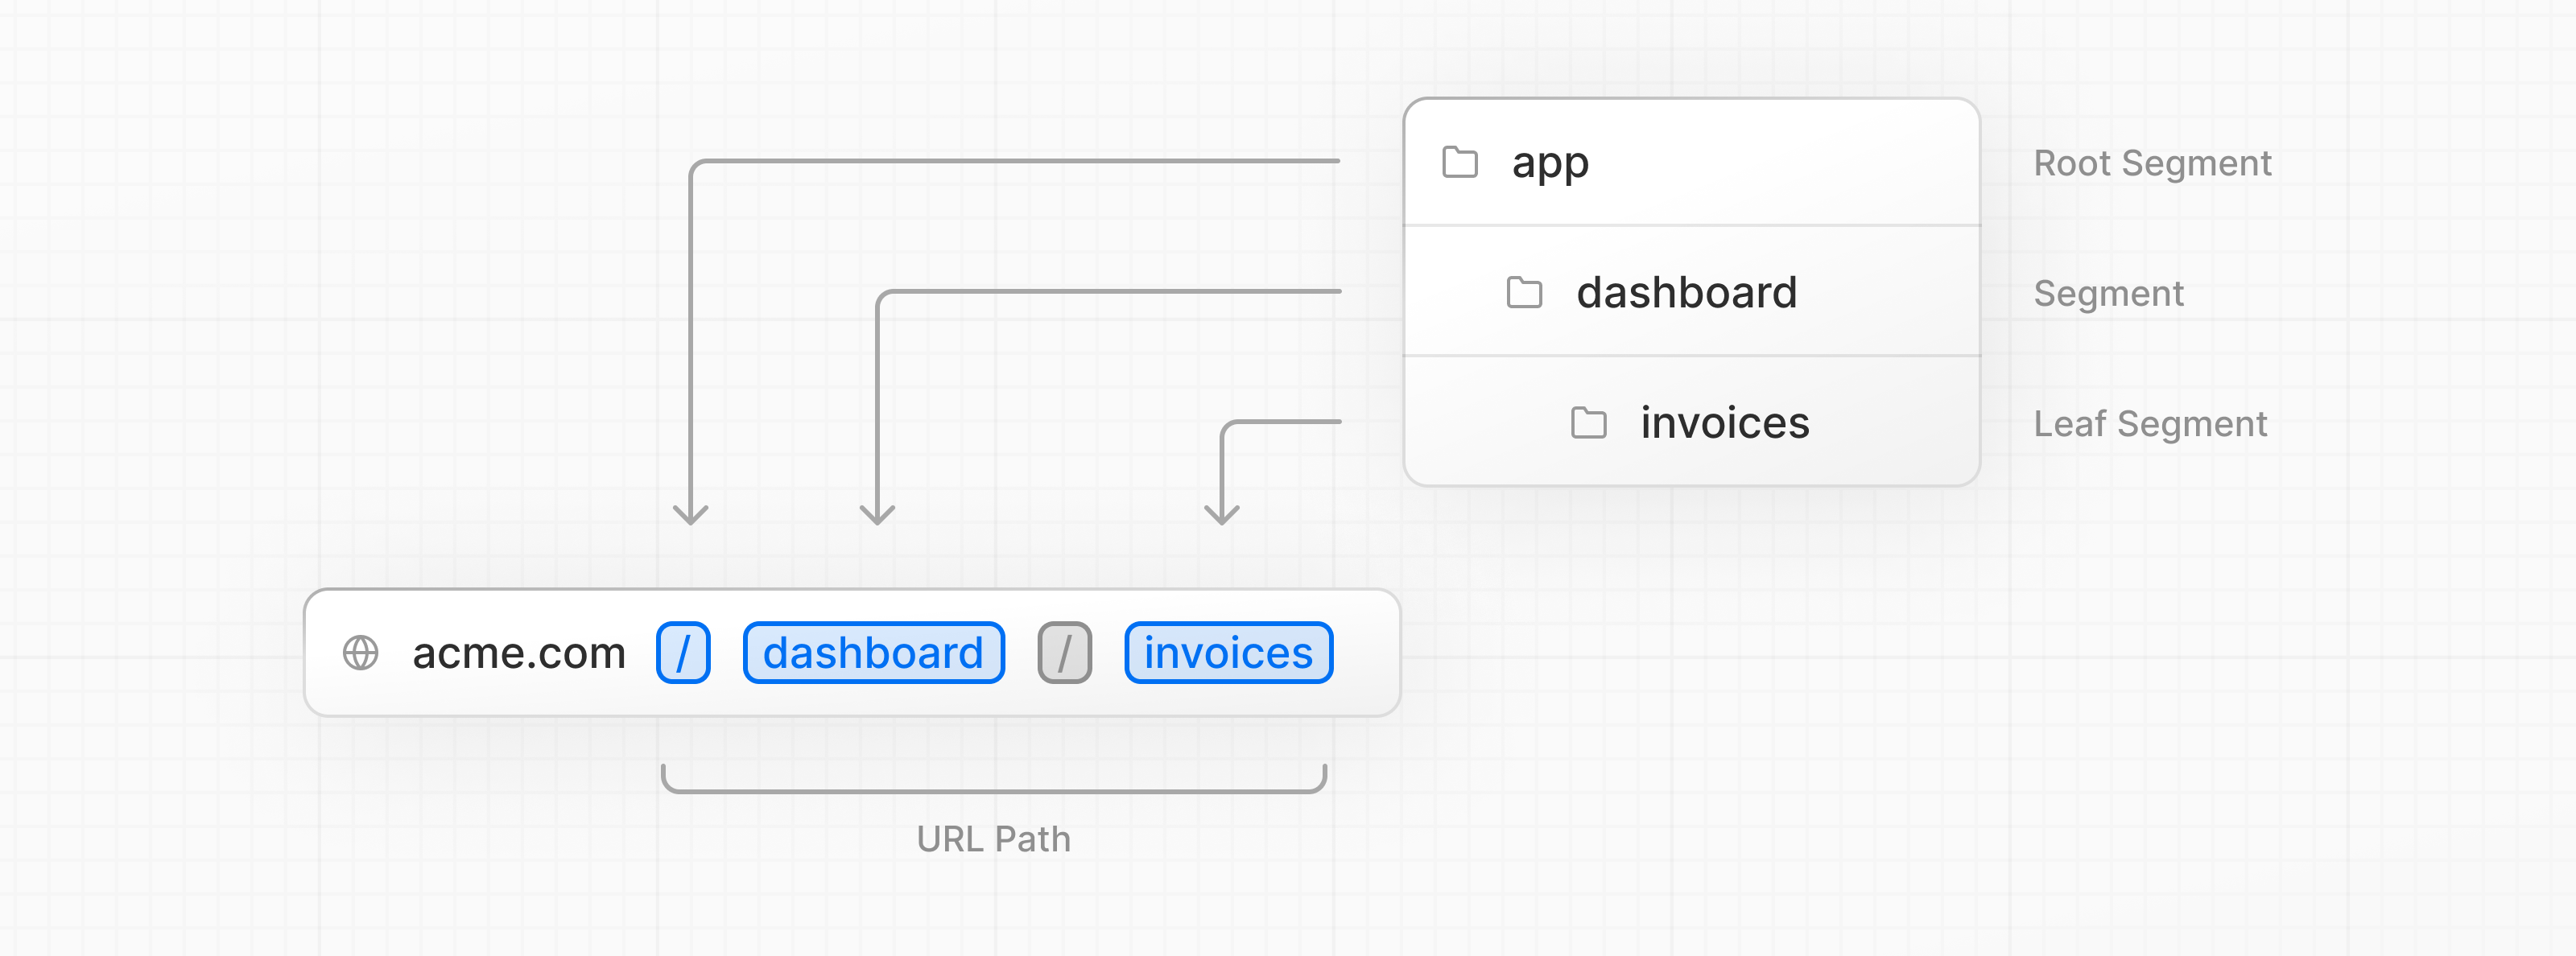
Nextjs uses file-system based routing.
-
you can create a folder in root directory i.e app in App router,for e.g: app/dashboard.
-
the folder created in app directory is known as route, but it should have a file named as page.tsx.
simply, routes inside route is known as nested routes.see the below image:
page.tsx is a special Next.js file that exports a React component, and it's required for the route to be accessible. In your application, you already have a page file: /app/page.tsx - this is the home page associated with the route /.
you can create seprate UI for each route:
- create a route inside app directory
- then, create layout.tsx and page.tsx inside that route which you have created.
simply its means that we have the option to colocate(organizing related files or components together within the same directory or folder.) our own files like: styles,button,etc inside the folder in App directory.
Because all the folders inside the app directory are not be counted as route ,it will be counted as route if it is returning page.tsx or route.tsx. like this:

simply create the layout.tsx in your dashboard route, and then populate your layout.tsx with the code. example code :
import SideNav from '@/app/ui/dashboard/sidenav';
export default function Layout({ children }: { children: React.ReactNode }) { return (
<div className="flex h-screen flex-col md:flex-row md:overflow-hidden">
  <div className="w-full flex-none md:w-64">
    <SideNav />
  </div>
  <div className="flex-grow p-6 md:overflow-y-auto md:p-12">{children}</div>
</div>
); }
-
The component receives a children prop. This child can either be a page or another layout. In your case, the pages inside /dashboard will automatically be nested inside a
-
Now this layout will apply on all the routes created inside dashboard route.
-
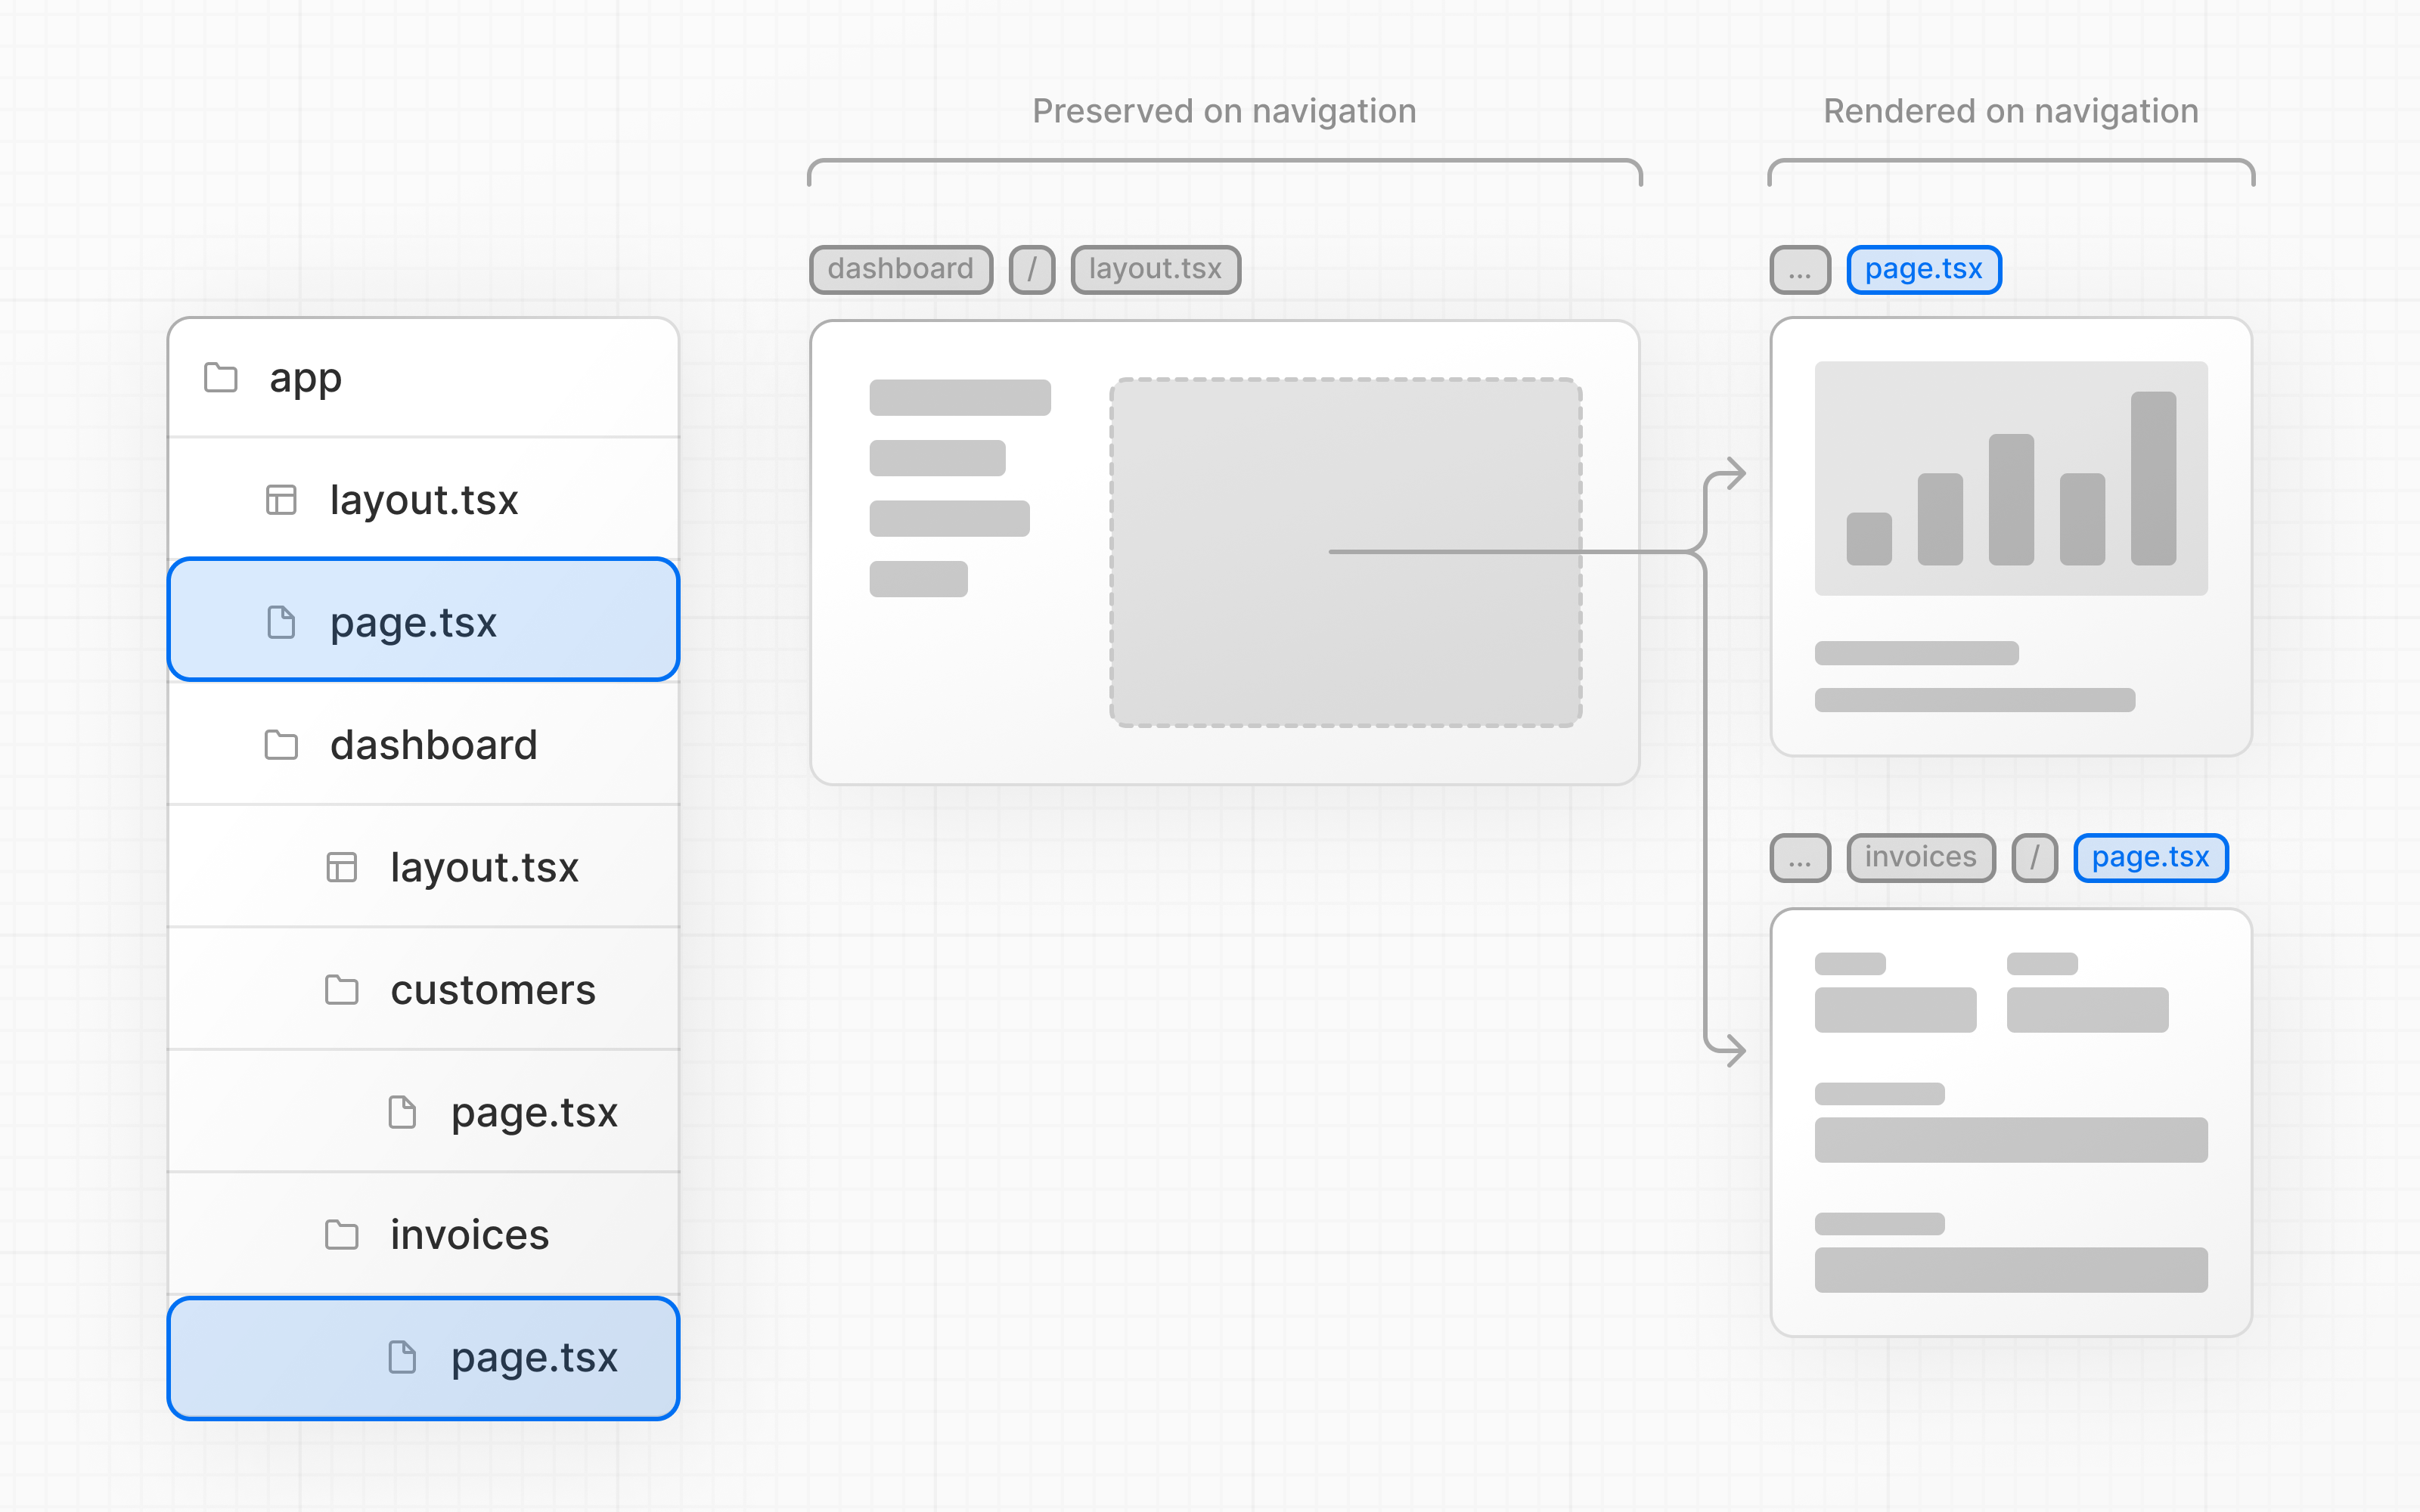
One benefit of using layouts in Next.js is that on navigation, only the page components update while the layout won't re-render. This is called partial rendering:
-
mostly the layout inside your app directory is known as root layout and it is neccessary.
-
the component rendered inside root layout will be apply across all pages in your application.
-
You can use the root layout to modify your and tags, and add metadata (you'll learn more about metadata in a later chapter).
- component is used to navigate between pages, it is in the replacement of anchor tag.
- it is used in the replacement of anchor tag because it does not reload whole page like anchor tag, its only load the specific page.
- it prefetches the data at build time and then, when user click the link it makes navigation within millisec to that URL without reloading whole page.
To improve the navigation experience, Next.js automatically code splits your application by route segments. This is different from a traditional React SPA, where the browser loads all your application code on initial load.
Splitting code by routes means that pages become isolated(far away). If a certain page throws an error, the rest of the application will still work.
- usePathname is a Client Component hook that lets you read the current URL's pathname.
- a Client Component with usePathname will be rendered into HTML on the initial page load. When navigating to a new route, this component does not need to be re-fetched. Instead, the component is downloaded once (in the client JavaScript bundle), and re-renders based on the current state.This means that at the moment when we navigate from one route segment to other, So first URL will be changed then usePathname will return you the pathName.
