This workshop is relevant to developers because:
- You will be using your terminal every day as a developer.
- It will help you understand your Operating System better.
After this workshop, developers will be able to:
- Summarize a basic filesystem structure, including absolute and relative paths
- Use the most common commands to navigate and modify files / directories via the Terminal window (
cd,pwd,mkdir,rm -r,mv,cp,touch) - Describe a basic UNIX permissions system
- Differentiate between navigating the file system using the CLI vs. the GUI
Before this workshop, developers should already be able to:
- Open the terminal
- Issue one or more commands on the command line
- Be comfortable navigating between folders on the command line
- Take a look at some simple keyboard shortcuts to practice: CLI Shortcuts
What is a GUI (pronounced gooey)?
There was a time when computers didn't come with a Graphical User Interface (GUI). Instead, everyone interacted with the computer using text commands in what we call a Command Line Interface (CLI).

Today, the command line still exists, even though you may have never seen it as a casual computer user. In this course, we are going to spend a lot of time in the command line, and we will use it every day to manage our files and tell our computer how to run our programs. It will greatly speed up our development process and help us take ownership of our computer at a deeper level. There is so much that your computer will do for you if you know how to speak its language!
What is a shell?
A shell is simply a type of command line program, which contains a very simple, text-based user interface enabling us to access all of an operating system's services. It is, very simply, a program that accepts text as input and translates that text into the appropriate functions that you want your computer to run. *Taken from Just for fun: [Type like a hacker](http://hackertyper.com/)*
First, we need to launch the command prompt. We do this by using spotlight:
- ⌘ (Command) + Space
- "Terminal"
- Enter
Notice that you can actually hit enter as soon as the field autocompletes. Get used to taking shortcuts – don't type the whole word out if you don't have to and avoid using your mouse if you can open or use an app with just keyboard shortcuts. It may seem harder now, but when you get used to it, it will save you literally hours of cumulative time.
-
For many programs, you can open multiple tabs by pressing ⌘-T.
- Try it in your terminal!
-
You can close the current tab or window with ⌘-W. This goes for most applications on a Mac.
- Try that in your terminal!
-
If you have a process running, you can quit it by pressing Ctrl-C. Let's try that now.
- At the command line, type
ping 127.0.0.1. This basically sends a message to your own computer asking if it's awake. - Notice that it will keep pinging, even if you type something.
- To stop the currently-running script, press Ctrl-C.
- At the command line, type
-
To quit the command line altogether, you can press ⌘-Q.
Every file or folder in a file system can be read, written, and deleted by referencing its position inside the filesystem. When we talk about the position of a file or a folder in a file system, we refer to its "path". There are a couple of different kinds of paths we can use to refer to a file – absolute paths and relative paths.
Directory is an important term that's used interchangeably with folder. Though they are not exactly the same thing, when we say "navigate to your project directory" think of this as "navigate to your project folder". Here's a little more information:
Strictly speaking, there is a difference between a directory which is a file system concept, and the graphical user interface metaphor that is used to represent it (a folder)...If one is referring to a container of documents, the term folder is more appropriate. The term directory refers to the way a structured list of document files and folders is stored on the computer. It is comparable to a telephone directory that contains lists of names, numbers and addresses and does not contain the actual documents themselves.
Taken from Close-To-Open Cache Consistency in the Linux NFS Client
An absolute path is defined as the specific location of a file or folder from the root directory, typically shown as /. The root directory is the starting point from which all other folders are defined and is not normally the same as your Home directory, which is normally found at /Users/[Your Username].
Typing cd - a command for "change directory" with no parameters takes us to our home directory.
cdIf we type in pwd - a command for "print working directory" from that folder, we can see where we are in relation to the root directory.
Some examples of absolute path:
/usr/local/bin/git
/etc/example.ext
/var/data/database.db
Notice, all these paths started from / directory which is a root directory for every Linux/Unix machines.
A relative path is a reference to a file or folder relative to the current position, or the present working directory(pwd). If we are in the folder /a/b/ and we want to open the file that has the absolute path /a/b/c/file.txt, we can just type:
open c/file.txtor
open ./c/file.txtAt any time, we can also use the absolute path, by adding a slash to the beginning of the path. The absolute path is the same for a file or a folder regardless of the current working directory, but relative paths are different, depending on what directory we are in. Directory structures are laid out like directory/subdirectory/subsubdirectory.
Below are some examples of using relative and absolute path for the same action:
-
My present location is
/wdi/lessonsand now I want to change directory to/wdi.- Using relative path:
cd .. - Using absolute path:
cd /wdi
- Using relative path:
-
My present location is
/wdi/lessonsand I want to change the location to/wdi/labs- Using relative path:
cd ../labs - Using absolute path:
cd /wdi/labs
- Using relative path:
By the way, your terminal is located in:
/Applications/Utilities/Terminal.appThe tilde ~ character is an alias to your home directory. Use it to quickly return home.
cd ~/We're "looking into" the User directory at this point; use Tab and the arrow keys in the command line to increase your speed while navigating the command line.
Pressing Up scrolls through previously entered commands.
What if you're wondering what's in a directory?
Typing ls and hitting enter is like asking the computer the question "what stuff is in this directory?" Try it in your current directory and share what you see!
Practice the unix commands we just learned with the bullets below:
- Use the
cdcommand to go to your home folder. - Use the
lscommand see what is in your home directory. - Use the
cd [directory]command to go into any folder that you spot. - In the above command, replace
[directory]with the directory name you intend to move to. - Use the
lscommand to see what files and directories exist there. - Use the
cdcommand to go to your home folder.
What if we want to create files and folders? The command mkdir directory-name creates a new directory with the name “directory-name”.
Try it out. From your current directory, ls to look around and then mkdir my-project to create a new directory with the name “my-project”. This new directory will be created within the current parent directory. ls again to see it's there.
From the same directory, to create a file, touch file-name creates a new file with the name “file-name”. Try it out - touch my-file creates a new file with the name “my-file”. Again, this new file will be created within the current parent directory. You can also use different file paths to create files within directories:
touch my-project/this-new-file.txtThen if you ls my-project you'll notice the this-new-file.txt is within.
Copying files and folders? No problem - cp file new-file1 creates a copy of the “file” and calls it “new-file” in your current directory. If you're looking to copy directories you'll have to pass in a -r, which stands for "recursive" - to copy the directory and everything inside of it:
cp -r my-project my-project-copyCreate a copy of the entire "my-project” directory and call it “my-project-copy". You could always chain a file path onto the second argument and create the copy elsewhere:
cp -r my-project my-project-copy/copy-within-a-copyHow about removing files and folders? Well, we talked about that earlier, but let's practice - cd to your root directory and do the following:
touch junk-file.txt
mkdir junk-directory
touch junk-directory/inner-junk-file.txt
ls
Now, you should see a junk-file.txt and a junk-directory in your root directory. But let's get rid of them:
rm junk-file.txt
rm -r junk-directory
The first command removes the file junk-file.txt; the second removes the directory junk-directory and everything inside of it - inner-junk-file.txt - because we passed the -r, which stands for "recursive". You could also accomplish this with -rf - the f stands for force but use with caution and make sure you are in the right place. You can imagine how bad the results could be if you did that to your home folder!
Now, if you're making a whole bunch of files/folders, mkdir rm and touch can be used to create and remove more than one file/directory at the same time.
Try it out. First, ls to see what you have in there and then:
mkdir directory01 directory02 directory03touch file01 file02 file03rm file01 file03
Thinking about this command with relative and absolute paths:
-
If my present location is
/a/b/, and I am want to remove/a/b/folder/file.txtfile- Using relative path:
rm folder/file.txt - Using absolute path:
rm /a/b/folder/file.txt
- Using relative path:
-
If my present location is
/wdi/labs, and I want to remove aa.txtfile located in this directory- Using relative path:
rm a.txt - Using absolute path:
rm /wdi/labs/a.txt
- Using relative path:
Finally, we can rename and move files and folders with this syntax:
mv file-name file-name2The first argument is the file or folder being moved or renamed, and the second argument is the directory destination you can use to also rename the file/folder if you want. For example, from your root directory:
mkdir this-folder that-folder
touch this-file.txt that-file.txt
mv this-file.txt this-folder
mv that-file.txt that-folder/that-file.txt
Notice now, this-folder has a this-file.txt within it and that-folder has a that-file.txt.
A few other helpful commands you can try on your own:
| Command | Explanation |
|---|---|
ls -a |
Lists all items in current directory including hidden files |
ls -l |
Gives a long list of items in current directory including permissions |
history |
lists entire commands history |
df -h |
displays free disk space |
You'll be using git and GitHub every day throughout this course (and as a developer in the industry) for version control. Version control is a system that records changes to a file or set of files over time so that you can recall specific versions later.
More specifically, a version control system allows you to:
- Review changes made over time
- Revert files (or an entire project) back to a previous state
- Collaborate on a project with other developers
- Track down the origin of bugs in the code
- Back up your projects on a remote server
Git is a version control system and GitHub is a social network built around git.
Git stores information about your project in a repository. A git repository holds the current version of your project's files, as well as the complete history of all past versions.
| Action | Command |
|---|---|
| Create new git repository | git init |
| Check status of git repo | git status |
| Check differences since last commit | git diff <filename> |
| Add file to git repo (stage for commit) | git add <filename> |
| Add (stage) all files in current directory | git add . |
| Commit (save) a version | git commit -m "message describing changes" |
| Push commits to GitHub (remote repository) | git push <remote> <branch> |
| Show version history | git log <filename> |
| Get help with git commands | git help <command> |
First, create a directory on your Desktop:
$ cd ~/Desktop
$ mkdir hello-world
You can place this directory under Git revision control using the command:
$ git initGit will reply:
Initialized empty Git repository in <location>You've now initialized the working directory.
If we look at the contents of this empty folder using:
ls -AWe should see that there is now a hidden folder called .git this is where all of the information about your repository is stored. There is no need for you to make any changes to this folder. You can control all the git flow using git commands.
Let's create a new file:
$ touch file.txtA small cross should show next to your prompt!
git:(master) ✗If we run git status we should get:
On branch master

Initial commit

Untracked files:
  (use "git add <file>..." to include in what will be committed)

	file.txt

nothing added to commit but untracked files present (use "git add" to track)
This means that there is a new untracked file. Next, tell Git to take a snapshot of the contents of all files under the current directory (note the .)
$ git add . (or git add -A)What is the difference?
This snapshot is now stored in a temporary staging area which Git calls the "index".
To permanently store the contents of the index in the repository, (commit these changes to the HEAD), you need to run:
$ git commit -m "Adds file.txt"You should now get:
[master (root-commit) b4faebd] Adds file.txt
 1 file changed, 0 insertions(+), 0 deletions(-)
create mode 100644 file.txtIf we want to view the commit history, we can run:
git logYou should see:
* b4faebd (HEAD, master) Adds file.txtTo exit this view, you need to press:
qA good commit message is:
- in present tense
- describes what the commit contributes
| Good | Bad |
|---|---|
| "Adds signup and login" | "Added logout stuff" |
| "Creates upvote counter" | "Upvotes!" |
| "Fixes merge conflict" | "conflict" |
| "Fixes typo" | "stupid f***ing typos" |
| "Fixes issue #347" | commit logs from last night |
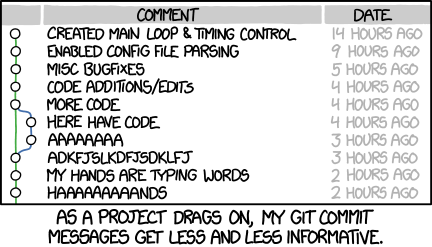
Maybe just take a break.
Now let's open file.txt in Atom:
$ atom file.txtInside the file, write something.
If you press return in the terminal, you will now see that you have untracked changes.
Running git status again will show you that file.txt has been modified.
Let's now make a second commit.
$ git add .
$ git commit -m "Adds content to file.txt"
Checking git log will show you 2 commits with different ids:
* 6e78569 (HEAD, master) Adds content to file.txt
* b4faebd Adds file.txt
We can revert the file back to the first commit using it's specific commit id with:
$ git reset --soft b4faebdThis will do a soft reset, where the changes in the file we made are still there - the changes are staged but not committed anymore.
If we want to revert the file back and disregard any changes (dangerous!), we can use almost definitely do not use:
$ git reset --hard b4faebdLet's do this together:
- Go to your Github account
- In the top left, hit the + button and select
New repository - Name your repository
hello-world - Initialize this repository with a README (So that we can
git pull) - Click the big green Create Repository button


We now need to connect our local Git repo with our remote repository on GitHub. We have to add a "remote" repository, an address where we can send our local files to be stored.
git remote add origin [email protected]:github-name/hello-world.gitIn order to send files from our local machine to our remote repository on Github, we need to use the command git push. However, you also need to add the name of the remote, in this case we called it origin and the name of the branch, in this case master.
git push origin masterThis should fail due to new files on the remote repo.
As we added the README.md in our repo, we need to first pull that file to our local repository to check that we haven't got a 'conflict'.
git pull origin masterOnce we have done this, you should see the README file on your computer. Now you can push your changes:
git push origin masterRefresh your GitHub webpage, and the files should be there.
Before you can open a pull request, you must create a branch in your local repository, commit to it, and push the branch to a repository or fork on GitHub.
-
Visit the repository you forked from
-
Click the "Compare, review, create a pull request" button in the repository

-
You'll land right onto the compare page - you can click Edit at the top to pick a new branch to merge in, using the Head Branch dropdown.
-
Select the target branch your branch should be merged to, using the Base Branch dropdown
-
Review your proposed change
-
Click "Click to create a pull request" for this comparison
-
Enter a title and description for your pull request
-
Click 'Send pull request'
We will use the command line several hours every day, because is makes all files and folders manipulations more easy. A lot of software programs that we will use during the course also only have a CLI interface and can only be used with commands. Always remember that every action you'll do in a GUI can be done in the CLI.


