-
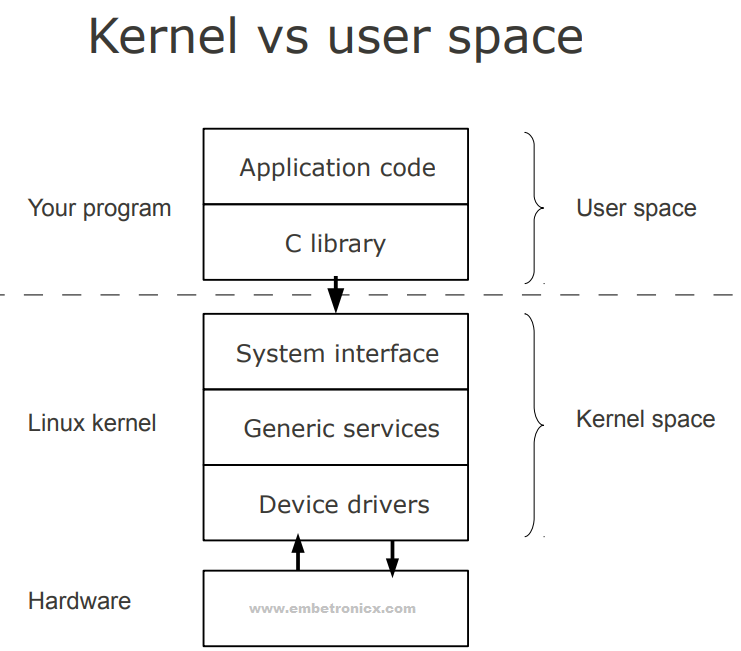
Linux is primarily divided into User Space & Kernel Space. These two components interact through a System Call Interface – which is a predefined and matured interface to Linux Kernel for Userspace applications. The below image will give you a basic understanding.
- Kernel space is where the kernel (i.e., the core of the operating system) executes (i.e., runs) and provides its services.
- User Space is where the user applications are executed.
-
Kernel modules are pieces of code that can be loaded and unloaded into the kernel upon demand. They extend the functionality of the kernel without the need to reboot the system.
-
Custom codes can be added to Linux kernels via two methods.
- The basic way is to add the code to the kernel source tree and recompile the kernel. --> In-tree Kernel Module
- A more efficient way is to do this is by adding code to the kernel while it is running. This process is called loading the module, where the module refers to the code that we want to add to the kernel. --> Out of tree Kernel Module
-
Since we are loading these codes at runtime and they are not part of the official Linux kernel, these are called Loadable Kernel Modules (LKM).
-
LKMs can perform a variety of task, but basically, they come under three main categories,
-
Device drivers
-
Filesystem drivers
-
System calls
-
- A device driver is designed for a specific piece of hardware. The kernel uses it to communicate with that piece of hardware without having to know any details of how the hardware works.
-
A filesystem driver interprets the contents of a filesystem (which is typically the contents of a disk drive) as files and directories and such.
-
There are lots of different ways of storing files and directories and such on disk drives, on network servers, and in other ways. For each way, you need a filesystem driver.
-
For example, there’s a filesystem driver for the ext2 filesystem type used almost universally on Linux disk drives. There is one for the MS-DOS filesystem too, and one for NFS
-
Userspace programs use system calls to get services from the kernel.
-
For example, there are system calls to read a file, to create a new process, and to shut down the system.
-
Most system calls are integral to the system and very standard, so are always built into the base kernel (no LKM option).
-
One major advantage they have is that we don’t need to keep rebuilding the kernel every time we add a new device or if we upgrade an old device. This saves time and also helps in keeping our base kernel error-free.
-
LKMs are very flexible, in the sense that they can be loaded and unloaded with a single line of command. This helps in saving memory as we load the LKM only when we need them.
-
Kernel modules have separate address spaces. A module runs in kernel space. An application runs in userspace. The system software is protected from user programs. Kernel space and user space have their own memory address spaces.
-
Kernel modules have higher execution privileges. Code that runs in kernel space has greater privilege than code that runs in userspace.
-
Kernel modules do not execute sequentially. A user program typically executes sequentially and performs a single task from beginning to end. A kernel module does not execute sequentially. A kernel module registers itself in order to serve future requests.
-
Kernel modules use different header files. Kernel modules require a different set of header files than user programs require.
-
A kernel module is a bit of compiled code that can be inserted into the kernel at run-time, such as with
insmodormodprobe. -
A driver is a bit of code that runs in the kernel to talk to some hardware device. It “drives” the hardware. Almost every bit of hardware in your computer has an associated driver.
-
A device driver is a particular form of software application that is designed to enable interaction with hardware devices.
-
Without the required device driver, the corresponding hardware device fails to work.
-
A device driver usually communicates with the hardware by means of the communications subsystem or computer bus to which the hardware is connected.
-
Device drivers are operating system-specific and hardware-dependent.
-
A device driver acts as a translator between the hardware device and the programs or operating systems that use it.
- Character Driver
- Block Driver
- Network Driver
In Linux, everything is a file. It means Linux treats everything as a File even hardware.
- A char file is a hardware file that reads/writes data in character by character fashion.
- Some classic examples are keyboard, mouse, serial printer.
- A block file is a hardware file that reads/writes data in blocks instead of character by character.
- This type of file is very much useful when we want to write/read data in a bulk fashion.
- Examples : HDD, USB, and CDROM's are block devices.
- A network device is, so far as Linux’s network subsystem is concerned, an entity that sends and receives packets of data.
- Examples : Ethernet, Wi-Fi, Bluetooth
- License
- Author
- Module Description
- Module Version
These pieces of information are present in the
Linux/module.has macros.- GPL, or the GNU General Public License, is an open-source license meant for software
"GPL" [GNU Public License v2 or later]"GPL v2" [GNU Public License v2]MODULE_LICENSE("GPL"); MODULE_LICENSE("GPL v2");
- Using this Macro we can mention that who is writing this Linux device driver or module.
MODULE_AUTHOR("Saishiva Reddy Gatla");
- Using this Macro we can give a description of the module or Linux device driver. So
modinfocan show a module description for users wanting to know.
MODULE_DESCRIPTION("A sample driver");
This is the function that will execute first when the Linux device driver is loaded into the kernel. For example, when we load the driver using
insmod, this function will execute. Please see below to know the syntax of this function.static int __init hello_world_init(void) /* Constructor */ { return 0; } module_init(hello_world_init);
This function should register itself by using
module_init()macro.This is the function that will execute last when the Linux device driver is unloaded from the kernel. For example, when we unload the driver using
rmmod, this function will execute. Please see below to know the syntax of this function.void __exit hello_world_exit(void) { } module_exit(hello_world_exit);
This function should register itself by using
module_exit()macro.In C programming, we will print the values using
printf()function.printf()is a user-space function. So we cant use this here. So, they have created another function for the kernel which isprintk().One of the differences is that
printklets you classify messages according to their severity by associating different log levels, or priorities, with the messages. You usually indicate the log level with a macro. There are several macros used forprintk.KERN_EMERG:
Used for emergency messages, usually those that precede a crash.
KERN_ALERT:
A situation requiring immediate action.
KERN_CRIT:
Critical conditions, often related to serious hardware or software failures.
KERN_ERR:
Used to report error conditions; device drivers often use
KERN_ERRto report hardware difficulties.KERN_WARNING:
Warnings about problematic situations that do not, in themselves, create serious problems with the system.
KERN_NOTICE:
Situations that are normal, but still worthy of note. A number of security-related conditions are reported at this level.
KERN_INFO:
Informational messages. Many drivers print information about the hardware they find at startup time at this level.
KERN_DEBUG:
Used for debugging messages.
Example
printk(KERN_INFO "Hello World!");
- **
Printk()**is a kernel-level function, which has the ability to print out to different log levels as defined in. We can see the prints usingdmesgcommand. - **
printf()**will always print to a file descriptor – STD_OUT. We can see the prints in the STD_OUT console.
Note: In the newer Linux kernels, you can use the APIs below instead of this
printk.pr_info– Print an info-level message. (ex.pr_info("test info message\n")).pr_cont– Continues a previous log message in the same line.pr_debug– Print a debug-level message conditionally.pr_err– Print an error-level message. (ex. pr_err(“test error message\n”)).pr_warn– Print a warning-level message.
#include <linux/init.h>
#include <linux/module.h>
#include <linux/kernel.h>

MODULE_LICENSE("GPL");
MODULE_AUTHOR("Saishiva Reddy");
MODULE_DESCRIPTION("Module to print Hello World");

static int __init hello_init(void)
{
    printk(KERN_INFO "\n Hello, World\n");
    return 0;
}

static void __exit hello_exit(void)
{
    printk(KERN_INFO"\n Goodbye, World\n");
}

module_init(hello_init);
module_exit(hello_exit);
- Makefile for Native Compilation
obj-m :=Hello.o
# Native Compilation
KERNELDIR = /lib/modules/$(shell uname -r)/build
PWD :=$(shell pwd)
default :
	$(MAKE) -C $(KERNELDIR) M=$(PWD) modules
clean	:
	$(MAKE) -C $(KERNELDIR) M=$(PWD) clean
- Makefile for Cross Compilation
obj-m := Hello.o
# Cross Compilation
KERNELDIR = /lib/modules/5.15.48-Shiva-v7l+/build
default :
	make ARCH=arm CROSS_COMPILE=arm-linux-gnueabihf- -C $(KERNELDIR) M=$(PWD) modules
clean :
	make ARCH=arm CROSS_COMPILE=arm-linux-gnueabihf- -C $(KERNELDIR) M=$(PWD) clean
-
On Host(Ubuntu):
-
Open terminal & Install rpi-imager:
sudo apt install rpi-imager
snap install rpi-imager
-
Run rpi-imager
rpi-imager
- Choose OS: Raspberry Pi OS (other) => rasperry pi OS Lite 32-bit
- Choose storage: choose your SD Card
- Click on write & then click on yes - This will take some time.
-
After completing flashing image plug out SD Card and insert SD Card again.
cd /media/<user-name of your machine>/boot
touch ssh
touch wpa_supplicant.conf
vim wpa_supplicant.conf
- Write the following code in wpa_supplicant.conf file and save it.
country=IN
ctrl_interface=DIR=/var/run/wpa_supplicant GROUP=netdev network={
    ssid="Your Hotspot name"
    psk="Your Hotspot Password"
    key_mgmt=WPA-PSK
    }
-
Plug out the SD Card and insert into your raspberry pi board.
-
Board will start booting & then access it.
-
-
On Host(Ubuntu) :
-
Install Required dependencies :
sudo apt install git bc bison flex libssl-dev make libc6-dev libncurses5-dev
-
Install 32-bit Toolchain :
sudo apt install crossbuild-essential-armhf
-
Download / clone Kernel source
mkdir rpi
cd rpi
git clone --depth=1 --branch rpi-5.15.y https://github.com/raspberrypi/linux
cd linux
-
Apply the config file of rpi4 :
-
Check config file for your board(rpi4) using below command.
ls arch/arm/configs
-
Default config file for rpi4 is bcm2711_defconfig.
-
Now apply config file using below command.
make ARCH=arm CROSS_COMPILE=arm-linux-gnueabihf- bcm2711_defconfig
-
-
Build Kernel image & Kernel modules for rpi4 :
make -j8 ARCH=arm CROSS_COMPILE=arm-linux-gnueabihf- zImage modules
-
Result of above command :
ls arch/arm/boot
Zimage  # This is the result.
-
-
Plug in your SD Card to your HOST PC(Ubuntu) :
cp arch/arm/boot/zImage /media/<user_name of your PC>/boot
-
Install modules onto rootfs partition (or "/") of SD Card
make ARCH=arm CROSS_COMPILE=arm-linux-gnueabihf- INSTALL_MOD_PATH=<path-to-sdcard-rootfs-partition> modules_install

sudo make ARCH=arm CROSS_COMPILE=arm-linux-gnueabihf- modules_install  # It will install 5.15.45-v7l+ into "ls /lib/modules"
-
Example in my PC :
make ARCH=arm CROSS_COMPILE=arm-linux-gnueabihf-INSTALL_MOD_PATH=/media/cdac/rootfs modules_install
-
Modules get install in rootfs/lib/modules path.
-
-
Configuring config.txt to boot our new Kernel.
cd /media/<user-name>/boot
-
Open
config.txt :
sudo vim config.txt
-
Add below line at the end of the file and save file.
kernel=zImage
-
-
if ssh & "wpa_supplicant.conf" files are not in your boot partition then follow steps-2 of flashing raspbian OS.
-
Plug out your SD Card and insert into your Raspberry pi board.
-
Board will start booting and access it.
-
A Kernel Module is a small file that may be loaded into the running Kernel and unloaded.
To load a Kernel Module, use the
insmodcommand with root privileges.For example, our module file name is hello_world_module.ko
sudo insmod hello_world_module.ko
lsmodused to see the modules were inserted.Use
dmesgto see the kernel prints.So, when I load the module, it executes the init function.
In order to see the list of currently loaded modules, use the **
lsmod**command.To un-load, a Kernel module, use the **
rmmod**command with root privileges.sudo rmmod hello_world_module.ko or sudo rmmod hello_world_module
So, when I unload the module, it executes the exit function.
In order to get information about a Module (author, supported options), use the
modinfocommand.For example
modinfo hello_world_module.ko
module_param()module_param_array()module_param_cb()
This macro is used to initialize the arguments.
module_paramtakes three parameters: the name of the variable, its type, and a permissions mask to be used for an accompanying sysfs entry. The macro should be placed outside of any function and is typically found near the head of the source file.module_param()macro, defined inlinux/moduleparam.h.module_param(name, type, perm);module_param() macro creates the sub-directory under /sys/module. For example,
module_param(value, int, S_IWUSR|S_IRUSR);
This will create a sysfs entry. (
/sys/module/hello_world_module/parameters/value
When some symbols (variables or functions) are using EXPORT_SYMBOL macro (ex. EXPORT_SYMBOL(func_name)), those symbols are exposed to all the loadable kernel drivers. You can call them directly in your kernel module without modifying the kernel code. In other words, It tells the kbuild mechanism that the symbol referred to should be part of the global list of kernel symbols. That allows the kernel modules to access them.
Only the symbols that have been explicitly exported can be used by other modules.
Another macro is also available to export the symbols like EXPORT_SYMBOL. That is EXPORT_SYMBOL_GPL().
EXPORT_SYMBOL exports the symbol to any loadable module.
EXPORT_SYMBOL_GPL exports the symbol only to GPL-licensed modules.
- Declare and define the symbol (functions or variables) which you want to make it visible to other kernel modules. Then below the definition, use
EXPORT_SYMBOL(symbol name). Now it is visible to all loadable modules. - Now take the kernel driver who is gonna use the above-exported symbol. Declare the symbol using
extern. Then use the symbol directly. - Finally, load the module first, who has the definition of the export symbol. Then load the caller module using
insmod.
- That symbol should not be
staticorinline. - Order of loading the driver is matter. ie. We should load the module which has the definition of the symbol, then only we can load the module that is using that symbol.

- Initially, the Application will open the device file. This device file is created by the device driver).
- Then this device file will find the corresponding device driver using major and minor numbers.
- Then that Device driver will talk to the Hardware device.
The Linux kernel represents character and block devices as pairs of numbers <major>:<minor>.
Traditionally, the major number identifies the driver associated with the device. A major number can also be shared by multiple device drivers. See /proc/devices to find out how major numbers are assigned on a running Linux instance.
The major number is to identify the corresponding driver. Many devices may use the same major number. So we need to assign the number to each device which is using the same major number. So, this is a minor number. In other words, The device driver uses the minor number to distinguish individual physical or logical devices.
We can allocate the major and minor numbers in two ways.
- Statically allocating
- Dynamically Allocating
int register_chrdev_region(dev_t first, unsigned int count, char *name);-
Here,
firstis the beginning device number of the range you would like to allocate. -
countis the total number of contiguous device numbers you are requesting. -
nameis the name of the device that should be associated with this number range; it will appear in/proc/devicesandsysfs.
The return value from *register_chrdev_region* will be 0 if the allocation was successfully performed. In case of error, a negative error code will be returned, and you will not have access to the requested region.
MKDEV(int major, int minor);MAJOR(dev_t dev);
MINOR(dev_t dev);Example :
dev_t dev = MKDEV(235, 0);
register_chrdev_region(dev, 1, "My_dev");- If we don’t want the fixed major and minor numbers please use this method. This method will allocate the major number dynamically to your driver which is available.
int alloc_chrdev_region(dev_t *dev, unsigned int firstminor, unsigned int count, char *name);dev is an output-only parameter that will, on successful completion, hold the first number in your allocated range.
firstminor should be the requested first minor number to use; it is usually 0.
count is the total number of contiguous device numbers you are requesting.
name is the name of the device that should be associated with this number range; it will appear in /proc/devices and sysfs.
void unregister_chrdev_region(dev_t first, unsigned int count);- The device file allows transparent communication between user-space applications and hardware.
We can create a device file in two ways.
- Manually
- Automatically
mknod -m <permissions> <name> <device type> <major> <minor><name> – your device file name that should have a full path (/dev/name)
<device type**> – Put c or b
c – Character Device
b – Block Device
<major> – major number of your driver
<minor> – minor number of your driver
-m <permissions> – optional argument that sets the permission bits of the new device file to permissions.
Example:
sudo mknod -m 666 /dev/My_device c 246 0- Anyone can create the device file using this method.
- You can create the device file even before loading the driver.
- Include the header file
linux/device.handlinux/kdev_t.h - Create the struct Class
- Create Device with the class which is created by the above step
struct class \* class_create (struct module \*owner, const char \*name);owner – pointer to the module that is to “own” this struct class
name – pointer to a string for the name of this class
Note, the pointer created here is to be destroyed when finished by making a call to class_destroy.
void class_destroy (struct class \* cls);struct device *device_create (struct *class, struct device *parent, dev_t dev, void * drvdata, const char *fmt, ...);class – pointer to the struct class that this device should be registered to
parent – pointer to the parent struct device of this new device, if any
devt – the dev_t for the char device to be added
drvdata – the data to be added to the device for callbacks
fmt – string for the device’s name
... – variable arguments
Note, you can destroy the device using device_destroy().
void device_destroy (struct class \* class, dev_t devt);struct cdev {
struct kobject kobj;
struct module *owner;
const struct file_operations *ops;
struct list_head list;
dev_t dev;
unsigned int count;
};This is cdev structure. Here we need to fill the two fields,
file_operations(This we will see after this cdev structure)owner(This should beTHIS_MODULE)
There are two ways of allocating and initializing one of these structures.
- Runtime Allocation
struct cdev *my_cdev = cdev_alloc( );
my_cdev->ops = &my_fops; 2. Own allocation
void cdev_init(struct cdev *cdev, struct file_operations *fops);Once the cdev structure is set up with file_operations and owner, the final step is to tell the kernel about it with a call to:
int cdev_add(struct cdev *dev, dev_t num, unsigned int count);dev is the cdev structure,
num is the first device number to which this device responds, and
count is the number of device numbers that should be associated with the device.
To remove a char device from the system, call:
void cdev_del(struct cdev *dev);The file_operations structure is how a char driver sets up this connection. The structure, (defined in <linux/fs.h>) is a collection of function pointers. Each open file is associated with its own set of functions. The operations are mostly in charge of implementing the system calls and are, therefore, named open, read, and so on.
A file_operations structure is called fops. Each field in the structure must point to the function in the driver that implements a specific operation or have to left NULL for unsupported operations.
ssize_t (*read) (struct file *, char _ _user *, size_t, loff_t *);ssize_t (*write) (struct file *, const char _ _user *, size_t, loff_t *);int (*ioctl) (struct inode *, struct file *, unsigned int, unsigned long);int (*open) (struct inode *, struct file *);int (*release) (struct inode *, struct file *);Example:
static struct file_operations fops =
{
.owner          = THIS_MODULE,
.read           = my_read,
.write          = my_write,
.open           = my_open,
.release        = my_release,
};- kmalloc()
- kfree()
- copy_from_user()
- copy_to_user()
kmallocfunction is used to allocate the memory in kernel space. This is like a malloc() function in userspace.
#include <linux/slab.h>
void *kmalloc(size_t size, gfp_t flags);
Arguments
size– how many bytes of memory are required.
flags– the type of memory to allocate.
GFP = Get Free pages
The flags argument may be one of:
GFP_USER – Allocate memory on behalf of the user. May sleep.
GFP_KERNEL – Allocate normal kernel ram. May sleep.
GFP_ATOMIC – Allocation will not sleep. May use emergency pools. For example, use this inside interrupt handler.
GFP_HIGHUSER – Allocate pages from high memory.
GFP_NOIO – Do not do any I/O at all while trying to get memory.
GFP_NOFS – Do not make any fs calls while trying to get memory.
GFP_NOWAIT – Allocation will not sleep.
__GFP_THISNODE – Allocate node-local memory only.
GFP_DMA – Allocation is suitable for DMA. Should only be used for kmalloc caches. Otherwise, use a slab created with SLAB_DMA.
Also, it is possible to set different flags by OR’ing in one or more of the following additional *flags*:
__GFP_COLD – Request cache-cold pages instead of trying to return cache-warm pages.
__GFP_HIGH – This allocation has high priority and may use emergency pools.
__GFP_NOFAIL – Indicate that this allocation is in no way allowed to fail (think twice before using).
__GFP_NORETRY – If memory is not immediately available, then give up at once.
__GFP_NOWARN – If allocation fails, don’t issue any warnings.
__GFP_REPEAT – If allocation fails initially, try once more before failing.
This is like a free() function in the userspace. This is used to free the previously allocated memory.
void kfree(const void \*objp)Arguments
\*objp – pointer returned by kmalloc
- This function is used to Copy a block of data from user space (Copy data from user space to kernel space).
unsigned long copy_from_user(void \*to, const void __user \*from, unsigned long n);Arguments
to – Destination address, in the kernel space
from – The source address in the user space
n – Number of bytes to copy
Returns number of bytes that could not be copied. On success, this will be zero.
- This function is used to Copy a block of data into userspace (Copy data from kernel space to user space).
unsigned long copy_to_user(const void __user \*to, const void \*from, unsigned long n);Arguments
to – Destination address, in the user space
from – The source address in the kernel space
n – Number of bytes to copy
Returns number of bytes that could not be copied. On success, this will be zero.
This function is called first, whenever we are opening the device file. In this function, I am going to allocate the memory using kmalloc. In the userspace application, you can use open() system call to open the device file.
static int my_open(struct inode *inode, struct file *file)
{
/*Creating Physical memory*/
if((kernel_buffer = kmalloc(mem_size , GFP_KERNEL)) == 0){
printk(KERN_INFO "Cannot allocate memory in kernel\n");
return -1;
}
printk(KERN_INFO "Device File Opened...!!!\n");
return 0;
}When writing the data to the device file it will call this write function. Here I will copy the data from user space to kernel space using copy_from_user() function. In the userspace application, you can use write() system call to write any data the device file.
static ssize_t my_write(struct file *filp, const char __user *buf, size_t len, loff_t *off)
{
copy_from_user(kernel_buffer, buf, len);
printk(KERN_INFO "Data Write : Done!\n");
return len;
}When we read the device file it will call this function. In this function, I used copy_to_user(). This function is used to copy the data to the userspace application. In the userspace application, you can use read() system call to read the data from the device file.
static ssize_t my_read(struct file *filp, char __user *buf, size_t len, loff_t *off)
{
copy_to_user(buf, kernel_buffer, mem_size);
printk(KERN_INFO "Data Read : Done!\n");
return mem_size;
}When we close the device file that will call this function. Here I will free the memory that is allocated by kmalloc using kfree(). In the userspace application, you can use close() system call to close the device file.
static int my_release(struct inode *inode, struct file *file)
{
kfree(kernel_buffer);
printk(KERN_INFO "Device File Closed...!!!\n");
return 0;
}IOCTL is referred to as Input and Output Control, which is used to talking to device drivers. This system call, available in most driver categories. The major use of this is in case of handling some specific operations of a device for which the kernel does not have a system call by default.
- Some real-time applications of ioctl are Ejecting the media from a “cd” drive, change the Baud Rate of Serial port, Adjust the Volume, Reading or Writing device registers, etc.
There are some steps involved to use IOCTL.
- Create IOCTL command in driver
- Write IOCTL function in the driver
- Create IOCTL command in a Userspace application
- Use the IOCTL system call in a Userspace
To implement a new ioctl command we need to follow the following steps.
- Define the ioctl command
#define "ioctl name" __IOX("magic number","command number","argument type")where IOX can be :
“IO“: an ioctl with no parameters
“IOW“: an ioctl with write parameters (copy_from_user)
“IOR“: an ioctl with read parameters (copy_to_user)
“IOWR“: an ioctl with both write and read parameters
- The
Magic Numberis a unique number or character that will differentiate our set of ioctl calls from the other ioctl calls. some times the major number for the device is used here. - Command Number is the number that is assigned to the ioctl. This is used to differentiate the commands from one another.
- The last is the type of data.
- Add the header file
linux/ioctl.hto make use of the above-mentioned calls.
Example:
#include <linux/ioctl.h>

#define WR_VALUE _IOW('a','a',int32_t*)
#define RD_VALUE _IOR('a','b',int32_t*)int ioctl(struct inode *inode,struct file *file,unsigned int cmd,unsigned long arg)Where
<inode> : is the inode number of the file being worked on.
<file> : is the file pointer to the file that was passed by the application.
<cmd> : is the ioctl command that was called from the userspace.
<arg> : are the arguments passed from the userspace
Within the function “ioctl” we need to implement all the commands that we defined above (WR_VALUE, RD_VALUE). We need to use the same commands in the switch statement which is defined above.
#define WR_VALUE _IOW('a','a',int32_t*)
#define RD_VALUE _IOR('a','b',int32_t*)- Include the header file
<sys/ioctl.h>.Now we need to call the new ioctl command from a user application.
long ioctl( "file descriptor","ioctl command","Arguments");Where,
<file descriptor>: This is the open file on which the ioctl command needs to be executed, which would generally be device files.
<ioctl command> : ioctl command which is implemented to achieve the desired functionality
<arguments> : The arguments need to be passed to the ioctl command.
ioctl(fd, WR_VALUE, (int32_t*) &number);
ioctl(fd, RD_VALUE, (int32_t*) &value);
File operation structure will be
static struct file_operations fops =
{
        .owner          = THIS_MODULE,
        .read           = my_read,
        .write          = my_write,
        .open           = my_open,
        .unlocked_ioctl = my_ioctl,
        .release        = my_release,
};When you write a Linux Driver or Module or Kernel Program, Some processes should wait or sleep for some event. There are several ways of handling sleeping and waking up in Linux, each suited to different needs. Waitqueue also one of the methods to handle that case.
Whenever a process must wait for an event (such as the arrival of data or the termination of a process), it should go to sleep. Sleeping causes the process to suspend execution, freeing the processor for other uses. After some time, the process will be woken up and will continue with its job when the event which we are waiting for has arrived.
Wait queue is a mechanism provided in the kernel to implement the wait. As the name itself suggests, waitqueue is the list of processes waiting for an event. In other words, A wait queue is used to wait for someone to wake you up when a certain condition is true. They must be used carefully to ensure there is no race condition.
There are 3 important steps in Waitqueue.
- Initializing Waitqueue
- Queuing (Put the Task to sleep until the event comes)
- Waking Up Queued Task
Use this Header file for Waitqueue (include <linux/wait.h>). There are two ways to initialize the waitqueue.
- Static method
- Dynamic method
You can use any one of the methods.
DECLARE_WAIT_QUEUE_HEAD(wq);Where the “wq” is the name of the queue on which task will be put to sleep.
wait_queue_head_t wq;
init_waitqueue_head (&wq);Once the wait queue is declared and initialized, a process may use it to go to sleep. There are several macros are available for different uses.
- wait_event
- wait_event_timeout
- wait_event_cmd
- wait_event_interruptible
- wait_event_interruptible_timeout
- wait_event_killable
Old kernel versions used the functions sleep_on() and interruptible_sleep_on(), but those two functions can introduce bad race conditions and should not be used.
Whenever we use the above one of the macro, it will add that task to the waitqueue which is created by us. Then it will wait for the event.
sleep until a condition gets true.
wait_event(wq, condition);

wq – the waitqueue to wait on
condition – a C expression for the event to wait forsleep until a condition gets true or a timeout elapses
wait_event_timeout(wq, condition, timeout);

wq – the waitqueue to wait on
condtion – a C expression for the event to wait for
timeout – timeout, in jiffiessleep until a condition gets true
wait_event_cmd(wq, condition, cmd1, cmd2);

wq – the waitqueue to wait on
condtion – a C expression for the event to wait for
cmd1 – the command will be executed before sleep
cmd2 – the command will be executed after sleepsleep until a condition gets true
wait_event_interruptible(wq, condition);

wq – the waitqueue to wait on
condtion – a C expression for the event to wait forsleep until a condition gets true or a timeout elapses
wait_event_interruptible_timeout(wq, condition, timeout);

wq– the waitqueue to wait on
condtion – a C expression for the event to wait for
timeout – timeout, in jiffiessleep until a condition gets true
wait_event_killable(wq, condition);

wq – the waitqueue to wait on
condtion– a C expression for the event to wait forWhen some Tasks are in sleep mode because of the waitqueue, then we can use the below function to wake up those tasks.
- wake_up
- wake_up_all
- wake_up_interruptible
- wake_up_sync and
wake_up_interruptible_sync
wakes up only one process from the wait queue which is in non-interruptible sleep.
wake_up(&wq);

wq – the waitqueue to wake upwakes up all the processes on the wait queue
wake_up_all(&wq);

wq – the waitqueue to wake upwakes up only one process from the wait queue that is in interruptible sleep
wake_up_interruptible(&wq);

wq– the waitqueue to wake upwake_up_sync(&wq);
wake_up_interruptible_sync(&wq);A race condition occurs when two or more threads can access shared data and they try to change it at the same time. Because the thread scheduling algorithm can swap between threads at any time, we don’t know the order in which the threads will attempt to access the shared data. Therefore, the result of the change in data is dependent on the thread scheduling algorithm, i.e. both threads are “racing” to access/change the data.
To avoid race conditions, we have many ways like Semaphore, Spinlock, and Mutex.
A mutex is a mutual exclusion lock. Only one thread can hold the lock.
A mutex can be used to prevent the simultaneous execution of a block of code by multiple threads that are running in a single or multiple processes.
Mutex is used as a synchronization primitive in situations where a resource has to be shared by multiple threads simultaneously.
A mutex has ownership. The thread which locks a Mutex must also unlock it.
So whenever you are accessing a shared resource that time first we lock the mutex and then access the shared resource. When we are finished with that shared resource then we unlock the Mutex.
Today most major operating systems employ multitasking. Multitasking is where multiple threads can execute in parallel and thereby utilizing the CPU in an optimum way. Even though, multitasking is useful, if not implemented cautiously can lead to concurrency issues (Race condition), which can be very difficult to handle.
The actual mutex type (minus debugging fields) is quite simple:
struct mutex {
    atomic_t        count;
    spinlock_t      wait_lock;
    struct list_head    wait_list;
};
We will be using this structure for Mutex in Linux kernel. Refer to linux/include/linux/mutex.h
We can initialize Mutex in two ways
- Static Method
- Dynamic Method
This method will be useful while using global Mutex. This macro is defined below.
DEFINE_MUTEX(name);This call defines and initializes a mutex. Refer to linux/include/linux/mutex.h
This method will be useful for per-object mutexes when the mutex is just a field in a heap-allocated object. This macro is defined below.
mutex_init(struct mutex \*lock);Argument:
struct mutex \*lock – the mutex to be initialized.
This call initializes already allocated mutex. Initialize the mutex to the unlocked state.
It is not allowed to initialize an already locked mutex.
struct mutex my_mutex;
mutex_init(&my_mutex);Once a mutex has been initialized, it can be locked by any one of them below.
This is used to lock/acquire the mutex exclusively for the current task. If the mutex is not available, the current task will sleep until it acquires the Mutex.
The mutex must, later on, released by the same task that acquired it. Recursive locking is not allowed. The task may not exit without first unlocking the mutex. Also, kernel memory where the mutex resides must not be freed with the mutex still locked. The mutex must first be initialized (or statically defined) before it can be locked. memset-ing the mutex to 0 is not allowed.
void mutex_lock(struct mutex \*lock);Argument:
struct mutex \*lock – the mutex to be acquired
Locks the mutex like mutex_lock, and returns 0 if the mutex has been acquired or sleep until the mutex becomes available. If a signal arrives while waiting for the lock then this function returns -EINTR.
int mutex_lock_interruptible(struct mutex \*lock);Argument:
struct mutex \*lock – the mutex to be acquired
This will try to acquire the mutex, without waiting (will attempt to obtain the lock, but will not sleep). Returns 1 if the mutex has been acquired successfully, and 0 on contention.
int mutex_trylock(struct mutex \*lock);Argument:
struct mutex \*lock – the mutex to be acquired
This function must not be used in an interrupt context. The mutex must be released by the same task that acquired it.
This is used to unlock/release a mutex that has been locked by a task previously.
This function must not be used in an interrupt context. Unlocking of a not locked mutex is not allowed.
void mutex_unlock(struct mutex \*lock);Argument:
struct mutex \*lock – the mutex to be released
This function is used to check whether mutex has been locked or not.
int mutex_is_locked(struct mutex \*lock);Argument:
struct mutex \*lock – the mutex to check the status.
Returns 1 if the mutex is locked, 0 if unlocked.
Semaphore as used in an operating system to restrict the access to resources by multiple processes at the same time. When a semaphore is used to restrict the access to only one process at a time, it is termed as mutex, as it serves the purpose of mutual exclusion. The part of the program which accesses the shared resource is called as the critical section. Hence a semaphore restricts the execution of the critical section by multiple processes at the same time.

Semaphore initialization:
Dynamic-
struct semaphore name;
sema_init(&name, count);
Static-
static DECLARE_MUTEX(name);Various kinds of down() :
down() : Will keep waiting for the semaphore unless it does not become available. Can not be interrupted. down_interruptible(): Will keep waiting for the semaphore unless it does not become available but can be interrupted. This is always preferable over down(). down_trylock() : Will not put the process to sleep if semaphore is already being held, but returns immediately with non zero return value.
void down(struct semaphore *sem);
void up(struct semaphore *sem);
int  down_interruptible(struct semaphore *sem);
int  down_killable(struct semaphore *sem);
int  down_trylock(struct semaphore *sem);
int down_timeout(struct semaphore *sem, long jiffies);| API | Work |
|---|---|
| void sema_init(struct semaphore *sem, int val) | Dynamically initialize a Semaphore |
| void down(struct semaphore *sem); | Acquire a Semaphore |
| void up(struct semaphore *sem); | Release a Semaphore |
The spinlock is a low-level synchronization mechanism which in simple words, represents a variable which can be in two states:
acquired;released.
void spin_lock(spinlock_t *lock);Note that all spinlock waits are, by their nature, uninterruptible. Once you call spin_lock, you will spin until the lock becomes available.
To release a lock that you have obtained, pass it to:
void spin_unlock(spinlock_t *lock);| Function | Description |
|---|---|
| spin lock init( ) | Set the spin lock to 1 (unlocked) |
| spin lock( ) | Cycle until spin lock becomes 1 (unlocked), then set it to 0 (locked) |
| spin unlock( ) | Set the spin lock to 1 (unlocked) |
| spin unlock wait( ) | Wait until the spin lock becomes 1 (unlocked) |
| spin is locked( ) | Return 0 if the spin lock is set to 1 (unlocked); 0 otherwise |
| spin trylock( ) | Set the spin lock to 0 (locked), and return 1 if the lock is obtained; 0 otherwise |
Completion, the name itself says. When we want to notify or wake up some thread or something when we finished some work, then we can use completion.
There are 5 important steps in Completions.
- Initializing Completion in Linux
- Re-Initializing Completion in Linux
- Waiting for completion (The code is waiting and sleeping for something to finish)
- Waking Up Task (Sending a signal to sleeping part)
- Check the status
We have to include <linux/completion.h> and creating a variable of type **struct completion,**which has only two fields:
struct completion {
    unsigned int done;
    wait_queue_head_t wait;
};
Where,
wait is the waitqueue to place tasks on for waiting (if any).
done is the completion flag for indicating whether it’s completed or not.
We can create the struct variable in two ways.
- Static Method
- Dynamic Method
You can use any one of the methods.
DECLARE_COMPLETION(data_read_done);Where the “data_read_done” is the name of the struct which is going to create statically.
init_completion (struct completion \* x);Where, x – completion structure that is to be initialized.
Example:
struct completion data_read_done;
init_completion(&data_read_done);reinit_completion (struct completion \* x);Where, x – completion structure that is to be reinitialized
Example :
reinit_completion(&data_read_done);For a thread to wait for some concurrent activity to finish, it calls anyone of the function based on the use case.
This is used to make the function waits for the completion of a task.
void wait_for_completion (struct completion \* x);Where, x – holds the state of this particular completion
This waits to be signaled for completion of a specific task. It is NOT interruptible and there is no timeout.
Example:
wait_for_completion (&data_read_done);Note that wait_for_completion() is calling spin_lock_irq()/spin_unlock_irq(), so it can only be called safely when you know that interrupts are enabled. Calling it from IRQs-off atomic contexts will result in hard-to-detect spurious enabling of interrupts.
This is used to make the function waits for the completion of a task with a timeout. Timeouts are preferably calculated with msecs_to_jiffies() or usecs_to_jiffies(), to make the code largely HZ-invariant.
unsigned long wait_for_completion_timeout (struct completion \* x, unsigned long timeout);where,x – holds the state of this particular completion
timeout – timeout value in jiffies
This waits for either completion of a specific task to be signaled or for a specified timeout to expire. The timeout is in jiffies. It is not interruptible.
It returns 0 if timed out, and positive (at least 1, or the number of jiffies left till timeout) if completed.
Example:
wait_for_completion_timeout (&data_read_done);This waits for the completion of a specific task to be signaled. It is interruptible.
int wait_for_completion_interruptible (struct completion \* x);where, x – holds the state of this particular completion
It return -ERESTARTSYS if interrupted, 0 if completed.
This waits for either completion of a specific task to be signaled or for a specified timeout to expire. It is interruptible. The timeout is in jiffies. Timeouts are preferably calculated with msecs_to_jiffies() or usecs_to_jiffies(), to make the code largely HZ-invariant.
long wait_for_completion_interruptible_timeout (struct completion \* x, unsigned long timeout);where, x – holds the state of this particular completion
timeout – timeout value in jiffies
It returns -ERESTARTSYS if interrupted, 0 if timed out, positive (at least 1, or a number of jiffies left till timeout) if completed.
This waits to be signaled for completion of a specific task. It can be interrupted by a kill signal.
int wait_for_completion_killable (struct completion \* x);where, x – holds the state of this particular completion
It returns -ERESTARTSYS if interrupted, 0 if completed.
This waits for either completion of a specific task to be signaled or for a specified timeout to expire. It can be interrupted by a kill signal. The timeout is in jiffies. Timeouts are preferably calculated with msecs_to_jiffies() or usecs_to_jiffies(), to make the code largely HZ-invariant.
long wait_for_completion_killable_timeout (struct completion \* x, unsigned long timeout);where, x – holds the state of this particular completion
timeout – timeout value in jiffies
It returns -ERESTARTSYS if interrupted, 0 if timed out, positive (at least 1, or a number of jiffies left till timeout) if completed.
This function will not put the thread on the wait queue but rather returns false if it would need to en queue (block) the thread, else it consumes one posted completion and returns true.
bool try_wait_for_completion (struct completion \* x);where, x – holds the state of this particular completion
It returns 0 if completion is not available 1 if a got it succeeded.
This try_wait_for_completion() is safe to be called in IRQ or atomic context.
This will wake up a single thread waiting on this completion. Threads will be awakened in the same order in which they were queued.
void complete (struct completion \* x);where, x – holds the state of this particular completion
Example:
complete(&data_read_done);This will wake up all threads waiting on this particular completion event.
void complete_all (struct completion \* x);where, x – holds the state of this particular completion
This is the test to see if completion has any waiters.
bool completion_done (struct completion \* x);where, x – holds the state of this particular completion
It returns 0 if there are waiters (wait_for_completion in progress) 1 if there are no waiters.
This completion_done() is safe to be called in IRQ or atomic context.
What is a timer in general? According to Wikipedia, A timer is a specialized type of clock used for measuring specific time intervals. Timers can be categorized into two main types. A timer that counts upwards from zero for measuring elapsed time is often called a stopwatch, while a device that counts down from a specified time interval is more usually called a timer.
In Linux, the kernel keeps track of the flow of time by means of timer interrupts. These timer interrupts are generated at regular timer intervals by using the system’s timing hardware. Every time a timer interrupt occurs, the value of an internal kernel counter is incremented. The counter is initialized to 0 at the system boot, so it represents the number of clock ticks since the last boot.
- Polling a device by checking its state at regular intervals when the hardware can’t fire interrupts.
- The user wants to send some messages to another device at regular intervals.
- Send an error when some action didn’t happen in a particular time period.
- Etc.
Linux Kernel provides the driver to create timers that are not periodic by default, register the timers and delete the timers.
We need to include the <linux/timer.h> (#include <linux/timer.h>) in order to use kernel timers. Kernel timers are described by the timer_list structure, defined in <linux/timer.h>:
struct timer_list {
    /* ... */
    unsigned long expires;
    void (*function)(unsigned long);
    unsigned long data;
};
The expires field contains the expiration time of the timer (in jiffies).
On expiration, function() will be called with the given data value.
There are multiple ways to Initialize / Setup Kernel Timer. We’ll see one by one.
void fastcall init_timer ( struct timer_list \* timer);This function is used to initialize the timer. init_timer must be done to a timer prior to calling any of the other timer functions. If you are using this function to initialize the timer, then you need to set the callback function and data of the timer_list structure manually.
Argument:
timer – the timer to be initialized
void setup_timer(timer, function, data);Instead of initializing the timer manually by calling init_timer, you can use this function to set data and function of timer_list structure and initialize the timer. This is recommended to use. This API will be available for the older kernel version. If you are using the newer kernel, then you have to use the below API (timer_setup).
Argument:
timer – the timer to be initialized
function – Callback function to be called when the timer expires. In this callback function, the argument will be unsigned long.
data – data has to be given to the callback function
/* setup your timer to call my_timer_callback */
setup_timer(&my_timer, timer_callback, 0);
//Timer Callback function. This will be called when timer expires
void timer_callback(unsigned long data)
{

}If you use a newer kernel version, then setup_timer won’t work. So you need to use this timer_setup function.
void timer_setup(timer, function, data);Instead of initializing the timer manually by calling init_timer, you can use this function to set data and function of timer_list structure and initialize the timer. This is recommended to use.
Argument:
timer – the timer to be initialized
function – Callback function to be called when the timer expires. In this callback function, the argument will be struct timer_list \*.
data – data has to be given to the callback function
/* setup your timer to call my_timer_callback */
timer_setup(&my_timer, timer_callback, 0);
//Timer Callback function. This will be called when timer expires
void timer_callback(struct timer_list * data)
{
}DEFINE_TIMER(_name, _function, _expires, _data)If we are using this method, then no need to create the timer_list structure on our side. The kernel will create the structure in the name of _name and initialize it.
Argument:
_name – name of the timer_list structure to be created
_function – Callback function to be called when the timer expires
_expires – the expiration time of the timer (in jiffies)
_data – data has to be given to the callback function
void add_timer(struct timer_list \*timer);This will start a timer.
Argument:
timer – the timer needs to be started
int mod_timer(struct timer_list \* timer, unsigned long expires);This function is used to modify a timer’s timeout. This is a more efficient way to update the expires field of an active timer (if the timer is inactive it will be activated).
mod_timer(timer, expires) is equivalent to:
del_timer(timer);
timer->expires = expires;
add_timer(timer);
Argument:
timer – the timer needs to modify the timer period
expires – the updated expiration time of the timer (in jiffies)
Return:
The function returns whether it has modified a pending timer or not.
0 – mod_timer of an inactive timer
1 – mod_timer of an active timer
The below functions will be used to deactivate the kernel timers.
int del_timer(struct timer_list \* timer);This will deactivate a timer. This works on both active and inactive timers.
timer – the timer needs to be deactivated
Return:
The function returns whether it has deactivated a pending timer or not.
0 – del_timer of an inactive timer
1 – del_timer of an active timer
int del_timer_sync(struct timer_list \* timer);This will deactivate a timer and wait for the handler to finish. This works on both active and inactive timers.
Argument:
timer – the timer needs to be deactivated
Return:
The function returns whether it has deactivated a pending timer or not.
0 – del_timer_syncof an inactive timer
1 – del_timer_sync of an active timer
Note: callers must prevent restarting of the timer, otherwise this function is meaningless. It must not be called from interrupt contexts. The caller must not hold locks that would prevent the completion of the timer’s handler. The timer’s handler must not call add_timer_on. Upon exit, the timer is not queued and the handler is not running on any CPU.
int timer_pending(const struct timer_list \* timer);This will tell whether a given timer is currently pending, or not. Callers must ensure serialization wrt. other operations done to this timer, eg. interrupt contexts or other CPUs on SMP.
Argument:
timer – the timer needs to check the status
Return:
The function returns whether the timer is pending or not.
0 – timer is not pending
1 – timer is pending
