Code Monkey home page Code Monkey logo

homeassistant-homeduino's Introduction

Home Assistant integration for Homeduino RF 433 MHz transceivers

Python GitHub Release Licence Maintainer Home Assistant HACS
Github Sponsors PayPal BuyMeCoffee Patreon

Introduction

Home Assistant integration for using various 433 MHz devices and sensors with a connected Arduino Nano with homeduino sketch.

This plugins supports all 433 MHz devices with rfcontrolpy protocol implementations.

Features

  • Sending and receiveing RF commands
  • Supports RF switches, lights and motion sensors
  • Read and write local IO connected to the Arduino Nano
  • Allows multiple Homeduinos to be connected
  • Reading DHT11/DHT22 sensors connected to the Arduino Nano

Hardware

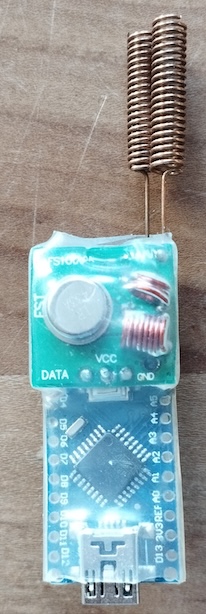
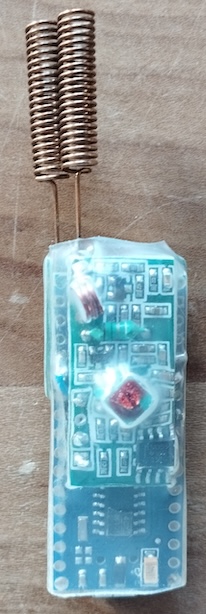
A Homeduino exists of an Arduino Nano with homeduino sketch. An 433 MHz RF transmitter and receiver can be connected to communicate with 433 MHz devices and local IO can be used to read inputs or switch relays.

image image

Installation

HACS

The recommended way to install this Home Assistant integration is by using HACS. Click the following button to open the integration directly on the HACS integration page.

Install Homeduino from HACS.

Or follow these instructions:

  • Go to your HACS view in Home Assistant and then to Integrations
  • Open the Custom repositories menu
  • Add this repository URL to the Custom repositories and select Integration as the Category
  • Click Add
  • Close the Custom repositories menu
  • Select + Explore & download repositories and search for Homeduino
  • Select Download
  • Restart Home Assistant

Manually

  • Copy the custom_components/homeduino directory of this repository into the config/custom_components/ directory of your Home Assistant installation
  • Restart Home Assistant

Adding a new Homeduino

  • After restarting go to Settings then Devices & Services
  • Select + Add integration and type in Homeduino
  • Select the Serial port or enter the path manually
  • Select the Baud rate
  • Define which digital and analog IO should be enabled.
  • Select Submit

When your wiring is right a new Homeduino integration and device will now be added to your Integrations view. If your wiring is not right you will get a Failed to connect error message.

Digital and analog IO

The Arduino Nano suports 12 digital IO and 8 analog inputs which can be used by the Homeduino integration

The digital IO can be configured as:

  • RF receiver on digital IO 2 or 3
  • RF sender on all digital IO
  • Digital input on digital IO 2 till 12
  • Digital output on all digital IO
  • PWM output on digital IO 3, 5, 6, 9, 10 and 11
  • DHT11/DHT22 sensor 2 till 12

The analog input reads a value between 0V and 5V and reports the measured value as a value between 0 and 1023. You can use a template sensor to use this value according to your needs.

Adding a new RF Actor

  • After adding your Homeduino go to Settings then Devices & Services
  • Select + Add integration and type in Homeduino
  • Select the Protocol and give the Device ID and Device unit for your device
  • Select Submit

Contributing

If you would like to use this Home Assistant integration in your own language you can provide me with a translation file as found in the custom_components/homeduino/translations directory. Create a pull request (preferred) or issue with the file attached.

More on translating custom integrations can be found here.

Support my work

Do you enjoy using this Home Assistant integration? Then consider supporting my work using one of the following platforms, your donation is greatly appreciated and keeps me motivated:

Github Sponsors PayPal BuyMeCoffee Patreon

Hire me

If you would like to have a Home Assistant integration developed for your product or are in need for a freelance Python developer for your project please contact me, you can find my email address on my GitHub profile.

homeassistant-homeduino's People

Contributors

imgbotapp avatar rrooggiieerr avatar

Stargazers

 avatar  avatar  avatar  avatar  avatar  avatar

Watchers

 avatar  avatar  avatar

Forkers

edautz roku133

homeassistant-homeduino's Issues

Feature Request: GPIO control of homeduino

Hello,
as a former longtime pimatic user, I am sad and happy at the same time to see this project here. Some time ago I moved my stuff to Home Assistant. Only the 433 devices are still running under Pimatic. It's a shame to think so, but I'd really like to see this replace my pimatic instance completely.
I could offer my helf by testing an so on. If you like just response.

Bye,
Daniel

Installation problems

Hello,

I tried to install your plugin on a fresh HA 2022.11.1 container, with a mapping to a homeduino device on a USB port:
devices:
- "/dev/serial/by-id/usb-1a86_USB2.0-Serial-if00-port0:/dev/ttyUSB0"

Here are my findings:

  • I missed the download repository step. Please add the installation step within HACS to download the Homeduino repository,

After the installation steps, I got the settings screen in the homeduino integration:

image

My homeduino device has the recieve pin on pin 0! But that option is not available. The lowest pin nummer is 2.

See my pimatic config:

image

When I try the config with recieve pin 2 and send pin 4, the plugin hangs. Also without the recieve pin.

image

  • Is it posible to update the repository to use pin 0?
  • Do I something wrong?
  • Is it dependable at a HA version?

Support of homeduino local sensors and weather protocols

Hi rrooggiieerr,

excellent job enabling us to continue with our homeduino implementations in HA.

You have mentioned that you are currently supporting protocols you personally need - this is completely understandable.
Looking into the protocols folder of rfcontrolpy two weather protocols (7, 19) are already available.
File sensor.py seems to basically support local sensors (DHT).

Is there an option to support them in homeassistant-homeduino with limited additional effort?
This extension would be great.

No problems for me to support testing.

Recommend Projects

  • React photo React

    A declarative, efficient, and flexible JavaScript library for building user interfaces.

  • Vue.js photo Vue.js

    ๐Ÿ–– Vue.js is a progressive, incrementally-adoptable JavaScript framework for building UI on the web.

  • Typescript photo Typescript

    TypeScript is a superset of JavaScript that compiles to clean JavaScript output.

  • TensorFlow photo TensorFlow

    An Open Source Machine Learning Framework for Everyone

  • Django photo Django

    The Web framework for perfectionists with deadlines.

  • D3 photo D3

    Bring data to life with SVG, Canvas and HTML. ๐Ÿ“Š๐Ÿ“ˆ๐ŸŽ‰

Recommend Topics

  • javascript

    JavaScript (JS) is a lightweight interpreted programming language with first-class functions.

  • web

    Some thing interesting about web. New door for the world.

  • server

    A server is a program made to process requests and deliver data to clients.

  • Machine learning

    Machine learning is a way of modeling and interpreting data that allows a piece of software to respond intelligently.

  • Game

    Some thing interesting about game, make everyone happy.

Recommend Org

  • Facebook photo Facebook

    We are working to build community through open source technology. NB: members must have two-factor auth.

  • Microsoft photo Microsoft

    Open source projects and samples from Microsoft.

  • Google photo Google

    Google โค๏ธ Open Source for everyone.

  • D3 photo D3

    Data-Driven Documents codes.