![]()
![]()
This is the official Roam iOS SDK developed and maintained by Roam B.V
Note: Before you get started signup to our dashboard to get your API Keys.
The Roam iOS SDK makes it quick and easy to build a location tracker for your iOS app. We provide powerful and customizable tracking modes and features that can be used to collect your users’ location updates.
To use the Roam SDK, the following things are required: Get yourself a free Roam Account. No credit card required.
- Create a project and add an iOS app to the project.
- You need the SDK_KEY in your project settings which you’ll need to initialize the SDK.
- Now you’re ready to integrate the SDK into your iOS application.
- The Roam iOS SDK requires Xcode 10.0 or later and it compatible with apps targeting iOS version 10 and above.
To integrate the Roam SDK, you need a Roam account.
-
Go to Xcode > File > New Project
-
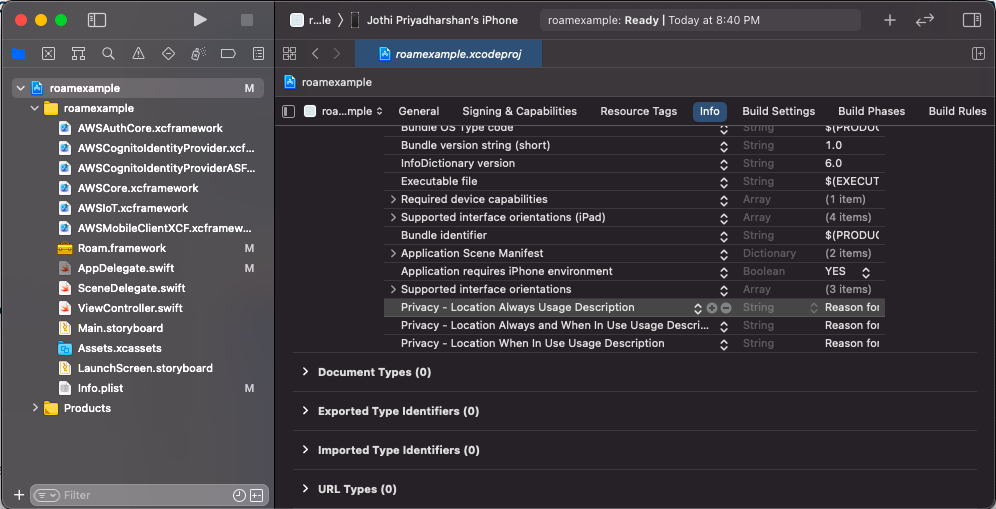
Configure the information property list file
Info.plistwith an XML snippet that contains data about your app. You need to add strings forNSLocationWhenInUseUsageDescriptionin theInfo.plistfile to prompt the user during location permissions for foreground location tracking. For background location tracking, you also need to add a string forNSLocationAlwaysUsageDescriptionandNSLocationAlwaysAndWhenInUseUsageDescriptionin the sameInfo.plistfile.<key>NSLocationWhenInUseUsageDescription</key> <string>Add description for foreground only location usage.</string> <key>NSLocationAlwaysUsageDescription</key> <string>Add description for background location usage. iOS 10 and below"</string> <key>NSLocationAlwaysAndWhenInUseUsageDescription</key> <string>Add description for background location usage. iOS 11 and above</string>
-
Next you need to enable
Background fetchandLocation updatesunderProject Setting>Capabilities>Background Modes.
There are several ways to integrate the Roam Mobile SDK for iOS into your own project:
- Swift Package Manager
- CocoaPods
- Carthage (Will be added soon)
- Dynamic Frameworks
- Swift Package Manager is distributed with Xcode. To start adding the AWS SDK to your iOS project, open your project in Xcode and select File > Swift Packages > Add Package Dependency.

- Enter the URL for the Roam SDK for iOS Swift Package Manager GitHub repo (https://github.com/roam-ai/roam-ios) into the search bar and click Next.

- You'll see the repository rules for which version of the SDK you want Swift Package Manager to install. Choose the first rule, Version, and select Up to Next Minor as it will use the latest compatible version of the dependency that can be detected from the main branch, then click Next.

- Select all that are appropriate, then click Finish.

You can always go back and modify which SPM packages are included in your project by opening the Swift Packages tab for your project: Click on the Project file in the Xcode navigator, then click on your project's icon, then select the Swift Packages tab.
Follow the steps below to add the SDK to the project using CocoaPods. Add the below to the Podfile
pod 'roam-ios'
Then run pod install.
This will add the Roam SDK and its dependencies to your project. The Roam SDK depends on CoreLocation, AWSMobileClient and AWSIoT for fetching locations and its transmission to our servers. The SDK supports iOS 10 and above.
If you’re not familiar with using Cocoapods or prefer manual installation, we’ve added a ZIP file to the SDK. Use this link to download the Roam.zip file.
Unzip the file and add the Roam Roam.framework to your Xcode project by dragging the file into your Project Navigator.
You can do this by selecting the project file in the navigator on the left side of the Xcode window, and then navigating to the Linked Frameworks and Libraries section. From there, click the “+” button to add the Roam framework. You will also want to add the following frameworks from this link.
AWSAuthCore.xcframework
AWSCognitoIdentityProvider.xcframework
AWSCognitoIdentityProviderASF.xcframework
AWSCore.xcframework
AWSIoT.xcframework
AWSMobileClientXCF.xcframework
Make sure the the added frameworks under Linked Frameworks and Libraries section are selected as Embed & Sign

Add the following code in AppDelegate file. This code imports the SDK and allows the SDK to use other methods.
import RoamAfter import, add the below code under application(_:didFinishLaunchingWithOptions:) in your AppDelegate file. The SDK must be initialized before calling any of the other SDK methods using your project's publishable key.
Roam.initialize("YOUR-SDK-KEY-GOES-HERE")Once the SDK is initialised, you need to create or get a user to start the tracking and use other methods. Every user created will have a unique Roam identifier which will be used to login and access developer APIs. We call this Roam user_Id.
Roam.createUser("YOUR-USER-DESCRIPTION-GOES-HERE") {(RoamUser, Error) in
            // Access Roam user data below
            // RoamUser?.userId
            // RoamUser?.description
            // RoamUser?.locationListener
            // RoamUser?.eventsListener
            // RoamUser?.locationEvents
            // RoamUser?.geofenceEvents
            // RoamUser?.tripsEvents
            // RoamUser?.nearbyEvents

            // Access error code & message below
            // Error?.code
            // Error?.message
        }
The option user description can be used to update user information such as name, address or add an existing user ID. Make sure the information is encrypted if you are planning to save personal information like an email or phone number.
You can always set or update user descriptions later using the below code.
Roam.setDescription("SET-USER-DESCRIPTION-HERE")If you already have a Roam user_ID which you would like to reuse instead of creating a new user, use the code below to get a user session.
Roam.getUser("YOUR-ROAM-USER-ID") {(RoamUser, Error) in
            // Access Roam user data below
            // RoamUser?.userId
            // RoamUser?.description
            // RoamUser?.locationListener
            // RoamUser?.eventsListener
            // RoamUser?.locationEvents
            // RoamUser?.geofenceEvents
            // RoamUser?.tripsEvents
            // RoamUser?.nearbyEvents

            // Access error code & message below
            // Error?.code
            // Error?.message
}Before you start location tracking, you need to get permission from the user for your application to access locations.
-
Import
CoreLocationat the top of theAppDelegatefile.import CoreLocation
-
Make the below class declaration for Location Manager and add this line before the return statement in
application(_:didFinishLaunchingWithOptions:)With this line, you ask users to allow the app to access location data both in the background and the foreground.let locationManager = CLLocationManager() locationManager.requestLocation()
For enabling accuracy engine for Passive, Active, and Balanced tracking.
Roam.enableAccuracyEngine()For Custom tracking mores, you can pass the desired accuracy values in integers ranging from 25-150m.
Roam.enableAccuracyEngine(50)To disable accuracy engine
Roam.disableAccuracyEngine()To modify the offline location tracking configuration, which will enabled by default.
Roam.offlineLocationTracking(true)Use the below tracking modes while you use the startTracking method Roam.startTracking
You can now start tracking your users. Roam has three default tracking modes along with a custom version. They are different based on the frequency of location updates and battery consumption. The higher the frequency, the higher the battery consumption.
| Mode | Battery usage | Updates every | Optimised for/advised for |
|---|---|---|---|
| Active | 6% - 12% | 25 ~ 250 meters | Ride Hailing / Sharing |
| Balanced | 3% - 6% | 50 ~ 500 meters | On Demand Services |
| Passive | 0% - 1% | 100 ~ 1000 meters | Social Apps |
//active tracking
Roam.startTracking(RoamTrackingMode.active)
// balanced tracking
Roam.startTracking(RoamTrackingMode.balanced)
// passive tracking
Roam.startTracking(RoamTrackingMode.passive)The SDK also provides a custom tracking mode which allows you to customize and build your own tracking mode as per your requirement.
| Type | Unit | Unit Range |
|---|---|---|
| Distance Interval | Meters | 1m ~ 2500m |
Distance between location updates example code:
// Define a custom tracking method
let trackingMethod = RoamTrackingCustomMethods()

// Update the settings for the created method as per need
trackingMethod.activityType = .fitness
trackingMethod.pausesLocationUpdatesAutomatically = true
trackingMethod.showsBackgroundLocationIndicator = true
trackingMethod.useSignificant = false
trackingMethod.useRegionMonitoring = false
trackingMethod.useVisits = false
trackingMethod.accuracyFilter = 10
trackingMethod.desiredAccuracy = .kCLLocationAccuracyNearestTenMeters

// Update the distance intervel as per the use case in meters
trackingMethod.distanceFilter = 10

// Start the tracking with the above created custom tracking method
Roam.startTracking(.custom, options: trackingMethod)
Time between location updates example code:
// Define a custom tracking method
let trackingMethod = RoamTrackingCustomMethods()

// Update the settings for the created method as per need
trackingMethod.activityType = .fitness
trackingMethod.pausesLocationUpdatesAutomatically = true
trackingMethod.showsBackgroundLocationIndicator = true
trackingMethod.useSignificant = false
trackingMethod.useRegionMonitoring = false
trackingMethod.useVisits = false
trackingMethod.accuracyFilter = 10
trackingMethod.desiredAccuracy = .kCLLocationAccuracyNearestTenMeters

// Update the time intervel as per the use case in seconds
trackingMethod.updateInterval = 10

// Start the tracking with the above created custom tracking method
Roam.startTracking(.custom, options: trackingMethod)To stop the tracking use the below method.
Roam.stopTracking()It will publish location data and these data will be sent to roam-ios servers for further processing and data will be saved in our database servers.
let locationData = RoamPublish()
Roam.publishSave(locationData)
To stop publishing the location data to other clients.
Roam.stopPublishing()Now that you have enabled the location listener, use the below method to subscribe to your own or other user's location updates and events.
Roam.subscribe(TYPE, "ROAM-USER-ID")Roam.unsubscribe(TYPE, "ROAM-USER-ID")| Type | Description |
|---|---|
| RoamSubscribe.Events | Subscribe to your own events. |
| RoamSubscribe.Location | Subscribe to your own location (or) other user's location updates. |
| RoamSubscribe.Both | Subscribe to your own events and location (or) other user's location updates. |
Now that the location tracking is set up, you can subscribe to locations and events and use the data locally on your device or send it directly to your own backend server.
To do that, you need to toggle the location and event listener to true. By default, the status will set to false and needs to be set to true in order to stream the location and events updates to the same device or other devices.
Roam.toggleListener(Events: true, Locations: true) {(RoamUser, Error) in
            // Access Roam user data below
            // RoamUser?.userId
            // RoamUser?.description
            // RoamUser?.locationListener
            // RoamUser?.eventsListener
            // RoamUser?.locationEvents
            // RoamUser?.geofenceEvents
            // RoamUser?.tripsEvents
            // RoamUser?.nearbyEvents

            // Access error code & message below
            // Error?.code
            // Error?.message
        }
Once the listener toggles are set to true, to listen to location updates create a class that implements RoamDelegate and then call Roam.delegate.
Set your RoamDelegate in a code path that will be initialized and executed in the background. For example, make your AppDelegate implement GeoSparkDelegate, not a ViewController. AppDelegate will be initialized in the background, whereas a ViewController may not be.
import UIKit
import Roam
import CoreLocation

@main
class AppDelegate: UIResponder, UIApplicationDelegate, RoamDelegate {
    func application(_ application: UIApplication, didFinishLaunchingWithOptions launchOptions: [UIApplication.LaunchOptionsKey: Any]?) -> Bool {
        Roam.delegate = self
        Roam.initialize("YOUR-SDK-KEY-GOES-HERE")
        return true
    }
    func didUpdateLocation(_ location: RoamLocation) {
        // Do something with the user location
    }
    func didReceiveEvents(_ events: RoamEvents) {
        // Do smoething with user events
    }
    func didReceiveUserLocation(_ location: RoamLocationReceived) {
        // Do something with location of other users' subscribed location
    }
See a Swift example app in Example/.
To run the example app, clone this repository, add your sdk "YOUR-SDK-KEY" key in AppDelegate.swift, and build the app.
If you have any problems or issues over our SDK, feel free to create a github issue or submit a request on Roam Help.


