Coder & Dreamer
Email:[email protected]
WeChat: RicoLiu1221
🎉🎉🎉 记录学习工作中的问题
License: Other
Coder & Dreamer
Email:[email protected]
WeChat: RicoLiu1221


function getType(obj) {
  let type = typeof obj;
  if (type !== 'object') {
    return type;
  }

  return Object.prototype.toString.call(obj).replace(/^\[object (\S+)\]$/, '$1');
}

> getType()
< "undefined"
> getType([])
< "Array"
> getType({})
<"Object"
> getType(1)
< "number"
> getType('')
< "string"
> getType(window)
< "Window"
> getType(document)
< "HTMLDocument"
> getType(/^a/)
< "RegExp"
> getType(() => {})
< "function"| 启动过程组 | 规划过程组 | 执行过程组 | 监控过程组 | 收尾过程组 | |
|---|---|---|---|---|---|
| 项目整合管理 | 制定项目章程 | 制定项目管理计划 | 指导与管理项目工作 管理项目知识 |
监控项目工作 实施整体变更控制 |
结束项目或阶段 |
| 项目范围管理 | 规划范围管理 收集需求 定义范围 创建 WBS |
确认范围 控制范围 |
|||
| 项目进度管理 | 规划进度活动 定义活动 排列活动顺序 估算活动持续时间 制定进度计划 |
控制进度 | |||
| 项目成本管理 | 规划成本管理 估算成本 制定预算 |
控制成本 | |||
| 项目质量管理 | 规划质量管理 | 管理质量 | 控制质量 | ||
| 项目资源管理 | 规划资源管理 估算活动资源 |
获取资源 建设团队 管理团队 |
控制资源 | ||
| 项目沟通管理 | 规划沟通管理 | 管理沟通 | 监督沟通 | ||
| 项目风险管理 | 规划风险管理 识别风险 实施定性风险分析 实施定量风险分析 规划风险应对 |
实施风险应对 | 监督风险 | ||
| 项目采购管理 | 规划采购管理 | 实施采购 | 控制采购 | ||
| 项目相关方管理 | 规划相关方参与 | 管理相关方参与 | 监督相关方参与 |
偶尔会遇到chrome://inspect白屏问题..
网上一般的结论是:没有翻墙
配置VPN后还是失败。
然后解决步骤是:
function Foo() {
    getName = function () { alert (1); };
    return this;
}
Foo.getName = function () { alert (2);};
Foo.prototype.getName = function () { alert (3);};
var getName = function () { alert (4);};
function getName() { alert (5);}

//请写出以下输出结果:
Foo.getName();
getName();
Foo().getName();
getName();
new Foo.getName();
new Foo().getName();
new new Foo().getName();现有如下的一个图,节点是城市,边是城市之间的距离,需要找到从一个城市到另一个城市的最短路径。
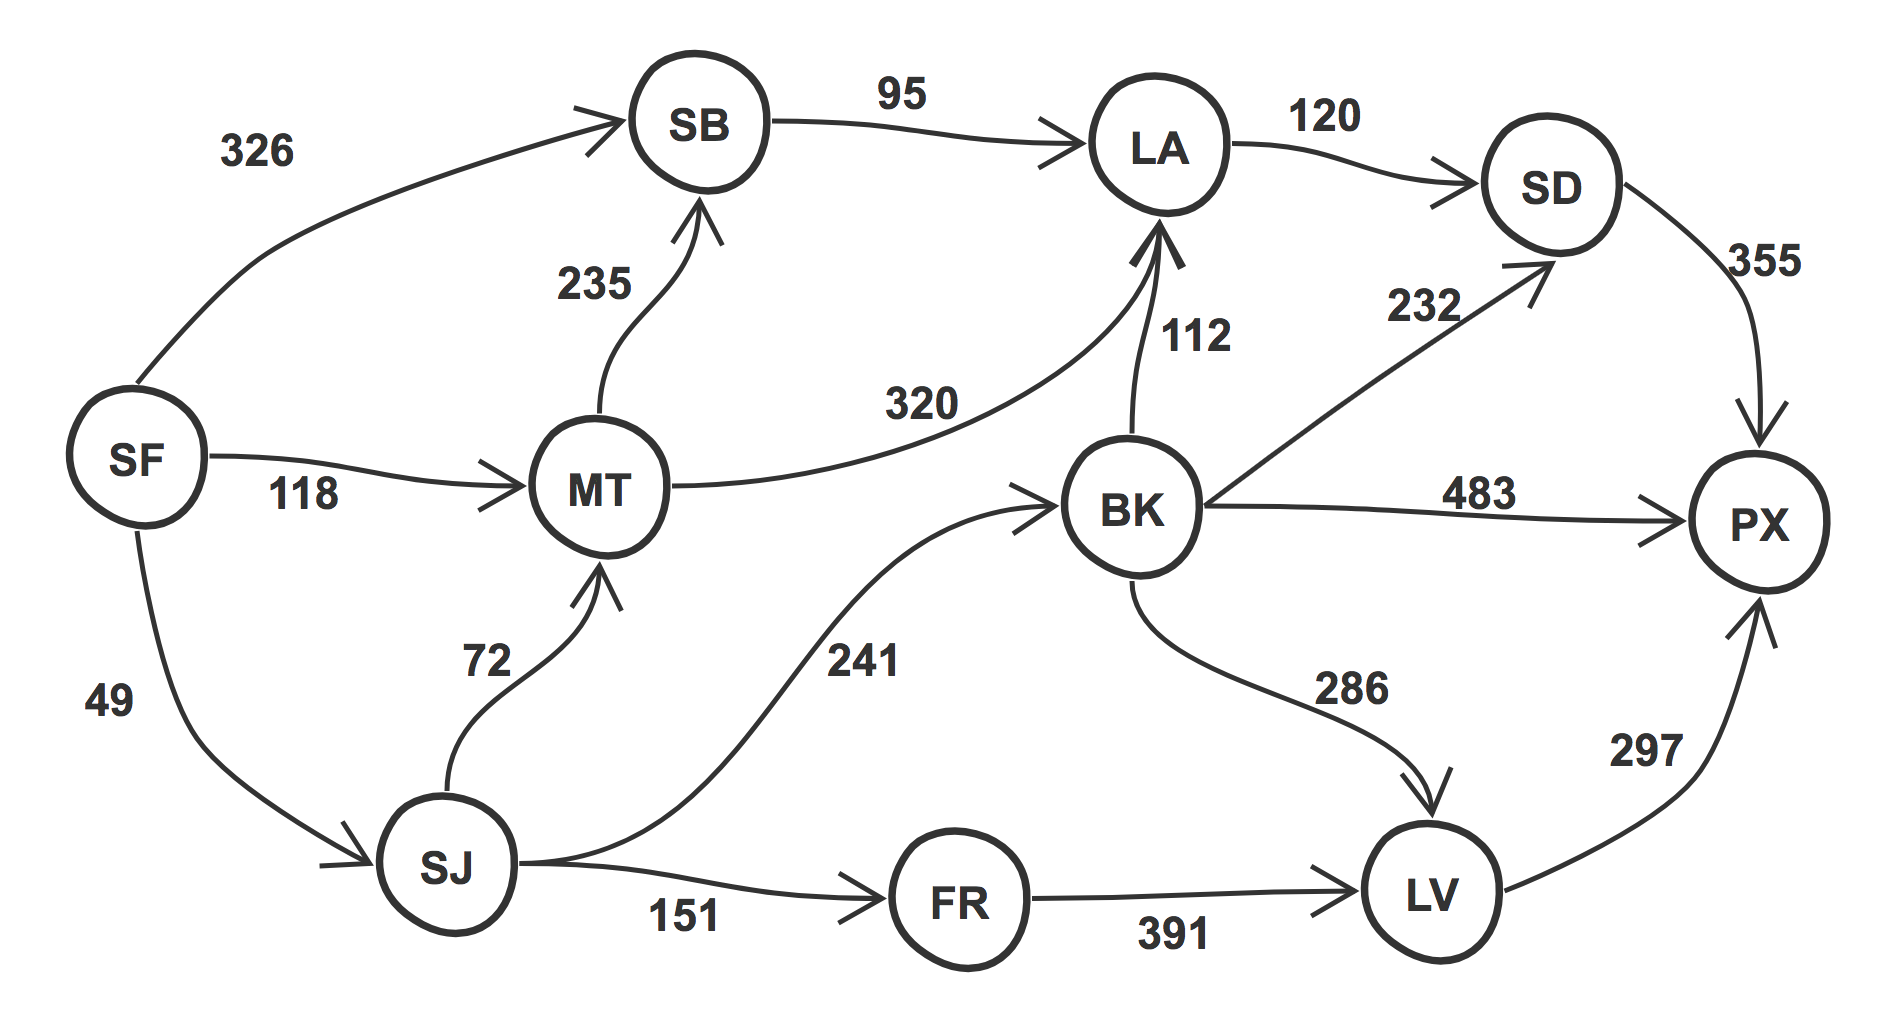
起点:San Francisco (SF),终点:Phoenix (PX). 途中可能经过的城市:Monterey (MT), San Jose (SJ), Santa Barbara (SB), Los Angeles (LA), San Diego (SD), Fresno (FR), Bakersfield (BK), Las Vegas (LV).
首先要初始化所有的变量,一个用来记录经过每一个节点的花费,一个用来记录走过的路径,另一个记录已经访问过的节点以避免重复计算。
这里的 solve() 方法初始化了 costs 变量,并将开始节点的 cost 值赋值给它,然后将结束节点的 cost 值设置为 Infinity. 这就意味着在开始阶段,costs 集合包含了所有的节点和边同样的数据。
var _ = require('lodash');

class Dijkstra {
  solve(graph, start, end) {

    // track costs of each node
    const costs = graph[start];

    // set end to infinite on 1st pass
    costs[end] = Infinity;

    // remember path from
    // which each node was visited
    const paths = {};

    // add path for the start nodes neighbors
    _.forEach(graph[start], (dist, city) => {
      // e.g. city SJ was visited from city SF
      paths[city] = start;
    });

    // track nodes that have already been visited nodes
    const visitedNodes = [];

    // get current nodes cheapest neighbor
    let currentCheapestNode = this.getNextLowestCostUnvisitedNode(costs, visitedNodes);

    // while node exists
    while (currentCheapestNode) {

      // get cost of reaching current cheapest node
      let costToReachCurrentNode = costs[currentCheapestNode];

      // access neighbors of current cheapest node
      let neighbors = graph[currentCheapestNode];

      // loop over neighbors
      _.forEach(neighbors, (dist, neighbor) => {

        // generate new cost to reach each neighbor
        let newCost = costToReachCurrentNode + dist;

        // if not already added
        // or if it is lowest cost amongst the neighbors
        if (!costs[neighbor] || costs[neighbor] > newCost) {

          // add cost to list of costs
          costs[neighbor] = newCost;

          // add to paths
          paths[neighbor] = currentCheapestNode;

        }

      });

      // mark as visited
      visitedNodes.push(currentCheapestNode);

      // get cheapest node for next node
      currentCheapestNode = this.getNextLowestCostUnvisitedNode(costs, visitedNodes);
    }

    // generate response
    let finalPath = [];

    // recursively go to the start
    let previousNode = paths[end];

    while (previousNode) {
      finalPath.unshift(previousNode);
      previousNode = paths[previousNode];
    }

    // add end node at the end
    finalPath.push(end);

    // return response
    return {
      distance: costs[end],
      path: finalPath
    };
  }

  getNextLowestCostUnvisitedNode(costs, visitedNodes) {
    //extract the costs of all non visited nodes
    costs = _.omit(costs, visitedNodes);

    // return the node with minimum cost
    return _.minBy(_.keys(costs), (node) => {
      return costs[node];
    });
  }
}从上面的代码中可以看出,currentCheapestNode 在首次迭代的时候值为 SJ,基于 costs 和 visitedNodes 数组。
一旦找到了第一个节点,那么就可以访问到它的邻居节点,并且更新 costs 的值(只有在它的 costs 小于当前节点的 cost).如果 cost 更小,这就说明了我们想通过这个节点到达结束节点是合乎逻辑的,所以也同样更新到他邻居的路径。然后就开始递归的进行这个过程,在递归结束时,我们就能得到更新过后的所有节点的 costs,并且得到到结束节点的最后 cost.
const graph = {
   'SF': { 'SB': 326, 'MT': 118, 'SJ': 49 },
   'SJ': { 'MT': 72, 'FR': 151, 'BK': 241 },
   'MT': { 'SB': 235, 'LA': 320 },
   'SB': { 'LA': 95 },
   'LA': { 'SD': 120 },
   'SD': { 'PX': 355 },
   'FR': { 'LV': 391 },
   'BK': { 'LA': 112, 'SD': 232, 'PX': 483, 'LV': 286 },
   'LV': { 'PX': 297 },
   'PX': {}
};

console.log(new Dijkstra().solve(graph, 'SF', 'PX'));
// { distance: 773, path: [ 'SF', 'SJ', 'BK', 'PX' ] } 
Reference: 《Hands-on Data Structures and Algorithm with JavaScript》
1.Array.prototype.includes
const arr = [1, 2, 3, 4, NaN]

// before
if (arr.indexOf(3) >= 0) {
  console.log('true')
}

// after
if (arr.includes(3)) {
  console.log('true')
}

arr.includes(NaN) // return true
arr.indexOf(NaN) // -1
2.幂运算操作符
// before
Math.pow(7, 2) // 49

// after
7**2 // 491.Object.values()
const cars = { BMW: 3, Polo: 2, Golf: 1 }

// before
const vals = Object.keys(cars).map(_ => cars[_])
console.log(vals) // [3, 2, 1]

// after
const vals = Object.values(cars)
console.log(vals) // [3, 2, 1]
2.Object.entries()
Using Object.entries() in loops
const cars = { BMW: 3, Polo: 2, Golf: 1 }

// before
Object.keys(cars).forEach(key => {
  console.log(`key: ${key}, value: ${cars[key]}`)
})
// after
for (let [value, key] of Object.entries(cars)) {
  console.log(`key: ${key}, value: ${value}`)
}
Using Object.entries() to convert Object to Map
const cars = { 'BMW': 3, 'Polo': 2, 'Golf': 1 }

// before
const map1 = new Map()
Object.keys(cars).forEach(key => {
  map1.set(key, cars[key])
})
console.log(map1) // Map { 'BMW' => 3, 'Polo' => 2, 'Golf' => 1 }

// after
const map = new Map(Object.entries(cars))

console.log(map) // Map { 'BMW' => 3, 'Polo' => 2, 'Golf' => 1 }1.RegExp Named Group Captures
This enhancement brings a useful RegExp feature from other languages like Python, Java and so on called “Named Groups.” This features allows developers writing RegExp to provide names (identifiers) in the format
(?<name>...)for different parts of the group in the RegExp. They can then use that name to grab whichever group they need with ease.
// before
let reg = /(\d{4})-(\d{2})-(\d){2}/u;
let result = reg.exec('2018-07-37');
console.log(result)
// ["2018-07-37", "2018", "07", "7", index: 0, input: "2018-07-37", groups: undefined]

// after
let reg = /(?<year>\d{4})-(?<month>\d{2})-(?<day>\d){2}/u;
let result = reg.exec('2018-07-37');
console.log(result)
// ["2018-07-37", "2018", "07", "7", index: 0, input: "2018-07-37", groups: {year: "2018", month: "07", day: "7"}]
console.log(result.groups.year) // 2018let sameWords = /(?<fruit>apple|orange)===\k<fruit>/u;
sameWords.test('apple===apple'); // true
sameWords.test('orange===orange'); // true
sameWords.test('apple===orange'); // falselet reg = /(?<firstName>[A-Za-z]+) (?<lastName>[A-Za-z]+$)/u;
'Raja Rao'.replace(reg, '$<lastName>, $<firstName>'); // 'Rao, Raja'Reference Here are examples of everything new in ECMAScript 2016, 2017, and 2018
问题:
在 iOS 10 上报错:
Viewport argument key "viewport-fit" not recognized and ignored.google 了一下发现是因为适配 iPhoneX 的刘海屏而导致的,这样的话,就需要对 iOS 11 做兼容性处理了。
解决:
    (function () {
      var viewportTag = null;
      var metaTags = document.getElementsByTagName('meta');
      for (var i = 0; i < metaTags.length; i++) {
          if (metaTags[i].getAttribute('name') === "viewport") {
              viewportTag = metaTags[i];
              break;
          }
      }
      if (!viewportTag) {
          viewportTag = document.createElement("meta");
          viewportTag.setAttribute('name', 'viewport');
      }

      var viewportTagContent = 'width=device-width, initial-scale=1.0, maximum-scale=1.0, minimum-scale=1.0, user-scalable=0';

      // Detect if iOS device
      if (/(iPhone|iPod|iPad)/i.test(window.navigator.userAgent)) {
        // Get iOS major version
        var iosVersion = parseInt((window.navigator.userAgent).match(/OS (\d+)_(\d+)_?(\d+)? like Mac OS X/i)[1]);
        // Detect if device is running >iOS 11
        // iOS 11's UIWebView and WKWebView changes the viewport behaviour to render viewport without the status bar. Need to override with "viewport-fit: cover" to include the status bar.
        if (iosVersion >= 11) {
          viewportTagContent += ', viewport-fit=cover';
        }
      }

      // Update viewport tag attribute
      viewportTag.setAttribute('content', viewportTagContent);
})()学习 JavaScript 中的闭包是如何工作的
https://blog.bitsrc.io/a-beginners-guide-to-closures-in-javascript-97d372284dda

闭包是 JavaScript 开发者应该知道和了解的基本概念。然而,它还是会使许多新手开发者感到困惑。
正确的理解闭包能够帮助你编写更好、更高效、更整洁的代码。相反地,它将会帮助你成为更好的 JavaScript 开发者。
所以,在这篇文章中,我将会深层的解析闭包以及它是如何在 JavaScript 中运行的。
现在,让我们开始吧。:)
闭包是能够访问到它外层函数作用域的一个函数,甚至在外层函数已经返回之后也是可以的。这就意味着:闭包能够记录和访问到它外层函数的变量和参数,即使在外层函数已经运行结束。
在我们深入了解闭包之前,让我们先理解词法作用域。
在 JavaScript 中,词法作用域或静态作用域指的是变量、函数和对象基于源代码中物理位置的可访问性。例如:
let a = 'global';
  function outer() {
    let b = 'outer';
    function inner() {
      let c = 'inner'
      console.log(c);   // prints 'inner'
      console.log(b);   // prints 'outer'
      console.log(a);   // prints 'global'
    }
    console.log(a);     // prints 'global'
    console.log(b);     // prints 'outer'
    inner();
  }
outer();
console.log(a);         // prints 'global'
这里的 inner 函数能够访问到定义在它内部作用域的变量,outer 函数的作用域,以及全局作用域。并且,outer 函数能够访问到定义在它内部的变量以及全局作用域。
所以,上段代码的作用域链如下:
Global {
  outer {
    inner
  }
}注意到:inner 函数被 outer 函数的词法作用域所包围,同样地,outer 函数被全局作用域所包围。这就是为什么 inner 函数能够访问到 outer 函数定义的变量以及全局作用域。
让我们在深入闭包如何运行之前看一些例子。
function person() {
  let name = 'Peter';

  return function displayName() {
    console.log(name);
  };
}
let peter = person();
peter(); // prints 'Peter'
在这段代码中,我们调用 person 函数,其返回了内部的 display 函数并且赋值给 peter 变量。当我们调用 peter 函数时(实际是 display 函数的引用),'Peter' 将会打印在控制台上。
但是在 display 函数内部,并没有任何变量名为 name 的变量,所以该函数能够访问到它外层函数的变量,即使该函数已经被返回。所以, display 函数实际上就是一个闭包。
function getCounter() {
  let counter = 0;
  return function() {
    return counter++;
  }
}
let count = getCounter();
console.log(count());  // 0
console.log(count());  // 1
console.log(count());  // 2
我们再一次地将 getCounter 函数返回的匿名内部函数赋值给 count 变量。count 函数现在是一个闭包,它能够访问到 getCounter 函数的 counter 变量,即使在 getCounter() 返回之后。
但是注意到,在每一次 count 函数被调用时,counter 的值没有像通常那样被重置为 0。
这是因为,在每一次调用 count() 时,就会创建一个新的作用域,但是 getCounter 函数只创建了一个作用域。因为 counter 变量是定义在 getCounter 函数作用域内部的,它将会在每一次调用 count 函数时进行自增,而不是重置为 0.
到目前为止,我们已经讨论了什么是闭包以及闭包的例子。现在,让我们理解在 JavaScript 中闭包是如何运行的。
为了真正的理解 JavaScript 中闭包的工作机制,我们不得不理解两个最重要的概念。1)执行上下文、2)词法环境。
执行上下文是一个 JavsScript 代码解析和运行的抽象环境。当全局代码被执行时,它是运行在全局的执行上下文中,并且函数代码是在函数内部执行上下文中运行的。
目前只能有一个正在运行的执行上下文(因为 JavaScript 是单线程语言),执行上下文是通过栈的数据结构来进行管理的,我们称之为执行栈或调用栈。
执行栈本质上就是一个栈,其拥有着 LIFO 的数据结构(后进先出),栈中的元素只能通过栈顶来添加和删除。
当前运行的执行上下文永远是在栈顶,当函数完全运行完,它的执行上下文将会从栈顶移除,并且控制达到它在堆栈中下一个的执行上下文。
来看一个代码片段以便更好的理解执行上下文和堆栈:

当代码执行时,JavaScript 引擎创建了一个全局的执行上下文来执行全局的代码,当代码执行到 first() 函数时,它会为该函数创建一个新的执行上下文并且将其压栈到执行堆栈当中。
所以,上段代码的执行堆栈如下所示:

当 first() 函数完成时,它的执行上下文从堆栈中移除,并且控制其下一个的执行堆栈---全局执行上下文。所以在全局作用域中剩余的代码将会执行。
每次 JavaScript 引擎创建一个执行上下文来执行函数或全局代码,它也会在函数运行时创建一个新的词法环境来存储定义在函数内部的变量。
词法环境是拥有 identifier-variable mapping 的数据结构。这里的, identifier 指的是变量和函数的名称,variable 指的是实际的对象(包含函数类型对象)或原始值。
词法环境拥有两个组件:(1)the environment record、(2)a reference to the outer environment.
environment record 是一个存储变量和函数声明的地方。
reference to the outer environment 意味着它能够访问到它父级的词法环境。这个组件对于理解闭包的运行原理有着非常重要的作用。
词法环境的概念如下所示:
lexicalEnvironment = {
  environmentRecord: {
    <identifier> : <value>,
    <identifier> : <value>
  }
  outer: < Reference to the parent lexical environment>
}
现在,让我们再看看上段代码:
let a = 'Hello World!';
function first() {
  let b = 25;
  console.log('Inside first function');
}
first();
console.log('Inside global execution context');
当 JavaScript 引擎创建了全局的执行上下文来执行全局代码,同时它也会创建一个新的词法环境来存储全局作用域中的变量和函数声明。所以,全局作用域的词法环境如下所示:
globalLexicalEnvironment = {
  environmentRecord: {
      a     : 'Hello World!',
      first : < reference to function object >
  }
  outer: null
}
这里的外层词法环境为 null , 是因为全局作用域没有外层的词法环境。
当引擎创建了 first() 函数的执行上下文,同时它也创建了词法环境用来存储在函数执行时在函数内部定义的变量。所以,该函数的词法环境如下所示:
functionLexicalEnvironment = {
  environmentRecord: {
      b    : 25,
  }
  outer: <globalLexicalEnvironment>
}
该函数的外层词法环境被设置为全局的词法环境,是因为在源代码中,该函数被全局作用域所包裹。
注意 --- 当函数执行完,它的执行上下文从执行堆栈中移除,但是它的词法环境可能会被移除、也可能不会被移除,这取决于它的词法环境是否被其外层的词法环境中的属性里的任何其他词法环境所引用。
现在我们理解了执行上下文以及词法环境,让我们回到闭包。
看看下面的代码片段:
function person() {
  let name = 'Peter';

  return function displayName() {
    console.log(name);
  };
}
let peter = person();
peter(); // prints 'Peter'
当运行 person 方法时, JavaScript 引擎为该方法创建了一个新的执行上下文和词法环境,在该方法运行结束后,他将 displayName 函数返回并将其赋值给 peter 变量。
所以,它的词法环境如下所以:
personLexicalEnvironment = {
  environmentRecord: {
    name : 'Peter',
    displayName: < displayName function reference>
  }
  outer: <globalLexicalEnvironment>
}
当 person 函数运行完时,它的执行上下文会同时从执行堆栈中移除。但是它的词法环境依旧在内存中,这是因为,它的词法环境被它内部的 displayName 函数的词法环境引用了,所以,它的词法环境在内存中依旧可用。
当 peter 函数运行时(实际上就是 displayName 函数的引用),JavaScript 引擎为该函数创建了一个新的执行上下文和词法环境。
所以,它的词法环境如下所示:
displayNameLexicalEnvironment = {
  environmentRecord: {

  }
  outer: <personLexicalEnvironment>
}
因为 displayName 函数中没有变量,所以它的 environment record 为空。在该方法执行中,JavaScript 引擎将会在函数的词法环境中寻找变量 name.
因为 displayName 函数中的词法环境内没有变量,所以它将会寻找它外层的词法环境,也就是 person 函数的词法环境依旧在内存当中。JavaScript 引擎找到了变量并将 name 打印在控制台上。
function getCounter() {
  let counter = 0;
  return function() {
    return counter++;
  }
}
let count = getCounter();
console.log(count());  // 0
console.log(count());  // 1
console.log(count());  // 2
getCounter 函数的词法环境如下所示:
getCounterLexicalEnvironment = {
  environmentRecord: {
    counter: 0,
    <anonymous function> : < reference to function>
  }
  outer: <globalLexicalEnvironment>
}
该函数返回一个匿名函数并将其赋值给 count 变量。
当 count 函数执行时,它的词法环境如下所示:
countLexicalEnvironment = {
  environmentRecord: {

  }
  outer: <getCountLexicalEnvironment>
}
当 count 函数被调用,JavaScript 引擎将会找寻该函数的词法环境内的 counter 变量。因为它的 environment record 为空,所以 JavaScript 引擎将会找寻其外层函数的词法环境。
JavaScript 引擎找到了变量,将其打印在控制台并会增加 getCounter 函数词法环境内的 counter 变量。
所以,在第一次调用 getCounter 函数之后,其词法环境如下所示:
getCounterLexicalEnvironment = {
  environmentRecord: {
    counter: 1,
    <anonymous function> : < reference to function>
  }
  outer: <globalLexicalEnvironment>
}
每一次调用 count 函数,JavaScript 引擎都会为 count 函数创建一个新的词法环境,增加 counter 变量值并且更新 getCounter 函数的词法环境来反映变化。
目前,我们已经学习了闭包是如何运行工作的。闭包是 JavaScript 中基本概念,每一个 JavaScript 开发者都应该理解它。熟练掌握这些概念有助于你成为更好、更高效的 JavaScript 开发者。
Reference: https://blog.webf.one/front-end-javascript-interviews-in-2018-19-e17b0b10514
const a = [1, 2, 3, 4, 5];
// Implement this
a.multiply();
console.log(a); // [1, 2, 3, 4, 5, 1, 4, 9, 16, 25]
Answer:
Array.prototype.multiply = function () {
  return this.concat(this.map(_ => Math.pow(_, 2)))
}false in JavaScript. Justify why it happens:// false
0.2 + 0.1 === 0.3Answer:
JavaScript uses 64-bit floating point representation, which is the same as Java's double. The crux of the problem is that numbers are represented in this format as a whole number times a power of two; rational numbers (such as 0.1, which is 1/10) whose denominator is not a power of two cannot be exactly represented.
Only two types — primary data types and reference types (objects). There are six primary types:
Retrieve and calculate the average score for each student belonging to a classroom with some Id say 75. Each student can take one or more courses in a given year. Following APIs are available to retrieve the required data.
// GET LIST OF ALL THE STUDENTS
GET /api/students
Response:
[{
    "id": 1,
    "name": "John",
    "classroomId": 75
}]
// GET COURSES FOR GIVEN A STUDENT
GET /api/courses?filter=studentId eq 1
Response:
[{
   "id": "history",
   "studentId": 1
}, {
   "id": "algebra",
   "studentId": 1
},]
// GET EVALUATION FOR EACH COURSE
GET /api/evaluation/history?filter=studentId eq 1
Response:
{
    "id": 200,
    "score": 50,
    "totalScore": 100
}Hint: ES Proxy allows you to intercept a call to any object property or method. To start with, DOM should be updated whenever an underlying bound object is changed.
Are you familiar with any other concurrency model that is used in other programming languages like Elixir, Clojure, Java, etc?
Hint: Look for Event loop, task queue, call stack, heap, etc.
new keyword do in JavaScript?Hint: In JavaScript, new is an operator used to instantiate an object. The aim here is to understand what is happening in terms of scope and memory.
Also, lookout for [[Construct]] and [[Call]].
Hint: There are four patterns, function call, method call, .call() and .apply().
Hint: As in 2018, BigInt, partial function, pipeline operator, etc.
Is it a myth? Has it suffered Chinese-whispers syndrome? Are there any use cases where they are useful?
If we convert the following object to JSON string, what would happen?
const a = {
    key1: Symbol(),
    key2: 10
}
// What will happen?
console.log(JSON.stringify(a));If we have to use the default value of the timeout when calling makeAPIRequest function, what is the correct syntax?
function makeAPIRequest(url, timeout = 2000, headers) {
   // Some code to fetch data
}Hint: As of 2018, there are none.
Angular 1.x was based on two-way data-binding whereas React, Vue, Elm, etc. are based on one-way data flow architecture.
MVC has a solid history of ~50 years and have evolved into MVP, MVVM and finally MV*. What is the co-relation between the two? If MVC is an architectural pattern, what is Unidirectional data flow? Are these competing patterns to solve the same problem?
Hint: Classical MVC is the Smalltalk MVC meant for a desktop application. In web applications, at a minimum, there are two distinct data MVC cycles.
Hint: Currying, point-free functions, partial function application, higher order functions, pure functions, isolated side effects, record types (unions, algebraic data types), etc.
Hint: No correct answer. But in crude terms, functional programming is about coding in small, writing pure function and reactive programming is coding in large, i.e. data-flows between modules, connecting components written in FP style. FRP — Functional Reactive Programming is another different but related concept.
Are there any performance implications of immutable structures? What are some of the libraries in JS ecosystem that provide immutable data structures? What are the pros and cons of these libraries?
Hint: Thread safety (Do we really need to worry about this in browser JavaScript?), Side-effect free functions, better state management, etc.
How does TypeScript or Flow compare to transpile-to-JS languages like Elm, ReasonML or PureScript? What are the pros and cons of these approaches?
What should be the prime criteria for selecting a particular type system over the others?
What is type inference?
What is the difference between statically typed language and a strongly typed language? What is the nature of JavaScript in this regards?
Do you know any language that is weakly typed yet statically typed language? Do you know any language that is dynamically typed yet strongly typed?
Hint: Structural vs Nominal type system, type soundness, tooling/ecosystem support, correctness over convenience.
List some of the intricacies involved when achieving interoperability between different module systems (Mostly interested in ES Module and CommonJS interoperability)
List fundamental characteristics that separate HTTP2 from its predecessors.
Discussion concept, implications, uses, etc.
async and defer attributes defined for script tag?el-upload 组件不支持图片压缩上传,只能自己实现了。
图片压缩核心就是:canvas
compress.js
/** 图片压缩
 * @param {Number} orient iphone & android 拍照图片方向
 * @param {Object} fileObj 图片对象
 * @param {function} cb 回调函数
 */
export function compress (orient, fileObj, cb) {
  try {
    // 压缩图片需要的一些元素和对象
    let img = new Image();

    // 缩放图片需要的canvas
    let canvas = document.createElement('canvas');
    let context = canvas.getContext('2d');
    img.src = URL.createObjectURL(fileObj);
    // base64地址图片加载完毕后
    img.onload = function () {
      // 图片原始尺寸
      let originWidth = this.width;
      let originHeight = this.height;

      if (originWidth > originHeight && originWidth > 750) {
        originWidth = 750;
        originHeight = Math.ceil(750 * this.height / this.width);
      } else if (originWidth < originHeight && originHeight > 1334) {
        originWidth = Math.ceil(1334 * this.width / this.height);
        originHeight = 1334;
      }
      let targetWidth = originWidth;
      let targetHeight = originHeight;
      // canvas对图片进行缩放
      canvas.width = targetWidth;
      canvas.height = targetHeight;
      // 清除画布
      context.clearRect(0, 0, targetWidth, targetHeight);
      if (orient && orient !== 1) {
        switch (orient) {
          case 6:
            canvas.width = targetHeight;
            canvas.height = targetWidth;
            context.rotate(Math.PI / 2);
            context.drawImage(img, 0, -targetHeight, targetWidth, targetHeight);
            break;
          case 3:
            context.rotate(Math.PI);
            context.drawImage(img, -targetWidth, -targetHeight, targetWidth, targetHeight);
            break;
          case 8:
            canvas.width = targetHeight;
            canvas.height = targetWidth;
            context.rotate(3 * Math.PI / 2);
            context.drawImage(img, -targetWidth, 0, targetWidth, targetHeight);
            break;
          default:
            context.drawImage(img, 0, 0, targetWidth, targetHeight);
            break;
        }
      } else {
        context.drawImage(img, 0, 0, targetWidth, targetHeight);
      }
      // 图片压缩
      // context.drawImage(img, 0, 0, targetWidth, targetHeight);
      // canvas转为blob并上传
      canvas.toBlob(function (blob) {
        cb(blob);
        console.log('压缩成功 toblob ', URL.createObjectURL(blob));
      }, fileObj.type || 'image/png');
    };
  } catch (e) {
    console.log('压缩失败:', e)
  }
}
upload.vue
import { compress } from './compress.js'

handlePictureCardPreview(file) {
        compress(file.raw, function(val) {
          console.log('success.....', URL.createObjectURL(val))
          let formdata = new FormData();
          formdata.append('file', val);
          // 图片ajax上传
          let xhr = new XMLHttpRequest();
          // 文件上传成功
          xhr.onreadystatechange = function() {
            if (xhr.status == 200) {
              // xhr.responseText就是返回的数据
              console.log('response data: ', xhr.responseText)
            }
          };
          // 开始上传
          xhr.open("POST", "xxxxxx", true);
          xhr.send(formdata);
       })
},
beforeAvatarUpload(file) {
        const isJPG = file.type === 'image/png' || file.type === 'image/gif' || file.type === 'image/jpg' || file.type === 'image/jpeg';
        const isLt10M = file.size / 1024 / 1024 < 10;
        if (!isJPG) {
          this.$message.error('上传头像图片只能是 JPG,gif,png,jpeg 格式!');
        }
        if (!isLt10M) {
          this.$message.error('上传头像图片大小不能超过 10MB!');
        }
        return false;
},Reference:https://medium.com/flutterdevs/design-patterns-in-flutter-part-3-mvvm-a310de4eb83
MVVM是由三部分组成:Model、View、ViewModel,其核心概念是建立一个可以通过视图(View)表示数据(Model)的视图模型(ViewModel)。
引入 MVVM 设计模式架构以解决UI逻辑与业务逻辑耦合的问题。
移动端应用采用 MVVM 设计模式能够很好的解决紧耦合问题。因为只有 View 持有对 ViewModel 的引用,反之亦然。单个 View 可以包含对多个 ViewModel 的引用,同时,对任何 ViewModel 的引用仅由 View 保留。
移动端应用采用 MVVM 设计模式能够提高软件的易测试性。因为 ViewModel 可以轻松表示数据或者状态。因此,他们可以独立进行测试,而且无需知道如何处理数据,这些都得益于 ViewModel 独立于 View。
移动端应用采用 MVVM 设计模式能够提高代码的复用性、可扩展性。

Model 层在 MVVM 设计模式中代表移动端应用开发中的实时数据。举个例子说明,开发应用时,涉及到用户个人信息如:姓名、头像等信息就可以使用 Model 来表示。Model 层只会反映实时数据,而不能反映与应用程序相关的特征或任何功能。这就意味着开发者无法操纵表示、格式化数据。Model 层主要是将数据从业务逻辑中分离出来。
View 层在 MVVM 设计模式中表示用户与应用程序进行交互的界面。View 层还具有与 Model 层相关联的行为属性,例如识别用户的输入操作,处理用户执行的操作。
ViewModel 层作为 MVVM 设计模式中最重要的部分,其本质上就是作为 View 层和 Model 层之间的桥梁,能够接收所有的用户事件,并且可以从 Model 中请求数据。一旦 Model 中有了数据,然后它就会将数据返回给 ViewModel,ViewModel 将数据处理后,通知 View 进行更新。
https://medium.com/@i_AnkurBiswas/common-git-mistakes-and-how-to-fix-them-10184cd5fa77
如果你曾经和许多开发者共同开发一个大型的项目,显然地,你将会使用 Git 做为你的版本控制工具。当你使用 Git 这样复杂的工具时,难免会犯一点错误。在这篇文章中,我将会讨论一些编程人员在使用 Git 时犯的错误,以及如何修复它们。现在,让我们开始吧🏃
在渡过一段快乐的编码时光后,很容易将你的提交信息拼写错误。幸运地是,有很简单的修复方式:
$ git commit --amend这将会打开你的编辑器并允许你修改最新的一次提交信息。没有人会知道你拼写的 Initial commment 里面有三个 m.
假设,现在已经快到下午三点了,但是你还没有吃午饭。处于饥饿状态中的你,为你的新的分支起了一个名: feature-brunch.额...很美味。
这种情况也有解决方法,我们可以用 mv 命令重命名该分支,就像重命名一个文件:使用正确的名字将其移动到新的位置。
$ git branch -m feature-brunch feature-branch如果你已经提交到这个分支了,还有一些其他必须的步骤。我们需要从远端删除老的分支并且将新的分支提交上去:
$ git push origin --delete deature-brunch
$ git push origin feature-branch现在,你正在快速的开发一个新的功能,但是你忘记了切换到新的分支进行开发。而你已经提交了许多文件到了主干分支。
所以,我们可以用以下的命令进行回滚操作,将这些变更回滚到一个新的分支:
注意: 确保先提交或者暂存你的变更,不然的话,所有的变更都将会丢失!
$ git branch feature-branch
$ git reset HEAD~ --hard
$ git checkou feature-branch
这将会创建一个新的分支,然后回滚主干分支到你做变更之前,最后将你之前所有的变更完整地切换到你的新分支。
另外一个常见的 Git 陷阱就是过早的提交。你忘记了保存一个文件,需要对最后一次提交做一个小改动才有意义,这时可以再次用到 --amend 标示。
添加遗忘的文件然后运行这个可靠的命令:
$ git add missed-file.txt
$ git commit --amend
此时,你可以修改提交消息,也可以只保存它以使其保持不变。
但是如果你做了相反的操作呢?假如你添加了一个你并不想提交的文件呢?一个冗余的 ENV 文件,一个构建之后的目录,你的宠物照片,你都不小心的保存到了错误的文件夹。别担心,这一切都是可以解决的。
如果你只是暂存了这些文件但是没有提交它,重置这些文件是很简单:
$ git reset /assets/img/misty-and-pepper.jpg如果你已经提交了这些变更,不必担心。你只需要运行额外的几行命令:
$ git reset --soft HEAD~1
$ git reset /assets/img/misty-and-pepper.jpg
$ rm /assets/img/misty-and-pepper.jpg
$ git commit
这会撤销提交,删除图片,然后在重新提交一次。
这个命令适用于每个地方都出错的时候,当你从 Stack Overflow 复制粘贴一个太多的解决方案时,且你的项目处于比你刚开始开发时更糟糕的状态。那么,就需要这个命令。
git reflog 会显示所有你已完成事项的列表。然后,它会帮你回到过去的任意的一个时间点。但是要注意的是,不到万不得已不要轻易使用。使用如下:
$ git reflog我们所做的每一步,Git 都在监控,运行这条命令之后会得到类似于如下结果:
3ff8691 (HEAD -> feature-branch) HEAD@{0}: Branch: renamed refs/heads/feature-brunch to refs/heads/feature-branch
3ff8691 (HEAD -> feature-branch) HEAD@{2}: checkout: moving from master to feature-brunch
2b7e508 (master) HEAD@{3}: reset: moving to HEAD~
3ff8691 (HEAD -> feature-branch) HEAD@{4}: commit: Adds the client logo
2b7e508 (master) HEAD@{5}: reset: moving to HEAD~1
37a632d HEAD@{6}: commit: Adds the client logo to the project
2b7e508 (master) HEAD@{7}: reset: moving to HEAD
2b7e508 (master) HEAD@{8}: commit (amend): Added contributing info to the site
dfa27a2 HEAD@{9}: reset: moving to HEAD
dfa27a2 HEAD@{10}: commit (amend): Added contributing info to the site
700d0b5 HEAD@{11}: commit: Addded contributing info to the site
efba795 HEAD@{12}: commit (initial): Initial commit
注意最左边一列,这是索引。如果你想回滚到历史版本中的任意一个地方,请运行下面的命令,例如:将 {index} 替换为 dfa27a2.
$ git reset HEAD@{index}如果你有任何的 Git 使用技巧,请留言。谢谢~
简单的 nodejs 爬虫
最近想用 node 写爬虫,然后将爬取的数据存入 mongodb。一开始想用 phantom 去写,但是一看 GitHub 上面有好多的 issue 都没有解决,所以就选了 puppeteer 。为什么呢?因为它的背后有个强大的团队---Chrome!
$ npm install puppeteer --save然后新建一个文件 index.js, Lets code~
const puppeteer = require('puppeteer');
(async () => {
    const browser = await puppeteer.launch({
        headless: false,
    });
    const page = await browser.newPage();

    const URL = '<your target url>';
    // 可以设置一些常量
    // ...

    try {
        await page.goto(URL);
        await page.setDefaultNavigationTimeout(50000); // 设置跳转超时时间
        await page.waitFor(2000);
        // 开始爬取
        const result = await page.evaluate(() => {
            let a = document.querySelector('<your selector path>');

            return a;
        })
    } catch (err) {
        console.log('ERR:', err);
    } finally {
        browser.close();
    }
})()
OK,以上就是一个非常简单的爬虫,具体爬取什么数据可以根据自己的喜好。
接下来,需要将爬取到的数据存入到 mongodb 中。
$ npm install mongoose --save首先,创建一个 data.js 文件,进行设置 Schema
const mongoose = require('mongoose');

const Schema = new mongoose.Schema({
    // �你需要的数据格式

});

module.exports = mongoose.model('DATA', Schema);
然后,连接 mongodb
const DB_URL = '<your db url>';
if (mongoose.connection.readyState == 0) {
    mongoose.connect(DB_URL);

    //On connection
    mongoose.connection.once('open', () => {
      console.log('connected to database: ' + DB_URL);
    })

    //Error connection
    mongoose.connection.on('error', (err) => {
      console.log('database error' + err);
    })
}
最后,存储数据
try {
    let newData = new DATA(obj);
    console.log('mongoose:', newData);
    newData.save( (err, newData) => {
      if (err) throw err;
      console.log('Saved successfully');
    });
  } catch (err) {
    console.log(err);
  }
彩蛋(读取数据)~
try {
        DATA.find({
            title: { $regex: arg, $options: 'i'} // 模糊查询,不区分大小写
        }, (err, datas) => {
            if (err) throw err;
            console.log(datas);
            res.send(datas);
        });
    } catch (err) {
        console.log(err);
    }
好了,水完了~~~
在进行iOS真机调试时,项目工程编译未报错,但是启动运行后页面一直白屏,控制台输出如下信息:
[VERBOSE-2:shell.cc(93)] Dart Error: Can't load Kernel binary: Invalid kernel binary format version.
[VERBOSE-2:dart_isolate.cc(143)] Could not prepare isolate.
[VERBOSE-2:runtime_controller.cc(385)] Could not create root isolate.
[VERBOSE-2:shell.cc(604)] Could not launch engine with configuration.
解决方案:
删除Flutter安装目录中的bin/cache目录,然后运行
flutter doctor -v
flutter clean
flutter pub get
flutter build ios
Vue 项目打包静态资源后,嵌入混合开发的 app 中,路由切换时报错:静态资源找不到。

webpack 打包已经改成相对路径,为什么还会报路径错误呢?
通过监控路由发现:在路由切换时,会导致上面的错误。
原来是因为项目中用 History 的路由模式引起的!如果使用 History 路由模式,需要服务端配置使用。
将路由模式改为 Hash 即可,不需服务端配合。
在实际业务中,任何实体都可以被抽象为一个使用类表达的类似对象的数据结构,且这个数据结构既包含属性,又包含方法,比如:
class Dog {
  name: string;
  constructor(name: string) {
    this.name = name;
  }

  bark() {
    console.log('Woof! Woof!');
  }
}

const dog = new Dog('Q');

dog.bark(); // => 'Woof! Woof!'在 TypeScript 中,使用 extends 关键字就能很方便地定义类继承的抽象模式,如下代码所示:
class Animal {
  type = 'Animal';
  say(name: string) {
    console.log(`I'm ${name}!`);
  }
}

class Dog extends Animal {
  bark() {
    console.log('Woof! Woof!');
  }
}

const dog = new Dog();
dog.bark(); // => 'Woof! Woof!'
dog.say('Q'); // => I'm Q!
dog.type; // => Animal说明:派生类通常被称为子类,基类也被称作超类(父类)。派生类如果包含一个构造函数,则必须在构造函数中调用 super() 方法,这是 TypeScript 强制执行的一条重要规则。
class Animal {
  weight: number;
  type = 'Animal';
  constructor(weight: number) {
    this.weight = weight;
  }

  say(name: string) {
    console.log(`I'm ${name}!`);
  }
}

class Dog extends Animal {
  name: string;
  constructor(name: string) {
    super(20);
    this.name = name;
  }

  bark() {
    console.log('Woof! Woof!');
  }
}类属性和方法除了可以通过 extends 被继承之外,还可以通过修饰符控制可访问性。
在 TypeScript 中就支持 3 种访问修饰符,分别是 public、private、protected。
public 修饰的是在任何地方可见、公有的属性或方法;
private 修饰的是仅在同一类中可见、私有的属性或方法;
protected 修饰的是仅在类自身及子类中可见、受保护的属性或方法。
class Son {
  public firstName: string;
  private lastName: string = 'Stark';
  constructor(firstName: string) {
    this.firstName = firstName;
    this.lastName; // ok
  }
}

const son = new Son('Tony');
console.log(son.firstName); //  => "Tony"
son.firstName = 'Jack';
console.log(son.firstName); //  => "Jack"
console.log(son.lastName); // ts(2341) Property 'lastName' is private and only accessible within class 'Son'.
受保护的属性和方法,如下代码所示:
class Son {
  public firstName: string;
  protected lastName: string = 'Stark';
  constructor(firstName: string) {
    this.firstName = firstName;
    this.lastName; // ok
  }
}

class GrandSon extends Son {
  constructor(firstName: string) {
    super(firstName);
  }

  public getMyLastName() {
    return this.lastName;
  }
}

const grandSon = new GrandSon('Tony');
console.log(grandSon.getMyLastName()); // => "Stark"
grandSon.lastName; // ts(2445) Property 'lastName' is protected and only accessible within class 'Son' and its subclasses.
注意: 虽然不能通过派生类的实例访问protected修饰的属性和方法,但是可以通过派生类的实例方法进行访问。
在前面的例子中,Son 类 public 修饰的属性既公开可见,又可以更改值,如果我们不希望类的属性被更改,则可以使用 readonly 只读修饰符声明类的属性,如下代码所示:
class Son {
  public readonly firstName: string;
  constructor(firstName: string) {
    this.firstName = firstName;
  }
}

const son = new Son('Tony');
son.firstName = 'Jack'; // ts(2540) Cannot assign to 'firstName' because it is a read-only property.
注意: 如果只读修饰符和可见性修饰符同时出现,我们需要将只读修饰符写在可见修饰符后面。
除了上边提到的修饰符之外,在 TypeScript 中还可以通过getter、setter截取对类成员的读写访问。
通过对类属性访问的截取,我们可以实现一些特定的访问控制逻辑。下面把之前的示例改造一下,如下代码所示:
class Son {
  public firstName: string;
  protected lastName: string = 'Stark';
  constructor(firstName: string) {
    this.firstName = firstName;
  }
}

class GrandSon extends Son {
  constructor(firstName: string) {
    super(firstName);
  }

  get myLastName() {
    return this.lastName;
  }

  set myLastName(name: string) {
    if (this.firstName === 'Tony') {
      this.lastName = name;
    } else {
      console.error('Unable to change myLastName');
    }
  }
}

const grandSon = new GrandSon('Tony');
console.log(grandSon.myLastName); // => "Stark"
grandSon.myLastName = 'Rogers';
console.log(grandSon.myLastName); // => "Rogers"
const grandSon1 = new GrandSon('Tony1');
grandSon1.myLastName = 'Rogers'; // => "Unable to change myLastName"以上介绍的关于类的所有属性和方法,只有类在实例化时才会被初始化。实际上,我们也可以给类定义静态属性和方法。
因为这些属性存在于类这个特殊的对象上,而不是类的实例上,所以我们可以直接通过类访问静态属性,如下代码所示:
class MyArray {
  static displayName = 'MyArray';
  static isArray(obj: unknown) {
    return Object.prototype.toString.call(obj).slice(8, -1) === 'Array';
  }
}

console.log(MyArray.displayName); // => "MyArray"
console.log(MyArray.isArray([])); // => true
console.log(MyArray.isArray({})); // => false接下来我们看看关于类的另外一个特性——抽象类,它是一种不能被实例化仅能被子类继承的特殊类。
我们可以使用抽象类定义派生类需要实现的属性和方法,同时也可以定义其他被继承的默认属性和方法,如下代码所示:
abstract class Adder {
  abstract x: number;
  abstract y: number;
  abstract add(): number;
  displayName = 'Adder';
  addTwice(): number {
    return (this.x + this.y) * 2;
  }
}

class NumAdder extends Adder {
  x: number;
  y: number;
  constructor(x: number, y: number) {
    super();
    this.x = x;
    this.y = y;
  }

  add(): number {
    return this.x + this.y;
  }
}

const numAdder = new NumAdder(1, 2);
console.log(numAdder.displayName); // => "Adder"
console.log(numAdder.add()); // => 3
console.log(numAdder.addTwice()); // => 6
因为抽象类不能被实例化,并且派生类必须实现继承自抽象类上的抽象属性和方法定义,所以抽象类的作用其实就是对基础逻辑的封装和抽象。
使用接口与使用抽象类相比,区别在于接口只能定义类成员的类型,如下代码所示:
interface IAdder {
  x: number;
  y: number;
  add: () => number;
}

class NumAdder implements IAdder {
  x: number;
  y: number;
  constructor(x: number, y: number) {
    this.x = x;
    this.y = y;
  }

  add() {
    return this.x + this.y;
  }

  addTwice() {
    return (this.x + this.y) * 2;
  }
}类的最后一个特性——类的类型和函数类似,即在声明类的时候,其实也同时声明了一个特殊的类型(确切地讲是一个接口类型),这个类型的名字就是类名,表示类实例的类型;在定义类的时候,我们声明的除构造函数外所有属性、方法的类型就是这个特殊类型的成员。如下代码所示:
class A {
  name: string;
  constructor(name: string) {
    this.name = name;
  }
}

const a1: A = {}; // ts(2741) Property 'name' is missing in type '{}' but required in type 'A'.
const a2: A = { name: 'a2' }; // ok/**
* base64 base64
* filename 转换后的文件名
*/
base64ToFile = (base64, filename )=> {
let arr = base64.split(',')
let mime = arr[0].match(/难过.*?);/)[1]
let suffix = mime.split('/')[1] // 图片后缀
let bstr = atob(arr[1])
let n = bstr.length
let u8arr = new Uint8Array(n)
while (n--) {
u8arr[n] = bstr.charCodeAt(n)
}
return new File([u8arr], `${filename}.${suffix}`, { type: mime })
}base64ToBlob = base64 => {
let arr = base64.split(','),
mime = arr[0].match(/:(.*?);/)[1],
bstr = atob(arr[1]),
n = bstr.length,
u8arr = new Uint8Array(n);
while (n--) {
u8arr[n] = bstr.charCodeAt(n);
}
return new Blob([u8arr], { type: mime });
};blobToFile = (blob, fileName) => {
blob.lastModifiedDate = new Date();
blob.name = fileName;
return blob;
};/**
* file 图片文件
* 返回图片的Base64数据
*/
fileToBase64 = file => {
let reader = new FileReader();
reader.readAsDataURL(file);
reader.onload = function (e) {
return e.target.result
};
}作者:YXi
链接:https://juejin.im/post/5deb2cdf518825122671b637
来源:掘金
著作权归作者所有。商业转载请联系作者获得授权,非商业转载请注明出处。
数据挖掘的过程一般由三个连续执行的步骤组成:数据预处理、数据分析、结果解释
我们把数据定义为一组对象及其属性的集合,其中属性定义为性质或者是对象的特征。对象的其他名称包括记录、物品、得分、样本、观察者或者实例。属性也可以称为变量、字段、特性或者特征。
协同过滤推荐备受青睐方法之一是使用 kNN 分类,这种分类技术(如同大多数的分类和聚类技术)主要取决于定义合适的相似度或者距离度量方法。
抽样是数据挖掘从大数据集中选择相关数据子集的主要技术。它用于数据预处理和最终解释步骤中。之所以使用抽样是因为处理全部数据集的计算开销太大。抽样的关键是发现具有整个原始数据集代表性的子集,也就是说,其具有与整个数据集大概类似的兴趣属性。最常用的抽样方法包含使用无取代的抽样:当物品被选择的时候,物品被从整体中取走。但是,执行取代抽样也是可以的,物品即使被选择也不用从整体中去除,允许同样的样本被选择多次。
降维技术通过吧原始的高维空间转化成低维有助于克服这类问题。相关的降维算法:
去噪是非常重要的预处理步骤,其目的是在最大化信息量时去除不必要的影响。
分类器是从特征空间到标签空间的映射,其中特征代表需要分类的元素的属性,标签代表类别。
基于样本的分类(instance-based classifier)通过存储训练记录并使用它们来预测未知样本的标签类别。这种分类器记住了所有的训练集,并且只有在新纪录的属性与训练级中样本完全匹配时才会分类。
决策树是以树结构形式对目标属性(或类)进行分类的分类器。要分类的观察数据(或物品)是由属性及其目标值组成的。树的节点可以是:
基于规则的分类是通过一组“if...then...”的规则集合划分数据。规则的前提或条件是属性连词的表达式。规则的结论是一个正或者负的分类。
贝叶斯分类器是解决分类问题的一个概率框架。它基于条件概率定义和贝叶斯理论。贝叶斯统计学派使用概率论来代表从数据中学习到的关系的不确定性。此外,先验的概率非常重要,因为他们的代表了我们的期望值,或者真正关系可能是什么的先验知识。
摘自:【Recommender Systems Handbook】
移动端设备调用摄像头拍照上传图片,会出现图片旋转90度的问题,比如:iPhone竖屏拍照会出现这个问题,横屏拍照正常。原因是:Orientation 的值不是1。iPhone 前后置摄像头进行旋转各种角度拍摄的结果都只在 [1, 6, 3, 8] 之间。
为了解决此问题,需要获取到图片 Exif 信息中的 Orientation 数据:
EXIF.getData(file, function() {
  let Orientation = EXIF.getTag(this, 'Orientation');
});
然后,根据 Orientation 去进行图片旋转:
if(Orientation && Orientation != 1){
  switch(Orientation){
   case 6:     // 旋转90度
      canvas.width = imgHeight;
      canvas.height = imgWidth;
      ctx.rotate(Math.PI / 2);
      // (0,-imgHeight) 从旋转原理图那里获得的起始点
      ctx.drawImage(this, 0, -imgHeight, imgWidth, imgHeight);
      break;
   case 3:     // 旋转180度
      ctx.rotate(Math.PI);
      ctx.drawImage(this, -imgWidth, -imgHeight, imgWidth, imgHeight);
      break;
   case 8:     // 旋转-90度
      canvas.width = imgHeight;
      canvas.height = imgWidth;
      ctx.rotate(3 * Math.PI / 2);
      ctx.drawImage(this, -imgWidth, 0, imgWidth, imgHeight);
      break;
   default:
      ctx.drawImage(this, 0, 0, imgWidth, imgHeight);
      break;
  }
}else{
    ctx.drawImage(this, 0, 0, imgWidth, imgHeight);
}可以借助栅格系统,能够适应不同尺寸的屏幕。
<div class="auth-block">
  <h1 style="text-align: center">登录</h1>
    <form class="form-horizontal" (submit)="onLoginSubmit()">
      <div class="form-group">
        <div class="col-sm-offset-4 col-sm-4">
          <input class="form-control" [(ngModel)]="username" name="username" placeholder="用户名">
        </div>
      </div>
      <div class="form-group">
        <div class="col-sm-offset-4 col-sm-4">
          <input type="password" class="form-control" [(ngModel)]="password" name="password" placeholder="密码">
        </div>
      </div>
      <div class="form-group">
        <div class="col-sm-offset-4 col-sm-2">
          <input type="checkbox">
          <span>记住密码</span>
        </div>
        <div class="col-sm-2">
          <a [routerLink]="['/retrieve']" style="float: right">
            <span>忘记密码?</span>
          </a>
        </div>
      </div>
      <div class="form-group">
        <div class="col-sm-offset-4 col-sm-4">
          <button type="submit" class="btn btn-primary" style="width: 100%">登录</button>
        </div>
      </div>
      <div class="form-group">
        <div class="col-sm-offset-4 col-sm-4">
          <a [routerLink]="['/register']">
            <span>还没有账号?快速注册</span>
          </a>
        </div>
      </div>
    </form>
</div>webpack 是 JS 的一个打包工具。其核心概念:
entry 一个可执行模块或库的入口文件.chunk 多个文件组成的代码块,例如把一个可执行模块和它所有依赖的模块组合成一个 chunk.loader 文件转化器,例如把 es6 转化为 es5,scss 转化为 css.plugin 插件,用于扩展 webpack 的功能,在 webpack 构建生命周期的节点上加入扩展 hook 为 webpack 加入功能.其构建流程:
webpack.config.js 文件里配置的参数,生产最后的配置结果。entry 入口文件开始解析文件构建 AST 语法树,找出每个文件所依赖的文件,递归下去。loader 配置找出合适的 loader 用来对文件进行转换。entry 配置生成代码块 chunk。chunk 到文件系统。优点:
缺点:
onload 事件是需要在所有的 iframe 加载完毕后才会触发。箭头函数没有独立的上下文,所以 this 的指向是:沿着作用域链向上查找最近的一个 function 上下文中的 this (如果没有最近的 function, 就是全局)
在使用时确定的,this 的作用域与函数定义的位置没有关系,而是取决于函数在哪里被调用。
Equal to the computed value of
font-sizeon the root element. When specified on thefont-sizeproperty of the root element, the rem units refer to the property’s initial value.
简单来说,1rem 等同于根元素的字体大小(大多数浏览器默认是 16px)
webpack性能优化
垂直居中
parentElement{
        position:relative;
    }

 childElement{
        position: absolute;
        top: 50%;
        transform: translateY(-50%);

 }
2.父容器下只有一个元素且高度确定,利用相对定位
parentElement{
        height:xxx;
    }

    childElement {
      position: relative;
      top: 50%;
      transform: translateY(-50%);
    }
3.Flex 布局
parentElement{
    display:flex;/*Flex布局*/
    display: -webkit-flex; /* Safari */
    align-items:center;/*指定垂直居中*/
}nodejs 优点:采用事件驱动、异步编程;非阻塞型I/O
不适合用在:CPU 使用率重、I/O 使用率轻的应用,如:视频应用
vue的项目打包部署在服务器后,访问 http://xxxx.com/xxx 时,提示各种静态资源找不到。
查阅了很多资料,对 webpack 打包做修改:
config/index.js:
build: {
  assetsPublicPath: '/xxx/',
}
build/webpack.prod.js:
output: {
  publicPath: '/xxx/',
}
router/index.js:
const router = new Router({
  base: '/xxx/'
})
最后,nginx 也需要修改对应的配置
location  ^~ /xxx/{
                alias /H5/xxx/;
                try_files $uri $uri/ /xxx/index.html;
                gzip on;
                gzip_types application/javascript text/css image/jpeg image/png;
        }
这样,访问静态资源抱404的问题就解决了。
快速排序,又称划分交换排序。在平均状况下,排序 n 个项目要 O(n·logn) 次比较。在最坏状况下则需要 O(nˆ2) 次比较,但这种状况并不常见。事实上,快速排序通常明显比其他 O(n·logn) 算法更快,因为它的内部循环可以在大部分的架构上很有效率地被实现出来。
Array.prototype.quick_sort = function() {
	var len = this.length;
	if (len <= 1) {
                return this.slice(0);
        }
	var left = [];
	var right = [];
	var mid = [this[0]];
	for (var i = 1; i < len; i++) {
                if (this[i] < mid[0]) {
                    left.push(this[i]);
                } else {
                    right.push(this[i]);
                }
        }
	return left.quick_sort().concat(mid.concat(right.quick_sort()));
};移动开发中,在调试 ios 10 时,遇到报错信息:
TypeError: Attempted to assign to readonly property.经过排查,发现是
document.getElementById('#xxx').style = 'display: none';这句话在 ios 10及以下版本有问题,原因是:webkit的内核bug
改为:
document.getElementById('#xxx').style.display = 'none';就可以规避此bug。
如果你是或者打算成为一名 JavaScript 开发者,那么你必须知道 JavaScript 代码内部是如何执行的。理解执行上下文和执行栈对于理解其他的 JavaScript 概念(如:变量提升、作用域、闭包)是非常重要的。
正确的理解执行上下文和执行栈会让你成为更好的 JavaScript 开发者。
那么,让我们开始吧 :)
简单的说,执行上下文是评估和执行 JavaScript 代码的环境的抽象概念。每当运行任何 JavaScript 代码的时候,它都是运行在执行上下文中。
在 JavaScript 中有三种执行上下文。
全局的执行上下文---这是一个默认的或者说是一个基本的执行上下文。不在任何函数内部的代码,那么就在全局的执行上下文中。它执行两件事情:1、它会创建一个全局的对象(在浏览器中是 window 对象);2、设置 this 的值为全局的对象。在一个程序中,有且只有一个全局的执行上下文。
函数的执行上下文---每当调用一个函数,都会为该函数创建一个新的执行上下文。每一个函数拥有自己的执行上下文,但是在调用或者调用函数的时候会创建它。函数的执行上下文可以有任意数量。每当一个新的执行上下文被创建,它将会按照定义的顺利执行一系列的步骤,这一点会在稍后的文章中讨论。
Eval 函数执行上下文---在 Eval 函数内部的代码被执行时也会拥有它自己的执行上下文,但是对于 JavaScript 开发者来说,Eval 函数并不常用,所以我不会在这讨论它。
执行栈,在其他的编程语言中也称为「调用栈」,具有先进后出的数据结构,其作用是用来存储所有在代码执行时创建的执行上下文。
每当 JavaScript 引擎第一次遇到你写的脚本,它就会创建一个全局的执行上下文,并且将它压栈到当前的执行栈中。每当引擎发现函数调用,它就会为该函数创建一个新的执行上下文并将其压栈。
该引擎会按照栈中的顺序,依次从栈顶开始执行函数。当该函数执行完成,它的执行栈将从堆栈中弹出,并且执行顺序将会到达当前堆栈中它下面函数的上下文。
让我们看下面的代码:
let a = 'Hello World!';
function first() {
  console.log('Inside first function');
  second();
  console.log('Again inside first function');
}
function second() {
  console.log('Inside second function');
}
first();
console.log('Inside Global Execution Context');
每当上面的代码在浏览器中加载,JavaScript 引擎会创建一个全局的执行上下文,并将它压栈到当前的执行堆栈中。当调用 first() 函数是,JavaScript 引擎为该函数创建了一个新的执行上下文并将它压栈到当前的执行堆栈中。
当 second() 函数在 first() 函数内部被调用时,JavaScript 引擎为该函数创建了一个心得执行上下文,并将它压栈到了当前的执行堆栈中。当 second() 函数运行结束时,它的执行栈将从当前堆栈中弹出,并且执行顺序会到达它下一个的执行上下文,也就是 first() 函数的执行上下文。
当 first() 函数运行结束时,它的执行堆栈将会从栈中移除,并且执行顺序会到达全局的执行上下文。一旦所有的代码都被执行了,JavaScript 引擎会从当前的堆栈中移除全局的执行上下文。
到目前为止,我们已经了解了 JavaScript 引擎是如何管理执行上下文的。现在,让我们来看看 JavaScript 引擎是如何创建执行上下文的。
执行上下文创建分两个步骤:1、创建阶段 和 2、执行阶段。
在任何 JavaScript 代码执行之前,执行环境经历了创建阶段,创建阶段包含以下三个事:
所以,执行上下文可以从概念上表示为如下:
ExecutionContext = {
  ThisBinding = <this value>,
  LexicalEnvironment = { ... },
  VariableEnvironment = { ... },
}在全局的执行上下文中,this 的值指向的是全局的对象。(在浏览器中,this 指向的是 window 对象)
在函数的执行上下文中,this 的值取决于函数是如何被调用的。如果它是通过对象引用调用的,那么 this 值指向那个对象,否则 this 值指向全局的对象或者是 undefined (在严格模式下)。例如:
let foo = {
  baz: function() {
  console.log(this);
  }
}
foo.baz();    // 'this' refers to 'foo', because 'baz' was called
             // with 'foo' object reference
let bar = foo.baz;
bar();       // 'this' refers to the global window object, because
// no object reference was given官方的 ES6 文档定义如下:
A Lexical Environment is a specification type used to define the association of Identifiers to specific variables and functions based upon the lexical nesting structure of ECMAScript code. A Lexical Environment consists of an Environment Record and a possibly null reference to an outer Lexical Environment.
简单来说,词法环境是一种包含标识符变量映射的结构。(这里的标识符指的是变量名或函数名,变量指的是实际的对象【包含函数类型对象】或原始值。)
在词法环境中,有两种组件:(1) environment record、(2) reference to the outer environment.
两种类型的词法环境:
两种类型的environment record:
简短点来说:
注意 --- 对于function environment,declarative environment record包含着一个 arguments 对象,该对象存储传递给函数的索引和参数之间的映射以及传递给函数的参数的长度。
抽象地认为词法环境伪代码如下:
GlobalExectionContext = {
  LexicalEnvironment: {
    EnvironmentRecord: {
      Type: "Object",
      // Identifier bindings go here
    }
    outer: <null>
  }
}
FunctionExectionContext = {
  LexicalEnvironment: {
    EnvironmentRecord: {
      Type: "Declarative",
      // Identifier bindings go here
    }
    outer: <Global or outer function environment reference>
  }
}它也是一个词法环境,其 EnvironmentRecord 包含由此执行上下文中的 VariableStatements 创建的绑定。
如上文所提到的,变量环境也是一个词法环境,所以它有上文中提到的所有词法环境的属性。
在 ES6 中,LexicalEnvironment 和 VariableEnvironment 有一点不同,前者是用来存储函数声明和变量绑定(let & const),后者是用来只存储变量绑定(var).
让我们看如下的例子:
let a = 20;
const b = 30;
var c;
function multiply(e, f) {
 var g = 20;
 return e * f * g;
}
c = multiply(20, 30);
执行上下文如下:
GlobalExectionContext = {
  ThisBinding: <Global Object>,
  LexicalEnvironment: {
    EnvironmentRecord: {
      Type: "Object",
      // Identifier bindings go here
      a: < uninitialized >,
      b: < uninitialized >,
      multiply: < func >
    }
    outer: <null>
  },
  VariableEnvironment: {
    EnvironmentRecord: {
      Type: "Object",
      // Identifier bindings go here
      c: undefined,
    }
    outer: <null>
  }
}
FunctionExectionContext = {

  ThisBinding: <Global Object>,
  LexicalEnvironment: {
    EnvironmentRecord: {
      Type: "Declarative",
      // Identifier bindings go here
      Arguments: {0: 20, 1: 30, length: 2},
    },
    outer: <GlobalLexicalEnvironment>
  },
VariableEnvironment: {
    EnvironmentRecord: {
      Type: "Declarative",
      // Identifier bindings go here
      g: undefined
    },
    outer: <GlobalLexicalEnvironment>
  }
}
注意 --- 仅在遇到函数 multiply 调用时才会创建函数执行上下文。
你可能注意到了:let 和 const 定义的变量没有任何关联到他们的值,但是 var 定义的变量被设置为 undefined.
这是因为在创建阶段,进行代码扫描以获取变量和函数声明,函数声明存储在它的整个环境中,但是变量被初始化为 undefined (var 定义的变量),或者保留未初始化(let & const 定义的变量)。
这就是为什么你能访问到 var 定义的未声明的变量(尽管是 undefined), 但是访问 let 和 const 定义的未声明的变量就会得到错误。
这个就是我们所说的「变量提升」。
这是本篇文章中最简单的部分,在此阶段,完成对所有这些变量的分配,最后执行代码。
注意 --- 在执行阶段,如果 JavaScript 引擎不能够找到在源码中已经被声明过的 let 变量的值,那么它的值就会被赋为 undefined.
我们已经讨论了如何在内部执行 JavaScript 程序。虽然你没有必要将所有这些概念都理解为了成为一名出色的 JavaScript 开发人员,但对上述概念的理解将有助于您更轻松,更深入地理解其他概念,如变量提升,作用域和闭包。
在进行双重 for 循环计算时,我们希望满足条件跳出循环,以免不必要的资源浪费。
此时,我们就可以使用 label 和 continue/break 配合使用。
firstLoop:
for (let i = 0; i < 3; i++) {
   for (let j = 0; j < 3; j++) {
      if (i === j) {
         continue firstLoop; // 继续 firstLoop 循环
         // break firstLoop; // 中止 firstLoop 循环
      }
      console.log(`i = ${i}, j = ${j}`);
   }
}
// 输出
i = 1, j = 0
i = 2, j = 0
i = 2, j = 1

for (let i = 0; i < 3; i++) {
   for (let j = 0; j < 3; j++) {
      if (i === j) {
         continue
      }
      console.log(`i = ${i}, j = ${j}`);
   }
}
// 输出
i = 0, j = 1
i = 0, j = 2
i = 1, j = 0
i = 1, j = 2
i = 2, j = 0
i = 2, j = 1
参考:
         /**
         * 二分查找法(有序数组)
         *
         * 时间复杂度: O(log N).
         *
         * @param {Array} array .
         * @param {Number} value.
         * @returns {Number} Index of the element or -1 if not found.
         */

         function binarySearch(array, value) {
            var middle = Math.floor(array.length / 2);
            var left = 0;
            var right = array.length;
            while (right >= left) {
              var middleValue = array[middle];
              if (middleValue === value) {
                  return middle;
              } else if (middleValue > value) {
                  right = middle - 1;
              } else {
                  left = middle + 1;
              }
              middle = Math.floor((left + right) / 2);
            }
            return -1;
}A declarative, efficient, and flexible JavaScript library for building user interfaces.
🖖 Vue.js is a progressive, incrementally-adoptable JavaScript framework for building UI on the web.
TypeScript is a superset of JavaScript that compiles to clean JavaScript output.
An Open Source Machine Learning Framework for Everyone
The Web framework for perfectionists with deadlines.
A PHP framework for web artisans
Bring data to life with SVG, Canvas and HTML. 📊📈🎉
JavaScript (JS) is a lightweight interpreted programming language with first-class functions.
Some thing interesting about web. New door for the world.
A server is a program made to process requests and deliver data to clients.
Machine learning is a way of modeling and interpreting data that allows a piece of software to respond intelligently.
Some thing interesting about visualization, use data art
Some thing interesting about game, make everyone happy.
We are working to build community through open source technology. NB: members must have two-factor auth.
Open source projects and samples from Microsoft.
Google ❤️ Open Source for everyone.
Alibaba Open Source for everyone
Data-Driven Documents codes.
China tencent open source team.