
Reaumur Server is a temperature logger/controller that runs on Particle devices. Using Reaumur requires experience working with Particle devices, relays, resistors, and 1-Wire temperature sensors (DS18B20).
The easiest way to install is with Docker
git clone --depth=1 https://github.com/reaumur/ReaumurServer.git
cd ReaumurServer
docker-compose up
After starting the server will be running at http://127.0.0.1:8080
To run the server in the background run docker-compose up -d
The docker-compose file does not include Grafana which can connect to the InfluxDB database for graphing temperatures, humidities, and cycles. If you want to use Grafana add the following to the docker-compose.yml file and connect to the InfluxDB with the address: http://influxdb:8086
	grafana:
		image: grafana/grafana:latest
		ports:
			- "3000:3000"
		volumes:
			- ./Database/grafana:/var/lib/grafana
			- ./Database/etc:/etc/grafana
		restart: always
If it is not already installed install MongoDB if you are using authentication or a non-standard port set it with the MONGO_HOST, MONGO_PORT, MONGO_USERNAME, MONGO_PASSWORD environment variables.
If it is not already installed install InfluxDB the host and port can be set with the INFLUXDB_HOST and INFLUXDB_PORT environment variables.
Next install Vapor and Swift here for macOS or Ubuntu.
Then build and run the project:
git clone --depth=1 https://github.com/reaumur/ReaumurServer.git
cd ReaumurServer
vapor build --release --verbose
.build/release/App
The server will now be running at http://127.0.0.1:8080. Note running the server with vapor run serve will not work it must be run directly with the App in .build/release directory.
If accessing the server remotely a secure HTTPS proxy pass is recommended which can be done using Nginx (Recommended) or Apache2. The iOS app uses a web socket which will require configuring Nginx or Apache2 to allow for web sockets.
Particle devices do not support HTTPS due do the limited processing power so the server must be reachable over insecure HTTP. But a secure HTTPS connection is still recommended for users connecting to the server. The recommended deployment is to have the server running on a local network where Particle devices connect locally and users connect remotely over HTTPS so that only the secure HTTPS connection is exposed to the internet this can be done by setting up a local server that connects to a VPN and on the VPN server setup a HTTPS Nginx proxy pass to the VPN client. The server allows for setting a local insecure server URL that will be used by the Particle devices.
Note that endpoints on the server that are used by Particle devices do not require authentication so you might want to block them form external connections:
/deivces/[deviceId]/action
/hostDevices/[hostDeviceId]/ping
/hostDevices/[hostDeviceId]/logs
/hostDevices/[hostDeviceId]/devices/register
Example Nginx Config:
server {
    listen 80;

    location / {
        proxy_set_header	Host $http_host;
        proxy_pass	http://127.0.0.1:8080;
        proxy_set_header	Host $host;
        proxy_set_header	X-Real-IP $remote_addr;
        proxy_set_header	X-Forwarded-For $proxy_add_x_forwarded_for;
        proxy_pass_header	Server;
        proxy_connect_timeout	3s;
        proxy_read_timeout	10s;
	        proxy_http_version	1.1;
	        proxy_set_header	Upgrade $http_upgrade;
	        proxy_set_header	Connection "upgrade";

    }
}
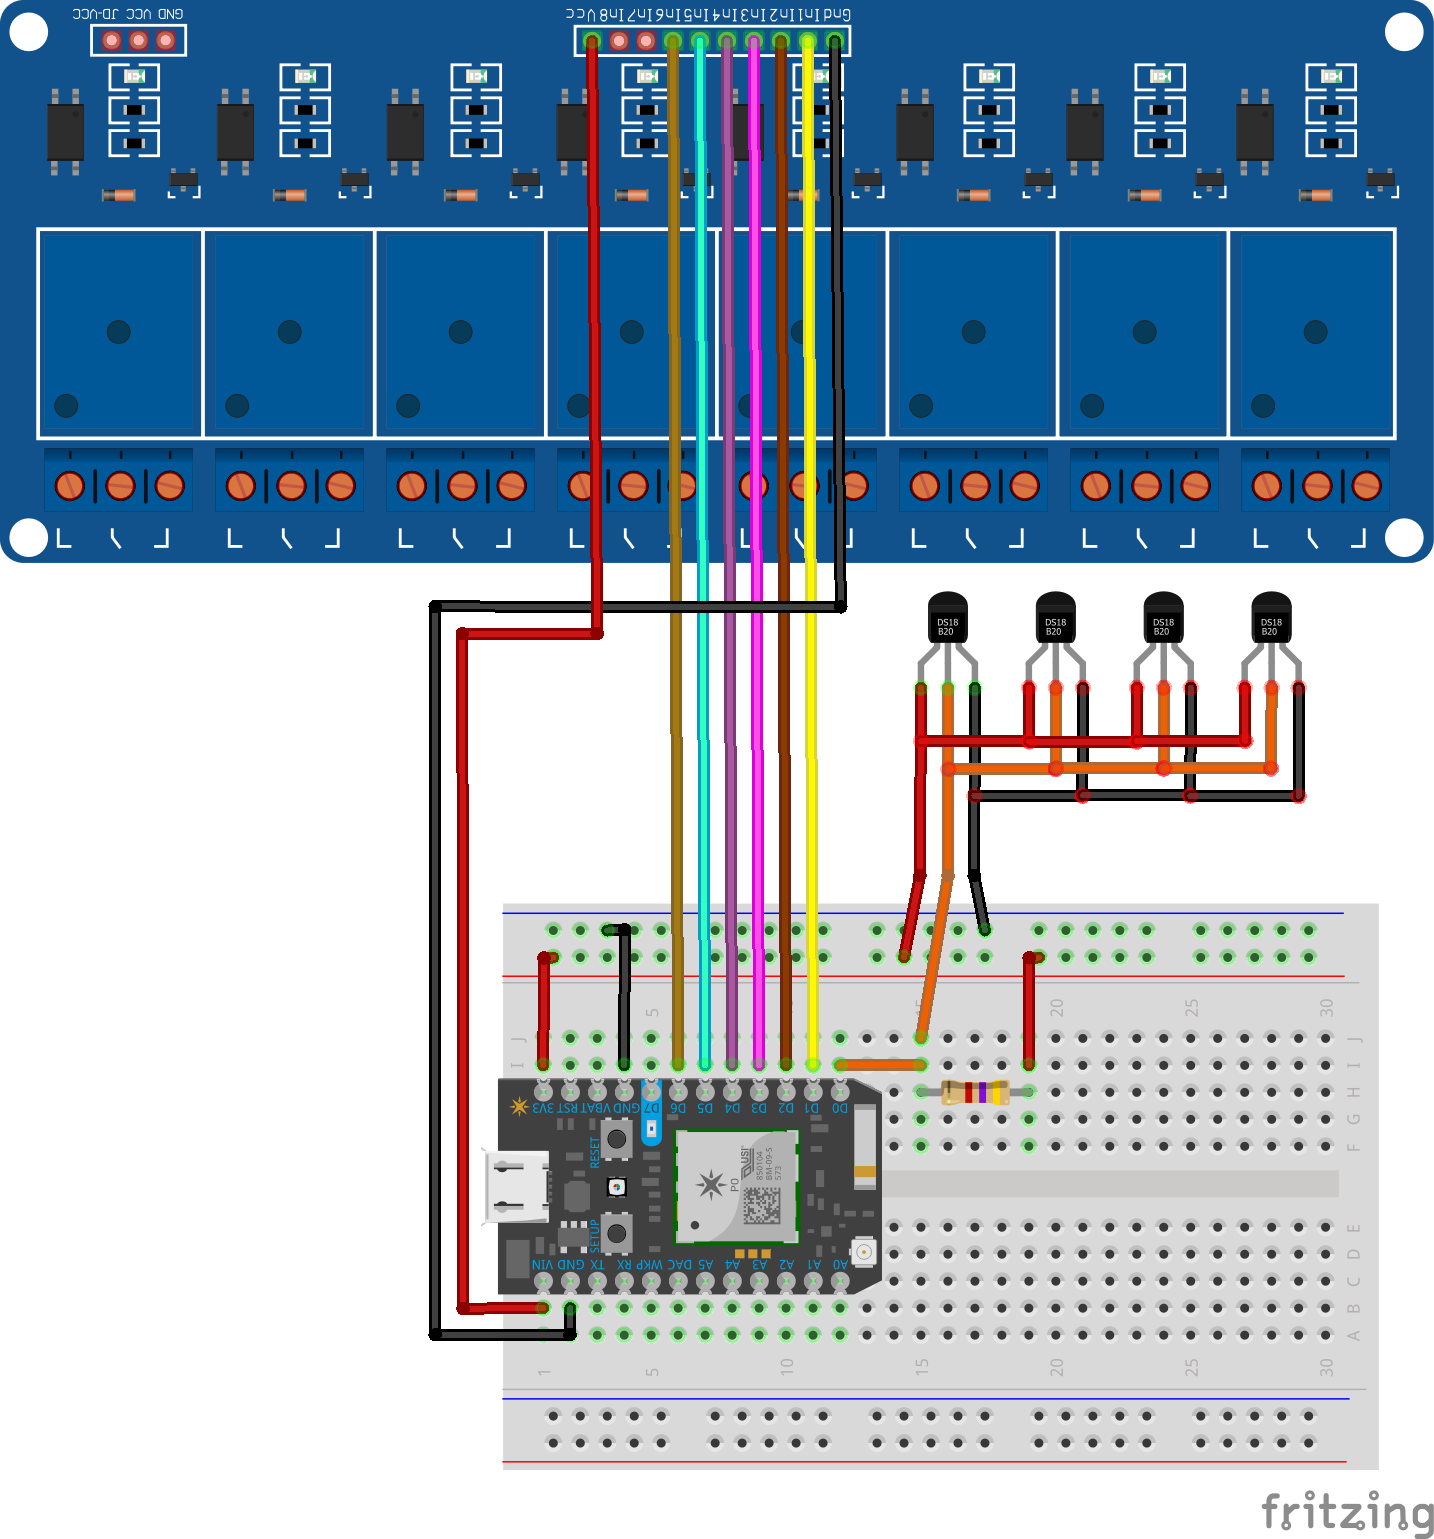
Most relay boards found on Amazon and other places are 5v, Particle devices run at 3.3v but the D0-D7 pins are 5v tolerant. The VIN pin on the Particle device will output 5v which can be used for a 5v relay board. By default pin D7 is used for the LED pin as it has a builtin LED this pin will blink to indicate temperature checking and uploading of temperatures to the Reaumur Server. An external LED can also be wired to the pin or the LED pin can be changed in settings. The D0 pin on the Particle device is reserved by Reaumur for 1-wire temperature sensors and is the only pin that 1-wire temperature sensors can be connected and it can not be used for anything else. So with the default LED setting that leaves 6 pins (D1-D6) open for a 5v relay. If you are using 3.3v relay the analog pins can be used as well.
The following example shows a 8 channel 5v relay board where only 6 of the channels are connected as there are no pins remaining by using an 8 channel relay board you will have 2 backup channels that can be used if one of the 6 fail. There are also 4 1-wire DS18B20 temperature sensors connected note that they are connected in a series as 1-wire temperature sensors can share the same 3 wires. The resistor used for the 1-wire sensors is a 4.7kOhm resistor.
With the Particle device having a single core processor it is not recommended to have more then 10-15 temperature/humidity sensors per host device as scanning and uploading the measurements from each sensor blocks the Particle device from preforming other actions such as checking and managing temperatures. Instead more host devices should be added if additional sensors are required.
First setup a (Particle)[https://particle.io] account then add and connect your devices to your account there is documentation on setting up your Particle devices in the (Particle documentation)[https://docs.particle.io/]. After setting up your devices and making sure they are connected to the internet get the Particle access token for your account to enter in the Reaumur Server settings.
First visit Reaumur Server's address and register a new user account after you create your account you should disable user registration in settings.
In the Reaumur Server's settings set the Server Address, Insecure Server Address, and Particle Access Token. After setting up your Particle devices in your Particle account you can then register them by selecting each device under Particle Devices in Reaumur Server. After registering the devices they will be added to the Host Devices in Reaumur where you can then add Devices such as heating and cooling switches. After adding your heating and cooling switches you can then flash the Particle device and it will detect and register any 1-wire temperature sensors. After all your devices have been added you can then create Containers and add those devices to the Container to control and monitor the temperature of those Containers. After setting the Containers up you will need the flash the Particle device again to apply the settings and again any time you change the settings in the future. Host Devices will show in Reaumur when they need to be flashed after settings have been changed.
- [Must Be Done] Disable user registration in Fax Server settings after setting up your user account so that new users can not be created. Note you can always create new users in the Users section this only disables anonymous user creation.
- [Strongly Recommended] Setup HTTPS on the proxy server (Nginx or Apache2) see tutorial here.
- [Advanced Users] Enabled secure (HTTPS Only) cookies in settings. This should only be done if you only access your server over a HTTPS connection and will restrict logins to HTTPS only. Note if you enable this you will not be able to sign in over an insecure (HTTP) connection to turn if off.
- [Advanced Users] Enable 2 factor authentication (TOTP) login, under Users select your user account and activate 2 factor authentication. Note there is no way to reset this if you loose your TOTP secret key.

- Open Clients in Reaumur Server and create a client with the above values.
- After creating the client copy the Client ID and Client Secret and fill them into the iOS app along with your servers URL.


