SETUP: https://info.lewagon.com/tokyo-chrome-ext
By Trouni Tiet for Le Wagon Tokyo
All you need for this workshop is Google Chrome and a text editor or IDE like Sublime Text or VS Code.
Clone the git repository for this workshop
git clone https://github.com/trouni/workshop-chrome-extension.gitOR download the ZIP file and unzip the archive to your desktop.
With ad blockers, integration to third party apps like Evernote or your favourite to-do app, or many humoristic extensions, Chrome extensions can be extremely powerful, but also very fun to use. The good news is that it's also super easy to build a Chrome extension. This workshop will take you step-by-step through the journey of creating and publishing your first Chrome extension, while teaching you the key concepts to understand.
Cheese. 🧀
But also, here are key aspects that we'll be covering:
- Recap about JavaScript and the DOM
- Basic structure of a Chrome extension
- Create a script to interact with a web page
- Add a popup menu to interact with your extension
- Publish an extension on the Chrome store
Before we dive into extensions, let's go through a quick JavaScript recap on how to interact with a web page.
Open the Chrome console:
⌘ Cmd + ⌥ Opt + J on Mac
✲ Ctrl + ⇧ Shift + J on Windows
// Target the first element matching the CSS selector
document.querySelector('.css-selector')

// Get an array of all the elements matching the CSS selector
document.querySelectorAll('.css-selector')

// Iterate over each selected element
document.querySelectorAll('.css-selector').forEach(element => {
  console.log(element)
})After selecting an HTML element:
// Change opacity of the element
element.style.opacity = 0.5

// Add a CSS class to the element
element.classList.add('hidden')

// Change an image
img.src = 'https://raw.githubusercontent.com/trouni/workshop-chrome-extension/master/images/hedgehog.jpg'You can ask the browser to listen for events and trigger actions using addEventListener():
element.addEventListener('click', (event) => {
  // Some action
  alert('The event has been triggered')
})
Check out the Event reference documentation for a complete list of available events.
We'll create an extension that replaces all images on a web page with photos of cheese 🧀.
Let's use Unsplash Source, to find random cheese images like this one, using https://source.unsplash.com/collection/8884129/.
You can also use
https://source.unsplash.com/featured/?cheeseand replacecheesewith anything you want (e.g.wine,puppy, etc.)
Use what we've learned so far to replace all the images on this website with photos of cheese.
Hint:
- Select all
imgelements - Iterate over each of them using
forEach - Update the
srcandsrcsetattributes with the Unsplash url
Once this is done, let's put this script in a Chrome extension!
The manifest is a simple JSON file that tells the browser about your web application, and it is the only file that every extension using WebExtension APIs must contain.
// manifest.json

{
  "manifest_version": 2,
  "name": "My first Chrome Extension",
  "description": "Chrome extension workshop for Le Wagon Tokyo",
  "author": "Your name",
  "version": "1",
  "permissions": ["tabs"],
  "content_scripts": [
    // ...
  ],
  "background": {
    // ...
  },
  "browser_action": {
    // ...
  },
  "icons": {
    "16": "images/icon16.png",
    "32": "images/icon32.png",
    "48": "images/icon48.png",
    "128": "images/icon128.png"
  }
}- Enter
chrome://extensionsin the Chrome search bar, and activate developer mode (top-right corner) - Click 'Load unpacked' and select your workshop-chrome-extension folder.
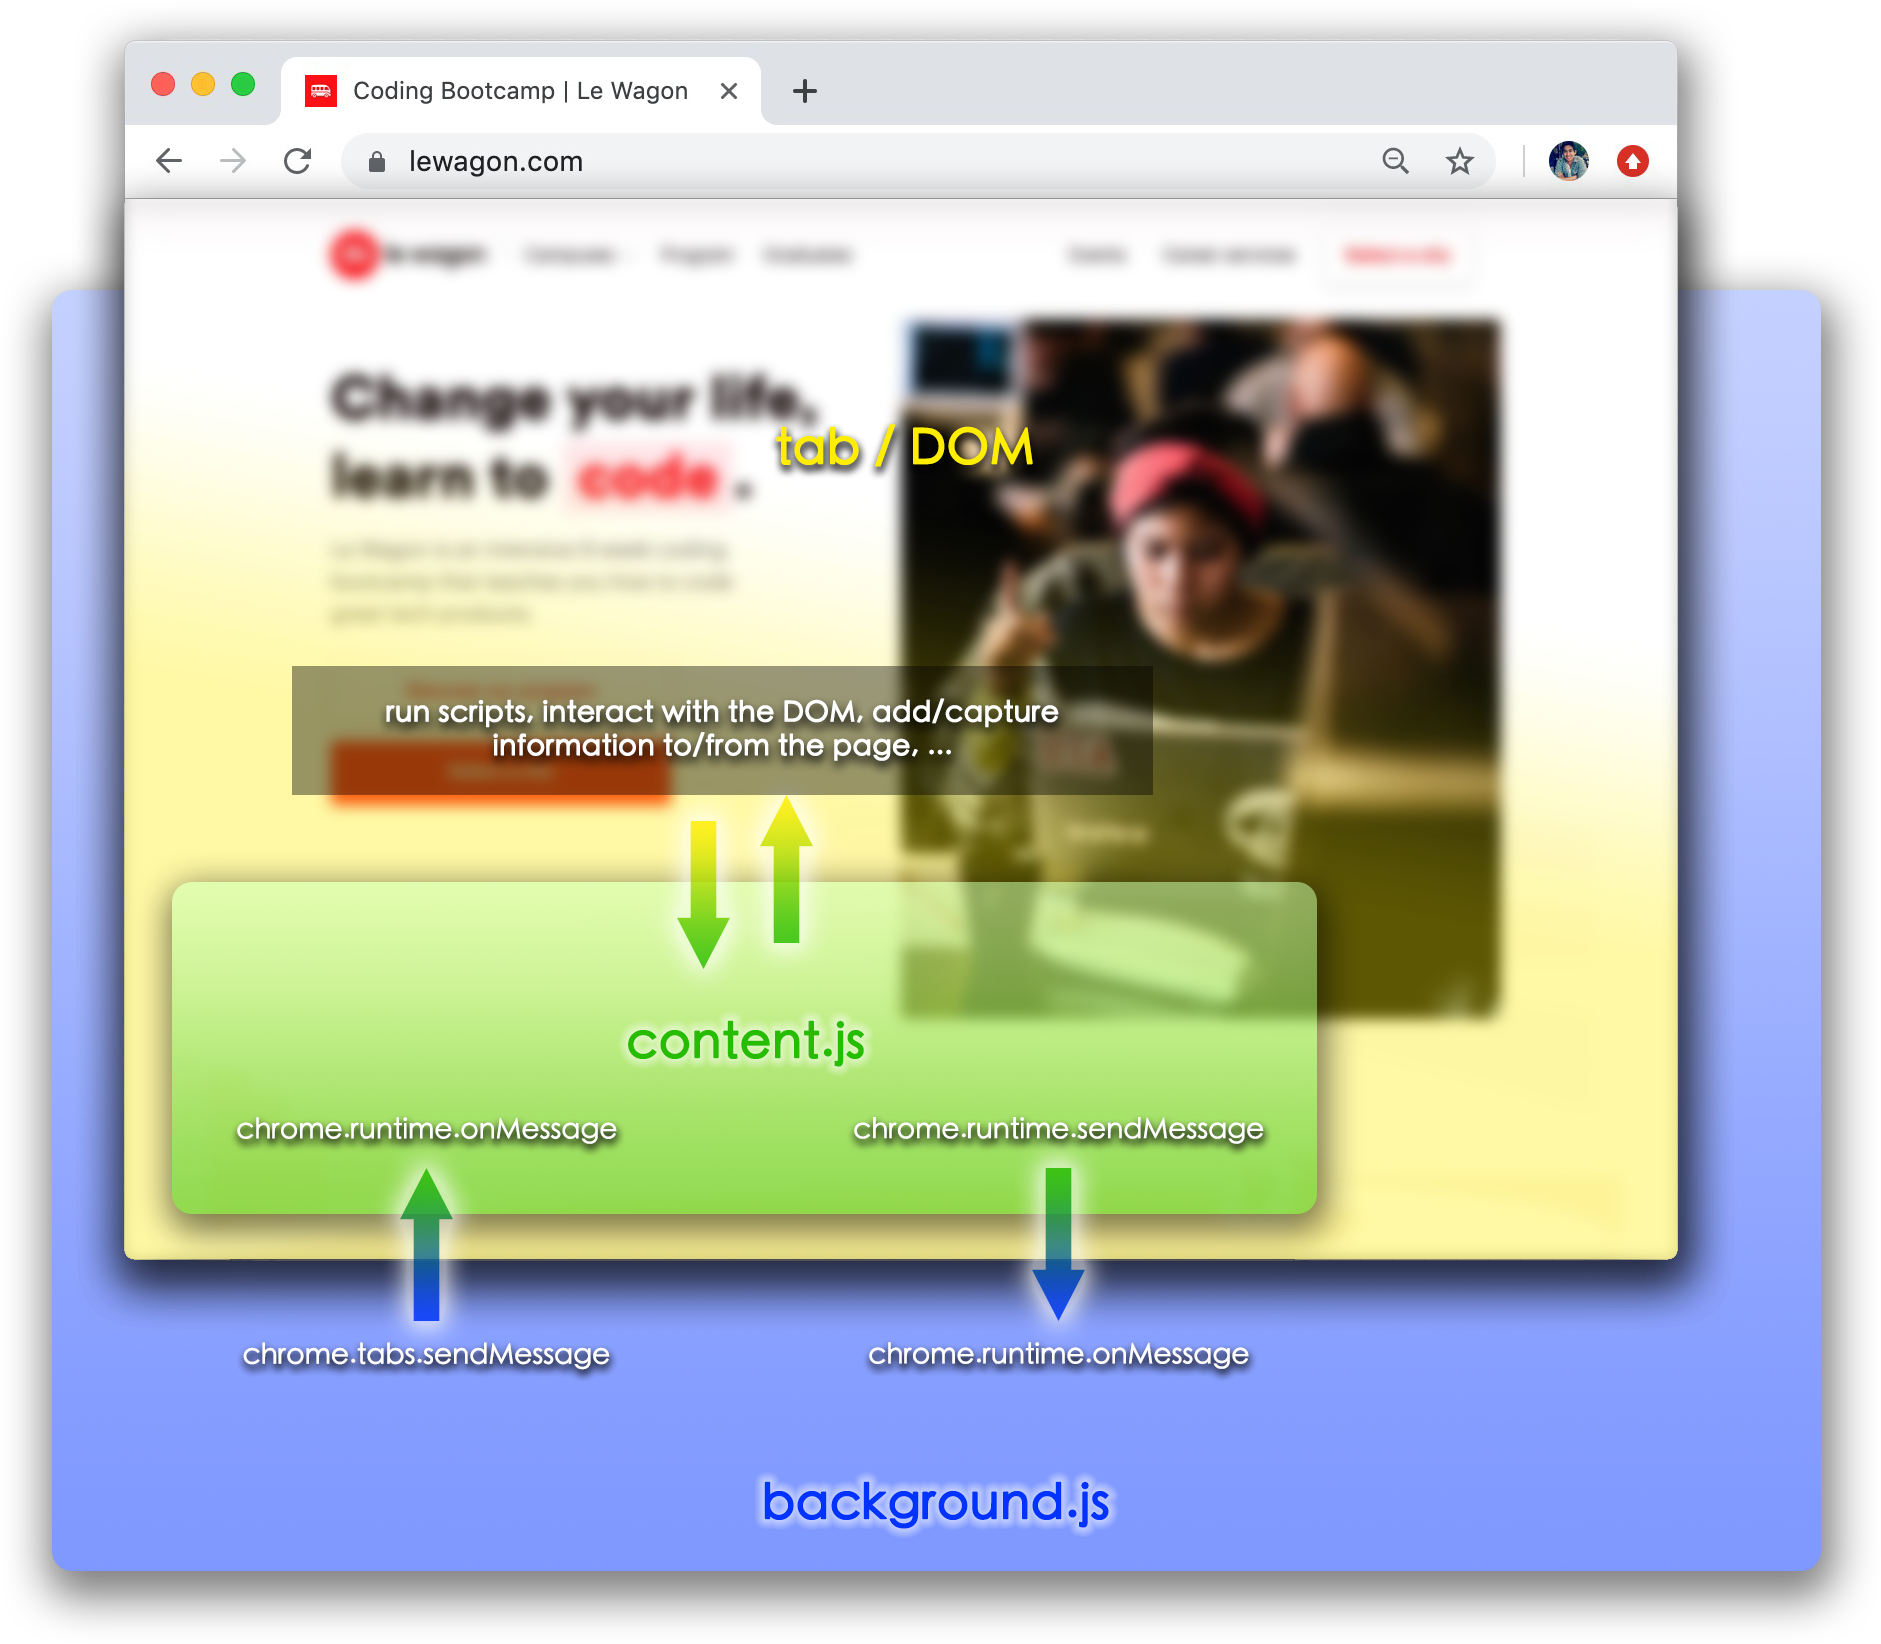
Content scripts run in the context of a web page / tab, and allow you to get information from it, or even change its contents. On the other side, as its name suggests, a background script runs in the background of the Chrome browser, acting as a controller and used to maintain state for your extension.
While content scripts have limited access to the Chrome Extension APIs, background scripts can make full use of them. As a general rule, content scripts should be used to interact with web pages / tabs, while the logic should ideally be located in the background script.
Since it interacts with our page, our image replacing script should go into a content script.
- Add this snippet to the
scripts/cheesify.jsfile.
document.querySelectorAll('img').forEach( (img) => {
  img.src = `https://source.unsplash.com/collection/8884129/${img.width}x${img.height}?${Math.random()}`;
  img.srcset = img.src;
})In your manifest, add the following to run our cheesify script on all the pages we visit.
// manifest.json

{
  // ...

  "content_scripts": [
    {
      "matches": [
        "<all_urls>"
      ],
      "js": ["scripts/cheesify.js"]
    }
  ],

  // ...
}Our script now runs on every single page we visit, and although I'm definitely loving all that cheesy goodness, I can think of a few situations where replacing all images on the internet with photos of coagulated milk may not be entirely relevant. So let's add a menu to our extension, in order to trigger the cheesification of our page only when we actually need it.
Create your menu or copy-paste the code below into popup.html.
<!-- popup.html -->

<!DOCTYPE html>
<html>
<head>
  <meta charset="utf-8">
  <meta http-equiv="X-UA-Compatible" content="IE=edge">
  <title>My first Chrome extension</title>
  <link rel="stylesheet" href="style/popup.css">
</head>
<body>
  <h1>My first Chrome extension</h1>
  <button id="cheesify"><span>🧀</span><p>Cheesify Page</p></button>
  <script src="scripts/popup.js"></script>
</body>
</html>
I have already included some CSS styling in style/popup.css for the template above.
We need to let Chrome know that the menu for our extension is now in our popup.html file.
Add this to your manifest.json file.
// manifest.json

{
  // ...

  "browser_action": {
    "default_popup": "popup.html",
    "default_title": "My first Chrome Extension"
  },

  // ...
}When we click the button of our popup.html page, we should send a message to the cheesify.js content script and trigger our image replacement script.
Here are some useful methods to pass messages to content scripts:
// Find the tab(s) you want to send a message to by querying the open tabs in Chrome
chrome.tabs.query( queryInfo, (responseCallback) )

// Send a message to a tab when you know its ID
chrome.tabs.sendMessage( tabId, message, (options), (responseCallback) )
Learn more in the chrome.tabs API.
Let's apply this to our extension and trigger the cheesify script when we click on our button.
// scripts/popup.js

// Send a message to the active tab to 'cheesify' it
function sendCheesifyMsg() {
  chrome.tabs.query({active: true, currentWindow: true}, function(tabs) { // Finds tabs that are active in the current window
    chrome.tabs.sendMessage(tabs[0].id, { action: 'cheesify' }); // Sends a message (object) to the first tab (tabs[0])
  });
}

// Trigger the function above when clicking the 'Cheesify' button
document.querySelector('#cheesify').addEventListener('click', event => sendCheesifyMsg());Now, all that's keeping us from turning our web page into dairy heaven is learning how to intercept the message we've just sent, then trigger an action based on that. We will be using the chrome.runtime API and more specifically, the onMessage.addListener method:
chrome.runtime.onMessage.addListener(
  function(request, sender, sendResponse) {
    // actions based on the request (which corresponds to the object we sent in our message)
  }
);
Learn more in the chrome.runtime API.
Complete/replace your code in cheesify.js with the one below.
// cheesify.js

// Listen for messages on the content page
chrome.runtime.onMessage.addListener(
  function(request, sender, sendResponse) {
    if (request.action === 'cheesify') cheesify();
  }
);

// Our image replacement script
function cheesify() {
  document.querySelectorAll('img').forEach( (img) => {
    img.src = `https://source.unsplash.com/${img.width}x${img.height}/?cheese&${Math.random()}`;
    img.srcset = img.src;
  })
}
Awesome! You should now be able to click on the extension's icon, then click on the 'Cheesify Page' button to run our cheesify script.
- Create your app’s zip file
- Create a developer account
- Upload your app
- Pay the developer's signup fee
Full official tutorial available here
You can publish unlisted extension and share the direct link if you don't want to make your extension public.
Show me what you've built! Contact me and let me know what extensions you've created!
Workshop/tutorial by Trouni Tiet
LinkedIn | GitHub
Created for Le Wagon Tokyo