Code Monkey home page Code Monkey logo

prusa3d / prusa-firmware-buddy Goto Github PK

View Code? Open in Web Editor NEW
1.0K 55.0 209.0 61.41 MB

Firmware for the Original Prusa MINI, Original Prusa MK4 and the Original Prusa XL 3D printers by Prusa Research.

License: Other

Python 0.73% CMake 0.69% Dockerfile 0.01% C 72.53% C++ 19.93% Shell 0.08% HTML 1.30% Assembly 0.50% CSS 0.17% JavaScript 0.02% Objective-C 0.01% Starlark 0.01% Batchfile 0.01% PowerShell 0.01% Objective-C++ 0.01% Roff 0.01% Makefile 0.37% OpenSCAD 0.01% G-code 3.63% Meson 0.01%
firmware prusa buddy

prusa-firmware-buddy's Introduction

Buddy

Build Status Build Status Build Status Build Status

This repository includes source code and firmware releases for the Original Prusa 3D printers based on the 32-bit ARM microcontrollers.

The currently supported models are:

  • Original Prusa MINI/MINI+
  • Original Prusa MK3.9
  • Original Prusa MK4
  • Original Prusa XL

Getting Started

Requirements

  • Python 3.8 or newer

Cloning this repository

Run git clone https://github.com/prusa3d/Prusa-Firmware-Buddy.git.

Building (on all platforms, without an IDE)

Run python utils/build.py. The binaries are then going to be stored under ./build/products.

  • Without any arguments, it will build a release version of the firmware for all supported printers and bootloader settings.
  • To generate .bbf versions of the firmware, use: ./utils/build.py --generate-bbf.
  • Use --build-type to select build configurations to be built (debug, release).
  • Use --preset to select for which printers the firmware should be built.
  • By default, it will build the firmware in "prerelease mode" set to beta. You can change the prerelease using --prerelease alpha, or use --final to build a final version of the firmware.
  • Use --host-tools to include host tools in the build (bin2cc, png2font, ...)
  • Find more options using the --help flag!

Examples:

Build the firmware for MINI and XL in debug mode:

python utils/build.py --preset mini,xl --build-type debug

Build the firmware for MINI using a custom version of gcc-arm-none-eabi (available in $PATH) and use Make instead of Ninja (not recommended):

python utils/build.py --preset mini --toolchain cmake/AnyGccArmNoneEabi.cmake --generator 'Unix Makefiles'

Windows 10 troubleshooting

If you have python installed and in your PATH but still getting cmake error Python3 not found. Try running python and python3 from cmd. If one of it opens Microsoft Store instead of either opening python interpreter or complaining 'python3' is not recognized as an internal or external command, operable program or batch file. Open manage app execution aliases and disable App Installer association with python.exe and python3.exe.

Development

The build process of this project is driven by CMake and build.py is just a high-level wrapper around it. As most modern IDEs support some kind of CMake integration, it should be possible to use almost any editor for development. Below are some documents describing how to setup some popular text editors.

Contributing

If you want to contribute to the codebase, please read the Contribution Guidelines.

XL and Puppies

With the XL, the situation gets a bit more complex. The firmware of XLBuddy contains firmwares for the puppies (Dwarf and Modularbed) to flash them when necessary. We support several ways of dealing with those firmwares when developing:

  1. Build Dwarf/Modularbed firmware automatically and flash it on startup by XLBuddy (the default)

    • The Dwarf & ModularBed firmware will be built from this repo.
    • The puppies are going to be flashed on startup by the XLBuddy. The puppies have to be running the Puppy Bootloader.
  2. Build Dwarf/Modularbed from a given source directory and flash it on startup by XLBuddy.

    • Specify DWARF_SOURCE_DIR/MODULARBED_SOURCE_DIR CMake cache variable with the local repo you want to use.
    • Example below would build modularbed's firmware from /Projects/Prusa-Firmware-Buddy-ModularBed and include it in the xlBuddy firmware.
    cmake .. --preset xl_release_boot -DMODULARBED_SOURCE_DIR=/Projects/Prusa-Firmware-Buddy-ModularBed
    
    • You can also specify the build directory you want to use:
    cmake .. --preset xl_release_boot \
        -DMODULARBED_SOURCE_DIR=/Projects/Prusa-Firmware-Buddy-ModularBed  \
        -DMODULARBED_BINARY_DIR=/Projects/Prusa-Firmware-Buddy-ModularBed/build
    
  3. Use pre-built Dwarf/Modularbed firmware and flash it on startup by xlBuddy

    • Specify the location of the .bin file with DWARF_BINARY_PATH/MODULARBED_BINARY_PATH.
    • For example
    cmake .. --preset xl_release_boot -DDWARF_BINARY_PATH=/Downloads/dwarf-4.4.0-boot.bin
    
  4. Do not include any puppy firmware, and do not flash the puppies by XLBuddy.

    -DENABLE_PUPPY_BOOTLOAD=NO
    
    • With the ENABLE_PUPPY_BOOTLOAD set to false, the project will disable Puppy flashing & interaction with Puppy bootloaders.
    • It is up to you to flash the correct firmware to the puppies (noboot variant).
  5. Keep bootloaders but do not write firmware on boot.

    -DPUPPY_SKIP_FLASH_FW=YES
    
    • With the PUPPY_SKIP_FLASH_FW set to true, the project will disable Puppy flashing on boot.
    • You can keep other puppies that are not debugged in the same state as before.
    • Use puppy build config with bootloaders (e.g. xl-dwarf_debug_boot) on one or more puppies.
    • Recommend breakpoint at the end of puppy_task_body() to prevent buddy from resetting the puppy immediately when puppy stops on breakpoint.

See /ProjectOptions.cmake for more information about those cache variables.

Running tests

mkdir build-tests
cd build-tests
cmake ..
make tests
ctest .

The simplest way to to debug (step through) a test is to specify CMAKE_BUILD_TYPE when configuring cmake -DCMAKE_BUILD_TYPE=Debug .. , build it with make tests as previously stated and then run the test with gdb <path to test binary> e.g. gdb tests/unit/configuration_store/eeprom_unit_tests.

Flashing Custom Firmware

To install custom firmware, you have to break the appendix on the board. Learn how to in the following article https://help.prusa3d.com/article/zoiw36imrs-flashing-custom-firmware.

Feedback

Credits

  • Marlin - 3D printing core driver
  • Klipper - input shaper code based on Klipper

License

The firmware source code is licensed under the GNU General Public License v3.0 and the graphics and design are licensed under Attribution-NonCommercial-ShareAlike 4.0 International (CC BY-NC-SA 4.0). Fonts are licensed under different license (see LICENSE).

prusa-firmware-buddy's People

Contributors

bkerler avatar chleba avatar czdanol-prusa avatar danopernis avatar derevin avatar dragomirecky avatar drracer avatar espr14 avatar hagridpon3 avatar helclm avatar joshymjose avatar kvmq avatar laloch avatar lukash avatar lukaslendvorsky avatar marekmosna-prusa3d avatar michalrudolf avatar milosfec avatar mistrkernnunos avatar mkbel avatar radekvana avatar tomasjakubik avatar tomcus avatar vladamatena avatar vojtanvk avatar vorner avatar wavexx avatar xpila avatar yaqwsx avatar zoltan-l avatar

Stargazers

 avatar  avatar  avatar  avatar  avatar  avatar  avatar  avatar  avatar  avatar  avatar  avatar  avatar  avatar  avatar  avatar  avatar  avatar  avatar  avatar  avatar  avatar  avatar  avatar  avatar  avatar  avatar  avatar  avatar  avatar  avatar  avatar  avatar  avatar  avatar  avatar  avatar  avatar  avatar  avatar  avatar  avatar  avatar  avatar  avatar  avatar  avatar  avatar  avatar  avatar  avatar  avatar  avatar  avatar  avatar  avatar  avatar  avatar  avatar  avatar  avatar  avatar  avatar  avatar  avatar  avatar  avatar  avatar  avatar  avatar  avatar  avatar  avatar  avatar  avatar  avatar  avatar  avatar  avatar  avatar  avatar  avatar  avatar  avatar  avatar  avatar  avatar  avatar  avatar  avatar  avatar  avatar  avatar  avatar  avatar  avatar  avatar  avatar  avatar  avatar

Watchers

 avatar  avatar  avatar  avatar  avatar  avatar  avatar  avatar  avatar  avatar  avatar  avatar  avatar  avatar  avatar  avatar  avatar  avatar  avatar  avatar  avatar  avatar  avatar  avatar  avatar  avatar  avatar  avatar  avatar  avatar  avatar  avatar  avatar  avatar  avatar  avatar  avatar  avatar  avatar  avatar  avatar  avatar  avatar  avatar  avatar  avatar  avatar  avatar  avatar  avatar  avatar  avatar  avatar  avatar  avatar

prusa-firmware-buddy's Issues

Only first 19 letters of long filename is shown

Firmware: 4.0.1

When selecting the G-code file to be printed, only the first 19 letters are shown. Filenames generated by PrusaSlicer can be very long and different versions is hard to distinguish if they only differ in the last part of the filename.

On the small display of Prusa MKs the filename is scrolled to display the full filename.

If scrolling the name in the file list is impossible, the full name could be shown after selection - The display should be large enough to display a lot more of the filename (Screen with model icon).
This will give a last change to check if the correct file is selected - print or go back to file list and select another file.

Feature request while loading filament

Brand new Prusa Mini, firmware 4.0.0. Using the sample Prusament that came with the printer.
whilst loading filament, often the filament doesn't get immediately pulled into the extruder, so when the extruder stops, the filament is only half way along the bowden tube.

If 'is color correct' = No, then
Filament moves a bit further forward then
We're sent back to main menu. At this moment I have a half-loaded filament only.
Add loop back to No, to give an option to extrude a bit more and eventually purge?
Thanks!

Mid-print tuning results in far too drastic temperature swings at the nozzle

For example, I just was printing at 230 and used tuning to set the printer to 220. The software reported that it knew it needed to heat when the screen showed 219 and it got all the way to 214 before the temperature stopped declining and headed back up. If I weren't already printing way above the necessary temperature, this could result in under extrusion or clogging.

Unload filament would not heat/start

I just had a case where I confirmed unloading the filament, but nothing happened. The Mini did not heat up, the display says "ramming", but no motors were moved at all. This happened immediately after I had to manually finish one of those seemingly unfinished print jobs (see #22). Maybe that's a connection to look into. Firmware 4.0.1.

The printing time is incorrect

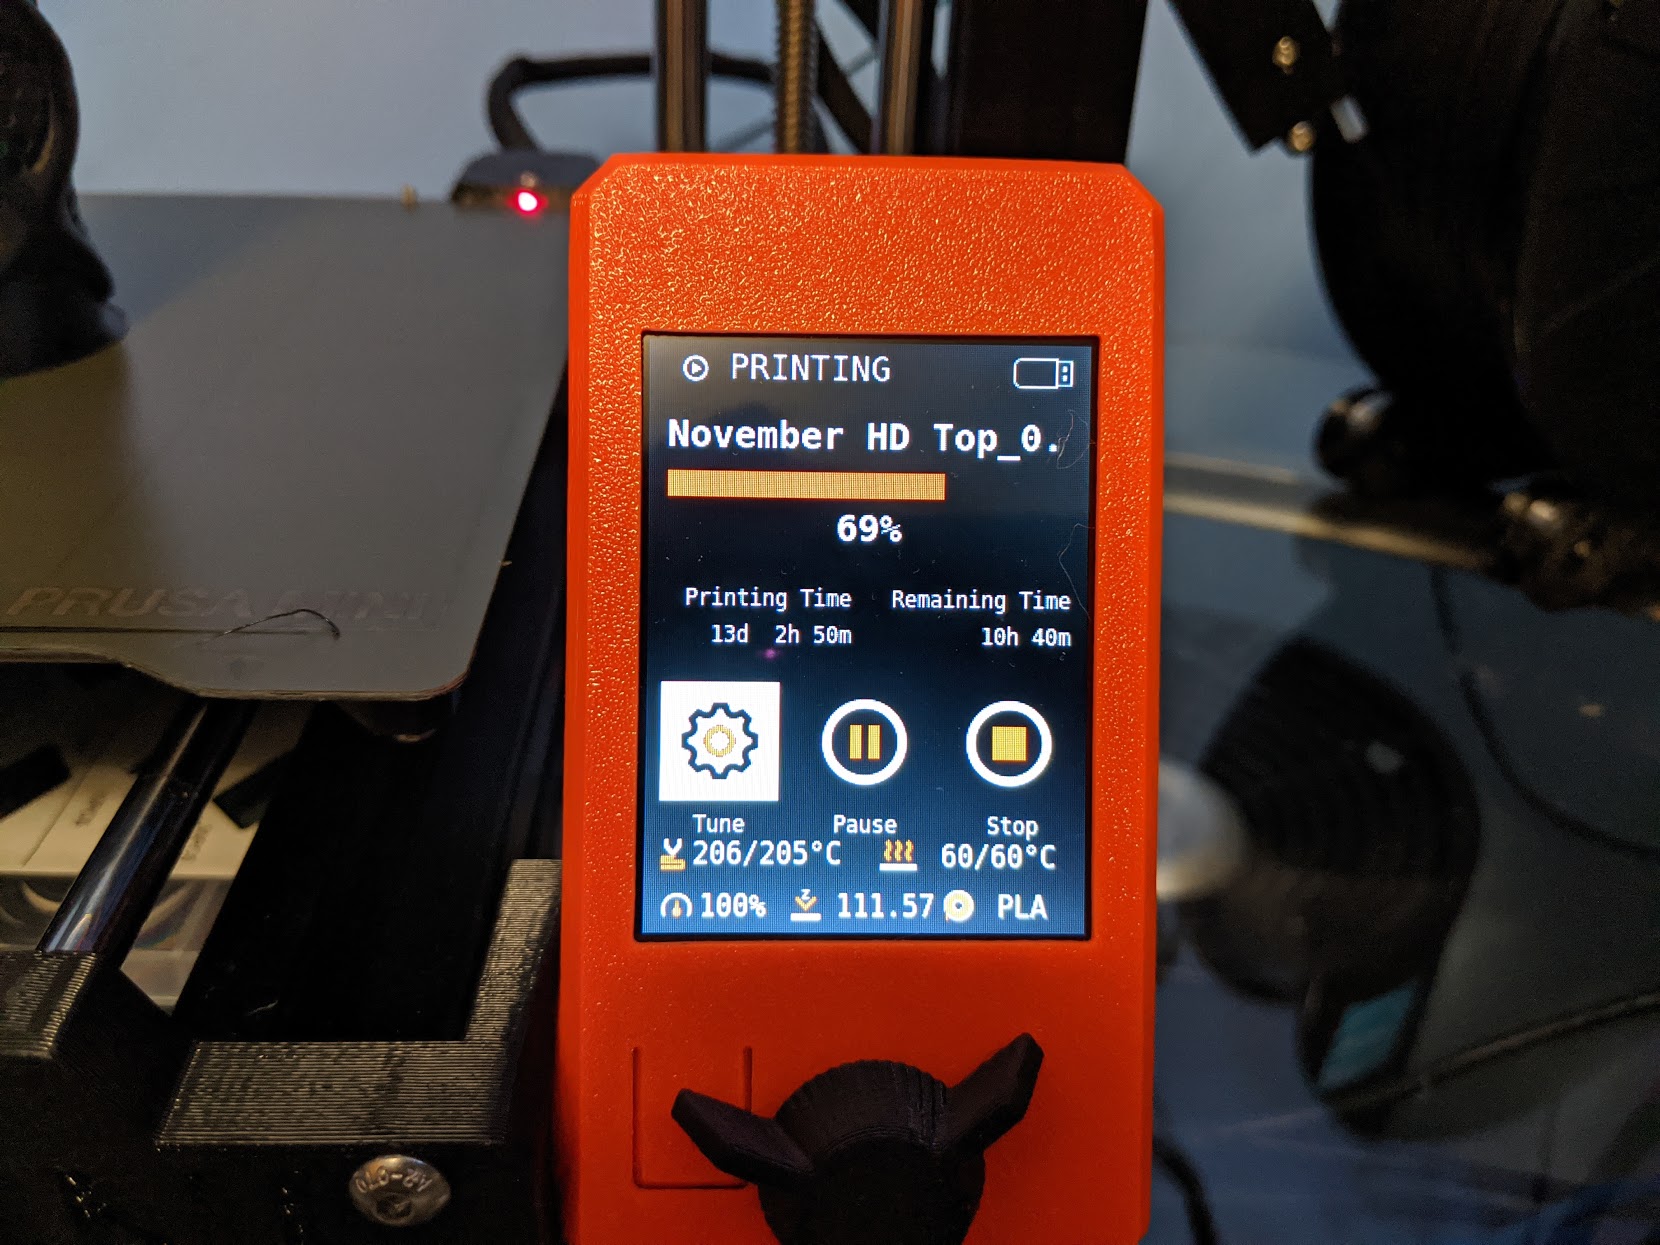
On the display it reports that the printing time elapsed is "13d 3h 16m" and it should report "1d 3h 16m", must be wrong because the printer has not even existed that long! lol.

V4.0.0 firmware provided on USB stick with printer

I did not watch the time rollover past 24 hours so I am not sure of the exact problem but I can try things if it helps to solve.

I am an amateur programmer so I doubt I can find it in the source conclusively on my own, and I am unwilling to break the tab off my mainboard to try to test it to contribute.

IMG_20191220_210937
IMG_20191220_210940

Allow greater than 4x4 mesh leveling

The Prusa Mini currently uses 4x4 bed leveling, and while this is good and useful for most uses, some tools require I have a perfect middle spot, which can only be done using a 5x5 or 7x7 or other odd-numbered Mesh Leveling option. This is also very useful for users who want as perfectly flat of a bed as physically possible.

Relevant Forum Thread: https://forum.prusaprinters.org/forum/general-discussion-announcements-and-releases/4x4-mesh-bed-leveling-why/#post-182333

Allow for faster baudrates over USB serial port

Streaming gcode with lots of tiny arc segments over serial is still troublesome, a baudrate of 115200 just isn't enough for that. Allowing for e.g. 230400, 460800, 921600 or the atmega special 250000 would be a nice feature.

Kalibrace menší plochy

Prusa slicer by mohl spočítat bounding box první vrstvy a podle toho vytvořit G29 parametry (L, R, F, B), aby se kalibrovala pouze plocha, na které se bude tisknout. FW by pak našel nejbližší kalibrační body (směrem k okraji podložky) a kalibroval by jen daný prostor. Kalibrace by tak byla rychlejší a přesnější. V případě počtu kalibračních bodů méně než 3 (v každém směru) by se přidaly body, aby jich bylo minimálně 3x3. Pokud je kalibrovaná plocha malá, tak by se případně mohlo přidat o 1 (či více) měření navíc. Čas by tak byl srovnatelný s běžnou kalibrací celé podložky, ale přesnost by byla větší, což je u malých výtisků důležitější.

Smysl to bude mít více pro i3 a nejvíce pro CoreXY (Prusa MAXI). Případně to může být jedno z témat příštího Hackatonu.

Fail to print from sub-folders (Folder/topic/"file"

Was not able to print a job from sub/sub folder like

Folder/topic/"file"

The temperature indication line for extruder and bed was flashing blue, and never increase.

By moving the same file to : Folder/"File" was positive.

Problem unloading filament with Prusa Mini

Just got a brand new Prusa Mini. Firmware 4.0.2+1977.
buddy board 1.0.0.

I'm having problems unloading and loading filament.
After a print, if I choose Unload filament, the extruder moves the filament backwards and forwards and then grinds the filament. I'm using the Prusament samples that came with the box.
The only way to remove the filament is to unscrew the brass fittings and pull the filament with pliers.
Could this be fixed, please? thanks!

Add more Print Specs to printing page, print complete page, Info area

This isn't as much of a bug as a request I have myself and seen elsewhere. If we could see the meters/grams of filament used during and after the print, this would be very, very useful.

Also, the Info page only displays CPU usage and something about Display test. "How many meters used" over the printer's lifetime (kind of like a print odometer) would be useful.

Last, but not least, for those of us without filament sensors (or even those with sensors), perhaps we could have a way to keep track of used filament. For example, if I load a spool, I could choose to mark it as a Full Spool, and the printer knows that if I don't unload it or otherwise object, it will keep track of how much I have left - until, when I attempt to print something with low filament, it suggests that I don't have enough and gives me the option to pause the print automatically shortly before it believes I will run out.

Default is to re-print after print?

95% of the time, I only print a model file once. If I print it more than once, it is properly in another material or colour.

When a print finish, the default predefined action is to re-print the model. I often, by mistake, click the button and starts a new print of the same model. To get out of the situation, I have to stop the print and confirm. The heaters has properly been turned on as well and must be turned off...

In my mind the right default action would be to return to the main menu or the file list.

If I had a print farm, this option would be nice to print a lot of the same parts, but this printer is recommended to beginners and schools. Any default action should always be harmless in my opinion.

System crash after long idle period

Firmware 4.0.1.
Printed a benchy, plugged into the network, realized that the network doesn’t do anything, left idle. After an unknown number of hours, the system crashed.
D7DDA6A7-8E52-433D-B11B-8984F1282483

Y-Homing Crash

Sometimes when homing with G28 the printer can't detect the end of the y-axis and therefore the y-motor will keep crashing against the end for 2 - 3 seconds before it finds out its the end.

Turning the power off and on helps. But the issue keep coming back.

Calibrating "Mesh Bed Level." no longer works on my Prusa MINI

Hello, I've been successfully printing on my MINI for a little over a week now, until today when I had to remove some stuck filament from my extruder and the automatic bed leveling stopped working.

What happens is, when I start "Mesh Bed Level." from the Calibration menu:

  1. The Z-axis auto-homes.
  2. The extruder moves to the first point, goes down and up, with the LED on the sensor blinking.
  3. The extruder moves to the second point, goes down and up, with the LED on the sensor blinking.
  4. The extruder moves to the third point, but sometimes instead of going down and up, it goes up twice, and the LED never blinks.
  5. The extruder moves to the fourth point, and always just goes up twice, and the LED never blinks.
  6. This process repeats for the next three lines, with the points on the X-axis closest to the Z-axis calibrating properly, while the points furthest away fail to calibrate at all.

I'm not sure why this is happening--my MINI appears fine, nothing seems misaligned, and the screws are properly tightened--so I'm not sure what I need to do to fix this, if there's anything that can be done without modifying the code. If code changes are needed, I'm not opposed to doing the work myself, but I'm not familiar with this code base or how to get started developing and debugging on this platform.

In my opinion, a minimum fix would be to error-out if the z-axis moves up twice without the sensor LED blinking (to avoid wasting the user's time), but a better fix would be to never move up on the first move in the first place, and the best fix would enable the user to "guide" the extruder head to the proper height when an error is detected (so it doesn't crash into the build plate) and then re-do that point's calibration.

This is happening on the latest firmware (4.0.1-final+1974).

Won't start printing

Most of the time if you plug the usb stick into the printer while its on, and try to start a print nothing happens.

Reset or turn the printer off and on lets you start the print.

"feature request" show information's of prints from OctoPrint

Description:
While prints initiated from OctoPrint, the display shown no progress of the print, but only the home screen (plus temps, nozzle height, speed ratio and material).

Feature request:
Show same information's in the display for prints initiated from OctoPrint as for print jobs from USB drive, at least progress in percent, printing and remaining time, like the MK3 does.
Also the option to stop or pause the print would be great.

Collision detection, lubrication self test

During self test, printer should test the force needed to move from one end to the other for X and Y axes. In case of high force or variable force needed, user should be notified that rods may need lubrication. Otherwise, false collision detections can occur during printing.

As well as belts are quantified in numbers, the lubrication of rods / state of bearings could be as well for X, Y, and Z axes.

If collision detection occurs, printer should home an axis and go to the end of the axis to find out if it was caused by collision or by friction of rods (bearings). If it finds axis too short, it should pause the print. Otherwise, shifted layers will occur.

Heatbed positioning screws impacting mesh bed leveling procedure?

When observing the mesh bed leveling procedure on FW 4.0.1 it seems that in the last row of measuring points (at the very back of the bed) the second and third measurements near the heatbed positioning screws result in less Z axis movement compared to all the other measurement points.
If that is a reproducible "problem" I assume this is already reflected in the firmware???

Printer is not setup to work properly with 0.25mm nozzle

While PrusaSlicer has configuration options for it, the Mini itself does not have any mechanism I can tell to compensate for a nozzle change. I've gone back through the initial wizard and first layer calibration and all the menus I can find and there's nowhere that I can tell it to not expect the ability to extrude for a nozzle other than 0.4.

As a result:

  • First layer calibration can't complete as it begins to ram/clog the filament in the nozzle near the end
  • Purge commands try to push too much filament through and can cause the extruder gears to grind away the filament until it cannot push any further
  • Loading filament is the same as above

Thermal Runaway Bed-error when placing steel sheet on heated bed

Description: When the printer is pre-heated w/o spring steel sheet, and the cold (~ambient temperature) steel sheet is placed on the printer bed, the steel sheet cools the heated bed down by an amount of Kelvins (visible in the display before the warning).
The printer then stalls with the error message

THERMAL RUNAWAY
Bed
[blank lines]
4.0.1-final+1974

Possible functional issue: the firmware is specified that this temperature drop is not plausible, and assumes the bed sensor is giving false readings.

Proposed solution: allow for higher temperature drops in the firmware to allow simultaneous pre-heating and cleaning/preparing bed for the next print.

Bed Level Correction needed

I can't get a good first layer on large prints. The majority of the bed prints nicely on both textured and smooth sheets; however, the back-right corner fails to stick. If I adjust down with live Z to get the back-right corner to stick, the rest of the bed is too squished.

After working with live chat support, there does not seem to be an easy mechanical solution in this case. If this was happening on my MK3, I believe it could be easily remedied with the Bed Level Correction function.

DHCP broken on 4.0.3-RC1

With 4.0.1 the mini would do a DHCP discover and then use the IP it was handed by the server, but on 4.0.3-RC1 it doesn't take the IP:

Feb 13 10:26:48 apu2c4 dnsmasq-dhcp[30300]: DHCPDISCOVER(enp3s0) 10:9c:70:08:0a:fc
Feb 13 10:26:48 apu2c4 dnsmasq-dhcp[30300]: DHCPOFFER(enp3s0) 172.20.0.168 10:9c:70:08:0a:fc
Feb 13 10:26:56 apu2c4 dnsmasq-dhcp[30300]: DHCPDISCOVER(enp3s0) 10:9c:70:08:0a:fc
Feb 13 10:26:56 apu2c4 dnsmasq-dhcp[30300]: DHCPOFFER(enp3s0) 172.20.0.168 10:9c:70:08:0a:fc
Feb 13 10:27:12 apu2c4 dnsmasq-dhcp[30300]: DHCPDISCOVER(enp3s0) 10:9c:70:08:0a:fc
Feb 13 10:27:12 apu2c4 dnsmasq-dhcp[30300]: DHCPOFFER(enp3s0) 172.20.0.168 10:9c:70:08:0a:fc
Feb 13 10:27:44 apu2c4 dnsmasq-dhcp[30300]: DHCPDISCOVER(enp3s0) 10:9c:70:08:0a:fc
Feb 13 10:27:44 apu2c4 dnsmasq-dhcp[30300]: DHCPOFFER(enp3s0) 172.20.0.168 10:9c:70:08:0a:fc
Feb 13 10:28:44 apu2c4 dnsmasq-dhcp[30300]: DHCPDISCOVER(enp3s0) 10:9c:70:08:0a:fc
Feb 13 10:28:44 apu2c4 dnsmasq-dhcp[30300]: DHCPOFFER(enp3s0) 172.20.0.168 10:9c:70:08:0a:fc
Feb 13 10:29:44 apu2c4 dnsmasq-dhcp[30300]: DHCPDISCOVER(enp3s0) 10:9c:70:08:0a:fc
Feb 13 10:29:44 apu2c4 dnsmasq-dhcp[30300]: DHCPOFFER(enp3s0) 172.20.0.168 10:9c:70:08:0a:fc

IMG_5949

USB stick not detected, needs reboot

I had several cases where my USB stick would not be detected by the Mini. It's not a problem of the stick (I tried several) or the formatting (FAT32). Most of the time the specific stick even works fine. At some point it stops working and I have to restart the Mini for the problem to go away. So far I have been unable to nail it down. It could be caused by hidden metadata stuff written by my Mac or by the specific files I place on the stick (had the impression that larger GCODE files might cause the problem, maybe as part of the preview functionality).

Starts to print something when USB is removed at the print finished screen

After a print is finished, if one does not select either reprint or home, when the USB is removed, "something" tries to print, as the Z axis moves up, and the buttons change from "reprint" and "home" to "resume" and "stop".

The heaters do not seem to activate as they show the current temp over 0.

If you click stop, the printer thinks for a second, then lowers Z back to where it was, or close to where it was.

4.0.1 firmware told me I had a thermal runaway during self test. After a power cycle the error went away and I've been using it for over an hour since with no problems.

I downloaded 4.0.1 and moved the 4.0.0 firmware off of the USB drive and installed 4.0.1 as soon as I powered the Mini on for the first time. During the self test it told me there was a thermal runaway (I liked the big red screen) and to check my cables. Everything had clicked in place just fine so I power cycled the machine and the self test passed just fine the second time.

Change filament assumes "yes" on second check

I mis-loaded my mini a few times, and unlike the mk2.5s/mk3s where it keeps asking if the filament is the right color, the mini only asked once, then assumed "yes" on the second check and started to print right away.

There was clearly no filament going down to the hotend.
I would suggest enabling a check loop to keep asking if it is the right color. And perhaps if the 2nd or 3rd answer is "No", ask if the filament was loaded correctly.
If yes, keep asking for color, or possibly cancel (who needs to hit it that many times), but if no, start the load cycle over again, so the filament can be re-inserted back down the bowden.

I lost a print an hour in, because I ran out of filament, and mis-loaded the new filament (I pushed in as far as it would go, but it was not grabbed)

Error in minda probe is not detected by mesh bed leveling

I have a broken cable on my minda probe and thereby noticed a bug in the firmware.
When the sensor fails to detect the bed on the MK3 it gives a warning and re-calibrates.
When the sensor fails on the Mini by not giving a response, the head goes up by some millimeters and goes on to the next location. When it starts to print the head goes up by the same few millimeters on these points.
So when hitting the maximum height allowed in the calibration it should give a warning!

crash recognition at mesh bed leveling is not working, printer will destroy itselfe

firmware 4.0.1 offizial Prusa Driver site release.

yesterday i forgotten that i took of the spring steel plate and started a print. a few minutes later i looked after it.

the nooze crashed so forcefull into the hotbed, that it got scrached very deep (you can scratched and bentded cooper), bented about 3 cm and even remained a massive dent. have to try out this evening if its still usable. i think i need a new hotbed :(

so be carefull, crash recognition on the mesh bed leveling does not work!
THIS SHOULD BE DEFINITLY BE HOTFIXED

Sleep Display During Prints

It would be nice if there was an option in the Tune menu to to have the display automatically sleep after 10 seconds while printing. Any input by the user should wake the screen when this mode is enabled.

If possible, the display should also wake any time one of the printer axes has not moved for more than 2 seconds.

Filament detection and measuring

If you swap filament detection ball with Bondtech wheel and point detector to the teeth you will get pulse signal every time filament moves. Thus you can measure speed of filament movement. This can:

  1. detect nozzle clog
  2. detect filament breakage
  3. detect filament grinding
  4. detect presence of filament (during move)
  5. detect if and when extruder grabs filament
  6. measure extruder multiplier (extruder gears can squish soft filaments which changes gear ratio)

If you add semitransparent cylinder at the wheel, you can detect even spaces between teeth. Then you can detect 3 states:

  1. no filament
  2. filament, no tooth
  3. filament, tooth

This provides detection of filament without any move.

Filament is thin so movement of wheel to the detector is very small. Still, you can add axis so the wheel is not moved but rotated. The end of the wheel will move faster and further. Finally, you don't need to use Bondtech wheel but you can print yourself with more optimal teeth shape (squared).

Feature request #define SERIAL_PORT_2 6

In the next update, could you please activate Serial Port 2. (Marlin #define SERIAL_PORT_2 6) Then you could already use the esp. Would not like to dismember my board to use this function.

Feature Request: Change the default selection after starting print

Currently the default selection, after a print is started is highlighting "Pause".

Being used to some other printers, where a double click of the dial brings up live Z adjust, this just triggers a pause a few lines into the first layer.

I would like to change the default action to "Tune" after a print is started. This way others do not accidentally hit pause a few lines into the first layer as I did.

"feature request" preheat nozzle to 170

Wouldn't it make sense to generally set the nozzle to 170 degrees when preheating, if I now take ASA, for example, the nozzle heats up to 260 degrees and then cools down to 170 for leveling and then heats up again to 260,

Print not being shown as completed

I had several prints that did not "end" properly, meaning the Mini would be in "pause" rather than saying the print was successful. First I though it might have beeen caused by a print that was exactly 18 cm in height, but then I saw the same for smaller prints, too.

HardFault on access to Web-Control

Setup:

  • Firmware: 4.0.1-final+1974
    (from shipped stick, latest release from GH does not trigger an update)
  • Browser: Firefox 71.0 on Linux
  • Hardware: Prusa Mini + Filament Sensor

Steps to reproduce:

  • Boot up printer
  • Let an IP get assigned
  • Open http://<ip of printer>/ in browser
  • Experience crash and fan spin-up on printer while getting only a partial website

Note:

  • In some cases the site gets loaded without image but with stylesheet
  • Most times the site looks like displayed below
  • After reset on crash the (broken) website can refresh temperatures without issues
  • Possibly related to / duplicate of #18 but in my case not related to an active print but occurring after freshly starting the printer without any print task, therefore opening a separate issue for this

Trace:
IMG_20191229_162140

Website:
image

Filament tip problem

After finish printing, and some hours later, the filament tip gets cold in a form that could not go through the ptfe tube when I was trying to unload the filament. To be able to unload the filament, I unscrew the brass nut and cut the filament tip, then the filament was easily unloaded.

Maybe you can add some filament movement right after ending printing to change the filament tip.

MMU2S not supported

it is not possible to use MMU2S in mini prusa for a software problem says a guy from PRUSA support.

how can we go around the problem?
Prusa's technical support adds that even other MMs (multi materials) are not compatible.

HELP BOYS :(

Is anyone trying to work on it?

Load Filament and Color Change Bug

Load Filament - correct color extruding question only prompts once. If you select “no”, more filament is extruded, but the question doesn’t repeat to confirm. The load filament routine completes, thus requiring to start the load filament process if something was wrong. In pre printing preparation stage, this is ok. But, during mid print, if the user/printer fails to load the filament, then the printer resumes printing once the load filament routine is complete and can print without filament for a few layers until it reaches the extruder.

While trying to find an option to restart the load filament process, I found the Change Color Filament option in the print options, but the option did not work. Eventually the printer crashed with E1 error, with nozzle and bed no longer heating prior to the error. Restarted printer and removed fail print, printer is still ok.

Load filament initial load, if the user/loading gear fails to grab the filament initially, the pre-set load movement from the gear to extruder can be missed, then the user would have to restart the printer to redo it.

backing out of the initiated program

(understand that this is my first 3D printer and also my first experience with a 3D printer) I set up my Prusa Mini but struggled to backtrack once I started setup. The reason I wanted to backup was two-fold:
the filament wasn't feeding into the long white tube that is attached to the print nozzle...had to unplug the machine to try again (numerous times until the feed-gear finally grabbed the filament and fed it to the print nozzle....no apparent reason this was so difficult to feed the filament)
when the test part became separated from the heat bed, I could not interrupt the printing without again unplugging the machine.
If I had a way to interrupt the setup process in either instance, I'm certain it would of been better than unplugging the power supply.
Thank You Josef for requesting feedback from new owners.

Different adjustment settings needed for PEI and powder coated sheet

I just changed from the powder coated spring sheet to the PEI sheet due to severe sticking issues that developed over time and wanted to test whether they were related to the filament used or to the bed surface itself. Before changing the surfaces I noticed that their thickness is quite different (PEI sheet somewhere around 1.7mm, powder coated sheet somewhere around 0.7mm) but assumed this would not effect the mesh bed leveling readings.
Apparently these different thicknesses are relevant for the MINDA readings as the adjustment height in the firmware needs to be changed by approx. 0.4mm (i.e. with the powder coated sheet I need a value of -1.3 to get the filament to stick well, with the PEI sheet I need to change the value to -0.9mm to get the filament to stick well). This is a real issue if you intend on printing a thin layer as this may cause the printhead to damage your PEI sheet with the first printing moves if you haven't changed the adjustment height appropriately.
Maybe I should have read the Manual accordingly - but a dedicated reminder in the different sheet bags would also help :-).
Or maybe the reading difference is not intended and there should not be the need for such adjustment height change?

X-axis crash

I just had a case where I needed to cancel a print during the first layer. I think it was still in the skirt. The x-carriage crashed into the right side (well, maybe that's a harsh word, but it obviously did not find the endstop). Single case so far. Firmware 4.0.1.

Nozzle cooling to 170°C during probing not consistently implemented

Description:
When I preheated the printer for any material, and start a print after that temperature has reached, the f/w first cools the tool down to 170°C, then proceeds mesh bed leveling with that temperature. Once complete, it heats up to print job temperature and prints as expected.

When doing first layer calibration, the f/w will not cool down to 170° tool temperature, but proceeds mesh bed leveling with the selected material temperature. Both cases are reproducible.

Assumption:
Cooling the tool to 170°C is required on the Mini, because the MINDA probe does not feature a thermistor for heat compensation.

Expected behaviour:
For the same reason the tool is limited to 170°C during pre-print mesh bed leveling, the tool should be limited for pre-1st-layer-calibration mesh bed leveling as well.

Feature Request: Lift and Park after "First Layer Cal."

Firmware Version: 4.0.1

Problem:
After running first layer calibration, the nozzle returns to front right position 10 mm over the build plate. I now have the choice of rerun the calibration. Doing so requires the build plate and the nozzle to be cleaned, but doing so it is very difficult when the build plate and nozzle is in this position:

P1130559 - GitHub

Running this test with PETG or other sticking filament requires the nozzle to be cleaned between runs.

Solution:
When the calibration is finished, lift z to 100 mm and centre the nozzle over the build plate. This way it is easy to clean the nozzle, remove the test print and prepare for another print (applying windows cleaner ;-)
If this is the last print, the printer would also be in a position where it could be turned off and moved (if required).

Filament runout has no sound

Though this is probably an issue for the LCD, I noticed when testing the runout sensor, there was no audible beeps. There was only text showing up on the display. Since there is a peizo on the LCD, there should be a audible notification.

Recommend Projects

  • React photo React

    A declarative, efficient, and flexible JavaScript library for building user interfaces.

  • Vue.js photo Vue.js

    🖖 Vue.js is a progressive, incrementally-adoptable JavaScript framework for building UI on the web.

  • Typescript photo Typescript

    TypeScript is a superset of JavaScript that compiles to clean JavaScript output.

  • TensorFlow photo TensorFlow

    An Open Source Machine Learning Framework for Everyone

  • Django photo Django

    The Web framework for perfectionists with deadlines.

  • D3 photo D3

    Bring data to life with SVG, Canvas and HTML. 📊📈🎉

Recommend Topics

  • javascript

    JavaScript (JS) is a lightweight interpreted programming language with first-class functions.

  • web

    Some thing interesting about web. New door for the world.

  • server

    A server is a program made to process requests and deliver data to clients.

  • Machine learning

    Machine learning is a way of modeling and interpreting data that allows a piece of software to respond intelligently.

  • Game

    Some thing interesting about game, make everyone happy.

Recommend Org

  • Facebook photo Facebook

    We are working to build community through open source technology. NB: members must have two-factor auth.

  • Microsoft photo Microsoft

    Open source projects and samples from Microsoft.

  • Google photo Google

    Google ❤️ Open Source for everyone.

  • D3 photo D3

    Data-Driven Documents codes.