pleasestartyourperformance / react-learn Goto Github PK
View Code? Open in Web Editor NEWreact整理知识点
react整理知识点


    function fun(obj){
      return `姓名是${obj.name}`
    }
    let obj= {
      name:'小明'
    };
    let num = 1
    let myDom = (
      <div>
        <div>{fun(obj)}</div>
        <div>{num}</div>
      </div>
    )
ReactDOM.render(myDom,document.getElementById('app')) let arr = [
<p>123</p>,
<p>123</p>,
<p>123</p>,
<p>123</p>
]
let myDom = (
<div>
<div>{arr}</div>
</div>
)
ReactDOM.render(myDom,document.getElementById('app')) const obj= {
name:'小明'
};
const domStyle = {
width: '453px',
margin: '20px auto',
}
const myDom = (
<div>
<div style={domStyle} className='myclass' >{obj.name}</div>
</div>
)//单个
const msg = '123'
const class1 = 1
const myDom = (
<div className={`bubble-box-${class1}`} >
<div>{msg}</div>
</div>
)
//多个
<fieldset className={`${styles.formFieldset} ${styles.formItem}`}>
</fieldset>1.Context 通过组件树提供了一个传递数据的方法,从而避免了在每一个层级手动的传递 props 属性。
创建一个上下文的容器(组件), defaultValue可以设置共享的默认数据
const {Provider, Consumer} = React.createContext(defaultValue);和他的名字一样。用于生产共享数据的地方。生产什么呢? 那就看value定义的是什么了。value:放置共享的数据。
<Provider value={/*共享的数据*/}>
    /*里面可以渲染对应的内容*/
</Provider>这个可以理解为消费者。 他是专门消费供应商(Provider 上面提到的)产生数据。Consumer需要嵌套在生产者下面。才能通过回调的方式拿到共享的数据源。当然也可以单独使用,那就只能消费到上文提到的defaultValue
注意是通过回调的方式
<Consumer>
  {value => /*根据上下文  进行渲染相应内容*/}
</Consumer>1.App.js 父组件
//App.js
import React from 'react';
import Son from './son';//引入子组件
// 创建一个 theme Context,
export const {Provider,Consumer} = React.createContext("默认名称");
export default class App extends React.Component {
    render() {
        let name ="小人头"
        return (
            //Provider共享容器 接收一个name属性
            <Provider value={name}>
                <div style={{border:'1px solid red',width:'30%',margin:'50px auto',textAlign:'center'}}>
                    <p>父组件定义的值:{name}</p>
                    <Son />
                </div>
            </Provider>
        );
    }
}
2.son.js 子组件
//son.js 子类
import React from 'react';
import { Consumer } from "./App.js";//引入父组件的Consumer容器
import Grandson from "./grandson.js";//引入子组件
function Son(props) {
    return (
        //Consumer容器,可以拿到上文传递下来的name属性,并可以展示对应的值
        <Consumer>
            {( name ) =>
                <div style={{ border: '1px solid blue', width: '60%', margin: '20px auto', textAlign: 'center' }}>
                    <p>子组件。获取父组件的值:{name}</p>
                    {/* 孙组件内容 */}
                    <Grandson />
               </div>
            }
        </Consumer>
    );
}
export default Son;
3.grandson.js 孙组件
//grandson.js 孙类
import React from 'react';
import { Consumer } from "./App.js";//引入父组件的Consumer容器
function Grandson(props) {
    return (
         //Consumer容器,可以拿到上文传递下来的name属性,并可以展示对应的值
        <Consumer>
            {(name ) =>
                   <div style={{border:'1px solid green',width:'60%',margin:'50px auto',textAlign:'center'}}>
                   <p>孙组件。获取传递下来的值:{name}</p>
               </div>
            }
        </Consumer>
    );
}
export default Grandson;
如果你想写的组件只包含一个 render 方法,并且不包含 state,那么使用函数组件就会更简单。
我们不需要定义一个继承于 React.Component 的类,我们可以定义一个函数,这个函数接收 props 作为参数,然后返回需要渲染的元素。
函数组件写起来并不像 class 组件那么繁琐,很多组件都可以使用函数组件来写。
function Square(props) {
  return (
    <button className="square" onClick={props.onClick}>
      {props.value}
    </button>
  );
}class Square extends React.Component {
constructor(props) {
super(props);
this.state = {
squares: Array(9).fill(null),
};
}
render() {
return (
<button
className="square"
onClick={() => this.props.onClick()}
>
{this.props.value}
</button>
);
}
}1.在类组件中需要调用reder(){return{UI内容}}函数组件中只需要return就可以了
2.在函数组件中无constructor,props是传递下来的调用时候直接props. 而类组件中需要this.props
3.场景不同--文章第一条
4.函数组件 无state 无生命周期 无 this 而类组件都有
我们今天讲的这种react路由懒加载是基于import 函数路由懒加载, 众所周知 ,import 执行会返回一个Promise作为异步加载的手段。我们可以利用这点来实现react异步加载路由
const routerObserveQueue = [] /* 存放路由卫视钩子 */
/* 懒加载路由卫士钩子 */
export const RouterHooks = {
  /* 路由组件加载之前 */
  beforeRouterComponentLoad: function(callback) {
    routerObserveQueue.push({
      type: 'before',
      callback
    })
  },
  /* 路由组件加载之后 */
  afterRouterComponentDidLoaded(callback) {
    routerObserveQueue.push({
      type: 'after',
      callback
    })
  }
}
/* 路由懒加载HOC */
export default function AsyncRouter(loadRouter) {
  return class Content extends React.Component {
    constructor(props) {
      super(props)
      /* 触发每个路由加载之前钩子函数 */
      this.dispatchRouterQueue('before')
    }
    state = {Component: null}
    dispatchRouterQueue(type) {
      const {history} = this.props
      routerObserveQueue.forEach(item => {
        if (item.type === type) item.callback(history)
      })
    }
    componentDidMount() {
      if (this.state.Component) return
      loadRouter()
        .then(module => module.default)
        .then(Component => this.setState({Component},
          () => {
            /* 触发每个路由加载之后钩子函数 */
            this.dispatchRouterQueue('after')
          }))
    }
    render() {
      const {Component} = this.state
      return Component ? <Component {
      ...this.props
      }
      /> : null
    }
  }
}
asyncRouter实际就是一个高级组件,将()=>import()作为加载函数传进来,然后当外部Route加载当前组件的时候,在componentDidMount生命周期函数,加载真实的组件,并渲染组件,我们还可以写针对路由懒加载状态定制属于自己的路由监听器beforeRouterComponentLoad和afterRouterComponentDidLoaded,类似vue中 watch $route 功能。接下来我们看看如何使用。
import AsyncRouter ,{ RouterHooks }  from './asyncRouter.js'
const { beforeRouterComponentLoad} = RouterHooks
const Index = AsyncRouter(()=>import('../src/page/home/index'))
const List = AsyncRouter(()=>import('../src/page/list'))
const Detail = AsyncRouter(()=>import('../src/page/detail'))
const index = () => {
  useEffect(()=>{
    /* 增加监听函数 */
    beforeRouterComponentLoad((history)=>{
      console.log('当前激活的路由是',history.location.pathname)
    })
  },[])
  return <div >
    <div >
      <Router  >
      <Meuns/>
      <Switch>
          <Route path={'/index'} component={Index} ></Route>
          <Route path={'/list'} component={List} ></Route>
          <Route path={'/detail'} component={ Detail } ></Route>
          <Redirect from='/*' to='/index' />
       </Switch>
      </Router>
    </div>
  </div>
}Refs 是 React 提供给我们的安全访问 DOM 元素或者某个组件实例的句柄。我们可以为元素添加ref属性然后在回调函数中接受该元素在 DOM 树中的句柄,该值会作为回调函数的第一个参数返回:
class CustomForm extends Component {
  handleSubmit = () => {
    console.log("Input Value: ", this.input.value)
  }
  render () {
    return (
      <form onSubmit={this.handleSubmit}>
        <input
          type='text'
          ref={(input) => this.input = input} />
        <button type='submit'>Submit</button>
      </form>
    )
  }
}
上述代码中的input域包含了一个ref属性,该属性声明的回调函数会接收input对应的 DOM 元素,我们将其绑定到this指针以便在其他的类函数中使用。另外值得一提的是
refs 并不是类组件的专属,函数式组件同样能够利用闭包暂存其值
function CustomForm ({handleSubmit}) {
  let inputElement
  return (
    <form onSubmit={() => handleSubmit(inputElement.value)}>
      <input
        type='text'
        ref={(input) => inputElement = input} />
      <button type='submit'>Submit</button>
    </form>
  )
}import React, { Component } from 'react'
import { withRouter } from 'react-router-dom'
class Home extends Component {
toAbout=()=>{
console.log(this.props);
this.props.history.push('/about')
}
render() {
return (
<div>
主页
<button onClick={this.toAbout}>跳转到关于</button>
</div>
)
}
}
export default withRouter(Home)有点类似Vue中的slot插槽
props是我们从上个组件传值传下来的集合,react是单向数据流,每一个props都应该对应的是从上个组件传过来的值。但是这里有一个例外,那就是this.props.children
this.props.children 的值有三种可能:
React 提供一个工具方法 React.Children 来处理 this.props.children 。可以用 React.Children.map 来遍历子节点,而不用担心 this.props.children 的数据类型是 undefined 还是 Object Array

this.props.children还涉及到 回调渲染模式 后面章节会提到
思路:父元素 overflow:hidden 子元素中渲染内容
展开时:给父元素最大高度:
收起时:取消父元素最大高度
判断:最大高度 是否大于 内容实际撑起的高度 大于 无展开和收起
/**
 * @file fold
 * @author v_kuiyufeng
 * @owner v_kuiyufeng:2020-06-19
 */
import * as React from 'react'
// import * as PropTypes from 'prop-types'
import { default as c } from 'classnames'
import { CompBaseProps } from '@befe/brick-mobile-utils'
import { useState, useEffect } from 'react'


export interface FoldProps extends CompBaseProps {
    /**
     * 自定义class
     */
    className?: string
    /**
     * 最大高度设置
     */
    maxHeight: number;
    /**
     * 自定义文本默认:展开
     */
    unPackText?: string
    /**
     * 自定义文本默认:收起
     */
    packText?: string
    /**
     * slot
     */
    children: any
}

/**
 * Fold
 * @description one-ui component Fold
 */
export const Fold = (props: FoldProps) => {
    const prefixCls = 'brick-mobile-fold'
    const {
        maxHeight,
        unPackText = '展开',
        packText = '收起',
        children,
        className
    } = props
    const contentRef = React.createRef<HTMLDivElement>()
    const contentWrapperRef = React.createRef<HTMLDivElement>();
    const [contentHeight, setContentHeight] = useState(0);
    const [contentWrapperHeight, setContentWrapperHeight] = useState(0);
    const [showAll, setShowAll] = useState(false);
    useEffect(() => {
        freshHeight();
    })
    const freshHeight = () => {
        const newContentHeignt = contentRef.current.getBoundingClientRect().height;
        const newContentWrapperHeight = contentWrapperRef.current.getBoundingClientRect().height;
        if (newContentHeignt !== contentHeight || newContentWrapperHeight !== contentWrapperHeight) {
            setContentHeight(newContentHeignt)
            setContentWrapperHeight(newContentWrapperHeight)
        }
    }

    const getClassName = () => {
        return c(
            prefixCls,
            className
        )
    }
    const isOverFlow = () => contentHeight > maxHeight;

    const showUnPack = () => {
        return !showAll
            && isOverFlow()
            && contentWrapperHeight < contentHeight;
    }

    const showPack = () => {
        return showAll && contentWrapperHeight > maxHeight;
    }

    return (
        <div className={`${getClassName()} comps-ellipsis`}>
            <div
                ref={contentWrapperRef}
                className="comps-content-wrapper"
                style={{ maxHeight: showAll ? undefined : `${maxHeight}px` }}
            >
                <div
                    ref={contentRef}
                    className="comps-content"
                >
                    {children}
                </div>
            </div>
            {
                showUnPack() &&
                <div
                    className="comps-ellipsis-unpack"
                    onClick={() => {
                        setShowAll(true)
                    }}
                >
                    {unPackText}
                </div>
            }
            {
                showPack() &&
                <div
                    onClick={() => {
                        setShowAll(false)
                    }}
                    className="comps-ellipsis-pack"
                >
                    {packText}
                </div>
            }
        </div>
    )
}
@import "~@befe/brick-mobile-style/src/base";
@include exports('mobile-comp-fold') {
.brick-mobile-fold {
@include reset();
}
.comps-ellipsis {
position: relative;
.comps-content-wrapper {
overflow: hidden;
}
.comps-content{
font-size: 14px;
}
.comps-ellipsis-unpack , .comps-ellipsis-pack{
float: right;
margin-right: 0px;
margin-top: 12px;
color: #409eff;
font-size: 14px;
color: #5A90FA;
letter-spacing: 0;
}
}
}
前言:
摸爬滚打了两天,什么滚动失效,什么下拉刷新失效,基本常见的脑残的坑都踩过了。CR一手 希望对大家有帮助
一款更好用的移动端滚动插件
PC端的滚动在移动端显得很笨,better-scroll能给你带来更优质更接近移动端的滚动体验(还在等什么 只要998想要即可带回家)
① 原生。不依赖于任何库或框架,完全基于原生 JS 实现。
② 轻量。编译后的代码大小是 63kb,压缩后是 35kb,gzip 后仅有 9kb!
③ 强大。对于那些常规的滚动需求(如图片轮播,局部文字滚动等)均可轻松满足,完全可以媲美 Swiper.js 和 iScroll.js 等经典插件。
坑比较多....也比较深...甚至措不及防
ps:我这边用的是 @1.12.2 有更新的2.0版本 但是使用上的坑真的没解决 在滚动中就跪了 后面有机会在补充2.0吧
import BScroll from 'better-scroll'
//在componentDidMount中
componentDidMount(){
        const wrapper: HTMLElement | null = document.querySelector('.wrapper')
        this.scroll = wrapper && new BScroll(wrapper, {
            scrollY: true,
            pullUpLoad: {
                threshold: 80,
                stop: 0
            }
        });
}
ok 第一个坑来了
在render中你必须这样的结构
<div class="wrapper">
    // 注意这里只对第一个div产生效果 高度必须大于wrapper的高度
    <div></div>
</div>
曾经我天真的以为这样真的就可以了 呵呵
wrapper 需要绝对定位
.wrapper{
   position: absolute;
   width:100%;
   height: 100%;
   overflow: hidden;
  // white-space: nowrap;千万不要看其他文章有这个属性 ,就是坑
}注意一定要使用个防抖函数不用也要放到setTimeout()中 别问为什么 问就是教训
        const scrollOn = () => {
            const { loading } = this.state;
            !loading && this.setState({
                params: {
                    p: this.p,
                    page: this.state.params.page + 1
                },
                loading: true,
            }, () => {
                this.init();
            });
        };

        this.scroll.on('pullingUp', debounce(scrollOn), false)
React 的核心流程可以分为两个部分:
如需要,则操作 dom 节点更新;
假设前端更新一个组件需要 1ms,如果有200个组件要更新,那就需要 200ms,在这200ms的更新过程中,浏览器唯一的主线程都在专心运行更新操作,无暇去做任何其他的事情。在这 200ms 内,用户往一个 input 元素中输入点什么,回车时不会获得响应,因为渲染输入按键结果需要浏览器主线程的工作,但是浏览器主线程被占用,最后的结果就是用户敲了按键看不到反应,等更新过程结束之后,那些按键会一下出现在 input 元素里,这就是界面卡顿。
我们都知道浏览器是单线程的,当遇到大计算量的操作或者设备性能不足会使页面掉帧,导致卡顿。市面上主流显示屏刷新频率为60Hz,即每(1000ms / 60Hz)16.6ms屏幕刷新一次,业务所包含大量的组件渲染(或数据)会导致主进程长时间被占用,导致一些动画或高频操作出现卡顿和掉帧的情况 。这个过程也是同步阻塞
此时就会由同步阻塞 在之前的调度算法中,React 需要实例化每个类组件,生成一颗组件树,使用 同步递归 的方式进行遍历渲染,而这个过程最大的问题就是无法 暂停和恢复。
解决方案: 解决同步阻塞的方法,通常有两种**: 异步化 和 任务分割**。而 React Fiber 便是为了实现任务分割而诞生的。
React Fiber 解决这个问题的思路是把渲染/更新过程(递归diff)拆分成一系列小任务。每次检查树上的一小部分,做完看是否还有时间继续下一个任务,有的话继续,没有的话把自己挂起,主线程不忙的时候再继续
先写一个 demo,简化一下问题
执行下面的代码,浏览器会有10s左右的时间处于卡死状态:无法滚动、无法编辑、无法关闭tab
function repeat(str, count){
    let result = ''
    for(let i = 0; i < count; i++){
        result += str
    }
    return result;
}
console.log(repeat('1', 9999999))
按照任务拆分 的设计**,拆分计算任务,来解决页面卡死的问题
async function repeat(str, count){
    let maxLoopCount = 999999;
    let loopCount = 0;

    async function runTask(count) {
        let newStr = ''
        return new Promise((resolve, reject) => {
            window.requestAnimationFrame(() => {
                for (let i = 0; i < count && i < maxLoopCount; i++) {
                    loopCount++
                    newStr += str;
                }
                resolve(newStr);
            });
        });
    }

    while (loopCount < count) {
        taskStr += await runTask(count - loopCount);
    }
    return taskStr;
}
repeat('1', 99999999).then(result => console.log(result))fiber tree 本质上是个单链表(Singly Linked List)树结构,react 以 虚拟 DOM 节点 为单位拆分计算任务,树的遍历完成,代表计算任务的完成


js 线程如果占用主线程太长时间,会影响页面本身的渲染任务
通过拆分 js 任务,保证在不影响渲染进程的前提下,实现js复杂任务的计算
当然React在fiber的处理上远复杂的多,有兴趣的同学可以去深究下
注意input中的accept属性
图片:
const img = ".bmp, .jpeg, .jpg, .png, .gif";文件:
const fileTypeAccept = ".txt, .doc, .docx, .xlsx, .xls, .pptx, .ppt, .zip, .rar, .pdf, .tar, .mp4, .jpeg, .jpg, .png";import * as React from 'react';
import './picupload.less';
import { Loading,Message } from '@baidu/one-ui';
//上传按钮的图标
import Addpic from './imgs/addpic.svg'
//重新上传图标
import Upload from './imgs/upload.svg'
//放大的图标
import Zoom from './imgs/zoom.svg'
import {getUpload } from '../api';
interface Props {
handlePicChange: (
picUrl: string,
picFileid: number,
picName: string,
picSizeText: string,
picSize: number) => void;
//临时展示的url
picUrl: string;
//一个页面多个上传需要唯一id
uploadId?:string | 'uploadFiles'
}
interface States {
picInitialUrl: string;
isPicLoading: boolean;
isShow: boolean;
isEnlarge: boolean;
}
export default class PicUpload extends React.PureComponent<Props, States> {
state = {
picInitialUrl: '',
isPicLoading: false,
isShow: false,
isEnlarge: false
}
//选择文件后会触发
uploadImage = async (e: React.ChangeEvent<HTMLInputElement>) => {
this.setState({
picInitialUrl: ''
});
const name = e.target.files![0].name;
const size = e.target.files![0].size;
const dValue = size / 1000 / 1024 - 2;
let sizeText = '';
if (dValue > 0){
return Message.warning({
content: '图片不超过2M'
})
}
if (size < 1024) {
sizeText = size + 'B';
}
else if (size < 1024 * 1024) {
sizeText = (size / 1024).toFixed(2) + 'KB';
}
else {
sizeText = (size / 1024 / 1024).toFixed(2) + 'MB';
}
//加载中
this.setState({
isPicLoading: true
});
const oFile = e.target.files[0];
const formData = new FormData();
formData.append("file", oFile);
try {
const res = await getUpload(formData);
const {url, fileid} = res.data.data;
this.props.handlePicChange(url, fileid, name, sizeText, size);
this.setState({
isPicLoading: false
});
} catch (error) {
if (error.msg) {
Message.error({
content: '上传失败,请重新上传'
})
this.setState({
isPicLoading: false
});
}
}
}
//触发input点击事件
uploadClick = () =>{
const {uploadId} = this.props
const uploadFile = document.getElementById(uploadId || 'uploadFiles')
uploadFile?.click();
}
render() {
const { picUrl,uploadId } = this.props;
const { isShow, isEnlarge } = this.state
return <div>
{
this.state.isPicLoading
? <div className="upload-material-wrapper">
<div className="upload-add">
<Loading size="large" className="loading-icon" />
<div className="add-title">上传中...</div>
</div>
</div>
: !this.props.picUrl
? <div className="upload-material-wrapper">
<div className="upload-add" onClick={this.uploadClick}>
<img src={Addpic} className="add-img" />
<div className="add-title">上传图片</div>
</div>
</div>
: <div
className={`upload-material-wrapper uploaded-material-wrapper`}
onMouseEnter={() => {
this.setState({
isShow: true
})
}}
onMouseLeave={() => {
this.setState({
isShow: false
})
}}
>
<div className="upload-add add-pic">
<img src={picUrl} className="uploaded-pic" />
</div>
{
isShow &&
<div className="upload-shadow">
<img
src={Upload}
className='upload-shadow-img'
onClick={this.uploadClick}
/>
<img
src={Zoom}
className='upload-shadow-img'
onClick={() => {
this.setState({
isEnlarge: true
})
}}
/>
</div>
}
</div>
}
{/* 限制文件类型 */}
<input
accept=".bmp, .jpeg, .jpg, .png, .gif"
type="file"
id={uploadId || 'uploadFiles'}
className="upload-img"
onChange={this.uploadImage}
value={this.state.picInitialUrl}
/>
{/* 放大模块 */}
{
isEnlarge &&
<div className='enlarge-img-mask'>
<div className='img-wrapper'>
<img src={picUrl} alt="" />
<span
className='close-enlarge'
onClick={() => {
this.setState({
isEnlarge: false
})
}}>
</span>
</div>
</div>
}
</div>
}
};@border-color: #e0e0e0;
@hover-background: #fff;
@font-color-main: #333;
@font-color-subtext: #999;
@table-th-border-color: #eee;
.upload-img-wrapper {
display: inline-block;
position: relative;
}
.upload-img{
position: absolute;
display: none;
// left: 0;
// top: 0;
// opacity: 0;
// width: 100%;
// height: 100%;
// max-height: 100%;
// overflow: hidden;
}
.upload-material-wrapper {
position: relative;
background: #fafafa;
border-radius: 3px;
width: 136px;
text-align: center;
&.uploaded-material-wrapper {
text-align: left;
}
&.uploaded-audio-wrapper,
&.uploaded-file-wrapper {
width: 260px;
}
.upload-add {
width: 100%;
height: 136px;
border: 1px solid @border-color;
border-radius: 3px;
cursor: pointer;
&.add-pic {
position: relative;
display: flex;
justify-content: center;
align-items: center;
background: @hover-background;
}
}
.upload-shadow{
background: rgba(0,0,0,0.4);
border-radius: 0 0 3px 3px;
width: 101%;
height: 27px;
position: absolute;
bottom: 0px;
}
.upload-shadow-img{
float:right;
margin-top: 7px;
margin-right: 10px;
cursor:pointer;
}
.loading-icon {
margin-top: 26px;
margin-bottom: 11px;
}
.add-img {
margin-top: 34px;
margin-bottom: 17px;
}
.add-title {
width: 64px;
height: 20px;
color:#fff;
text-align: center;
background: #3275FA;
border-radius: 2px;
font-size:12px;
line-height: 20px;
letter-spacing: 0;
font-family: PingFangSC-Regular;
margin:0 auto;
cursor: pointer;
}
.uploaded-pic {
max-width: 100%;
max-height: 100%;
}
.pic-size {
font-size: 14px;
color: @font-color-subtext;
line-height: 22px;
margin: 4px 0;
text-align: left;
}
.pic-name {
color: @font-color-main;
line-height: 22px;
text-align: left;
width: 352px;
white-space: pre-wrap;
word-break: break-all;
}
}
.upload-material-wrapper:not(.uploaded-material-wrapper) {
background: #fff;
// &:hover {
// background: #f6f7fa;
// }
// &:active {
// background: @table-th-border-color;
// }
}
.enlarge-img-mask{
display: flex;
justify-content: center;
align-items: center;
position: fixed;
top: 0;
left: 0;
width: 100%;
height: 100%;
background: rgba(0, 0, 0, 0.6);
z-index: 999;
}
.img-wrapper{
position: absolute;
display: flex;
justify-content: center;
align-items: center;
padding: 10px;
max-width: 820px;
max-height: 520px;
}
.close-enlarge{
position: absolute;
top: -50px;
right: -50px;
width: 20px;
height: 20px;
background: url(data:image/png;base64,iVBORw0KGgoAAAANSUhEUgAAACoAAAAqCAYAAADFw8lbAAAABGdBTUEAALGPC/xhBQAAACBjSFJNAAB6JgAAgIQAAPoAAACA6AAAdTAAAOpgAAA6mAAAF3CculE8AAAABmJLR0QAAAAAAAD5Q7t/AAAACXBIWXMAAAsSAAALEgHS3X78AAABMElEQVRYw83ZbWrDMAyAYbErNKMX2Oh2oCUtO393h47Aux91IAt14w9Zsn7KwjxgC4MsIiLAEbgAn9JJAB/BdFwSB+CHe/wCYwfIMVgItoMAX/yP2RMbkPPGNArwBtx6wEaQN+B9KTg/KDDFRpAzMG0L3bDJSE9sNtIDW4y0xFYjLbBqyJZYdWQLbDOkJrY5UgNrhqzBmiNLsG7IHKw7MgXbDTIB2w9yB9sXcoWdIlg15IuWtXDNLiKNk/0oeCBjzeSDjdzLOeSnLrDPkAk1NtgUpDs2B+mGLUGaY2uQZlgNZHOsJrIZtgVSHftko3MtUg1rgazGWiKLsR7IbKwnMhlLfDRuhtzB3kfjPP5sMEfuYEcBBuC60rshN9jllK/AsCwMwDdw8kausKdgehUR+QN/8sykW52BfwAAAABJRU5ErkJggg==) no-repeat;
background-size: 100%;
cursor: pointer;
}
.enlarge-img-mask .img-wrapper img {
max-width:800px;
max-height:500px;
}


handlePicChange:中暴露出了 rl, fileid, name, sizeText, size 属性 根据接口 可修改组件
                <PicUpload
                    handlePicChange={this.handlePicChange()}
                    uploadId='S4XE'
                    picUrl={businessFiles.url}
/>图片:
export const uploadImg = (
    files: FileList,
    option?: AxiosRequestConfig
) => {
    const imgTypes = [
        'bmp',
        'cis-cod',
        'gif',
        'ief',
        'jpeg',
        'pipeg',
        'png',
        'svg',
        '+xml',
        'tiff',
        'x-cmu-raster',
        'x-cmx',
        'x-icon',
        'x-portable-anymap',
        'x-portable-bitmap',
        'x-portable-graymap',
        'x-portable-pixmap',
        'x-rgb',
        'x-xbitmap',
        'x-xpixmap',
        'x-xwindowdump'
    ].map(type => `image/${type}`).join('|');
    const rFilter = new RegExp(`^(?:${imgTypes})$`, 'i');
    if (files.length === 0) {
        Message.error({ content: "请选择文件!"});
        return Promise.reject('请选择文件!');
    }
    const oFile = files[0];
    if (!rFilter.test(oFile.type)) {
        Message.error({ content: "请选择图片!"});
        return Promise.reject('请选择图片!');
    }
    const formData = new FormData();
    formData.append("file", oFile);
    return request.upload<{}, IUpload>('/upload', formData, option);
};
文件:
// 上传文件
export const uploadFile = (
    files: FileList,
    option?: AxiosRequestConfig
) => {
    if (files.length === 0) {
        Message.error({ content: "请选择文件!"});
        return Promise.reject('请选择文件!');
    }
    const oFile = files[0];
    const formData = new FormData();
    formData.append("file", oFile);
    return request.upload<{}, IUpload>('/upload', formData, option);
};
语音:
export const uploadAudio = (
    files: FileList,
    option?: AxiosRequestConfig
) => {
    const imgTypes = [
        'MP3',
        'mp3',
        'MPEG',
        'mpeg'
    ].map(type => `audio/${type}`).join('|');
    const rFilter = new RegExp(`^(?:${imgTypes})$`, 'i');
    if (files.length === 0) {
        Message.warning({ content: "请上传语音!"});
        return Promise.reject('请上传语音!');
    }
    const oFile = files[0];
    if (!rFilter.test(oFile.type)) {
        Message.warning({ content: "请上传语音!"});
        return Promise.reject('请上传语音!');
    }
    const formData = new FormData();
    formData.append("file", oFile);
return request.upload<{}, IUpload>('/upload', formData, option);react-froala-wysiwyg
注意 版本需要固定到3.1.0版本 升级需要付费
基本上90%的情况下,都应该用这个,这个是在render结束后,你的callback函数执行,但是不会block browser painting,算是某种异步的方式吧,但是class的componentDidMount 和componentDidUpdate是同步的,在render结束后就运行,useEffect在大部分场景下都比class的方式性能更好.
这个是用在处理DOM的时候,当你的useEffect里面的操作需要处理DOM,并且会改变页面的样式,就需要用这个,否则可能会出现出现闪屏问题, useLayoutEffect里面的callback函数会在DOM更新完成后立即执行,但是会在浏览器进行任何绘制之前运行完成,阻塞了浏览器的绘制.
在0秒的时间内,将方块的横坐标位置移到600px的位置
import React, { useEffect, useLayoutEffect, useRef } from "react";
import TweenMax from "gsap/TweenMax";
import './index.less';

const Animate = () => {
    const REl = useRef(null);
    useEffect(() => {
        /*下面这段代码的意思是当组件加载完成后,在0秒的时间内,将方块的横坐标位置移到600px的位置*/
        TweenMax.to(REl.current, 0, {x: 600})
    }, []);
    return (
        <div className='animate'>
            <div ref={REl} className="square">square</div>
        </div>
    );
};

export default Animate;
在useEffect中 会发现 一闪而过 ,但是在useLayoutEffect中不会 因为useLayoutEffect里面的callback函数会在DOM更新完成后立即执行,但是会在浏览器进行任何绘制之前运行完成,阻塞了浏览器的绘制.
场景:有些后台返回是 html 格式字段,就需要用到 innerHTML 属性
export default class TwentyFive extends React.Component {
  render() {
    return (
      <div dangerouslySetInnerHTML={{ __html: "<span>这是渲染的 HTML 内容</span>" }}></div>
    );
  }
}/**
* @file audio
* @author v_kuiyufeng
* @owner v_kuiyufeng:2020-06-28
*/
import React from 'react'
// import * as PropTypes from 'prop-types'
import {CompBaseProps} from '@befe/brick-mobile-utils'
import { Media, Player, controls } from 'react-media-player';
import PlayPause from './components/play-pause';
import SeekBar from './components/seek-bar';
import CurrentTime from './components/current-time';
export interface AudioProps extends CompBaseProps {
/**
* 语音url
*/
audioUrl:string
}
const {Duration} = controls;
/**
* Audio
* @description component Audio
*/
export const Audio = (props: AudioProps) => {
const prefixCls = 'brick-mobile-audio-';
const {audioUrl} = props;
return (
<Media key={audioUrl}>
{() => {
return <div className="brick-mobile-audio">
<Player src={audioUrl} className={prefixCls+'media-player'} />
<div className={prefixCls + 'media-controls'}>
<PlayPause />
<SeekBar />
<CurrentTime />
<span className={prefixCls + 'slanting'}> / </span>
<Duration />
</div>
</div>;
}
}
</Media>
)
}import React from 'react';
// import './index.less';
import {withMediaProps} from 'react-media-player';
import playPng from '../imgs/play.png';
import pausePng from '../imgs/pause.png';
interface playPauseProps{
media:any
}
class PlayPause extends React.PureComponent<playPauseProps> {
constructor(props:playPauseProps){
super(props)
}
handlePlayPause = () => {
this.props.media.playPause();
}
render() {
const {media} = this.props;
return (
<button
type="button"
className="brick-mobile-audio-control-button"
onClick={this.handlePlayPause}
>
{
<img
className="control-img"
src={media.isPlaying ? playPng : pausePng} />
}
</button>
);
}
}
export default withMediaProps(PlayPause);import React from 'react';
// import './index.less';
import {withMediaProps} from 'react-media-player';
interface SeekBarProps{
media:any;
}
class SeekBar extends React.PureComponent<SeekBarProps> {
isPlayingOnMouseDown = false
onChangeUsed = false
handleMouseDown = () => {
this.isPlayingOnMouseDown = this.props.media.isPlaying;
this.props.media.pause();
}
handleMouseUp = ({target: {value}}) => {
//ie11以下有问题
!this.onChangeUsed && this.props.media.seekTo(+value);
this.isPlayingOnMouseDown && this.props.media.play();
}
handleChange = ({target: {value}}) => {
this.props.media.seekTo(+value);
this.onChangeUsed = true;
}
render() {
const {media} = this.props;
const {duration, currentTime} = media;
return (
<input
type="range"
step="any"
max={duration.toFixed(4)}
value={currentTime}
onMouseDown={this.handleMouseDown}
onMouseUp={this.handleMouseUp}
onChange={this.handleChange}
className="range"
style={{
backgroundSize: currentTime * 100 / duration + '% 100%',
}}
/>
);
}
}
export default withMediaProps(SeekBar);import React from 'react';
import {withMediaProps, utils} from 'react-media-player';
const {formatTime} = utils;
interface CurrentTimeProps{
className:string;
media:any;
}
class CurrentTime extends React.PureComponent<CurrentTimeProps> {
render() {
const {className, media} = this.props;
console.log(this.props)
return (
<time className={className}>
{formatTime(media.currentTime)}
</time>
);
}
}
export default withMediaProps(CurrentTime);@import "~@befe/brick-mobile-style/src/base";
@include exports('mobile-comp-audio') {
.brick-mobile-audio {
@include reset();
font-size: 14px;
&-media-player{
display: none;
}
&-media-controls {
display: flex;
align-items: center;
}
&-slanting {
margin: 0 3px;
}
&-control-button {
width: 20px;
height: 20px;
border: none;
background: none;
outline: none;
img.control-img {
width: 10px;
height: 10px;
margin-top: -4px;
}
}
input[type=range].range {
margin: 0 6px;
outline: none;
/*清除系统默认样式*/
-webkit-appearance: none;
width: 90px;
/*横条的高度*/
height: 3px;
background: -moz-linear-gradient(#54A1FF, #54A1FF) no-repeat, #e0e0e0;
background: -webkit-linear-gradient(#54A1FF, #54A1FF) no-repeat, #e0e0e0;
background: -o-linear-gradient(#54A1FF, #54A1FF) no-repeat, #e0e0e0;
background: -ms-linear-gradient(#54A1FF, #54A1FF) no-repeat, #e0e0e0;
background: linear-gradient(#54A1FF, #54A1FF) no-repeat, #e0e0e0;
/*设置左右宽度比例*/
background-size: 30% 100%;
&:focus {
border: none;
}
}
/*firefox去input range 的outline*/
input[type=range].range::-moz-focus-outer {
border: 0;
}
/*chrome、safari下拖动块的样式*/
input[type=range].range::-webkit-slider-thumb {
/*清除系统默认样式*/
-webkit-appearance: none;
width: 6px;
height: 6px;
background: #fff;
border-radius: 50%;
border: 1px solid #54A1FF;
&:hover {
width: 10px;
height: 10px;
}
}
/*firefox下拖动块的样式*/
input[type=range].range::-moz-range-thumb {
-webkit-appearance: none;
width: 6px;
height: 6px;
background: #fff;
border-radius: 50%;
border: 1px solid #54A1FF;
&:hover {
width: 10px;
height: 10px;
}
}
/*ie下拖动块的样式*/
input[type=range].range::-ms-thumb {
-webkit-appearance: none;
width: 6px;
height: 6px;
background: #fff;
border-radius: 50%;
border: 1px solid #54A1FF;
&:hover {
width: 10px;
height: 10px;
}
}
input[type=range].range::-moz-range-progress {
background: linear-gradient(#54A1FF, #54A1FF) no-repeat, #e0e0e0;
}
}
}
<Audio audioUrl={xxx}/>
//第一步
<Provider appState={store}>
</Provider>

//第二步
@inject('appState')

//第三步
this.props.appState;
swiper.js
import React, { Component } from 'react'
import './xin-swiper.scss'
export default class XinSwiper extends Component {
    constructor(props){
        super(props)
        this.state = {
            list:[
                {
                    name:1
                },
                {
                    name:2
                },
                {
                    name:3
                },
            ],
            current: 1, // 轮播图当前 index
            itemWidth:0, //  图片区域 宽度
            out: 1,  // 堆叠式 外部看到的数量 (左右各相同) 不限制 可以设置 0 或 大于轮播图数量
            offset:90, // 堆叠式 外部偏移量 (产生堆叠效果)
            startTime: 0,
            startX: 0,
            startY: 0,
        }
    }
    componentDidMount(){
        // 获取轮播图片区域宽度
        const width = this.refs.swiperitem.clientWidth
        this.setState({
            itemWidth:width
        })
    }
    // 上一张
    onPrev = (index) => {
        const length = this.state.list.length
        if( index - 1 < 0) {
            this.setState({
                current : length -1
            })
        }else {
            this.setState({
                current : index -1
            })
        }
    }
    // 下一张
    onNext = (index) => {
        const length = this.state.list.length
        if ( index + 1 === length) {
            this.setState({
                current: 0
            })
        }else{
            this.setState({
                current: index + 1
            })
        }
    }
    handelTouchStart = (e) => {
        this.setState({
            startTime:Date.now(),
            startX:e.changedTouches[0].clientX,
            startY:e.changedTouches[0].clientY
        })
    }
    handelTouchend = (e) => {
        const { startX,startY } = this.state
        let endTime = Date.now()
        let endX = e.changedTouches[0].clientX;
        let endY = e.changedTouches[0].clientY;
        if (endTime - this.startTime > 2500) { //正常操作不会大于2.5秒
            return;
        }
        //如果Y轴移动小于10,泽上下滑动
        if (Math.abs(endX - startX) > 10 && Math.abs(endY - startY) < 10) {
            // endX - startX > 0 ? 'right' : 'left'
            let {current} = this.state
            endX - startX > 0 ? this.onPrev(current) : this.onNext(current)
        }
    }

    render() {
        let  {list,current,itemWidth,out,offset} = this.state
        // 水平式   计算轮播区整体位移
        let x = current === 0 ? 0 : - current*itemWidth +'px'
        const translateX = `translateX(${x})`
        return (
            <div className="card-carousels">
                <div className='btn-prev' onClick={ () => this.onPrev(current)}>左按钮</div>
                <div className='btn-next' onClick={ () => this.onNext(current)}>右按钮</div>
                {/*卡片式*/}
                {/*<div className='wrapper'>*/}
                {/*    <div className='inner'>*/}
                {/*        <div ref='swiper' className='swiper' style={{ transform: translateX}}>*/}
                {/*            {*/}
                {/*                list.map( (item,key) =>*/}
                {/*                    (*/}
                {/*                        <div*/}
                {/*                            ref='swiperitem'*/}
                {/*                            className={['swiper-item', key === current ? 'current' : ''].join(" ")} key={key}*/}
                {/*                            onTouchStart={this.handelTouchStart}*/}
                {/*                            onTouchEnd={this.handelTouchend}*/}
                {/*                        >*/}
                {/*                            <div className='pic' >{item.name}</div>*/}
                {/*                        </div>*/}
                {/*                    )*/}
                {/*                )}*/}
                {/*        </div>*/}
                {/*    </div>*/}
                {/*</div>*/}

                <div className='wrapper'>
                    <div className='inner'>
                        <div className='swiper2'>
                            {
                                list.map((item , index ) => {
                                    // 层叠式 计算各张图片 translateX scale  z-index 产生堆叠效果
                                    let transform = 'none'
                                    let zIndex = 0
                                    let opacity = 1
                                    // if(out ? index < current && current - index <= out : index < current){
                                    //     // 左边 堆叠
                                    //     zIndex = index +1
                                    //     transform = `translateX(${(index - current)*offset}px) scale(${1-(current-index)*0.1})`
                                    // }else if(out ?  index > current && index - current <= out : index> current){
                                    //     // 右边 堆叠
                                    //     zIndex = list.length - index
                                    //     transform = `translateX(${(index - current)*offset}px) scale(${1-(index-current)*0.1})`
                                    // }else if (index === current){
                                    //     // 当前图片
                                    //     zIndex = list.length
                                    // }
                                    if(current === 0 && list.length -1 === index ){
                                        transform = `translateX(${0-offset}px) scale(0.9)`
                                        opacity = 0.5
                                    } else if(current === list.length -1 && index === 0 ){
                                        transform = `translateX(${offset}px) scale(0.9)`
                                        opacity = 0.5
                                    } else if(index === current - 1){
                                        // 左边 堆叠
                                        zIndex = index +1
                                        transform = `translateX(${0-offset}px) scale(0.9)`
                                        opacity = 0.5
                                    }else if(index === current + 1){
                                        // 右边 堆叠
                                        zIndex = list.length - index
                                        transform = `translateX(${offset}px) scale(0.9)`
                                        opacity = 0.5
                                    }else if (index === current){
                                        // 当前图片
                                        zIndex = list.length
                                    }
                                    return (
                                        <div
                                            className='swiper-item'
                                            key={index} style={{transform,zIndex,opacity}}
                                            onTouchStart={this.handelTouchStart}
                                            onTouchEnd={this.handelTouchend}
                                        >
                                            {item.name}
                                        </div>
                                    )
                                })
                            }
                        </div>
                    </div>
                </div>
            </div>
        )
    }
}
swiper.css
.card-carousels{
  div{
    box-sizing: border-box;
  }
  .wrapper{
    width: 100%;
    margin:30px auto;
    border:1px solid #ccc;
    overflow: hidden;
    display: flex;
    justify-content: center;
    align-items: center;
    position: relative;
    .btn-prev,.btn-next{
      position: absolute;
      width: 40px;
      height: 40px;
      background: rgba(0,0,0,.3);
      color: white;
      line-height: 40px;
      text-align: center;
      z-index: 9;
      cursor:pointer
    }
    .inner{
      position: relative;
      width: 504px;
      height: 470px;
      background: #FFFFFF;
      border-radius: 10px;
      .swiper{
        position: absolute;
        top:0;
        left: 0;
        height: 100%;
        min-width: 100%;
        display: flex;
        flex-wrap: nowrap;
        transition: all 0.5s;
        .swiper-item{
          padding:0 20px;
          width: 400px;
          transition:all 0.5s;
          transform: scale(0.8);
          &.current{
            transform:scale(1);
          }
          .pic{
            border:1px solid pink;
            border-radius: 20px;
            height: 100%;
            line-height: 200px;
            font-size: 50px;
            background:#ccc;
          }
        }
      }
      .swiper2, .swiper2 .swiper-item{
        position: absolute;
        left:0;
        top:0;
        width:100%;
        height: 100%;
        font-size: 50px;
        text-align: center;
        line-height: 150px;
      }
      .swiper2 .swiper-item{
        transition: transform .5s;
        border:2px solid #ccc;
        color:black;
        border-radius: 20px;
        background: white;
      }
    }
  }
}时间分片的概念,就是一次性渲染大量数据,初始化的时候会出现卡顿等现象。我们必须要明白的一个道理,js执行永远要比dom渲染快的多。 ,所以对于大量的数据,一次性渲染,容易造成卡顿,卡死的情况。我们先来看一下例子
class Index extends React.Component<any,any>{
    state={
       list: []
    }
    handerClick=()=>{
       let starTime = new Date().getTime()
       this.setState({
           list: new Array(40000).fill(0)
       },()=>{
          const end =  new Date().getTime()
          console.log( (end - starTime ) / 1000 + '秒')
       })
    }
    render(){
        const { list } = this.state
        console.log(list)
        return <div>
            <button onClick={ this.handerClick } >点击</button>
            {
                list.map((item,index)=><li className="list"  key={index} >
                    { item  + '' + index } Item
                </li>)
            }
        </div>
    }
}
我们看到 40000 个 简单列表渲染了,将近5秒的时间。为了解决一次性加载大量数据的问题。我们引出了时间分片的概念,就是用setTimeout把任务分割,分成若干次来渲染。一共40000个数据,我们可以每次渲染100个, 分次400渲染。
class Index extends React.Component<any,any>{
    state={
       list: []
    }
    handerClick=()=>{
       this.sliceTime(new Array(40000).fill(0), 0)
    }
    sliceTime=(list,times)=>{
        if(times === 400) return
        setTimeout(() => {
            const newList = list.slice( times , (times + 1) * 100 ) /* 每次截取 100 个 */
            this.setState({
                list: this.state.list.concat(newList)
            })
            this.sliceTime( list ,times + 1 )
        }, 0)
    }
    render(){
        const { list } = this.state
        return <div>
            <button onClick={ this.handerClick } >点击</button>
            {
                list.map((item,index)=><li className="list"  key={index} >
                    { item  + '' + index } Item
                </li>)
            }
        </div>
    }
}
etTimeout 可以用 window.requestAnimationFrame() 代替,会有更好的渲染效果。 我们demo使用列表做的,实际对于列表来说,最佳方案是虚拟列表,而时间分片,更适合热力图,地图点位比较多的情况。
关于虚拟列表我的JS篇文章有一个叫做长列表优化得 是一位大佬写的很优秀得代码

是一个较为轻量的实现虚拟列表的组件。这是官方文档。
import React from 'react';
import {render} from 'react-dom';
import VirtualList from 'react-tiny-virtual-list';

const data = ['A', 'B', 'C', 'D', 'E', 'F', ...];

render(
  <VirtualList
    width='100%'
    height={600}
    itemCount={data.length}
    itemSize={50} // Also supports variable heights (array or function getter)
    renderItem={({index, style}) =>
      <div key={index} style={style}> // The style property contains the item's absolute position
        Letter: {data[index]}, Row: #{index}
      </div>
    }
  />,
  document.getElementById('root')
);let num = 0
class Index extends React.Component<any, any>{
state = {
list: new Array(9999).fill(0).map(() =>{
num++
return num
}),
scorllBoxHeight: 500, /* 容器高度(初始化高度) */
renderList: [], /* 渲染列表 */
itemHeight: 60, /* 每一个列表高度 */
bufferCount: 8, /* 缓冲个数 上下四个 */
renderCount: 0, /* 渲染数量 */
start: 0, /* 起始索引 */
end: 0 /* 终止索引 */
}
listBox: any = null
scrollBox : any = null
scrollContent:any = null
componentDidMount() {
const { itemHeight, bufferCount } = this.state
/* 计算容器高度 */
const scorllBoxHeight = this.listBox.offsetHeight
const renderCount = Math.ceil(scorllBoxHeight / itemHeight) + bufferCount
const end = renderCount + 1
this.setState({
scorllBoxHeight,
end,
renderCount,
})
}
/* 处理滚动效果 */
handerScroll=()=>{
const { scrollTop } :any = this.scrollBox
const { itemHeight , renderCount } = this.state
const currentOffset = scrollTop - (scrollTop % itemHeight)
/* translate3d 开启css cpu 加速 */
this.scrollContent.style.transform = `translate3d(0, ${currentOffset}px, 0)`
const start = Math.floor(scrollTop / itemHeight)
const end = Math.floor(scrollTop / itemHeight + renderCount + 1)
this.setState({
start,
end,
})
}
/* 性能优化:只有在列表start 和 end 改变的时候在渲染列表 */
shouldComponentUpdate(_nextProps, _nextState){
const { start , end } = _nextState
return start !== this.state.start || end !==this.state.end
}
/* 处理滚动效果 */
render() {
console.log(1111)
const { list, scorllBoxHeight, itemHeight ,start ,end } = this.state
const renderList = list.slice(start,end)
return <div className="list_box"
ref={(node) => this.listBox = node}
>
<div
style={{ height: scorllBoxHeight, overflow: 'scroll', position: 'relative' }}
ref={ (node)=> this.scrollBox = node }
onScroll={ this.handerScroll }
>
{ /* 占位作用 */}
<div style={{ height: `${list.length * itemHeight}px`, position: 'absolute', left: 0, top: 0, right: 0 }} />
{ /* 显然区 */ }
<div ref={(node) => this.scrollContent = node} style={{ position: 'relative', left: 0, top: 0, right: 0 }} >
{
renderList.map((item, index) => (
<div className="list" key={index} >
{item + '' } Item
</div>
))
}
</div>
</div>
</div>
}
}
原文链接:https://juejin.cn/post/6844903860327186445#heading-5(非常得棒)
//单行省略
{
    overflow: hidden;
    white-space: nowrap;
    text-overflow: ellipsis;
}
//多行换行省略
{
    overflow : hidden;
    text-overflow: ellipsis;
    display: -webkit-box;
    -webkit-line-clamp: 2;
    -webkit-box-orient: vertical;
}“我的文件不知道在那里呢
你告诉我在...好吗.pdf”
https://www.npmjs.com/package/react-lines-ellipsis
import LinesEllipsis from 'react-lines-ellipsis';

<LinesEllipsis
  text='long long text'
  maxLine='3'
  ellipsis='...'
  trimRight
  basedOn='letters'
/>为了解决跨浏览器兼容性问题,React 会将浏览器原生事件(Browser Native Event)封装为合成事件(SyntheticEvent)传入设置的事件处理器中。这里的合成事件提供了与原生事件相同的接口,不过它们屏蔽了底层浏览器的细节差异,保证了行为的一致性。另外有意思的是,React 并没有直接将事件附着到子元素上,而是以单一事件监听器的方式将所有的事件发送到顶层进行处理。这样 React 在更新 DOM 的时候就不需要考虑如何去处理附着在 DOM 上的事件监听器,最终达到优化性能的目的。
<div className="testDom" onClick={this.testDomClick()}><div>React合成事件一套机制:React并不是将Click事件直接绑定在dom上面,而是采用事件冒泡的形式冒泡到document上面,然后React将事件封装给正式的函数处理运行和处理。
如果DOM上绑定了过多的事件处理函数,整个页面响应以及内存占用可能都会受到影响。React为了避免这类DOM事件滥用,同时屏蔽底层不同浏览器之间的事件系统差异,实现了一个中间层——SyntheticEvent。
以下代码来显示两者的区别
class Test extends Component {
    constructor() {
        super(arguments);
        this.onReactClick.bind(this);
    }
    componentDidMount() {
        const parentDom = ReactDOM.findDOMNode(this);
        const childrenDom = parentDom.queneSelector(".button");
        childrenDom .addEventListen('click', this.onDomClick, false);
    }
    onDomClick() {  // 事件委托
        console.log('Javascript Dom click');
    }
    onReactClick() {  // react合成事件
        console.log('React click');
    }
    render() {
        <div>
            <button className="button" onClick={this.onReactClick()}>点击</button>
        </div>
    }
}
输出
Javascript Dom click
React click
可以看待原生绑定快于合成事件绑定
<!DOCTYPE html>
<html lang="en">

<head>
    <meta charset="utf-8">
    <style>
        .global-loading{
            display: block;
            width: 100vw;
            height: 100vh;
            text-align: center;
            line-height: 100vh;
        }
    </style>
    <title>如流</title>
</head>

<body>
    <div id='root'>
        <div class="global-loading">
            <img  src="../public/loading.gif" alt="">
        </div>
    </div>


</body>

</html>1.html比js先加载,会先展示loading.gif

2.js加载完成并运行后,会把div#root下的元素清空

https://segmentfault.com/a/1190000018917730
##关于
感谢帅气阿源提供方案
import React, { Component } from 'react';
import ReactDOM from 'react-dom';

class Demo1 extends Component {
    render() {
        return (
            <input />
        )
    }
}

ReactDOM.render(<Demo1/>, document.getElementById('content'))
在这个最简单的输入框组件里,我们并没有干涉input中的value展示,即用户输入的内容都会展示在上面。如果我们通过props给组件设置一个初始默认值,defaultValue属性是React内部实现的一个属性,目的类似于input的placeholder属性。
受控组件就是组件的状态受React控制。上面提到过,既然通过设置input的value属性, 无法改变输入框值,那么我们把它和state结合在一起,再绑定onChange事件,实时更新value值就行了。
class Demo1 extends Component {
    constructor(props) {
        super(props);
        this.state = {
            value: props.value
        }
    }

    handleChange(e) {
        this.setState({
            value: e.target.value
        })
    }

    render() {
        return (
            <input value={this.state.value} onChange={e => this.handleChange(e)}/>
        )
    }
}1.首屏渲染优化。
<div id="root"> SVG </div>也可以使用插件 prerender-spa-plugin 插件进行首屏渲染。
2.页面切换优化。使用 html-webpack-plugin 插件自动插入 loading,这样切换的时候,就不需要在每个页面都写一套 loading。
3.减少业务代码体积。通过 Tree Shaking 来减少一些代码。
4.提取公共代码。通过 SplitChunkPlugin 自动拆分业务基础库,减少大文件的存在。
5.切分代码。通过 Code Splitting 来懒加载代码,提高用户的加载体验。例如通过 React Loadable 来将组件改写成支持动态 import 的形式。
6.懒加载。React 可以通过 react-lazyload 这种成熟组件来进行懒加载的支持。
7.页面占位。有时候加载页面的文本、图片的时候,会出现 “闪屏” 的情况,比如图片或者文字没有加载完毕,对应位置空白,然后加载完毕,会突然撑开页面,导致闪屏。这时候使用第三方组件 react-placeholder 可以解决这种情况。
链接:https://juejin.cn/post/6904412477547773959?utm_source=gold_browser_extension#chapter-one
链接:https://juejin.cn/post/6908895801116721160?utm_source=gold_browser_extension
1.在代码中调用 setState 之后,React 会将传入的参数对象与组件当前的状态合并,触发所谓的调和过程(Reconciliation)。
2.经过调和过程,React 会以相对高效的方式根据新的状态构建 React 元素树并且着手重新渲染整个 UI 界面。
3.在 React 得到元素树之后,React 会自动计算新树和老树之间的节点差异,然后根据差异对界面进行最小化重新渲染。
4.在差异计算算法(Diff)中,React 能够相对精确地知道哪些位置发生了改变以及应该如何改变,保证了按需更新,而不是全部重新渲染。
简单来说:
1.合并参数对象,触发调和过程
2.计算新树和老树差异(Diff)
3.根据差异进行最小化重新渲染
在代码中调用setState函数之后,React 会将传入的参数对象与组件当前的状态合并,然后触发所谓的调和过程(Reconciliation)。经过调和过程,React 会以相对高效的方式根据新的状态构建 React 元素树并且着手重新渲染整个UI界面。在 React 得到元素树之后,React 会自动计算出新的树与老树的节点差异,然后根据差异对界面进行最小化重渲染。在差异计算算法中,React 能够相对精确地知道哪些位置发生了改变以及应该如何改变,这就保证了按需更新,而不是全部重新渲染。
作用:有些要通过自定义属性传值
export default class Thirty extends React.Component {
  click = e => {
    console.log(e.target.getAttribute("data-row"));
  };

  render() {
    return (
      <div>
        <div data-row={"属性1"} data-col={"属性 2"} onClick={this.click}>
          点击获取属性
        </div>
      </div>
    );
  }
}Children:react.ReactNodeexport const Fold: React.FC<FoldProps> = (props: FoldProps) => {
} style: React.CSSProperties ;
style: CSSStyleDeclaration;//有待大佬指导页面和组件变得越来越复杂,如何更好的实现 状态逻辑复用 一直都是应用程序中重要的一部分,这直接关系着应用程序的质量以及维护的难易程度。
Mixin、HOC 和 Hook 是 React 采用的 3 种 状态逻辑复用 的技术,Mixin 已被抛弃,HOC 正当壮年,Hook 初露锋芒,掌握它迭代因素和规律非常重要。
Mixin(混入)是一种通过扩展收集功能的方式,它本质上是将一个对象的属性拷贝到另一个对象上面去。
不过你可以拷贝任意多个对象的任意个方法到一个新对象上去,这是继承所不能实现的。
它的出现主要就是为了解决代码复用问题。
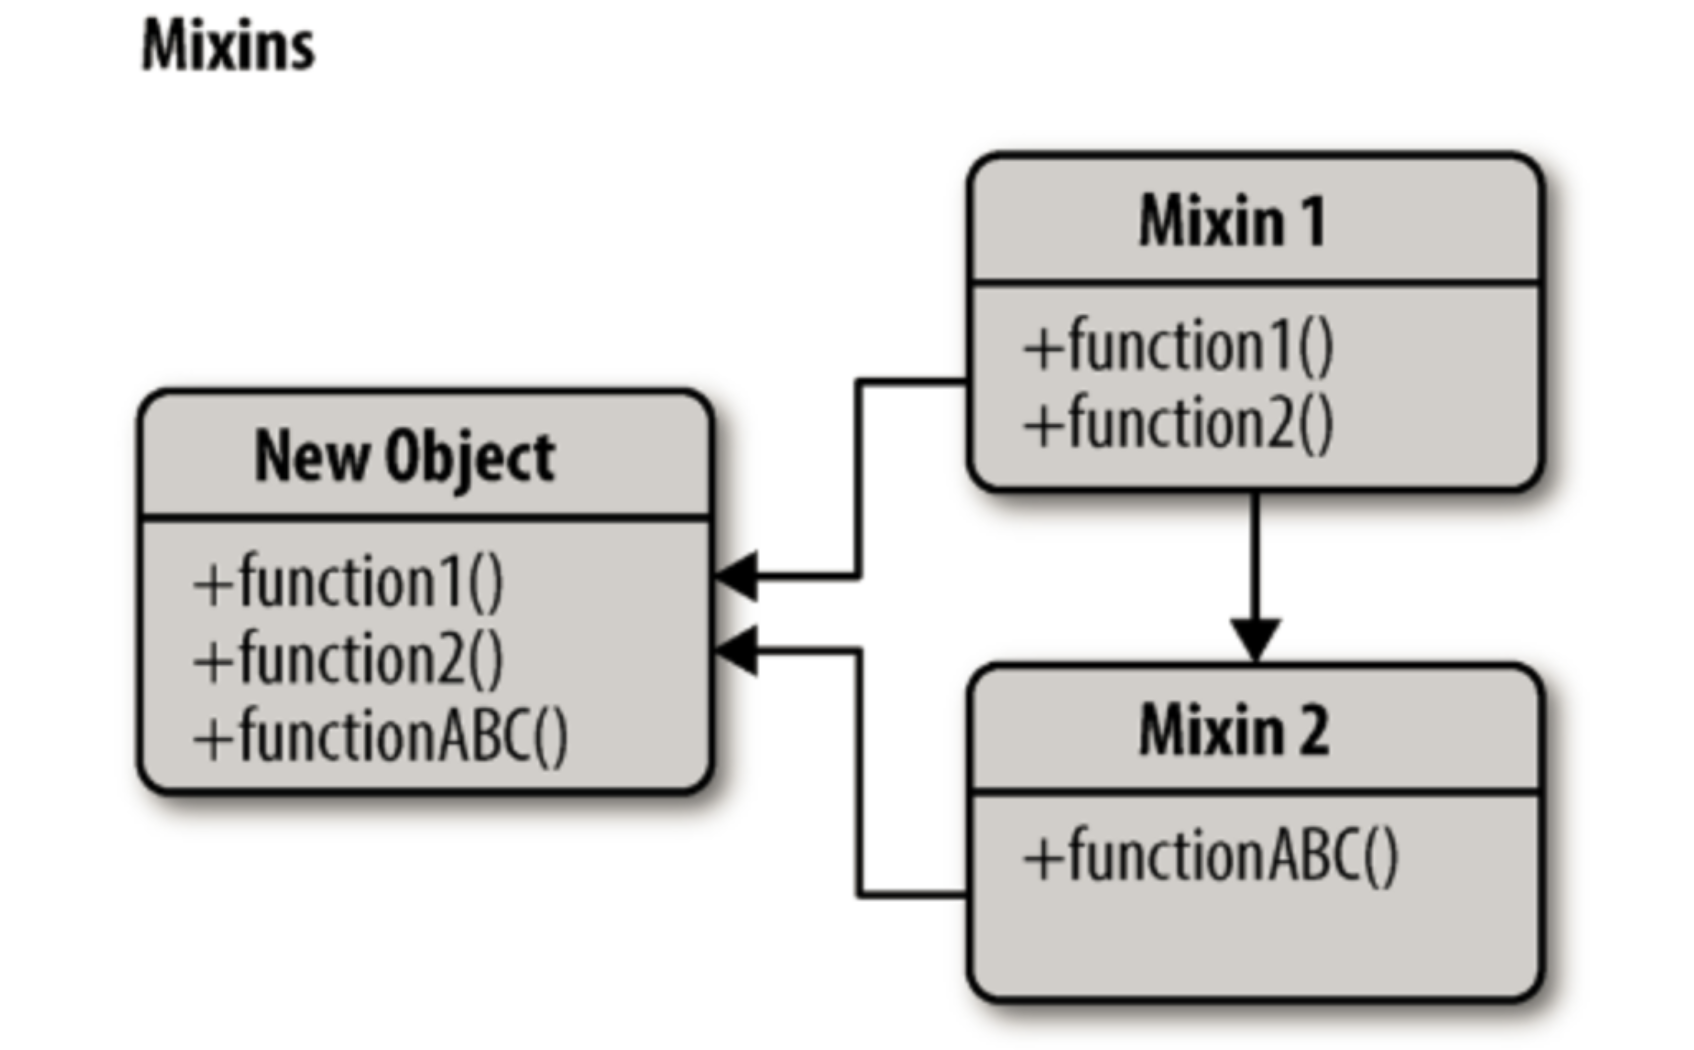
但是,它会带来一些危害:
1.Mixin 相互依赖、相互耦合,不利于代码维护
2.不同的 Mixin 中的方法可能会互相冲突
3.Mixin 非常多时,组件是可以感知到的,甚至还要为其做相关处理,这样给代码造成滚雪球式的复杂性。
高阶组件类似高阶函数,高阶组件接收一个组件作为参数,并返回一个新的组件。
高阶组件(HOC)是 React 中的高级技术,用来重用组件逻辑。但高阶组件本身并不是 React API。它只是一种模式,这种模式是由 React 自身的组合性质必然产生的。
function visible(WrappedComponent) {
  return class extends Component {
    render() {
      const { visible, ...props } = this.props;
      if (visible === false) return null;
      return <WrappedComponent {...props} />;
    }
  }
}
高阶组件可以应用于 日志打点、可用权限控制、双向绑定、表单校验等。
高阶组件解决了 Mixin 带来的问题:
低耦合。高阶组件就是一个没有副作用的纯函数,各个高阶组件不会互相依赖耦合
避免冲突。高阶组件也有可能造成冲突,但我们可以在遵守约定的情况下避免这些行为
副作用小。高阶组件并不关心数据使用的方式和原因,而被包裹的组件也不关心数据来自何处。高阶组件的增加不会为原组件增加负担
但是,有光的地方总有暗,高阶组件也存在一些缺陷:
HOC 需要在原组件上进行包裹或者嵌套,如果大量使用 HOC,将会产生非常多的嵌套,这让调试变得非常困难。
HOC 可以劫持 props,在不遵守约定的情况下也可能造成冲突
Hook 是 React v16.7.0-alpha 中加入的新特性。它可以让你在 class 以外使用 state 和其他 React 特性。
使用 Hook,你可以在将含有 state 的逻辑从组件中抽象出来,这将可以让这些逻辑容易被测试。
同时,Hook 可以帮助你在不重写组件结构的情况下复用这些逻辑。
所以,它也可以作为一种实现状态逻辑复用的方案。
Hook 使用带来的好处:
减少状态逻辑复用的风险:Hook 和 Mixin 在用法上有一定的相似之处,但是 Mixin 引入的逻辑和状态是可以相互覆盖的,而多个 Hook 之间互不影响,这让我们不需要在把一部分精力放在防止避免逻辑复用的冲突上。
避免地狱式嵌套:大量使用 HOC 的情况下让我们的代码变得嵌套层级非常深,使用 Hook,我们可以实现扁平式的状态逻辑复用,而避免了大量的组件嵌套。
让组件更容易理解:在使用 class 组件构建我们的程序时,他们各自拥有自己的状态,业务逻辑的复杂使这些组件变得越来越庞大,各个生命周期中会调用越来越多的逻辑,越来越难以维护。使用 Hook,可以让你更大限度的将公用逻辑抽离,将一个组件分割成更小的函数,而不是强制基于生命周期方法进行分割。
使用函数代替 class:相比函数,编写一个 class 可能需要掌握更多的知识,需要注意的点也越多,比如 this 指向、绑定事件等等。另外,计算机理解一个函数比理解一个 class 更快。Hooks 让你可以在 class 之外使用更多 React 的新特性。
在我们的观察中,class是学习React的最大障碍。你必须了解this在JavaScript中是如何工作的,这与它在大多数语言中的工作方式有很大不同。你必须记住bind事件处理程序。没有不稳定的语法提议,代码非常冗长。开发者可以很好地理解props,state和自上而下的数据流,但仍然很难与类斗争。React中的函数和类组件之间的区别以及何时使用每个组件导致即使在经验丰富的React开发人员之间也存在分歧。
此外,React已经推出了大约五年,我们希望确保它在未来五年内保持相关性。正如Svelte,Angular,Glimmer和其他人所表明的那样,提前编译组件在未来有很大潜力。特别是如果它不限于模板。最近,我们一直在尝试使用Prepack进行组件折叠,我们已经看到了有希望的早期结果。但是,我们发现类组件可能会增长无意识的模式,使这些优化回归到较慢的路径。类也为今天的工具提出了问题。例如,类不会很好地缩小,并且它们使得热加载片状和不可靠。我们希望提供一种API,使代码更有可能保持可优化途径。
为了解决这些问题,Hooks允许你在没有类的情况下使用更多React的功能。 从概念上讲,React组件一直更接近功能(function)。 Hooks拥抱功能,但不会牺牲React的实践精神。钩子提供了对命令式逃生舱口的访问,并且不需要你学习复杂的功能或反应式编程技术。
https://zh-hans.reactjs.org/docs/hooks-overview.html --React官网
https://codesandbox.io/s/frosty-agnesi-sy94n?file=/src/App.js --线上代码编辑
import { observable, computed } from "mobx";

class Srore {

 @observable time = '2020'
//和vue一样根据依赖项变化则会变化
 computed get msg(){
   return `当前时间是${this.time}`
 }
//通过action修改属性相当于vue中的mution
 action setTime(){
   this.time = '2020'
 }
}
const store = new Srore()
export default store如果进行如下方式更新状态,那么它将不会重新渲染组件。
this.state.message =”Hello world”;而是使用 setState() 方法。它计划对组件状态对象的更新。状态改变时,组件通过重新渲染做出响应
this.setState({message: ‘Hello World’});注意:可以分配状态的唯一位置是构造函数。
A declarative, efficient, and flexible JavaScript library for building user interfaces.
🖖 Vue.js is a progressive, incrementally-adoptable JavaScript framework for building UI on the web.
TypeScript is a superset of JavaScript that compiles to clean JavaScript output.
An Open Source Machine Learning Framework for Everyone
The Web framework for perfectionists with deadlines.
A PHP framework for web artisans
Bring data to life with SVG, Canvas and HTML. 📊📈🎉
JavaScript (JS) is a lightweight interpreted programming language with first-class functions.
Some thing interesting about web. New door for the world.
A server is a program made to process requests and deliver data to clients.
Machine learning is a way of modeling and interpreting data that allows a piece of software to respond intelligently.
Some thing interesting about visualization, use data art
Some thing interesting about game, make everyone happy.
We are working to build community through open source technology. NB: members must have two-factor auth.
Open source projects and samples from Microsoft.
Google ❤️ Open Source for everyone.
Alibaba Open Source for everyone
Data-Driven Documents codes.
China tencent open source team.