The deep integration of Learn, Git, and GitHub means that you can actually use the native git command line application to work on Learn. git is complex so we're going to show how it works, but we're also going to show you how to use the simpler learn CLI (Command Line Interface) to open a lab.
There are two ways to open a lab on Learn.
- You can Fork and
git cloneit via Github andgit. - You can use the Open button or
learn openvia the Learn CLI. This is the preferred way to work.
Note: This is an informational README. You just have to read and conceptualize these workflows. Don't try to execute these commands yet. You will have a chance to practice the entire workflow using learn very shortly.
The git command line is something every developer uses hundreds of times a day, so while a bit technical, it's a good thing to know.
In this lesson, we'll show you the sequence of steps (or workflow) needed to use git to solve labs on Learn. Don't worry too much about understanding the details of each command. And there is a simpler workflow that you're going to learn about soon using the learn command line application that automates all of this, so really, don't worry if this seems overly complex or cumbersome. Be brave.
The first step of solving any code lab on Learn is to "fork" the lab's repo to your GitHub account.
Forking means that you're creating your own copy of the lab so that you can solve it.

Every lab is initially stored in GitHub in an account called learn-co-students. Every student has access to that lab. But if you solve that copy of the lab, the next student to attempt the lab will find it already solved. We can't all work on the same copy. Every student on Learn needs their own copy of the original lab. When you fork a lab, that's what you're making, your own copy of a lab. We call the original lab the "Upstream" and we call your version of the lab the "Origin". These copies are called "Remotes". The original lab is the "Upstream" remote, your fork is your "Origin" remote. This is the standard convention for open source. When you clone your copy (fork) of the lab, we call that copy your local copy.
When you are on a Lab page on Learn, you will click on "View on GitHub" in the Lab's menu.

The GitHub page for the Lab will open. You'll then click the Fork button on GitHub.

You'll then select your personal Github account as the location to fork to.

Cloning is the process of making a local copy of the lab from the personal remote of your fork on GitHub, called "Origin".

When you're ready to clone a lab from GitHub, make sure you've first clicked on the SSH link, then click the copy button next to the Clone URL to copy it to your clipboard.

Next, you'll navigate in the console to the parent directory where you would like to place this lab. Then you will type: git clone <paste the clone URL here>
Note: You should replace the <paste the clone URL here> including the < and > symbols in the snippet above with your actual clone URL by pressing command+v on mac or ctrl+v on windows. Example: git clone [email protected]:faiyamTestFS16/first-lab-ruby-learn-cli-nitrous-q-000.git

Don't forget to cd into the lab directory that was made when you cloned the lab. Once in the directory, you'll open the directory with the Nitrous file browser.
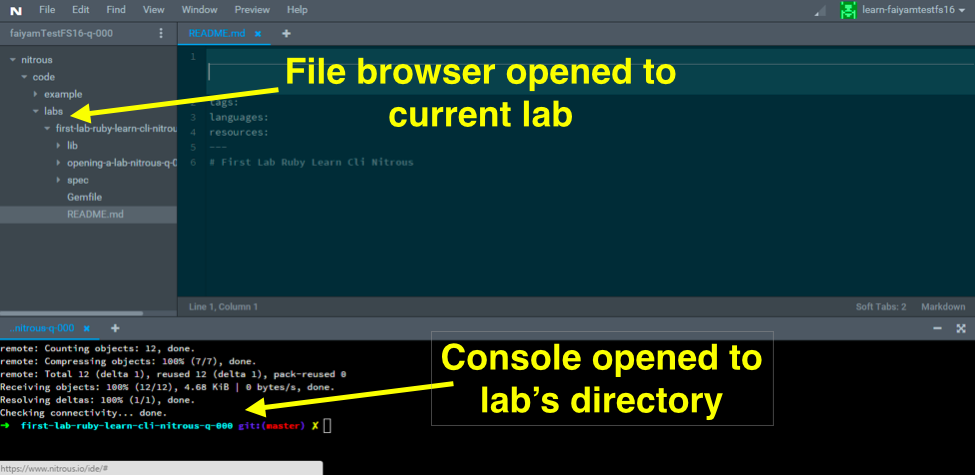
This setup, with the lab's directory open in both the console and the file browser, that's the state you want to be in when working on a lab on Learn. It means you're ready.
The Learn CLI is a command line application that allows you to interact with Learn and work on labs. With learn you can open labs, run tests, and submit labs.
Command Line Applications are simply programs we use through our Terminal or shell. git is a CLI program. When you type learn into your command line, you are interacting with the Learn web application through your terminal.
Let's walk through the steps you need to take to solve a lab on Learn using the Learn CLI workflow.
The Learn CLI workflow is the preferred way to work on Learn.
This is important and understanding how to use learn is crucial. A CLI, or Command Line Interface, is a program - like the Learn CLI - that interacts with your computer via your terminal.
All lessons are stored on GitHub. You need to fork and clone every lesson you want to work on. But instead of doing that through GitHub Fork and git clone, you can automate all these steps by using learn open.
When you're on a Lab on Learn.co and want to begin working on it, go to your Nitrous console and type learn open. You'll see:

Don't do this now as this isn't a lab and you're not ready to work on one now.
After typing learn open, the learn application did the following:
- Checked what your current lesson is on Learn.
- Forked that lesson on GitHub (notice the Fork light turned green on the right in Learn).
- Cloned your fork lesson locally, generally into a directory
~/nitrous/code/(which is your home directory, theDevelopmentfolder, and then a foldercode). - Prepared the lesson bundle, which isn't something you need to worry about at all yet, but it did it for you just in case.
cdchanged directory into the cloned lesson's directory.
Whenever you type learn open you'll end up 90% in the right setup to work on a lab, with the lab forked and cloned to your Nitrous environment and the console navigated to the lab's directory. All you need to do is navigate to the lab's directory in your file system.
If you're ever lost and can't remember where your last lab was located or what you were working on, you can always type learn open and you'll end up in the right state.
But the simplest (and highly recommended!) way to start work on any lab on Learn, is to simply click the "Open" button on menu bar at the top of a Lab on the Learn.co web app.

So that's all you need to remember: press the Open button to get started. Behind the scenes, that will automatically open your terminal and execute learn open (which itself is using git).
The learn CLI workflow is way easier, but just as professional and real so don't feel bad about using learn and never using git.
However, sometimes in a lesson on Learn, we'll tell you to Fork and Clone a lab to get started or say something like "Fork this repo". We might use language relating to Git and GitHub to communicate to you that a lesson is a lab and you need to solve it by writing code and submitting it.
Every single time you see a reference to forking, cloning, or GitHub to get started on a lab, you can just use the Open button or learn open via the Learn CLI. The learn CLI is exactly equivalent to the git workflow. It's just automated, so understand that equivalence. GitHub Fork and git clone are the same as learn open.


