Data is stored as snapshots of files, rather than stored as a file and the changes made to that file over time.
A file can reside in one of 3 states:
- Committed - the data is stored in the local database
- Modified - the file has been changed but not committed to the local database
- Staged - the modified file in its current version has been marked to go into the next commit snapshot
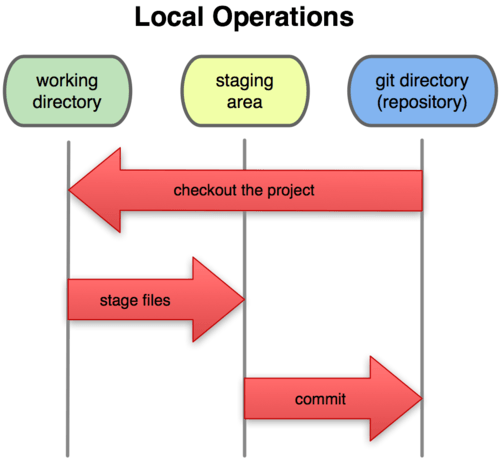
- Git directory - where the metadata and object database for the project is stored. This is what gets copied when you clone a repo.
- Working directory - a single checkout of one version of the project.
- Staging area - stores information about what will go into the next commit. Also called the index.
#Do's and Don'ts#
- Commit often
- Use "ABCD-123 #comment some meaningful comments about the commit" where ABCD-123 is the Jira scenario number
- Update your feature branch often
- Learn to use Git from the command-line
- Do NOT create branches
- Do NOT commit anything to the develop or master branches
- Do NOT perform tasks directly in GitHub other than working on pull requests (creating, closing, and commenting)
The command line git is recommended for working with the github repository. Pro GIt is an excellent resource for learning how to use git from the command line.
Note: Before you can install the MEDSEEK common node modules you will need to setup ssh keys. To generate the ssh keys and attach them to your github account follow these instructions: Generating SSH Keys
####Branching Strategy We will follow the Gitflow workflow. This tutorial is a good introduction to the Gitflow workflow.
All feature and defect development will be performed in feature branches. The Medseek US team lead is the primary team member responsible for creating feature branches. Typically a feature branch will be created for each epic story in a sprint, however the team lead may choose to further break out that work into separate feature branches.
A senior member of each sprint team will be designated as the branch owner. The branch owner will be responsible for pulling down changes to the feature branch. This should be done frequently to keep the feature branch in sync with develop.
#####Feature Branch Naming Convention All feature branches will be named "feature/some-short-description-of-the-feature". Once we decide on a scrum tool, we will also include the story or defect identifier in the branch name.
####Initial setup You will first need to clone the repo. This is a one-time step -- after executing this step, you will not need to clone the repository again. Execute
git clone https://github.com/medseek-engineering/training
####Working with Git A local repository consists of three trees maintained by git:
- the working directory, which holds the actual files
- the index, which acts as a staging area
- the head, which points to the last commit you made
The Medseek US team lead is responsible for creating feature branches as appropriate for the Medseek India sprint teams. It is critical that the assigned stories and defects are worked in the correct feature branch. If a team member feels a new feature branch is required, they must consult with the US team lead.
#####Working on a user story Once the feature branch is created, you will want to checkout the branch. From the command prompt, change directory to the root of the code base and execute the following commands :
git checkout master
git pull
git checkout feature_branch_name
Now you're ready to implement the code for the story. You should commit changes often. Committing changes in git only commits your changes to the local repository. First, you'll need to update the index with your changes:
git add .
To commit files, execute :
git commit
This command will open a VIM editor for entering a commit message. If you want to cancel the commit, enter ":q". To add your commit message, enter "i" then type the commit message. When finished, enter ":wq" to save the message and commit the changes.
To share your changes with other team members, you need to push your changes from the local repo to the github repo. To do this, execute
git push
Before pushing, be sure all unit tests are passing and no static analysis warnings are found in the code.
If the push fails with the message "Updates were rejected because the remote contains work that you do not have locally.", you need to first pull changes from the remote before pushing. Execute
git pull
Then perform the push again.
####Sync feature branch with develop The feature branch, especially if it's long-lived, will need to be synced with the develop branch. This can be accomplished by executing the following commands
git checkout develop
git pull
git checkout feature_branch_name
git merge develop
If there are conflicts with the merge, you will get a message stating the automatic merge failed. The conflicted files will be listed. See the next section on how to resolve these conflicts.
Once any conflicts are resolved, commit and push the merged files. You will notice that the commit message is already supplied, indicating that develop was merged into the feature branch.
#####Handling merge conflicts Edit the conflicted files to resolve the conflicts. After editing the conflicts, execute
git add file_name
for each of the conflicted files to mark the conflicts as resolved.
####Sync local repo with remote branch
git pull
If there are merge conflicts, see the previous section on handling merge conflicts.
####Undoing things in git
#####Undoing unstaged changes To revert changes in your working copy, execute
git checkout .
To revert changes made to the index (files that you have added), execute
git reset
To revert untracked changes, execute
git clean -f
#####Undoing local commits To undo the last commit and reset the repo's state (you will lose the changes that were made in the commit), execute
git reset --hard HEAD~1
To undo the last commit, but not lose those changes (say, you just need to make a quick edit to fix the commit), execute
git reset HEAD~1
#####Undoing changes that have been pushed To undo changes that have been pushed to the remote repo, execute
git log
to find the commit name (the SHA-1 object name). Then execute the following to revert the commit
git revert commitNumber
git push
####Stashing changes If you have local changes that aren't ready to commit, but you need to switch branches, you can store your changes by executing
git stash
Now you can switch branches and/or commit changes without sharing your in-process work. Once you're ready to go back to your work-in-progress, switch to the correct branch and execute
git stash list
This will list the changes that have been stashed (each time you run "git stash" you create a different changeset). If you want to apply the most recent stash, execute
git stash apply
If you want to apply a specific stash, execute
git stash apply stashId
The stashId will be from the output of the "git stash list" command
####Moving code from the feature branch to develop When the code from your feature branch is ready to be shared with the development team, you will need to create a pull request. Before creating the pull request, be sure the feature branch has been sync'd with the develop branch.
- Browse to your feature branch on git hub
- Click the Pull Request link
- Add comments in the comment text area
- Click the Send pull request button to submit the pull request
The Medseek US team lead is responsible for processing pull requests. If there are questions or comments about the changes, these will be added to the pull request discussion. Subsequent changes that are pushed to the branch will be automatically included in the open pull request. Once complete, the Medseek US team lead will close the pull request. The feature branch should also be deleted.
####Unrelated bugs found when working in a feature branch During development of a feature, you may find a bug in some unrelated part of the application. You should create a defect in the trouble tracking system. If the defect needs to be addressed immediately, see the Medseek US team lead to have a branch created for the defect.
####Sharing changes with other branches DO NOT copy/paste code between branches! If you need the code from another branch, create a pull request to have the code merged between the branches.


