Intercom allows users to remotely chat with representatives using Watson Speech to Text technology. The representatives are notified via text and can reply directly to the user by SMS using the Twilio APIs. All of this is kicked off at the push of a bttn, enabling users to comminute with ultimate ease by completely avoid manual input into the app.

-
Push the bttn to start a conversation
-
Once the mic is flashing red, start recording your message. The app will automatically detect when you are done speaking and send the message. Your chat will be automatically assigned to an available representative.
-
Using Twilio, the rep will respond to your inquiry
-
This manner of communication can continue as long as either party would like. Once the rep has decided that they have addressed the user's concerns, they will end the chat.
-
Rinse and repeat to your heart's content!
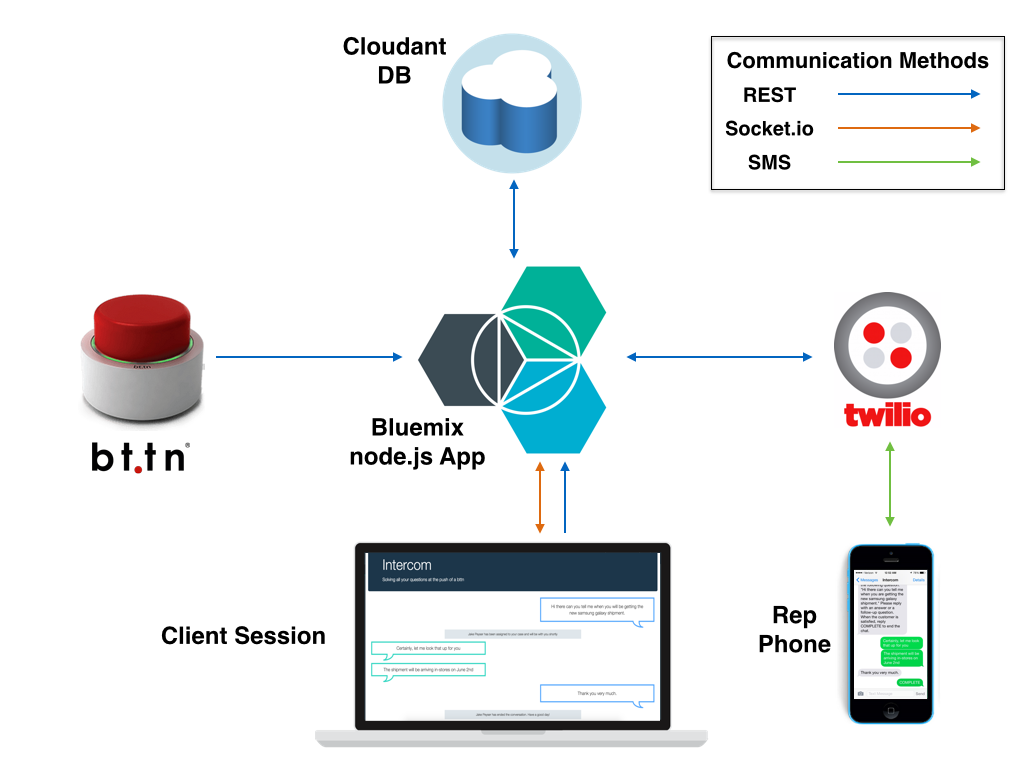
This an architectural overview of the systems that make this app run.
-
Create a Bluemix Account
Sign up in Bluemix, or use an existing account.
-
Download and install the Cloud-foundry CLI tool
-
Edit the
manifest.ymlfile and change the<application-name>and<application-host>to something unique.
applications:
- name: Intercom-user1
  framework: node
  runtime: node10
  memory: 512M
  instances: 1
  host: intercom-user1
The host you use will determinate your application url initially, e.g. <application-host>.mybluemix.net.
- Connect to Bluemix in the command line tool and follow the prompts to log in.
$ cf api https://api.ng.bluemix.net
$ cf login- Create the Cloudant service in Bluemix.
$ cf create-service cloudantNoSQLDB Shared cloudant-service- Create the Speech to Text service in Bluemix.
$ cf create-service speech_to_text free speech-to-text-service- Push it to Bluemix. This will initially fail, but don't worry! The next steps will get your app up and running!
$ cf push-
Create a Twilio service by adding it in the catalog, inputting your Account SID and Auth Token, and binding the service to your app.
-
Create a user provided service to store your DB reset credentials
$ cf cups CloudantCleanser -p '{"host":"https://YOUR_HOST_NAME.mybluemix.net/db/reset","username":"YOUR_USER_NAME","password":"YOUR_PASSWORD"}'- Enter the Cloudant dashboard and do the following:
a. Create a DB called 'intercom'
b. Create the following design docs:
i. Bttns
Document: _design/bttns
Index name: bttns_index
Map function:
function(doc) {
    if (doc.type === 'bttn') {
      emit(doc._id, {
        uniqueId : doc._id,
        revNum : doc._rev,
        name : doc.bttnName,
        bttnId : doc.bttnId
      });
    }
  }
ii. Chats
Document: _design/chats
Index name: chats_index
Map function:
function(doc) {
        if (doc.type === 'chat') {
          emit(doc._id, {
            uniqueId : doc._id,
            revNum : doc._rev,
            startTime : doc.startTime,
            chatStatus : doc.chatStatus,
            bttn : doc.bttnId,
            rep : doc.repId
          });
        }
      }
iii. Messages
Document: _design/messages
Index name: messages_index
Map function:
function(doc) {
          if (doc.type === 'message') {
            emit(doc._id, {
              uniqueId : doc._id,
              revNum : doc._rev,
              chatId : doc.chatId,
              message : doc.messageText,
              date : doc.dateTime,
              subType : doc.subType
            });
          }
      }
iv. Reps
Document: _design/reps
Index name: reps_index
Map function:
function(doc) {
        if (doc.type === 'rep') {
          emit(doc._id, {
            uniqueId : doc._id,
            revNum : doc._rev,
            name : doc.repName,
            phoneNumber : doc.repPhoneNum,
            state : doc.state
          });
        }
      }
To troubleshoot your Bluemix app the main useful source of information are the logs, to see them, run:
$ cf logs <application-name> --recent


