In this project, the goal is to teach an agent collect yellow bananas and avoid blue bananas in a 3D Unity environment. The agent has access to the environment's 37 dimensional state, which consists of the agent's velocity as well as "ray-based perception of objects around the agent's forward direction". Each of these 37 dimensional states takes on a continuous value. From this state, the agent learns which of four descrete actions it should take. The actions are as follows:
0 - Move forward
1 - Move backward
2 - Turn left
3 - Turn right
When interacting with the environment during a single run or episode, the agent will recieve a reward of +1 when collecting a yellow banana and a reward of -1 when collecting a blue banana. The agent is thought to have solved or learned the environment when the agent gets an average score of +13 over 100 consecutive episodes.
To replicate this results of this project you need to create a conda environment using python 3.6 and activate it. This can be done as follows for Linux or Mac. (For windows, follow Udacity's instructions)
$ conda create --name drlnd python=3.6
$ source activate drlnd
(drlnd) $
Then in your environment, install OpenAI's gym as follows:
(drlnd) $ git clone https://github.com/openai/gym.git
(drlnd) $ cd gym
(drlnd) $ pip install -e .
After installing gym, you must install Udacity's required python packages as follows:
(drlnd) $ git clone https://github.com/udacity/deep-reinforcement-learning.git
(drlnd) $ cd deep-reinforcement-learning/python
(drlnd) $ pip install .
Then you create a Jupiter notebook kernel that can run the Unity environment provided by Udacity as follows:
(drlnd) $ python -m ipykernel install --user --name droned --display-name "drlnd"
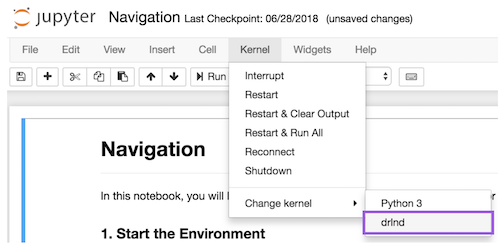
When running in the Jupiter notebook you can start your your notebook kernel as shown below.
Next you will download the rebuild Unity Environment at one of these links:
Linux: Single Agent Linux: No Visualization - Single Agent Mac: Single Agent
You can then explore the environment by going to the Udacity DRLND GitHub (here) repository and open the Navigation.ipynb file in the p1_navigation folder (here).
To train, in your terminal run the following:
(drlnd) $ python3 ./training.py
graph TD
./training.py --> ./dqn_agent.py
./dqn_agent.py --> ./model.py
This will run a Deep Q-Network with the following default hyper parameters:
(drlnd) $ python3 ./training.py \
--n_episodes 2000 \
--max_t 2000 \
--eps_start 1.0 \
--eps_end 0.01 \
--eps_decay 0.9 \
--BUFFER_SIZE 1e5 \
--BATCH_SIZE 64 \
--GAMMA 0.99 \
--TAU 1e-3 \
--LR 5e-4 \
--UPDATE_EVERY 4 \
--state_size 37 \
--seed 42 \
--model_num 8 \
--num_units 64
To train multiple agents (and have it run in the background, in your terminal run the following:
(drlnd) $ nohup python3 MultiModel.py &
You can edit the loops inside MultiModel.py to control what hyper-parameters you train with.

