Code Monkey home page Code Monkey logo

learn-git-basics's Introduction

Learn git

This workshop has been made for students of Founders and Coders, and therefore assumes that you have completed lesson 1 of Udacity's Git and GitHub course (as part of the precourse material)

All contributions to this workshop are very welcome! If you have any suggestions for improvements, please raise an issue. The author will let you know whether they prefer to make the changes themselves, or whether you are welcome to submit your own PR (Pull Request). If you do make PR yourself, please follow the Founders and Coders contributing guidelines.

Contents

  1. Introducing Github Flow
  2. Git Basics
  1. Git for Collaboration
  1. Resources

GitHub Flow

Version control makes it possible for you and I to work on one file at the same time, because we can keep both our versions saved and then compare them once we have each finished our work. This allows us to integrate our changes more swiftly.

Most developers use git as their version control system, but different teams use different "workflows". At Founders and Coders, we generally follow something called "GitHub flow", because this flow makes it easy to deploy the latest version of your application very regularly. For a fuller explanation, there is a useful article in the resources section.

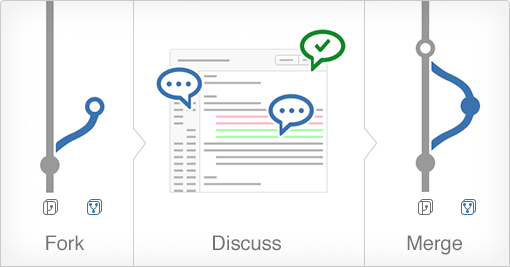
To see the steps involved in working on a "feature branch", follow GitHub's visual guide now.

What is a branch?
Creating your own "branch" is like taking a copy of master and renaming it. When you commit, the changes that you make will only exist on that branch. As you work on a GitHub repo, the first branch you are on is the default branch, called master. If you wanted to start working on a new section of the website (say the footer styling), it is best practise to create a new branch for working on that feature.

Git Basics

Next please fork this repository.

fork button on github

Getting Started

The next step is to clone the forked version of this repository. On the main page of the repo, copy the url shown here:

where to copy url on github

Then use the command in your terminal:

git clone https://github.com/NataliaLKB/learn-git-basics.git

You should now be able to redirect into the directory just created using the command line.

Next, it is good to get in the habit after each command to use git status. Let us use it now.

git status

Now check which branch you are on:

git branch

You should only see master which is the default branch in this repo.

When there are other branches in your repo the green branch is the current one you are on.

Branching

The next step is to create your own branch to work on. try this:

git branch new-branch

It is best to try to name your branches as specific as possible, so not to confuse them with any others. There are many naming conventions out there for branches, but for this week simply try to name them off of a feature. For example (navbar-collapse or sass-file-structure). To see all your branches:

git branch

As you can see, you have created your branch, but are not currently on it. To navigate onto it please:

git checkout new-branch
git branch

Now you can see you are on that branch. Go back to master and now we are going to delete new-branch.

git checkout master
git branch -d new-branch
git branch

As you can see, your branch is now gone.

Making Changes

Now it is time to make some changes in the project. Make yourself a new branch named update-cheatsheet and go onto it. open up the file cheatsheet.md in your favourite text editor.

As you can see, this contains all the commands you will need to begin using git. Continue to add to it all the new commands you learn. To begin, here is a command that both creates a branch, and moves you onto it at the same time:

git checkout -b <new branch name>

Add that command, and its description to cheatsheet.md and save it. Now in your terminal:

git status

You will see something like this:

git status example

You will see your changes in red. now we need to add them to the git staging area. Doing this is like telling git to pay attention to these files, and start tracking the changes. To do this write this command:

git add cheatsheet.md
git status

Now you can see the file name has turned green. Now to commit your changes.

git commit -m 'adding new command in the cheatsheet'
git status

The message could be anything, but it is best to make it something that describes what you just did. You can also use the command git commit without -m '<message', however beware that it will send you to a text editor called Vim. Though learning how to use Vim is important, it isn't necessary at this stage. Typing :q straight away will get you out of it and commit again with a message.

Merging Changes with Master

Now that you have made and committed your changes, it is time to merge your branch with master. Even though you are not working with anyone else on this repository, it is always good practice to make sure your current branch is completely up to date with master. Imagine if you were working with a team. Someone else has already pushed up changes to master. If that someone else and yourself have changed the same file, it is quite likely that your changes will not be compatible with theirs. To avoid this, you want to merge your changes with theirs to avoid future problems. Checkout back onto master and pull down. These commands look like this:

git checkout master
git pull origin master

Pulling down means that you are getting any recent changes from the remote master branch which is located in Github. Next go back to your branch (update-cheatsheet) and merge with master.

git merge master

Even though in this situation there isn't any changes to merge, it is best to get in the habit on going through these steps in your work flow. Merging like this means taking any possible changes in master and merging them with the branch you are currently on. After you merge with master you have to push your changes to the remote repo (Github).

git push origin update-cheatsheet

When you pull or push you are referring to your remote repo, or origin. In the example of git push origin <branch name> you are pushing your local changes to a remote branch that you are both creating, and naming. Since you are creating this branch from your local one it makes things much simpler if you use the same name for your remote branch, as your local one.

For more information on pushing, see here

Go to your browser and open up this repository in github. Press the branches button

branches button in gitub

And then make a pull request to master

viewing all your branches on github

Afterwards you will see a merge button. Press it and delete your branch. Now your remote branch master is completely up to date with your latest changes.

Return to your terminal and navigate to your local master branch. Pull down. You will see your branch update (fast-forward). Delete the branch update-cheatsheet.

Merge Conflicts

Check all the branches on this repository, even the remote ones. To do this use this command:

git branch -a

You should see something like this:

see all branches in github

Run the command:

git checkout merging-experiments

Open up the git cheatsheet, as you can see there are some differences between this and master. To see these differences use command:

git diff master

The differences in green and the additions on this branch, that don't exist on master. The red are the things that are on master, that don't exist on this branch.

Merge with master. You should have a git conflict that looks something like this:

git merge conflict example

Do you see the lines at the top. The first section is labelled HEAD those are from this branch. The next section is from master. Delete the lines, and any other code you want until the cheatsheet looks like how you want it to look.

Afterwards git status, add the files in red, commit, and push. Then make a pull request to master like before and merge. Don't forget to update your local master branch, and delete the merged branch in Github and in your local repo. It is good to keep your working environments clean and organised.

Changing File Structure

Imagine you're working on a project that's getting bigger in size. As new files are added, it makes sense to group some of them into folders. For example, it's a good idea to keep all CSS files in one folder, JS files in another etc.

Let's assume you've just cloned a repository structured like this:

index.html
stylesheet.css
script.js

However, you'd prefer to split these into folders like:

css/stylesheet.css
js/script.js
index.html

In order to achieve this, git mv command comes in handy. Using it to move files ensures preserving history of the files you work on. To change file structure like above (and create new folders at the same time) use command:

mkdir css && git mv stylesheet.css ./css
mkdir js && git mv script.js ./js

(This glues mkdir and git mv commands together with && operator).

Basic function usage is

git mv <source> <destination>

The command also takes optional parameters. To find out more, refer to documentation.

Git for Collaboration

Terminology

#####Β Commit Hash: commit hash picture

HEAD

Simply put, the HEAD is a reference to a commit object. For more information see: http://eagain.net/articles/git-for-computer-scientists/

The Timeline

As you know from the Udacity course, git stores all the commits on the project. You can use them as a timeline and travel back and forth in time. This section reminds you how to do that, which will come in handy as you work in projects with your team.

Make a new branch called timeline-practice and navigate onto it.

Step 1) Make a new directory in the project via the command line. Lets call it time.

mkdir time

Step 2) Also make a new file in that directory and call it whatever you like. A simple text file should be fine. After you are done, open it.

touch time/newfile.txt
open time/newfile.txt

Write the current time stamp, and a short message to your future self. Save it. Next add and commit your changes. Your commit message should be descriptive of what you just did. Repeat step 2 twice more, deleting the previous time and message, and adding the new time and a different message. Make sure you add and commit each time. Make sure your commit messages are unique, and you can tell which one was first, second, and third.

Step 3) Next type in this command:

git log

You should see something like this:

git log example

Pick the second time commit that you made and copy the hash. Use q to exit the log and checkout to your commit.

Step 4)

git checkout <commit hash>
git status

git detached head warning

As you can see after you checkout a message appears informing you that you are in a 'detached HEAD' state, meaning your are not working on any current branch. Open up the file in the time folder and look at the time and message. It should be the 2nd one that you wrote.

Repeat step 4, and use the hash of the first time commit you made. Open the file and see that the time of your first commit, and your message to yourself. This is going back in time. You can easily go back as far as you like in the project and see older iterations of this tutorial!

Next, we should go back to the future. The quickest and easiest way is to checkout onto thetimeline-practise branch and you should be back up to date. However, you can also navigate back to the latest commit from where you are now. First, check git log. You will notice your latest commits are no longer on there. This is where another command is handy. git reflog is best used to find recently "lost" commits. you should see something like:

git reflog example

Find the commit name of the last commit you did (the third time that you recorded) and copy the short hash in yellow. Checkout back to that commit, and git diff timeline-practise there should be no difference. Checkout back to timeline-practise and push up to Github to make a pull request to master. Make sure you first check that it is up to date with master locally.

Committing

When should you commit?

You should aim each commit to be a "safe" version of the project. This means that if you checkout to any commit in your timeline, that should reflect where the project was at that point, and be functional.

Given that, when you commit is very important. I have heard two very useful guidelines.

The first, is that as you complete the task assigned to you, you make several commits at different times during that task. In the end you merge all those commits together to make one very informative commit of that task. I will talk about ways to merge commits together in a later section.

The second method is you work through your task and complete it before adding or committing at all. Then you check the status of the repo and see all the files you have changed. The next step is selectively adding and committing

Through my research I have come across many different methodologies, and ultimately you should try to do what seems the most natural to you. I use both of these methodologies depending on the extent of the task before me. The best thing is to always keep in mind that you and your colleagues will inevitably need to go back to your commits and it will help everyone if commits are aptly named.

Likewise, even in pull requests, you must aim to make your commits a clear and concise summary of what tasks where completed on that branch. That way the person reviewing your pull request understands what they will be reviewing before looking at the code itself.

Commit messages

Just like choosing when to commit, and what to commit, it is also important to think about your naming. It is always good to be as descriptive as possible with your commit messages.

Also consider:

  • Present tense for your commit messages
  • If related to an issue on github, should contain issue number
  • The first line should be 50 characters or less. Your message should be brief and to the point.
  • Focus on why you did something, not how you did it
  • Avoid ands. If you find yourself wanting to write and, you should probably break up that commit into multiple ones.

Remember that the purpose of this commit is to be a message for future you, or your colleagues who may not have known what you are working on. Try to think about your message with this in mind.

Many development teams take it one step further and turn their commit messages into change logs. These change logs may be used for user consumption making it all the more important to have clear messages of what was done for that commit.

I tend to favour one line commits for simplicity, but many schools of thought out there prefer multiline commit messages. For examples of "best practice" formats for this see:

Merging Commits

Often you will find yourself wanting to merge commits, or organising your early commits slightly differently on a branch to better demonstrate what you worked on. I will briefly go through one easy way to do this.

Reset Soft

This is my preferred method of merging commits together. It leaves you with lots of flexibility.

To begin, make a new branch and make some new files and commit regularly (at least twice).

Next git log and pick the 3rd most recent hash. Copy it and:

git reset --soft <commit hash>
git status
git log

Your working directory shouldn't changes, but all the files that you changed should be in green. Your log should have the newest commit as the hash you copied. Even though all your work is still the same as before the reset, the commits are different. Then you can commit again and this is an easy way to replace 2 or more commits with one commit.

For more information and techiques see:

RESOURCES contributions welcome

Have you found a useful Git or GitHub resource or tutorial? Please let us know by creating an issue

learn-git-basics's People

Contributors

jsms90 avatar jwhiles avatar naomigaynor avatar natalialkb avatar nelsonic avatar patrickwalkowicz avatar piotrberebecki avatar smarthutza avatar

Stargazers

 avatar  avatar  avatar  avatar  avatar  avatar  avatar  avatar  avatar  avatar  avatar  avatar  avatar  avatar  avatar  avatar  avatar  avatar  avatar  avatar  avatar  avatar  avatar  avatar  avatar  avatar  avatar  avatar  avatar  avatar  avatar  avatar  avatar  avatar  avatar  avatar  avatar  avatar  avatar  avatar  avatar  avatar  avatar  avatar  avatar  avatar  avatar  avatar  avatar  avatar  avatar  avatar  avatar  avatar  avatar  avatar  avatar  avatar  avatar  avatar  avatar  avatar  avatar

Watchers

 avatar  avatar  avatar  avatar  avatar  avatar

learn-git-basics's Issues

FAQ Section?

e.g:

  • Q: Should I ever push directly to the Master Branch?
    push to master

Terminology | Definitions

Commit
You need to point out the difference between the verb to commit and the noun a commit. You have the verb in this section mostly, but you use the noun in the first sentence of β€˜Why Version Control'.

I think adding that all commits are 'saved and accessible' at any time would clarify a little as well 😊

Branching
This isn't really a definition of branching - it jumps straight into using the branching terminology without actually giving a sentence or diagram on what it actually is.

Fork
Used in the first section of the tutorial but not defined.

Diagrams are particularly useful for branching and forking, but would be fantastic throughout the tutorial as they make git concepts much easier to understand.

Terminology

While I was following this tutorial I noticed something. πŸ”
I was wondering if it was supposed to be like this or was it a mistake.

Screen Shot 2020-01-27 at 13 40 57

What to do if a pull request cannot be automatically merged.

"We can’t automatically merge this pull request. Use the command line to resolve conflicts before continuing."

It might be worth briefly covering what to do if a pull request doesn't quite come off and the reasons why it might happen.

Condense 2 tutorials into 1

The current version of the FAC curriculum has only one slot for learning git & github. By week 2, students are now expected to know all of the content in this workshop.

So it would be good to restructure this tutorial slightly and remove these references at the beginning:

The introduction to Git is aimed at the first week of the full time Founders & Coders course

Git for Collaboration is aimed at the second week students of the course

If we're condensing it, we will also need to:

  • move the "GitHub flow" section to the top, before the workshop begins.
  • remove:

Before we start make sure you have a terminal open located at the local copy of this repo. The same one that was used for the first tutorial is essential.

Which directory to Fork / clone your git repo?

Something that had me a wee bit doubtful about the fork then clone instructions were as to where exactly to do this. Just a one liner about adding a 'github directory' or 'Projects_Folder'.

Side note pink box on git status chops off the part which also displays which branch you're on.

Minor additions

Possible inclusions based on what I found confusing when learning version control:

On the line about adding comments to commits: emphasise the necessity of a message otherwise you end up in VIM, which is pretty confusing and difficult to exit if you haven't seen it before.

Explain that when using push or pull, 'origin' refers to the location(usually/always? the remote repo) and 'master' is referring to the branch there. For a while I did not understand the difference between them.

That merging locally and merging on GitHub is the same step twice, so not mandatory but gives extra control of remote repo.

When pushing to the remote repo the new branch has to have the exact same name as the local branch as you are pushing a copy of it.

A couple of times referring to a pull request as a PR may be confusing for those not familiar with the overall process.

These feel like very nitpicky points for what will be an amazing learning resource for newcomers to Git, but are things I was slightly confused by to begin with so may be worth including.

Use Brew to install Git? What is brew?

On line https://github.com/NataliaLKB/learn-git-basics/blame/1116839e12c4165cb1b232747b466189e216ec7c/README.md#L98 you are recommending people install Git CLI tools using Homebrew.

While this is often recommended as the "easy" way of installing/upgrading the version of Git on Mac, e.g: http://apple.stackexchange.com/questions/93002/how-to-properly-update-git-on-mac

But if you want the latest version (brew is usually behind by one release) its easy enough to download it directly: http://git-scm.com/download/mac see: http://superuser.com/questions/666086/issues-installing-git-under-mac-os-x-10-9-mavericks

If you are keen on keeping in the brew suggestion, maybe hyperlink it to a brew tutorial:
http://computers.tutsplus.com/tutorials/homebrew-demystified-os-xs-ultimate-package-manager--mac-44884

Introductions

  • The repeated introduction is unnecessary for the introduction section. You could use this space to give a two line overview of what version control is and how it's used in 'plain English', or leave it out altogether.
  • For Git Collaboration, you do need an introduction section as it's much later in the tutorial - what you have is good but it's not actually an introduction to the section, it would be nice to see a two sentence overview of what this section is about and covers

Minor suggestions for Git for Collaboration

Could replace:

touch time/newfile.txt
open time/newfile.txt

With:

date > time/newfile.txt

or

echo "first version" > time/newfile.txt 

You say, "Repeat step 2...step 6". It is not immediately obvious which steps you are referring to.

Typos under https://github.com/NataliaLKB/learn-git-basics#when-should-you-commit:
"The first, is that a you..."
*"...depending on the extend of..."
*"...what tasks where completed..."

This is just such a marvellous piece of work. I am very happy with where we are setting the bar for future tutorials.

a few typos

You should now be ablle to redirect into the directory just created using the command line.

mkdir css && git mv script.js ./js

informing your that you are in a 'detached HEAD' state

Your working directory shouldn't changes

Also, there are 4 backticks on line 124 instead of 3. It's messing with the code blocks & therefore the syntax higlighting

Tutorial Structure?

Would it be helpful to enumerate the sections for structure (and have a catchy blog post title?) ?
e.g:
#11 Things You Need to Know Git

  1. What is Git and Why do I need it?
  2. init - initialise a folder on your computer as a git repository (would also need to show creating the repo on GitHub)
  3. clone - make a copy of an existing project (e.g. from GitHub)
  4. add - add specific files you have changed or all files at once.
  5. commit - save your work as a version.
  6. pull - retrieve the changes others have made (updates your local copy of the project)
  7. push - sends the changes you have made to files/folders to the remote repository
  8. Checkout / Branching - create a new feature
  9. merge - Apply the changes you have made to the main repository
  10. _Resolve_ Merge Conflicts - Inevitably when working in a team...
  11. Revert - if you want to go back to a previous version of your code. (the power of version control... History.)

Then it makes it easier for others to extend your tutorial with other topics/sections they find useful.
e.g:

  1. Forking - useful when you want to contribute to someone else's project
  2. Issues - creating an issue is the easiest way to get started contributing to projects.
  3. Commenting on commits using line references
  4. Pull Requests - Collaboration
  5. History/Blame (see who made what change in the GitHub UI)
  6. Starring & Watching
  7. Forcing (should you ever force push a commit?)
  8. Deleting ("Pruning") branches you no longer need.
  9. Other Git hosting providers (its not just GitHub...) e.g: BitBucket allows you to have unlimited Private repos for free (provided you have a small team): https://bitbucket.org/plans

This way the contributors to your repository/tutorial could discuss and vote on the ordering of the sections and easily propose new ones or expand on existing...

If it got to the point that you had an exhaustive list of GitFu The 67 things you need to know Git your post will move from being a "beginner" post to the Number 1 linked to & starred tutorial on the internet (hacker news, reddit, etc.)

Again, just a suggestion... πŸ‘

Diagrams (You can Borrow Images!)

There are quite a few decent git tutorials (some of which you have linked to) but you can also, borrow their images e.g:

git fork diagram

from: http://blogs.atlassian.com/2013/05/stash-git-forking-development-workflow/

Provided you give the original authors credit. (I would also drop them a quick email requesting - retrospective - permission and include a Screenshot of the email you send in the GitHub issue so you can refer back to it in your commit message.)

Using images makes it way easier to understand.

Tutorial should be made more group based

In FAC10, pretty much everyone did this workshop solo, I think it should be done in partners. The solo aspect of this tutorial led to some people getting quite confused about flow when working on their first projects in their groups.

The current process for the introduction section is essentially:

  1. Fork and clone a repo
  2. Create a new branch
  3. Make a change to a file in your new branch
  4. Add and commit changes
  5. Pull master branch to make sure local master is up to date
  6. Merge new branch with master
  7. Push your new branch
  8. Make a pull request for your new branch to your own forked master branch
  9. Merge your new branch with your master branch
  10. Pull updates from remote master to local master
  11. practice dealing with merge conflicts with a pre-made branch

I think perhaps this could be adapted to be more partner based, rather than one person doing everything, which accidentally teaches bad practices like merging your own pull requests.

Missing component: .gitignore

.gitignore is quite an important thing for beginners which I am missing in this tutorial.

A small section on this should be added.

"Unhappy Path"

Thank you for this! It was really helpful this week.

My main issues came when I had diverged from the route of the tutorial and not realised. A mistake I kept making was:

  1. Make some changes to some files.
  2. Stage the files
  3. Realise I was on the main branch
  4. Try to checkout to a new branch
  5. Oh no!

I realised I could unstage and then create the new branch and commit. Perhaps an FAQ/Troubleshooting section would be useful?

Clarifications

Getting started

  • git clone and git status in this section need a little more clarification for beginners - what do these commands do? It would also be great to have a screenshot of the results so people know 'it's working' πŸ˜‰

Branching

  • "name them off of a feature" - needs to be clearer, for example 'named for the feature you are working on or the bug you are fixing'. Maybe also encourage people to not be afraid to open branches for small fixes, it's still good practice!
  • The git branch here here makes things a little unclear as it's the first time you're using git checkout - suggest splitting them out so people don't think you have to always use them together
  • Maybe move deleting a branch to further down the workflow or explain why you're deleting it here

Making Changes

Merging changes with master

Merge conflicts

  • git status should be code or a full sentence πŸ˜‰

Git Flow

  • A couple of words added to explain git flow is a workflow (so people aren't forced to open the links and break the flow of the tutorial - no pun intended!)

Further Terminology

  • This section feels a little disjointed to me here (I would expect 'Further anything' to come at the end of a tutorial), maybe just needs a little clarification, i.e. 'Further terminology you will need for this section'

Timeline

Commit messages

  • "Present tense for your commit messages" - example?
  • "If related to an issue on github, should contain issue number" - if you put the issue url into the commit message, a comment will automatically be added to your issue referencing the commit

Numbering the steps in the section "Timeline"

Hey Natalia,

Thanks for making this tutorial!
Just a small observation, in the Timeline section under Git for Collaboration, you refer to each step by their number, eg. "step 2". However the steps themselves aren't numbered. I would find it easier to follow if they we're numbered so i could connect the "step #" with is code equivalent.

It might also be helpful when learning as a beginner to have the steps numbered in all of the sections so that you know that you're on step 1 rather than thinking you're on step "mkdir" which is foreign terminology at this point. Although on the other hand it might be beneficial to be chucked in and having to start using that terminology internally from the start of the learning.

A Note on git stash

I would love to see a little explanation on the use of git stash.

In my day to day I am frequently prompted to:

commit [my] changes or stash them before [I] can switch branches.

I have recently discovered the utility of stashing, making changes and committing and then "popping" the stash to return to where I was. The examples on git-scm docs have been particularly useful.

What do you think? Would this be something to be made aware of as a beginner? It takes a bit of understanding of the state of your current branch and the other branch you're working with so maybe not?

Anyway, if you decide to add in this feature, I'd love to see how you word it!

update content based on the current pre-reqs & precourse

Given our current pre-requisites and pre-course material, some of the content of this tutorial is a bit out of date now. It is a shame to get rid of any content, considering the fact that this tutorial is not aimed exclusively at FAC students:

the first week of the full time Founders & Coders course, or to those just starting out with git

So, @NataliaLKB, I'm not sure how you feel about the suggestions below? But if this is going to be used as the first workshop in the FAC curriculum, it feels a bit strange for students to have any basics explained to them, which we have already required them to cover.


We now consider the first part of Udacity's git & github course to be mandatory precourse material. So it's probably worth removing the following:

  • "Need to Know Terminology" - repo, version control, git & github
  • "Why Version Control"
    • "Code Base History" - whole section
  • How to install git

We require people to have a github account & to create their own one-page website in order to apply for the course. So we can remove:

  • mention of getting a github account for the first time

Initial feedback

I love this.

Here are some minor comments:

  1. "students of Founders & Coders 8 week coding Academy."

perhaps change to "students of courses at Founders & Coders", just because I suspect we will want to use this for our weekend courses, too.

  1. git branch new-branch

To a novice, it may not be clear whether new-branch is a command or the name of something. my-new-branch might be more obvious.

  1. Might be worth noting the difference between:

git clone https://github.com/NataliaLKB/learn-git-basics.git

and:

[email protected]:NataliaLKB/learn-git-basics.git

which beginners could usefully be made aware of.

  1. Might be worth nothing the difference between git push, git push origin and git push origin master. See http://stackoverflow.com/questions/12462481/what-is-the-difference-between-git-push-origin-and-git-push-origin-master and https://www.kernel.org/pub/software/scm/git/docs/git-push.html#_examples
  2. Under "Merging Changes with Master" at the end, you may want to say something about comparing across forks, and about base fork and head fork otherwise there is a danger that you will get loads of pull requests into your original repo.

Moar Resources?

I would add an intro paragraph to the resources section: https://github.com/NataliaLKB/learn-git-basics/blame/1116839e12c4165cb1b232747b466189e216ec7c/README.md#L430

Resources contributions welcome

_found a useful Git or GitHub resource or tutorial? Please let us know_ by creating an issue

My picks would be:

  1. Great interactive tutorial: http://gitimmersion.com
  2. Video: http://build-podcast.com/git/
  3. Git User Manual: https://www.kernel.org/pub/software/scm/git/docs/user-manual.html
  4. GitHub's Treasure Trove of Video Tutorials: https://www.youtube.com/user/GitHubGuides (channel) and specifically: https://www.youtube.com/watch?v=FyfwLX4HAxM
  5. The simple guide to git: http://rogerdudler.github.io/git-guide/
  6. Jeff Schomay's Git-Fu presentation: http://slides.com/jschomay/git-fu
  7. Git Pretty: http://justinhileman.info/article/git-pretty/ (anything visual makes learning git much easier...)
  8. Intermediate: http://www.raywenderlich.com/74258/git-tutorial-intermediate
  9. Visualise your Git with SourceTree: http://www.sourcetreeapp.com/

Recommend Projects

  • React photo React

    A declarative, efficient, and flexible JavaScript library for building user interfaces.

  • Vue.js photo Vue.js

    πŸ–– Vue.js is a progressive, incrementally-adoptable JavaScript framework for building UI on the web.

  • Typescript photo Typescript

    TypeScript is a superset of JavaScript that compiles to clean JavaScript output.

  • TensorFlow photo TensorFlow

    An Open Source Machine Learning Framework for Everyone

  • Django photo Django

    The Web framework for perfectionists with deadlines.

  • D3 photo D3

    Bring data to life with SVG, Canvas and HTML. πŸ“ŠπŸ“ˆπŸŽ‰

Recommend Topics

  • javascript

    JavaScript (JS) is a lightweight interpreted programming language with first-class functions.

  • web

    Some thing interesting about web. New door for the world.

  • server

    A server is a program made to process requests and deliver data to clients.

  • Machine learning

    Machine learning is a way of modeling and interpreting data that allows a piece of software to respond intelligently.

  • Game

    Some thing interesting about game, make everyone happy.

Recommend Org

  • Facebook photo Facebook

    We are working to build community through open source technology. NB: members must have two-factor auth.

  • Microsoft photo Microsoft

    Open source projects and samples from Microsoft.

  • Google photo Google

    Google ❀️ Open Source for everyone.

  • D3 photo D3

    Data-Driven Documents codes.