🤗 Please consider subscribing to my YouTube channel Your subscription goes a long way in backing my work. if you feel more generous, you can buy me a coffee

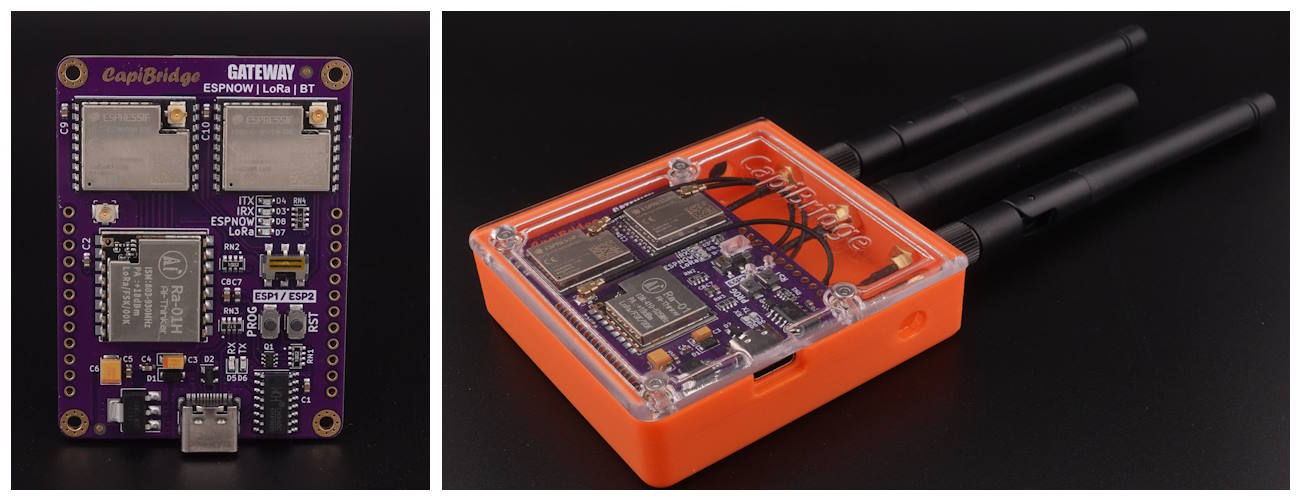
CapiBridge is an open-source one-way gateway for low-power devices. It supports various communication technologies including LoRa, ESP-NOW, and WiFi. The gateway receives JSON strings from LoRa and ESP-NOW DIY devices and publishes them to an MQTT server. It automatically separates the JSON string into dynamic MQTT topics based on keys within the JSON, such as "b" for battery or "m" for motion, making it highly compatible with Home Assistant. This gateway simplifies adding new DIY nodes/sensors to your smart home by standardizing the communication protocol across all your DIY projects, focusing on simplicity and unified protocol handling.
If you prefer a DIY approach instead of buying a ready-made device, here are the links for antennas and cables.
Note
If you're ready to contribute to the project, your support would be greatly appreciated. Due to time constraints, I may not be able to quickly verify new "features" or completely new "code" functionality, so please create a new code/script in the new folder.
- 1x LoRa Module 868 or 433MHz
- 2x ESP32-C3
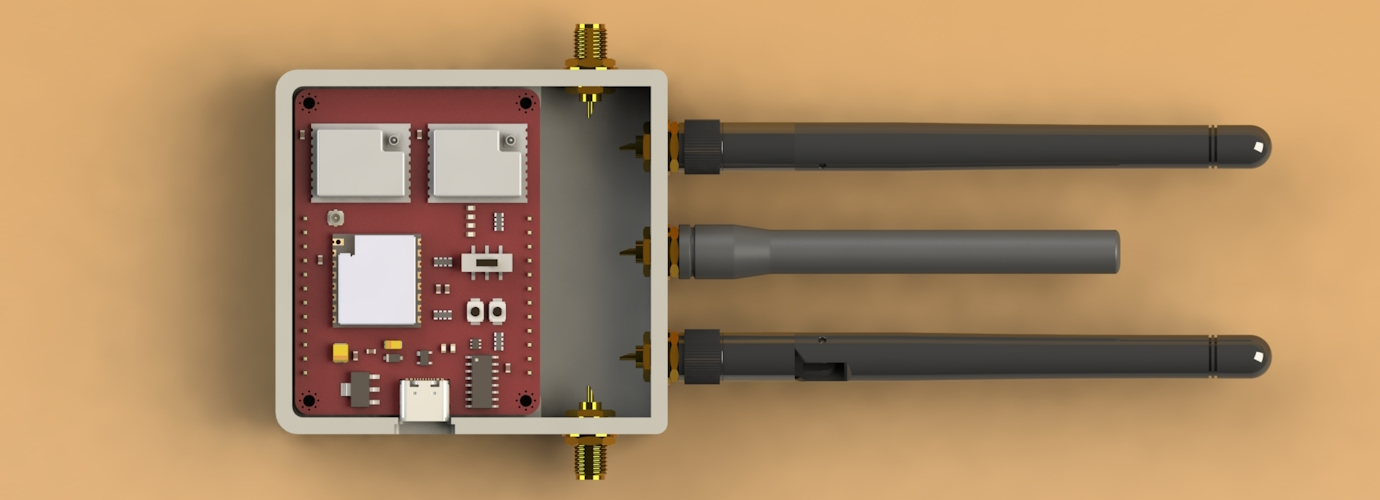
- ESP1 Free GPIOs
- IO7, IO10
- ESP2 Free GPIOs
- IO10, IO3, IO1, IO0, IO4, IO5, IO6, IO7
- Power Pins 5V, 3.3V, GND
- USB-C with auto reset
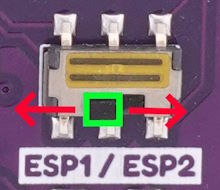
- UART switch for selecting ( ESP1 | ESP2 )
- Buttons for flashing and reset
- Debug LEDs
- USB - TX, RX
- ESP1 to ESP2 - TX, RX
- One LED for LoRa
- One LED for ESP-NOW
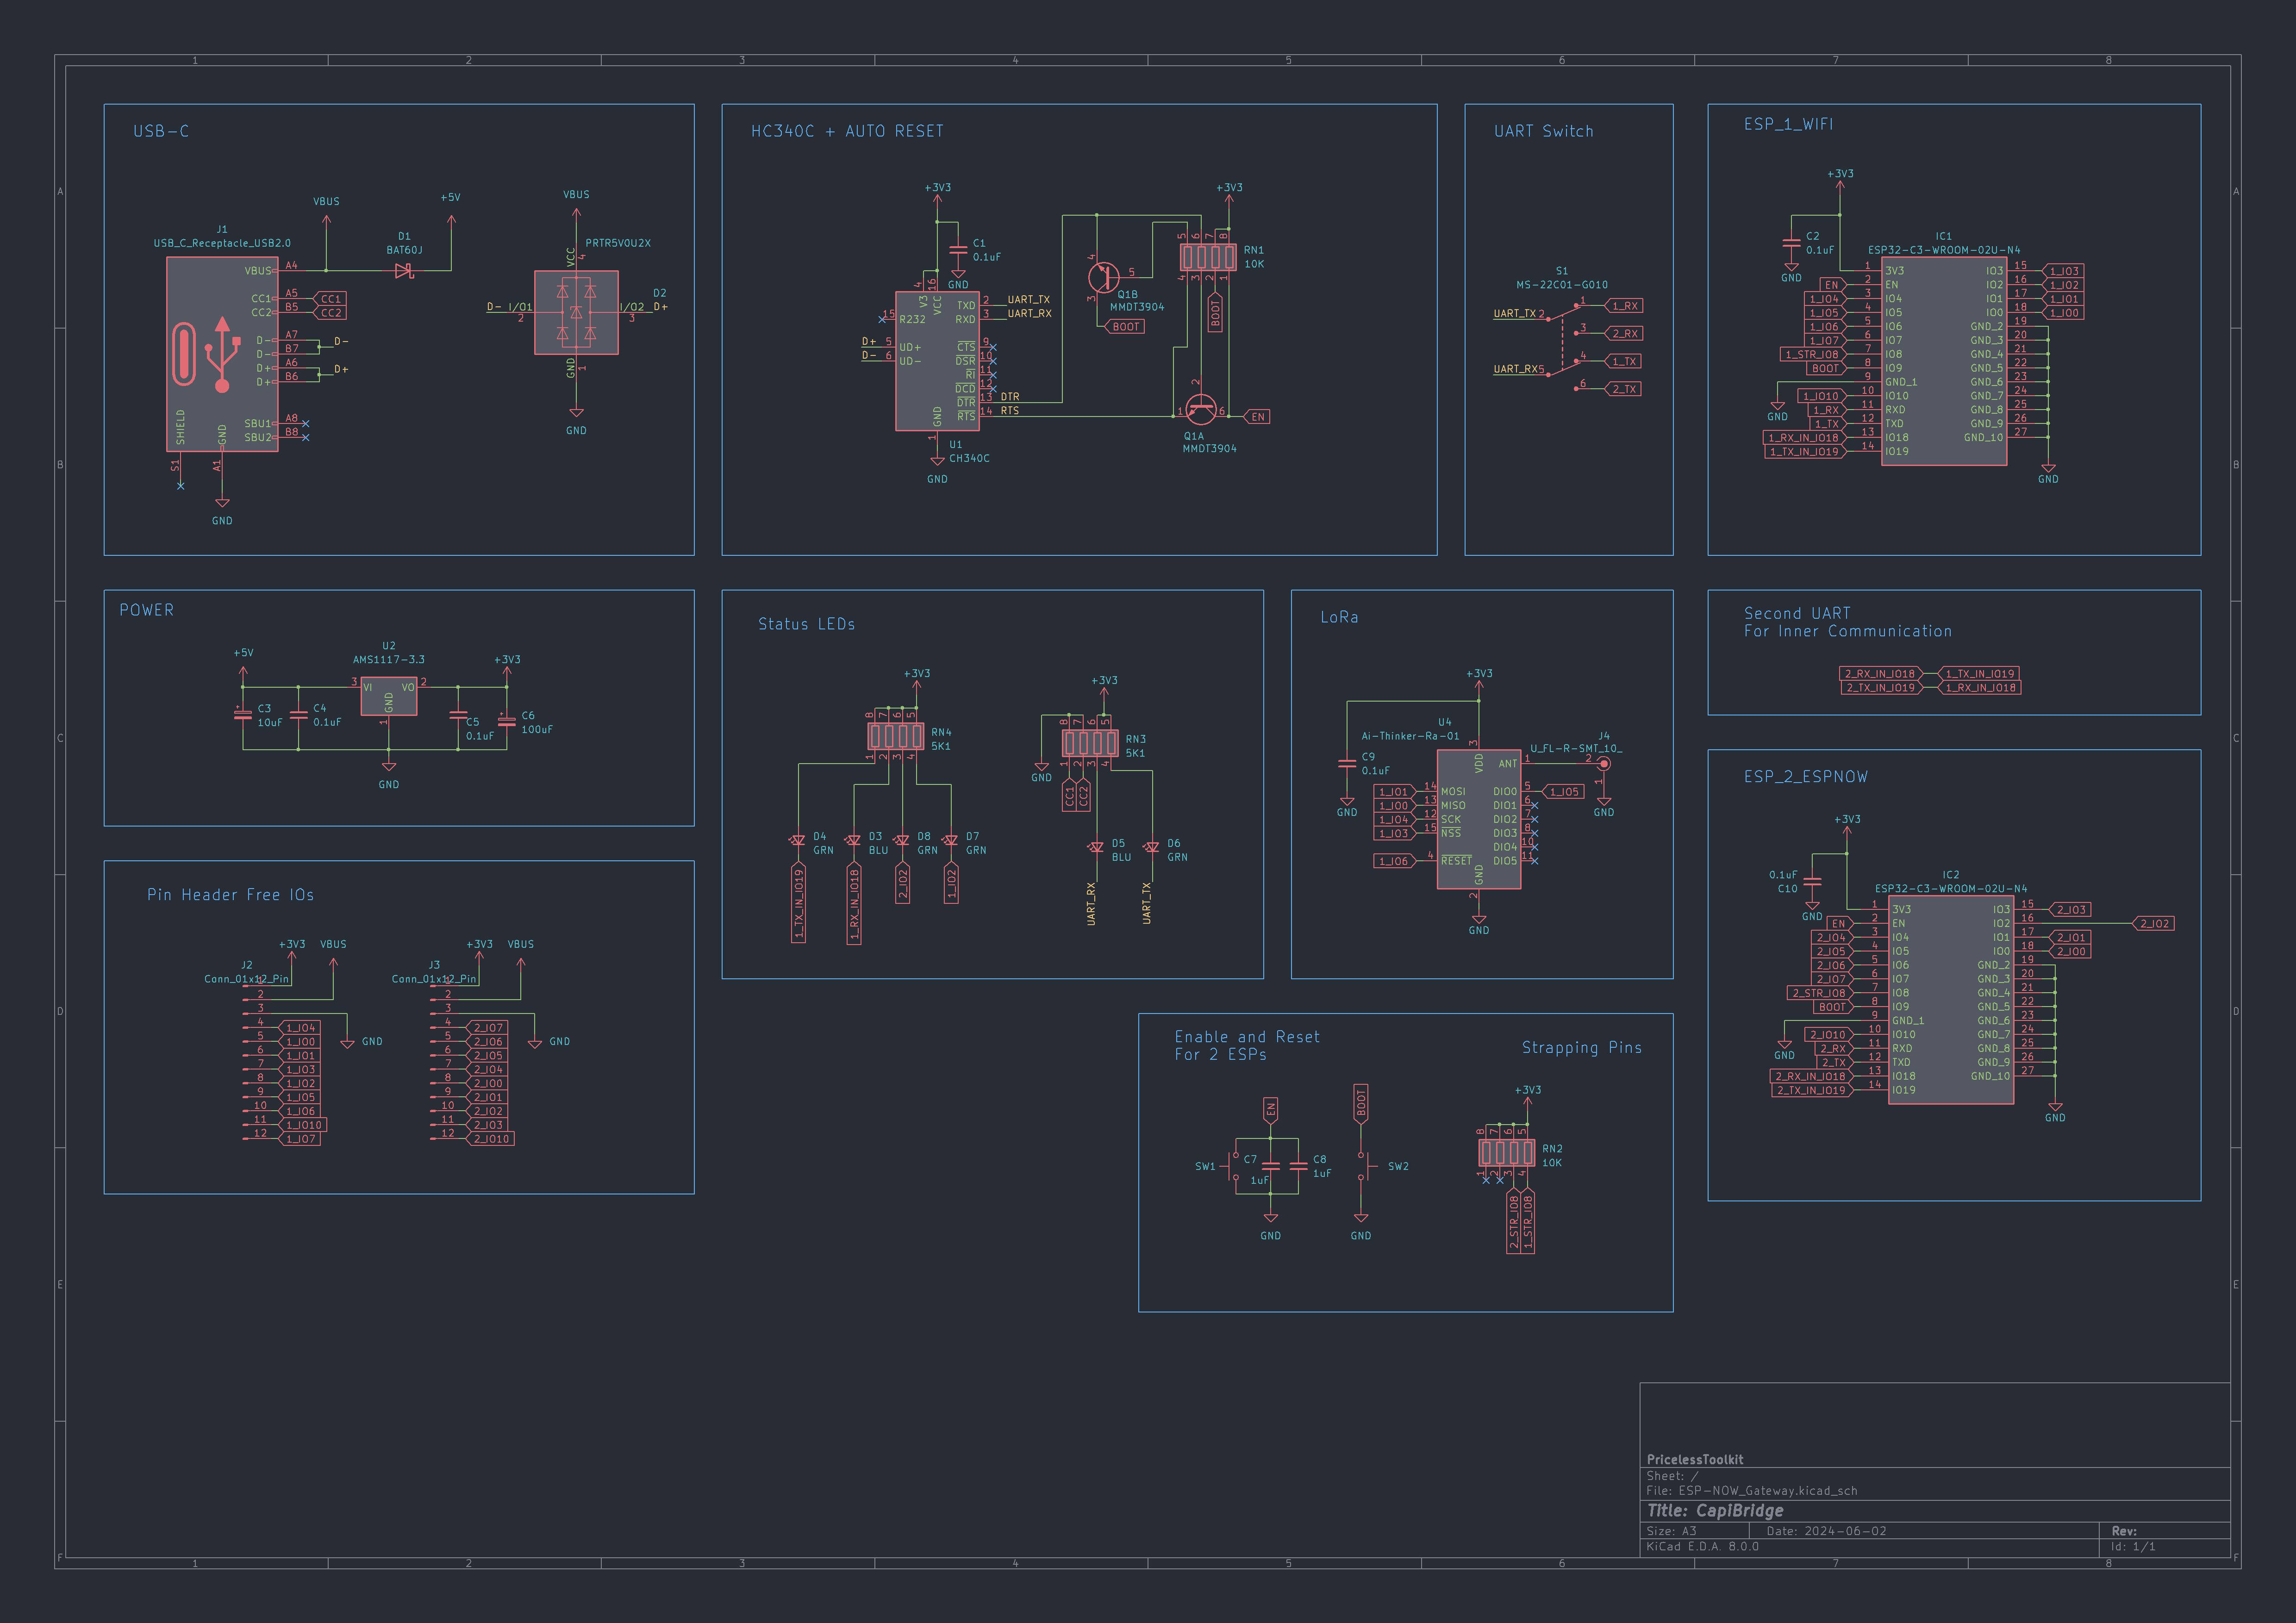
View schematic. Click here
Important
If you're new to Arduino-related matters, please refrain from asking basic questions like "how to install Arduino IDE". There are already plenty of excellent tutorials available on the internet. If you encounter any issues to which you can't find the answer -> Here , feel free to join our Facebook Group or open a new discussion topic in the dedicated tab. Remember that providing detailed information about the problem will help me offer more effective assistance. More information equals better help!
Note
Arduino IDE 2.3.0
#include <Arduino.h>
#include <SPI.h>
#include <LoRa.h>
#include <WiFi.h>
#include <PubSubClient.h>
#include <ArduinoJson.h>
#include <esp_now.h>
CapiBridge is based on ESP32-C3 so If you are using ESP32 for the first time, you need To install the ESP32 board and all libraries, in your Arduino IDE.
- In your Arduino IDE, go to File> Preferences.
- Enter
https://raw.githubusercontent.com/espressif/arduino-esp32/gh-pages/package_esp32_index.jsoninto the “Additional Boards Manager URLs” field. Then, click the “OK” button - Open the Boards Manager. Go to Tools > Board > Boards Manager and Search for ESP32 and press the install button for the “esp32 by Expressif Systems“
- Open Library Manager search for PubSubClient and press the install button, do the same for other libraries.
Note
For ESP1.ino
all configurations are done in the file config.h
Important
Unique key within the JSON to differentiate your signal from others. Must match the key in Nodes/Sensors.
#define GATEWAY_KEY "xy"#define WIFI_SSID "your_wifi_ssid"
#define WIFI_PASSWORD "your_wifi_passwd"
#define MQTT_USERNAME "your_mqtt_user"
#define MQTT_PASSWORD "your_mqtt_passwd"
#define MQTT_SERVER "your_mqtt_broker_address"
#define MQTT_PORT 1883Important
LoRa configuration must match the configuration in Nodes/Sensors.
#define SIGNAL_BANDWITH 125E3  // signal bandwidth in Hz, defaults to 125E3
#define SPREADING_FACTOR 8    // ranges from 6-12, default 7 see API docs
#define CODING_RATE 5          // Supported values are between 5 and 8
#define SYNC_WORD 0xF3         // Any hexadecimal value from 0x00 to 0xFF. Dont use LoRaWAN/TTN "0x34"
#define PREAMBLE_LENGTH 6      // Supported values are between 6 and 65535.
#define TX_POWER 20            // TX power in dB, defaults to 17, Supported values are 2 to 20
#define BAND 433E6             // 433E6 / 868E6 / 915E6 - Depends on what board you bought.
Important
For optimizing the SPREADING_FACTOR (SF) in your network, it's crucial not to default to SF12 aiming for maximum distance without considering its downsides. SF12, while extending range, significantly slows down data transmission. For example, if your furthest sensor is only 100 meters away, opting for SF7 is more efficient. SF7 is faster, taking only 0.027 seconds to transmit "6 bytes", thus consuming less power compared to SF12, which would take 0.75 seconds for the same task. Therefore, it's essential to choose the SF wisely based on your specific needs and understand the trade-offs. Avoid setting SF12 by default without assessing the impact on speed, power consumption, and time on air (ToA) for others.
// For sending 6 bytes "6 characters" of data using different Spreading Factors (SF), the estimated time on air (ToA)
// for each SF is as follows:

// SF7: Approximately 0.027 seconds (27.494 milliseconds)
// SF8: Approximately 0.052 seconds (52.224 milliseconds)
// SF9: Approximately 0.100 seconds (100.147 milliseconds)
// SF10: Approximately 0.193 seconds (193.413 milliseconds)
// SF11: Approximately 0.385 seconds (385.297 milliseconds)
// SF12: Approximately 0.746 seconds (746.127 milliseconds)
// These calculations demonstrate how the time on air increases with higher Spreading Factors
// due to the decreased data rate, which is a trade-off for increased communication range and signal robustness.Note
ESP2 for ESPNOW requires no initial setup, once the sketch is uploaded, it automatically prints the MAC address in the serial monitor for integration with ESPNOW nodes/sensors.
- Open ESP1.ino sketch and configure config.h file see https://github.com/PricelessToolkit/CapiBridge?tab=readme-ov-file#esp1ino-sketch-configuration
- Set the UART switch on the CapiBridge to the 'ESP1' position.
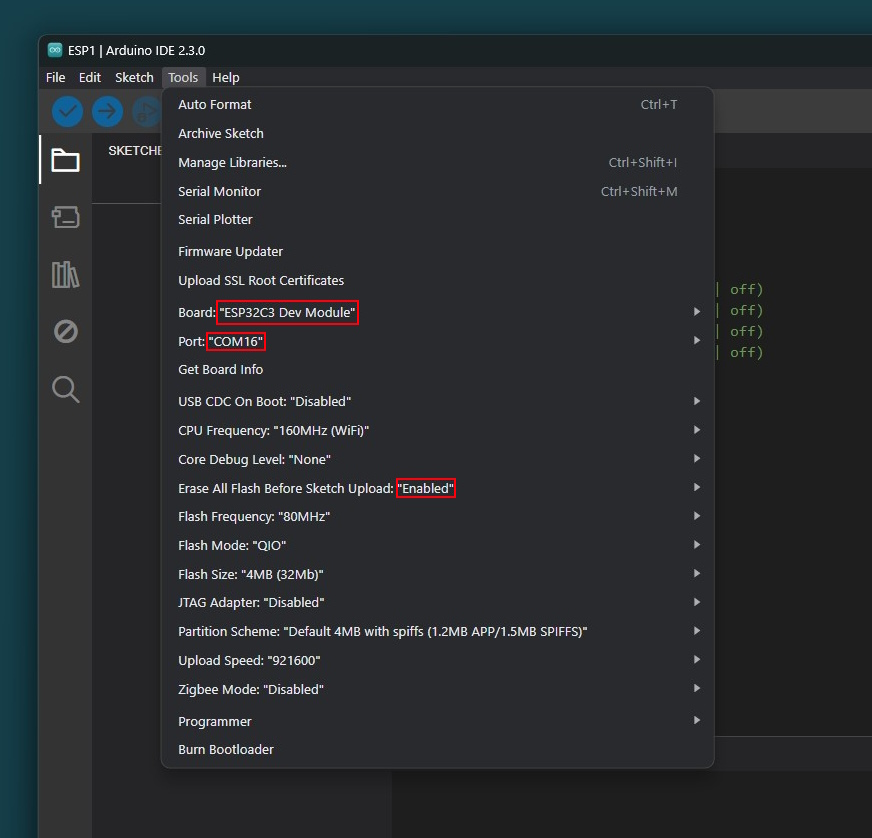
- Click Upload and wait until the upload is done.
- Set the UART switch on the CapiBridge to the 'ESP2' position.
Everything will be ready shortly; the CapiBridge RSSI entity should appear in the Home Assistant MQTT devices list within a minute or two.
Note
With MQTT-Autodiscovery, there's no need to configure anything in Home Assistant manually. Any sensor or node that sends a JSON string with special keys ('k' for the gateway private key and 'id' for the node name, both of which are mandatory) will be automatically discovered. Refer to the table below for details, and of course, full ESP32 examples are provided.
{
  "k": "xy",
  "id": "ESP32",
  "b": "3.8",
  "rw": "Test123",
  "dr": "on"
}
Full Suported MQTT-Autodiscovery List
| Key | Description | Unit of Measurement | Required |
|---|---|---|---|
k |
Private Gateway key | - | Yes |
id |
Node Name | - | Yes |
r |
RSSI | dBm | No |
b |
Battery Voltage | Volts | No |
v |
Volts | Volts | No |
pw |
Current | mAh | No |
l |
Luminance | lux | No |
m |
Motion | Binary on/off | No |
w |
Weight | grams | No |
s |
State | Anything | No |
t |
Temperature | °C | No |
t2 |
Temperature 2 | °C | No |
hu |
Humidity | % | No |
mo |
Moisture | % | No |
rw |
ROW | Anything | No |
bt |
Button | Binary on/off | No |
atm |
Pressure | kph | No |
cd |
Dioxyde de carbone | ppm | No |
dr |
Door | Binary on/off | No |
wd |
Window | Binary on/off | No |
vb |
Vibration | Binary on/off | No |
The simplest way to create JSON String without the ArduinoJson.h library and transmit it via LoRa. Example from MailBox sensor
#define NODE_NAME "mbox"
float volts = analogReadEnh(PIN_PB4, 12) * (1.1 / 4096) * (30 + 10) / 10;

// Send a message via LoRa
LoRa.print("{\"k\":\"xy\",\"id\":\"" + String(NODE_NAME) + "\",\"s\":\"mail\",\"b\":" + volts + "}"); If your DIY sensor/assembly is not showing up in Home Assistant, here are some tips that may help you find the problem.
- Check if the node LoRa settings are the same as the LoRa Gateway config, like Frequency, and spreading factor...
- Connect CapiBridge to PC with switch position selected ESP1, open Arduino IDE Serial monitor "Speed 115200 baud" and check received JSON strings for errors.
- Download MQTT Explorer and connect to your MQTT server. Check the
homeassistant/sensor/Your_Node_Nametopic for any errors.
