Drive an iRobot Create (Roomba) © over the web
Let's drive a Roomba via a web interface (shown here, running in Chrome on a laptop and a smartphone):
Using the webpage is simple. Just hold down any of the buttons to move or spin the roomba in that direction. You can also rotate the orientation of the webpage in order to match it to the current orientation of the roomba, using the top two buttons.
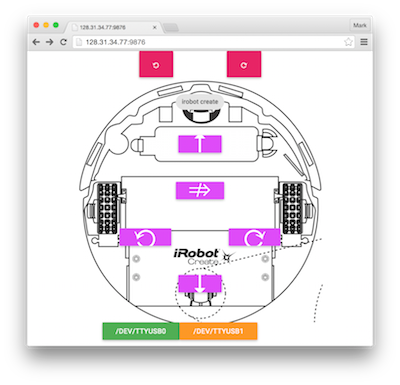
When you first open the webpage, the server has not yet tried to communicate with the roomba over the roomba's serial port. Plugging a USB-to-serialport adapter into the server will expose the roomba on either of two serial interfaces, so try clicking /dev/ttyUSB0 first, and if that doesnt work (or if the USB cable accidentally gets disconnected from the Roomba while driving), try the other one. In case neither works, try navigating to http://roomba:9876/debug in your browser, and looking for *USB0 or *USB1 in the list (where roomba is the IP address of the server, e.g., localhost if you are SSH'd in) - if you don't see any *USB* entries, check the physical connections.
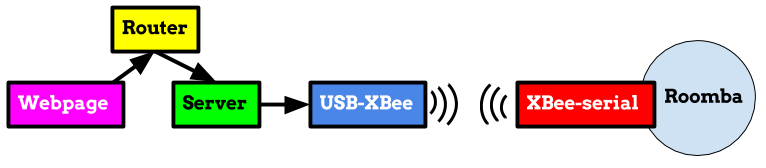
To dissuade your lab partner's natural inclination to try driving your laptop into traffic or down a stairwell, it is suggested to connect your laptop to the Roomba's serialport wirelessly, using XBees: as a result, the full chain of control is:
In additon to using the buttons on the webpage, you can drive the roomba around programatically. curl is a commandline program that, by default, takes a URL and issues a GET request to a webserver. The webserver controlling the roomba offers several commands for driving. stop is the most important command for halting runaway roombas. The other commands, forward, back, cw (clockwise), and ccw (counterclockwise) will each instruct the roomba to begin moving or rotating in that direction until stop is later received by the webserver. In summary, here are the available driving commands:
$ curl http://roomba:9876/stop
$ curl http://roomba:9876/forward #e.g., the roomba drives forward until it receives a 'stop'
$ curl http://roomba:9876/back
$ curl http://roomba:9876/cw
$ curl http://roomba:9876/ccw
So the following shell command would rotate the roomba clockwise for 10 seconds (instead of sleep try usleep to rotate for a given number of microseconds):
$ curl http://roomba:9876/cw && sleep 10 && curl http://roomba:9876/stopFor completing your lab, the server and javascript has already been compiled and the server has been started by the course staff, so these instructions can be ignored. If you would like to modify the server, for instance, to modify the rate of rotation, please read further. The webserver and the frontend interface (for your browser) are both written in Haskell, implying that some Haskell source code has been transcompiled into executable Javascript for the browser. Thanks to the Haskell community's efforts, this process is quite simple (approximately two shell commands). Details below! Alternatively, there are some other projects such as pycreate for Python folks and create-oi for JS folks. Don't have access to an iRobot create roomba? Check this arduino project out for an alternative! And lastly, and perhaps most importantly, here's the very useful description of the serial interface from iRobot.
These are quickstart instructions to build both the server and the frontend. (If you only want to build the server, then you only need to install stack.) These two tools, stack and nvm, are "fully sandboxed" - they only scribble inside their respective directories in your $HOME directory, and won't touch anything else on your system. To elaborate, they sandbox entire language ecosystems - stack sandboxes the Haskell language, its dependencies, and your compiled code, and nvm similarly sandboxes the NodeJS language, runtime, etc.
- Install stack - the "manual instructions," which just involves adding the
stackbinary to your$PATH, are simplest (here's the manual instructions for OSX and for linux) but installing it via a package manager (e.g.,aptorbrew) is fine if you prefer that. You'll need to download or install at least version 0.1.6.0 to build the frontend. After downloadingstack, run the following to fetch some dependencies into stack's sandbox:
$ stack setup # should download some stuff to ~/.stack/ and successfully complete- Install Node. There are several ways to do it, but here's the best:
$ git clone https://github.com/creationix/nvm.git ~/.nvm && cd ~/.nvm && git checkout `git describe --abbrev=0 --tags`
$ echo '. $HOME/.nvm/nvm.sh' >> ~/.bash_profile # (if you use a bash terminal)
$ source ~/.bash_profile # again, assuming you use a bash terminal
$ nvm --version # should work
Uninstallation is trivial: just delete ~/.nvm and ~/.stack and the stack binary itself. stack will also put the results of the code you build in ~/.local/bin - if you don't already have a ~/.local directory in your $HOME folder, you can delete that too.
$ cd botapi/server
$ stack build --ghc-options="-O2 -static -optl-static -optl-pthread" --copy-binsThis step takes a while, but you'll only have to run it once. It will compile a Javascript transcompiler for the frontend. These details aren't important to just use this project for your lab, but under the hood, stack will build a tool called GHCJS, which compiles a frontend written in Haskell to Javascript, so that botserver can serve the Javascript to your browser, and you can drive your robot around without installing an application on your phone or laptop (and in a future version of stack, hopefully building GHCJS won't be necessary, and this section will be omitted). Once GHCJS is built, the last step tries the compiler out by building the frontend.
Before building GHCJS, we need to tell GHCJS where to find a binary called happy:
$ cd botapi/server && stack install happy && export PATH=$HOME/.local/bin:$PATH && cd ..happy is required to build GHCJS's dependencies, but happy must be built with GHC (the regular, non-Javascript Haskell compiler) and not GHCJS, so the above command uses the version of GHC available to botserver to compile happy, and temporarily adds the binary (which stack placed in your ~/.local/bin/ directory) to our path, for GHCJS to use. Now we can build GHCJS:
$ cd botapi/frontend
$ nvm install v0.12.7
$ nvm use v0.12.7 # nvm will set up your terminal session's $PATH to point to its sandboxed version of node
$ node --version #should tell you you're using 0.12.17
$ stack setup # this will take a long while
$ stack build # this will take a little while more, but it's exciting! Haskell-to-Javascript compilation!
stack build will by default output everything in a directory deep within the bowels of your project. If you're curious you can look at the directory contents with $ ls $(stack path --local-install-root)/bin/roombajs.jsexe/ but we can use GHCJS directly instead (it's simpler!) to compile changes now.
Now that your development environment is complete, it's quite simple to make changes to the code. Any changes to the botserver can be recompiled with:
$ stack build --ghc-options="-O2 -static -optl-static -optl-pthread" --copy-binswhich places a binary called botserver in ~/.local/bin/ - Running this binary (./botserver) on your laptop starts the server, but where's the javascript? Let's first compile the frontend so that it uses the nicer CSS in our own index.html here and includes a picture of the roomba (shamelessly taken from the roomba's instruction manual):
$ cd botapi/frontend
$ nvm use v0.12.7 # only necessary if your last nvm temrinal session is no longer active (check by running "nvm current")
$ stack exec ghcjs -- --make app.hs
This produces a folder called app.jsexe with a bunch of compiled javascript in it. As long as that directory is in the same directory as botserver, then running botserver will serve the javascript up too. Easy!
$ cd botapi/frontend
$ cp ~/.local/bin/botserver .
$ ls
> botserver
> app.jsexe/
> ...
$ ./botserver #now navigate to http://YOUR_IP_ADDRESS:9876 in your browser