Code Monkey home page Code Monkey logo

aws-demos's Introduction

AWS 2 Tier Architecture setup with AWS CLI - Wordpress application on AWS RDS running MySQL

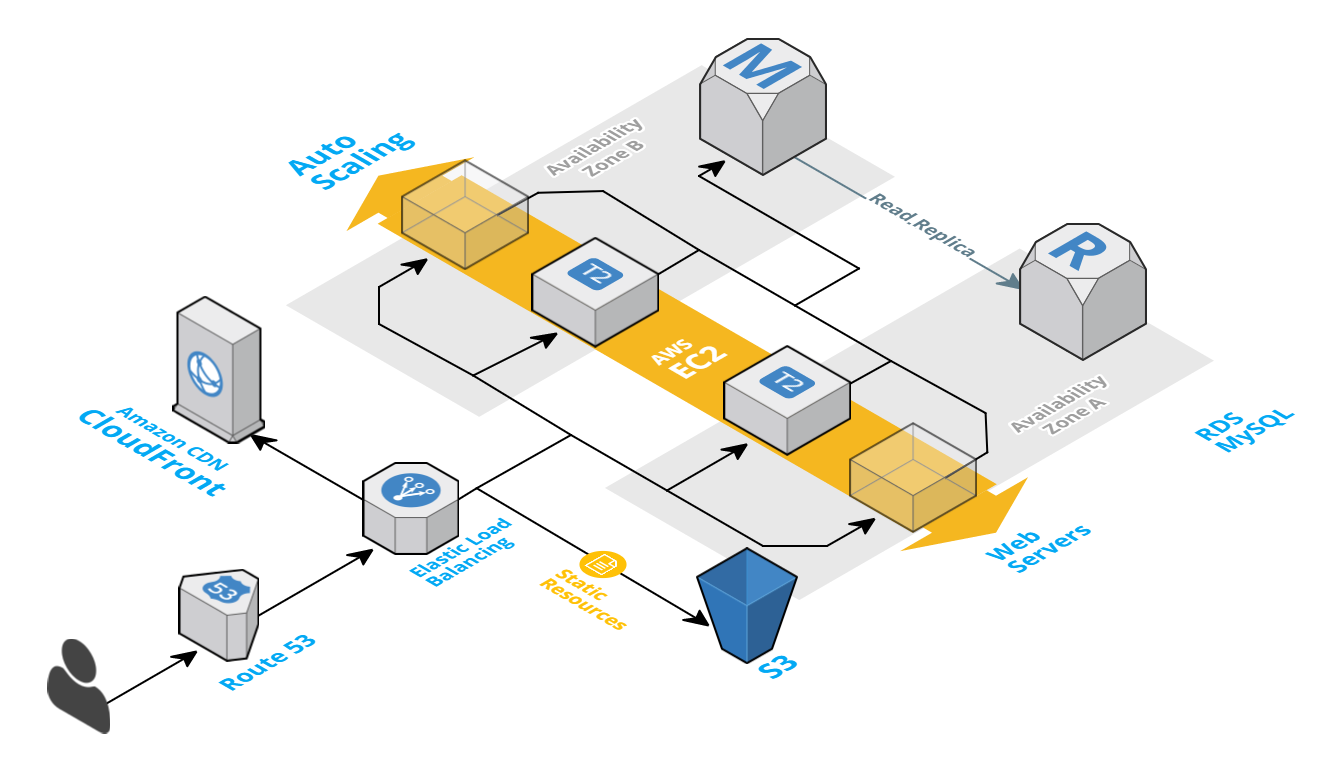
There are two parts to the setup,

  • Part 1 - Setting up the network infrastructure (VPC, Subnets, Security Groups)
  • Part 2 - Create & Configure the Database, Web & Load Balancer Instances Fig 1 : Web-App-DB (3 Tier) - Reference Architecture Context Assuming you have already setup your AWS CLI for Region US East (N. Virginia). Lets move forward;

Part 1 - Create VPC, Subnet, Security Group

Setting the AWS Region

export AWS_DEFAULT_REGION=us-east-1

Creating a VPC

Lets create a Virtual Private Cloud - VPC for our setup with /20 range and get our VPC ID using the query parameter and set the output format to text. Its is a good practice to give meaningful name to the AWS resources, Lets call our VPC tmpVPC

vpcID=$(aws ec2 create-vpc \
      --cidr-block 10.0.0.0/20 \
      --query 'Vpc.VpcId' \
      --output text)
Tag the VPC
aws ec2 create-tags --resources "$vpcID" --tags 'Key=Name,Value=tmpVPC'

Instances launched inside a VPC are invisible to the rest of the internet by default. AWS therefore does not bother assigning them a public DNS name. This can be changed easily by enabling the DNS support as shown below,

aws ec2 modify-vpc-attribute --vpc-id "$vpcID" --enable-dns-support "{\"Value\":true}"

aws ec2 modify-vpc-attribute --vpc-id "$vpcID" --enable-dns-hostnames "{\"Value\":true}"

Check if internet gateway is set. If it wasn't there then do these,

internetGatewayId=$(aws ec2 create-internet-gateway \
                  --query 'InternetGateway.InternetGatewayId' \
                  --output text) && echo "$internetGatewayId"
aws ec2 attach-internet-gateway --internet-gateway-id "$internetGatewayId" --vpc-id "$vpcID"
Tag the Internet Gateway
aws ec2 create-tags --resources $internetGatewayId --tags 'Key=Name,Value=tmpVPC-Internet-Gateway'

I have chosen /20 CIDR deliberately to allow us to create different subnets for our db, web instances and reserve some for the future. You might want to choose something else that works better for you. Important: AWS reserves both the first four and the last IP address in each subnet's CIDR block. They're not available for use. The smallest subnet (and VPC) you can create uses a /28 netmask (16 IP addresses), and the largest uses a /16 netmask (65,536 IP addresses). Excellent resources to understand CIDR blocks here & here & my quick help gist

Subnet Reservation for the Database, Web Servers & future

Lets reserve the IP Range to spread across multiple availability zones.

VPC Range Availability Zone Reservation Purpose IP Ranges IP Ranges IP Ranges
10.0.0.0/20
AZ1 US-East-1b 10.0.0.0/21
AZ1 Private - DB Subnet 10.0.0.0/22
AZ1 10.0.4.0/22
AZ1 Web Subnet 10.0.4.0/23
AZ1 Spare Subnet 10.0.6.0/23
AZ2 US-East-1c 10.0.8.0/21
AZ2 Private - DB Subnet 10.0.8.0/22
AZ2 10.0.12.0/22
AZ2 Web Subnet 10.0.12.0/23
AZ2 Spare Subnet 10.0.14.0/23

After creating all the subnets, It should look something like this, alt tag

Creating subnets for the DB & Web Servers in AZ1

USEast1b_DbSubnetID=$(aws ec2 create-subnet --vpc-id "$vpcID" --cidr-block 10.0.0.0/22 --availability-zone us-east-1b --query 'Subnet.SubnetId' --output text)

USEast1b_WebSubnetID=$(aws ec2 create-subnet --vpc-id "$vpcID" --cidr-block 10.0.4.0/23 --availability-zone us-east-1b --query 'Subnet.SubnetId' --output text)

USEast1b_SpareSubnetID=$(aws ec2 create-subnet --vpc-id "$vpcID" --cidr-block 10.0.6.0/23 --availability-zone us-east-1b --query 'Subnet.SubnetId' --output text)
Tag the subnet ID's for AZ1
aws ec2 create-tags --resources "$USEast1b_DbSubnetID" --tags 'Key=Name,Value=az1-us-east-1b-DB-Subnet'

aws ec2 create-tags --resources "$USEast1b_WebSubnetID" --tags 'Key=Name,Value=az1-us-east-1b-Web-Subnet'

aws ec2 create-tags --resources "$USEast1b_SpareSubnetID" --tags 'Key=Name,Value=az1-us-east-1b-Spare-Subnet'

Creating subnets for the DB & Web Servers in AZ2

USEast1c_DbSubnetID=$(aws ec2 create-subnet --vpc-id "$vpcID" --cidr-block 10.0.8.0/22 --availability-zone us-east-1c --query 'Subnet.SubnetId' --output text)

USEast1c_WebSubnetID=$(aws ec2 create-subnet --vpc-id "$vpcID" --cidr-block 10.0.12.0/23 --availability-zone us-east-1c --query 'Subnet.SubnetId' --output text)

USEast1c_SpareSubnetID=$(aws ec2 create-subnet --vpc-id "$vpcID" --cidr-block 10.0.14.0/23 --availability-zone us-east-1c --query 'Subnet.SubnetId' --output text)
Tag the subnet ID's for AZ2
aws ec2 create-tags --resources "$USEast1c_DbSubnetID" --tags 'Key=Name,Value=az1-us-east-1c-DB-Subnet'

aws ec2 create-tags --resources "$USEast1c_WebSubnetID" --tags 'Key=Name,Value=az1-us-east-1c-Web-Subnet'

aws ec2 create-tags --resources "$USEast1c_SpareSubnetID" --tags 'Key=Name,Value=az1-us-east-1c-Spare-Subnet'

Configuring the Route Table

Each subnet needs to have a route table associated with it to specify the routing of its outbound traffic. By default every subnet inherits the default VPC route table which allows for intra-VPC communication only.

The following adds a route table to our subnet that allows traffic not meant for an instance inside the VPC to be routed to the internet through our earlier created internet gateway.

routeTableID=$(aws ec2 create-route-table --vpc-id "$vpcID" --query 'RouteTable.RouteTableId' --output text)

aws ec2 create-route --route-table-id "$routeTableID" --destination-cidr-block 0.0.0.0/0 --gateway-id "$internetGatewayId"

aws ec2 associate-route-table --route-table-id "$routeTableID" --subnet-id "$USEast1b_WebSubnetID"

aws ec2 associate-route-table --route-table-id "$routeTableID" --subnet-id "$USEast1c_WebSubnetID"

Creating a security group for the Web Servers

  • Group Name - webSecGrp
  • Description - My Web Security Group
webSecGrpID=$(aws ec2 create-security-group --group-name webSecGrp \
            --description "Security Group for Web servers" \
            --vpc-id "$vpcID" \
            --output text)

Add a rule that allows inbound SSH, HTTP, HTTP traffic ( from any source )

aws ec2 authorize-security-group-ingress --group-id "$webSecGrpID" --protocol tcp --port 22 --cidr 0.0.0.0/0
aws ec2 authorize-security-group-ingress --group-id "$webSecGrpID" --protocol tcp --port 80 --cidr 0.0.0.0/0
aws ec2 authorize-security-group-ingress --group-id "$webSecGrpID" --protocol tcp --port 443 --cidr 0.0.0.0/0

Interesting reading here about why we need to use security group ID instead of name; AWS Documentation & Github Bug Report

When you specify a security group for a nondefault VPC to the CLI or the API actions, you must use the security group ID and not the security group name to identify the security group.

Part 2 - Create & Configure the Database, Web & Load Balancer Instances

Creating the RDS Instance

Pre-Requisites

Create the DB Subnet

Creates a new DB subnet group. DB subnet groups must contain at least one subnet in at least two AZs in the region.

aws rds create-db-subnet-group \
        --db-subnet-group-name "mysqlDBSubnet" \
        --db-subnet-group-description "Subnet group for my databases instances" \
        --subnet-ids "$USEast1b_DbSubnetID" "$USEast1c_DbSubnetID"

Creating a Security Group for RDS Database (running MySQL)

  • Group Name - dbSecGrp
  • Description - My Database Security Group
dbSecGrpID=$(aws ec2 create-security-group \
           --group-name dbSecGrp \
           --description "Security Group for database servers" \
           --vpc-id "$vpcID" \
           --output text)

Add a rule that allows inbound MySQL from Webservers (in our Web Security Group)

aws ec2 authorize-security-group-ingress \
        --group-id "$dbSecGrpID" \
        --protocol tcp \
        --port 3306 \
        --source-group \
        "$webSecGrpID"
Create a DB parameter group to monitor CRUD
aws rds create-db-parameter-group \
    --db-parameter-group-name myParamGrp \
    --db-parameter-group-family MySQL5.6 \
    --description "My new parameter group"

aws rds modify-db-parameter-group --db-parameter-group-name myParamGrp --parameters "ParameterName=general_log, ParameterValue=ON, Description=logParameter,ApplyMethod=immediate"

Start the RDS - MySQL Instance

rdsInstID=rds-mysql-inst01
aws rds create-db-instance \
        --db-instance-identifier "$rdsInstID" \
        --allocated-storage 5 \
        --db-instance-class db.t2.micro \
        --no-multi-az \
        --no-auto-minor-version-upgrade \
        --availability-zone us-east-1b \
        --vpc-security-group-ids "$dbSecGrpID" \
        --db-subnet-group-name "mysqldbsubnet" \
        --engine mysql \
        --port 3306 \
        --master-username dbuser \
        --master-user-password dbuserpass \
        --db-parameter-group-name myParamGrp \
        --db-name wpdb \
        --backup-retention-period 3
        
aws rds modify-db-instance --db-instance-identifier "$rdsInstID" --db-parameter-group-name myParamGrp

Refer:

Create the Web Servers

Create the SSH Keys & boot-strap the binaries

aws ec2 create-key-pair --key-name webKey --query 'KeyMaterial' --output text > webKey.pem
chmod 400 webKey.pem

cat >> userDataScript <<EOF
#!/bin/bash
set -e -x

# Setting up the HTTP server 
yum update -y
yum install -y httpd php php-mysql mysql
service httpd start
chkconfig httpd on
groupadd www
usermod -a -G www ec2-user


# Download wordpress site & move to http
cd /var/www/
curl -O https://wordpress.org/latest.tar.gz && tar -zxf latest.tar.gz
rm -rf /var/www/html
mv wordpress /var/www/html

# Set the permissions
chown -R root:www /var/www
chmod 2775 /var/www
find /var/www -type d -exec chmod 2775 {} +
find /var/www -type f -exec chmod 0664 {} +

# SE Linux permissive
# needed to make wp connect to DB over newtork
setsebool -P httpd_can_network_connect=1
setsebool httpd_can_network_connect_db on

systemctl restart httpd
# Remove below file after testing
echo "<?php phpinfo(); ?>" > /var/www/html/phpinfo.php
EOF

Start the Web Instance

instanceID=$(aws ec2 run-instances \
           --image-id ami-2051294a \
           --count 1 \
           --instance-type t2.micro \
           --key-name wpKey \
           --security-group-ids "$webSecGrpID" \
           --subnet-id "$webSubnetID" \
           --user-data file://userDataScript \
           --associate-public-ip-address \
           --query 'Instances[0].InstanceId' \
           --output text)

instanceUrl=$(aws ec2 describe-instances \
            --instance-ids "$instanceID" \
            --query 'Reservations[0].Instances[0].PublicDnsName' \
            --output text)

# Get the IP address of the running instance:
ip_address=$(aws ec2 describe-instances \
           --instance-ids "$instanceID" \
           --output text --query 'Reservations[*].Instances[*].PublicIpAddress')

Create the Elastic Load Balancer

Ref: https://aws.amazon.com/articles/1636185810492479

aws elb create-load-balancer \
--load-balancer-name my-load-balancer \
--listeners "Protocol=HTTP,LoadBalancerPort=80,InstanceProtocol=HTTP,InstancePort=80" \
--subnets "$USEast1c_WebSubnetID" \
--security-groups "$webSecGrpID"

Apache Workbench Results

[root@ip-172-31-55-78 ec2-user]# ab -n 20000 -c 30 -k http://xx.xx.xx.xx/
This is ApacheBench, Version 2.3 <$Revision: 1430300 $>
Copyright 1996 Adam Twiss, Zeus Technology Ltd, http://www.zeustech.net/
Licensed to The Apache Software Foundation, http://www.apache.org/

Benchmarking xx.xx.xx.xx (be patient)
Completed 2000 requests
Completed 4000 requests
Completed 6000 requests
Completed 8000 requests
Completed 10000 requests
Completed 12000 requests
Completed 14000 requests
Completed 16000 requests
Completed 18000 requests
Completed 20000 requests
Finished 20000 requests


Server Software:        Apache/2.4.6
Server Hostname:        xx.xx.xx.xx
Server Port:            80

Document Path:          /
Document Length:        11951 bytes

Concurrency Level:      30
Time taken for tests:   4684.053 seconds
Complete requests:      20000
Failed requests:        5641
   (Connect: 0, Receive: 0, Length: 5641, Exceptions: 0)
Write errors:           0
Keep-Alive requests:    0
Total transferred:      349703793 bytes
HTML transferred:       344441217 bytes
Requests per second:    4.27 [#/sec] (mean)
Time per request:       7026.079 [ms] (mean)
Time per request:       234.203 [ms] (mean, across all concurrent requests)
Transfer rate:          72.91 [Kbytes/sec] received

Connection Times (ms)
              min  mean[+/-sd] median   max
Connect:        1    2  49.6      1    7014
Processing:   356 7013 3842.2   5067   43302
Waiting:        0 6040 3317.2   4332   40634
Total:        357 7014 3842.9   5069   43303

Percentage of the requests served within a certain time (ms)
  50%   5069
  66%   7997
  75%   9596
  80%  10332
  90%  12134
  95%  13574
  98%  16122
  99%  18490
 100%  43303 (longest request)
[root@ip-172-31-55-78 ec2-user]#

aws-demos's People

Contributors

leoswaldo avatar miztiik avatar

Stargazers

 avatar  avatar  avatar  avatar  avatar  avatar  avatar  avatar  avatar  avatar  avatar  avatar  avatar  avatar  avatar  avatar  avatar  avatar  avatar  avatar  avatar  avatar  avatar  avatar  avatar  avatar  avatar  avatar  avatar  avatar  avatar  avatar  avatar  avatar  avatar  avatar  avatar  avatar  avatar  avatar  avatar  avatar  avatar  avatar  avatar  avatar  avatar  avatar  avatar  avatar  avatar  avatar  avatar  avatar  avatar  avatar  avatar  avatar  avatar  avatar  avatar  avatar  avatar  avatar  avatar  avatar  avatar  avatar  avatar  avatar  avatar  avatar  avatar  avatar  avatar  avatar  avatar  avatar  avatar  avatar  avatar  avatar  avatar  avatar  avatar  avatar  avatar  avatar  avatar  avatar  avatar  avatar  avatar  avatar  avatar  avatar  avatar  avatar  avatar  avatar

Watchers

 avatar  avatar  avatar  avatar  avatar  avatar  avatar  avatar  avatar  avatar  avatar  avatar  avatar  avatar  avatar  avatar  avatar  avatar  avatar  avatar  avatar  avatar  avatar  avatar  avatar  avatar  avatar  avatar  avatar  avatar  avatar  avatar  avatar  avatar  avatar  avatar  avatar  avatar  avatar  avatar  avatar  avatar  avatar  avatar  avatar  avatar

aws-demos's Issues

Hit a key using User Data field

How can we give a command to press any key during the script?
ex:

  1. I want to create anew file: vi test.txt
  2. I added some sample data to it
  3. I want to press ESC (in order to exit insert mode)
  4. Save the file

How can we pass the command to press ESC key?

Not possible to access the web server that is created?

Hi,

the web server that is built as a part of the CloudFormation is not possible to be accessed.
I get connection refused - is this to do with some of the commands on the linux machine is not supported anymore?
Or why do we get this issue - I did not get it before the first time I tried this code?

This is related to the code in setup-cloudformation-webserver

Vpc Peer connections can be across regions

issue for the interview questions:
Q: Can you establish a peering connection to a VPC in a different REGION?

Ans: Not possible. Peering Connection are available only between VPC in the same region.

need to update the answer to below:
Ans: Yes, if the VPCs are in different regions, the request must be accepted in the region of the accepter VPC.

Assume role is unable to be assumed

I have created IAM roles and updated the trusted entities as instructed, but I continue to get an error "The defined assume role is unable to be assumed." When executing I am selecting the basic function option.

I did make some minor modifications to the parameter store. I have already created a hardened image and would like to use that one. I am also using Ubuntu 18.04, but don't think any of these modifications would trigger the error above.

Do you have any ideas on what is causing this error?

============================================
{
"schemaVersion": "0.3",
"description": "Create a Golden AMI with Linux distribution packages(ClamAV) and Amazon software(SSM & Inspector). For details,see https://github.com/miztiik/AWS-Demos/tree/master/How-To/setup-ami-lifecycle-management-using-ssm",
"assumeRole": "{{AutomationAssumeRole}}}",
"parameters": {
"SourceAmiId": {
"type": "String",
"description": "(Required) The source Amazon Machine Image ID.",
"default": "{{ssm:/GoldenAMI/Ubuntu/source}}"
},
"InstanceIamRole": {
"type": "String",
"description": "(Required) The name of the role that enables Systems Manager (SSM) to manage the instance.",
"default": "ManagedInstanceRole"
},
"AutomationAssumeRole": {
"type": "String",
"description": "(Required) The ARN of the role that allows Automation to perform the actions on your behalf.",
"default": "arn:aws:iam::{{global:ACCOUNT_ID}}:role/AutomationServiceRole"
},
"SubnetId": {
"type": "String",
"description": "(Required) The subnet that the created instance will be placed into.",
"default": ""
},
"TargetAmiName": {
"type": "String",
"description": "(Optional) The name of the new AMI that will be created. Default is a system-generated string including the source AMI id, and the creation time and date.",
"default": "GoldenAMI-Ubuntu_18_on_{{global:DATE_TIME}}"
},
"InstanceType": {
"type": "String",
"description": "(Optional) Type of instance to launch as the workspace host. Instance types vary by region. Default is t2.medium.",
"default": "t2.medium"
},
"PreUpdateScript": {
"type": "String",
"description": "(Optional) URL of a script to run before updates are applied. Default ("none") is to not run a script.",
"default": "none"
},
"PostUpdateScript": {
"type": "String",
"description": "(Optional) URL of a script to run after package updates are applied. Default ("none") is to not run a script.",
"default": ""
},
"IncludePackages": {
"type": "String",
"description": "(Optional) Only update these named packages. By default ("all"), all available updates are applied.",
"default": "all"
},
"ExcludePackages": {
"type": "String",
"description": "(Optional) Names of packages to hold back from updates, under all conditions. By default ("none"), no package is excluded.",
"default": "none"
},
"lambdaFunctionName": {
"type": "String",
"description": "(Required) The name of the lambda function. Default ('none') is to not run a script.",
"default": "GoldImg-Automation-UpdateSsmParam"
}
},
"mainSteps": [
{
"name": "launchInstance",
"action": "aws:runInstances",
"maxAttempts": 3,
"timeoutSeconds": 1200,
"onFailure": "Abort",
"inputs": {
"ImageId": "{{SourceAmiId}}",
"InstanceType": "{{InstanceType}}",
"SubnetId": "{{ SubnetId }}",
"UserData":
"MinInstanceCount": 1,
"MaxInstanceCount": 1,
"IamInstanceProfileName": "{{InstanceIamRole}}"
}
},
{
"name": "updateOSSoftware",
"action": "aws:runCommand",
"maxAttempts": 3,
"timeoutSeconds": 3600,
"onFailure": "Abort",
"inputs": {
"DocumentName": "AWS-RunShellScript",
"InstanceIds": [
"{{launchInstance.InstanceIds}}"
],
"Parameters": {
"commands": [
"set -e",
"[ -x "$(which wget)" ] && get_contents='wget $1 -O -'",
"[ -x "$(which curl)" ] && get_contents='curl -s -f $1'",
"eval $get_contents https://aws-ssm-downloads-{{global:REGION}}.s3.amazonaws.com/scripts/aws-update-linux-instance > /tmp/aws-update-linux-instance",
"chmod +x /tmp/aws-update-linux-instance",
"/tmp/aws-update-linux-instance --pre-update-script '{{PreUpdateScript}}' --post-update-script '{{PostUpdateScript}}' --include-packages '{{IncludePackages}}' --exclude-packages '{{ExcludePackages}}' 2>&1 | tee /tmp/aws-update-linux-instance.log"
]
}
}
},
{
"name": "installCustomizations",
"action": "aws:runCommand",
"maxAttempts": 3,
"timeoutSeconds": 600,
"onFailure": "Abort",
"inputs": {
"DocumentName": "AWS-RunShellScript",
"InstanceIds": [
"{{launchInstance.InstanceIds}}"
],
"Parameters": {
"commands": "sudo apt-get update && sudo apt-get upgrade -y"
}
}
},
{
"name": "installInspectorAgent",
"action": "aws:runCommand",
"maxAttempts": 3,
"timeoutSeconds": 600,
"onFailure": "Abort",
"inputs": {
"DocumentName": "AmazonInspector-ManageAWSAgent",
"InstanceIds": [
"{{launchInstance.InstanceIds}}"
],
"Parameters": {
"Operation": "Install"
}
}
},
{
"name": "installUnifiedCloudWatchAgent",
"action": "aws:runCommand",
"maxAttempts": 3,
"timeoutSeconds": 600,
"onFailure": "Abort",
"inputs": {
"DocumentName": "AWS-ConfigureAWSPackage",
"InstanceIds": [
"{{launchInstance.InstanceIds}}"
],
"Parameters": {
"name": "AmazonCloudWatchAgent",
"action": "Install"
}
}
},
{
"name": "stopInstance",
"action": "aws:changeInstanceState",
"maxAttempts": 3,
"timeoutSeconds": 1200,
"onFailure": "Abort",
"inputs": {
"InstanceIds": [
"{{launchInstance.InstanceIds}}"
],
"DesiredState": "stopped"
}
},
{
"name": "createImage",
"action": "aws:createImage",
"maxAttempts": 3,
"onFailure": "Abort",
"inputs": {
"InstanceId": "{{launchInstance.InstanceIds}}",
"ImageName": "{{TargetAmiName}}",
"NoReboot": true,
"ImageDescription": "AMI Generated by EC2 Automation on {{global:DATE_TIME}} from {{SourceAmiId}}"
}
},
{
"name": "createEncryptedCopy",
"action": "aws:copyImage",
"maxAttempts": 3,
"onFailure": "Abort",
"inputs": {
"SourceImageId": "{{createImage.ImageId}}",
"SourceRegion": "{{global:REGION}}",
"ImageName": "Encrypted-{{TargetAmiName}}",
"ImageDescription": "Encrypted GoldenAMI by SSM Automation on {{global:DATE_TIME}} from source AMI {{createImage.ImageId}}",
"Encrypted": true
}
},
{
"name": "createTagsForEncryptedImage",
"action": "aws:createTags",
"maxAttempts": 1,
"onFailure": "Continue",
"inputs": {
"ResourceType": "EC2",
"ResourceIds": [
"{{createEncryptedCopy.ImageId}}"
],
"Tags": [
{
"Key": "Automation-Id",
"Value": "{{automation:EXECUTION_ID}}"
},
{
"Key": "Owner",
"Value": "Mystique"
},
{
"Key": "SourceAMI",
"Value": "{{SourceAmiId}}"
},
{
"Key": "Amazon-Inspector",
"Value": "true"
},
{
"Key": "Amazon-SSM",
"Value": "true"
},
{
"Key": "Encrypted",
"Value": "true"
}
]
}
},
{
"name": "updateSsmParam",
"action": "aws:invokeLambdaFunction",
"timeoutSeconds": 1200,
"maxAttempts": 1,
"onFailure": "Abort",
"inputs": {
"FunctionName": "Automation-UpdateSsmParam",
"Payload": "{"parameterName":"/GoldenAMI/Ubuntu/latest", "parameterValue":"{{createEncryptedCopy.ImageId}}"}"
}
},
{
"name": "terminateInstance",
"action": "aws:changeInstanceState",
"maxAttempts": 3,
"onFailure": "Continue",
"inputs": {
"InstanceIds": [
"{{launchInstance.InstanceIds}}"
],
"DesiredState": "terminated"
}
},
{
"name": "deleteUnEcryptedImage",
"action": "aws:deleteImage",
"maxAttempts": 3,
"timeoutSeconds": 180,
"onFailure": "Abort",
"inputs": {
"ImageId": "{{createImage.ImageId}}"
}
}
],
"outputs": [
"createImage.ImageId"
]
}

cant make index.html public as showed

Hi
As showed in the video the bucket has to be private, however index.html file has to be public. I am unable to make my index.html public. please see snapshot below

image

can you please suggest why "make public" option is grayed out

Changes required for updated AWS ?

AWS recently updated I was wondering what changes do we need to do to deploy S3 Security - Uploading Objects Using Pre-Signed URLs project or will it work as it is?

Recommend Projects

  • React photo React

    A declarative, efficient, and flexible JavaScript library for building user interfaces.

  • Vue.js photo Vue.js

    ๐Ÿ–– Vue.js is a progressive, incrementally-adoptable JavaScript framework for building UI on the web.

  • Typescript photo Typescript

    TypeScript is a superset of JavaScript that compiles to clean JavaScript output.

  • TensorFlow photo TensorFlow

    An Open Source Machine Learning Framework for Everyone

  • Django photo Django

    The Web framework for perfectionists with deadlines.

  • D3 photo D3

    Bring data to life with SVG, Canvas and HTML. ๐Ÿ“Š๐Ÿ“ˆ๐ŸŽ‰

Recommend Topics

  • javascript

    JavaScript (JS) is a lightweight interpreted programming language with first-class functions.

  • web

    Some thing interesting about web. New door for the world.

  • server

    A server is a program made to process requests and deliver data to clients.

  • Machine learning

    Machine learning is a way of modeling and interpreting data that allows a piece of software to respond intelligently.

  • Game

    Some thing interesting about game, make everyone happy.

Recommend Org

  • Facebook photo Facebook

    We are working to build community through open source technology. NB: members must have two-factor auth.

  • Microsoft photo Microsoft

    Open source projects and samples from Microsoft.

  • Google photo Google

    Google โค๏ธ Open Source for everyone.

  • D3 photo D3

    Data-Driven Documents codes.