Code Monkey home page Code Monkey logo

mqsensorslib's Introduction

DOI Build Status Contributors Forks Stargazers Issues MIT License LinkedIn

MQSensorsLib

We present a unified library for MQ sensors, this library allows to read MQ signals easily from Arduino, Genuino, ESP8266, ESP-32 boards whose references are MQ2, MQ3, MQ4, MQ5, MQ6, MQ7, MQ8, MQ9, MQ131, MQ135, MQ303A, MQ309A.

Table of Contents

Getting Started

//Include the library
#include <MQUnifiedsensor.h>
/************************Hardware Related Macros************************************/
#define         Board                   ("Arduino UNO")
#define         Pin                     (A4)  //Analog input 4 of your arduino
/***********************Software Related Macros************************************/
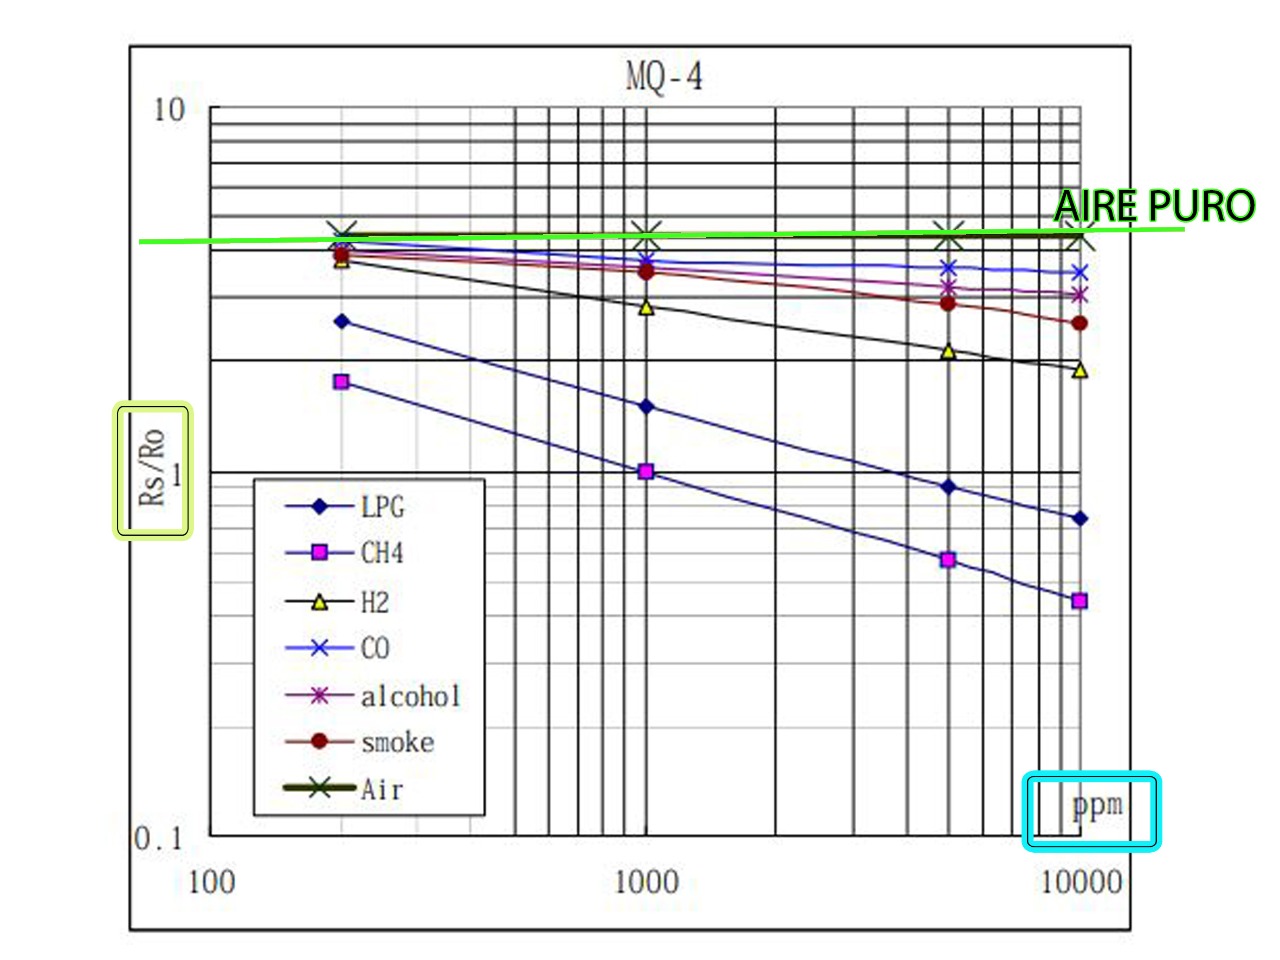
#define         Type                    ("MQ-4") //MQ4
#define         Voltage_Resolution      (5)
#define         ADC_Bit_Resolution      (10) // For arduino UNO/MEGA/NANO
#define         RatioMQ4CleanAir        (4.4) //RS / R0 = 60 ppm 
/*****************************Globals***********************************************/
//Declare Sensor
MQUnifiedsensor MQ4(Board, Voltage_Resolution, ADC_Bit_Resolution, Pin, Type);
// Setup
MQ4.setRegressionMethod("Exponential"); //_PPM =  a*ratio^b
MQ4.setA(1012.7); MQ4.setB(-2.786); // Configure the equation to to calculate CH4 concentration
MQ4.setR0(3.86018237); // Value getted on calibration
// Loop
MQ4.init();
MQ4.update();
float ppmCH4 = MQ4.readSensor();

Wiring

Sensor

Important points:

Points you should identify
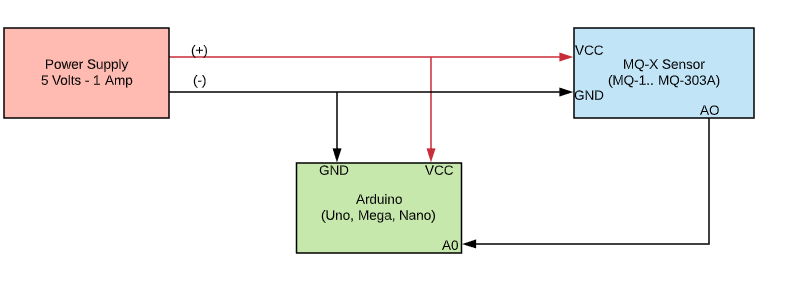
  • VCC -> 5V Power supply (+) wire
  • GND -> GND Ground (-) wire
  • AO -> Analog Output of the sensor
Data of board that you should have
  • RL Value in KOhms
Graph

Wiring_MQSensor

RS/R0 value (From datasheet of your sensor)

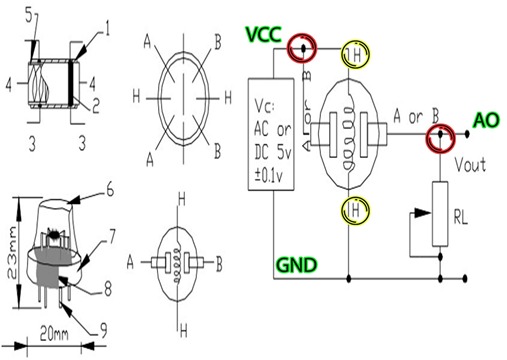
  • RS/R0 (Clean air - English) -> (Aire puro - Spanish)
  • Note: RS/R0 is equal to Ratio variable on the program Graph from datasheet

Arduino

Arduino_Wiring_MQSensor

MQ-7 / MQ-309A

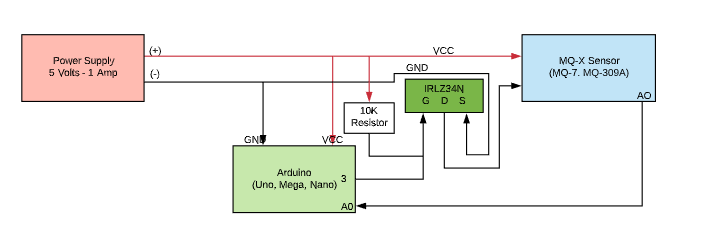
** Note ** issue: MQ-7 and MQ-309 needs two different voltages for heater, they can be supplied by PWM and DC Signal controlled by your controller, another option is to use two different power sources, you should use the best option for you, next i will show the PWM option and on the examples this will be the way . MQ-7_MQ-309

ESP8266-ESP32

ESP8266_Wiring_MQSensor

ESP32 WROOM 32D

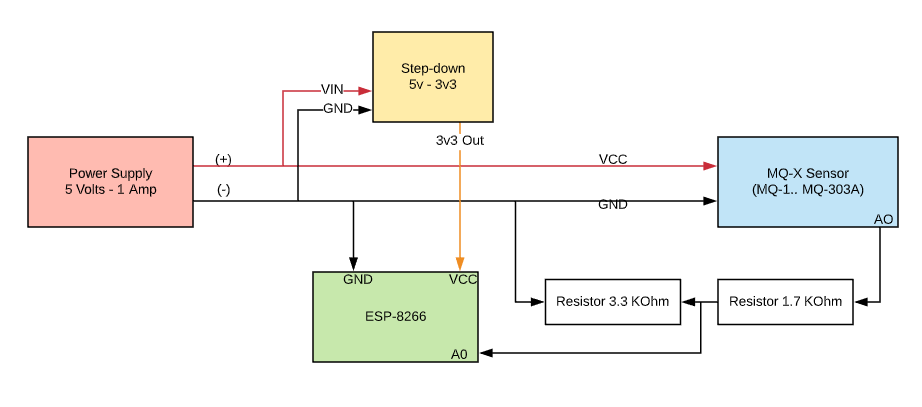
The ESP32 WROOM 32D does not need an external power supply. A0 goes to PIN36, Vcc to 3v3 and GND to any GND port on the board. Check the ESP2/ESP32_WROOM_32 folder to fixing the measuring issue when connecting to wifi.

Manuals

User Manual (v1.0) 12.2019

Manual

User Manual (v2.0) 04.2020

Manual

Serial debug (optional)

If your sensor is an MQ2 (Same for others sensors):

  • To enable on setup wrote
MQ2.serialDebug(true); 
  • And on Loop Wrote
MQ2.serialDebug(); 
  • Result:

Serial debug output

Note:

  • #c5f015 Yellow -> Calibration status.
  • #008000 Green -> Hardware and software characteristics.
  • #f03c15 Red -> Headers of the library calculations.
  • Only valid for 1 gas sensor readings.

Usage

  • Quick troubleshooting, since it shows everything the library does and the results of the calculations in each function.

Prerequisites

You'll need Arduino desktop app 1.8.9 or later.

Sensor manufacturers:

Sensor Manufacture URL Datasheet
MQ-2 HANWEI Electronics datasheet
MQ-3 HANWEI Electronics datasheet
MQ-4 HANWEI Electronics datasheet
MQ-5 HANWEI Electronics datasheet
MQ-6 HANWEI Electronics datasheet
MQ-7 HANWEI Electronics datasheet
MQ-8 HANWEI Electronics datasheet
MQ-9 HANWEI Electronics datasheet
MQ-131 HANWEI Electronics datasheet
MQ-135 HANWEI Electronics datasheet
MQ-136 HANWEI Electronics datasheet
MQ-303A HANWEI Electronics datasheet
MQ-309A HANWEI Electronics datasheet

Info of datasheets

Review WPDigitalizer folder website

Installing

Clone this repository into your desktop machine

git clone https://github.com/miguel5612/MQSensorsLib

Running the tests

Use calibration systems if you have several sensors that read the same gas.

Break down into end to end tests

These tests can re-adjust values defined previously and you can contribute to improve conditions or features obtained from particular scenes.

Examples/MQ-3

And coding style tests

These tests may generate statistics validation using descriptive tools for quantitative variables.

Examples/MQ-board.ino

Built With

  • Data sheets - Curves and behavior for each sensor, using logarithmic graphs.
  • Main purpose - Every sensor has high sensibility for a specific gas or material.

Contributing

Please read CONTRIBUTING.md for details on our code of conduct, and the process for submitting pull requests to us.

Reviewers

Authors

Collaborators

See also the list of contributors who participated in this project.

License

This project is licensed under the MIT License - see the LICENSE.md file for details

Cite as

  • Plain text: Califa Urquiza, Miguel Angel, Contreras Contreras, Ghiordy, & Carrillo Amado, Yerson Ramiro. (2019, September 3). miguel5612/MQSensorsLib: Arduino Preview V1.03 (Version 1.0.3). Zenodo. http://doi.org/10.5281/zenodo.3384301
  • CSL: { "publisher": "Zenodo", "DOI": "10.5281/zenodo.3384301", "title": "miguel5612/MQSensorsLib: Arduino Preview V1.03", "issued": { "date-parts": [ [ 2019, 9, 3 ] ] }, "abstract": "

    Publishing on Zenodo platform as software in order to extend its applications for other works allowing to recognize MQSensorLib's Authors this work into scientific community using Digital Object Identifier System (DOI).

    ", "author": [ { "family": "Califa Urquiza, Miguel Angel" }, { "family": "Contreras Contreras, Ghiordy" }, { "family": "Carrillo Amado, Yerson Ramiro" } ], "version": "1.0.3", "type": "article", "id": "3384301" }
  • BibTeX: @misc{califa_urquiza_miguel_angel_2019_3384301, author = {Califa Urquiza, Miguel Angel and Contreras Contreras, Ghiordy and Carrillo Amado, Yerson Ramiro}, title = {miguel5612/MQSensorsLib: Arduino Preview V1.03}, month = sep, year = 2019, doi = {10.5281/zenodo.3384301}, url = {https://doi.org/10.5281/zenodo.3384301} }

Sponsor

mqsensorslib's People

Contributors

adrcunha avatar aetilius avatar fredolaredo avatar ghiordy avatar jhonatanramirez avatar miguel5612 avatar per1234 avatar prabhuelectro avatar smh17 avatar vincenzomanzoni avatar yoimer avatar

Stargazers

 avatar  avatar  avatar  avatar  avatar  avatar  avatar  avatar  avatar  avatar  avatar  avatar  avatar  avatar  avatar  avatar  avatar  avatar  avatar  avatar  avatar  avatar  avatar  avatar  avatar  avatar  avatar  avatar  avatar  avatar  avatar  avatar  avatar  avatar  avatar  avatar  avatar  avatar  avatar  avatar  avatar  avatar  avatar  avatar  avatar  avatar  avatar  avatar  avatar  avatar  avatar  avatar  avatar  avatar  avatar  avatar  avatar  avatar  avatar  avatar  avatar  avatar  avatar  avatar  avatar  avatar  avatar  avatar  avatar  avatar  avatar  avatar  avatar  avatar  avatar  avatar  avatar  avatar  avatar  avatar  avatar  avatar  avatar  avatar  avatar  avatar  avatar  avatar  avatar  avatar  avatar  avatar  avatar  avatar  avatar  avatar  avatar  avatar  avatar  avatar

Watchers

 avatar  avatar  avatar  avatar  avatar  avatar  avatar  avatar

mqsensorslib's Issues

Set Temperature to adjust Rs/Ro temperature dependency

Is your feature request related to a problem? Please describe.
I have my MQ-135 in an environment that changes temperatures throughout the day. There are fluctuations throughout the day as the temperature changes, adding this function should help normalize the levels to not be dependent on the changing temperatures.

Describe the solution you'd like
Create a setTemp() function that would adjust the calculations based on the temperature/humidity dependency curve.

Describe alternatives you've considered
I've considered re-initializing the library with the value of RatioMQ135CleanAir multiplied by the appropriate factor.

Additional context
Screen Shot 2020-07-14 at 10 55 23 PM

use many different mq sensor on the same mega2560 board

Is your feature request related to a problem? Please describe.
A clear and concise description of what the problem is. Ex. I'm always frustrated when [...]
I'd like to use many different mq sensors on the same board, I am wondering if this feature is already included in the library

Describe the solution you'd like
A clear and concise description of what you want to happen.
I'd like to be able to set as many analog inputs from as many different mq sensors I have, is it already possible? how can I do it ?

Describe alternatives you've considered
A clear and concise description of any alternative solutions or features you've considered.
I am searching around and this is the first interesting hit I found.

Additional context
Add any other context or screenshots about the feature request here.
if it is already possible could I have one sketch example ?

Support digital MQ sensors

Is your feature request related to a problem? Please describe.

Based on examples of this library, this library supports analogue MQ sensors. However, Arduino-like devices usually don't have much analogue input pins. This can be a problem if you want to connect more sensors at once.

Describe the solution you'd like

Luckily, most MQ sensors also support digital mode. I don't know if all of them supports it, but I'm sure that at least MQ-2, MQ3, MQ-7 and MQ-135 have DOUT/DO pin. I also don't know which protocol they use. Based on some datasheets, they use some "TTL signal".

It would be good that this library would also support them.

Update: Based on some other datasheets, the digital output is just 1 or 0 depending if the gas concentration is enough high. This means that this library does not need to support it, as it can't output precisely value. However, if there is any other way to get precise value, library should support it.

MQ135 example all: CO2 value is not ppm?

Describe the bug
When i run your example code it return values ca. between 401 - 410 ppm. When you subtract the offset of 400 from this value it seems the remaining value is 100 times lower than it should be. What am I missing?

To Reproduce
Steps to reproduce the behavior:

  1. run mq135 all example code
  2. place hardware outside or in a room where you know the actual co2 ppm
  3. look on the output window

Expected behavior
getting co2 values of around 400 to 1500 depends room condition

Desktop (please complete the following information):

  • OS: win10
  • arduino nano
  • mq135 (pre heated and run for 24h straight)
  • vs code

Calibration Methodology (for MQ7)

If you look at the datasheet of MQ7, it says that R0 is the resistance of sensor in 100 ppm of CO.
image

In this library, it assumes R0 to be the resistance of sensor in clean air. Where as, the wording from the datasheet are R0: sensor resistance at 100 ppm CO in the clean air. which means that there is no other gas in the air except 100 ppm of CO.

I believe we need a source of CO (with known concentration in ppm) which we need to use to expose to our sensor. and then measure R0.

What is your opinion?

Thanks

Example doesn't work on WemosD1mini

Describe the bug

I want to run the example code from the readme file with the MQ4 on a wemos D1 mini.
But I get following error when compiling.

Arduino: 1.8.13 (Mac OS X), Board: "WeMos D1 R1, 80 MHz, Flash, Legacy (new can return nullptr), All SSL ciphers (most compatible), 4MB (FS:2MB OTA:~1019KB), v2 Lower Memory, Disabled, None, Only Sketch, 921600"

MQ4:15:1: error: 'MQ4' does not name a type
MQ4.setRegressionMethod("Exponential"); //_PPM = a*ratio^b
^
MQ4:16:1: error: 'MQ4' does not name a type
MQ4.setA(1012.7); MQ4.setB(-2.786); // Configurate the ecuation values to get CH4 concentration
^
MQ4:16:19: error: 'MQ4' does not name a type
MQ4.setA(1012.7); MQ4.setB(-2.786); // Configurate the ecuation values to get CH4 concentration
^
MQ4:17:1: error: 'MQ4' does not name a type
MQ4.setR0(3.86018237); // Value getted on calibration
^
MQ4:19:1: error: 'MQ4' does not name a type
MQ4.init();
^
MQ4:20:1: error: 'MQ4' does not name a type
MQ4.update();
^
exit status 1
'MQ4' does not name a type

Problems importing the header

I really want and need to use this library and I thank you for all the effort you put into it.

I have imported the MQUnifiedsensor-2.0.1.zip

Downloaded the library, click on Sketch->Import Library->Add library
Selected the zip file.

Sadly the Arduino ide doesn't like filenames and dir names containing the char "-"

So I had to rename every and each directory name and every and each file name in each directory removing the character "-" and then I re-zipped the whole dir

(is it possible to have a zip with the "-" already removed from all the filenames and directory names and from the zip name itself ? please ?)

After I did that it imported fine.

I am sure this is by my mistake (read pebkac), that said once I tried to use the library the following happens:

MQBoard.ino:22:29: fatal error: MQUnifiedsensor.h: No such file or directory
compilation terminated.

As you can see the header has been imported (I suspect it is in the wrong place)

root@raspberrypi:~# locate MQUnifiedsensor.h
/home/pi/Downloads/MQUnifiedsensor/src/MQUnifiedsensor.h
/home/pi/sketchbook/libraries/MQUnifiedsensor/src/MQUnifiedsensor.h
root@raspberrypi:~# 

arduino ide version 2:1.0.5+df2-4.1

Please help :)
Thanks

ESP32

How to use it with esp32 board.

Conflicted MQsensor library with ThinkSpeak library.

I think there is a conflict that occurs between this MQ library and the ThingSpeak library, after pre-heating the sensor always displays a Warning message: Connection issue, R0 is infinite (Open circuit detected) please check your wiring and supply, but if I do not include the ThingSpeak communication program the sensor readings can be seen properly. This is just my assumption, what do you guys think?

incompatibility with wemos D1 mini

I'm trying to use the library with a wemos D1 mini (esp8266) but I have some issues.
After compiling I have warnings that said Architecture of the library is for AVR and i'm using ESP8266 and it may not be compatible.
When the code is running on the Wemos I encounter a error of illegal instruction:

11:59:27.692 -> Exception (0):
11:59:27.692 -> epc1=0x4000dce5 epc2=0x00000000 epc3=0x00000000 excvaddr=0x00000000 depc=0x00000000
11:59:27.772 ->
11:59:27.772 -> >>>stack>>>
11:59:27.772 ->
11:59:27.772 -> ctx: cont
11:59:27.772 -> sp: 3ffffd70 end: 3fffffc0 offset: 01a0
11:59:27.852 -> 3fffff10: 00000000 00000000 00000000 3ffee52c
11:59:27.892 -> 3fffff20: 00000010 3fffff80 3fffff80 40203f1f
11:59:27.932 -> 3fffff30: 3ffe85b0 00000002 3fffff80 40203f6b
11:59:27.972 -> 3fffff40: cccccccd 40588ccc 3fffff80 40203fb4
11:59:28.052 -> 3fffff50: 3fffdad0 3ffee480 3fffff80 40203fea
11:59:28.092 -> 3fffff60: 3ffe85b0 3ffee480 3ffee480 3ffee52c
11:59:28.132 -> 3fffff70: 3fffdad0 3ffee480 3ffee4fc 4020276a
11:59:28.172 -> 3fffff80: 3ffef26c 0000000f 00000002 feefeffe
11:59:28.252 -> 3fffff90: feefeffe 00000000 3ffee4fc 3ffee52c
11:59:28.292 -> 3fffffa0: 3fffdad0 00000000 3ffee4fc 40204390
11:59:28.332 -> 3fffffb0: feefeffe feefeffe 3ffe8504 40100ce1
11:59:28.372 -> <<<stack<<<

sounds to be an :

Exception 0: Illegal instruction
PC: 0x4000dce5
EXCVADDR: 0x00000000

I tried on to Wemos with differents sensors (MQ2 MQ135 and MQ7), change setting of compiling from arduinoISP to AVR ISP but nothing change.

I'm missing something? or there is a bug?

correction formula for _sensor_volt

although the error is very small especially at a large number of bits the correct formula is
this-> _sensor_volt = (value) * _VOLT_RESOLUTION / (pow(2, _ADC_Bit_Resolution));
not
this-> _sensor_volt = (value) * _VOLT_RESOLUTION / ((pow(2, _ADC_Bit_Resolution)) - 1);
because there are pow(2, _ADC_Bit_Resolution) quant 0, 1, ......((pow(2, _ADC_Bit_Resolution)) - 1)

Problems with MQ135

Hi Miguel,

at first: Thank you for your Lib! :)

I have some problems using my MQ135 sensors: They show very strange ppm values. I want to use this sensor for room air quality detection, so i'm mostly interested in CO2 values in ppm range from 0-1000ppm.
I analyzed the board layout and found out, that my sensor board only has an 1 kΩ resistor for RL. This causes the sensor to be very insensitive so I decided to remove that 1 kΩ SMD resistor and add some linear trimmer with up to 50 kΩ. Now I can change my RL to use higher sensitivity.

The problem is: The sensor shows values of "0.11" ppm in normal air. But normal air should have aprox. 400 ppm of CO2?

I dont even understand your exponential regressions for the MQ135. Where are these values from? I cant find anything like that in the datasheet. The CO2 curve in the RS/R0 graph seems to be "almost" linear?

Maybe I'm doing things wrong, but I cant find any more helpful information.
Can you help me? :/

Thank you!

Kind regards
Malte

MQSensorsLib ADS1115

Hi,

Is it possible to use ADS1115 16 bit ADC over I2C with MQSensorsLib?
Regards,

Something not right about MQ7 sensor readings

Hello, I am experimenting with an MQ7 CO sensor, and the measurements obtained from the library seem inaccurate.
First, the library wasn't getting any voltage readings, so after inspection of the header file, I noticed the _VOLT_RESOLUTION variable was being defined as type byte, while it should be a float. After changing the type, the voltage readings were correct.
Now, the returned value for CO is a float, while it should be an uint16_t between 20-2000ppm, which is the range that the datasheet shows this sensor can provide. I took a syringe and got an air sample from a car's exhaust tube (with engine on), and after injecting the air it into the sensor, its light turned on, indicating the detection, and the voltage reading went from 0.6 to 3.1V, but the value shown for CO was only 40-45PPM.
LPG, CH4 and Alcohol values were at 9999PPM.
Maybe the constants used for CO calculation are wrong?
I don't have a CO meter so unfortunately I can not calibrate. But value should have been a lot more than 40PPM of CO for the exhaust tube's sample, isn't it?
Thanks for the lib, I will experiment with MQ9 and MQ135 sensors as well in the future ;)

Include coeficient tables to library

I would like to avoid duplication of constant in my project. What I did is to copy A,B interpolation coefficients from examples.

There are 2 things which can be done. 1st is to include some array which will contain coefficients or there could be class for every gas sensor with a proper method. Second variant seems to me as better because it is faster and intuitive.

class MQ2GasSensor: public MQGasSensor {
public:
  static const float CLEAN_AIR_PPM = 9.83; // RS / R0
  using MQGasSensor::MQGasSensor;
  
  float getPpmH2() {
     return getInterpolation(987.99, -2.162);
  }
  float getPpmLPG() {
     return getInterpolation(574.25, -2.222);
  }
// ...
}

Calculations a and b for equation

Hy,

I am testing the mq135 sensor with your library. Thanks for it !
I red this page https://jayconsystems.com/blog/understanding-a-gas-sensor to understand the method.
And, then I tried to make the calculations to find a and b as described in the page.
But I really dont find the same as written in the example file neither for MQ135 nor for the MQ4 (in the page above).
For example : I find 1.02 and -0.41 for CO2.
And, the same thing when I compare a and b, in the MQ4 example and in the page.

I think I am missing something. Maybe you could light me.

Thank you
Have a gode day.

MQ-7 sensor connecting with nodeMcu V3

Hi, I'm using the MQ-7 sensor, and I don't know how to connect it with NodeMcu V3. Is it the same as the following circuit with Arduino?
If not, please help me connect it the right way and update the code if needed.

image

Thanks,

Support for external A2D convertors

Is your feature request related to a problem? Please describe.

Some microcontrollers, like NodeMCU, only have limited number of analog inputs. This means that you cant use more than one sensor, or even none if controller does not have any analog inputs.

Describe the solution you'd like

Solution is to add support for external I2C analog-to-digital convertors. That convertors, which have more analog inputs, can then be attached to controllers. This library should then handle them and read and parse values normally as with internal analog inputs.

As there are quite many A2D convertors, system should be modular and allow more A2D convertors and should be easy to add more.

RatioMQ135CleanAir

Hello Gentlemen,
I was trying to use MQ135 for CO2 detection and was looking into MQ135 example and was bit confused about #define RatioMQ135CleanAir 3.6//RS / R0 = 3.6 ppm . Though example is for NH4, I was wondering if this value is true for CO2 detection. Also, not sure how this value was achieved.

  1. Does your model takes into account temperature and humidity by any chance or does it somehow manages to negate those factors.

  2. What should be ballpark range for R0 when using 3.3V reference.

Here is my spec:
Arduino Pro Min - 3.3V
ADC resolution - 10
Replaced on board resistor on MQ135 with 20K..

As always Thanks a ton for your effort and work!

"Equation_V_ADC" is wrong

in the debug "Equation_V_ADC" displayed as

v = ADC * A0_max_voltage / 1023

but it should be

v = ADC * A0_max_voltage / 1024

Im using an ESP8266 dev board. The possible analogue pin values range from 0..1023. this amounts to a total of 1024 values!

_type is too small for some sensor names

Describe the bug
When trying to debug my MQ-135 sensor issues, I found that the serialDebug function was the sensor as MQ-13. This is due to the type being defined as 6 chars when it actually needs to be 7 chars.

To Reproduce
Compile code for MQ-135 sensor and run with MQ135.serialDebug(true);

************************************************************************************************************************************************
MQ sensor reading library for arduino
Note: remember that all the parameters below can be modified during the program execution with the methods:
setR0, setRL, setA, setB where you will have to send as parameter the new value, example: mySensor.setR0(20); //R0 = 20KΩ
Authors: Miguel A. Califa U - Yersson R. Carrillo A - Ghiordy F. Contreras C
Contributors: Andres A. Martinez - Juan A. Rodríguez - Mario A. Rodríguez O 
Sensor: MQ-13
Supply voltage: 3.30 VDC
ADC Resolution: 12 Bits
R0: 4.65 KΩ
RL: 10.00 KΩ
Model: Exponential
MQ-13 -> a: 0.00 | b: 0.00
Development board: ESP-32
** Values from MQ-135 ****

Notice that these lines from above have the wrong value.

Sensor: MQ-13
MQ-13 -> a: 0.00 | b: 0.00

Fix

Update the MQUnifiedsensor.h

...
    char _type[7];
...

Update the MQUnifiedsensor.cpp

...
MQUnifiedsensor::MQUnifiedsensor(String Placa, float Voltage_Resolution, int ADC_Bit_Resolution, int pin, String type) {
  this->_pin = pin;
  Placa.toCharArray(this->_placa, 20);
  type.toCharArray(this->_type, 7);
  //this->_type = type; //MQ-2, MQ-3 ... MQ-309A
  //this->_placa = Placa;
  this-> _VOLT_RESOLUTION = Voltage_Resolution;
  this-> _ADC_Bit_Resolution = ADC_Bit_Resolution;
}
MQUnifiedsensor::MQUnifiedsensor(String Placa, String type) {
  Placa.toCharArray(this->_placa, 20);
  type.toCharArray(this->_type, 7);
}
...

Compile and run and we now get the proper behavior.

************************************************************************************************************************************************
MQ sensor reading library for arduino
Note: remember that all the parameters below can be modified during the program execution with the methods:
setR0, setRL, setA, setB where you will have to send as parameter the new value, example: mySensor.setR0(20); //R0 = 20KΩ
Authors: Miguel A. Califa U - Yersson R. Carrillo A - Ghiordy F. Contreras C
Contributors: Andres A. Martinez - Juan A. Rodríguez - Mario A. Rodríguez O 
Sensor: MQ-135
Supply voltage: 3.30 VDC
ADC Resolution: 12 Bits
R0: 6.94 KΩ
RL: 10.00 KΩ
Model: Exponential
MQ-135 -> a: 0.00 | b: 0.00
Development board: ESP-32
** Values from MQ-135 ****

QR Code to access live data without register

Is your feature request related to a problem? Please describe.
A clear and concise description of what the problem is. Ex. I'm always frustrated when [...]

Describe the solution you'd like
A clear and concise description of what you want to happen.

Describe alternatives you've considered
A clear and concise description of any alternative solutions or features you've considered.

Additional context
Add any other context or screenshots about the feature request here.

setRL() Float type error

Hello how are you ?
I need to set the value of the RL variable to 0.4 ohms, because my MQ7 sensor has a maximum potentiometer resistance equal to this value...
But every time I set the value to 0.4 he understands it to be 0 ... is this a bug? If not how can I solve this?

error

retries and retry_interval definitions may conflict with user's sketch definitions

Describe the bug

The definitions retries and retry_interval in MQUnifiedsensor.h may conflict with user's sketch own definitions.

To Reproduce
Steps to reproduce the behavior:

  1. Open any example of the library in the Arduino IDE.
  2. Add your own definition of retries, e.g., #define retries 33.
  3. Build the example: the example won't build because retries is already defined.

Expected behavior
No build error should occur.

Desktop (please complete the following information):

  • OS: macOS 12.3.1 with Arduino IDE 1.8.19 and latest MQSensorsLib

only 9999.00 ppm

Describe the bug
code in arduino

/*
  MQUnifiedsensor Library - reading an MQ135

  Demonstrates the use a MQ135 sensor.
  Library originally added 01 may 2019
  by Miguel A Califa, Yersson Carrillo, Ghiordy Contreras, Mario Rodriguez
 
  Added example
  modified 23 May 2019
  by Miguel Califa 

 This example code is in the public domain.

*/

//Include the library
#include <MQUnifiedsensor.h>

//Definitions
#define pin A0 //Analog input 0 of your arduino
#define type 135 //MQ135
//#define calibration_button 13 //Pin to calibrate your sensor

//Declare Sensor
MQUnifiedsensor MQ135(pin, type);

//Variables
float CO, Alcohol, CO2, Tolueno, NH4, Acetona;

void setup() {
  Serial.begin(9600); //Init serial port
   //init the sensor
  /*****************************  MQInicializar****************************************
  Input:  pin, type 
  Output:  
  Remarks: This function create the sensor object.
  ************************************************************************************/ 
  MQ135.inicializar(); 
  //pinMode(calibration_button, INPUT);

  MQ135.setVoltResolution(5);
}

void loop() {
  MQ135.update(); // Update data, the arduino will be read the voltaje in the analog pin
  
  /*
    //Si el valor de RL es diferente a 10K por favor asigna tu valor de RL con el siguiente metodo:
    MQ135.setRL(10);
  */
  /*
  //Rutina de calibracion - Uncomment if you need (setup too and header)
  if(calibration_button)
  {
    float R0 = MQ135.calibrate();
    MQ135.setR0(R0):
  }
  */
  
   /*****************************  MQReadSensor  ****************************************
  Input:   Gas - Serial print flag
  Output:  Value in PPM
  Remarks: This function use readPPM to read the value in PPM the gas in the air.
  ************************************************************************************/ 
  //Read the sensor and print in serial port
  //Lecture will be saved in lecture variable
  //float lecture =  MQ135.readSensor("", true); // Return NH4 concentration
  // Options, uncomment where you need
  CO =  MQ135.readSensor("CO"); // Return CO concentration
  Alcohol =  MQ135.readSensor("Alcohol"); // Return Alcohol concentration
  CO2 =  MQ135.readSensor("CO2"); // Return CO2 concentration
  Tolueno =  MQ135.readSensor("Tolueno"); // Return Tolueno concentration
  NH4 =  MQ135.readSensor("NH4"); // Return NH4 concentration
  Acetona =  MQ135.readSensor("Acetona"); // Return Acetona concentration
  
  Serial.println("***************************");
  Serial.print("Volt: ");Serial.print(MQ135.getVoltage(true));Serial.println(" V"); 
  Serial.print("R0: ");Serial.print(MQ135.getR0());Serial.println(" Ohm"); 
  Serial.print("CO: ");Serial.print(CO,2);Serial.println(" ppm");
  Serial.print("Alcohol: ");Serial.print(Alcohol,2);Serial.println(" ppm");
  Serial.print("CO2: ");Serial.print(CO2,2);Serial.println(" ppm");
  Serial.print("Tolueno: ");Serial.print(Tolueno,2);Serial.println(" ppm");
  Serial.print("NH4: ");Serial.print(NH4,2);Serial.println(" ppm");
  Serial.print("Acetona: ");Serial.print(Acetona,2);Serial.println(" ppm");
  Serial.print("Analog: ");Serial.print(analogRead(pin), DEC);Serial.println(" "); // my added
  Serial.println("***************************");
  
  delay(500);
}

Serial Monitor

A0-A0

Volt: 0.14 V
R0: 76.63 Ohm
CO: 9999.00 ppm
Alcohol: 9999.00 ppm
CO2: 9999.00 ppm
Tolueno: 9999.00 ppm
NH4: 9999.00 ppm
Acetona: 9999.00 ppm
Analog: 28 
***************************

A0-GND

Volt: 0.02 V
R0: 76.63 Ohm
CO: 9999.00 ppm
Alcohol: 9999.00 ppm
CO2: 9999.00 ppm
Tolueno: 9999.00 ppm
NH4: 9999.00 ppm
Acetona: 9999.00 ppm
Analog: 4 
***************************

A0-VCC

Volt: 4.99 V
R0: 76.63 Ohm
CO: 9999.00 ppm
Alcohol: 9999.00 ppm
CO2: 9999.00 ppm
Tolueno: 9999.00 ppm
NH4: 9999.00 ppm
Acetona: 9999.00 ppm
Analog: 1020 
***************************

Circuit Picture
WhatsApp Image 2019-12-31 at 11 38 39

Desktop (please complete the following information):

  • OS: Ubuntu 18
  • Ide Version 1.8.10

Explanation
Pin connections:

  • A0-A0
  • Gnd-Gnd
  • VCC-5V

I've been trying for a few days. Where am I wrong?
Only 9999.00 ppm data comes from the serial.

MQUnifiedsensor integration with ESPHome

I'm not able to make MQUnifiedsensor working with ESPHome. I'm using a tutorial based in Custom Sensor Component but I believe because my code is in C (not C++) I´m not able to declare and initialize in other to set up parameter (board, pin, etc).

When declaring sensor
MQUnifiedsensor bmp("ESP8266", 3.3, 10, A0, "MQ-135"); //this in the line that doesn't compile correctly
MQUnifiedsensor bmp; //while with this line compile is success but returns are wrong because of set up not done

My code .h
ESPHome compiling errors
ESPHome config .yaml

Alternative
In case there is no way to declare and initialize it, I would like to help you to create methods to initialize (to set up the Board, Pin, Type, Voltage_Resolution, ADC_Bit_Resolution and RatioMQ9CleanAir) if you would like to add it to the library to improve compatibility (I'm new here but I want to help as possible).

I truly believe if we go forward it will get this library more support from the ESPHome community and it will be widely popular on the ESPHome platform.

Value of _RLValue

The function calibrate() use _RLValue. Looking for this value, I saw that it is set to:
byte _RLValue = 10; //Value in KiloOhms

Why?
In the datasheet given it says this resistance is 200k Ohms.
Do all MQ sensor modules use 10k?

Integrate ADS1X15 inputs for sensor reading

Good Morning. I have an ESP8266 Board (NodeMCU) and one of the biggest problems of it, is the existence of a single analog port. Because of this, I decided to deploy an "Analog Extender" (ADS1X15) to place more analog sensors. Unfortunately, I couldn't get it to work, although the build works, the mqsensorslib library accuses a problem in the serial monitor. See below my code:

void loop(){
   //ANALOG EXTENDER SETUP START

  int16_t adc0, adc1, adc2;
  adc0 = ads.readADC_SingleEnded(0);
  adc1 = ads.readADC_SingleEnded(1);
  adc2 = ads.readADC_SingleEnded(2);


  //ANALOG EXTENDER SETUP END
  //MQ SETUP START
  MQUnifiedsensor MQ4(Board, Voltage_Resolution, ADC_Bit_Resolution,adc0, mq4_Type);
  MQUnifiedsensor MQ135(Board, Voltage_Resolution, ADC_Bit_Resolution,adc1, mq135_Type);
  //MQ SETUP END
  //PH SENSOR START
  //pinMode(adc2,INPUT);
  //PH SENSOR END


  MQ4.setRegressionMethod(1);
  MQ135.setRegressionMethod(1);
  MQ4.init(); 
  MQ135.init(); 
 
  Serial.print("Calibrating MQ4 please wait.");
  float calcR0 = 0;
  for(int i = 1; i<=10; i ++)
  {
    MQ4.update();
    calcR0 += MQ4.calibrate(RatioMQ4CleanAir);
    Serial.print(".");
  }
  MQ4.setR0(calcR0/10);
  Serial.println("  MQ4 Calibrating Completed!");
  
  Serial.print("Calibrating MQ135 please wait.");
  float calcR1 = 0;
  for(int i = 1; i<=10; i ++)
  {
    MQ135.update();
    calcR1 += MQ4.calibrate(RatioMQ135CleanAir);
    Serial.print(".");
  }
  MQ4.setR0(calcR1/10);
  Serial.println("  MQ135 Calibrating Completed!");
  
  if(isinf(calcR0)) {Serial.println("Warning: MQ4 Conection issue, R0 is infinite (Open circuit detected) please check your wiring and supply"); while(1);}
  if(calcR0 == 0){Serial.println("Warning: MQ4 Conection issue found, R0 is zero (Analog pin shorts to ground) please check your wiring and supply"); while(1);}
  if(isinf(calcR1)) {Serial.println("Warning: MQ135 Conection issue, R0 is infinite (Open circuit detected) please check your wiring and supply"); while(1);}
  if(calcR1 == 0){Serial.println("Warning: MQ135 Conection issue found, R0 is zero (Analog pin shorts to ground) please check your wiring and supply"); while(1);}
  //MQ4.serialDebug(true);

The error happens precisely in the last lines (ifs calcR0 or calcR1 check).
Because of this, I would like to know if it is possible to integrate the analog input extender with the library.

Calculations for RS using mq303a sensor look wrong

The calculation of RS in the library assumes the load resistor is connected between GND and the sensor ( the other end of the sensor is connected to VCC) . However for the the Mq303A this is the other way round. For the MQ303a the Load resistor is connected between the sensor output and VCC (not GND like most of the other sensors)
see the connection of the test circuit here: http://www.kosmodrom.com.ua/pdf/MQ303A.pdf
So you can not use the same formula to calculate RS i.e. RS = [(VC x RL) / VRL] - RL is wrong.

Also this is a 3pin sensor, the other end of the sensor appears to be connected to the mid point of the heater. I can not see this confirmed in any data sheet but from experimentation this appears to be the case (also the drawings show like this). With the heater voltage at 0.9 volts, the other end of the sensor will be at 0.45V not 0v so again this will affect the calculation of RS and needs to be taken into account (0.45 needs to be taken off VCC?).

Error in MQ4 sensor calibrating

at examples/MQ-4/MQ-4.ino there is an error in the if function:
//Rutina de calibracion - Uncomment if you need (setup too and header)
if(calibration_button)
{
float R0 = MQ4.calibrate();
MQ4.setR0(R0);
}

calibration_button=13 and so the if statement is always true.
Instead of if(calibration_button) should be if(digitalRead(calibration_button==High)).

Probably Incorrect Readings

I'm using MQUnifiedsensor library much like examples/MQ-135-ALL/MQ-135-ALL.ino shows.

MQ135.setA(605.18); MQ135.setB(-3.937); // Configure the equation to calculate CO concentration value
float CO = MQ135.readSensor();

MQ135.setA(77.255); MQ135.setB(-3.18); //Configure the equation to calculate Alcohol concentration value
float Alcohol = MQ135.readSensor();

// ...

But when I get near some "element" to test, like Alcohol or Aceton all the readings changes in a correlated way. See:
MQ135: https://thingspeak.com/channels/2295455/
MQ3: https://thingspeak.com/channels/2295454/

The expected behavior is that when I put some Alcohol near the sensor, only Alcohol has a change in readings.

Translate the Spanish strings / words to English

Is your feature request related to a problem? Please describe.
Not a problem, just the examples and some function names (checkout https://github.com/miguel5612/MQSensorsLib/blob/master/examples/MQ-2/MQ-2.ino --> //Si el valor de RL es diferente a 10K por favor asigna tu valor de RL con el siguiente metodo: is Spanish or the method inicializar.

Describe the solution you'd like
A clean library with everything including the examples in English so that everyone can understand it.

Describe alternatives you've considered
Alternative for me would be to fork an change the library on my own but I believe it's better to contribute here if possible.

Additional context
None.

ADC pin cannot be set when creating a MQUnifiedsensor object using the short constructor

Describe the bug

ADC pin cannot be set when creating a MQUnifiedsensor object using the short constructor (name/type only).

To Reproduce

Steps to reproduce the behavior:

  1. Open any example of the library in the Arduino IDE using an Arduino Nano.
  2. Change the MQUnifiedsensor object constructor to use the short constructor (name/type only).
  3. Run the example.
  4. Erratic behavior will happen, as the ADC pin is either incorrect or non-existing.

Expected behavior

Library should be usable with the short constructor (name/type only), allowing further definition of the ADC pin.

Desktop:

OS: macOS 12.3.1 with Arduino IDE 1.8.19 and latest MQSensorsLib

info mq135

Hi, i have an mq135 sensor. I would to konw the right R0 value default for a right calibration. I also have an RL value. Can i use an r0 for all gases controlled? thank y

Sensor won't finish the Calibration process if done in clean air.

Describe the bug
When using the sample code for ESP32 and updating it for the MQ135 per the MQ135-all sample code, I run into the "Warning: Conection issue, R0 is infinite (Open circuit detected) please check your wiring and supply" unless I use a cigarette lighter's gas in front of the sensor during the calibration process.

Code

#include "Arduino.h"
#include <WiFi.h>

const char* ssid = ""; // Wifi SSID
const char* password = ""; // Wifi Password

//Include the library
#include <MQUnifiedsensor.h>
/************************Hardware Related Macros************************************/
#define         Board                   ("ESP-32") // Wemos ESP-32 or other board, whatever have ESP32 core.

//https://www.amazon.com/HiLetgo-ESP-WROOM-32-Development-Microcontroller-Integrated/dp/B0718T232Z (Although Amazon shows ESP-WROOM-32 ESP32 ESP-32S, the board is the ESP-WROOM-32D)
#define         Pin                     (32) //check the esp32-wroom-32d.jpg image on ESP32 folder 

/***********************Software Related Macros************************************/
#define         Type                    ("MQ-135") //MQ2 or other MQ Sensor, if change this verify your a and b values.
#define         Voltage_Resolution      (3.3) // 3V3 <- IMPORTANT. Source: https://randomnerdtutorials.com/esp32-adc-analog-read-arduino-ide/
#define         ADC_Bit_Resolution      (12) // ESP-32 bit resolution. Source: https://randomnerdtutorials.com/esp32-adc-analog-read-arduino-ide/
#define         RatioMQ135CleanAir      (3.6) //RS / R0 = 9.83 ppm
/*****************************Globals***********************************************/
MQUnifiedsensor MQ135(Board, Voltage_Resolution, ADC_Bit_Resolution, Pin, Type);
/*****************************Globals***********************************************/


void setup()
{

  //Init the serial port communication - to debug the library
  Serial.begin(9600); //Init serial port
  delay(10);

  //Set math model to calculate the PPM concentration and the value of constants
  MQ135.setRegressionMethod(1); //_PPM =  a*ratio^b

  /*****************************  MQ Init ********************************************/ 
  //Remarks: Configure the pin of arduino as input.
  /************************************************************************************/ 
  MQ135.init(); 
  /* 
    //If the RL value is different from 10K please assign your RL value with the following method:
    MQ135.setRL(10);
  */
  /*****************************  MQ CAlibration ********************************************/ 
  // Explanation: 
  // In this routine the sensor will measure the resistance of the sensor supposedly before being pre-heated
  // and on clean air (Calibration conditions), setting up R0 value.
  // We recomend executing this routine only on setup in laboratory conditions.
  // This routine does not need to be executed on each restart, you can load your R0 value from eeprom.
  // Acknowledgements: https://jayconsystems.com/blog/understanding-a-gas-sensor
  Serial.print("Calibrating please wait.");
  float calcR0 = 0;
  for(int i = 1; i<=10; i ++)
  {
    MQ135.update(); // Update data, the arduino will read the voltage from the analog pin
    calcR0 += MQ135.calibrate(RatioMQ135CleanAir);
    Serial.print(".");
  }
  MQ135.setR0(calcR0/10);
  Serial.println("  done!.");
  
  if(isinf(calcR0)) {Serial.println("Warning: Conection issue, R0 is infinite (Open circuit detected) please check your wiring and supply"); while(1);}
  if(calcR0 == 0){Serial.println("Warning: Conection issue found, R0 is zero (Analog pin shorts to ground) please check your wiring and supply"); while(1);}
  /*****************************  MQ CAlibration ********************************************/ 
  Serial.println("** Values from MQ-135 ****");
  Serial.println("|    CO   |  Alcohol |   CO2  |  Toluen  |  NH4  |  Aceton  |");  
}

void loop() {
  MQ135.update(); // Update data, the arduino will read the voltage from the analog pin

  MQ135.setA(605.18); MQ135.setB(-3.937); // Configure the equation to calculate CO concentration value
  float CO = MQ135.readSensor(); // Sensor will read PPM concentration using the model, a and b values set previously or from the setup

  MQ135.setA(77.255); MQ135.setB(-3.18); //Configure the equation to calculate Alcohol concentration value
  float Alcohol = MQ135.readSensor(); // SSensor will read PPM concentration using the model, a and b values set previously or from the setup

  MQ135.setA(110.47); MQ135.setB(-2.862); // Configure the equation to calculate CO2 concentration value
  float CO2 = MQ135.readSensor(); // Sensor will read PPM concentration using the model, a and b values set previously or from the setup

  MQ135.setA(44.947); MQ135.setB(-3.445); // Configure the equation to calculate Toluen concentration value
  float Toluen = MQ135.readSensor(); // Sensor will read PPM concentration using the model, a and b values set previously or from the setup
  
  MQ135.setA(102.2 ); MQ135.setB(-2.473); // Configure the equation to calculate NH4 concentration value
  float NH4 = MQ135.readSensor(); // Sensor will read PPM concentration using the model, a and b values set previously or from the setup

  MQ135.setA(34.668); MQ135.setB(-3.369); // Configure the equation to calculate Aceton concentration value
  float Aceton = MQ135.readSensor(); // Sensor will read PPM concentration using the model, a and b values set previously or from the setup
  Serial.print("|   "); Serial.print(CO); 
  Serial.print("   |   "); Serial.print(Alcohol);
  // Note: 400 Offset for CO2 source: https://github.com/miguel5612/MQSensorsLib/issues/29
  /*
  Motivation:
  We have added 400 PPM because when the library is calibrated it assumes the current state of the
  air as 0 PPM, and it is considered today that the CO2 present in the atmosphere is around 400 PPM.
  https://www.lavanguardia.com/natural/20190514/462242832581/concentracion-dioxido-cabono-co2-atmosfera-bate-record-historia-humanidad.html
  */
  Serial.print("   |   "); Serial.print(CO2 + 400); 
  Serial.print("   |   "); Serial.print(Toluen); 
  Serial.print("   |   "); Serial.print(NH4); 
  Serial.print("   |   "); Serial.print(Aceton);
  Serial.println("   |"); 
  /*
    Exponential regression:
  GAS      | a      | b
  CO       | 605.18 | -3.937  
  Alcohol  | 77.255 | -3.18 
  CO2      | 110.47 | -2.862
  Toluen  | 44.947 | -3.445
  NH4      | 102.2  | -2.473
  Aceton  | 34.668 | -3.369
  */

  delay(500); //Sampling frequency
}

I also updated MQUinifiedsensor.cpp to give me some diagnostic information to help with debugging this issue.

...
float MQUnifiedsensor::calibrate(float ratioInCleanAir) {
  Serial.print("_sensor_volt = ");
  Serial.print(_sensor_volt);
  Serial.print(" | _RL = ");
  Serial.print(_RL);
  Serial.print(" | _VOLT_RESOLUTION = ");
  Serial.print(_VOLT_RESOLUTION);
  Serial.print(" | ratioInCleanAir = ");
  Serial.println(ratioInCleanAir);
...

To Reproduce
Compile and run.

Calibrating please wait._sensor_volt = 0.00 | _RL = 10.00 | _VOLT_RESOLUTION = 3.30 | ratioInCleanAir = 3.60
._sensor_volt = 0.00 | _RL = 10.00 | _VOLT_RESOLUTION = 3.30 | ratioInCleanAir = 3.60
.  done!.
Warning: Conection issue, R0 is infinite (Open circuit detected) please check your wiring and supply

Now re-run using a cigarette lighter's gas in front of the sensor. Note the zeros are after I turn off the gas.

Calibrating please wait._sensor_volt = 0.60 | _RL = 10.00 | _VOLT_RESOLUTION = 3.30 | ratioInCleanAir = 3.60
._sensor_volt = 0.66 | _RL = 10.00 | _VOLT_RESOLUTION = 3.30 | ratioInCleanAir = 3.60
._sensor_volt = 0.88 | _RL = 10.00 | _VOLT_RESOLUTION = 3.30 | ratioInCleanAir = 3.60
._sensor_volt = 0.92 | _RL = 10.00 | _VOLT_RESOLUTION = 3.30 | ratioInCleanAir = 3.60
._sensor_volt = 1.00 | _RL = 10.00 | _VOLT_RESOLUTION = 3.30 | ratioInCleanAir = 3.60
._sensor_volt = 1.02 | _RL = 10.00 | _VOLT_RESOLUTION = 3.30 | ratioInCleanAir = 3.60
._sensor_volt = 1.06 | _RL = 10.00 | _VOLT_RESOLUTION = 3.30 | ratioInCleanAir = 3.60
._sensor_volt = 1.10 | _RL = 10.00 | _VOLT_RESOLUTION = 3.30 | ratioInCleanAir = 3.60
._sensor_volt = 1.11 | _RL = 10.00 | _VOLT_RESOLUTION = 3.30 | ratioInCleanAir = 3.60
.  done!.
** Values from MQ-135 ****
|    CO   |  Alcohol |   CO2  |  Toluen  |  NH4  |  Aceton  |
|   13.37   |   3.55   |   406.91   |   1.60   |   9.32   |   1.33   |
|   18.18   |   4.55   |   408.64   |   2.09   |   11.30   |   1.73   |
|   22.29   |   5.37   |   410.02   |   2.50   |   12.85   |   2.06   |
|   32.57   |   7.29   |   413.20   |   3.49   |   16.30   |   2.84   |
|   3.42   |   1.18   |   402.57   |   0.49   |   3.96   |   0.41   |
|   0.00   |   0.00   |   400.01   |   0.00   |   0.03   |   0.00   |
|   0.00   |   0.00   |   400.00   |   0.00   |   0.00   |   0.00   |
|   0.00   |   0.00   |   400.00   |   0.00   |   0.00   |   0.00   |
|   0.00   |   0.00   |   400.00   |   0.00   |   0.00   |   0.00   |
|   0.00   |   0.00   |   400.00   |   0.00   |   0.00   |   0.00   |
|   0.00   |   0.00   |   400.00   |   0.00   |   0.00   |   0.00   |
|   0.00   |   0.00   |   400.00   |   0.00   |   0.00   |   0.00   |
|   0.00   |   0.00   |   400.00   |   0.00   |   0.00   |   0.00   |
|   0.00   |   0.00   |   400.00   |   0.00   |   0.00   |   0.00   |
|   0.00   |   0.00   |   400.00   |   0.00   |   0.00   |   0.00   |
|   0.00   |   0.00   |   400.00   |   0.00   |   0.00   |   0.00   |
|   0.00   |   0.00   |   400.00   |   0.00   |   0.00   |   0.00   |
|   0.00   |   0.00   |   400.00   |   0.00   |   0.00   |   0.00   |
|   0.00   |   0.00   |   400.00   |   0.00   |   0.00   |   0.00   |
|   0.00   |   0.00   |   400.00   |   0.00   |   0.00   |   0.00   |

Expected behavior
I would expect this app to be able to calibrate properly in clean air. I have also tried putting in a delay(20000); after the MQ135.init(); to see if it just needed 20 seconds to warm up before the calibration process started. This did not help so I also tried 60,000 and it also did not help, _sensor_volt = 0.00 after either 20,000 and 60,000 wait.

Hardware:

MQ131 doubt

Hi, I have some doubt about MQ131 example and parameters.
First of all, if 'b' is the result of ' log(y) - m * log(x)' , what's 'a' ?
You link a datasheet for MQ131 that consider only an high concentration sensor for ozone, but Ostaquet lib and Winsen datasheet tell about 2 kind of sensor, black bachelite for low concentration and metal case for high concentration.
There's a lot of difference from ppm or ppm ... and the graph of Winsen respect sensorportal is the opposite.
It's also not clear (in datasheets) if is Rs/R0 or R0/Rs because one tell about ratio go up if concentration go up, in the other ratio go down if concentration go up.
thanks

ESP-32 S2 Mini Compatibility

I am writing because the documentation states that it supports ESP-32 boards. I am attempting to use the Wemos ESP-32 S2 Mini but I am not able to get it to work. I am unsure of what to put for the board in the Hardware related macros so that it recognizes the correct board and what pins I am able to use. Any feedback would be very much appreciated.

Incorrect MQ7 sensor readings

I am running the example for the MQ7 sensor, connected on a ESP32 devkit board but I get incorrect results from the library. What might be wrong here?
Bellow is the serial output

Lectures for MQ-7
Volt: 5.00 V
R0: 4.00 Ohm
H2: 9999.00 ppm
LPG: 9999.00 ppm
CH4: 9999.00 ppm
CO: 9999.00 ppm
Alcohol: 9999.00 ppm


Support for NodeMCU

Does this library supports NodeMCU? If not, can it be updated to support it?

QR Code for register new device

Is your feature request related to a problem? Please describe.
A clear and concise description of what the problem is. Ex. I'm always frustrated when [...]

Describe the solution you'd like
A clear and concise description of what you want to happen.

Describe alternatives you've considered
A clear and concise description of any alternative solutions or features you've considered.

Additional context
Add any other context or screenshots about the feature request here.

MQ136

Hello

Thanks for this library.
I would need MQ136 support. It would be very usefull for people like me living near a paper factory... I can deliver you a MQ136 if you accept to develop a libray.

Thanks

Issues with MQUnifiedsensor existing with SSD1306

Describe the bug
When using on Arduino nano, if using MQ135 alone works fine.
When using Adafruit SSD1306 alone this works fine.
When using both together. Unit locks up when calling MQU Library.
Only happens intermittently. Nano locks up and doesn't respond or display freezes and code stops

To Reproduce
Steps to reproduce the behavior:

  1. Go to '...'
  2. Click on '....'
  3. Scroll down to '....'
  4. See code below where sections have been commented out.

Expected behavior
Expect both to co-exist

Additional context
//Include the library

#include <SPI.h>
#include <Wire.h>
//#include <Adafruit_GFX.h>
//#include <Adafruit_SSD1306.h>
#include <MQUnifiedsensor.h>

//#define SCREEN_WIDTH 128 // OLED display width, in pixels
//#define SCREEN_HEIGHT 64 // OLED display height, in pixels

// Declaration for an SSD1306 display connected to I2C (SDA, SCL pins)
//#define OLED_RESET -1 // Reset pin # (or -1 if sharing Arduino reset pin)
//Adafruit_SSD1306 display(SCREEN_WIDTH, SCREEN_HEIGHT, &Wire, OLED_RESET);

//Definitions
#define placa "Arduino Nano"
#define Voltage_Resolution 5
#define pin A0 //Analog input 0 of your arduino
#define type "MQ-135" //MQ135
#define ADC_Bit_Resolution 10 // For arduino UNO/MEGA/NANO
#define RatioMQ135CleanAir 3.6//RS / R0 = 3.6 ppm
#define calibration_button 13 //Pin to calibrate your sensor

//Declare Sensor
MQUnifiedsensor MQ135(placa, Voltage_Resolution, ADC_Bit_Resolution, pin, type);

void setup() {

Serial.begin(115200); //Init serial port

/************************************** OLED INIT ***********************************/
SSD1306_SWITCHCAPVCC = generate display voltage from 3.3V internally
if(!display.begin(SSD1306_SWITCHCAPVCC, 0x3C)) {
Serial.println(F("SSD1306 allocation failed"));
for(;;); // Don't proceed, loop forever
}

// Show initial display buffer contents on the screen --
// the library initializes this with an Adafruit splash screen.
display.display();
delay(2000); // Pause for 2 seconds

// Clear the buffer
display.clearDisplay();
display.display();
// Draw a single pixel in white
display.drawPixel(10, 10, WHITE);

// Show the display buffer on the screen. You MUST call display() after
// drawing commands to make them visible on screen!
delay(2000);

/************************************************************************************/

//Init the serial port communication - to debug the library

//Set math model to calculate the PPM concentration and the value of constants
MQ135.setRegressionMethod(1); //_PPM = a*ratio^b

/***************************** MQ Init /
//Remarks: Configure the pin of arduino as input.
/
***********/
MQ135.init();
/

//If the RL value is different from 10K please assign your RL value with the following method:
MQ135.setRL(10);
/
/
MQ CAlibration ********************************************/
// Explanation:
// In this routine the sensor will measure the resistance of the sensor supposing before was pre-heated
// and now is on clean air (Calibration conditions), and it will setup R0 value.
// We recomend execute this routine only on setup or on the laboratory and save on the eeprom of your arduino
// This routine not need to execute to every restart, you can load your R0 if you know the value
// Acknowledgements: https://jayconsystems.com/blog/understanding-a-gas-sensor
Serial.print("Calibrating please wait.");
float calcR0 = 0;
for(int i = 1; i<=10; i ++)
{
MQ135.update(); // Update data, the arduino will be read the voltage on the analog pin
calcR0 += MQ135.calibrate(RatioMQ135CleanAir);
Serial.print(".");
}
MQ135.setR0(calcR0/10);
Serial.println(" done!.");

if(isinf(calcR0)) {Serial.println("Warning: Conection issue founded, R0 is infite (Open circuit detected) please check your wiring and supply"); while(1);}
if(calcR0 == 0){Serial.println("Warning: Conection issue founded, R0 is zero (Analog pin with short circuit to ground) please check your wiring and supply"); while(1);}
/***************************** MQ CAlibration ******************************************/
Serial.println("
Air Quality Sensor from MQ-135 ****");
//Serial.println("| CO | Alcohol | CO2 | Toluene | NH4 | Acetone |");
}

void loop() {

// MQ135.update(); // Update data, the arduino will be read the voltage on the analog pin

// MQ135.setA(605.18); MQ135.setB(-3.937); // Configurate the ecuation values to get CO concentration
// float CO = MQ135.readSensor(); // Sensor will read PPM concentration using the model and a and b values setted before or in the setup
//
// MQ135.setA(77.255); MQ135.setB(-3.18); // Configurate the ecuation values to get Alcohol concentration
// float Alcohol = MQ135.readSensor(); // Sensor will read PPM concentration using the model and a and b values setted before or in the setup

// MQ135.setA(110.47); MQ135.setB(-2.862); // Configurate the ecuation values to get CO2 concentration
// float CO2 = MQ135.readSensor(); // Sensor will read PPM concentration using the model and a and b values setted before or in the setup

// MQ135.setA(44.947); MQ135.setB(-3.445); // Configurate the ecuation values to get Tolueno concentration
// float Tolueno = MQ135.readSensor(); // Sensor will read PPM concentration using the model and a and b values setted before or in the setup

// MQ135.setA(102.2 ); MQ135.setB(-2.473); // Configurate the ecuation values to get NH4 concentration
// float NH4 = MQ135.readSensor(); // Sensor will read PPM concentration using the model and a and b values setted before or in the setup

// MQ135.setA(34.668); MQ135.setB(-3.369); // Configurate the ecuation values to get Acetona concentration
// float Acetona = MQ135.readSensor(); // Sensor will read PPM concentration using the model and a and b values setted before or in the setup
// Serial.println("| CO | Alcohol | CO2 | Toluene | NH4 | Acetone |");
// Serial.print("| "); Serial.print(CO);
// Serial.print(" | "); Serial.print(Alcohol);
// Serial.print(" | "); Serial.print(CO2);
// Serial.print(" | "); Serial.print(Tolueno);
// Serial.print(" | "); Serial.print(NH4);
// Serial.print(" | "); Serial.print(Acetona);
// Serial.println(" |");
// Serial.println();

// delay(10000); //Sampling frequency
}

Co2 values round 400 whatever I do

Hi,

by now I did no calibrating, but smoking in front of the MQ-135, putting a candle in a glas, breathing to the sensor etc. makes almost no difference to the Co2 value. It's always around 400.

Are You sure that You made the correct calculation?

Greetings

Klaus

Recommend Projects

  • React photo React

    A declarative, efficient, and flexible JavaScript library for building user interfaces.

  • Vue.js photo Vue.js

    🖖 Vue.js is a progressive, incrementally-adoptable JavaScript framework for building UI on the web.

  • Typescript photo Typescript

    TypeScript is a superset of JavaScript that compiles to clean JavaScript output.

  • TensorFlow photo TensorFlow

    An Open Source Machine Learning Framework for Everyone

  • Django photo Django

    The Web framework for perfectionists with deadlines.

  • D3 photo D3

    Bring data to life with SVG, Canvas and HTML. 📊📈🎉

Recommend Topics

  • javascript

    JavaScript (JS) is a lightweight interpreted programming language with first-class functions.

  • web

    Some thing interesting about web. New door for the world.

  • server

    A server is a program made to process requests and deliver data to clients.

  • Machine learning

    Machine learning is a way of modeling and interpreting data that allows a piece of software to respond intelligently.

  • Game

    Some thing interesting about game, make everyone happy.

Recommend Org

  • Facebook photo Facebook

    We are working to build community through open source technology. NB: members must have two-factor auth.

  • Microsoft photo Microsoft

    Open source projects and samples from Microsoft.

  • Google photo Google

    Google ❤️ Open Source for everyone.

  • D3 photo D3

    Data-Driven Documents codes.