mbaxszy7 / blog Goto Github PK
View Code? Open in Web Editor NEWmy learning blogs
my learning blogs


整理一下CSS格式化上下文
CSS格式化上下文主要有这么几种: BFC块级格式化上下文、IFC内联格式化上下文、GFC网格(grid)格式化上下文、FFC弹性(flex)格式上下文
创建规则:display:grid/inline-grid
创建规则: display:flex/inline-flex
下面主要整理一下BFC块级格式化上下文 和 IFC内联格式化上下文
  如果一个元素具有 BFC,内部子元素再怎么倒腾,都不会影响外部的元素。
  所以,
  1. BFC 元素是不可能发生 margin 重叠的,因为 margin 重叠是会影响外部的元素的;
  2. BFC 元素也可以用来清除浮动的影响,因为如果不清除,子元素浮动则父元素高度塌陷,必然会影
      响后面元素布局和定位,这显然有违 BFC 元素的子元素不会影响外部元素的设定
所以BFC可以用来防止外边距合并,清除内部浮动
创建规则: IFC 只有在一个块元素中仅包含内联级别元素(inline-level elements)时才会生成
内联级元素(inline-level elements)在一行中一个挨一个地排列,一旦当前行放不下了,就在它下方创建一个新行,所有这些行都是所谓的行盒(line box),用来包住这一行的所有内容。
inline-level element (内联级元素)。内联级元素包括 display属性计算值为:
使用IFC,可以实现内联级元素的垂直和水平居中
记录一下CSS盒模型
从计算上看,border-box更符合人的直觉,比如实际生活中的纸盒子.
如果由第三方库不兼容box-sizing: border-box,则可以如下设置
  : root { box-sizing: border-box; }
  *,
  ::before,
  ::after {
    box-sizing: inherit;
  }
// 这样的话不会破坏第三方组件可能改变的box-sizing
// 可以在必要时选中第三方组件的顶级容器,将其恢复为 content-box
.third-party-component { box-sizing: content-box; }先来看一下这张图

图片来自https://projects.wojtekmaj.pl/react-lifecycle-methods-diagram/
图中介绍了React 16.4以后的生命周期函数的执行时机,牵扯到了React 的两个主要阶段:render阶段和commit阶段。下面来简单说一下这两个阶段React做了什么事。
在render阶段,React将更新应用于通过setState或render方法触发的组件,并确定需要在用户屏幕上做哪些更新--哪些节点需要插入,更新或删除,哪些组件需要调用其生命周期方法。最终的这些更新信息被保存在一个叫effect list的fiber 节点树上(关于fiber的内容,在这篇文章中有简述react中的fiber)。当然,在首次渲染时,React不需要产生任何更新信息,而是会给每个从render方法返回的element生成一个fiber节点,最终生成一个fiber节点树, 后续的更新也是复用了这棵fiber树。
在上图中, render阶段被标记为纯的、没有副作用的,可能会被React暂停、终止或者重新执行。也就是说,React会根据产生的任务的优先级,安排任务的调度(schedule)。利用类似requestIdleCallback的原理在浏览器空闲阶段进行更新计算,而不会阻塞动画,事件等的执行。
在这个阶段时,React内部会有三个fiber树:
current fiber tree: 在首次渲染时,React不需要产生任何更新信息,而是会给每个从render方法返回的element生成一个fiber节点,最终生成一个fiber节点树, 后续的更新也是复用了这棵fiber树。

workInProgress fiber tree:
所有的更新计算工作都在workInProgress tree的fiber上执行。当React 遍历current fiber tree时,它为每个current fiber 创建一个替代(alternate)节点,这样的alternate节点构成了workInProgress tree

effect list fiber tree: workInProgress fiber tree 的子树,这个树的作用串联了标记具有更新的节点
commit阶段会遍历effect list,把所有更新都commit到DOM树上。具体的,首先会有一个pre-commit阶段,主要是执行getSnapshotBeforeUpdate方法,可以获取当前DOM的快照(snap)。然后给需要卸载的组件执行componentWillUnmount方法。接着会把current fiber tree 替换为workInProgress fiber tree。最后执行DOM的插入、更新和删除,给更新的组件执行componentDidUpdate,给插入的组件执行componentDidMount。
重点要注意的是,这一阶段是同步执行的,不能中止。
下面比较简单的来总结一下webpack 的 scope hoisting
scope hoisting 翻译过来就是作用域提升。在webpack中,这个特性被用来检测引用链(import chaining)是否可以被内联,从而减少没有必要的module。
要了解webpack中的scope hoisting,首选需要知道webpack打包出来的代码。这一部分已经在我的前面一篇webpack是如何实现动态导入的中有详细的讲述,下面来简单提一下。webpack打包后的代码框架:
(function(modules) {
  . . .
  // cache
  var installedModules = {};

  function __webpack_require__(moduleId) {
     // check cache
    if (installedModules[id]) {
      return installedModules[id].exports;
    }

     // create new module and cache it
     var module = installedModules[id] = {
       id: id,
       exports: {}
     };

     // execute the module function
     modules[id].call(module.exports, module, module.exports, __webpack_require__);
  }

  // load entry module and return exports
   return __webpack_require__(0);
})({
  "hello.js": function() {},
  "app.js": function() {},
  0:  function() {}
});
可以看到匿名函数的参数modules对象是一个个我们项目中的模块。如果模块很多那modules将会很大,毫无疑问会有大量的函数声明和内存开销。所以webpack通过scope hoisting来检测模块间的引用链(import chaining),从而来展平引用链,并把他们内联到一个函数中,达到“压缩”modules的效果。
在webpack中开启ModuleConcatenationPlugin插件可以开启scope hoisting。此插件只在 production mode生产环境中默认开启。
new webpack.optimize.ModuleConcatenationPlugin();
大致翻译如下: webpack尝试完成部分scope hoisting。也就是说webpack不会在每种情况下都把modules合并到同一个作用域。如果合并失败会有以下两种情况替代: Prevent and Root。
- Prevent: 模块必须待在自己的作用域中。比如非es6模块、使用eval()、export * from "cjs-module"
- Root:一个新的模块会被开启。比如动态import
具体情况如下,可以在官方文档中查阅。
记录一下自己对react fiber 的理解
React 的JXS语法最终会被编译为ReactReact.createElement:
class Demo extends React.Component {
  constructor(props) {
    super(props);
    this.state = { count: 0 };
  }
  render() {
    return <span>{this.state.count}</span>;
  }
}

// 编译后
class Demo {
...
  render() {
    return React.createElement("span", null, this.state.count);
  }
}
在render方法中的React.createElement 会把span转变为如下的数据结构:
{
  $$typeof: Symbol(react.element),
  type: 'span',
  key:null
  props: {
      children: 0
  }
}
React 用$$typeof标识了一个 React element, 而每个这样的element对应了一个fiber。
上面提到用fiber就是要完成一系列的任务,这些任务具体可以概括为:
这一些列的工作运用在一整棵fiber树(Fiber上下文)上也最终体现了react 的Fiber架构。让React有了优先级调度(schedule)的能力。也让React能把reconciliation(计算哪一部分的element 树需要被更新,计算更新的这一步也被分为很多unit,防止阻塞主线程)和render(使用那些计算好的更新信息,把更新渲染到用户屏幕上)分开,使得reconciliation可以重用在不同的平台上(React Native 、React DOM)
几个重要属性如下:
 {
    type: React.createElement 对应的type,表明这个fiber 节点对应的element
    tag: 表明fiber 的类型
    pendingProps: 已经是被更新的props,需要被运用到子组件或者dom 元素上
    key: 对应prop 上的key
    stateNode:  dom节点(HostComponent) / 类组件的实例 (ClassComponent) / fn() (FunctionComponent)
    nextEffect:  指向下一个**effect list**中的节点 (effect list:一个workInProgress(finishedWork)的子树,是在render阶段 最终需要决定被执行更新 的产物,会在commit阶段被处理)
    effectTag:  当前fiber需要执行的副作用类型
    alternate:  用于构成**workInProgress**(从当前fiber树构建而来,反应了需要被更新渲染到用户屏幕的状态树)
    return: 指向父fiber节点
    sibling: 指向兄弟fiber节点
    child: 指向child fiber节点
  }
推荐一篇很棒的介绍React Fiber的文章 完全理解React Fiber
整理一下 CSS 相对长度
<style>
  .par {
    font-size: 16px;
  }
  .chi {
    font-size: 2em;
    padding: 2em;
  }
</style>

<div class="par">
  cdcdcdcdcdc
  <div class="chi">
    dcdcdc
  </div>
</div>
div.chi computed:

如果给一个元素加上 font-size: 2vw 会发生什么?
在一个 1200px 的桌面显示器上,计算值为 24px(1200 的 2%)。在一个 768px 宽的平板上,计算值约为 15px(768 的 2%)。这样做的好处在于元素能够在这两种大小之间平滑地过渡,这意味着不会在某个断点突然改变。当视口大小改变时,元素会逐渐过渡 。
不幸的是,24px 在大屏上来说太大了。更糟糕的是,在 iPhone 6 上会缩小到只有 7.5px
0.5em 保证了最小字号,1vw 则确保 了字体会随着视口缩放。这段代码保证基础字号从 iPhone 6 里的 11.75px 一直过渡到 1200px 的浏 览器窗口里的 20px。可以按照自己的喜好调整这个值:
:root { font-size: calc(0.5em + 1vw); }
整理一下CSS层叠值的计算和CSS的继承
层叠值: 浏览器遵循三个步骤,即来源、优先级、源码顺序,来解析网页上每个元素的每个属性
!!!不推荐使用!important,因为!important没有层叠值可言。
 [0,0,0,0] -> [行内,id, class, 标签]
根据以上对应关系统计每个选择器的个数作为指数,然后再给一个很大的基数,结果值就是相加值。栗子如下(基数取1000):

div#a.b .c[id=x]
属性选择器[id=x] 跟 class选择器 .b .c 权重一致
[0, 1, 3, 1]
1000^0 + 1000^1 + 1000^3 + 1000^1

#a:not(#b)
:not 不参与权重计算
[0, 2, 0, 0]
1000^0 + 1000^2 + 1000^0 + 1000^0

*.a
通用选择器*  不参与权重计算
[0, 0, 1, 0]
1000^0 + 1000^0 + 1000^1 + 1000^0

div.a
[0, 0, 1, 1]
1000^0 + 1000^0 + 1000^1 + 1000^1
伪类选择器(如 :hover )和属性选择器(如 [type="input"] )与一个类选择 器的优先级相同。
通用选择器( * )和组合器( > 、 + 、 ~ )对优先级没有影响(不参与权重计算)。
通常最好让优先级尽可能低,这样当需要覆盖一些样式时,才能有选择空间
当没有给元素的继承属性指定一个值的时候,该属性会取父元素的同属性的计算值 computed value。
但不是所有的属性都能被继承。默认情况下,只有特定的一些属性能被继承,通常是我们希望被继承的那些。它们主要是跟文本相关的属性:color、font、font-family、font-size、 font-weight、font-variant、font-style、line-height、letter-spacing、text-align、 text-indent、text-transform、white-space 以及 word-spacing。
看了webpack打包出来后的代码,觉得很精妙,想尝试写一个极其简易版的js bundler
项目地址:https://github.com/mbaxszy7/make-bundler
运行: node ./bundler.js
入口模块: index.js
index模块依赖的模块: hello.js ,console.js
hello模块依赖的模块:world.js
模块分析器主要是来转换import语句,分析模块的import chanining和收集这些import依赖。从源码层面来分析代码结构就需要用到抽象语法树ast, 这里使用了@babel/parser。然后需要遍历分析ast的节点,来收集import依赖,我们需要使用@babel/traverse这个库。收集到的import依赖的文件路径是相对于entry 文件的路径,需要处理一下变为相对于根目录的文件路径。最后,需要把ast转换为实际的代码。具体代码如下:
  // 相对于entry 文件的路径 -> 相对于根目录的路径
const makeSrcPath = (fileName, moduleSrc) => {
  const dirName = path.join(path.dirname(fileName), moduleSrc);
  return `./${dirName}`;
};

const moduleAnalysis = (fileName) => {
  const content = fs.readFileSync(fileName, "utf-8");
  const ast = parser.parse(content, {
    // parse in strict mode and allow module declarations
    sourceType: "module",
  });
  const dependencies = {};
  traverse(ast, {
    ImportDeclaration({ node }) {
      const moduleSrc = node.source.value;
      const path = makeSrcPath(fileName, moduleSrc);
      dependencies[moduleSrc] = path;
    },
  });
  const { code } = babel.transformFromAst(ast, null);
  return {
    fileName,
    dependencies,
    code,
  };
};
产出的dependencies结构如下:
// {
//   相对于entry 文件的路径:  相对于根目录的路径
// }

dependencies =  {
  './hello.js': './src/hello.js',
  './console.js': './src/console.js'
}
这样的结构便于我们下一步遍历每个模块的dependencies,产出整个dependencies。
为了收集全部模块的dependencies,需要遍历每个模块的import依赖。分析这个项目的模块依赖,我们可以把它简化为一个多叉树。那么遍历依赖就变成了广度优先的遍历方式,其中为了简单处理循环引用,在dependencies result中已经存在的模块就不再次遍历。代码如下:
 const generateDependenciesGraph = (entry) => {
  const entryModule = moduleAnalysis(entry);
  console.log(entryModule);
  // 构造队列,处理广度优先遍历
  const queue = [entryModule];
  const ret = {
    [entry]: {
      dependencies: entryModule.dependencies,
      code: entryModule.code,
    },
  };

  while (queue.length) {
    const item = queue.shift();

    const { dependencies } = item;
    if (dependencies) {
      for (const [k, v] of Object.entries(dependencies)) {
       // 如果不在dependencies result中
        if (!ret[v]) {
          const res = moduleAnalysis(v);
          // 把依赖推入queue
          queue.push(res);
          const { dependencies, code } = res;
          ret[v] = {
            dependencies,
            code,
          };
        }
      }
    }
  }
  return ret;
};
最后返回的ret:
{
  "./src/index.js": {
    dependencies: {
      "./hello.js": "./src/hello.js",
      "./console.js": "./src/console.js",
    },
    code:
      '"use strict";\n\nvar _hello = _interopRequireDefault(require("./hello.js"));\n\nvar _console = require("./console.js");\n\nfunction _interopRequireDefault(obj) { return obj && obj.__esModule ? obj : { default: obj }; }\n\ndocument.getElementById("root").innerText = _hello.default;\n(0, _console.log)(_hello.default);',
  },
  "./src/hello.js": {
    dependencies: { "./world.js": "./src/world.js" },
    code:
      '"use strict";\n\nObject.defineProperty(exports, "__esModule", {\n  value: true\n});\nexports.default = void 0;\n\nvar _world = _interopRequireDefault(require("./world.js"));\n\nfunction _interopRequireDefault(obj) { return obj && obj.__esModule ? obj : { default: obj }; }\n\nconst hello = `Hello. ${_world.default}`;\nvar _default = hello;\nexports.default = _default;',
  },
  "./src/console.js": {
    dependencies: {},
    code:
      '"use strict";\n\nObject.defineProperty(exports, "__esModule", {\n  value: true\n});\nexports.log = void 0;\n\nconst log = (...props) => console.log(...props);\n\nexports.log = log;',
  },
  "./src/world.js": {
    dependencies: {},
    code:
      '"use strict";\n\nObject.defineProperty(exports, "__esModule", {\n  value: true\n});\nexports.default = void 0;\nconst world = "A brave new world";\nvar _default = world;\nexports.default = _default;',
  },
}在上一阶段产出的dependencies中每个dependency的code就是对应模块的源码(index.js 为例):
var _hello = _interopRequireDefault(require("./hello.js"));
var _console = require("./console.js");
function _interopRequireDefault(obj) {
  return obj && obj.__esModule ? obj : { default: obj };
}
document.getElementById("root").innerText = _hello.default;
(0, _console.log)(_hello.default);
但是这段代码在浏览器上运行不来,因为我们没有实现代码里的require函数,下面就来分析实现这段代码里的require函数。
代码里用require函数是这么运行的:require("./console.js"),所以要用./console.js得到./src/hello.js, 也就是我们之前构造好的
dependencies。然后为了传入require函数运行模块代码和防止模块变量污染外部的变量,我们需要把代码放在一个闭包中运行。最后,生成可运行的代码的函数返回的也是一个立即执行函数,接受的modules参数就是上一步的ret:
const generateCode = (entry) => {
  const modules = JSON.stringify(generateDependenciesGraph(entry));
  return `
    (
      function(modules) {
        function _bundler_require_(module) {
          function _relative_require_(relativePath) {
            return _bundler_require_(modules[module].dependencies[relativePath])
          }

          var exports = {};
          (
            function(require, exports, code) {
              eval(code)
            }
          )(_relative_require_, exports, modules[module].code)

          return exports
        }

        _bundler_require_('${entry}')
      }
    )(${modules})
  `;
};
这个立即执行函数参考的就是webpack打包出来的那个立即执行函数。
代码如下:
 fs.writeFile("./dist/bundle.js", generateCode("./src/index.js"), (error) => {
  console.error(error);
});记录下这么一个问题:React 中 setState 什么时候是同步的,什么时候是异步的?
这里的异步并不是异步执行,而是React会把多个setState合并更新
直接上代码
class Test extends Component<
  Record<string, unknown>,
  { [propName: string]: number }
> {
  constructor(props: Record<string, unknown>) {
    super(props)
    this.state = {
      num: 1,
      number: 1,
      batchNumber: 1,
      clickNum: 1,
      callbackNum: 1
    }
  }

  componentDidMount(): void {
     // componentDidMount中正常的多次setState
    this.setState({
      num: this.state.num + 1
    })
    console.log(`num: ${this.state.num}`)
    this.setState({
      num: this.state.num + 2
    })
    console.log(`num: ${this.state.num}`)
    this.setState({
      num: this.state.num + 3
    })
    console.log(`num: ${this.state.num}`)

      // componentDidMount中在setTimeout内多次setState
    setTimeout(() => {
      this.setState({
        number: this.state.number + 1
      })
      console.log(`number: ${this.state.number}`)
      this.setState({
        number: this.state.number + 2
      })
      console.log(`number: ${this.state.number}`)
      this.setState({
        number: this.state.number + 3
      })
      console.log(`number: ${this.state.number}`)
    }, 0)

     // componentDidMount中在unstable_batchedUpdates内多次setState
    batchedUpdates(() => {
      this.setState({
        batchNumber: this.state.batchNumber + 1
      })
      console.log(`batchNumber: ${this.state.batchNumber}`)

      this.setState({
        batchNumber: this.state.batchNumber + 2
      })
      console.log(`batchNumber: ${this.state.batchNumber}`)
      this.setState({
        batchNumber: this.state.batchNumber + 3
      })
      console.log(`batchNumber: ${this.state.batchNumber}`)
    })

    // componentDidMount中在使用setState传入函数的多次setState
    this.setState((state) => ({
      callbackNum: state.callbackNum + 1
    }))
    console.log(`callbackNum: ${this.state.callbackNum}`)
    this.setState((state) => ({
      callbackNum: state.callbackNum + 2
    }))
    console.log(`callbackNum: ${this.state.callbackNum}`)
    this.setState((state) => ({
      callbackNum: state.callbackNum + 3
    }))
    console.log(`callbackNum: ${this.state.callbackNum}`)
  }

   // 在onClick 中多次setState
  handleTestClick: () => void = () => {
    this.setState((preState) => ({
      clickNum: preState.clickNum + 1
    }))
    console.log(`clickNum: ${this.state.clickNum}`)
    this.setState((preState) => ({
      clickNum: preState.clickNum + 2
    }))
    console.log(`clickNum: ${this.state.clickNum}`)
    this.setState((preState) => ({
      clickNum: preState.clickNum + 3
    }))
    console.log(`clickNum: ${this.state.clickNum}`)
  }

  render(): React.ReactElement {
    return (
      <>
        <h1 onClick={this.handleTestClick}> Test </h1>
        <p>clickNum {this.state.clickNum}</p>
        <p>callbackNum {this.state.callbackNum}</p>
        <p>batchNumber {this.state.batchNumber}</p>
        <p>number {this.state.number}</p>
        <p>num {this.state.num}</p>
      </>
    )
  }
}
上面代码注释有五种setState。下面来看一下log:
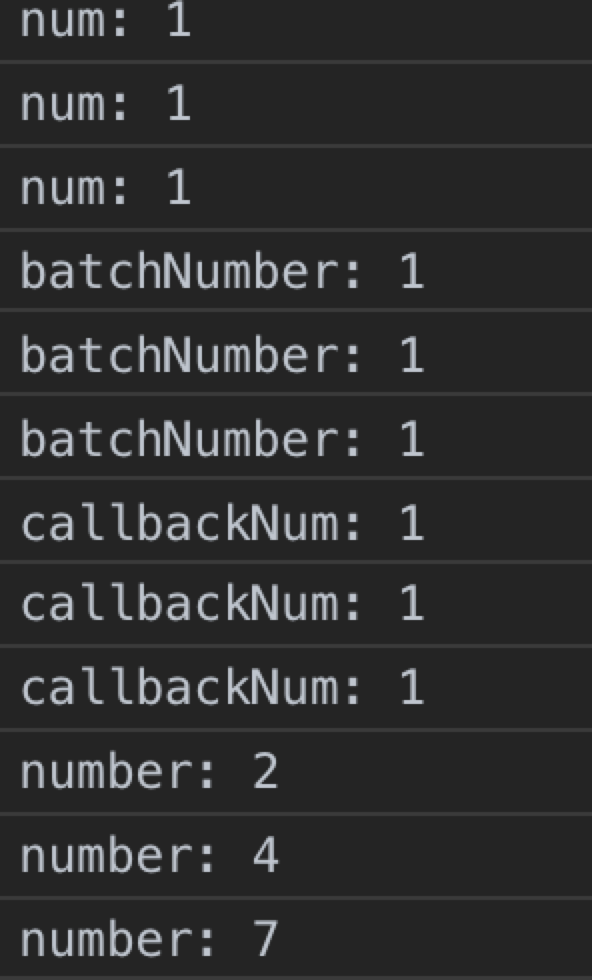
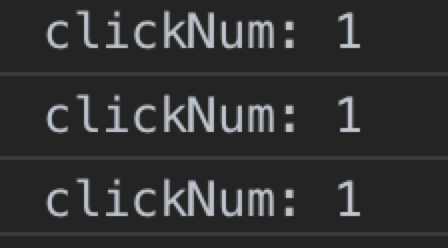
五种setState在每次调用this.setState后的console.log中,只有setTimeout中的this.setState是每次都可以拿到最新的state的,其余都是原始的state值。
再来看一下屏幕上render的结果:
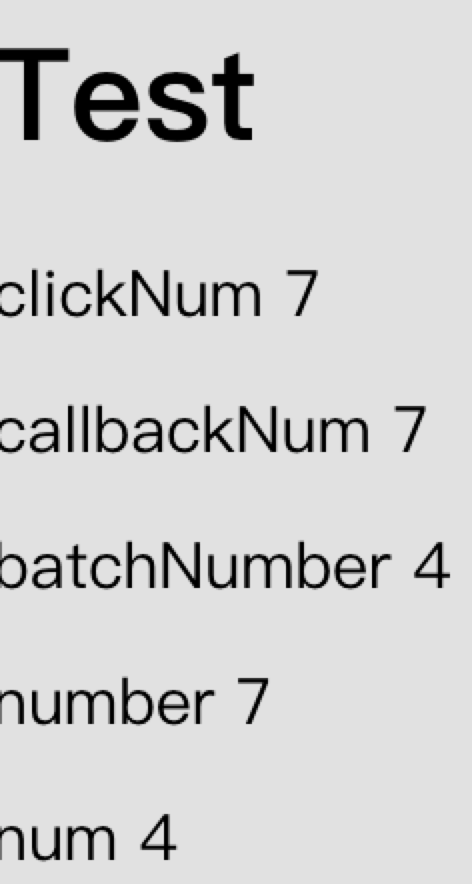
只有在setState中使用function 和 在setTimeout中的setState 才会根据上一次的state来产生state,其余都是用了原始值作为base state
出现上面现象的原因主要有:
在之前版本的React中会有一个isBatchingUpdates变量,当isBatchingUpdates 为true的时候会产生批量更新的效果(放到队列中),当isBatchingUpdates为false的时候会直接产生更新。比如在之前版本的React的unstable_batchedUpdates实现
function batchedUpdates<A, R>(fn: (a: A) => R, a: A): R {
  const previousIsBatchingUpdates = isBatchingUpdates;
  // isBatchingUpdates 设置为true
  isBatchingUpdates = true;
  try {
    return fn(a);
  } finally {
    // 复原isBatchingUpdates
    isBatchingUpdates = previousIsBatchingUpdates;
    if (!isBatchingUpdates && !isRendering) {
      performSyncWork();
    }
  }
}
在当前最新版本的React(16.13.1)中unstable_batchedUpdates的实现:
function batchedUpdates<A, R>(fn: A => R, a: A): R {
  const prevExecutionContext = executionContext;
  executionContext |= BatchedContext;
  try {
    return fn(a);
  } finally {
    executionContext = prevExecutionContext;
    if (executionContext === NoContext) {
      // Flush the immediate callbacks that were scheduled during this batch
      flushSyncCallbackQueue();
    }
  }
}
可以看到React已经去掉了isBatchingUpdates,换成了executionContext这个枚举值
然后再看当在setTimeout中setState的时候executionContext会变成0 (枚举值NoContext):
// scheduleUpdateOnFiber也就是scheduleWork (在enqueueSetState中调用)
function scheduleUpdateOnFiber(
  fiber: Fiber,
  lane: Lane,
  eventTime: number,
) {
  checkForNestedUpdates();
  warnAboutRenderPhaseUpdatesInDEV(fiber);

  const root = markUpdateLaneFromFiberToRoot(fiber, lane);
  if (root === null) {
    warnAboutUpdateOnUnmountedFiberInDEV(fiber);
    return null;
  }

  // TODO: requestUpdateLanePriority also reads the priority. Pass the
  // priority as an argument to that function and this one.
  const priorityLevel = getCurrentPriorityLevel();

  if (lane === SyncLane) {
    if (
      // 是否在unbatched update中
      (executionContext & LegacyUnbatchedContext) !== NoContext &&
      (executionContext & (RenderContext | CommitContext)) === NoContext
    ) {
      schedulePendingInteractions(root, lane);
      performSyncWorkOnRoot(root);
    } else {
      ensureRootIsScheduled(root, eventTime);
      schedulePendingInteractions(root, lane);
      // setTimeout命中,触发flushSyncCallbackQueue
      if (executionContext === NoContext) {
        flushSyncCallbackQueue();
      }
    }
  } else {
    if (
      (executionContext & DiscreteEventContext) !== NoContext &&
      (priorityLevel === UserBlockingSchedulerPriority ||
        priorityLevel === ImmediateSchedulerPriority)
    ) {
      if (rootsWithPendingDiscreteUpdates === null) {
        rootsWithPendingDiscreteUpdates = new Set([root]);
      } else {
        rootsWithPendingDiscreteUpdates.add(root);
      }
    }
    ensureRootIsScheduled(root, eventTime);
    schedulePendingInteractions(root, lane);
  }
  mostRecentlyUpdatedRoot = root;
}使用 will-change 控制绘制图层
will-change 的属性对渲染图层添加控制。这个属性可以提前告知浏览器,元素的特定属性将改变。这通常意味着元素将被提升到自己的绘制图层。例如,设置了 will-change: transform 就表示我们将要改变元素的 transform属性。
除非遇到性能问题,否则不要盲目添加该属性到页面,因为它会占用很多的系统资源
只有 tranfrorm 3D 变换会提升元素到自己的图层,现在已经不是这样了,最新的浏览器对 2D 变换也可以使用 GPU 加速
CSS 选择器整理
.parent > .child。p + h2。li.active ~ li。多个基础选择器可以连起来(不使用空格或者其他组合器)组成一个复合(compound)选择器(例如:h1.page-header)。 复合选择器选中的元素将匹配其全部基础选择器。 例如,.dropdown.is-active 能够选中<div class="dropdown is-active">,但是无法选中<div class="dropdown">
比如:
:first-child
:last-child
:disabled——匹配已禁用的元素,包括 input、select 以及 button 元素
比如:
::first-line
::first-letter
::before
::after
input[disabled]。input[type="radio"]a[href^="https"]。a[href$= ".pdf"]。[class*="sprite-"]。a[rel="author"]。CSS in Depth
先看下面的代码:
class Demo {
  @observable
  public test = 1

  log: () => void = autorun(() => {
    console.log(`test input onChange: ${this.test}`)
  })
}
修改test的值,会触发log函数自动执行。相当于传入autorun的方法,会自动收集依赖到的 observable值的变化。个人猜测autorun函数的工作方式是这样的
function autorun (fn) {
   // 依赖收集的准备工作
   fn() // 触发observable属性的get方法
   // 清理依赖收集
}
下面来简单看一下autorun源码 (5.15.4)
function autorun(
    view: (r: IReactionPublic) => any,
    opts: IAutorunOptions = EMPTY_OBJECT
): IReactionDisposer {

    const name: string = (opts && opts.name) || (view as any).name || "Autorun@" + getNextId()
    const runSync = !opts.scheduler && !opts.delay
    let reaction: Reaction

    // 只看同步的autorun,异步是根据传入的delay setTimeout
    if (runSync) {
        // normal autorun
        reaction = new Reaction(
            name,
            // reaction的onInvalidate, 用track调用reactionRunner, 也就是view(reaction), (重新)收集依赖
            function(this: Reaction) {
                this.track(reactionRunner)
            },
            opts.onError,
            opts.requiresObservable
        )
    } else {
       // ... 处理异步
    }

    function reactionRunner() {
        view(reaction)
    }
    // 将 reaction 放进全局 globalState.pendingReactions 队列,里面会执行runReactions
    reaction.schedule()
    // 返回取消订阅
    return reaction.getDisposer()
}
再来看看runReactions,runReactions是依赖收集启动方法
let reactionScheduler: (fn: () => void) => void = f => f();

function runReactions() {
  // 不在事务中并且没有正在执行的reaction
  if (globalState.inBatch > 0 || globalState.isRunningReactions) return
  // 核心的调用runReactionsHelper
  reactionScheduler(runReactionsHelper)
}
runReactionsHelper:
function runReactionsHelper() {
    globalState.isRunningReactions = true
    const allReactions = globalState.pendingReactions
    let iterations = 0

    // 遍历所有globalState.pendingReactions中的reaction,并执行每个对象的runReaction
    while (allReactions.length > 0) {
        if (++iterations === MAX_REACTION_ITERATIONS) {
            console.error(
                `Reaction doesn't converge to a stable state after ${MAX_REACTION_ITERATIONS} iterations.` +
                    ` Probably there is a cycle in the reactive function: ${allReactions[0]}`
            )
            allReactions.splice(0) // clear reactions
        }
        let remainingReactions = allReactions.splice(0)
        for (let i = 0, l = remainingReactions.length; i < l; i++)
            remainingReactions[i].runReaction()
    }
    globalState.isRunningReactions = false
}
runReaction关键就是触发onInvalidate参数函数, 也就是用track包裹的view函数(autorun的传入函数)
    // fn 就是view 函数
    track(fn: () => void) {

        startBatch()
        ....
        this._isRunning = true
        // trackDerivedFunction是核心, 把fn传入了trackDerivedFunction,
        const result = trackDerivedFunction(this, fn, undefined)
        this._isRunning = false
        ....
        endBatch()
    }
终于到trackDerivedFunction了,trackDerivedFunction就是最终调用autorun的传入函数的方法。至此就完成了触发observable属性的get方法。后面就是监听observable属性的get方法的调用, 最终完成依赖收集。例如在mobx ObservableValue类中有一个get方法,这个方法就是trap了observable属性的get方法:
  public get(): T {
        // reportObserved将 observable 上报给正在收集依赖的 derivation (reaction)
        //  derivation 从globalState.trackingDerivation中获取,globalState.trackingDerivation在上面提到的最终触发autorun的传入
       //    函数 的 trackDerivedFunction中设置的
        this.reportObserved()
        return this.dehanceValue(this.value)
    }
至此完成了依赖收集。
下面来简单的说一下obserable属性的set方法,触发set方法,如果值改变,mobx会通知此obserable属性的依赖:
    public set(newValue: T) {
        const oldValue = this.value
        newValue = this.prepareNewValue(newValue) as any
        if (newValue !== globalState.UNCHANGED) {
             ...
            //值改变, 触发setNewValue, 最终会触发Reaction 中的onBecomeStale, 而onBecomeStale调用的就是 this.schedule(),这个就合前面的依赖收集重合了
            this.setNewValue(newValue)
            if (notifySpy && process.env.NODE_ENV !== "production") spyReportEnd()
        }
    }
最后,我们也可以看到mobx抽离Reaction这一层,设计的很巧妙,不仅抽离了依赖收集的逻辑,管理全局的依赖管理,也抽离了不同依赖管理阶段side effect,在初始化依赖收集的时候可以设置track get 方法,在依赖更新的时候也可以将Reaction用作他处,比如React,进行组件的更新。
要搞懂webpack 动态import的实现需要先搞懂webpack打包后产生的代码

从以上代码可以看出,webpack替换了import 和 index中依赖的模块Hello。

简化以后的代码如下:

所以这个自执行函数会运行__webpack_require__(0)(第0项内容就是去加载 src/index.js 中的代码)

__webpack_require__接受一个moduleId,就是modules参数的key。__webpack_require__内执行的模块的代码就是key对应的value。

这里多了执行__webpack_require__.r 和 webpack_require.e。可以看到打包后的hello.js中有这样有个promise链:
__webpack_require__.e(/*! import() */ 0)
.then(__webpack_require__.bind(null, /*! ./async */ "./src/async.js"))
先去加载了bundle 0 也就是0.bundle.js, 也就是webpack code splitting 出的async.js。然后(then)执行async.js的代码。
webpack_require.r

webpack_require.e
先来看一下__webpack_require__.e内部的代码:

大致概括一下__webpack_require__.e的代码: 根据传入的chunkId,先检查是否已经加载过了,再检查是否正在加载, 否则的话创建加载script的promise,然后去加载chunk script。如果script加载失败(超时也算),那么执行chunk promise的reject。
从这步可以看到动态import的实现已经初露端倪。要完整的理解,还需要思考一个问题:上面script加载成功的chunk promise的resolve在什么时候执行?下面来看一下项目async.js打包出来的代码(去掉了一些注释):

这里重点要看window[“webpackJsonp”]。window[“webpackJsonp”]
在之前的自执行函数的匿名函数中有定义。并且window[“webpackJsonp”]
的push方法已经被重写为webpackJsonpCallback。下面就来看一下webpackJsonpCallback这个函数。

webpackJsonpCallback大致就是在做:将传入的chunkid(个人以为叫bundleid更合理)标记为已加载,并将传入的模块挂在到installedChunks对象上(缓存),最终执行 webpack_require.e 函数返回的promise的resolve,注意resolve也是从__webpack_require__.e 函数处理过的installedChunks上取的(installedChunks[chunkId] = [resolve, reject])
实现动态import的主要代码:
async () => {
    const res = await import("./async");
    console.log(res.default());
}
对应打包后的代码:
async () => {
  const res = await __webpack_require__.e(/*! import() */ 0)
  .then(__webpack_require__.bind(null, /*! ./async */ "./src/
           async.js"));
    console.log(res.default());
}先执行__webpack_require__.e(0),把动态import的promise挂载到installedChunks上, 创建script 加载0.bundle.js, 返回promise
如果加载(超时也是)失败,在onScriptComplete中reject;如果加载成功,则执行加载过来的js:执行 window[webpackJsonp] 上的push方法(已经被重写为webpackJsonpCallback),将动态加载的模块(0.bundle.j)标记为已加载,并将模块(async.js)对应的代码挂载到modules参数上,最后resolve异步加载的模块。
在then后执行(webpack_require)挂载到modules参数上对应的模块(async.js)的代码
通过分析 webpack打包后的模板代码,可以看到webpack用IIFE的形式将所有模块作为modules参数传入,从entry模块开始依次执行modules,巧妙的处理了动态加载的模块。用 webpack_require 抹平了import和require之间的差异。
react Diff 算法
react Diff 操作发生在render阶段产出workInProgress fiber节点的时候,会根据current fiber tree 和本次要更新节点进行diff,同时会标记effect tag(在effect list fiber tree 上)。
    workInProgress.child = reconcileChildFibers(
      workInProgress,
      current.child,
      nextChildren,
      renderExpirationTime,
    );
reconcileChildFibers就是diff算法的入口函数
正常的两棵树diff的时间复杂度是O(n^3) ,在React官网文档Reconciliation上有提到。
O(n^3) 的大致由来: 两棵树嵌套循环寻找不同的节点:O(n^2),寻找到不同的节点后,需要再遍历得到最小的转换消耗,最终得 到O(n^3)
React基于两个假设实现了一种启发式O(n)算法
按照这样的优化,最终只需一层遍历O(n)即可完成
 function reconcileChildFibers(
    // 父节点fiber
    returnFiber: Fiber,
    // 父节点fiber的第一个child fiber
    currentFirstChild: Fiber | null,
    // 新产生的节点信息
    newChild: any,
    expirationTime: ExpirationTime,
  ): Fiber | null {
    // 处理<>{[...]}</> and <>...</> 直接取fragment的children
    const isUnkeyedTopLevelFragment =
      typeof newChild === 'object' &&
      newChild !== null &&
      newChild.type === REACT_FRAGMENT_TYPE &&
      newChild.key === null;
    if (isUnkeyedTopLevelFragment) {
      newChild = newChild.props.children;
    }

    // Handle object types
    const isObject = typeof newChild === 'object' && newChild !== null;

    if (isObject) {
      switch (newChild.$$typeof) {
        // React.createElement
        case REACT_ELEMENT_TYPE:
          return placeSingleChild(
            reconcileSingleElement(
              returnFiber,
              currentFirstChild,
              newChild,
              expirationTime,
            ),
          );
        // ReactDOM.createPortal
        case REACT_PORTAL_TYPE:
          return placeSingleChild(
            reconcileSinglePortal(
              returnFiber,
              currentFirstChild,
              newChild,
              expirationTime,
            ),
          );
      }
    }

    if (typeof newChild === 'string' || typeof newChild === 'number') {
      // 文本
      return placeSingleChild(
        reconcileSingleTextNode(
          returnFiber,
          currentFirstChild,
          '' + newChild,
          expirationTime,
        ),
      );
    }

    if (isArray(newChild)) {
      // 数组
      return reconcileChildrenArray(
        returnFiber,
        currentFirstChild,
        newChild,
        expirationTime,
      );
    }

    if (getIteratorFn(newChild)) {
      // generator
      return reconcileChildrenIterator(
        returnFiber,
        currentFirstChild,
        newChild,
        expirationTime,
      );
    }

   ......

    // 删除没有匹配的子节点
    return deleteRemainingChildren(returnFiber, currentFirstChild);
  }
通过判断新节点(newChild)的类型,匹配不同的diff操作。
最后对没有匹配的到newChild节点的old子节点进行删除操作
详细注释
function reconcileSingleElement(
    returnFiber: Fiber,
    currentFirstChild: Fiber | null,
    element: ReactElement,
    expirationTime: ExpirationTime,
  ): Fiber {
    // 要更新的child的key
    const key = element.key;
    // current child
    let child = currentFirstChild;
    // 取第一个不为null的current child
    while (child !== null) {
      // 判断current child 和 要更新的child的key 是否相等
      if (child.key === key) {
        switch (child.tag) {
          case Fragment: {
            if (element.type === REACT_FRAGMENT_TYPE) {
              // "删除" current child 的 sibling
              deleteRemainingChildren(returnFiber, child.sibling);
              // 复用current child, 传入要更新的child的props
              const existing = useFiber(child, element.props.children);
              existing.return = returnFiber;
              if (__DEV__) {
                existing._debugSource = element._source;
                existing._debugOwner = element._owner;
              }
              return existing;
            }
            break;
          }
          case Block:
            if (enableBlocksAPI) {
              if (
                element.type.$$typeof === REACT_BLOCK_TYPE &&
                element.type.render === child.type.render
              ) {
                deleteRemainingChildren(returnFiber, child.sibling);
                // 复用current child, 传入要更新的child的props
                const existing = useFiber(child, element.props);
                existing.type = element.type;
                existing.return = returnFiber;
                if (__DEV__) {
                  existing._debugSource = element._source;
                  existing._debugOwner = element._owner;
                }
                return existing;
              }
            }

          default: {
            // type 相同
            if (
              child.elementType === element.type ||
              (__DEV__
                ? isCompatibleFamilyForHotReloading(child, element)
                : false)
            ) {
              deleteRemainingChildren(returnFiber, child.sibling);
              // 复用current child, 传入要更新的child的props
              const existing = useFiber(child, element.props);
              existing.ref = coerceRef(returnFiber, child, element);
              existing.return = returnFiber;
              if (__DEV__) {
                existing._debugSource = element._source;
                existing._debugOwner = element._owner;
              }
              return existing;
            }
            break;
          }
        }
        // "删除" 不能复用的节点
        deleteRemainingChildren(returnFiber, child);
        break;
      } else {
        // key不相等,“删除” current child (标记child的effectTag为Deletion)
        deleteChild(returnFiber, child);
      }
      child = child.sibling;
    }

    // 最终没有可复用的节点,创建节点
    if (element.type === REACT_FRAGMENT_TYPE) {
      const created = createFiberFromFragment(
        element.props.children,
        returnFiber.mode,
        expirationTime,
        element.key,
      );
      created.return = returnFiber;
      return created;
    } else {
      const created = createFiberFromElement(
        element,
        returnFiber.mode,
        expirationTime,
      );
      created.ref = coerceRef(returnFiber, currentFirstChild, element);
      created.return = returnFiber;
      return created;
    }
}详细注释
 function reconcileChildrenArray(
    // current fiber 父节点
    returnFiber: Fiber,
    // current fiber 的第一个child, 其余child用sibling指针链接 (父节点没有指向非首个子节点的指针)
    currentFirstChild: Fiber | null,
    // 当前要更新的child 数组
    newChildren: Array<*>,
    expirationTime: ExpirationTime,
  ): Fiber | null {
    // 需要返回的结果,当返回时,已经是匹配复用好了的fiber first child,其余child用sibling指针链接
    let resultingFirstChild: Fiber | null = null;
    let previousNewFiber: Fiber | null = null;

    let oldFiber = currentFirstChild;
    // 最后一个可复用节点的index, index指的是current fiber child(oldFiber)对应的index
    let lastPlacedIndex = 0;
    let newIdx = 0;
    let nextOldFiber = null;
    // newChildren第一次循环
    // 处理的是key相同,并且是按顺序的,也就是newChildren 的节点没有改变位置
    // 这一次的循环处理完后,有如下结果
    // 1. newChildren没有遍历完,oldFiber也没有遍历完,待后续处理
    // 2. newChildren 数据已经匹配处理完成, 那就要标记删除oldFiber的节点
    // 3. 没有oldFiber可以复用,那就要新建插入fiber
    for (; oldFiber !== null && newIdx < newChildren.length; newIdx++) {
      if (oldFiber.index > newIdx) {
        nextOldFiber = oldFiber;
        oldFiber = null;
      } else {
        nextOldFiber = oldFiber.sibling;
      }
      // key相等就复用oldFiber
      const newFiber = updateSlot(
        returnFiber,
        oldFiber,
        newChildren[newIdx],
        expirationTime,
      );
      if (newFiber === null) {
        if (oldFiber === null) {
          oldFiber = nextOldFiber;
        }
        break;
      }
      // shouldTrackSideEffects 非首屏渲染为true, 表示需要标记 workInProgress child的effectTag
      if (shouldTrackSideEffects) {
        // newFiber.alternate ===null 匹配完成
        if (oldFiber && newFiber.alternate === null) {
          //标记删除其余的old fiber child
          deleteChild(returnFiber, oldFiber);
        }
      }
      lastPlacedIndex = placeChild(newFiber, lastPlacedIndex, newIdx);
      if (previousNewFiber === null) {
        resultingFirstChild = newFiber;
      } else {
        previousNewFiber.sibling = newFiber;
      }
      // 记录能匹配到的最后一个newFiber child
      previousNewFiber = newFiber;
      // 记录能匹配到的最后一个oldFiber child
      oldFiber = nextOldFiber;
    }

    // newChildren 数据已经匹配处理完成
    if (newIdx === newChildren.length) {
      // 标记删除其余的old fiber child
      deleteRemainingChildren(returnFiber, oldFiber);
      return resultingFirstChild;
    }

    if (oldFiber === null) {
      // 没有oldFiber可以复用,新建插入fiber
      for (; newIdx < newChildren.length; newIdx++) {
        const newFiber = createChild(
          returnFiber,
          newChildren[newIdx],
          expirationTime,
        );
        if (newFiber === null) {
          continue;
        }
        lastPlacedIndex = placeChild(newFiber, lastPlacedIndex, newIdx);
        if (previousNewFiber === null) {
          // TODO: Move out of the loop. This only happens for the first run.
          resultingFirstChild = newFiber;
        } else {
          // 用sibling串联newFiber
          previousNewFiber.sibling = newFiber;
        }
        previousNewFiber = newFiber;
      }
      return resultingFirstChild;
    }

    // Add all children to a key map for quick lookups.
    // 处理oldFiber, 转换为一个map, key为oldFiber节点的key, value为oldFiber child
    const existingChildren = mapRemainingChildren(returnFiber, oldFiber);

    // newChildren第二次循环开始
    // 处理的是newChildren的节点位置换了
    // 这里的逻辑有点绕,需要举🌰
    for (; newIdx < newChildren.length; newIdx++) {
      const newFiber = updateFromMap(
        existingChildren,
        returnFiber,
        newIdx,
        newChildren[newIdx],
        expirationTime,
      );
      if (newFiber !== null) {
        if (shouldTrackSideEffects) {
          if (newFiber.alternate !== null) {
            // The new fiber is a work in progress, but if there exists a
            // current, that means that we reused the fiber. We need to delete
            // it from the child list so that we don't add it to the deletion
            // list.
            existingChildren.delete(
              newFiber.key === null ? newIdx : newFiber.key,
            );
          }
        }
        lastPlacedIndex = placeChild(newFiber, lastPlacedIndex, newIdx);
        if (previousNewFiber === null) {
          resultingFirstChild = newFiber;
        } else {
          previousNewFiber.sibling = newFiber;
        }
        previousNewFiber = newFiber;
      }
    }

    if (shouldTrackSideEffects) {
      // Any existing children that weren't consumed above were deleted. We need
      // to add them to the deletion list.
      existingChildren.forEach((child) => deleteChild(returnFiber, child));
    }

    return resultingFirstChild;
}第二次循环的例子(🌰来源)
// 之前
abcd

// 之后
acdb

===第一轮遍历开始===
a(之后)vs a(之前)
key不变,可复用
此时 a 对应的oldFiber(之前的a)在之前的数组(abcd)中索引为0
所以 lastPlacedIndex = 0;

继续第一轮遍历...

c(之后)vs b(之前)
key改变,不能复用,跳出第一轮遍历
此时 lastPlacedIndex === 0;
===第一轮遍历结束===

===第二轮遍历开始===
newChildren === cdb,没用完,不需要执行删除旧节点
oldFiber === bcd,没用完,不需要执行插入新节点

将剩余oldFiber(bcd)保存为map

// 当前oldFiber:bcd
// 当前newChildren:cdb

继续遍历剩余newChildren

key === c 在 oldFiber中存在
const oldIndex = c(之前).index;
即 oldIndex 代表当前可复用节点(c)在上一次更新时的位置索引
此时 oldIndex === 2;  // 之前节点为 abcd,所以c.index === 2
比较 oldIndex 与 lastPlacedIndex;

如果 oldIndex >= lastPlacedIndex 代表该可复用节点不需要移动
并将 lastPlacedIndex = oldIndex;
如果 oldIndex < lastplacedIndex 该可复用节点之前插入的位置索引小于这次更新需要插入的位置索引,代表该节点需要向右移动

在例子中,oldIndex 2 > lastPlacedIndex 0,
则 lastPlacedIndex = 2;
c节点位置不变

继续遍历剩余newChildren

// 当前oldFiber:bd
// 当前newChildren:db

key === d 在 oldFiber中存在
const oldIndex = d(之前).index;
oldIndex 3 > lastPlacedIndex 2 // 之前节点为 abcd,所以d.index === 3
则 lastPlacedIndex = 3;
d节点位置不变

继续遍历剩余newChildren

// 当前oldFiber:b
// 当前newChildren:b

key === b 在 oldFiber中存在
const oldIndex = b(之前).index;
oldIndex 1 < lastPlacedIndex 3 // 之前节点为 abcd,所以b.index === 1
则 b节点需要向右移动
===第二轮遍历结束===

最终acd 3个节点都没有移动,b节点被标记为移动整理一下webpack几个基础概念
总结一下CSS中的定位和层叠上下文
fixed固定定位
固定定位让元素相对视口定位,此时视口被称作元素的包含块(containing block)。
absolute绝对定位
绝对定位不是相对视口,而是相对最近 的祖先定位元素。如果祖先元素都没有定位, 那么绝对定位的元素会基于初始包含块(initial containing block)来定位。 初始包含块跟视口一样大,固定在网页的顶部。
relative相对定位
相对定位的元素以及它周围的所有元素,都还保持着原来的位置。
sticky定位
它是相对定位和固定定位的结合体:正常情况下,元素会随着页面滚动,当到达屏幕的特定位置时,如果用户继续滚动,它就会 “锁定”在这个位置。
一个层叠上下文包含一个元素或者由浏览器一起绘制的一组元素。其中一个元素会作为层叠 上下文的根,比如给一个定位元素加上 z-index 的时候,它就变成了一个新的层叠上下文的根。 所有后代元素就是这个层叠上下文的一部分。
由下到上:
1. 层叠上下文的根元素
2. z-index为负值的已定位元素(包括它们的子元素 )
3. 未定位元素
     1. block块级元素
     2. float浮动元素
     3. inline/inline-block元素
4. z-index为auto/0的已定位元素(包括它们的子元素)
5. z-index为正值的已定位元素(包括它们的子元素)
之前对tree shaking的认识仅仅停留在无用代码剔除上。今天来深究总结一下。
Tree shaking is a term commonly used in the JavaScript context for dead-code elimination
Tree shaking是一个用在js中删除无用代码的术语。
在webpack 2版本中webpack内置支持了ES2015 modules,并且也支持了无用模块的导出检测。webpack 4版本在此功能上进行了扩展,并通过在package.json 中添加“ sideEffects” 属性向编译器提供提示,以标示项目中的哪些文件是“纯”的,从而可以安全的移除。
所以tree shaking背后依据的原理肯定和es module息息相关— 依赖的是ES6模块的静态分析能力,体现在:
下面的例子都是用最新版的webpack
// test.js:
export const one = function (value) {
  console.log("this is one");
  return value
};
export const two = function (value) {
  console.log("this is two");
  return value;
};

// index.js
import { one, two } from "./test";
console.log(two("test"));
在生产环境下打包(下同),发现函数one没有被打包进去:

// test-one.js
window.testOne = () => {
  console.log("this is window test one")
}

export const anotherTest = () => {
  console.log("another test")
}

// test.js
import { anotherTest } from "./test-one.js";

export const one = function (value) {
  console.log("this is one");
  return value;
};
export const two = function (value) {
  console.log("this is two");
  return value;
};

// index.js
import { one, two } from "./test";
console.log(two("test"))
打包后:

可以看到test-one.js 中的anotherTest虽然已经exported,因为没有被使用,所以被tree shaking了。但是,test-one.js中的window.testOne代码却被打包了。如果我想要的效果是:test-one.js export 的内容没有用到就不需要打包该怎么办呢?下面来介绍一下package.json中可以添加的一个属性sideEffects。
sideEffects 顾名思义是side effects,也就是副作用(函数式编程中的一个名词)。在webpack4中,通过在package.json 中添加"sideEffects": false , 可以向webpack指明整个项目是没用副作用的,可以安全的 tree-shaking 。sideEffects 也可以接受一个数组,数组的每一项是文件路径,用于保留这些文件的副作用:
"sideEffects":["./src/global.config.js"]在package.json中配置"sideEffects": false 后,我们再来打包看一下结果:

我们可以看到window.testOne确实没有被打包了
有时候在项目中我们确实想“引入一些有副作用的文件”,比如我们想在window对象上定义一些js函数,供native端调用 (js bridge):
 // global.js
window.NativeBridge = {
  share: () => {
    console.log("this is native share")
  }
}
此时我们在index.js中调用global.js
import { one, two } from "./test";
import "./global.js"

console.log(two("test"));打包后发现global.js根本没有被打包进文件。导致这种错误的原因是:我们是通过import "./global.js" 引入文件的,webpack 会把所有import "xxx" 看做是引入了文件,但是没有使用的。 如果此时在package.json中配置"sideEffects": false ”, 那么就global.js会被 tree-shaking 。
解决中类似import "xxx" 的方法是在`"sideEffects”中表明有副作用的文件:
"sideEffects":["./src/global.js"]直接上代码:
  // test.js
import { isDate } from "lodash-es"

export const one = function (value) {
  console.log("this is one");
  return isDate(value);
};

export const two = function (value) {
  console.log("this is two");
  return value;
};

// index.js
import { one, two } from "./test";
import "./global.js"

console.log(two("test"));
打包后:

可以看到虽然函数one没有没使用,但是lodash-es的部分代码还是被打包了。
解决方法:
export const one = function (value, isDate ) {
  console.log("this is one");
  return isDate(value);
};为了确保babel不会将代码编译为commonjs,配置 Babel preset @babel/preset-env 的modules属性为false
想要在webpack 中更好的使用tree shaking,那么
Redux的核心本质就是一个发布订阅模式。

Redux的三个基本原则:
function createStore(reducer, preloadedState, enhancer) {
  // 删除了一些参数矫正的代码

  if (typeof enhancer !== 'undefined') {
    if (typeof enhancer !== 'function') {
      throw new Error('Expected the enhancer to be a function.')
    }
    // store enhancer的使用,也就是使用传入的中间件
    // enhancer就是后续会提到的applyMiddleware函数
    return enhancer(createStore)(reducer, preloadedState)
  }


  let currentReducer = reducer
  let currentState = preloadedState
  let currentListeners = []
  let nextListeners = currentListeners
  let isDispatching = false

  // 这个方法用于保持nextListeners和currentListeners的同步
  // nextListeners 是从currentListeners浅拷贝来的。
  // 订阅的时候是操作nextListeners, 防止在dispatch的时候执行subscribe/unsubscribe带来的bug
  // 在dispatch 的时候会同步 currentListeners 和 nextListeners (currentListeners = nextListeners)
  function ensureCanMutateNextListeners() {
    if (nextListeners === currentListeners) {
      nextListeners = currentListeners.slice()
    }
  }

  // 获取当前currentState
  function getState() {
    if (isDispatching) {
      throw new Error(
        'You may not call store.getState() while the reducer is executing. ' +
          'The reducer has already received the state as an argument. ' +
          'Pass it down from the top reducer instead of reading it from the store.'
      )
    }

    return currentState
  }

  // 订阅一个listener,是操作在nextListeners上的
  // 返回的是一个函数,用于删除这个订阅的listener,也是在nextListeners上操作的
  // 删除订阅不会在当前的dispatch中生效,而是会在下一次dispatch的时候生效
  function subscribe(listener) {
    if (typeof listener !== 'function') {
      throw new Error('Expected the listener to be a function.')
    }

    if (isDispatching) {
      throw new Error(
        'You may not call store.subscribe() while the reducer is executing. ' +
          'If you would like to be notified after the store has been updated, subscribe from a ' +
          'component and invoke store.getState() in the callback to access the latest state. ' +
          'See https://redux.js.org/api-reference/store#subscribelistener for more details.'
      )
    }

    let isSubscribed = true

    ensureCanMutateNextListeners()
    nextListeners.push(listener)

    return function unsubscribe() {
      if (!isSubscribed) {
        return
      }

      if (isDispatching) {
        throw new Error(
          'You may not unsubscribe from a store listener while the reducer is executing. ' +
            'See https://redux.js.org/api-reference/store#subscribelistener for more details.'
        )
      }

      isSubscribed = false

      ensureCanMutateNextListeners()
      const index = nextListeners.indexOf(listener)
      nextListeners.splice(index, 1)
      currentListeners = null
    }
  }


   // 触发action
   // 1. 执行reducer,更新state
   // 2. 执行订阅的listener
   // 返回的是传入的action, 用于调试记录
  function dispatch(action) {
    if (!isPlainObject(action)) {
      throw new Error(
        'Actions must be plain objects. ' +
          'Use custom middleware for async actions.'
      )
    }

    if (typeof action.type === 'undefined') {
      throw new Error(
        'Actions may not have an undefined "type" property. ' +
          'Have you misspelled a constant?'
      )
    }

    if (isDispatching) {
      throw new Error('Reducers may not dispatch actions.')
    }

    try {
      isDispatching = true
      currentState = currentReducer(currentState, action)
    } finally {
      isDispatching = false
    }

    const listeners = (currentListeners = nextListeners)
    for (let i = 0; i < listeners.length; i++) {
      const listener = listeners[i]
      listener()
    }

    return action
  }

  // 替换当前的reducer
  function replaceReducer(nextReducer) {
    if (typeof nextReducer !== 'function') {
      throw new Error('Expected the nextReducer to be a function.')
    }

    currentReducer = nextReducer
    // 触发一个内部的REPLACE action
    dispatch({ type: ActionTypes.REPLACE })
  }

  // 用于 observable/reactive libraries
  function observable() {
    const outerSubscribe = subscribe
    return {
      subscribe(observer) {
        if (typeof observer !== 'object' || observer === null) {
          throw new TypeError('Expected the observer to be an object.')
        }

        function observeState() {
          if (observer.next) {
            observer.next(getState())
          }
        }

        observeState()
        const unsubscribe = outerSubscribe(observeState)
        return { unsubscribe }
      },

      [$$observable]() {
        return this
      }
    }
  }

  // 触发一个INIT action,用于创建初始state树
  dispatch({ type: ActionTypes.INIT })

  return {
    dispatch,
    subscribe,
    getState,
    replaceReducer,
    [$$observable]: observable
  }
}function applyMiddleware(...middlewares) {
// 返回的函数就是在createStore中调用的那个enhancer
return (createStore) => (...args) => {
// 创建store, 可以获取dispatch和getState
const store = createStore(...args)
let dispatch = () => {
throw new Error(
'Dispatching while constructing your middleware is not allowed. ' +
'Other middleware would not be applied to this dispatch.'
)
}
// 封装传入中间件的api
const middlewareAPI = {
getState: store.getState,
dispatch: (...args) => dispatch(...args),
}
// 给中间件们绑定能dispatch和getState的api
const chain = middlewares.map((middleware) => middleware(middlewareAPI))
// 从这里就可以看出middleware就是来加强dispatch的,在dispatch了一个action后搞点事情
// compose的本质就是用于串联执行中间件
// 这个dispatch也重写个middlewareAPI调用的dispatch
dispatch = compose(...chain)(store.dispatch)
return {
...store,
dispatch,
}
}
}dispatch = compose(...chain)(store.dispatch)compose的本质,组合多个函数, 用于串联执行中间件
const compose =(...middlewares) => middlewares.reduce((f1, f2) => (...args) => f1(f2(...args)))先看看标准的middleware
({ dispatch, getState }) => (next) => (action) => {
   // 搞点事情
   const state =  next(action)
   // 搞点事情
   return state
}去掉getState和dispatch的实现dispatch = compose(...chain)(store.dispatch)中的chain可以理解为:
const middlewares = [
  (next) => (action) => {
    console.log('middleware 1')
    next(action)
    console.log('middleware 1 after')
  },
  (next) => (action) => {
    console.log('middleware 2')
    next(action)
    console.log('middleware 2 after')
  },
  (next) => (action) => {
    console.log('middleware 3')
    next(action)
    console.log('middleware 3 after')
  },
]
调用上面的chain
const compose = middlewares.reduce((f1, f2) => (...args) => f1(f2(...args)))
// compose好后传入middleware 1 的next就是middleware 2, 传入middleware 2 的next就是middleware3
// 而middleware 3 的next就是调用compose后的传入的原始dispatch
const dispatch = compose((action) => {
  console.log('origin dispatch', action)
})
// 最终执行绑定好后的dispatch,就相当于最终执行每个middleware,每个middleware会传递action参数给原始的dispatch
// redux-thunk 的核心原理就是:检测到传入的action如果是函数类型,就执行这个函数
dispatch({ a: 3 })
// log 如下
middleware 1
middleware 2
middleware 3
origin dispatch {a: 3}
middleware 3 after
middleware 2 after
middleware 1 after
applyMiddleware的本质就是把中间件函数参数先一个一个的绑定好,来增强store 的dispatch的执行
combineReducers(reducers) {
  const reducerKeys = Object.keys(reducers)
  const finalReducers = {}
  // 收集所有传入的 reducer 函数
  for (let i = 0; i < reducerKeys.length; i++) {
    const key = reducerKeys[i]
    if (typeof reducers[key] === 'function') {
      finalReducers[key] = reducers[key]
    }
  }
  const finalReducerKeys = Object.keys(finalReducers)

  // 在 dispatch 时会执行 combination 函数,
  // 遍历执行所有 reducer 函数。如果某个 reducer 函数返回了新的 state,就标记hasChanged为true,
  // 所有的 reducer 函数都会被执行一遍
  // hasChanged ? 返回新的state : 返回原来的state

  return function combination(state = {}, action) {

    let hasChanged = false
    const nextState = {}
    for (let i = 0; i < finalReducerKeys.length; i++) {
      const key = finalReducerKeys[i]
      const reducer = finalReducers[key]
      const previousStateForKey = state[key]
      const nextStateForKey = reducer(previousStateForKey, action)
      if (typeof nextStateForKey === 'undefined') {
        const errorMessage = getUndefinedStateErrorMessage(key, action)
        throw new Error(errorMessage)
      }
      nextState[key] = nextStateForKey
      hasChanged = hasChanged || nextStateForKey !== previousStateForKey
    }
    hasChanged =
      hasChanged || finalReducerKeys.length !== Object.keys(state).length
    return hasChanged ? nextState : state
  }
}A declarative, efficient, and flexible JavaScript library for building user interfaces.
🖖 Vue.js is a progressive, incrementally-adoptable JavaScript framework for building UI on the web.
TypeScript is a superset of JavaScript that compiles to clean JavaScript output.
An Open Source Machine Learning Framework for Everyone
The Web framework for perfectionists with deadlines.
A PHP framework for web artisans
Bring data to life with SVG, Canvas and HTML. 📊📈🎉
JavaScript (JS) is a lightweight interpreted programming language with first-class functions.
Some thing interesting about web. New door for the world.
A server is a program made to process requests and deliver data to clients.
Machine learning is a way of modeling and interpreting data that allows a piece of software to respond intelligently.
Some thing interesting about visualization, use data art
Some thing interesting about game, make everyone happy.
We are working to build community through open source technology. NB: members must have two-factor auth.
Open source projects and samples from Microsoft.
Google ❤️ Open Source for everyone.
Alibaba Open Source for everyone
Data-Driven Documents codes.
China tencent open source team.