Extension for 3D Slicer that allows the application to be used from Jupyter notebook
Demo video: https://youtu.be/oZ3_cRXX2QM
You can use this option for a quick start. No installation or setup is needed, just click the link below and start using Slicer via Jupyter notebook in your web browser.
When you click on the link, Binder launches 3D Slicer with SlicerJupyter extension on their cloud servers. Binder is a free service and server resources are quite limited. Also, there is no interactive access to the graphical user interface. Therefore, this option is only recommended for testing, demos, or simple computations or visualizations.
- Install 3D Slicer and launch it
- Install
SlicerJupyterextension in Extension Manager (in the application menu choose View/Extension Manager, click Install button of SlicerJupyter, wait for the installation to complete, and clickRestart) - Switch to
JupyterKernelmodule (open the module finder by click the "Search" icon on the toolbar, or hitting Ctrl/Cmd-F, then type its name) - Click
Start Jupyter serverbutton
Installation (in addition to the steps above):
- Install node.js. Make sure it is in a location that is included in the path (or copy node.js files into the same folder as SlicerApp-real executable)
- Run these commands in the Python console:
pip_install('jupyterlab')
slicer.util._executePythonModule('jupyter',['labextension','install','@jupyter-widgets/jupyterlab-manager','ipycanvas','ipyevents'])
Launch JupyterLab:
slicer.util._executePythonModule('jupyter',['lab'])
Slicer's Python kernel can be used in Jupyter servers in external Python environments. Kernel specification installation command is displayed in Jupyter server in external Python environment section in JupyterKernel module.
- Create a new notebook, selecting Slicer 4.x kernel (for example, Slicer 4.11). Jupyter will open a new Slicer instance automatically when kernel start is requested. This Slicer instance will be automatically closed when kernel shutdown is requested.

- While the kernel is starting, "Kernel starting, please wait.." message is displayed. After maximum few ten seconds Slicer kernel should start.
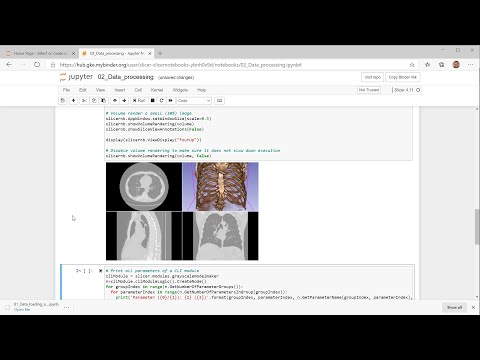
- Do a quick test - show views content in the notebook:
import JupyterNotebooksLib as slicernb
slicernb.ViewDisplay()
- Try the interactive view widget:
slicernb.ViewInteractiveWidget()
- Hit
Tabkey for auto-complete - Hit
Shift+Tabfor showing documentation for a method (hit multiple times to show more details). Note: method name must be complete (you can useTabkey to complete the name) and the cursor must be inside the name or right after it (not in the parentheses). For example, typeslicer.util.getNodeand hitShift+Tab.


You can get started by looking at example Slicer notebooks here.
-
Build the extension against the newly built Slicer with Qt5 and VTK9 enabled.
-
Install Jupyter
mkvirtualenv -p python3.6 jupyter_env  # Create and activare virtual environment

pip install jupyter
- Install kernel
jupyter-kernelspec install /tmp/SlicerJupyter-build/inner-build/share/Slicer-4.11/qt-loadable-modules/JupyterKernel/Slicer-4.9/ --replace --user
- Start notebook
workon jupyter_env
python -m jupyter notebook
Type this into Slicer's Python console to manually start a kernel that a notebook can connect to:
connection_file=r'C:\Users\andra\AppData\Roaming\jupyter\runtime\kernel-3100f53f-3433-40f9-8978-c72ed8f88515.json'
print('Jupyter connection file: ['+connection_file+']')
slicer.modules.jupyterkernel.startKernel(connection_file)
Path of connection_file is printed on jupyter notebook's terminal window.
These commands must be the last commands in a cell.
__kernel_debug_enable(): enable detailed logging of all incoming Jupyter requests__kernel_debug_disable(): enable detailed logging of all incoming Jupyter requests


