FMBerry is a piece of software that allows you to transmit FM radio with your Raspberry Pi.
It uses the Sony-Ericsson MMR-70 transmitter, which was originally intended for use with Sonys Walkman cellphones from early 2000s.
- MMR-70 transmitter
- Raspberry Pi (compatible & tested with every Pi, Model Beta, A, B, B+, 2, Zero, 3)
- Soldering equipment (soldering iron and some solder)
- Cable for connecting to your Raspberry Pis GPIO port (old IDE cable does work fine!)
The hardware is explained here: HARDWARE.md
This software was developed under Raspbian Wheezy 2013-02-09.
Arch Linux users: AUR - fmberry-rpi-git
Open raspi-blacklist.conf:
sudo nano /etc/modprobe.d/raspi-blacklist.conf
Comment out the Line "blacklist i2c-bcm2708" with a #.
Save with Ctrl+O and close nano with Ctrl+X
To make sure I²C Support is loaded at boottime open /etc/modules.
sudo nano /etc/modules
Add the following lines:
i2c-dev
Then again, Save with Ctrl+O and then close nano with Ctrl+X.
Please reboot your Raspberry after this step.
First update your local package repository with
sudo apt-get update
then install all needed software with the following command:
sudo apt-get install i2c-tools build-essential git libconfuse-dev
Run
cat /proc/cpuinfo | grep "CPU revision"
in your terminal.
All Raspberry Pi's with a revision newer than rev. 2 have their i2c port connected up to /dev/i2c-1.
Older devices (beta, alpha, early 256MB Model B's) have it connected up to /dev/i2c-0.
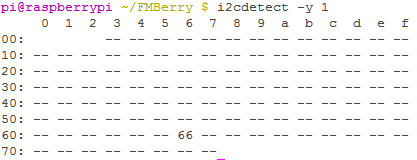
You can check your wiring with the following command:
i2cdetect -y 1
Please remember that you need to run the command on another port on older revisions!
i2cdetect -y 0
You should then see your transmitter at 0x66.
If you are not able to see your transmitter please double check your wiring!
If you connect you MMR-70 to I²C bus 0 on Raspberry Pi rev2 make sure that header P5 pins are configured as I²C pins!
To build the software execute the following commands (in your homefolder):
git clone https://github.com/Manawyrm/FMBerry/
cd FMBerry
If you have got an old revision board, please open fmberryd.c and change the RPI_REVISION definition to RPI_REV1!
make
Compiling the software will take a couple of seconds.
FMBerry is essentially a daemon called fmberryd.
To install it into your system path type
sudo make install.
You can start it by typing sudo /etc/init.d/fmberry start.
To control the daemon you have to use ctlfmberry.
It currently allows the following commands:
ctlfmberry set freq 99000- Frequency in kHz (76000 - 108000)ctlfmberry poweronctlfmberry poweroffctlfmberry set rdsid DEADBEEF(8 chars! Longer strings will be truncated, shorter - padded with spaces)ctlfmberry set rdstext Mike Oldfield - Pictures in the Dark(max. 64 chars. Longer strings will be truncated)ctlfmberry set txpwr 0- 0.5 mW Outputpowerctlfmberry set txpwr 1- 0.8 mW Outputpowerctlfmberry set txpwr 2- 1.0 mW Outputpowerctlfmberry set txpwr 3- 2.0 mW Outputpower (Default.)ctlfmberry stereo on- Enables stereo signal (Default)ctlfmberry stereo off- Disables stereo signalctlfmberry muteon- Mute audioctlfmberry muteoff- Unmute audioctlfmberry gainlow- Audio gain -9dBctlfmberry gainoff- Audio gain 0dB"ctlfmberry set volume 0-6Audio volume level 0 to 6, equal -9dB to +9db, 3dB stepctlfmberry status- Print current statusctlfmberry stop- Stop FMBerry daemon
That's it! :)
FMBerry writes debugging output to /var/log/syslog.
You can watch the information by running ctlfmberry log. It's essentially just a cat /var/log/syslog | grep fmberryd
It will tell you what's wrong.
Please check for new dependencies. You can safely just run the apt-get install command again. It will only install new dependencies if necessary.
First stop the daemon by typing /etc/init.d/fmberry stop.
Then run git pull followed by a make and a sudo make install.
You can then start FMBerry again with /etc/init.d/fmberry start.
- The Daemon itself is essentially a simple TCP server. It is listening to Port 42516. (set in fmberry.conf) You can control it by sending the exact same commands you would give to ctlfmberry.
- For information on How to control the Daemon have a look into ctlfmberry. It's a simple shell script.
https://github.com/Manawyrm/FMBerryRDSMPD (streaming of MPD title data via RDS) https://github.com/akkinitsch/FMBerryRemote (streaming of internet radio streams, controllable via Webinterface) http://achilikin.blogspot.de/2013/06/sony-ericsson-mmr-70-transmitter-led.html (enabling the LED on the transmitter to be software controllable)
The daemon does not show anything.
That's normal. You have to use ./ctlfmberry to control the daemon.
I can't seem to hear music.
Turn up the volume/unmute your raspi with alsamixer.
I am getting compile errors.
Did you install all dependencies? (All lines with apt-get)
The transmission dies after a couple of minutes.
You didn't disable the internal processor of the MMR70. Do this by connecting TP18 to GND.
The power supply of the raspberry pi shorts out/there are no lights anymore_
There is a short circuit. Probably caused by a wiring fault or by using an 80pin IDE cable for connecting the FMBerry.
Alternative linux distributions don't detect the I2C bus (ArchLinux, OpenWRT, OSMC)
Linux 3.18 introduced a new feature called Device Tree support. To get the I²C Bus working, you need to put this configuration at the end of /boot/config.txt (change the first parameter according to the RPi you have):
device_tree=bcm2708-rpi-b-plus.dtb
device_tree_param=i2c1=on
device_tree_param=spi=on
Thanks to Daniel for the solution to that problem!


