In this lesson, you'll learn how to tweak a messy repository so it aligns with industry expectations.
You will be able to:
- list the steps taken to clean the messy repository example
- reproduce those steps locally on your own machine
- Use GitHub to change the name of the directory to something meaningful
- Use the terminal to:
- Create a
gitignorefile - Remove unnecessary files
- Move image files into a new
imagesfolder - Rename individual files to have more descriptive names
- Create a
To follow along with these steps and replicate locally, first fork this repository and clone to your local machine.
A repository name should be informative about its contents. Which repository name tells more to potential employers?
- Project Repository
- House Price Prediction
The latter is much more descriptive!
There are two ways to change the name of a GitHub repository. It can be done through the terminal or through GitHub on the repository website.
This example shows using the repository on GitHub:
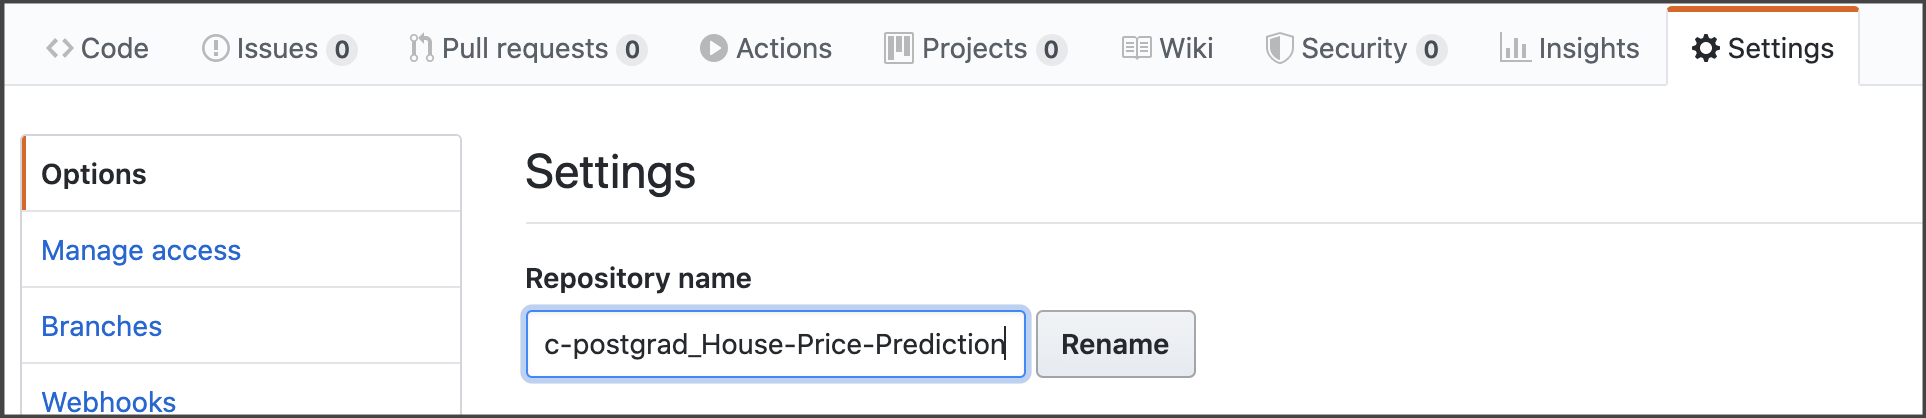
- go to the Settings tab of the GitHub repository for your project
- change the name to something more descriptive and click
Rename
Note! This will change the URL for your repository. You will need to update the URL everywhere it's located - for example, do you link the repository for this project directly in your resume?
This also affects the local repository you have, where you will be making further changes. While Git and GitHub are smart enough to know when a repository has moved, you may get an warning when you try to push to the old URL that says you should use the new location.
You can check the remote repository URL in your terminal by navigating to the repository locally, then running
git remote -v
You can update the remote repository URL in your terminal by then running
Syntax:
git remote set-url origin <new repo url>
The gitignore file tells Git which files to "ignore" and not track. Each line in a gitignore list the string pattern in your directories that Git should not track. Many hidden system files, caches, and output directories do not need to be tracked for a project or could cause problems on another person's system if they were to clone and pull your system files to their computer.
GitHub provides many sample gitignore templates based on the languages or tools of your project. GitHub's Python gitignore template is the best choice for most Flatiron School data science projects. If a specific file or directory type is not listed in a gitignore template it is not a problem - for example, if you are using a Mac, you may want to add the .DS_Store hidden file (which tracks folder attributes for your local directory) to your gitignore. gitignore files can be updated through any text editor or edited on GitHub. The steps below walk through creating a gitignore file from scratch, using the Python gitignore template, and adding specifications to the file.
Create gitignore file
- Navigate to your local project repository in the terminal
touch .gitignore- This command creates a new file called .gitignore
Copy template
- Copy content from GitHub's Python gitignore template
Add content to gitignore
-
open .gitignore- This command should open the
gitignorefile for editing using some default text editor - feel free to use whichever text editor you prefer (VSCode, vim, etc.)
- This command should open the
-
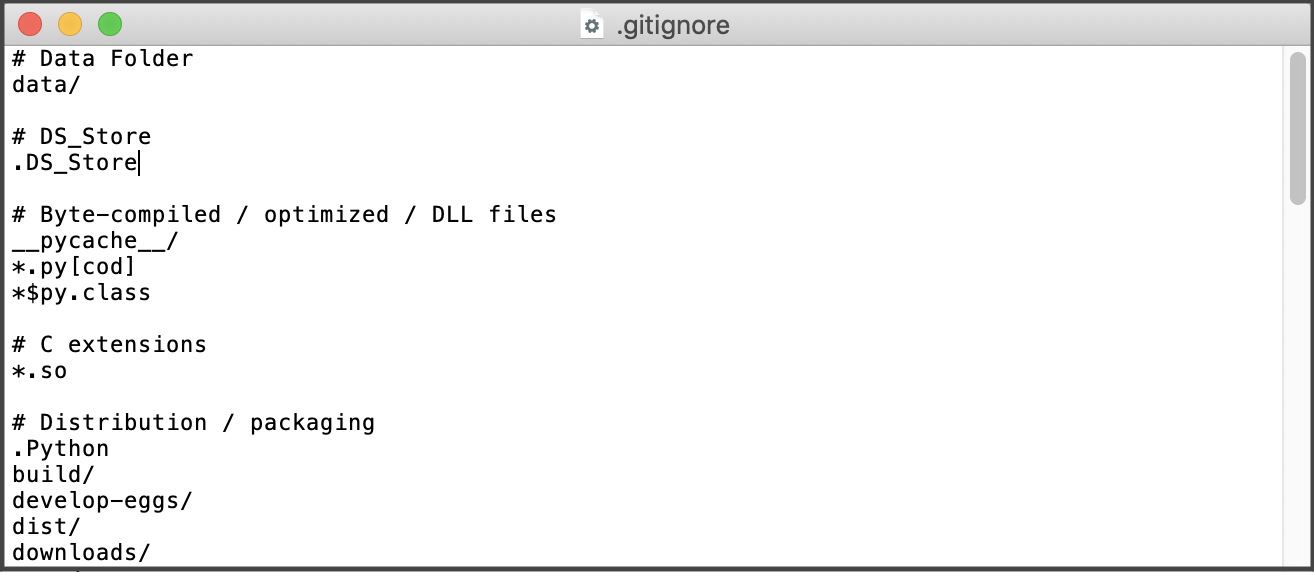
Paste content into the
gitignorefile
Tell Git to ignore more files/directories
- Adding more lines, without comment hashes ('#'), will have Git ignore those files/directories
- Examples of more files/directories you may want Git to ignore include:
.DS_Store(for Mac users)- Data folder (so you don't accidentally commit data that is too large for GitHub)
.pyfiles containing API keys
Example:
Once you've added a gitignore to your repository, you can add/commit/push your changes to see how this affects both your local and remote repositories.
While tracking the steps you take to transform and clean data before modeling is important, GitHub is not the place to store those datasets. GitHub has a firm limit on file size and it takes extra work to remove large files from a repository if you commit them by mistake. It is best to store your data locally, and add your data folder (or specific data file types) to your .gitignore file.
For this exercise, you can remove the data file and other unnecessary files from the example repository using git rm. git rm will remove a file both from the local directory and from your repository when you push. If you only use a del or rm locally without using git rm, the file will still be stored remotely and be downloaded again with future pull commands.
Please make sure you have local copies of all datasets before removing them!
Syntax:
git rm <filename>
Example:
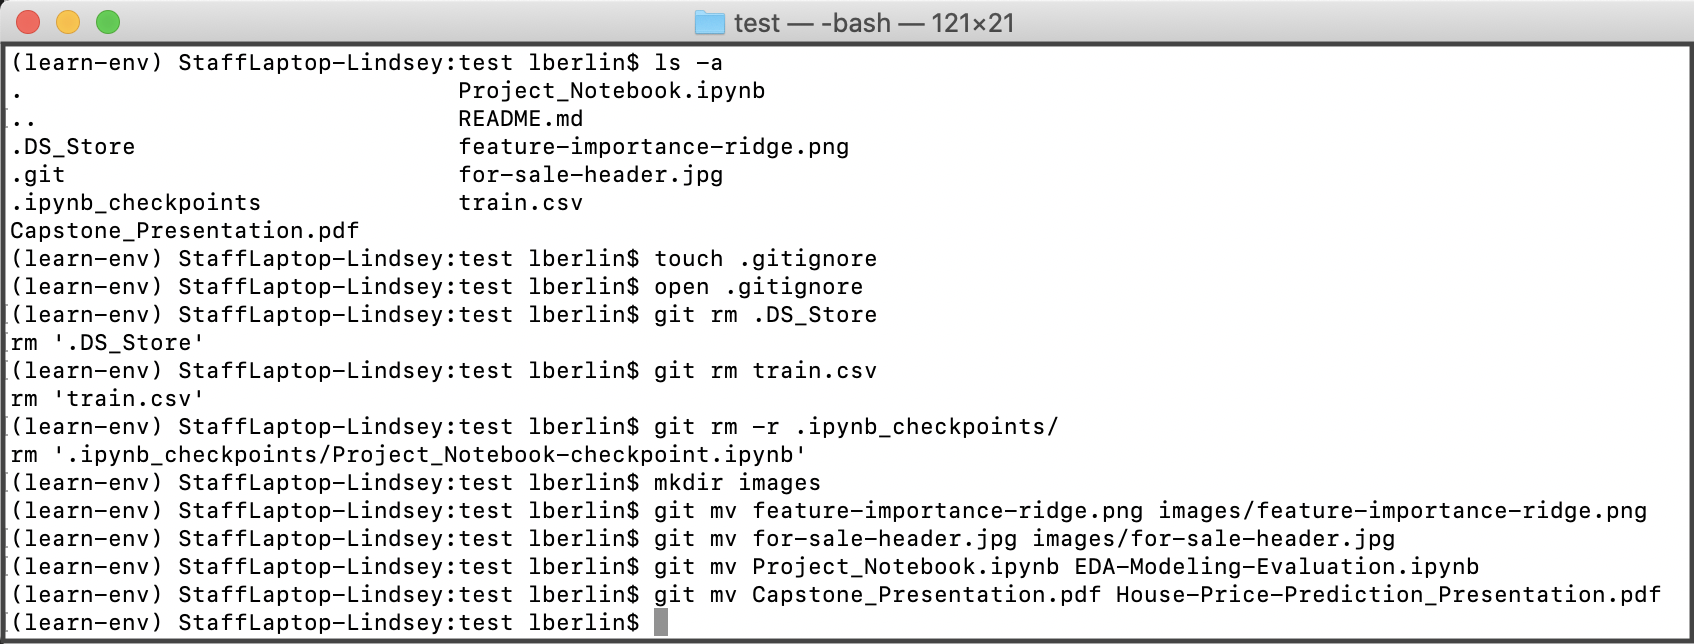
git rm .DS_Store
For the purposes of the example messy repository, please remove the data file, train.csv, the .DS_Store file, and the .ipynb_checkpoints folder. If you get an error regarding removing the .ipynb_checkpoints folder, read it carefully - adding -r to the git rm command (so: git rm -r .ipynb_checkpoints) will remove the directory properly.
Note! It is easier to avoid accidental commits than it is to remove something from an accidental commit. Check out GitHub's guidelines here, and especially remember to stage and commit files individually instead of using catch-all commands!
The top level of the repository directory needs to uncluttered and direct employers to what they need to see. All files are on the same level in the messy repository example. The image files, while important to our notebook, are merely clutter to a future employer.
Create image folder
Creating subdirectories to store non-priority files will solve this problem. Use mkdir to create a new folder within your directory.
Note: the folder will not show up in the remote repository until files are in the folder.
Syntax:
mkdir <foldername>
Example:
mkdir images
Move image files
git mv is another command, like git rm, that both physically makes a change within a directory and updates the index within the Git file in one step.
Note: when you move images or other files referenced elsewhere in your repository, for example images that are shown in your README, you will need to change the image path to reflect the new location! Also, you need to include the filetypes as they are considered part of the file name.
Syntax:
git mv <oldlocation/filename> <newlocation/filename>
Example:
git mv for-sale-header.jpg images/for-sale-header.jpg
All file names should be informative. git mv can also be used to rename files! Essentially, you're telling Git to move the file from its old name to its new name.
Note! You still need to include the filetypes as they are considered part of the file name.
Syntax:
git mv <oldfilename> <newfilename>
Example:
git mv Project_Notebook.ipynb EDA-Modeling-Evaluation.ipynb
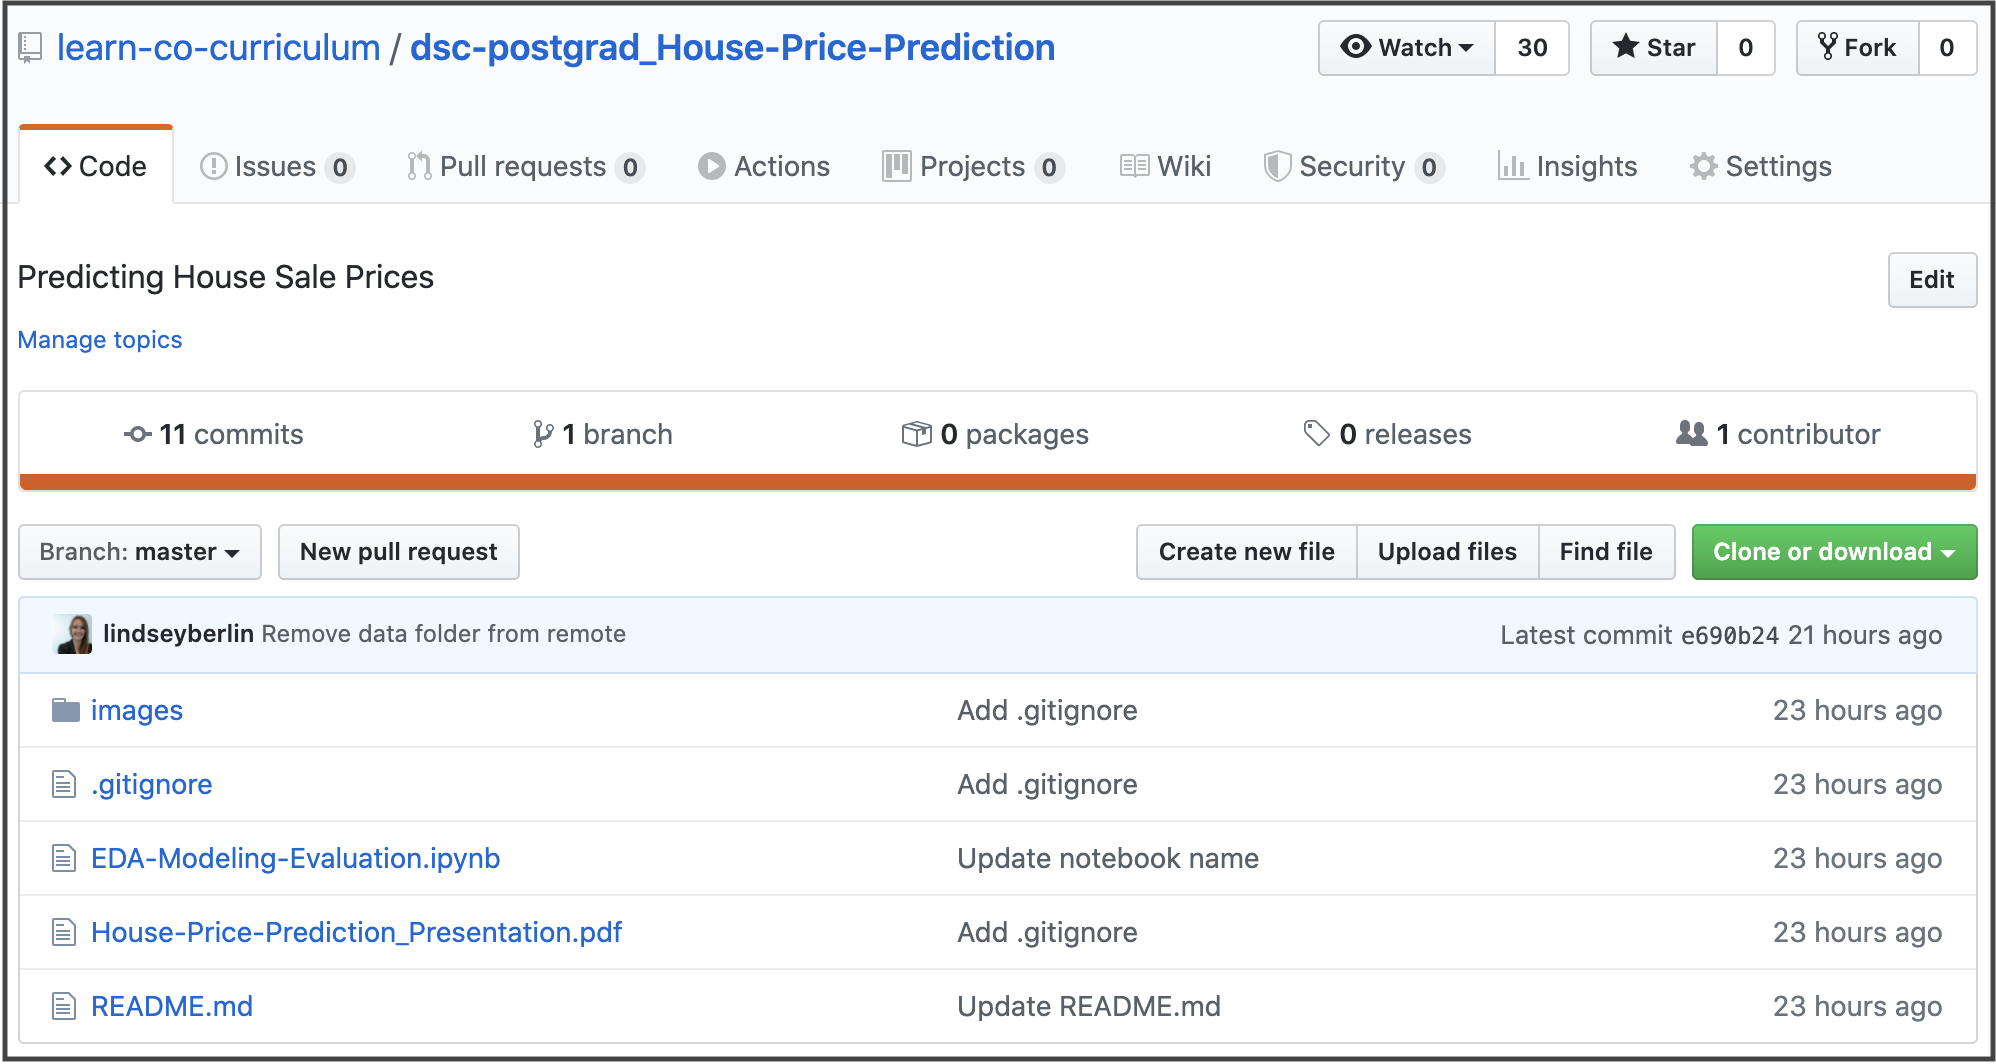
In the end, your repository should look like this:
To recap, we used the following terminal commands for these changes: