Code Monkey home page Code Monkey logo

stylerf's Introduction

[CVPR 2023] StyleRF: Zero-shot 3D Style Transfer of Neural Radiance Fields

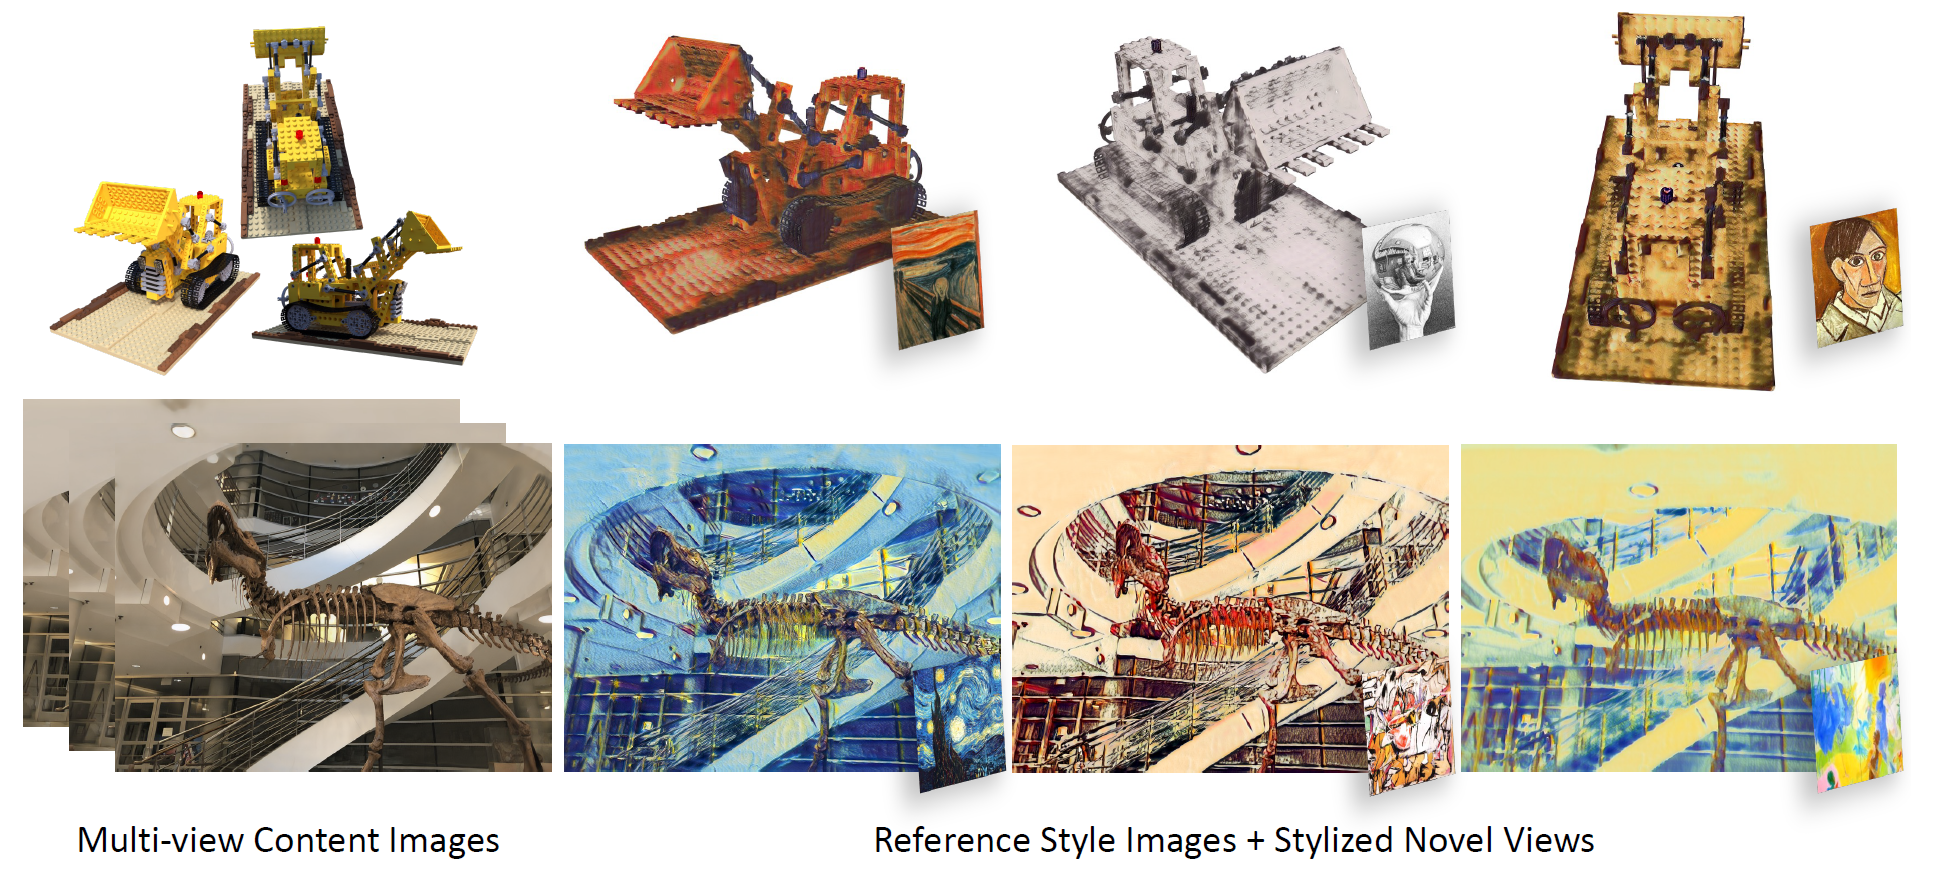
This repository contains a pytorch implementation for the paper: StyleRF: Zero-shot 3D Style Transfer of Neural Radiance Fields. StyleRF is an innovative 3D style transfer technique that achieves superior 3D stylization quality with precise geometry reconstruction and it can generalize to various new styles in a zero-shot manner.

teaser


Installation

Tested on Ubuntu 20.04 + Pytorch 1.12.1

Install environment:

conda create -n StyleRF python=3.9
conda activate StyleRF
pip install torch torchvision
pip install tqdm scikit-image opencv-python configargparse lpips imageio-ffmpeg kornia lpips tensorboard

Datasets

Please put the datasets in ./data. You can put the datasets elsewhere if you modify the corresponding paths in the configs.

3D scene datasets

Style image dataset

Quick Start

We provide some trained checkpoints in: StyleRF checkpoints

Then modify the following attributes in scripts/test_style.sh:

  • --config: choose configs/llff_style.txt or configs/nerf_synthetic_style.txt according to which type of dataset is being used
  • --datadir: dataset's path
  • --ckpt: checkpoint's path
  • --style_img: reference style image's path

To generate stylized novel views:

bash scripts/test_style.sh [GPU ID]

The rendered stylized images can then be found in the directory under the checkpoint's path.

Training

Current settings in configs are tested on one NVIDIA RTX A5000 Graphics Card with 24G memory. To reduce memory consumption, you can set batch_size, chunk_size or patch_size to a smaller number.

We follow the following 3 steps of training:

1. Train original TensoRF

This step is for reconstructing the density field, which contains more precise geometry details compared to mesh-based methods. You can skip this step by directly downloading pre-trained checkpoints provided by TensoRF checkpoints.

The configs are stored in configs/llff.txt and configs/nerf_synthetic.txt. For the details of the settings, please also refer to TensoRF. The checkpoints are stored in ./log by default.

You can train the original TensoRF by:

bash script/train.sh [GPU ID]

2. Feature grid training stage

This step is for reconstructing the 3D gird containing the VGG features.

The configs are stored in configs/llff_feature.txt and configs/nerf_synthetic_feature.txt, in which ckpt specifies the checkpoints trained in the first step. The checkpoints are stored in ./log_feature by default.

Then run:

bash script/train_feature.sh [GPU ID]

3. Stylization training stage

This step is for training the style transfer modules.

The configs are stored in configs/llff_style.txt and configs/nerf_synthetic_style.txt, in which ckpt specifies the checkpoints trained in the second step. The checkpoints are stored in ./log_style by default.

Then run:

bash script/train_style.sh [GPU ID]

Training on 360 Unbounded Scenes

The code for training StyleRF on the Tanks&Temples dataset is available on the 360 branch. To access it, run git checkout 360.

Acknowledgments

This repo is heavily based on the TensoRF. Thank them for sharing their amazing work!

Citation

If you find our code or paper helps, please consider citing:

@inproceedings{liu2023stylerf,
  title={StyleRF: Zero-shot 3D Style Transfer of Neural Radiance Fields},
  author={Liu, Kunhao and Zhan, Fangneng and Chen, Yiwen and Zhang, Jiahui and Yu, Yingchen and El Saddik, Abdulmotaleb and Lu, Shijian and Xing, Eric P},
  booktitle={Proceedings of the IEEE/CVF Conference on Computer Vision and Pattern Recognition},
  pages={8338--8348},
  year={2023}
}

stylerf's People

Stargazers

 avatar  avatar  avatar  avatar  avatar  avatar  avatar  avatar  avatar  avatar  avatar  avatar  avatar  avatar  avatar  avatar  avatar  avatar  avatar  avatar  avatar  avatar  avatar  avatar  avatar  avatar  avatar  avatar  avatar  avatar  avatar  avatar  avatar  avatar  avatar  avatar  avatar  avatar  avatar  avatar  avatar  avatar  avatar  avatar  avatar  avatar  avatar  avatar  avatar  avatar  avatar  avatar  avatar  avatar  avatar  avatar  avatar  avatar  avatar  avatar  avatar  avatar  avatar  avatar  avatar  avatar  avatar  avatar  avatar  avatar  avatar  avatar  avatar  avatar  avatar  avatar  avatar  avatar  avatar  avatar  avatar  avatar  avatar  avatar  avatar  avatar  avatar  avatar  avatar  avatar  avatar  avatar  avatar  avatar  avatar  avatar  avatar  avatar  avatar  avatar

Watchers

 avatar  avatar  avatar  avatar

stylerf's Issues

Too much memory consumption

Hi, when I try to run the script train.sh, everything worked fine, but when I run the script train_feature.sh, my computer will kill the running process. After navigating, I found that the function prepare_feature_data in BlenderDataset class has some problem with the memory consumption, it uses so much RAM, more than 64GB RAM after running half of the number of iterations. Is this a bug or you just used more RAM in your experiments ?

Question for room dataset

We run your code on llff room dataset. And we use the images_8(downsample 8 times). In the second stage, train_feature.py can only achieve 15 PSNR. Does it normal? In the first stage, train.py can achieve 35 PSNR.

Question for Blender dataset

Hi,
Thanks for your work. When I rendered the Blender dataset, I found that the background was not clear. But I saw your project page is very clear. How can I get the white background result?

Question about sampling method.

Hi! thanks for sharing such amazing work!
After reading your code, I found that when training the feature encoder part, you used random sampling of the light, and when training the decoder, you sampled the whole image. What is the consideration for difference between them? Does the sampling method have a significant impact on the training of the feature encoder?
Looking forward reply!

Changing the camera render path

您好,冒昧再次来访,我目前在做相同领域的工作,但我遇到了一些问题,很久没有解决,应该是坐标系变换方面的问题,希望从您这儿来寻求一些帮助。对于llff数据集,render path=1时,会进行螺旋式的拍摄,我想修改这一部分,使相机以中心相机为中点按一定的间隔水平排列,并修改光线的方向(使变换后的相机光线方向向量=相机原光线方向向量+相机相较于中心相机的偏移量),最终目的是实现相机的离轴拍摄效果。
我想问下您这块代码该如何实现。
以下是我的实现思路:
1、将llff.py的get_spiral()替换为如下的leval函数:目的是构造水平排列的60个相机的c2ws矩阵:
def _trans_t(x, t):
return np.array(
[
[1, 0, 0, x],
[0, 1, 0, 0],
[0, 0, 1, t],
[0, 0, 0, 1],
],
dtype=np.float32,
)

def _rot_phi(phi):
return np.array(
[
[1, 0, 0, 0],
[0, np.cos(phi), -np.sin(phi), 0],
[0, np.sin(phi), np.cos(phi), 0],
[0, 0, 0, 1],
],
dtype=np.float32,
)

def _rot_theta(th):
return np.array(
[
[np.cos(th), 0, -np.sin(th), 0],
[0, 1, 0, 0],
[np.sin(th), 0, np.cos(th), 0],
[0, 0, 0, 1],
],
dtype=np.float32,
)
def pose_spherical(offsetx : float, theta : float, phi : float, radius : float,
vec_up : Optional[np.ndarray]=None):
"""
Generate spherical rendering poses, from NeRF. Forgive the code horror
:return: r (3,), t (3,)
"""
c2w = _trans_t(offsetx, radius)
c2w = _rot_phi(phi / 180.0 * np.pi) @ c2w
c2w = _rot_theta(theta / 180.0 * np.pi) @ c2w
c2w = (
np.array(
[[-1, 0, 0, 0], [0, 0, 1, 0], [0, 1, 0, 0], [0, 0, 0, 1]],
dtype=np.float32,
)
@ c2w
)
if vec_up is not None:
vec_up = vec_up / np.linalg.norm(vec_up)
vec_1 = np.array([vec_up[0], -vec_up[2], vec_up[1]])
vec_2 = np.cross(vec_up, vec_1)

    trans = np.eye(4, 4, dtype=np.float32)
    trans[:3, 0] = vec_1
    trans[:3, 1] = vec_2
    trans[:3, 2] = vec_up
    c2w = trans @ c2w
c2w = c2w @ np.diag(np.array([1, -1, -1, 1], dtype=np.float32))
return c2w

def leval(c2ws_all):
# 定义offsets
offsetxs = []
num_views=60 # 路径上渲染的视点数
for i in range(0, num_views):

    offsetxs.append((i - num_views//2) * 0.03)   # 相机偏移量
offsetxs = np.array(offsetxs)

angles = np.linspace(-180, 180, num_views + 1)[:-1]
# 定义vec_up
up_rot = c2ws_all[:, :3, :3]
ups = np.matmul(up_rot, np.array([0, -1.0, 0])[None, :, None])[..., 0]
vec_up = np.mean(ups, axis=0)
vec_up /= np.linalg.norm(vec_up)
c2ws = [
    pose_spherical(
        offsetx,
        90,  
        0,   
        1, 
        vec_up=vec_up,
    )
    for angle, offsetx in zip(angles, offsetxs)
]
return np.stack(c2ws, axis=0)

2、修改evaluation_feature_path()函数:
首先定义一个中心相机,使其为
center = c2ws[60//2]
center = torch.FloatTensor(center)
然后修改rays_o, rays_d = get_rays(test_dataset.directions, c2w, center)的get_rays函数:
目的是模拟离轴变换
def get_rays(directions, c2w, center_c2w):
rays_d = directions @ c2w[:3, :3].T # (H, W, 3)
rays_o = c2w[:3, 3].expand(rays_d.shape) # (H, W, 3)
center_rays_o = center_c2w[:3, 3].expand(rays_d.shape) # (H, W, 3)

tt = center_rays_o - rays_o  # 当前相机指向中心相机间的偏移向量

rays_d = rays_d + tt  # 当前相机的原始方向+偏移向量=当前相机模拟离轴变换之后的光线方向
rays_d = rays_d.view(-1, 3)
rays_o = rays_o.view(-1, 3)
return rays_o, rays_d

其他地方与原代码相同。非常希望可以得到您的答复和帮助!

About results on consistency

Hi, thanks for your valuable work. Can you tell me how you achieved these results in the paper? I don't seem to find it in the code.

RMSE and LPIPS

Hi, thanks for sharing your work !

Can you tell me the implementation method in the project for calculating the masked RMSE score and LPIPS score?
It seems that I couldn't find the corresponding code implementation, thanks!

Does the result (include RMSE and LPIPS) in Table 1 obtain in the Stylization training stage?

Question about sampling method.

Hi! thanks for sharing such amazing work!
After reading your code, I found that when training the feature encoder part, you used random sampling of the light, and when training the decoder, you sampled the whole image. What is the consideration for difference between them? Does the sampling method have a significant impact on the training of the feature encoder?
Looking forward reply!

question about the quantitative results

Hi, thanks for sharing your work !

Can you tell me the implementation method in the project for calculating the masked RMSE score and LPIPS score?
It seems that I couldn't find the corresponding code implementation, thanks!

Does the result (include RMSE and LPIPS) in Table 1 obtain in the Stylization training stage?

Question about sampling method.

Hi! thanks for sharing such amazing work!
After reading your code, I found that when training the feature encoder part, you used random sampling of the light, and when training the decoder, you sampled the whole image. What is the consideration for difference between them? Does the sampling method have a significant impact on the training of the feature encoder?
Looking forward reply!

关于超内存问题

请问,我在进行 Feature grid training stage过程中,出现超内存问题导致训练代码被中断,尽管我的电脑是128G的内存容量依然不行,能告知一下您用的是多少的内存吗,或者是否有其他的解决办法。
Traceback (most recent call last):
File "/home/zzj/disk1/zzj/StyleRF-main/train_feature.py", line 290, in
reconstruction(args)
File "/home/zzj/disk1/zzj/StyleRF-main/train_feature.py", line 148, in reconstruction
train_dataset.prepare_feature_data(tensorf.encoder)
File "/home/zzj/anaconda3/envs/StyleRF/lib/python3.9/site-packages/torch/utils/contextlib.py", line 115, in decorate_context
return func(*args, **kwargs)
File "/home/zzj/disk1/zzj/StyleRF-main/dataLoader/blender.py", line 119, in prepare_feature_data
features.append(features_chunk.detach().cpu().requires_grad
(False))
RuntimeError: [enforce fail at alloc_cpu.cpp:75] err == 0. DefaultCPUAllocator: can't allocate memory: you tried to allocate 5242880000 bytes. Error code 12 (Cannot allocate memory)

关于style training stage

请问在第二阶段stylization training stage时,对于wikiart中style image的选择是怎样的呢,我在这一训练阶段尝试了很多办法,但都没有得到很好的效果

Request for LPIPS and RMSE Calculation Code in StyleRF.(code)

First of all, I'd like to express my gratitude for developing and sharing this valuable project. It has been significantly helpful in my research work.

I am currently utilizing your project for my experiments and have completed the experimental part. Now, I need to calculate LPIPS and RMSE for evaluating my experimental results. However, I noticed that the source code for this part seems to be missing in the project.

Could you kindly provide the source code for calculating LPIPS and RMSE, if it's possible? This would greatly aid me in completing the evaluation of my experiments and understanding my results better.

Thank you very much for your time and assistance. I look forward to your response.

Best regards.

the covariance matrix in the channel dimension

Hi, thanks for sharing your work ! and I have some questions about the code, there is a covariance matrix Cov(Q,K) in the channel dimension in section 3.2.1 , but I noticed that the code about the matrix is c_cov = q_embed.transpose(1,2).unsqueeze(3) * k_embed.transpose(1,2).unsqueeze(2) in styleModules.py that seems like outer product rather than Cov, do I locate the wrong code or make some misunderstandings?

style loss becomes nan

Hi, I am training StyleRF on my own dataset. The training on the original TensoRF and the feature stages looks good and the rendered novel views of these two stages are good. But when I train the style stage, the style loss becomes nan after about 1K iters. Any solution on it?
image

llff.py 'images_4/*' Is there a problem with the path name

Hello, I want to ask if the pathname in line 175 of llff.py is wrong, and "images/* '" should be used instead of "images_4/*'". During training, I just need to put the original dataset in the "images" folder, and set "downsample_train" if it is necessary to reduce sampling, without additional preparation of the "images_4" folder

Testing on nerf_synthetic. (blender.py‘s code of the data_loader)

Hello, when I try to conduct testing experiments on the nerf_synthetic dataset, I encountered an error saying 'BlenderDataset' object has no attribute 'render_path'. It seems that there is a missing part in the blender.py code of the data_loader. Could you please share the code for testing on nerf_synthetic? Thank you

Question for the zero-shot?

May I ask where the zero-shot of your paper is presented? StyleRF, like other papers, is a two-stage training. I'm very confused about the zero-shot. Thanks

Question about sampling method.

Hi! thanks for sharing such amazing work!
After reading your code, I found that when training the feature encoder part, you used random sampling of the light, and when training the decoder, you sampled the whole image. What is the consideration for difference between them? Does the sampling method have a significant impact on the training of the feature encoder?
Looking forward reply!

How to calculate LPIPS and RMSE?

Should I warp the first frame image to the second frame image for measuring LPIPS and RMSE, and then use the py you provided compute_Metrics.py? What is the use of the optical flow you mentioned?

Question about the baseline

Hi, very thanks for your work! In the paper, your work choose 《 Stylizing 3d scene via implicit representation and hypernetwork》as a baseline, the code of this baseline is based on NeRF++, and the dataset is Tanks&Templets. So I'd like to know what changes you made to the NeRF++ code to make it possible to run on the LLFF dataset? Thanks a lot !

Recommend Projects

  • React photo React

    A declarative, efficient, and flexible JavaScript library for building user interfaces.

  • Vue.js photo Vue.js

    🖖 Vue.js is a progressive, incrementally-adoptable JavaScript framework for building UI on the web.

  • Typescript photo Typescript

    TypeScript is a superset of JavaScript that compiles to clean JavaScript output.

  • TensorFlow photo TensorFlow

    An Open Source Machine Learning Framework for Everyone

  • Django photo Django

    The Web framework for perfectionists with deadlines.

  • D3 photo D3

    Bring data to life with SVG, Canvas and HTML. 📊📈🎉

Recommend Topics

  • javascript

    JavaScript (JS) is a lightweight interpreted programming language with first-class functions.

  • web

    Some thing interesting about web. New door for the world.

  • server

    A server is a program made to process requests and deliver data to clients.

  • Machine learning

    Machine learning is a way of modeling and interpreting data that allows a piece of software to respond intelligently.

  • Game

    Some thing interesting about game, make everyone happy.

Recommend Org

  • Facebook photo Facebook

    We are working to build community through open source technology. NB: members must have two-factor auth.

  • Microsoft photo Microsoft

    Open source projects and samples from Microsoft.

  • Google photo Google

    Google ❤️ Open Source for everyone.

  • D3 photo D3

    Data-Driven Documents codes.