In this guide I am going to show you how to use Cognito for authentication with React and a Node.js Express API. By the time we are done, our app will be able to login/register on AWS with email and Google OAuth. Users will also be able to receive a confirmation email, and reset/change their password.
This guide's main focus is authenticating with Cognito but If you want more in-depth guide on how to deploy the server on Elastic Beanstalk, I wrote one here.
Our app will be deployed on Elastic Beanstalk using RDS (Amazon's Relational Database Service). It will use a custom serverless Lambda trigger function to make sure our Cognito users are synced with our server's database. In this function we will also add the user's primary database key into the identity token so our API can easily find the user's data without having to query by email.
When a user authenticates through Cognito, AWS will issue the client a JWT (JSON Web Token). Our client app will send the token to our server, which will verify the token through AWS. Let's get started!
Step One: Configuring Cognito in the AWS Console and Google OAuth
Step Two: Creating the React application
Part One: Init React application and create Auth functions
Part Two: Creating components to utilize our Auth functions
Step Three: Create middleware to verify the JWTs issued by Cognito from our client
Step Five: Deploying our server to Elastic Beanstalk with an RDS instance
Step Six: Adding a custom Lambda trigger function to our Cognito user pool
First, let's create a new user pool in Cognito. Open the AWS console. In the top right, make sure you are in the correct region you want to use for your application. Navigate to Services > **Cognito ** > Manage User Pools > Create a user pool.
Enter any name you choose for your user pool. I'll call mine cognito-react-node. We'll click review defaults to load a default configuration, then we'll customize our configuration as needed. On the left, click attributes. For this application, our users will be able to register and sign in with their email. Select the following attributes:

Click next step. In policies you can set the password requirements. We can keep the default configuration.

Next we'll also keep the default MFA and verifications settings.

Next, in message customizations I'm going to set the verification type to link, although I will also provide the code to enter a verification code later if you wish to use that method instead. We can leave the other message settings as the defaults.

You can skip the Tags and Devices settings.
In App clients click Add an app client.
Enter a name for your app client. Since we are using React for the frontend, uncheck Generate client secret. Leave the other default values and click Create app client.

Next, click Review and then Create pool.
After the pool is created, on the left under App integration, select Domain name. For this guide we'll use a Amazon Cognito domain. Choose a domain name, check if it's available, then click save changes. Make note of the domain you just created. If you click Go to summary you can easily copy it. We'll need this in the next step for configuring Google OAuth.
We still have some more configuration to do, but before we do that lets hop over to Google's developer console and create an OAuth application to use for our user pool.
Navigate to the Google API console and log in. Once you are in the Google API dashboard, click CREATE PROJECT.

Enter a name for your project, leave the location as "No organization" and click CREATE.
Next, on the left side click OAuth consent screen. Select External, then CREATE. Enter a name for your application, then click Save.
On the left, click Credentials > CREATE CREDENTIALS > OAuth client ID.
For the Application type select Web application. Enter a name for your client. Under Authorized JavaScript origins, add the Cognito domain URI you created earlier.
Under Authorized redirect URIs, enter /oauth2/idpresponse prefixed with the same domain URI you used above.
Click CREATE.

Once the Oauth client is created, make note of the client ID and client secret. We'll need these values to configure Google Oauth in the Cognito user pool settings. Head back to over to your Cognito user pool. On the left under Federation, click Identity providers. Select Google.
Enter your Google OAuth **client ID ** and client secret. For the Autorized scope enter profile email openid. Click Enable Google.

Once enabled, click Configure attribute mapping.

We'll map the email and email_verified attributes to our user pool Email and Email Verified attributes, and use Username for the sub attribute. Our users will only need to verify their emails if they register without using Google OAuth. Click Save changes.

Finally, on the left under App integration, click App client settings. Under Enabled Identity Providers enable Google and Cognito User Pool.
For the Callback URL and Sign out URL enter http://localhost:3000/ since we'll be developing locally. If you ever deploy your React application you'll also need to add hosted URL.
Under OAuth 2.0, select Authorization code grant and Implicit grant under Allowed Oauth Flows.
Select email, openid, aws.cognito.signin.user.admin, and profile for Allowed OAuth Scopes.
Click Save changes.
Now our Cognito user pool is configured and we are ready to start coding!
I'm going to use Create React App to initialize our project.
npx create-react-app cognito-react
cd cognito-react
We'll be using axios to send API requests to our server, and aws-amplify to authenticate with Cognito.
npm i axios aws-amplify
Inside the src folder of your project, create a folder called config with a file called cognito-config.json. We'll heed to head back to our Cognito user pool to grab a bunch of values to store in this config file. Here is an example of what mine looks like:
{
    "clientId": "71cs1vs1bkc1b6ai9q0olocjas",
    "userPoolUri": "reactnodeguide.auth.us-east-1.amazoncognito.com",
    "userPool": "us-east-1_M3Gx3MjTH",
    "region": "us-east-1",
    "callbackUri": "http://localhost:3000/",
    "signoutUri": "http://localhost:3000/",
    "tokenScopes": [
        "openid",
        "email",
        "profile",
        "aws.cognito.signin.user.admin"
    ]
}
For clientId, on the left of the Cognito dashboard under App integration, use the ID found in App client settings.

Use the domain found in App integration for the userPoolUri. Remove https://.

Use the Pool Id found under General settings for userPool.

Use the region you created your Cognito user pool in.
Finally, add the callbackUri, signoutUri, and tokenScopes.
Now lets create all the helper functions we'll use to login, register, reset password, etc. From the root directory of your project, create a folder called utils and inside it create a file called cognitoAuth.js.
Import the following:
import cognitoConfig from "../config/cognitoConfig.json";
import Amplify, { Auth } from "aws-amplify";
Next we'll need to configure Amplify.
Amplify.configure({
    Auth: {
        userPoolId: cognitoConfig.userPool,
        userPoolWebClientId: cognitoConfig.clientId,
        region: cognitoConfig.region,
        oauth: {
            domain: cognitoConfig.userPoolUri,
            scope: cognitoConfig.tokenScopes,
            redirectSignIn: cognitoConfig.callbackUri,
            redirectSignOut: cognitoConfig.signoutUri,
            responseType: "code",
        },
    	// storage: CustomChromeStorage
    },
});
Notice the // storage: CustomChromeStorage. By default, Amplify Auth functions use and store information in localStorage. You can optionally create a custom storage class if you would like to store the tokens elsewhere. For example, Chrome extensions do not have access to localStorage. We would have to provide Amplfiy with a workaround. Below is an example of a custom storage class I wrote to use Chrome Storage instead of localStorage. Amplify will sync an in-memory storage with Chrome Storage.
You would import this class and pass it into the Amplify configuration.
/*global chrome*/

const STORAGE_PREFIX = "@CustomChromeStorage";
let dataMemory = {};

class CustomChromeStorage {
    static syncPromise = null;

    static setItem(key, value) {
        chrome.storage.sync.set({ key: JSON.stringify(value) }, () => {
            console.log("item stored");
        });
        dataMemory[key] = value;
        return dataMemory[key];
    }

    static getItem(key) {
        return Object.prototype.hasOwnProperty(dataMemory, key)
            ? dataMemory[key]
            : undefined;
    }

    static removeItem(key, value) {
        chrome.storage.sync.remove(key, () => {
            console.log("item removed");
        });
        return delete dataMemory[key];
    }

    static clear() {
        chrome.storage.sync.clear(() => {
            console.log("storage cleared");
        });
        dataMemory = {};
        return dataMemory;
    }

    static sync() {
        if (!CustomChromeStorage.syncPromise) {
            CustomChromeStorage.syncPromise = new Promise((resolve, reject) => {
                chrome.storage.sync.get(null, (items) => {
                    const keys = Object.keys(items);
                    const memoryKeys = keys.filter((key) =>
                        key.startsWith(STORAGE_PREFIX)
                    );
                    chrome.storage.sync.get(memoryKeys, (stores) => {
                        for (let key in stores) {
                            const value = stores[key];
                            const memoryKey = key.replace(STORAGE_PREFIX, "");
                            dataMemory[memoryKey] = value;
                        }
                        resolve();
                    });
                });
            });
        }
	return CustomChromeStorage.syncPromise;
    }
}

export { CustomChromeStorage };
Now to create the utility functions our app will use to authenticate with Cognito.
async function signUp(email, password) {
    return await Auth.signUp({
        username: email,
        password,
    });
}async function signIn(email, password) {
return await Auth.signIn(email, password);
}async function confirmSignUp(email, code) {
return await Auth.confirmSignUp(email, code);
}async function resendConfirmationCode(username) {
return await Auth.resendSignUp(username);
}// pass in true to sign out from all devices
async function signOut(global = false) {
return await Auth.signOut({ global });
}async function federatedSignIn(provider) {
return await Auth.federatedSignIn({ provider });
}async function forgotPassword(email) {
return await Auth.forgotPassword(email);
}async function forgotPasswordSubmit(email, code, newPassword) {
try {
await Auth.forgotPasswordSubmit(email, code, newPassword);
return "Password was changed successfully.";
} catch (err) {
throw err;
}
}async function changePassword(oldPassword, newPassword) {
try {
const user = await Auth.currentAuthenticatedUser();
await Auth.changePassword(user, oldPassword, newPassword);
return "Password was changed successfully.";
} catch (err) {
throw err;
}
}function getIdToken() {
return new Promise((resolve, reject) => {
Auth.currentSession()
.then((data) => {
const idToken = data.getIdToken();
resolve(idToken.jwtToken);
})
.catch(() => {
reject(Error("Not signed in."));
});
});
}function getCurrentUser() {
return new Promise((resolve, reject) => {
Auth.currentSession()
.then((data) => {
const idToken = data.getIdToken();
const user = idToken.payload;
resolve(user);
})
.catch(() => {
reject(Error("Not signed in."));
});
});
}Export the functions so we can use them in our application:
export {
    signUp,
    signIn,
    confirmSignUp,
    resendConfirmationCode,
    signOut,
    federatedSignIn,
    forgotPassword,
    forgotPasswordSubmit,
    getIdToken,
    changePassword,
    getCurrentUser,
};When we make requests to our server, we'll need to send the authenticated user's id token in the authorization headers. Let's create a helper function that returns an axios instance with our users id token already in the headers. We'll place this function inside our utility folder.
Getting a user's id token is an asynchronous operation, but this function will allow us to use axios similarly to what we are used to without chaining requests. All we have to do is pass in the specified method and path. The base URL will be set to the URL of our API.
import axios from "axios";
import { getIdToken } from "./cognitoAuth";

export async function axiosWithAuth(method, path) {
    try {
        const idToken = await getIdToken();
        return await axios
            .create({
                baseURL: "http://localhost:5000",
                headers: {
                    "Content-Type": "application/json",
                    Authorization: `Bearer ${idToken}`,
                },
            })
            [method](path);
    } catch (err) {
        throw err;
    }
}
Here's an example of how we'd use this function:
axiosWithAuth('get', '/users').then(res => {
    console.log(res)
}).catch(err => {
    console.log(err)
})
This would send a GET request to http://localhost:5000/users.
Now it's time to start creating some components so we can put all our functions into action!
Create a folder called components in the src directory. Inside this folder create a file called authHub.js and another folder called auth. We will create individual components for each of the authorization operations our app will use and store them in the auth folder. We'll import them into our authHub.js component so we can test them out. The state in our authHub component will keep track of the current user. It will also use Amplify's local eventing system called Hub to listen for authentication events.
First we'll create the auth components.
import React, { useState } from "react";
import { changePassword } from "../../utils/cognitoAuth";

export default function ChangePassword() {
    const [oldPassword, setOldPassword] = useState("");
    const [newPassword, setNewPassword] = useState("");

    function handleChangePassword(e) {
        e.preventDefault();
        changePassword(oldPassword, newPassword)
            .then((res) => {
                console.log(res);
            })
            .catch((err) => {
                console.log(err);
            });
    }
    return (
        <>
            <h3>Change password</h3>
            <form onSubmit={handleChangePassword}>
                <input
                    required
                    placeholder="old password"
                    value={oldPassword}
                    onChange={(e) => setOldPassword(e.target.value)}
                />
                <input
                    required
                    placeholder="new password"
                    value={newPassword}
                    onChange={(e) => setNewPassword(e.target.value)}
                />
                <button>Submit</button>
            </form>
        </>
    );
}import React, { useState } from "react";
import { forgotPassword } from "../../utils/cognitoAuth";
export default function ForgotPassword() {
const [resetPasswordEmail, setResetPasswordEmail] = useState("");
function handleResetPassword(e) {
e.preventDefault();
forgotPassword(resetPasswordEmail)
.then((res) => console.log(res))
.catch((err) => console.log(err));
}
return (
<>
<h3>Forgot password</h3>
<form onSubmit={handleResetPassword}>
<input
required
placeholder="email"
value={resetPasswordEmail}
onChange={(e) => setResetPasswordEmail(e.target.value)}
/>
<button>Re-send</button>
</form>
</>
);
}import React from "react";
import { federatedSignIn } from "../../utils/cognitoAuth";
export default function GoogleSignIn() {
return (
<>
<h3>Google Sign In</h3>
<button onClick={() => federatedSignIn("Google")}>
Login/Register with Google
</button>
</>
);
}import React, { useState } from "react";
import { signIn } from "../../utils/cognitoAuth";
export default function LogIn() {
const [loginEmail, setLoginEmail] = useState("");
const [loginPassword, setLoginPassword] = useState("");
function handleLogin(e) {
e.preventDefault();
signIn(loginEmail, loginPassword).catch(() => {});
}
return (
<>
<h3>Login</h3>
<form onSubmit={handleLogin}>
<input
placeholder="email"
onChange={(e) => setLoginEmail(e.target.value)}
value={loginEmail}
/>
<input
type="password"
onChange={(e) => setLoginPassword(e.target.value)}
value={loginPassword}
placeholder="password"
/>
<button>Log in</button>
</form>
</>
);
}import React, { useState } from "react";
import { signUp } from "../../utils/cognitoAuth";
export default function Register() {
const [registerEmail, setRegisterEmail] = useState("");
const [registerPassword, setRegisterPassword] = useState("");
function handleRegister(e) {
e.preventDefault();
signUp(registerEmail, registerPassword).catch((err) =>
console.log(err)
);
}
return (
<>
<h3>Register</h3>
<form onSubmit={handleRegister}>
<input
placeholder="email"
onChange={(e) => setRegisterEmail(e.target.value)}
value={registerEmail}
/>
<input
type="password"
onChange={(e) => setRegisterPassword(e.target.value)}
value={registerPassword}
placeholder="password"
/>
<button>Register</button>
</form>
</>
);
}import React, { useState } from "react";
import { resendConfirmationCode } from "../../utils/cognitoAuth";
export default function ResendVerificationCode() {
const [resendEmail, setResendEmail] = useState("");
function handleResendVerification(e) {
e.preventDefault();
resendConfirmationCode(resendEmail)
.then((res) => console.log(res))
.catch((err) => {
console.log(err);
});
}
return (
<>
<h3>Resend Confirmation Code</h3>
<form onSubmit={handleResendVerification}>
<input
required
placeholder="email"
value={resendEmail}
onChange={(e) => setResendEmail(e.target.value)}
/>
<button>Re-send</button>
</form>
</>
);
}import React from "react";
import { signOut } from "../../utils/cognitoAuth";
export default function SignOut() {
return (
<>
<button
onClick={() => {
signOut();
}}
>
Log out
</button>
</>
);
}import React, { useState } from "react";
import { confirmSignUp } from "../../utils/cognitoAuth";
export default function VerifyEmailWithCode() {
const [verifyEmail, setVerifyEmail] = useState("");
const [verificationCode, setVerificationCode] = useState("");
function handleVerification(e) {
e.preventDefault();
confirmSignUp(verifyEmail, verificationCode)
.then((res) => console.log(res))
.catch((err) => console.log(err));
}
return (
<>
<h3>Verify Email With Code</h3>
<form onSubmit={handleVerification}>
<input
placeholder="email"
onChange={(e) => setVerifyEmail(e.target.value)}
value={verifyEmail}
/>
<input
onChange={(e) => setVerificationCode(e.target.value)}
value={verificationCode}
placeholder="verification code"
/>
<button>Submit</button>
</form>
</>
);
}import React, { useState } from "react";
import { forgotPasswordSubmit } from "../../utils/cognitoAuth";
export default function VerifyForgotPassword() {
const [resetPasswordCode, setResetPasswordCode] = useState("");
const [resetNewPassword, setResetNewPassword] = useState("");
const [resetPasswordEmail, setResetPasswordEmail] = useState("");
function handleForgotPasswordSubmit(e) {
e.preventDefault();
forgotPasswordSubmit(
resetPasswordEmail,
resetPasswordCode,
resetNewPassword
)
.then((res) => console.log(res))
.catch((err) => console.log(err));
}
return (
<>
<h3>Verify Forgot Password</h3>
<form onSubmit={handleForgotPasswordSubmit}>
<input
required
placeholder="email"
value={resetPasswordEmail}
onChange={(e) => setResetPasswordEmail(e.target.value)}
/>
<input
required
placeholder="code"
value={resetPasswordCode}
onChange={(e) => setResetPasswordCode(e.target.value)}
/>
<input
required
placeholder="new password"
value={resetNewPassword}
onChange={(e) => setResetNewPassword(e.target.value)}
/>
<button>Submit</button>
</form>
</>
);
}Let's add an index.js file inside our folder. We'll export our components from there so we can import them from one location.
import ChangePassword from "./ChangePassword";
import ForgotPassword from "./ForgotPassword";
import GoogleSignIn from "./GoogleSignIn";
import LogIn from "./LogIn";
import Register from "./Register";
import ResendVerificationCode from "./ResendVerificationCode";
import SignOut from "./SignOut";
import VerifyEmailWithCode from "./VerifyEmailWithCode";
import VerifyForgotPassword from "./VerifyForgotPassword";

export {
    ChangePassword,
    ForgotPassword,
    GoogleSignIn,
    LogIn,
    Register,
    ResendVerificationCode,
    SignOut,
    VerifyEmailWithCode,
    VerifyForgotPassword,
};
Now we'll import all our components into Auth.js and implement our Hub listnener.
import React, { useEffect, useState } from "react";
import { getCurrentUser } from "../utils/cognitoAuth";
import { Hub } from "aws-amplify";

import {
    ChangePassword,
    ForgotPassword,
    GoogleSignIn,
    LogIn,
    Register,
    ResendVerificationCode,
    SignOut,
    VerifyEmailWithCode,
    VerifyForgotPassword,
} from "./auth";

export default function AuthHub() {
    const [currentUser, setCurrentUser] = useState(null);

    useEffect(() => {
            Hub.listen("auth", ({ payload: { event, data } }) => {
                switch (event) {
                    case "signUp":
                        console.log("User registered");
                        break;
                    case "cognitoHostedUI":
                    case "signIn":
                        getCurrentUser()
                            .then((userData) => {
                                setCurrentUser(userData);
                            })
                            .catch((err) => {
                                console.log(err);
                            });
                        break;
                    case "signOut":
                        setCurrentUser(null);
                        break;
                    case "signIn_failure":
                    case "cognitoHostedUI_failure":
                        console.log("Sign in failure", data);
                        break;
                    default:
                }
            });

            getCurrentUser()
                .then((userData) => setCurrentUser(userData))
                .catch((err) => console.log(err));
        }, []);
Our Hub listener will emit an event each time an authentication action is performed. It uses a switch statement to perform certain actions depending on the event that is emitted.
When our user signs in, it will store the user object in state.
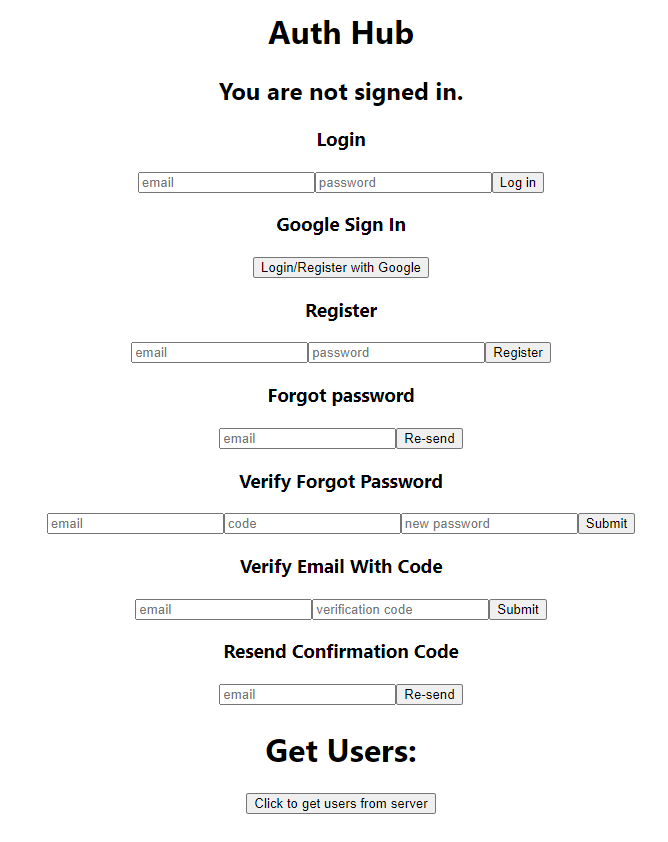
Finally, we'll lay out our components so we can test them out. We'll use conditional rendering to hide or show components based on the state of our authenticated user.
    return (
        <div>
	        <h1>Auth Hub</h1>
            {!currentUser && (
                <>
                    <h2>You are not signed in.</h2>
                    <LogIn />
                    <GoogleSignIn />
                    <Register />
                    <ForgotPassword />
                    <VerifyForgotPassword />
                </>
            )}
            {currentUser && (
                <>
                    <h2>Hello {currentUser["email"]}</h2>
                    <SignOut />
                </>
            )}

            {(!currentUser || !currentUser.email_verified) && (
                <>
                    <VerifyEmailWithCode />
                    <ResendVerificationCode />
                </>
            )}

            {currentUser && !currentUser.identities && (
                <>
                    <ChangePassword />
                </>
            )}
        </div>
    );
}
Let's create a component we'll use later to test our server's authentication and get a list of users.
In ./src/components add a file getUsers.js and add the following:
import React, { useState } from "react";
import { axiosWithAuth } from "../utils/axiosWithAuth";

export default function GetUsers() {
    const [users, setUsers] = useState(null);
    const [error, setError] = useState(null);

    function getUsers() {
        setError(null);
        axiosWithAuth("get", "/users")
            .then(({ data }) => {
                setUsers(data);
            })
            .catch((err) => {
                console.log(err);
                if (users) {
                    setUsers(null);
                }
                setError(err);
            });
    }
    return (
        <>
            <h1>Get Users:</h1>
            <button onClick={() => getUsers()}>
                Click to get users from server
            </button>
            {error && <h3>Error: {error.message}</h3>}
            {users && <p>{JSON.stringify(users)}</p>}
        </>
    );
}
Finally we'll import our AuthHub component into App.js. Let's get rid of the code generated by Create React App and use the following:
import React from "react";
import AuthHub from "./components/authHub";
import GetUsers from "./components/getUsers";
import "./App.css";

function App() {
    return (
        <div className="App">
            <AuthHub />
            <GetUsers />
        </div>
    );
}

export default App;
In your terminal in the root directory, let's start out app with npm start
Your app should look like this:
You should now be able login/register with email/Google and use all of the awesome functions we implemented. Now let's create the Node.js Express API to authenticate with our client/Cognito.
Let's init our server project. Open up a terminal, CD into the new project folder and npm init -y .
Then npx gitignore
Add *.sqlite3 to the .gitignore file
Install dependencies: npm i axios cors express jsonwebtoken jwk-to-pem knex knex-cleaner pg
Install dev dependencies: npm i -D nodemon sqlite3
Create a new folder called config and add a cognitoConfig.json file. It's similar to the one we created for our React application, but it doesn't need all of the values. Mine looks like:
{
    "clientId": "71cs1vs1bkc1b6ai9q0olocjas",
    "userPool": "us-east-1_M3Gx3MjTH",
    "region": "us-east-1",
    "callbackUri": "http://localhost:3000",
    "signoutUri": "http://localhost:3000",
    "tokenScopes": [
        "openid",
        "email",
        "profile",
        "aws.cognito.signin.user.admin"
    ]
}
Next, create a folder called middleware and add a file called cognitoAuth.js. It will be the authentication middleware our server uses for all our protected endpoints.
Import cognitoConfig.json and necessary dependencies.
const axios = require("axios");
const cognitoConfig = require("../config/cognitoConfig.json");
const jwkToPem = require("jwk-to-pem");
const jwt = require("jsonwebtoken");
Our server will need to download the JWKs (JSON Web Keys) for our Cognito user pool. This is public information and can be downloaded from:
https://cognito-idp.<YOUR_USER_POOLS_REGION>.amazonaws.com/<USER_POOL_ID>/.well-known/jwks.json
When our server first starts, we'll convert the JWKs to PEM (Public Enhanced Mail) format. Our middleware will need to use the information stored in these keys to authorize actions against our server. We'll send a GET request to the JWKs URL above and then use the library jwk-to-pem to convert the JWKs to PEMs. Then throughout our middleware function we will use the jsonwebtoken library to decode and verify that the JWT's sent to our server are valid and came from Cognito.
Lets store our JWKs URL in a variable.
const JWKS_URL = `https://cognito-idp.${cognitoConfig.region}.amazonaws.com/${cognitoConfig.userPool}/.well-known/jwks.json`;We'll create a custom class called AuthErr that extends Error.
class AuthErr extends Error {}We'll use this class to throw Authentication errors. Whenever an Authentication error is thrown we can respond to requests with a 401 Unauthorized status code. We can check if an error is of the type AuthErr by using:
instanceof AuthErrLet's create the function that gets the JWKs from Cognito and converts them to PEM format.
async function getPems() {
    try {
        const { data } = await axios.get(`${JWKS_URL}`);
        if (!data || !data.keys) {
            throw Error("Error downloading JWKs");
        }
        const pems = {};
        for (let i = 0; i < data.keys.length; i++) {
            pems[data.keys[i].kid] = jwkToPem(data.keys[i]);
        }
        return pems;
    } catch (err) {
        console.log(`Error getting JWKs: ${err}`);
        throw Error("Error occured downloading JWKs");
    }
}
When we send a GET request to the the URL stored in JWKS_URL, we'll get back an array of JWKs. For each key in the array we'll convert the key to PEM format and add it to an object called pems which is what our function will return.
Next we'll create a function that verifies the JWTs sent in the authorization headers.
async function getPems() {
    try {
        const { data } = await axios.get(`${JWKS_URL}`);
        if (!data || !data.keys) {
            throw Error("Error downloading JWKs");
        }
        const pems = {};
        for (let i = 0; i < data.keys.length; i++) {
            pems[data.keys[i].kid] = jwkToPem(data.keys[i]);
        }
        return pems;
    } catch (err) {
        console.log(`Error getting JWKs: ${err}`);
        throw Error("Error occured downloading JWKs");
    }
}

async function verify(pems, auth) {
    const token = auth.substring(7); // remove 'Bearer ' from auth header
    const unverified = jwt.decode(token, { complete: true });

    if (!unverified) {
        console.log(`Error decoding token.`);
        throw new AuthErr("Invalid JWT.");
    } else if (!unverified.header.kid || !pems[unverified.header.kid]) {
        console.log("Invalid JWT. KID not found.");
        throw new AuthErr("Invalid JWT.");
    }

    return jwt.verify(
        token,
        pems[unverified.header.kid],
        {
            issuer: JWKS_URL.substring(
                0,
                JWKS_URL.indexOf("/.well-known/jwks.json")
            ),
            maxAge: 60 * 60, //3600 seconds
        },
        (err, decoded) => {
            if (err) {
                console.log(`Invalid JWT: ${err}.`);
                throw new AuthErr(
                    err instanceof jwt.TokenExpiredError
                        ? `JWT expired.`
                        : "Invalid JWT"
                );
            }

            // Verify allowed token_use
            if (decoded.token_use !== "access" && decoded.token_use !== "id") {
                console.log(
                    `token_use ${decoded.token_use} not "access" or "id".`
                );
                throw new AuthErr("Invalid JWT.");
            }

            // Verify aud or client_id
            const clientId = decoded.aud || decoded.client_id;
            if (clientId !== cognitoConfig.clientId) {
                console.log(
                    `Invalid JWT. Client id ${clientId} is not ${cognitoConfig.clientId}.`
                );
                throw new AuthErr("Invalid JWT.");
            }
            return decoded;
        }
    );
}

exports.getCognitoMiddleware = () => (req, res, next) => {
    (async () => {
        try {
            const { token_use, scope, email, db_user_id } = await verify(
                await getPems(),
                req.get("Authorization")
            );
            req.user = { token_use };
            if (token_use === "access") {
                req.user.scope = scope.split(" ");
            } else if (token_use === "id") {
                req.user.email = email;
                req.user.id = db_user_id;
            }
            next();
        } catch (err) {
            console.log(err);
            res.status(err instanceof AuthErr ? 401 : 500).send(
                err.message || err
            );
        }
    })();
};
It's common practice to prefix tokens in Authorization headers with "Bearer". We'll remove this prefix to get the actual token string.
We'll then decode the JWT using the .decode() method. Passing in the {complete: true} option to .decode() gets the token's decoded payload and header.
A KID (Key Id) header is an optional header that specifies the key used to validate the signature of the JWT. We'll check this value against our PEM keys and throw an error if the KID isn't found.
If the JWT gets decoded without errors, it means it hasn't been altered. This does not mean the token's signature is valid. To verify the token's signature, we'll use the jsonwebtoken library .verify() method.
The .verify() method takes in the token as the first argument, a public key, an options object, and a callback function. The callback function is called with the decoded token or an error.
Cognito issues three types of tokens: access tokens, id tokens, and refresh tokens. We'll check the decoded token's token_use value to make sure it's only an access token or an id token.
Next, we'll check compare the token's aud or client_id value to our Cognito client id. The token has an aud or a client_id depending if it's an access token or an id token. The verify function will return our decoded token if it makes it through our verify function without any errors being thrown. We'll then store any useful claims in req.user, and then call next() to exit our middleware and continue our request. Finally the middleware function is exported so it can be used by the API.
Step Four: Configuring the rest of our server, deploying it to Elastic Beanstalk, and connecting an RDS instance
In the root of our server project, create a Procfile file with the following:
web: npm start
In the root of the server folder, create a folder called data and inside it add a dbConfig.js file. Add the following:
const knex = require("knex");
const config = require("../knexfile.js");
const dbEnv = process.env.DB_ENV || "development";

module.exports = knex(config[dbEnv]);
In the root of the server folder, create another folder called scripts. Add a file called knex.sh with the following:
#!/bin/bash

export $(grep -v '^#' ../../../../opt/elasticbeanstalk/deployment/env | xargs)
sudo RDS_DB_NAME=${RDS_DB_NAME} \
RDS_HOSTNAME=${RDS_HOSTNAME} \
RDS_USERNAME=${RDS_USERNAME} \
RDS_PASSWORD=${RDS_PASSWORD} \
npx knex $1 --env production
In the root of the server folder, add a knexfile.js file. Add the following:
module.exports = {
    development: {
        client: "sqlite3",
        useNullAsDefault: true,
        connection: {
            filename: "./data/dev.sqlite3",
        },
        pool: {
            afterCreate: (conn, done) => {
                conn.run("PRAGMA foreign_keys = ON", done);
            },
        },
        migrations: {
            directory: "./data/migrations",
        },
        seeds: {
            directory: "./data/seeds",
        },
    },

    testing: {
        client: "sqlite3",
        useNullAsDefault: true,
        connection: {
            filename: "./data/testing/test.sqlite3",
        },
        pool: {
            afterCreate: (conn, done) => {
                conn.run("PRAGMA foreign_keys = ON", done);
            },
        },
        migrations: {
            directory: "./data/testing/migrations",
        },
        seeds: {
            directory: "./data/testing/seeds",
        },
    },

    production: {
        client: "pg",
        connection: {
            host: process.env.RDS_HOSTNAME,
            user: process.env.RDS_USERNAME,
            password: process.env.RDS_PASSWORD,
            database: process.env.RDS_DB_NAME,
        },
        migrations: {
            directory: "./data/migrations",
        },
        seeds: {
            directory: "./data/seeds",
        },
    },
};
Modify package.json to include the following:
...
	"main": "app.js",
    "scripts": {
        "start": "node app.js",
        "dev": "nodemon app.js",
        "test": "echo \"Error: no test specified\" && exit 1"
    },
...
Using knex cli or npx run knex migrate:make users
Update the migration file in ./data/migrations with the following:
exports.up = function (knex) {
    return knex.schema.createTable("users", (tbl) => {
        tbl.increments();
        tbl.varchar("email", 255).notNullable().unique();
    });
};

exports.down = function (knex) {
    return knex.schema.dropTableIfExists("users");
};
Run knex seed:make 00-cleaner and knex seed:make 01-users
In ./data/seeds update 00-cleaner.js with the following:
const cleaner = require("knex-cleaner");

exports.seed = function (knex) {
    return cleaner.clean(knex, {
        mode: "truncate",
        ignoreTables: ["knex_migrations", "knex_migrations_lock"],
    });
};
In ./data/seeds update 01-users.js with the following to add initial test users to our database:
exports.seed = function (knex) {
    return knex("users").insert(
        [
            { email: "[email protected]" },
            { email: "[email protected]" },
            { email: "[email protected]" },
            { email: "[email protected]" },
        ],
        "id"
    );
};
Run knex migrate:latest and knex seed:run to generate our sqlite3 database and load it with test users.
In the root of our server project, create two new folders: routers and models
In the models folder create a usersModel.js file and update it with the following:
const db = require("../data/dbConfig");

function getUsers() {
    return db("users");
}

module.exports = { getUsers };
In the routers folder create a usersRouter.js file and update it with the following:
const router = require("express").Router();
const { getUsers } = require("../models/usersModel");

router.get("/", async (req, res) => {
    try {
        const users = await getUsers();
        res.status(200).send(users);
    } catch (err) {
        console.log(err);
        res.status(500).send("Error retrieving users.");
    }
});

module.exports = router;
Finally, create a filed called app.js in the root directory. Update it with the following:
const express = require("express");
const cors = require("cors");
const { getCognitoMiddleware } = require("./middleware/cognitoAuth");
const usersRouter = require("./routers/usersRouter");
const app = express();
const PORT = process.env.PORT || 5000;
app.use(cors());
app.use(express.json());
app.use("/users", getCognitoMiddleware(), usersRouter);
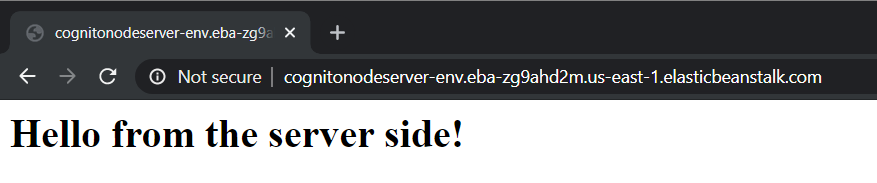
app.get("/", (req, res) => {
res.send("<h1>Hello from the server side!</h1>");
});
app.listen(PORT, () => {
console.log(`app listening on port ${PORT}`);
});Now let's start our React app and server to make sure everything works locally.
In the root directory of the React app run npm start.
In the root directory of the server run npm run dev
If we try to get users without being logged in, our app will throw an error before it sends a request to our server. This is because our axiosWithAuth function calls getIdToken() from cognitoAuth.js which requires a user to be logged in.

Now let's log in try to get users.
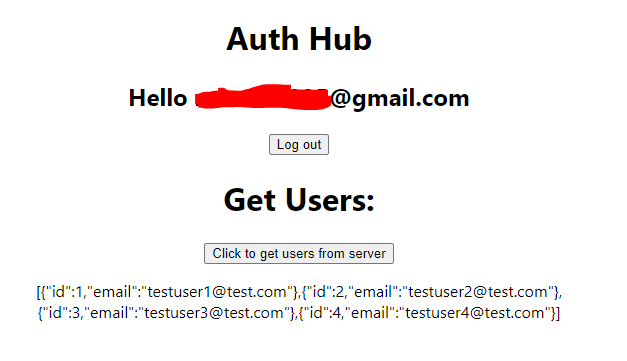
Let's try one more thing to double check our server's authentication. We'll temporarily modify the authorization header in axiosWithAuth to send an invalid token.
// Authorization: `Bearer ${idToken}`,
Authorization: 'Bearer this_should_not_work',
Great! Our server responded with a 401 Unauthorized error when we sent an invalid token. Change the axiosWithAuth back to what it was earlier. Now it's time to deploy our server onto Elastic Beanstalk and add an RDS instance. After that we will create a custom Lambda trigger function that will run whenever Cognito generates a token. The first time a user logs in, it will add the user to the server's RDS database and insert the user's database id to the identity token's payload.
Navigate to the AWS console and go to Services > Elastic Beanstalk. Enter a name for your server, select Node.js for the platform, version 12 for the platform branch, and use the recommended platform version. For Application code select Sample application, then Create application.
Click on the application that was just created then click on its environment. It might take a few minutes for the environment to launch. Once it's done initializing, on the left click on Configuration > Software > Edit. Add the key : value pair DB_ENV : production to the Environment properties and click Apply.
After the environment is done updating, go to Configuration > Database > Edit. Select postgres for the Engine, 12.3 for the Engine version, leave the instance class at db.t2.micro and the storage at 5GB. Enter a username and password and click Apply.
While the RDS instance is being added, upload your server to GitHub.
Next we'll create a CodePipeline. Go to Services > CodePipeline > Create pipeline.
Enter a name for your pipeline and click Next. Select GitHub as the Source provider. Click Connect to GitHub, then select the repository for your server and choose the master branch. Leave GitHub webhooks selected, and click Next > Skip build stage.
For the deploy provider select Elastic Beanstalk. Select the Elastic Beanstalk application and environment you created earlier and click Next > Create pipeline. Your server should thenautomatically deploy from GitHub. After it's finished you should be able to access your deployed server.
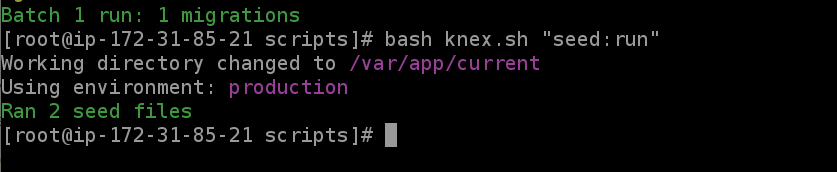
Now that our server is running on Elastic Beanstalk, let's SSH into it and use the knex.sh script to run our migration and seed files.
First we'll need to update the security group for our server to allow us to be able to SSH into it. Navigate to Services > EC2. Select your running instance, and select the security group under Description. Select the security group, then click Actions > Edit inbound rules. Click Add rule. Select SSH for the type and select Anywhere for the source. Click Save rules.
If you are unfamiliar with SSH'ing into an AWS instance, checkout this guide here. You can also go to Services > EC2. Right click your running instance, and click Connect. Select EC2 Instance Connect. Use root as the username, and click Connect.
Once you're in, type cd ../../var/app/current/scripts
Enter bash knex.sh "migrate:latest" and then bash knex.sh "seed:run"
The database should now be seeded with our test users. Awesome!
Update the baseURL in axiosWithAuth to match the URL of your Elastic Beanstalk server. For example:
baseURL: "http://cognitonodeserver-env.eba-zg9ahd2m.us-east-1.elasticbeanstalk.com",Now start up your React application and check to see if it can authenticate with our deployed server and get users from the database.

It's working!
Now the last thing we have to do is add a custom Lambda trigger to our Cognito user pool so our Cognito users will be synced to our RDS database. This function will also add the user's database id into the payload of issued identity tokens.
Our Node.js Lambda function will make use of an NPM package called pg to connect to our database. Because of this, we'll have to create a deployment package and upload it to Lambda in a .zip file. Let's do that now!
Create an empty directory for our deployment package. Open up a terminal inside the directory and enter npm init -y.
Then enter npm i pg.
Create an index.js file and add the following:
const { Pool } = require("pg");

exports.handler = async (event, context) => {
    const pool = new Pool({
        user: process.env.RDS_USERNAME,
        host: process.env.RDS_HOSTNAME,
        database: process.env.RDS_DB_NAME,
        password: process.env.RDS_PASSWORD,
        port: process.env.RDS_PORT,
    });
    return new Promise((resolve, reject) => {
        const email =
            event &&
            event.request &&
            event.request.userAttributes &&
            event.request.userAttributes.email;

        if (email) {
            pool.query(`SELECT email, id from USERS WHERE email='${email}'`)
                .then((result) => {
                    if (result.rows.length) {
                        event.response = {
                            claimsOverrideDetails: {
                                claimsToAddOrOverride: {
                                    db_user_id: result.rows[0].id,
                                },
                            },
                        };
                        resolve(event);
                        if (!pool.ended) {
                            pool.end();
                        }
                        return;
                    } else {
                        pool.query(
                            `INSERT INTO users (email) VALUES ('${email}') RETURNING id`
                        )
                            .then((result) => {
                                event.response = {
                                    claimsOverrideDetails: {
                                        claimsToAddOrOverride: {
                                            db_user_id: result.rows[0].id,
                                        },
                                    },
                                };
                                resolve(event);
                                if (!pool.ended) {
                                    pool.end();
                                }
                                return;
                            })
                            .catch((err) => {
                                console.log(err);
                                reject(err);
                                if (!pool.ended) {
                                    pool.end();
                                }
                                return;
                            });
                    }
                })
                .catch((err) => {
                    console.log(err);
                    reject(err);
                    if (!pool.ended) {
                        pool.end();
                    }
                    return;
                });
        } else {
            if (!pool.ended) {
                pool.end();
            }
            resolve(event);
        }
    });
};
Whenever a token is issued to a user, this function will check if that user is in our database. If they aren't it will add them. Then either way it will grab the user's id and store it in the identity token as db_user_id.
Now bundle all the files in our deployment package folder into a .zip file called function.zip.
If you are using Linux you can use:
sudo apt-get install zip and then zip -r function.zip .
If you are using Windows you can download and install 7-Zip. After it is installed, add it to your path with set PATH=%PATH%;C:\Program Files\7-Zip\ then run 7z a -tzip function.zip .
Go back into the AWS console and go to Services > Lambda. Click Create function. Select Author from scratch and enter a function name. Select Node.js 12.x for the Runtime and click Create function.
Once your function is created, open it up and in the Function code section, select Actions > Upload a .zip file.

Upload the function.zip file you created earlier then click Save.
We'll need to add the environment variables for our RDS database. An easy way to get the values we need is to SSH back into our Elastic Beanstalk instance. Once you're in, type cd ../../../opt/elasticbeanstalk/deployment/.
Then enter cat env to list the env variables that are loaded into our server. Make note of these then head back over to our Lambda function.
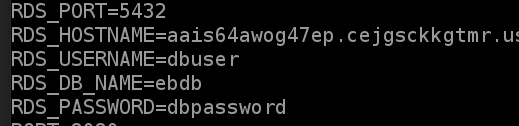
Underneath the Function code section of our Lambda function, select Edit in the Environment variables section. Add all RDS key value pairs you grabbed earlier, then click Save.
We'll need to add some role policies to our Lambda function, and add it to a VPC (Virtual Private Cloud) and a Security Group so our RDS instance can allow inbound database connections from the function's security group.
At the top of our function's dashboard, select Permissions next to Configuration.
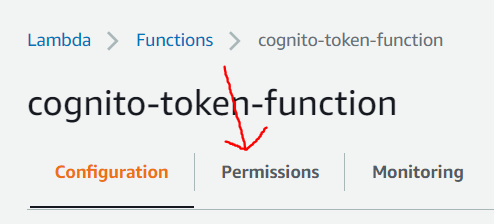
Select the execution role of your Lambda function. Then click Attach policies. Type in RDS and then select AmazonRDSFullAccess, then type in AWSLambda and select AWSLambdaVPCAccessExecutionRole. Click Attach policy.
Go to Services > VPC. On the left under SECURITY, click Security Groups > Create security group. Enter a name for your security group, a description, and select the default VPC. Click Create security group.
Go back to your Lambda function. Scroll down and under VPC, click Edit. Select Custom VPC. Select the default VPC. Add at least two subnets. Then select the security group your created earlier. Click Save.
Now go to Services > RDS. Select the RDS instance for your server, and click on its Security group. Then click Actions > Edit inbound rules > Add rule. Select PostgreSQL for the type. Select Custom for the source, and select the security group you placed your Lambda function into earlier. Click Save rules.
Now go to Services > Cognito and select the user pool for your application. On the left, click Triggers. Add the Lambda function you created to the Pre Token Generation trigger, then click Save changes.
Now start up your React application and log in, then get users from the server. Your email should be in the server's RDS database now! The primary key id of the user in the database will also be stored in the identity token that get's sent to the server.
Andddd.. that's a wrap! I hope you enjoyed this guide.

