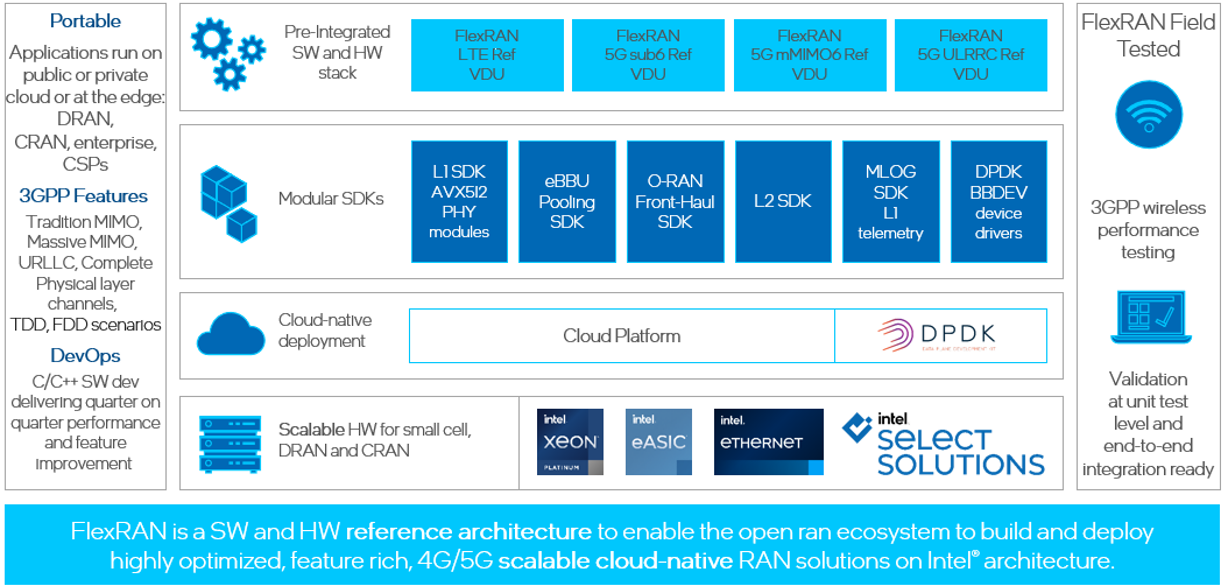
Intel® provides a vRAN reference architecture in the form of the FlexRAN™ software reference stack,which demonstrates how to optimize VDU software implementations using Intel® C++ class libraries,leveraging the Intel® Advanced Vector Extensions 512 (Intel® AVX-512) instruction set.The multi-threaded design allows a single VDU software implementation to scale to meet the requirements of multiple deployment scenarios,scaling from single small cells deployments, optimized D-RAN deployments or servicing large number of 5G cells in C-RAN pooled deployments.As a SW implementation, it is also capable of supporting LTE, 5G narrow band and 5G massive MIMO deployments all from the same SW stack using the O-RAN 7.2x split.The FlexRAN™ software reference solution framework by Intel® is shown in below diagram:
Since 2022, Intel® FlexRAN team is publishing docker image to docker hub. The purpose is to make more and more potential users can easily enter the door and play the game. The docker image include only binaries, runtime dependency libraries, configure files and several typical cases. If downloader had already been a NDA customer of Intel®, They can get corresponding source code, more test cases and supports from Intel® FlexRAN team.If you are new entry users and just want to do a quick try, please follow below guides. if you have further intention, please contact Intel® FlexRAN Marketing team.
| Category | Details |
|---|---|
| CPU | 4th Generation Intel® Xeon® Scalable Processor with vRAN Boost MCC 32 cores |
| Memory | 16*16GB DDR5 |
| Storage | 2TB INTEL® SSDPE2KX020T8 |
| NIC1 | Intel® Corporation I350(LoM to CPU-0) |
| NIC2 | Intel® Corporation Ethernet Controller E810-C for SFP |
| Baseband dev | vRAN Boost embeded in SPR-EE CPU Optional, use software mode only if not present |
| Category | Components | Details |
|---|---|---|
| Firmware | IFWI | Includes BIOS, BMC, ME as well as FRUSDR. |
| E810 | 4.20 0x8001778b 1.3346.0 | |
| OS | Ubuntu 22.04 | Ubuntu Server 22.04 Realtime kernel 5.15.0-1030 |
| Drivers | E810 | ice 1.11.14 |
| Cloudnative | kubernetes | 1.26.2 |
| Container runtime | containerd 1.6.21 | |
| FlexRAN™ | FlexRAN™ 23.11 pacakge | 23.11 |
| Toolchain | Intel® oneAPI Base Tookit | 2023.0.0 (2023.0.0.20221201) |
| DPDK | DPDK release | dpdk-stable-22.11.1 |
BIOS configuration please refer to FlexRAN BIOS Settings Intel Xeon RefGuide
Details please refer to chapter Configure the OS for Realtime in document FlexRAN™ Software Reference Solution Cloud-Native Setup for Ubuntu
After configuration ,check the kernel parameter, which should look like:
$ cat /proc/cmdline
BOOT_IMAGE=/vmlinuz-5.15.0-1030-realtime root=/dev/mapper/ubuntu--vg-ubuntu--lv ro intel_iommu=on iommu=pt vfio_pci.enable_sriov=1 vfio_pci.disable_idle_d3=1 usbcore.autosuspend=-1 selinux=0 enforcing=0 nmi_watchdog=0 crashkernel=auto softlockup_panic=0 audit=0 tsc=nowatchdog mce=off hugepagesz=1G hugepages=50 hugepagesz=2M hugepages=0 default_hugepagesz=1G intel_idle.max_cstate=0 kthread_cpus=0,31,32,63 irqaffinity=0,31,32,63 nohz=on nosoftlockup rcu_nocb_poll skew_tick=1 isolcpus=managed_irq,domain,1-30,33-62 nohz_full=1-30,33-62 rcu_nocbs=1-30,33-62 nosoftlockupFurther improve the deterministic and power efficiency
$ cpupower frequency-set -g performanceSet cpu core frequency to 2.5Ghz
cpupower frequency-set -u 2500000Make sure specific version of kubernetes and docker container had been installed.
Details please refer to document FlexRAN™ Software Reference Solution Cloud-Native Setup for Ubuntu
Except for kubernetes and docker, below plugin is required (install from master):
-
calico:
- follow calico instruction on offical website - http://docs.projectcalico.org
-
SRIOV (cni and network device plugin):
-
follow SRIOV instruction on SRIOV GitHub - https://github.com/intel/sriov-network-deviceplugin.
-
SRIOV DP configuration
below is an example to cofigure SRIOV DP configure map:$ cd sriov-network-device-plugin $ cat <<EOF > deployments/configMap.yaml apiVersion: v1 kind: ConfigMap metadata: name: sriovdp-config namespace: kube-system data: config.json: | { "resourceList": [ { "resourceName": "intel_fec_5g", "deviceType": "accelerator", "selectors": { "vendors": ["8086"], "devices": ["57c1"] } }, { "resourceName": "intel_sriov_odu", "selectors": { "vendors": ["8086"], "devices": ["1889"], "drivers": ["vfio-pci"], "pfNames": ["ens9f1"] } }, { "resourceName": "intel_sriov_oru", "selectors": { "vendors": ["8086"], "devices": ["1889"], "drivers": ["vfio-pci"], "pfNames": ["ens9f0"] } } ] } EOF $ kubectl create -f deployments/configMap.yaml $ kubectl create -f deployments/k8s-v1.16/sriovdp-daemonset.yaml
-
Download DPDK
$ cd /opt/
$ wget http://static.dpdk.org/rel/dpdk-22.11.1.tar.xz
$ tar xf /opt/dpdk-22.11.1.tar.xz
Configure FEC and FVL SRIOV (example as below)
$ RTE_SDK=/opt/dpdk-stable-22.11.1
$ modprobe vfio-pci enable_sriov=1 disable_idle_d3=1
$ echo 1 | sudo tee /sys/module/vfio_pci/parameters/enable_sriov
$ echo 1 | tee /sys/module/vfio_pci/parameters/disable_idle_d3
$ $RTE_SDK/usertools/dpdk-devbind.py -b vfio-pci f7:00.0
$ export UUID=00112233-4455-6677-8899-aabbccddeeff
$ echo 1 > /sys/bus/pci/devices/0000:f7:00.0/sriov_numvfs
$ $RTE_SDK/usertools/dpdk-devbind.py -b vfio-pci 0000:f7:00.1
$ cd /opt/pf-bb-config
$ ./pf_bb_config ACC200 -v $UUID -c acc200/acc200_config_vf_5g.cfg

$ echo 4 > /sys/bus/pci/devices/0000:4b:00.0/sriov_numvfs
$ ip link set ens9f0 vf 0 mac 00:11:22:33:00:00
$ ip link set ens9f0 vf 1 mac 00:11:22:33:00:10
$ ip link set ens9f0 vf 2 mac 00:11:22:33:00:20
$ ip link set ens9f0 vf 3 mac 00:11:22:33:00:30
$ $RTE_SDK/usertools/dpdk-devbind.py -b vfio-pci 0000:4b:02.0 0000:4b:02.1
$ $RTE_SDK/usertools/dpdk-devbind.py -b vfio-pci 0000:4b:02.2 0000:4b:02.3

$ echo 4 > /sys/bus/pci/devices/0000:4b:00.1/sriov_numvfs
$ ip link set ens9f1 vf 2 mac 00:11:22:33:00:21
$ ip link set ens9f1 vf 3 mac 00:11:22:33:00:31
$ ip link set ens9f1 vf 0 mac 00:11:22:33:00:01
$ ip link set ens9f1 vf 1 mac 00:11:22:33:00:11
$ $RTE_SDK/usertools/dpdk-devbind.py -b vfio-pci 0000:4b:0a.0 0000:4b:0a.1
$ $RTE_SDK/usertools/dpdk-devbind.py -b vfio-pci 0000:4b:0a.2 0000:4b:0a.3
$ $RTE_SDK/usertools/dpdk-devbind.py -s
After configuration, need to restart SRIOV docker container to make VF resource ready.
$ cat <<EOF > /opt/restart_sriov_container.sh
  #!/bin/bash

  docker ps | grep sriov
  docker kill `docker ps | grep sriov | head -n 1 | awk -F ' ' '{print $1}'`
  while ((`docker ps | grep sriov | wc -l` < 2 ))
  do
     sleep 3
     docker ps | grep sriov >/dev/null 2>&1
     echo "..."
  done
EOF
$chmod +x /opt/restart_sriov_container.sh; sh /opt/restart_sriov_container.sh
After restart sriov container, the resources can be seen thru below command:
$ sudo apt install jq
$ kubectl get node dockerimagerel -o json | jq '.status.allocatable'
{
  "cpu": "28",
  "ephemeral-storage": "143494008185",
  "hugepages-1Gi": "48Gi",
  "hugepages-2Mi": "0",
  "intel.com/intel_fec_5g": "1",
  "intel.com/intel_sriov_odu": "4",
  "intel.com/intel_sriov_oru": "4",
  "memory": "48012416Ki",
  "pods": "110"
}
label node
$ kubectl label node host_name testnode=worker1login docker hub (for external user)
$ docker login input you username/password of your docker hub account
$ docker pull intel/flexran_l1_spree:v23.11below gives the diagram of the deployment for flexran timer mode and xRAN mode. based on that, following chapters give the example yaml file for deployment.

$ cat <<EOF > /opt/flexran_timer_mode.yaml
apiVersion: v1
kind: Pod
metadata:
  labels:
    app: flexran-dockerimage_release
  name: flexran-dockerimage-release
spec:
  securityContext:
    fsGroup: 1250
  nodeSelector:
     testnode: worker1
  containers:
  - securityContext:
      runAsNonRoot: true
         runAsUser: 1250
      capabilities:
        add:
          - IPC_LOCK
          - SYS_NICE
    command: [ "/bin/bash", "-c", "--" ]
    args: ["sh docker_entry.sh -m timer ; cd /home/flexran/bin/nr5g/gnb/l1/; ./l1.sh -e ; top"]
    tty: true
    stdin: true
    env:
    - name: LD_LIBRARY_PATH
      value: /opt/oneapi/lib/intel64
    image: intel/flexran_l1_spree:v23.11
    name: flexran-l1app
    resources:
      requests:
        memory: "32Gi"
        intel.com/intel_fec_5g: '1'
        hugepages-1Gi: 16Gi
      limits:
        memory: "32Gi"
        intel.com/intel_fec_5g: '1'
        hugepages-1Gi: 16Gi
    volumeMounts:
    - name: hugepage
      mountPath: /hugepages
    - name: varrun
      mountPath: /var/run/dpdk
      readOnly: false
  - securityContext:
      runAsNonRoot: true
         runAsUser: 1250
      capabilities:
        add:
          - IPC_LOCK
          - SYS_NICE
    command: [ "/bin/bash", "-c", "--" ]
    args: ["sleep 10; sh docker_entry.sh -m timer ; cd /home/flexran/bin/nr5g/gnb/testmac/; ./l2.sh --testfile=spr-sp-eec/sprsp.cfg; top"]
    tty: true
    stdin: true
    env:
    - name: LD_LIBRARY_PATH
      value: /opt/oneapi/lib/intel64
    image: intel/flexran_l1_spree:v23.11
    name: flexran-testmac
    resources:
      requests:
        memory: "16Gi"
        hugepages-1Gi: 8Gi
      limits:
        memory: "16Gi"
        hugepages-1Gi: 8Gi
    volumeMounts:
    - name: hugepage
      mountPath: /hugepages
    - name: varrun
      mountPath: /var/run/dpdk
      readOnly: false
  volumes:
  - name: hugepage
    emptyDir:
      medium: HugePages
  - name: varrun
    emptyDir: {}
EOF

$ kubectl create -f /opt/flexran_timer_mode.yaml
for timer mode, once the container created, corresponding timer mode test will be run up.if user want to deploy own timer mode case, they need contact FlexRAN account team/PAE team to get the 23.11 release package, extract it and copy the sub-folder "tests" into host folder - "/home/tmp_flexran". and then execute the pod creation work. And you can check POD status thru - "kubectl describe po pode-name".
You can also check the status of RAN service thru - "kubectl logs -f pode-name -c container-name"
$ cat <<EOF > /opt/flexran_xran_mode.yaml
apiVersion: v1
kind: Pod
metadata:
  labels:
    app: flexran-vdu
  name: flexran-vdu
spec:
  securityContext:
     fsGroup: 1250
  nodeSelector:
     testnode: worker1
  containers:
  - securityContext:
      runAsNonRoot: true
      runAsUser: 1250
      capabilities:
        add:
          - IPC_LOCK
          - SYS_NICE
    command: [ "/bin/bash", "-c", "--" ]
    args: ["sh docker_entry.sh -m xran ; top"]
    tty: true
    stdin: true
    env:
    - name: LD_LIBRARY_PATH
      value: /opt/oneapi/lib/intel64
    image: intel/flexran_l1_spree:v23.11
    name: flexran-vdu
    resources:
      requests:
        memory: "32Gi"
        intel.com/intel_fec_5g: '1'
        intel.com/intel_sriov_odu: '4'
        hugepages-1Gi: 24Gi
      limits:
        memory: "32Gi"
        intel.com/intel_fec_5g: '1'
        intel.com/intel_sriov_odu: '4'
        hugepages-1Gi: 24Gi
    volumeMounts:
    - name: hugepage
      mountPath: /hugepages
    - name: varrun
      mountPath: /var/run/dpdk
      readOnly: false
  volumes:
  - name: hugepage
    emptyDir:
      medium: HugePages
  - name: varrun
    emptyDir: {}
---
apiVersion: v1
kind: Pod
metadata:
  labels:
    app: flexran-vru
  name: flexran-vru
spec:
  securityContext:
     fsGroup: 1250
  nodeSelector:
     testnode: worker1
  containers:
  - securityContext:
      runAsNonRoot: true
      runAsUser: 1250
      capabilities:
        add:
          - IPC_LOCK
          - SYS_NICE
    command: [ "/bin/bash", "-c", "--" ]
    args: ["sh docker_entry.sh -m xran ; top"]
    tty: true
    stdin: true
    env:
    - name: LD_LIBRARY_PATH
      value: /opt/oneapi/lib/intel64
    image: intel/flexran_l1_spree:v23.11
    name: flexran-oru
    resources:
      requests:
        memory: "24Gi"
        intel.com/intel_sriov_oru: '4'
        hugepages-1Gi: 20Gi
      limits:
        memory: "24Gi"
        intel.com/intel_sriov_oru: '4'
        hugepages-1Gi: 20Gi
    volumeMounts:
    - name: hugepage
      mountPath: /hugepages
    - name: varrun
      mountPath: /var/run/dpdk
      readOnly: false
  volumes:
  - name: hugepage
    emptyDir:
      medium: HugePages
  - name: varrun
    emptyDir: {}
EOF

$ kubectl create -f /opt/flexran_xran_mode.yaml
For xran mode, once the container created, corresponding xran mode test will not be run up. You need enter the pod and execute the test manually. Below chapter give the steps to run xRAN mode test case: "sub3_mu0_20mhz_4x4"
Open a new terminal, run the following command:
$ kubectl exec -it pod-name -- bash
$ cd flexran/bin/nr5g/gnb/l1/spree_mcc/sub3_mu0_20mhz_4x4/gnb/
update the file phycfg_xran.xml for FEC address and token , xrancfg_sub6_oru.xml for vf-pci address
$ ./l1.sh -oru
Open another new terminal, run the following command:
$ kubectl exec -it pod-name -- bash
$ cd flexran/bin/nr5g/gnb/testmac
$ ./l2.sh --testfile=../l1/spree_mcc/sub3_mu0_20mhz_4x4/gnb/testmac_spree_mu0_20mhz_hton_oru.cfg

#### Open another new terminal, run the following command:
$ kubectl exec -it pod-name -- bash

$ cd flexran/bin/nr5g/gnb/l1/spree_mcc/sub3_mu0_20mhz_4x4/oru/
update the file run_o_ru.sh for the port BDF corresponding with your server port, example <--vf_addr_o_xu_a "0000:43:11.0,0000:43:11.1">
$ taskset -c 20 ./run_o_ru.sh
You can run the same for other two test cases "sub3_mu0_10mhz_4x4" and "sub6_mu1_100mhz_4x4"
Intel docker image also provide the support of core pining feature. In order to enable this feature, you need to make below configuration and change of yaml file.
Enable core pining feature:
#!/bin/bash
pathfile=/var/lib/kubelet/config.yaml
sed -i 's/cpuManagerReconcilePeriod: 0s/cpuManagerReconcilePeriod: 10s/g' $pathfile

cat >> $pathfile << EOF
cpuManagerPolicy: static
systemReserved:
  cpu: 2000m
  memory: 2000Mi
kubeReserved:
  cpu: 1000m
  memory: 1000Mi
EOF
rm -rf /var/lib/kubelet/cpu_manager_state
systemctl restart kubelet
copy above code line to a file and execute:
$ sh core_pining_kubelet_config.shDisable core pining feature:
#!/bin/bash

pathfile=/var/lib/kubelet/config.yaml
#pathfile=config.yaml
sed -i 's/cpuManagerReconcilePeriod: 10s/cpuManagerReconcilePeriod: 0s/g' $pathfile

sed -i 's/cpuManagerPolicy: static/ /g' $pathfile
sed -i 's/systemReserved:/ /g' $pathfile
sed -i 's/cpu: 2000m/ /g' $pathfile
sed -i 's/memory: 2000Mi/ /g' $pathfile
sed -i 's/kubeReserved:/ /g' $pathfile
sed -i 's/cpu: 1000m/ /g' $pathfile
sed -i 's/memory: 1000Mi/ /g' $pathfile
rm -rf /var/lib/kubelet/cpu_manager_state
systemctl restart kubelet
copy above code line into a file and execute:
$ sh uncore_pining_kubelet_config.sh$ cat <<EOF > /opt/flexran_timer_mode.yaml
......
name: flexran-l1app
resources:
requests:
cpu: 24
......
limits:
cpu: 24
......
name: flexran-testmac
resources:
requests:
cpu: 16
......
limits:
cpu: 16
......
EOF
$ kubectl create -f /opt/flexran_timer_mode.yamlfor timer mode, once the container created, corresponding test will be run up,case procedure is the same as the one without core pining. configure the max required cores when hyper thread on to ensure high performance cases can pass.if customer needn't run high performance cases, can manually adjust cpu core count in yaml file according to case configurations.
compared with uncore pining, need add resource request for cpu as below
$ cat <<EOF > /opt/flexran_xran_mode.yaml
........
    resources:
      requests:
        cpu: 24
........
EOF

$ kubectl create -f /opt/flexran_xran_mode.yaml
For xran mode, once the container created, corresponding xran mode test will not be run up. You need enter the pod and execute the test manually. the steps are the same as the one without core pining
For GPL/LGPL open source libs/components used by flexran docker image at run time. User can find the used version in below git hub repo: https://github.com/intel/flexRAN-docker-image-dependencies
For further support, please contact Intel® flexRAN marketing team and FAE/PAE team and Engineering team.
Since 23.11 release, the same docker image is also validated by E2E test rather than only component test (timer mode and xRAN mode, described above) . If customer want to know detail on E2E test, please contact Intel® flexRAN marketing team and FAE/PAE team and Engineering team.


