SPDY Proxy
Google Chrome comes with built-in support for SSL-based proxies, which means that we can give Chrome an HTTPS proxy URL, and the rest is taken care of: a TLS tunnel is first established to the proxy, and the proxied requests are sent over a secure link. No eavesdropping allowed! This is a huge improvement over regular HTTP proxies, which can also tunnel SSL, but in the process leak information about the site we're connecting to - read more about Chrome and secure proxies. This allow a number of new and interesting use cases:
- End-to-end secure browsing for all sites (HTTP, HTTPS, SPDY) - no sniffing!
- Web VPN: secure access to internal servers and services without relying on heavy TCP VPN solutions
Where does SPDY fit in here? When the SSL handshake is done, the browser and the server can agree to establish a SPDY session by using SSL NPN (RFC). If both sides support SPDY, then all communication between browser and proxy can be done over SPDY:
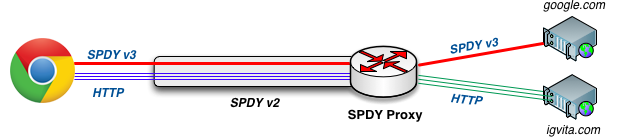
- All browser <-> proxy communication is done over SSL
- SPDY Proxy and Chrome communicate via SPDY (v2)
- Browser requests are routed via SPDY proxy to destination
Notice that we can route both HTTP and HTTPS requests through the SPDY tunnel. To establish an HTTPS session, the browser sends a CONNECT request to the proxy with the hostname of the secure server (ex, https://google.com), the proxy establishes the TCP connection and then simply transfers the encrypted bytes between the streams - the proxy only knows that you wanted to connect to Google, but cannot see any of your actual traffic - we're tunneling SSL over SSL!
Same logic applies for tunneling SPDY! We can establish a SPDY v2 tunnel to the proxy, and then tunnel SPDY v3 connections over it.
Installation & Configuration
SPDY proxy requires node.js 0.8.x+. Grab the package for your platform from the node site. Once node.js is installed, you can use npm (node package manager) to install SPDY Proxy:
$> npm install -g spdyproxy
$> spdyproxy --help
To run the proxy, you need to provide your SSL keys:
$> spdyproxy -k keys/mykey.pem -c keys/mycert.pem -p 44300With that, you should have a SPDY proxy running on port 44300.
Configuring Google Chrome
Google Chrome uses PAC (proxy auto-config) files to choose the appropriate proxy server for fetching any URL. The PAC file itself, is just a simple JavaScript function:
function FindProxyForURL(url, host) {
  return "HTTPS proxy.example.com:8080; DIRECT";
}
The above file tells the browser to proxy all requests via a secure proxy on port 8080, and if the proxy fails, then try to connect directly to the host. However, the PAC file allows us to create much more interesting scenarios: proxy specific URLs or hostnames, proxy rules based on DNS resolution results, and more. See PAC directory for examples.
DIY demo setup
To do a quick local test, start the SPDY proxy on your machine, and start Chrome with the --proxy-pac-url flag:
$> spdyproxy -k keys/mykey.pem -c keys/mycert.pem -p 44300 -v
$> "/Applications/Google Chrome.app/Contents/MacOS/Google Chrome" --proxy-pac-url=file:///path/to/config.pac --use-npn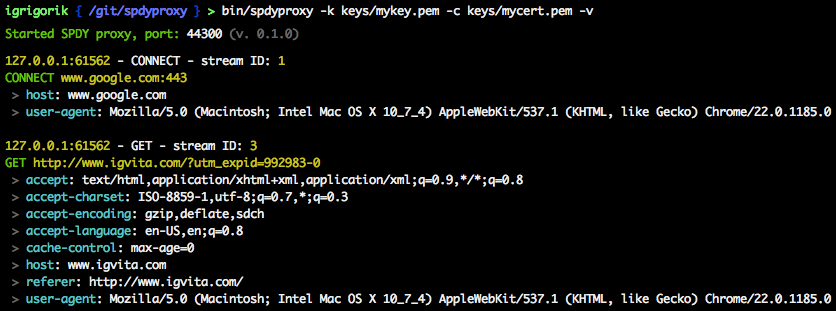
Securing the proxy
To run a secure (SPDY) proxy your will need a valid SSL certificate on the server, and also make sure that your client will accept this certificate without any errors. If you're generating a self-signed certificate, then you will need to manually import it into your client keychain - otherwise, the browser will terminate the connection. To create a self-signed certificate:
$> openssl req -x509 -nodes -days 365 -newkey rsa:2048 -keyout mykey.pem -out mycert.pem

# on OSX, you now need to manually add mycert.pem to your keychain (for local testing)
# -> lauch Keychain app, drag the key into the app, and mark it as acceptedProtip: You can get a free, signed SSL certificate for your domain via StartSSL.
Once the proxy server is running, it is accessible by any client that wants to use it. To restrict access, you can use regular firewall rules, IP blacklists, etc. Alternatively, SPDY proxy supports Basic-Auth proxy authentication. Recall that all communication between client and server is done over SSL, hence all auth data is secure! The first time your browser connects to the proxy, it will ask for a login and password. After that, the browser will automatically append the authentication headers.
# pass in -U and -P flags to spdyproxy to set the Basic-Auth username and password
$> spdyproxy -k keys/mykey.pem -c keys/mycert.pem -p 44300 -U user -P pass
Other resources
- SPDY & Secure Proxy Support in Google Chrome
- Web VPN: Secure proxies with SPDY & Chrome
- SPDY proxy examples on chromium.org
- Proxy Auto Configuration
- Creating an SSL Certificate Signing Request
- Creating a Self-Signed SSL Certificate
License
(MIT License) - Copyright (c) 2012 Ilya Grigorik


