Code Monkey home page Code Monkey logo

raspberry-pi-dramble's Introduction

DEPRECATED: Please see my pi-cluster project for active development.

Raspberry Pi Dramble

Build Status

A cluster (Bramble) of Raspberry Pis on which Drupal is deployed using Ansible and Kubernetes.

Raspberry Pi Dramble - Hero Image

Read the rest of this README and the official Pi Dramble Wiki for more information about the Dramble.

Why

I'm doing presentations on Ansible, and how easy it makes infrastructure configuration, even for high-performance/high-availability Drupal sites. WiFi/Internet access is spotty at most conferences, so deploying to AWS, DigitalOcean, or other live public cloud instances that require a stable Internet connection is a Bad Idea™.

I'm also presenting on Kubernetes, and how easy it is to have self-healing, almost-infinitely-scalable infrastructure (managed with Ansible), and it's more fun to build with Kubernetes on bare metal... at least when the RAM on the Kubernetes master isn't all eaten up!

But really, it's just plain awesome. How many people can say they carry their entire datacenter in a travel bag, and can run it from a USB battery pack?

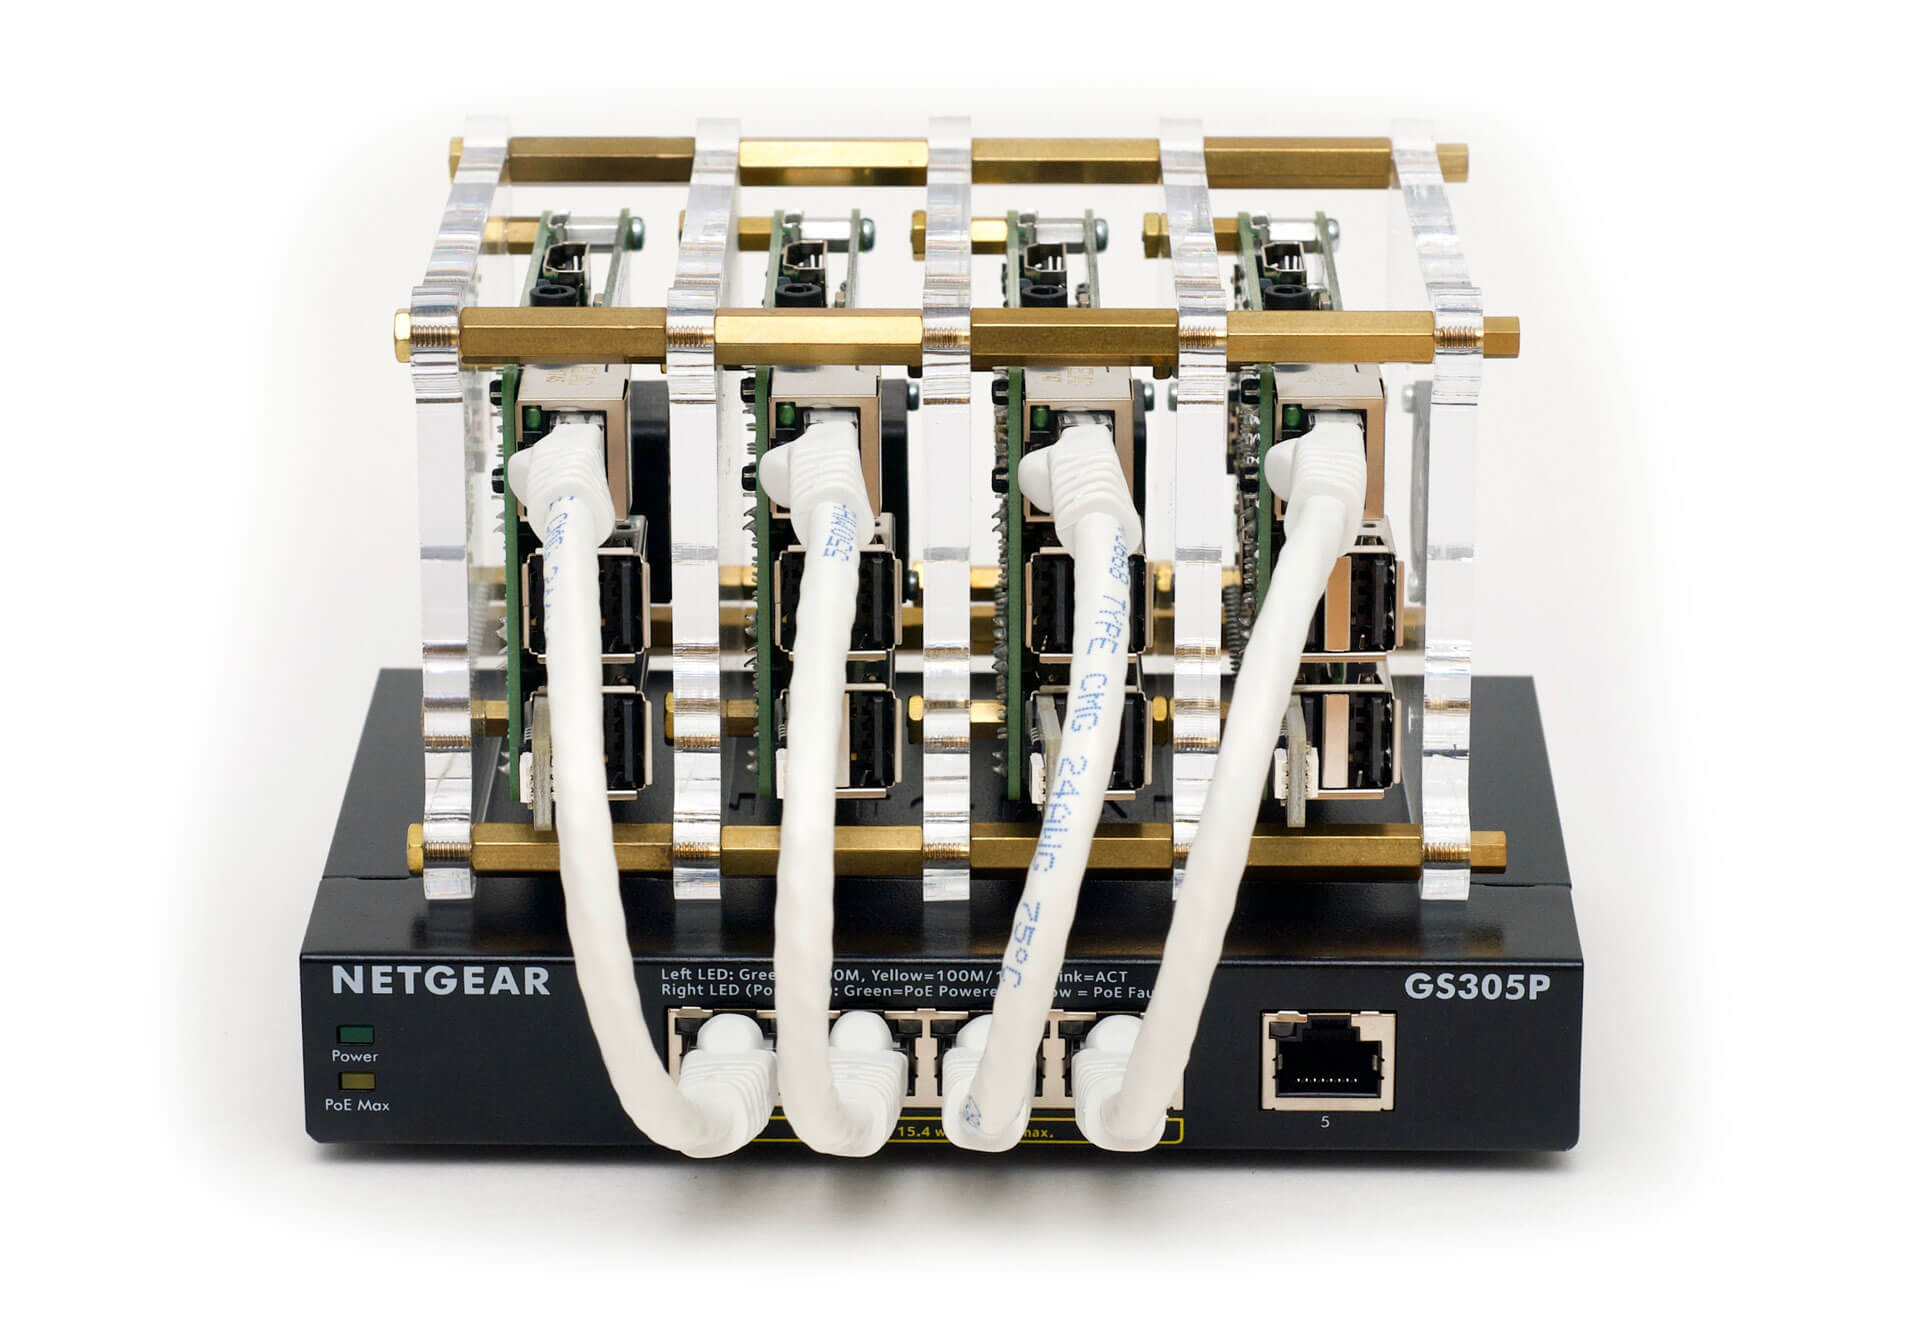
A cluster of servers, in my hand, at the presentation. With blinking LEDs!

Official Site

You can browse more information about geerlingguy's Dramble on http://www.pidramble.com/. This website is actually running on the Rasbperry Pi Dramble cluster pictured above!

Specs

  • 16+ ARMv7 CPU Cores
  • 5.6 GHz combined compute power
  • 4 GB RAM
  • 128 GB microSD flash-based storage
  • 1 Gbps private network with PoE

Getting the Pis (and other accessories)

Many people have asked for a basic list of components used in constructing the Dramble, or where I found particular parts. In the Wiki, I've added pages listing the following:

Setting up the Pis

The process for setting up all the Raspberry Pis is outlined in the Wiki:

  1. Prepare the Raspberry Pis for provisioning
  2. Rack the Raspberry Pis
  3. Network the Raspberry Pis
  4. Test the Ansible configuration
  5. Provision the Raspberry Pis
  6. Deploy Drupal to the Raspberry Pis

It is recommended you use the 64-bit version of Raspberry Pi OS, as some of this project's dependencies require it (and may not install on 32-bit Pi OS).

Adding more nodes

You can add more than four nodes, if you desire; add additional hosts in the same sequence in the following files:

  • setup/networking/inventory
  • setup/networking/vars.yml
  • inventory

If you need to change the IP subnet (default is 10.0.100.x), make sure to also update hosts.j2 to use the new subnet so hostnames resolve correctly.

Private Docker Registry Usage

The Pi Dramble includes a built-in Docker registry that is used to host Drupal images for deployment to Kubernetes. To use the Docker registry manually (to push or pull images):

  1. Edit your /etc/hosts file and add the line:

    10.0.100.62  registry.pidramble.test
    
  2. Follow the linked directions to get Docker to use your self-signed Docker Registry cert. For macOS, using the GUI:

    1. Double-click on k8s-manifests/docker-registry/certs/tls.crt to add it to your Keychain
    2. Select the certificate in Keychain Access, choose 'File' > 'Get Info'
    3. Expand the 'Trust' section, and choose 'Always Trust' for "When using this certificate:"
    4. Close the info dialog and enter your password to save the changes.
    5. Restart Docker for Mac.
  3. Tag your image for the registry and push it:

    docker tag my/image:latest registry.pidramble.test/my/image:latest
    docker push registry.pidramble.test/my/image:latest
    

Benchmarks - Testing the performance of the Dramble

See the Pi Dramble Benchmarks section of the Wiki for current benchmarks and statistics.

Local testing

A Vagrantfile is also included for local testing and debugging of the Kubernetes cluster and manifests using Vagrant. See the Vagrant README for more details.

Drupal on a Single Pi - Drupal Pi

If you have only a single Raspberry Pi, you can use the Drupal Pi project to quickly get Drupal running on the single Pi.

Using older or slower Raspberry Pi models

The Raspberry Pi 2, 3, 3 B+, and 4 have quad-core processors that make certain operations four to ten times faster than single-core Pis like the A+, B+, Zero, etc. Additionally, cluster members need as much RAM as possible, and any Pi without at least 1 GB of RAM simply can't be used as a Kubernetes master.

Therefore only the following Pi models are officially supported:

  • Raspberry Pi model 4 B
  • Raspberry Pi model 3 B+
  • Raspberry Pi model 3 B
  • Raspberry Pi model 2

Presentation Mode

The Raspberry Pi Dramble Kubernetes cluster can function entirely 'air-gapped' from the Internet, and this is in fact how the maintainer uses it in presentations.

See the README in the testing/presentation directory for instructions for operating the cluster standalone.

Author

This project was started in 2015 by Jeff Geerling, author of Ansible for DevOps and Ansible for Kubernetes.

raspberry-pi-dramble's People

Contributors

aallbrig avatar diomedesdominguez avatar geerlingguy avatar jaevans avatar niftymist avatar opdavies avatar s-e-a-n-s avatar shanzez avatar weshouman avatar yyolk avatar

Stargazers

 avatar  avatar  avatar  avatar  avatar  avatar  avatar  avatar  avatar  avatar  avatar  avatar  avatar  avatar  avatar  avatar  avatar  avatar  avatar  avatar  avatar  avatar  avatar  avatar  avatar  avatar  avatar  avatar  avatar  avatar  avatar  avatar  avatar  avatar  avatar  avatar  avatar  avatar  avatar  avatar  avatar  avatar  avatar  avatar  avatar  avatar  avatar  avatar  avatar  avatar  avatar  avatar  avatar  avatar  avatar  avatar  avatar  avatar  avatar  avatar  avatar  avatar  avatar  avatar  avatar  avatar  avatar  avatar  avatar  avatar  avatar  avatar  avatar  avatar  avatar  avatar  avatar  avatar  avatar  avatar  avatar  avatar  avatar  avatar  avatar  avatar  avatar  avatar  avatar  avatar  avatar  avatar  avatar  avatar  avatar  avatar  avatar  avatar  avatar  avatar

Watchers

 avatar  avatar  avatar  avatar  avatar  avatar  avatar  avatar  avatar  avatar  avatar  avatar  avatar  avatar  avatar  avatar  avatar  avatar  avatar  avatar  avatar  avatar  avatar  avatar  avatar  avatar  avatar  avatar  avatar  avatar  avatar  avatar  avatar  avatar  avatar  avatar  avatar  avatar  avatar  avatar  avatar  avatar  avatar  avatar  avatar  avatar  avatar  avatar  avatar  avatar  avatar  avatar  avatar  avatar  avatar  avatar  avatar  avatar  avatar  avatar  avatar  avatar  avatar  avatar  avatar  avatar  avatar  avatar  avatar  avatar  avatar  avatar  avatar  avatar  avatar  avatar  avatar  avatar  avatar  avatar  avatar  avatar  avatar  avatar  avatar  avatar  avatar  avatar  avatar  avatar  avatar  avatar

raspberry-pi-dramble's Issues

Add script to use RGB LED as Nginx request monitor

It seems switching the GPIO pin on which the ACT LED operates is as easy as setting the following inside /etc/config.txt:

# Use a different GPIO pin for ACT LED.
dtparam=act_led_gpio=XX

...where XX is the pin to be used.

Is there a way to set this dynamically? Or failing that, some way to control the LED using a script that monitors CPU usage or something (so we can emulate the ACT status)?

Use logstash; don't store local logs

Logging can quickly slow down the Pis, since every flush to disk is going to be pretty slow (writing to microSD cards == gonna be a bad day).

Logging config in nginx can be set to write to disk infrequently, but it's still going to be a small bottleneck when serving tons of traffic during a load test. I'd rather set up logstash and route logging over the network to one of the Pis. Maybe. It might be too much overhead.

Another possibility is just dropping logging altogether. Annoying for debugging... but we're just interested in getting the infrastructure running—and running fast.

Benchmark NFS vs rsync on inotify, GlusterFS, etc.

NFS seems to add a little network overhead, though I don't think it's as much as I'm expecting. Might be interesting—especially since this site isn't heavy on writes/reads—to see if just having an inotify-based rsync configuration or even getting extravagant and using GlusterFS would speed up a shared files directory over the existing NFS implementation.

Plus it might simplify the config in general; right now I have an NFS mount shared from the cache/Redis server, and NFS has to connect from each of the web heads.

See:

Make server IP or name-based configuration more robust

To make almost everything easier... use name-based configuration and connections (e.g. www1.pidramble.com etc.) instead of IP-based configuration. Maybe. Need to think it through further. But would make #40 a little simpler, I think.

Configure and use local NTP server

Since this cluster is meant to run standalone, and the Pi doesn't have an RTC, I've ordered an RTC that I can stick onto one of the Pis, then set up the Pi as an NTP server.

I'll need to configure all the other Pis to use the master Pi as the NTP server, then have the master Pi update it's time periodically if connected to the Internet.

Should hopefully not be too difficult to set up; I can probably do most of it with the geerlingguy.ntp role, and here's a guide to help as well: Use local NTP server with Raspberry Pi.

Update to Drupal 8.0.x beta 7

There are a few niggles I'm still working through in terms of config dump for the demo-drupal-8 project:

  • Can't disable dblog or update modules, otherwise I get twig errors.
  • Create a new view with some markup and set that as the default home page (so it's not just the user login page).
  • Set up text format Full HTML and associate CKEditor with it.

Switch to GlusterFS for shared Drupal files directory

According to #20, GlusterFS was a tiny bit slower than NFS, but since it offers greater redundancy (especially with 3 replicas across the 3 webservers), and doesn't require an extra server to act as the NFS server, I'm going to switch.

I have the configuration ready/working locally, just using this issue to track the commits.

Document some tips and tricks for hardware setup with the Pi

There are a number of things I need to document more formally elsewhere (to save my future self and others time in hardware-related setup with the Pi and accessories)... but for now, I'll just add them here, in this issue.

A good power supply is essential

I bought a decent, name-brand 6-port 2A-per-port (except for a couple) power supply to power all the Pis in the Dramble. I could've also gone with a PC 5V PSU and hacked the power to the Pi through GPIO pins (a lot of cluster builds do this, since it's easier to custom wire and doesn't require a mess of micro USB cables).

But either way, you need to get clean, 2A or greater power to the Pi, or you're going to run into weird issues, like random restarts, USB device issues, network flakiness, etc.

If you ever run into strange issues with your Pi, check your power supply. For other Pis I've been using Samsung and Apple 2A chargers (like the one that comes with an iPad), and they have worked great for a couple years!

Increasing Current available for USB devices to 1.2A

I have an SSD that seems to require something like 300-500mA of current to function properly. Mix that with a 40 mA USB keyboard and a 100-200mA WiFi dongle, and the default 600mA supplied over the Pi's bus is a bit cramped. To prevent plugging in of certain medium-high powered USB devices from crashing your Pi or taking down other USB devices, there's a /boot/config.txt parameter that allows you to double the default current on USB. To enable this mode:

  1. $ sudo nano /boot/config.txt
  2. Add the line max_usb_current=1 and save the file.
  3. Reboot the Pi.

This hack is only available on the Raspberry Pi B+ and later Pis (like the Pi 2 model B). Also, I have an open question (and another) asking whether there are any real downsides to setting this value to 1. For now, I'm only setting this value for Pis where I need to power an external HDD/SSD drive.

Tips for getting WiFi to connect automatically and reliably

See this guide, which I posted to Midwestern Mac's blog: Setting up an 802.11n WiFi adapter on the Raspberry Pi. Shows how to connect using WPA Supplicant, and how to prevent the WiFi from going into standby mode.

Tips for fixing a botched microSD card

If you accidentally break your Pi by editing the wrong file or breaking configuration somewhere on the microSD card you use to boot the Pi, you can usually just pull it and mount it on another workstation, edit the file to revert the change, and pop it back in your Pi.

I wrote a guide for mounting a Raspberry Pi's ext4-formatted microSD card in Ubuntu 14.04 on a Mac, and the process for other platforms is similar (use a VM, make it easy).

You can also re-image the entire SD card, and that's generally what I do if I've botched things too badly (easy to rebuild things when the configuration's all done in Ansible :).

Test performance of a variety of microSD cards on Raspberry Pi - sequential and random read/write

I have an old 64GB USB 3.0 SSD I pulled from an old MacBook Air, and it gets 150-300MB/sec transfer, with quite low latency. It would definitely saturate the USB 2.0 bus on the Pi, but it might be a heck of a lot faster as the data store for MySQL than using the normal mount inside the cheap Kingston microSD card!

It's worth investigating at least, and maybe in the database playbook, the configuration could allow for internal vs. external drive configuration.

Format a USB-connected drive on the Raspberry Pi in Raspbian

  1. Get the drive's path using $ sudo fdisk -l
  2. Enter fdisk to edit the disk's partition table: $ sudo fdisk /dev/sda1*
    1. d, n, p, 1, <enter>, <enter>, w
  3. Format the partition: $ sudo mkfs -t ext4 /dev/sda1*
  4. Create a directory (e.g. /ssd) and mount the partition: $ sudo mount /dev/sda1 /ssd
  5. (If you want the disk mounted on boot) Edit fstab and add the drive: $ sudo nano /etc/fstab

See this post for more tips.

We're assuming the device is sda1. It could be something else, depending on your system's configuration/hardware.

Test the raw read/write speed of the disk with hdparm and dd

Install hdparm first, with $ sudo apt-get install -y hdparm.

Read speed, SSD:

$ sudo hdparm -t /dev/sda1
 Timing buffered disk reads:  72 MB in  3.05 seconds =  23.59 MB/sec

$ sudo hdparm -T /dev/sda1
 Timing cached reads:   464 MB in  2.01 seconds = 231.31 MB/sec

Read speed, internal microSD (Kingston Class 10):

$ sudo hdparm -t /dev/mmcblk0
 Timing buffered disk reads:  38 MB in  3.02 seconds =  12.57 MB/sec

$ sudo hdparm -T /dev/mmcblk0
 Timing cached reads:   488 MB in  2.00 seconds = 244.02 MB/sec

Read speed, internal microSD (SanDisk Ultra Class 10):

$ sudo hdparm -t /dev/mmcblk0
 Timing buffered disk reads:  54 MB in  3.07 seconds =  17.59 MB/sec

$ sudo hdparm -T /dev/mmcblk0
 Timing cached reads:   460 MB in  2.00 seconds = 229.54 MB/sec

Read speed, internal microSD (Transcend Premium 300x 32GB):

$ sudo hdparm -t /dev/mmcblk0
 Timing buffered disk reads:  54 MB in  3.11 seconds =  17.38 MB/sec

$ sudo hdparm -T /dev/mmcblk0
 Timing cached reads:   498 MB in  2.00 seconds = 249.00 MB/sec

Read speed, internal microSD (Cheapo Class 4 4GB):

$ sudo hdparm -t /dev/mmcblk0
 Timing buffered disk reads:  42 MB in  3.14 seconds =  13.37 MB/sec

$ sudo hdparm -T /dev/mmcblk0
 Timing cached reads:   430 MB in  2.00 seconds = 214.55 MB/sec

Write speed, SSD:

$ sudo dd if=/dev/zero of=/ssd/output bs=8k count=10k; sudo rm -f /ssd/output
83886080 bytes (84 MB) copied, 2.31056 s, 36.3 MB/s

Write speed, internal microSD (Kingston Class 10):

$ sudo dd if=/dev/zero of=/tmp/output bs=8k count=10k; sudo rm -f /tmp/output

83886080 bytes (84 MB) copied, 2.02959 s, 41.3 MB/s

Write speed, internal microSD (SanDisk Ultra Class 10):

$ sudo dd if=/dev/zero of=/tmp/output bs=8k count=10k; sudo rm -f /tmp/output
83886080 bytes (84 MB) copied, 2.03785 s, 41.2 MB/s

Write speed, internal microSD (Transcend Premium 300x 32GB):

$ sudo dd if=/dev/zero of=/tmp/output bs=8k count=10k; sudo rm -f /tmp/output
83886080 bytes (84 MB) copied, 1.84696 s, 45.4 MB/s

Write speed, internal microSD (Cheap Class 4 4GB):

$ sudo dd if=/dev/zero of=/tmp/output bs=8k count=10k; sudo rm -f /tmp/output
83886080 bytes (84 MB) copied, 0.492591 s, 170 MB/s

...looks like I need to do some more benchmarking and see whether the internal microSD card can hold its own against a fast SSD over USB 2.0! Maybe the Pi 2 is even better than the Pi in terms of latency/sustained speed for the directly-connected microSD slot?

Test random I/O and other things with iozone

Install iozone on the Raspberry Pi

  1. $ wget http://www.iozone.org/src/current/iozone3_430.tar
  2. $ cat iozone3_430.tar | tar -x
  3. $ cd iozone3_430/src/current
  4. $ make linux-arm
  5. ./iozone -e -I -a -s 100M -r 4k -r 512k -r 16M -i 0 -i 1 -i 2

Test results

Internal Kingston 8GB microSD

$ ./iozone -e -I -a -s 100M -r 4k -r 512k -r 16M -i 0 -i 1 -i 2
                                                    random    random
    kB  reclen    write  rewrite    read    reread    read     write
102400       4     1029     1204     4895     4797     4245       82
102400     512     9854    10237    13693    13661    13640     1116
102400   16384    10326    10368    13852    13826    13850    10363

Internal SanDisk Ultra 16GB microSD

$ ./iozone -e -I -a -s 100M -r 4k -r 512k -r 16M -i 0 -i 1 -i 2
                                                    random    random
    kB  reclen    write  rewrite    read    reread    read     write
102400       4     1269     1467     4311     4311     4252      764
102400     512     9102     8252    18529    18467    18517     1571
102400   16384     7485    10029    18840    18843    18837     9605

Internal Transcend Premium 300x 32GB microSD

$ ./iozone -e -I -a -s 100M -r 4k -r 512k -r 16M -i 0 -i 1 -i 2
                                                    random    random
    kB  reclen    write  rewrite    read    reread    read     write
102400       4     1369     1107     5047     5042     4280      933
102400     512     9349    10955    18766    18667    18732     5007
102400   16384    11067    11802    19046    19047    18961    11710

Internal Cheapo Class4 4GB microSD

$ ./iozone -e -I -a -s 100M -r 4k -r 512k -r 16M -i 0 -i 1 -i 2
TODO

External USB 3.0 64GB SSD

$ ./iozone -e -I -a -s 100M -r 4k -r 512k -r 16M -i 0 -i 1 -i 2 -f /ssd/test
                                                    random    random
    kB  reclen    write  rewrite    read    reread    read     write
102400       4     3877     5004     5184     5193     4553     4943
102400     512    29181    29630    30053    30036    29394    29554
102400   16384    31528    31540    32025    32153    32236    31446

Further notes on iozone usage

  • -f filename "Used to specify the filename for the temporary file under test. This is useful when
    the unmount option is used. When testing with unmount between tests it is necessary for
    the temporary file under test to be in a directory that can be unmounted. It is not possible
    to unmount the current working directory as the process Iozone is running in this directory."
  • SD card benchmark on the Raspberry Pi
  • iozone.org
  • Linux File System Read Write Performance Test

Comparison with 2013 MacBook Air

This is just to demonstrate the incredibly wide gap between a modest modern workstation's I/O capabilities and the Raspberry Pi (for anyone who believes that optimizing a Raspberry Pi for modern high performance computing applications is potentially worth the effort for anything besides education and fun).

Write speed, internal SSD (PCIe):

$ sudo dd if=/dev/zero of=/tmp/output bs=8k count=100k; sudo rm -f /tmp/output
838860800 bytes transferred in 1.295498 secs (647519884 bytes/sec) (647 MB/sec)

Write speed, external SSD (USB 3.0):

$ sudo dd if=/dev/zero of=/tmp/output bs=8k count=100k; sudo rm -f /tmp/output
838860800 bytes transferred in 5.186630 secs (161735230 bytes/sec) (162 MB/sec)

Internal SSD (PCIe):

$ ./iozone -e -I -a -s 100M -r 4k -r 512k -r 16M -i 0 -i 1 -i 2
                                                    random    random
    kB  reclen    write  rewrite    read    reread    read     write
102400       4   349051   378714  2057008  2052849  1757784   384525
102400     512   378961   381589  1633720  1831942  1602355   397143
102400   16384   345783   255575  1726816  1740601  1561742   384016

External SSD (USB 3.0):

$ ./iozone -e -I -a -s 100M -r 4k -r 512k -r 16M -i 0 -i 1 -i 2 -f /ssd/test
                                                    random    random
    kB  reclen    write  rewrite    read    reread    read     write
102400       4   106728    93730  1954872  1809223  1739037   164208
102400     512   140001   124136  1746128  1798353  1691446   160632
102400   16384    81202   101984  1545561  1809853  1528714   112968

External old-fashioned 2TB spinning disk (USB 3.0):

$ ./iozone -e -I -a -s 100M -r 4k -r 512k -r 16M -i 0 -i 1 -i 2 -f /hdd/test
                                                    random    random
    kB  reclen    write  rewrite    read    reread    read     write
102400       4    92336    90505  1969492  2007127  1834830    86063
102400     512    99231    82251  1759390  1654712  1496792    95612
102400   16384    96631    87459  1532236  1525795  1325369    92766

(To build iozone on Mac OS X, I had to run make macosx instead of make linux-arm in step 4 above).

Implement fast, flexible Load Balancing architecture

There are a few considerations here (along with the determination as to what balancing software to use—see #1):

  1. Should the balancer have two network interfaces—one for public, one for internal?
  2. Should the balancer have any other hardware differences? Gigabit USB 3.0 NIC instead of built-in 10/100 jack? (There could be some speedup by using a different interface, but likely not... worth testing at least).
  3. For Nginx, Varnish, HAProxy, etc., what's the best way to manage the servers in the balancer live/on-the-fly, without having to restart the balancer for a config change?

I'm definitely leaning towards Nginx, for simplicity's sake, and since it's used all over the place. Not considering Apache really, since I haven't been impressed with it's balancing/proxying capabilities (which are getting better, but are still a bit resource-intensive).

Here are a couple links to help tease out using Nginx:

Add playbook and instructions for installing Drupal on a single Pi

Many people have asked about installing Drupal 8 (specifically) on a single Raspberry Pi, as they're not necessarily willing to put down $400+ on a full cluster.

I'd like to add a separate playbook, maybe under the testing directory, along with a separate README, which details setting up Drupal on a single Raspberry Pi.

Move NFS back to the database server

As the title says. Check out #18 and #20 for more info, but basically, I think having the NFS share files on the external USB SSD would be better for reliability, longevity, and performance, than having it all on the Redis server (which is still not yet being used).

Figure out how to do something like moduleExists() inside settings.php for Redis

Currently, because the Redis module isn't installed by default, I have to start things with the following line commented in settings.php:

// $settings['cache']['default'] = 'cache.backend.redis';

Only after Drupal is installed and the Redis module is enabled can I uncomment that line and redeploy settings.php. I tried adding the conditional if (\Drupal::moduleHandler()->moduleExists('redis')) { inside settings.php, but it seems the module_handler isn't yet loaded into the container when settings.php is called, so I can't check for the module's existence. I get the error:

2015/02/26 14:42:37 [error] 3339#0: *11 FastCGI sent in stderr: "PHP message: PHP Fatal error:  Call to a member function get() on a non-object in /var/www/drupal/core/lib/Drupal.php on line 446" while reading response header from upstream, client: 192.168.77.2, server: 192.168.77.3, request: "GET /user HTTP/1.0", upstream: "fastcgi://unix:/var/run/php5-fpm.sock:", host: "pidramble.com"

Implement MySQL or MariaDB database server configuration

Check into whether MariaDB might be simple enough/feasible on the Pi. I've done a lot of work with MySQL 5.5 on the Pi, and it runs well enough, but can I just as easily install MariaDB, even using the geerlingguy.mysql role? Or maybe create a new mariadb role?

Configure LED for boot and playbook runs

I would like to add a separate python script that accepts a few simple arguments and is run on startup (maybe via init script).

  • On boot: Turn on the LED to 'green' (e.g. 'ready/waiting')
  • On playbook run start: Switch LED to 'red' (e.g. 'something's being deployed')
  • On playbook run end: Switch LED to 'green'

Also, maybe have 'drupal' for drupal blue as a demo for doing serial vs. clustered deployment.

Start using wrk instead of ab for all benchmarks

From some informal testing, it looks like wrk might be a little more lightweight and accurate than ab for local-network tests. Plus the summary is much more concise, which I like :)

For example:

$ wrk -t12 -c200 -d30 http://pidramble.com/about
Running 30s test @ http://pidramble.com/about
  12 threads and 200 connections
  Thread Stats   Avg      Stdev     Max   +/- Stdev
    Latency     4.37s     6.33s   16.36s    79.36%
    Req/Sec   417.69    650.51     5.44k    92.71%
  78676 requests in 30.01s, 516.52MB read
  Socket errors: connect 0, read 0, write 0, timeout 652
Requests/sec:   2622.02
Transfer/sec:     17.21MB

I need to:

  • Update README.md docs for benchmarking.
  • Re-run authenticated/cached/uncached benchmarks.

Remove Redis / Redis configuration

Since Redis adds minimal performance improvement (for the needs of this cluster), and requires the use of a full Raspberry Pi (the way I have it configured), I'd like to remove the Redis server from the mix, and instead use it as a fourth Drupal backend server.

This would also make the general playbook configuration a little simpler, and with Drupal 8's recent huge performance improvements, I think the requests/second across the cluster will improve much more dramatically by adding another web head.

Benchmark whether APC enable_cli helps drush tasks (install, config update)

It seems there are two bottlenecks in the playbook runs right now: first, the install step, which takes maybe 1-2 minutes, and second, the configuration update step on the second deploy.

I'd like to see if enabling APC on cli speeds up drush tasks in any perceivable way, since it seems PHP was consuming 60-95% of the CPU during some parts of both processes. Since the database seems to be humming along nicely, I think PHP is one of the only areas where I can make decent gains at this point.

Redis vs Memcached - D8 Fight!

Check out whether Redis or Memcached is faster on the Pi cluster. Tradition and small memory capacity seems to indicate that Memcached would be the better option for this particular project... but I haven't benchmarked Redis in a while, and it might make things simpler if I just have 1 Redis server and 2 Web servers, instead of distributing Memcached across all the webservers... (see related: #1).

Make entire drupal playbook capable of being run on the local network

I think the only thing that needs to happen to make it so is adding a step to stick the Git repository on one of the servers (maybe on the balancer), then update the Drupal playbook to clone from there instead of GitHub directly.

This will make deployments during rapid development a little more annoying, but at least the entire demonstration of deploying Drupal to the Raspberry Pi Dramble will be local to the Pi and not rely on an internet connection.

Use PHP 5.6 (5.4 is only available version in Wheezy)

Raspberry Pi-compatible (ARM) apt repos only contain PHP versions up to 5.4.x. A couple options:

  • Compile PHP from source (supported easily by geerlingguy.php role, but would take absolutely forever on the Pi).
  • Pin php* packages to the Debian jessie repo sources (via pinning).
  • See if the dotdeb or ondrej PPAs work with the Raspberry Pi (doubtful, as I'm guessing they're only built for x64 architectures, but worth a try.

I need to create a sister issue in the drupal-pi project, since this 5.5+ will soon become a hard requirement for Drupal 8...

Set up provisioning playbook to recreate Dramble on DigitalOcean

Since I'd like to compare baseline Raspberry Pi 2 performance to a 'real' infrastructure setup in the cloud, I'd like to add a DigitalOcean provisioning playbook that builds the servers with 1 GB RAM, 1 CPU, 30 GB HDD, and Debian 7, so I can deploy to them and run performance benchmarks.

Increase pm.max-children for PHP fpm

Currently it looks like php5-fpm is using a pm.max-children limit of 5 (is that the default? We don't have anything configured in /etc/php5/fpm/php-fpm.conf).

This means the Raspberry Pi's 4-core CPU seems to max out around 250% PHP processes... and 50% for Gluster.

We should be able to go up to 6 processes (which could probably push through 18-20 req/second, up from the current maximum of ~14/second), while still leaving a little overhead for Gluster and system processes.

Test power consumption/CPU stability with stress and Kill-a-Watt

This will be helpful information when it comes time to work on a potential inline UPS.

Some numbers:

Pi State Power Consumption Per Pi (average)
Idle 170 mA (7.2W) 28 mA (1.2W)
400% CPU load 230 mA (11.4W) 38 mA (1.9W)
400% CPU load, 1x USB 64GB SSD 300 mA (13.6W) 50 mA (2.3W)

These readings were taken with the Pis in the following configuration:

  • 6x Raspberry Pi 2, all powered on.
  • Headless (no video displays attached).
  • No USB devices attached (except as noted).
  • Onboard LAN connected to Gigabit network switch.
  • Powered via 6-port USB power supply.
  • Kill A Watt meter (for measurements) was plugged into wall, then USB power supply was plugged into the Kill A Watt.
  • CPU stress tests were done using stress -c 4 to max out all 4 CPU cores.

Add cluster specs to README

It'd be nice to have a quick overview of how much computing power/resources are present in a 5-node Raspberry Pi 2 model B cluster :)

Benchmark various network configurations

tl;dr Getting Gigabit Networking on a Raspberry Pi 2 and B+


I'd like to see what gives us the most bang for the buck, especially with regard to the load balancer and database server, which will need the lowest latency and highest throughput.

Theories/questions to test/verify/debunk

  • Using a separate USB Ethernet adapter (maybe even a Gigabit USB 3.0 adapter?)—does this offer any latency or throughput advantage over the built-in Ethernet?
  • Using an 802.11n chip—does this offer comparable speeds? Can these be used as separate, sandboxed interfaces just for Internet access? Is it worth it? (I have a few extra laying around).
  • Can I set up the internal network to work both for intra-Dramble communication and Internet communication with some simple configuration? (e.g. plug the switch into a network with a router/Internet connection... what happens then?)

Notes

Switching interfaces (via SSH, since I'm doing everything headless) is a simple matter of:

  1. Log into the interface you want to test (e.g. IP .35 for Wifi, .36 for Ethernet, in my case).
  2. $ sudo ifdown [eth0|wlan0] (whichever one you are not connected through).
  3. $ sudo ifconfig -a to list all interfaces and verify current status.
  4. $ ping 8.8.8.8 to test Internet connectivity, and if it's down:
    1. $ ip route show to make sure there's a default route configured.
    2. If not, $ sudo ip route add default via 10.0.1.1 dev [eth0|wlan0] (whichever one you are connected through).
    3. $ ping 8.8.8.8 again to test Internet connectivity.
  5. Profit!

Benchmarks

Internal microSD vs external USB 3.0 SSD

10/100 Ethernet (built-in)

Using /tmp (on the internal Kingston Class 10 microSD card):

$ wget -O /tmp/test100.zip http://speedtest.wdc01.softlayer.com/downloads/test100.zip
2015-02-15 15:04:17 (6.05 MB/s) - `/tmp/test100.zip' saved [104874307/104874307]

$ rsync --progress [email protected]:/tmp/test100.zip ~/Downloads/test100.zip
sent 42 bytes  received 104887203 bytes  2954570.28 bytes/sec (2.94MB/sec)

$ rsync --progress ~/Downloads/test100.zip [email protected]:/tmp/test100.zip
sent 104887199 bytes  received 42 bytes  3555499.69 bytes/sec (3.55MB/sec)

Using /ssd (on the external USB 3.0 SSD):

$ wget -O /ssd/test100.zip http://speedtest.wdc01.softlayer.com/downloads/test100.zip
2015-02-15 15:18:22 (6.32 MB/s) - `/ssd/test100.zip' saved [104874307/104874307]

$ rsync --progress [email protected]:/ssd/test100.zip ~/Downloads/test100.zip
sent 42 bytes  received 104887203 bytes  2796993.20 bytes/sec (2.80MB/sec)

$ rsync --progress ~/Downloads/test100.zip [email protected]:/ssd/test100.zip
sent 104887199 bytes  received 42 bytes  3555499.69 bytes/sec (3.55MB/sec)

By testing on an SSD and on the microSD card, it seems pretty obvious that disk I/O is not the bottleneck here, but rather the entire bus (so it seems).

And it also seems likely that, with a decent enough microSD card, there's no real performance to be gained (at least network/throughput-wise) from using an external HDD or SSD. I'm going to also test random read/write scenarios over in #7, so that might shed more light on database/codebase activity, and optimizations to be had there...

Note also that my local Internet connection is a bit past saturating the Pi's network interface (heck, it requires Gigabit or 802.11ac with a strong signal to saturate the connection on my Macs!). Here's the initial download, running on my MacBook Air with 802.11ac a couple feet from my AirPort Extreme:

$ wget -O /dev/null http://speedtest.wdc01.softlayer.com/downloads/test100.zip
2015-02-15 16:01:04 (8.77 MB/s) - '/dev/null' saved [104874307/104874307]

Network throughput in common usage scenarios

802.11n USB WiFi

Using /tmp (on the internal Kingston Class 10 microSD card):

$ wget -O /tmp/test100.zip http://speedtest.wdc01.softlayer.com/downloads/test100.zip
2015-02-15 15:32:44 (2.94 MB/s) - `/tmp/test100.zip' saved [104874307/104874307]

$ rsync --progress [email protected]:/tmp/test100.zip ~/Downloads/test100.zip
sent 42 bytes  received 104887203 bytes  2589808.52 bytes/sec (2.59MB/sec)

$ rsync --progress ~/Downloads/test100.zip [email protected]:/tmp/test100.zip
sent 104887199 bytes  received 42 bytes  2873623.04 bytes/sec (2.87MB/sec)

WiFi is slightly slower; the signal was great, and I think it was hitting the full bus speed here as well (just like with the 10/100 example). But pretty stable and fast regardless. I have no hesitation using a reliable little WiFi adapter in lieu of wired Ethernet when it's more convenient.

10/100 Ethernet (built-in)

Using /tmp (on the internal Kingston Class 10 microSD card):

$ wget -O /tmp/test100.zip http://speedtest.wdc01.softlayer.com/downloads/test100.zip
2015-02-15 15:59:04 (2.69 MB/s) - `/tmp/test100.zip' saved [104874307/104874307]

$ rsync --progress [email protected]:/tmp/test100.zip ~/Downloads/test100.zip
sent 42 bytes  received 104887203 bytes  2655373.29 bytes/sec (2.66MB/sec)

$ rsync --progress ~/Downloads/test100.zip [email protected]:/tmp/test100.zip
sent 104887199 bytes  received 42 bytes  3438925.93 bytes/sec (3.43MB/sec)

10/100/1000 Gigabit Ethernet (external USB dongle)

Using /tmp (on the internal Kingston Class 10 microSD card):

$ wget -O /tmp/test100.zip http://speedtest.wdc01.softlayer.com/downloads/test100.zip
2015-02-16 21:07:19 (6.32 MB/s) - `/tmp/test100.zip' saved [104874307/104874307]

$ rsync --progress [email protected]:/tmp/test100.zip ~/Downloads/test100.zip
sent 42 bytes  received 104887203 bytes  2954570.28 bytes/sec (2.95MB/sec)

$ rsync --progress ~/Downloads/test100.zip [email protected]:/tmp/test100.zip
sent 104887199 bytes  received 42 bytes  3438925.93 bytes/sec (3.44MB/sec)

Raw Network Throughput using iperf

To do this test, install iperf on the Pi ($ sudo apt-get install -y iperf), then:

  1. (On the Pi) Start iperf: $ iperf -s
  2. (On other machine) Start the test: $ iperf -c 10.0.1.37

10/100 Ethernet

$ iperf -c 10.0.1.36
[ ID] Interval       Transfer     Bandwidth
[  4]  0.0-10.0 sec   113 MBytes  94.4 Mbits/sec

802.11n USB WiFi

$ iperf -c 10.0.1.35
[ ID] Interval       Transfer     Bandwidth
[  4]  0.0-10.0 sec  53.1 MBytes  44.5 Mbits/sec

10/100/1000 Gigabit Ethernet (external USB dongle)

$ iperf -c 10.0.1.38
[ ID] Interval       Transfer     Bandwidth
[  4]  0.0-10.0 sec   266 MBytes   222 Mbits/sec

Conclusion

It looks like, at least as far as a Raspberry Pi B+ and A+ are concerned, internal 10/100 Ethernet is more than adequate for most use cases, and other interfaces add throughput, but only for operations where other I/O is not a priority.

If network throughput is a priority, it is definitely worth investing in a 10/100/1000 Gigabit USB 3.0 adapter; even over the Raspberry Pi's USB 2.0 bus, you will see at least double the bandwidth, meaning uploads, downloads and streaming will get a LOT more bandwidth!

Plan 5-server Drupal App Architecture

Initial idea

  • 1 - Git server, Nginx load balance/reverse proxy
  • 2 - Web server (Apache + PHP), Memcached
  • 3 - Web server (Apache + PHP), Memcached
  • 4 - Web server (Apache + PHP), Memcached
  • 5 - Database server (MySQL single master)

Architectural questions

  • Memcached on dedicated server (#4) instead of distributed? (Do a few benchmarks to see what's fastest).
  • Varnish instead of Nginx for load balance and reverse proxy? (Maybe just whatever's quicker/simpler).
  • Should we go master/slave for MySQL instead of single server? (Might add too much complexity).

Add local testing configuration (Vagrant-based)

For local testing and comparison purposes, I'd like to add a Vagrant configuration to build at least most of the servers required (maybe just two webservers instead of three, to conserve RAM/CPU), and run the playbooks.

Also, I'll add it in a testing/ subdirectory along with perhaps a configuration for deploying everything to DigitalOcean and/or AWS.

Add easy ability to run D8 HEAD instead of demonstration codebase

Currently the Dramble really is only configured to run the demonstration D8 codebase, which I maintain and which will likely always be a couple beta/final releases behind the latest stable D8 release.

Therefore it would be nice if there were an easy/simple way to tell the playbook, "install D8 HEAD from Drupal.org using this makefile rather than the demo codebase".

Build lightweight Raspbian image for easier resetting

Since I'm going to be doing a lot of testing on this platform, I want to have a really stable and easy way to get things back into a pristine condition.

Currently, Raspbian's default image weighs in at a hefty 2.5G (once fully installed and updated) according to df -h, but I think I can trim that down considerably by removing cruft I don't need for a bunch of headless servers.

I'd like to wrap up the process in an Ansible playbook, so I can rebuild this lightweight image (and allow others to do the same) as-needed. I might even be tempted to host a lightweight zipped .img file on http://files.midwesternmac.com/, but we'll see.

There are a few guides to the process, but nothing authoritative (or updated):

It looks like this would be the process:

  1. Set up config defaults for the Pis:
    1. Locale/timezone (locales, keyboard, localtime, etc.)
    2. /boot/config.txt values (see one of my Pis for current defaults; this should be specific to Pi revision)
  2. Delete files and folders you don't need:
    1. /home/pi/python_games
    2. /home/pi/Desktop
    3. /usr/share/icons/gnome/icon-theme.cache
    4. /opt/vc/src/hello_pi/hello_video/test.h264
    5. etc...
  3. Purge packages and repositories you don't need, for example:
    1. Wolfram: $ sudo apt-get remove --purge wolfram-engine
    2. Desktop GUI: $ sudo apt-get remove --purge desktop-base lightdm lxappearance lxde-common lxde-icon-theme lxinput lxpanel lxpolkit lxrandr lxsession-edit lxshortcut lxtask lxterminal
    3. Other X-related packages: $ sudo apt-get remove --purge obconf openbox raspberrypi-artwork xarchiver xinit xserver-xorg xserver-xorg-video-fbdev x11-utils x11-common
    4. Multimedia-related packages: $ sudo apt-get remove --purge esound-common freepats sonic-pi jackd2 omxplayer
    5. Pi-related packages that I don't need: `$ sudo apt-get remove --purge python-pifacecommon python3-pifacecommon
    6. Other packages: $ sudo apt-get remove --purge dillo squeak-plugins-scratch netsurf-gtk netsurf-common epiphany-browser-data fonts-droid gsfonts ruby1.9.1
    7. etc... (looks like there are still many things installed in /usr/share!).
  4. Remove packages that are no longer needed: $ sudo apt-get autoremove
  5. Clean apt caches: $ sudo apt-get clean
  6. Clear any log file entries.
  7. Disable swap and fill free space with 0s.
  8. Shut down, pop out the SD card, pop it into my Mac, build a new image, compress the image...

Helpful hints:

  • List installed packages with $ sudo dpkg --get-selections | grep deinstall (question: does this actually list everything?).
  • Find large files (10+ MB): $ sudo find / -type f -size +10000k -exec ls -lh {} \; | awk '{ print $NF ": " $5 }'
  • Find large directories (within current directory): $ sudo du -hsx * | sort -rh | head -10

Start a Wiki

There are a bunch of things about the Dramble that I'd like to document more permanently, but not in the main README. Things like:

  • SD card considerations
  • Networking considerations
  • External USB drive considerations and setup (for DB especially)
  • Networking setup guide
  • Diet Raspbian guide
  • Benchmarking guide

Things like that.

Add GPIO-based RGB LED Control (for IRL deploy status)

I have a bunch of RGB LEDs, and I'd like to mount them to the front of the Raspberry Pi cases, one for each Pi. I'd need a small library/command line app that sets the LED into different modes (like PWM-based 'breathing' status for nothing happening, green for deployment happening, drupal blue for drupal going... that kind of thing).

I need to work on the hardware aspect (GPIO to LED and a decent/flexible mounting solution), and the software aspect (a library that I can call through Ansible to change the lights.

See the following resources for more info:

Nginx vs Apache mpm_worker - D8 Fight!

I'd like to see—for the web servers (not the balancer)—whether Nginx or Apache running as mpm_worker will load D8 faster and with more concurrency. Should be relatively simple using my Ansible Galaxy roles :)

Add munin (or some other monitoring dashboard)

It'd be nice to have a HUD of the entire cluster's activity. Munin is lightweight, easy to get going, and can maybe run on one of the three webservers, or on the caching server maybe...

Benchmark MySQL on USB SSD vs. different internal microSD cards

Random IO is causing iowait to be the major source of contention with almost any Drupal-related activity on the db server Pi right now.

I need to benchmark whether having the db store internal or external is faster; it seems the microSD reader might have some sort of IO advantage over external USB devices, but IO in general is fairly slow through USB 2.0, and I'm not sure what will give the best speed.

Test Varnish, and maybe allow user to switch between Varnish and Nginx

I'd ideally be able to switch the balancer between Varnish and Nginx. Maybe add a variable like dramble_balancer_software and default it to nginx.

I don't think we'll get much improved performance out of Varnish, but since the Drupal community still has a lot of momentum/familiarity behind Varnish (as opposed to Nginx), it would be good to allow it to be used—and to show how easy it is to switch between them using Ansible :)

Recommend Projects

  • React photo React

    A declarative, efficient, and flexible JavaScript library for building user interfaces.

  • Vue.js photo Vue.js

    🖖 Vue.js is a progressive, incrementally-adoptable JavaScript framework for building UI on the web.

  • Typescript photo Typescript

    TypeScript is a superset of JavaScript that compiles to clean JavaScript output.

  • TensorFlow photo TensorFlow

    An Open Source Machine Learning Framework for Everyone

  • Django photo Django

    The Web framework for perfectionists with deadlines.

  • D3 photo D3

    Bring data to life with SVG, Canvas and HTML. 📊📈🎉

Recommend Topics

  • javascript

    JavaScript (JS) is a lightweight interpreted programming language with first-class functions.

  • web

    Some thing interesting about web. New door for the world.

  • server

    A server is a program made to process requests and deliver data to clients.

  • Machine learning

    Machine learning is a way of modeling and interpreting data that allows a piece of software to respond intelligently.

  • Game

    Some thing interesting about game, make everyone happy.

Recommend Org

  • Facebook photo Facebook

    We are working to build community through open source technology. NB: members must have two-factor auth.

  • Microsoft photo Microsoft

    Open source projects and samples from Microsoft.

  • Google photo Google

    Google ❤️ Open Source for everyone.

  • D3 photo D3

    Data-Driven Documents codes.